Crochet Dinosaur Lovey Pattern (Free Baby Security Blanket Pattern)
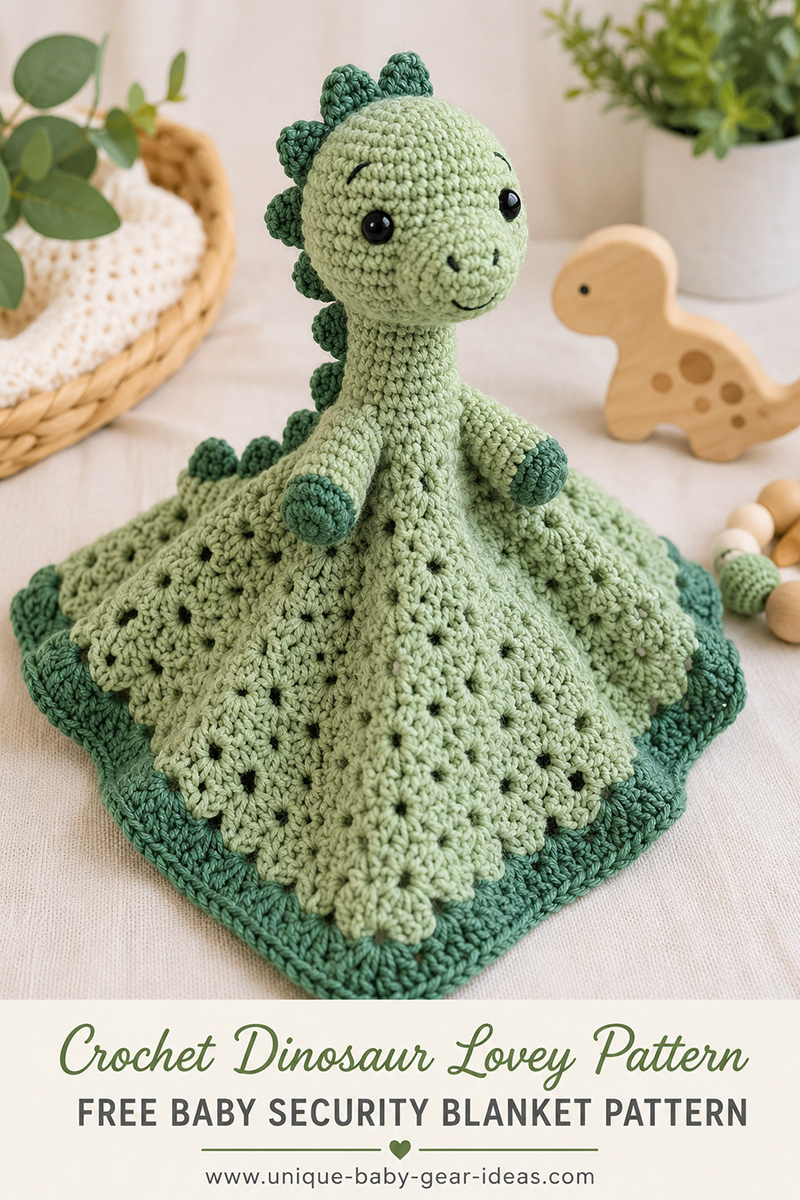
This crochet dinosaur lovey pattern shows you how to make a baby security blanket with a friendly dinosaur head, embroidered eyes, and a small blanket body that works as a handmade baby shower gift or decorative dinosaur nursery accent.
Browse more baby crochet patterns:
Helpful crochet supply:
Jump to a section:
Quick Dinosaur Lovey Answer
A lot of crochet dinosaur patterns look cute sitting on a shelf, then lose their dinosaur shape once they become a lovey. The long neck on this design fixes that problem. Even when the blanket is folded or draped over an arm, it still reads like a brontosaurus.
Quick Answer: This crochet dinosaur lovey pattern combines a brontosaurus-style head and neck with a 15-inch square baby security blanket body. It uses basic crochet stitches, embroidered facial features, four small legs, and dark green back spikes to create a handmade dinosaur baby lovey with clear step-by-step guidance.
Finished dinosaur lovey measurements:
- Security blanket body: about 15 inches square after the border
- Dinosaur head: about 3½ inches wide
- Muzzle: about 1¼ inches wide
- Neck height: about 5 inches
- Leg height: about 1½ inches
- Total dinosaur height: about 8½ to 9 inches from the blanket center to the top of the head
- Back spikes: 8 rounded spikes, about ¾ inch tall each
Skill Level: Intermediate. You should already be comfortable with single crochet, double crochet, increases, decreases, working in continuous rounds, stuffing amigurumi pieces, embroidering facial features, and securely sewing crochet parts together.
This crochet dinosaur lovey pattern is written for an intermediate crocheter who knows the basic stitches but wants clear measurements, stitch counts, and assembly guidance in one place.
A recognizable dinosaur shape matters.
If you enjoy handmade comfort items, you’ll find more nursery-friendly projects in my crochet animal lovey patterns collection.
Many baby gifts are opened, admired, and tucked away. A dinosaur lovey tends to stay out where little hands can grab it because the neck gives the blanket an easy little handle during supervised use.
If this lovey is part of a whole room plan, the dinosaur nursery page has decorating ideas that pair naturally with handmade dinosaur projects.
Crochet Dinosaur Lovey Pattern Materials and Notes
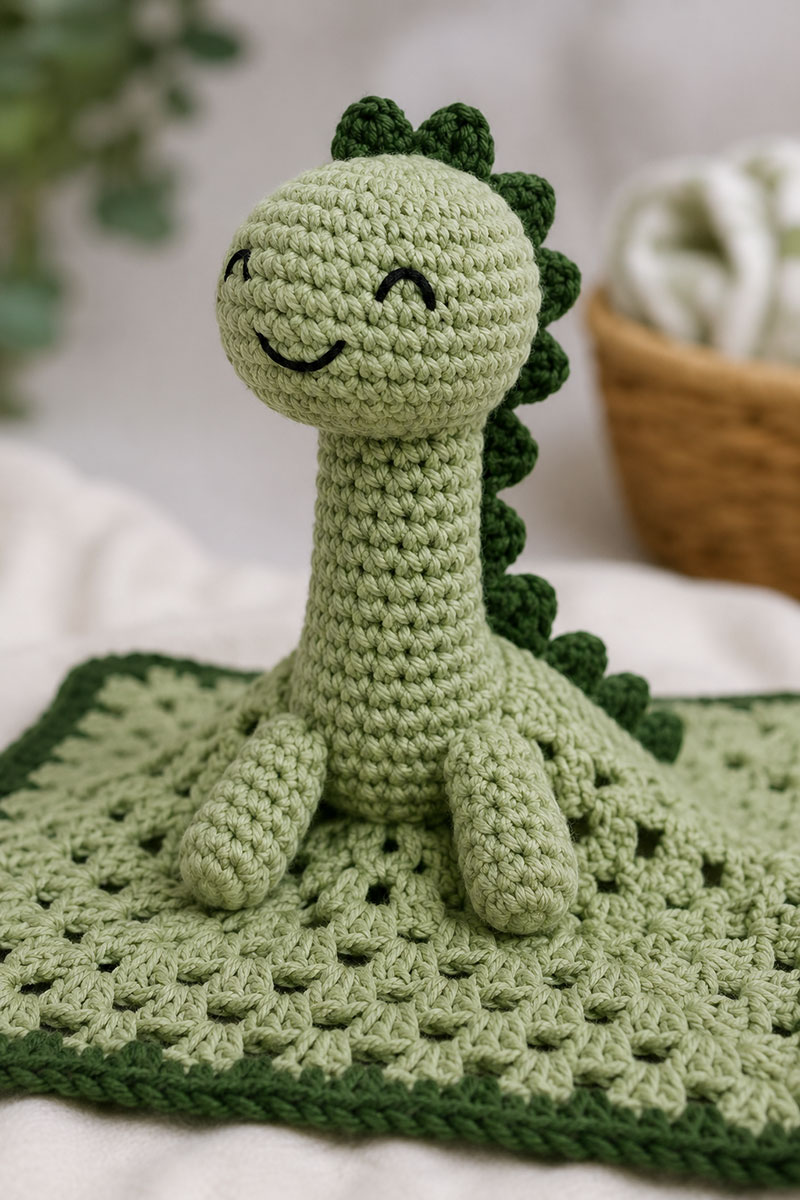
This pattern creates a brontosaurus-style dinosaur lovey with a rounded stuffed head, separate muzzle, long neck, four small legs attached around the neck base, rounded back spikes, and a granny-square security blanket body.
Materials
- Approximately 280 yards worsted weight yarn in sage green
- Approximately 70 yards worsted weight yarn in dark green
- 4.0 mm crochet hook, or the size needed to meet gauge and create a firm fabric
- Polyfill stuffing
- Tapestry needle
- Black embroidery floss
- Scissors
- Stitch markers
Abbreviations
- ch = chain
- sc = single crochet
- dc = double crochet
- sl st = slip stitch
- inc = increase, 2 sc in same stitch
- dec = invisible decrease
- st = stitch
Gauge
18 sc stitches and 20 rows in single crochet should measure about 4 inches before stuffing.
Use a hook size that creates a firm fabric with no stuffing showing between the stitches. The blanket is worked to its finished measurement rather than to a fixed final round number.
Secure every magic ring: Each time you use a magic ring, pull it completely closed after the next two rounds are finished. Thread the starting tail through the backs of several stitches around the center, then weave it back through several stitches in the opposite direction. Leave the remaining tail inside each stuffed piece. On the blanket, weave the tail securely into the wrong side. Do not rely only on pulling the adjustable loop closed.
Finished Measurements
- Head: about 3½ inches wide
- Muzzle: about 1¼ inches wide
- Neck: about 5 inches tall
- Legs: about 1½ inches tall
- Blanket: about 15 inches square after the border
- Total finished height: about 8½ to 9 inches from the blanket center to the top of the head
Embroidered eyes are recommended for this baby project because they avoid adding separate plastic pieces. Fasten the embroidery floss securely inside the head and bury the trimmed ends beneath the stuffing.
For nursery safety information, visit the U.S. Consumer Product Safety Commission Safe Sleep Resource Center.
Baby-use safety note: This lovey is not an infant sleep product. Do not place it in a crib, bassinet, play yard, or other infant sleep space. Use it only during awake, supervised time, and remove it from use if any seam loosens or stuffing becomes visible.
Crochet the Dinosaur Head and Muzzle
The head is worked in continuous rounds with sage green yarn. Place a stitch marker in the first stitch of every round.
Round 1: Magic ring, 6 sc. (6)
Round 2: Inc around. (12)
Round 3: (Sc 1, inc) repeat 6 times. (18)
Round 4: (Sc 2, inc) repeat 6 times. (24)
Round 5: (Sc 3, inc) repeat 6 times. (30)
Round 6: (Sc 4, inc) repeat 6 times. (36)
Round 7: (Sc 5, inc) repeat 6 times. (42)
Round 8: (Sc 6, inc) repeat 6 times. (48)
Rounds 9 through 15: Sc around. (48)
Round 16: (Sc 6, dec) repeat 6 times. (42)
Round 17: (Sc 5, dec) repeat 6 times. (36)
Round 18: (Sc 4, dec) repeat 6 times. (30)
Round 19: (Sc 3, dec) repeat 6 times. (24)
Begin stuffing the head firmly enough to hold its shape, but do not stretch the stitches. Secure the active loop with a locking stitch marker while you make and attach the muzzle.
Make the muzzle with sage green yarn.
Work the muzzle in continuous rounds. Place a stitch marker in the first stitch of each round.
Round 1: Magic ring, 6 sc. (6)
Round 2: Inc around. (12)
Round 3: (Sc 1, inc) repeat 6 times. (18)
Round 4: Sc around. (18)
Fasten off and leave a 24-inch sewing tail. Add a very small amount of stuffing.
Hold the head with Head Round 1 at the top and the open closing end at the bottom. Center the muzzle on the front of the head with its upper edge near Head Round 11 and its lower edge near Head Round 17. Leave Head Rounds 18 through 22 clear for shaping and neck attachment.
Pin the entire 18-stitch muzzle opening before sewing. Sew each muzzle stitch to the head, keeping the muzzle centered, level, and lightly rounded rather than flattened against the face.
Embroider two closed eyes above the muzzle. Embroider two small nostrils and a curved smile on the muzzle. Knot the embroidery floss inside the open head and trim the ends securely.
With the muzzle facing forward, place three removable markers along the vertical center back of the head: one near Head Round 4, one directly opposite the middle of the muzzle near Head Round 13, and one near Head Round 18. These markers establish the dorsal centerline for the neck and spikes.
Return to the secured head loop.
Round 20: (Sc 2, dec) repeat 6 times. (18)
Add the remaining stuffing and shape the head evenly.
Round 21: (Sc 1, dec) repeat 6 times. (12)
Round 22: Dec around. (6)
Fasten off, close the final opening with a tapestry needle, and bury the yarn tail inside the head.
Make the Long Dinosaur Neck
The neck is worked in continuous rounds from the head end downward. The final rounds widen the bottom so the neck has a stable attachment area at the center of the blanket.
Using sage green yarn:
Round 1: Magic ring, 6 sc. (6)
Round 2: Inc around. (12)
Round 3: (Sc 1, inc) repeat 6 times. (18)
Rounds 4 through 22: Sc around. (18)
Stuff the neck every few rounds. Keep the stuffing firm enough to support the head, but stop if the stuffing begins to show between the stitches.
Round 23: (Sc 2, inc) repeat 6 times. (24)
Round 24: (Sc 3, inc) repeat 6 times. (30)
Round 25: Sc around. (30)
The finished neck should measure about 5 inches from the closed top to the open base.
Fasten off and leave a 36-inch sewing tail for the first neck-to-blanket seam. Do not close the 30-stitch base opening.
Crochet the Legs and Back Spikes
Make four legs with sage green yarn.
Work each leg in continuous rounds. Place a stitch marker in the first stitch of each round.
Round 1: Magic ring, 6 sc. (6)
Round 2: Inc around. (12)
Rounds 3 through 7: Sc around. (12)
Add a small amount of stuffing. Keep the rounded magic-ring end firm and leave the upper end slightly softer for sewing.
Round 8: Dec around. (6)
Fasten off and leave a 12-inch sewing tail. Do not close the 6-stitch opening.
Each leg should measure about 1½ inches tall. Make all four legs before assembly and compare them side by side.
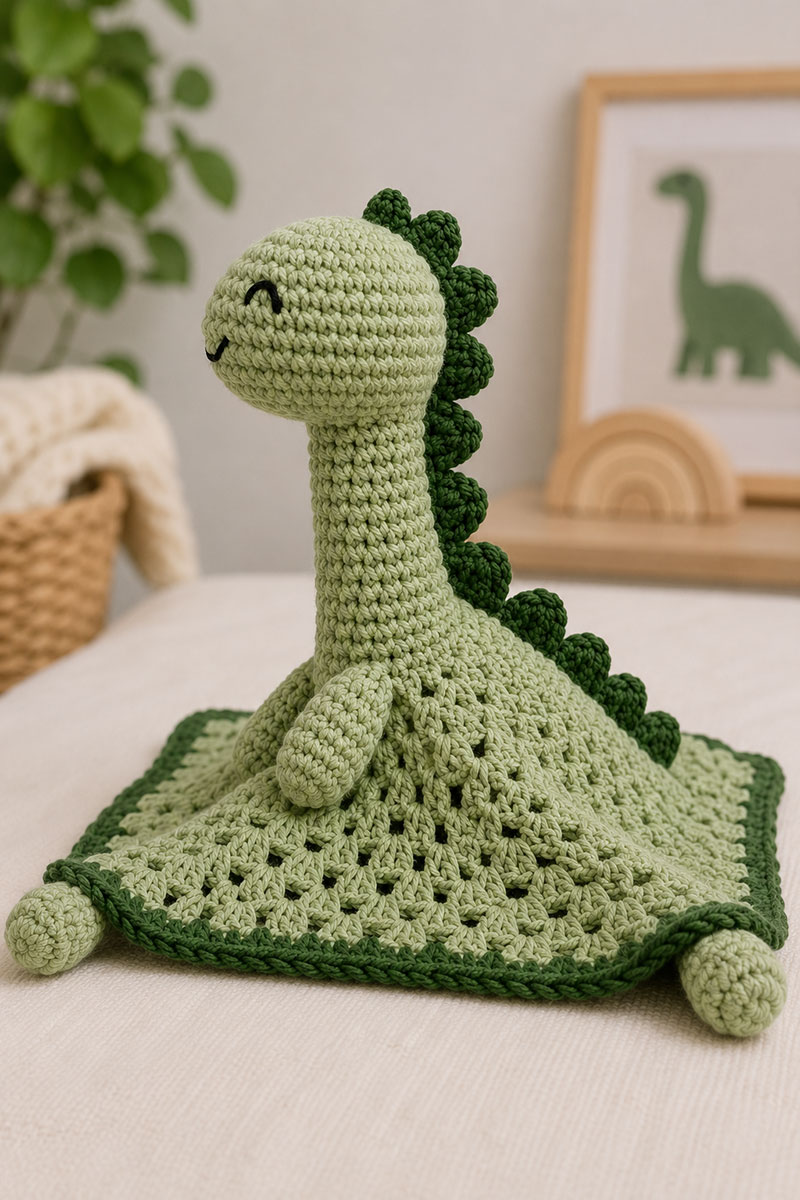
Make eight rounded back spikes with dark green yarn.
Work each spike in continuous rounds.
Round 1: Magic ring, 4 sc. (4)
Round 2: Inc around. (8)
Round 3: Sc around. (8)
Round 4: (Sc 2, dec) repeat twice. (6)
Fasten off and leave an 8-inch sewing tail. Add a tiny pinch of stuffing or tuck the starting yarn tail inside the spike. Do not close the 6-stitch base.
Each spike should measure about ¾ inch tall. Compare all eight spikes before assembly so they finish at matching sizes.
Crochet the Lovey Blanket
The blanket is worked as a granny square from the center outward. Keep the center flat as you work. If it cups, your tension may be too tight at the corners.
The beginning ch 3 counts as the first dc in every sage blanket round. The joining sl st does not count as a stitch. The ch 1 used to begin the border does not count as a sc.
The right side of the blanket is the side facing you while you work the joined rounds. Place a removable marker on the right side if needed so it remains easy to identify during assembly.
Using sage green yarn:
Round 1: Make a magic ring. Ch 3, which counts as the first dc. Work 2 dc in the ring, ch 2, then work (3 dc in the ring, ch 2) three times. Join with sl st to the top of the beginning ch 3. (12 dc and 4 ch-2 corner spaces)
Round 2: Sl st in the next 2 dc and into the first ch-2 corner space. Ch 3, 2 dc, ch 2, and 3 dc in the same corner. Ch 1. In each of the remaining three ch-2 corner spaces, work 3 dc, ch 2, 3 dc, followed by ch 1. Join with sl st to the top of the beginning ch 3. (24 dc, 4 ch-2 corner spaces, and 4 ch-1 side spaces)
Round 3: Sl st in the next 2 dc and into the first ch-2 corner space. Ch 3, 2 dc, ch 2, and 3 dc in the same corner. *Ch 1. Work 3 dc in each ch-1 space across the next side, placing ch 1 after every 3-dc group. In the next ch-2 corner, work 3 dc, ch 2, and 3 dc. Repeat from * two more times. Ch 1. Work 3 dc in each ch-1 space across the final side, placing ch 1 after every 3-dc group. Join with sl st to the top of the beginning ch 3. (36 dc)
Round 4 and following sage rounds: Repeat Round 3. Each new round adds one additional 3-dc group to every side.
After any sage Round N, each side contains N groups of 3 dc and N minus 1 ch-1 spaces. The complete round contains 12 times N double crochet stitches, 4 times (N minus 1) ch-1 spaces, and 4 ch-2 corner spaces. For example, Round 10 contains 120 dc and 36 ch-1 spaces.
Continue until the sage square measures about 14½ inches across when laid flat without stretching. End after completing a full round.
Record the number of the final sage round because it determines the border stitch count. Fasten off the sage green yarn and weave its tail securely into the wrong side of the blanket.
Border Round: With the right side facing up, join dark green yarn in any ch-2 corner space. Ch 1. Work 3 sc in the same corner. *Work 1 sc in every dc and 1 sc in every ch-1 space across the next side, then work 3 sc in the next ch-2 corner space. Repeat from * two more times. Work 1 sc in every dc and 1 sc in every ch-1 space across the final side. Join with sl st to the first sc and fasten off.
If the final sage round is Round N, work 4N minus 1 sc between each pair of corner spaces, not counting the corner stitches. For example, if the final sage round is Round 10, work 39 sc between adjacent corner spaces. The complete border contains 16N plus 8 sc, including the 3 sc worked in each of the four corners. All four sides should have matching stitch counts.
Lay the finished blanket flat and confirm that the border does not pull the corners inward or ripple along the sides. The bordered blanket should measure about 15 inches square.
The blanket can be folded loosely around the center attachment, but the stuffed head, neck, and legs will remain bulky. Do not tightly roll or compress the stuffed pieces for storage or gifting.
For a crib bedding tie-in, see dinosaur crib bedding before choosing the yarn colors for this lovey.
If you enjoy nursery themed handmade projects, browse my free baby patterns collection.
Assemble the Dinosaur Lovey
Before assembly, weave in all remaining blanket tails. Lay the blanket flat and confirm that the sides are straight and the four corners lie evenly. If needed, gently shape or wet-block the blanket according to the yarn-label instructions. Allow it to dry completely before attaching the stuffed pieces.
Attach the head to the neck.
Place the closed top of the neck against the underside of the head, centered over the final Head Round 22 closure.
Align the back of the neck with the three removable markers running down the back of the head. Place one removable marker in Neck Round 3 directly below the lowest head marker. Place a second marker near Neck Round 22 in a straight line below the first neck marker. These markers establish the back centerline of the neck.
Using a separate 30-inch length of sage green yarn, sew one complete pass through all 18 stitches around the outer edge of Neck Round 3 and into the underside of the head.
Use a fresh 30-inch length of sage green yarn for a second reinforcing pass around the same seam. Weave in both sets of yarn ends securely. The muzzle should point straight forward, and the marked back centerline should run directly behind it without twisting.
Attach the neck to the blanket.
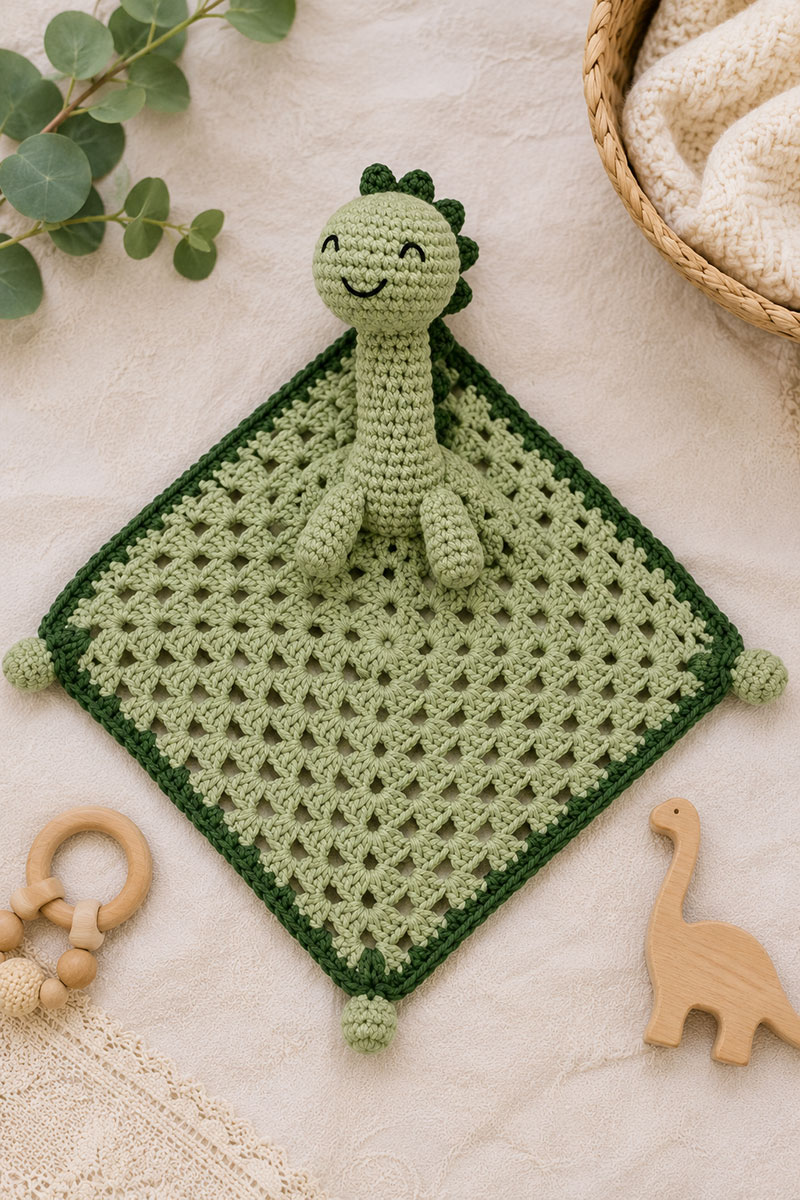
Lay the blanket flat with the right side facing up and one corner pointing forward like a diamond. Mark the exact center.
At Neck Round 25, identify the base stitch directly aligned with the marked back centerline. Place a removable marker in that stitch and call it the back marker.
Starting with the back-marker stitch as Stitch 1, count clockwise around the 30-stitch base. Place additional markers in Stitches 9, 16, and 24. Stitch 16 is the front marker. Stitches 9 and 24 are the two side markers. This divides the base into four sections containing 8, 7, 8, and 7 stitches.
Place the open neck base over the blanket center. Point the front marker and muzzle toward the front blanket corner. Point the back marker and dorsal centerline toward the opposite corner. Point the two side markers toward the remaining two corners.
Pin all four marked positions first. Add more pins between them until the neck base forms an even circle and the four sections are distributed evenly around the blanket center.
Add a final small amount of stuffing if needed, but keep the flared base flat against the blanket.
Using the 36-inch neck tail, sew one complete pass through all 30 neck-base stitches and into solid yarn strands around the blanket center. If a neck stitch falls above an open granny-square space, angle the needle slightly to catch a nearby double crochet stitch or chain-space bar. Do not sew across an empty hole.
Keep the sewing yarn firm but not tight enough to gather or cup the blanket. Set the lovey upright and confirm that the neck is centered before reinforcing the seam.
Using a fresh 36-inch length of sage green yarn, make a second complete pass around the 30-stitch neck base. Weave in both yarn ends securely.
Confirm that the muzzle faces the front corner and that the marked dorsal centerline points toward the opposite corner before attaching the legs.
Attach the four legs.
Place the open 6-stitch end of each leg against the blanket beside the neck base. The closed rounded magic-ring end of each leg should point outward.
Place one front leg on each side of the front centerline. Place the two back legs directly opposite the front pair. Adjust all four legs until they are evenly spaced around the neck base.
Using each leg tail, sew the open 6-stitch edge to the blanket. Add two or three small stitches between the upper side of the leg and the neck base so the leg cannot twist or flip backward.
Attach the eight spikes.
Pin all eight spikes along the marked dorsal centerline before sewing any of them permanently.
Place the first spike near Head Round 4 at the top back of the head. Place two more spikes evenly down the back of the head, with the third ending near Head Round 18.
Place the remaining five spikes evenly down the marked back centerline of the neck. End the final spike above Neck Round 23 so it does not interfere with the flared neck base or blanket seam.
Adjust the spacing so the eight spikes form one continuous visual line from the crown to the lower neck. The bases may touch or have a small space between them, but do not force fixed ½-inch gaps.
Using each spike tail, sew completely around the open 6-stitch base. Check the back view after attaching every one or two spikes so the row does not drift to the left or right.
Weave in every yarn tail securely and bury the ends inside a stuffed piece or beneath several blanket stitches.
Tug gently on the muzzle, head, neck, legs, and every spike. Repair any seam that moves, opens, or exposes stuffing.
For room decorating ideas that pair naturally with handmade baby projects, visit nursery ideas.
Final Pattern Checklist Before Gifting
- Head measures about 3½ inches wide
- Muzzle measures about 1¼ inches wide and is centered on the face
- Neck measures about 5 inches from its closed top to its flared base
- All four legs measure about 1½ inches and match one another
- Blanket measures about 15 inches square after the border
- Total height is about 8½ to 9 inches from the blanket center to the top of the head
- Neck base is sewn through all 30 stitches and reinforced with a second pass
- Eight rounded spikes run in a straight line down the back
- Eyes, nostrils, and smile are embroidered securely
- No stuffing is visible between stitches or through a seam
- No loose yarn or embroidery tails remain
- Muzzle, head, neck, legs, and spikes pass a gentle tug test
A completed dinosaur lovey should look like a brontosaurus from a distance. The longer neck is intentional because it keeps the dinosaur shape visible when the blanket is folded, carried, or draped over a nursery chair.
For smaller stitched animal shapes that can decorate blankets, banners, nursery hoops, or handmade baby gift sets, browse my crochet animal applique patterns.
Some handmade nursery pieces are mainly for display. This one is made to be useful, giftable, and easy to recognize at a glance.
A handmade lovey also pairs well with a nursery quilt, especially if you are using the dinosaur crib quilt pattern for a coordinated baby gift.
For more room style ideas, visit baby nursery themes.
Dinosaur Lovey Pattern FAQ
What dinosaur works best for a crochet lovey?
A brontosaurus works especially well because the long neck remains recognizable even when the blanket is folded.
Can beginners make this crochet dinosaur lovey pattern?
This is an intermediate crochet pattern rather than a first beginner project. It uses basic stitches, but the stuffed-piece shaping, embroidered face, granny-square blanket, directional marking, spike placement, and reinforced assembly require previous crochet experience.
Can I use blanket yarn for this dinosaur lovey?
Yes, but the finished size will change. A thicker yarn will make the head, neck, legs, and blanket larger than the measurements listed here.
Are safety eyes recommended for this pattern?
No. Embroidered facial features are a better choice for baby projects.
How long does this dinosaur lovey take to make?
Many crocheters can finish it during a weekend, especially if the head, neck, and legs are made in one sitting and the blanket is worked separately.
Can this be used inside a crib?
No. Do not place this lovey in a crib, bassinet, play yard, or other infant sleep space. Infant sleep spaces should remain bare except for a properly fitted sheet. Use the lovey only as an awake, supervised comfort item, baby shower gift, or nursery keepsake.
When you click on links to various merchants on this site and make a purchase, this may result in this site earning a commission. This does not affect the price you pay.

UBGI Gold Standard 2026
Reviewed under the site's
editorial checklist.
Photos, decorating ideas, party setups and reader submissions are shared for inspiration unless a page is specifically presented as a pattern, tutorial, reference guide or step-by-step project. Follow the instructions, measurements, safety guidance and manufacturer directions provided for the particular project or product.
About Jan | Contact | Baby Nursery Ideas (Blog) | Site Map | Privacy Policy | Disclosure Policy | Disclaimer | Affiliate Disclosure | Earnings Disclosure | Facebook | Pinterest
I am a participant in the Amazon Services LLC Associates Program, an affiliate advertising program designed to provide a means for us to earn fees by linking to Amazon. As an Amazon Associate I earn from qualifying purchases.
Copyright © 2006-2026. All Rights Reserved.