Free Crochet Christmas Puppy Ornament Pattern: Sleeping Dog
By Jan Bay
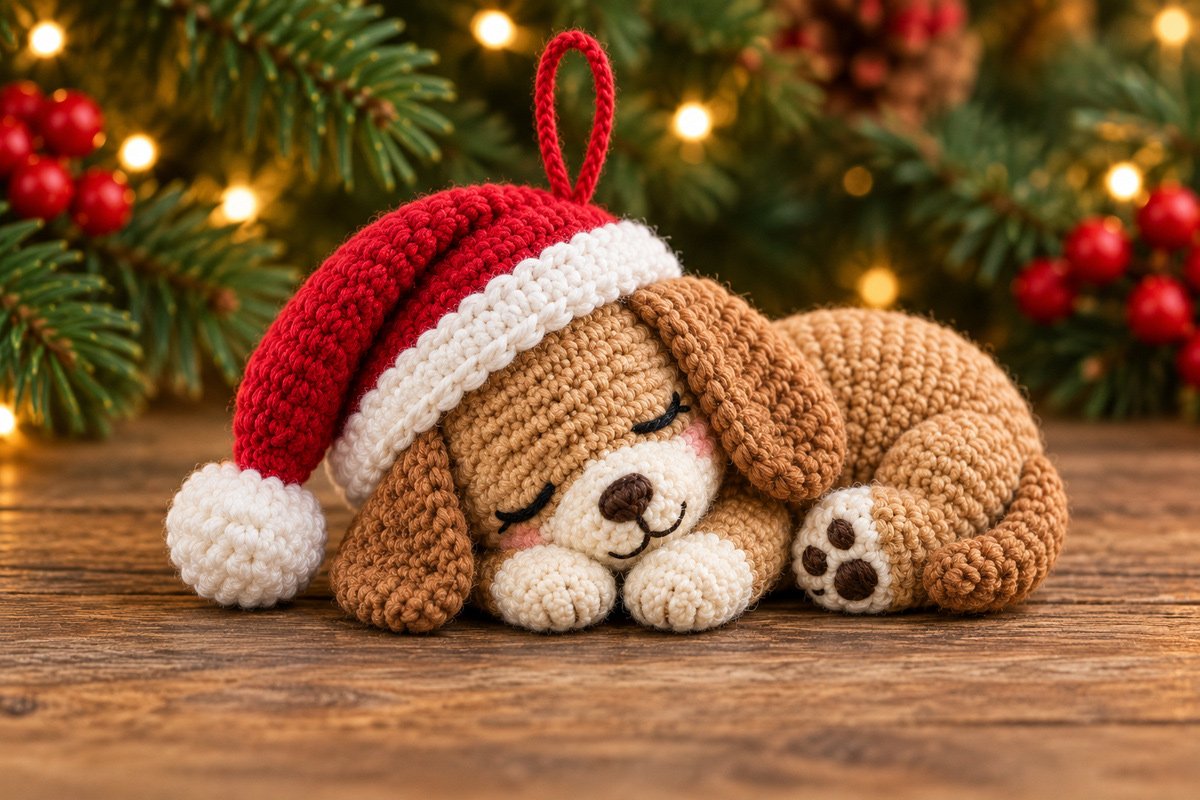
This free crochet Christmas puppy ornament pattern features a sweet little dog curled up fast asleep beneath a cranberry-red Santa hat, no doubt with visions of puppy treats dancing in his head. With floppy ears, an ivory muzzle, embroidered sleepy eyes and tiny paws tucked beneath his chin, this handmade puppy looks like he fell asleep waiting for Santa. The finished ornament makes a charming Christmas tree decoration or handmade holiday keepsake for any dog lover on your gift list.
Explore More Free Christmas Crochet Patterns
Christmas Crochet Patterns Collection
Crochet Reindeer Ornament Pattern
Crochet Snowman Ornament Pattern
See Supplies for This Project Here.
Jump to the Free Crochet Christmas Puppy Ornament Pattern
Yarn, Supplies and Finished Size
Crochet Abbreviations and Pattern Notes
Crochet the Sleeping Puppy Head and Muzzle
Make the Floppy Ears, Paws and Curled Tail
Crochet the Cranberry Santa Hat
Assembly, Embroidered Face and Finishing
Materials for the Free Crochet Christmas Puppy Ornament Pattern
Our little Christmas puppy is made with medium-weight yarn and a small hook, so the stitches sit close together and the stuffing stays tucked inside. You'll make the rounded body and head first, then add the floppy ears, little paws and oversized Santa hat.
I'd stick with smooth yarn for this project. Fuzzy yarn might look cute, but it makes those tiny embroidered eyes and paw details harder to see. And those are half the puppy's personality!
Yarn and Supplies
- Caramel-brown yarn: Approximately 50–70 yards for the body, head, ears, legs and tail.
- Ivory yarn: Approximately 15–20 yards for the muzzle, front paws, hind paw soles, Santa hat brim and pom-pom.
- Cranberry-red yarn: Approximately 20–30 yards for the Santa hat and hanging loop.
- Dark brown yarn or embroidery floss: For the nose, mouth and paw pads.
- Black embroidery floss: For the closed, sleepy eyes and eyelashes.
- Soft pink embroidery floss or yarn: For the tiny cheeks.
- 3.25 mm crochet hook: Or the size needed to make firm stitches without gaps.
- Polyester fiberfill stuffing.
- Yarn needle for sewing and embroidery.
- Stitch marker.
- Small scissors.
- Optional sewing pins and a blunt stuffing tool.
The yardage amounts are planning estimates, not quantities measured from a completed sample. A few leftover balls of yarn may be plenty, provided they're the same weight and close enough in texture.
Finished Size and Gauge
At the proposed gauge, expect a puppy approximately 6–7 inches long from the side-draped pom-pom to the back of the curled body. The resting puppy should be roughly 3–3.5 inches tall, depending on how the hat falls.
Working gauge target: Approximately 24 single crochet stitches and 26 rounds per 4 inches, worked firmly.
The head should be approximately 2.2 inches across at its widest point, while the stuffed body should be approximately 2.5 inches thick. These are calculated targets, so check your own crocheting before assembling the pieces.
The example images show the intended finished design. The stitch counts have been checked mathematically, but the pattern has not yet been physically test-crocheted. Check the fit and positioning of the pieces as you assemble your puppy.
The important part is keeping the stitches firm enough that stuffing doesn't show. If you can see gaps when you gently stretch your crochet fabric, use a smaller hook.
Skill level: Confident beginner to intermediate. You'll need basic amigurumi increases and decreases, a few color changes, embroidery and careful assembly.
Crochet Abbreviations and Pattern Notes
We'll use US crochet terminology throughout this pattern. Keep a stitch marker in the first stitch of each round. Most pieces are worked in continuous spirals, so don't join the rounds unless the instructions specifically tell you to.
- MR: Magic ring.
- ch: Chain.
- sc: Single crochet.
- sl st: Slip stitch.
- inc: Work 2 single crochet stitches in the same stitch.
- dec: Invisible single crochet decrease over the next 2 stitches.
- BLO: Back loop only.
- st/sts: Stitch or stitches.
- rnd: Round.
- FO: Fasten off.
Numbers in parentheses at the end of each round tell you how many stitches you should have when that round is finished. For example, (24) means 24 stitches.
Instructions inside square brackets are repeated the stated number of times. For example, [2 sc, inc] six times means work 2 single crochets followed by an increase, repeating that sequence six times.
If you need a refresher, the Craft Yarn Council's crochet abbreviation guide explains the standard US terms.
Before You Start
Make your pieces in this order: body, head, muzzle, ears, front paws, hind paws, tail, Santa hat and pom-pom. The hanging loop goes on after the puppy has been assembled.
The body is worked lengthwise from the narrow chest toward the rounded rump. It will look like an elongated oval at first. That's intentional. The sleeping pose comes from the final positioning of the head, paws, haunches and tail.
Stuff the pieces firmly enough to hold their shape, but don't pack them so tightly that they become hard balls. The puppy should have a soft, rounded appearance, particularly around its face and tummy.
Unless stated otherwise, use caramel yarn for the puppy's main pieces. Leave long sewing tails on components that need to be attached later.
Crochet the Curled Puppy Body
Start with the body because everything else needs to fit around it. We're making a longer oval with a slightly narrower front and fuller back. Once the puppy's head and paws are attached, this shape will curl into that sleepy little pose.
Use caramel-brown yarn and a 3.25 mm hook.
Body Pattern
Rnd 1: Work 6 sc in a MR. (6)
Rnd 2: Inc in each stitch around. (12)
Rnd 3: [1 sc, inc] 6 times. (18)
Rnd 4: [2 sc, inc] 6 times. (24)
Rnd 5: [3 sc, inc] 6 times. (30)
Rnd 6: [4 sc, inc] 6 times. (36)
Rnd 7: [5 sc, inc] 6 times. (42)
Rnds 8–10: Sc in each stitch around. (42)
Rnd 11: [6 sc, inc] 6 times. (48)
Rnds 12–19: Sc in each stitch around. (48)
Rnd 20: [6 sc, dec] 6 times. (42)
Rnds 21–22: Sc in each stitch around. (42)
Rnd 23: [5 sc, dec] 6 times. (36)
Rnd 24: [4 sc, dec] 6 times. (30)
Rnd 25: [3 sc, dec] 6 times. (24)
Rnd 26: [2 sc, dec] 6 times. (18)
Begin stuffing the body. Fill the rounded back first, then work toward the narrower chest. Keep the stuffing even, with slightly less firmness along the underside.
Rnd 27: [1 sc, dec] 6 times. (12)
Rnd 28: Dec 6 times. (6)
FO, leaving a tail long enough to draw through the remaining front loops and close the opening. Weave the tail securely into the body.
Shape the Sleeping Body
Lay the body horizontally with the narrow starting end pointing left and the rounded finishing end pointing right. The narrow end is the chest. The fuller end becomes the rump.
Choose which side will face upward and which will rest against the table. Mark the underside with a short piece of contrasting yarn.
If the stuffed body looks too straight, mark two stitches along the same center line on its underside, one near Round 10 and the other near Round 22. Thread a doubled strand of caramel yarn through the underside at the first mark, carry it through the stuffing to the second mark, and return through neighboring stitches to the starting area. Gently tighten the strand until the underside shortens by approximately 1/4 to 1/2 inch, creating a soft inward curve. Secure the yarn, bury the ends inside the body, and remove the markers.
You're looking for a small inward curve, not a sharply folded body. You should still be able to smooth the surface with your fingers.
Body checkpoint: You should have a plump, horizontal oval that is narrowest at the chest and fuller toward the rear. Keep it lying on its side for the remainder of assembly.
Crochet the Sleeping Puppy Head and Ivory Muzzle
Now for that sleepy little face. The puppy's head is fairly round, with a generous forehead and an ivory muzzle that sits just above its front paws. We'll embroider the eyes later, so you can position them after you see exactly how the head rests against the body.
Caramel Puppy Head
Use caramel yarn.
Rnd 1: Work 6 sc in a MR. (6)
Rnd 2: Inc in each stitch around. (12)
Rnd 3: [1 sc, inc] 6 times. (18)
Rnd 4: [2 sc, inc] 6 times. (24)
Rnd 5: [3 sc, inc] 6 times. (30)
Rnd 6: [4 sc, inc] 6 times. (36)
Rnd 7: [5 sc, inc] 6 times. (42)
Rnds 8–14: Sc in each stitch around. (42)
Rnd 15: [5 sc, dec] 6 times. (36)
Rnd 16: Sc in each stitch around. (36)
Rnd 17: [4 sc, dec] 6 times. (30)
Rnd 18: [3 sc, dec] 6 times. (24)
Begin stuffing the head, keeping its rounded shape. The upper forehead should remain smooth, while the lower portion should be firm enough to support the muzzle.
Rnd 19: [2 sc, dec] 6 times. (18)
Rnd 20: [1 sc, dec] 6 times. (12)
Rnd 21: Dec 6 times. (6)
FO, leaving a long tail for sewing. Close the remaining opening and keep the sewing tail accessible.
Ivory Muzzle
Use ivory yarn. The muzzle is worked as a small oval rather than a round ball. It needs a little fullness without sticking too far forward.
Ch 6.
Rnd 1: Beginning in the second chain from the hook, work 1 sc in that chain and in each of the next 3 chains. Work 3 sc in the last chain. Continue around the opposite side of the foundation chain, working 1 sc in each of the next 3 chains and 2 sc in the final chain. (12)
Rnd 2: Inc in the first stitch, sc in the next 3 stitches, inc in each of the next 3 stitches, sc in the next 3 stitches, and inc in each of the final 2 stitches. (18)
Rnd 3: Sc in each stitch around. (18)
FO, leaving a long sewing tail. Don't close the opening yet.
Attach the Muzzle
Hold the head so the starting-round center is at the top and the closing rounds are toward the bottom.
Center the ivory muzzle across the lower front of the face, approximately over head Rounds 12–17. Keep its long direction horizontal and its lower edge near the rounded bottom of the cheeks.
Pin the muzzle temporarily. Check that there's enough caramel-colored face showing above it for the closed eyes.
Sew around the muzzle's edge using the ivory yarn tail. Before closing the final section, add a very small pinch of stuffing to give the muzzle a softly raised shape. Finish sewing and hide the tail.
Don't stuff the muzzle into a large ball. The finished puppy needs a soft little nose and cheeks, not a long pointed snout.
Embroider the Nose and Mouth
Using dark brown embroidery floss, stitch a small rounded triangular nose near the upper center of the ivory muzzle. Keep it approximately 1/4 inch wide.
Bring one short vertical stitch down from the bottom of the nose. Then make two gently curved mouth lines, one toward each side, to create a tiny sleeping smile.
Keep the mouth embroidery close to the center of the muzzle. The floppy ears and closed eyes will supply the rest of the expression.
Set the head aside until the other puppy pieces are ready.
Make the Floppy Ears, Paws and Curled Tail
These little pieces give the puppy its personality. One ear will drape over the cheek, the front paws will tuck beneath the chin, and the back foot will peek out beside the curled tail.
Keep the ears soft and mostly unstuffed. A little movement in them looks much sweeter than two stiff ears sticking straight out.
Long Floppy Ear
Use caramel yarn.
Rnd 1: Work 6 sc in a MR. (6)
Rnd 2: [1 sc, inc] 3 times. (9)
Rnd 3: [2 sc, inc] 3 times. (12)
Rnds 4–10: Sc in each stitch around. (12)
Rnd 11: [2 sc, dec] 3 times. (9)
Rnd 12: Sc in each stitch around. (9)
FO, leaving a long sewing tail.
Do not stuff. Flatten the open end between your fingers and sew it closed through both layers. The ear should lie naturally against the side of the face.
Shorter Floppy Ear
Use caramel yarn.
Rnd 1: Work 6 sc in a MR. (6)
Rnd 2: [1 sc, inc] 3 times. (9)
Rnd 3: [2 sc, inc] 3 times. (12)
Rnds 4–8: Sc in each stitch around. (12)
Rnd 9: [2 sc, dec] 3 times. (9)
Rnd 10: Sc in each stitch around. (9)
FO, leaving a sewing tail. Flatten the opening and sew through both layers.
Set both ears aside. We'll place the longer one over the cheek nearest the viewer and the shorter one toward the opposite side of the head.
Ivory-Tipped Front Paws: Make 2
Begin each paw with ivory yarn.
Rnd 1: Work 6 sc in a MR. (6)
Rnd 2: Inc in each stitch around. (12)
Rnd 3: [1 sc, inc] 6 times. (18)
Rnds 4–5: Sc in each stitch around. (18)
Change to caramel yarn before working Round 6. Complete the final pull-through of the preceding stitch with caramel, then continue with the new color.
Rnd 6: [1 sc, dec] 6 times. (12)
Rnds 7–10: Sc in each stitch around. (12)
Stuff the ivory rounded tip lightly. Leave the narrower caramel section soft enough to bend toward the puppy's chest.
FO, leaving a long sewing tail. Flatten the upper opening and sew it closed through both layers.
Using a strand of caramel yarn, add two very short separation stitches across the front of each ivory paw to suggest three tiny toes. Do not pull tightly enough to distort the paw.
Front paw checkpoint: Each paw should have a rounded ivory tip and a narrower caramel upper section. Make sure both paws are approximately the same size before fastening them to the body.
Rounded Hind Paws: Make 2
Use caramel yarn.
Rnd 1: Work 6 sc in a MR. (6)
Rnd 2: Inc in each stitch around. (12)
Rnd 3: [1 sc, inc] 6 times. (18)
Rnds 4–5: Sc in each stitch around. (18)
Rnd 6: [1 sc, dec] 6 times. (12)
Rnds 7–8: Sc in each stitch around. (12)
Lightly stuff the rounded end. FO, leaving a sewing tail, and flatten the open end.
These are short hind feet, not long back legs. Once attached, most of each foot will sit close to the puppy's rounded haunches.
Ivory Hind Paw Soles: Make 2
Use ivory yarn.
Rnd 1: Work 6 sc in a MR. (6)
Rnd 2: Inc in each stitch around. (12)
Join with a sl st and FO, leaving a sewing tail.
Flatten each small circle and sew it onto the outward-facing rounded end of a hind foot.
With dark brown embroidery floss, add one rounded central paw pad and three smaller toe pads above it. Use closely placed satin stitches, keeping the dark brown yarn flat against the ivory surface.
The hind paw nearest the viewer should show these little pads clearly. The opposite hind paw may be partly hidden underneath the body, but finish both soles the same way.
Short Curled Tail
Use caramel yarn.
Rnd 1: Work 6 sc in a MR. (6)
Rnd 2: Sc in each stitch around. (6)
Rnd 3: [1 sc, inc] 3 times. (9)
Rnds 4–11: Sc in each stitch around. (9)
Rnd 12: [1 sc, dec] 3 times. (6)
Rnd 13: Sc in each stitch around. (6)
FO, leaving a long sewing tail. Add a tiny amount of stuffing through the open end, but leave the tail flexible enough to curl.
Gently bend the tail into a shallow C shape. Use matching caramel yarn to place a small securing stitch between the tail tip and the side of the tail. This will help it keep its curve.
Don't make the tail stand upright. In the finished ornament, it should lie close against the rounded back of the puppy.
Crochet the Cranberry Santa Hat with White Trim
The oversized Santa hat gives our sleeping puppy its Christmas personality. It needs a thick ivory brim, a long cranberry crown and a soft white pom-pom that falls to one side of the face.
I'd keep the hat quite floppy. There's no need to stuff the crown because we want it to bend naturally beside that drooping ear.
Ivory Brim and Cranberry Hat
Begin with ivory yarn.
Ch 42. Without twisting the chain, join to the first chain with a sl st to form a ring.
Rnd 1: Work 1 sc in each chain around. (42)
Rnd 2: Sc in each stitch around. (42)
Rnd 3: Sc in each stitch around. (42)
Change to cranberry yarn before Round 4. Leave a short ivory tail on the inside of the hat and weave it in securely.
Rnd 4: Working in BLO, sc in each stitch around. (42)
Rnd 5: Sc in each stitch around. (42)
Rnd 6: [5 sc, dec] 6 times. (36)
Rnds 7–8: Sc in each stitch around. (36)
Rnd 9: [4 sc, dec] 6 times. (30)
Rnds 10–11: Sc in each stitch around. (30)
Rnd 12: [3 sc, dec] 6 times. (24)
Rnds 13–14: Sc in each stitch around. (24)
Rnd 15: [2 sc, dec] 6 times. (18)
Rnds 16–17: Sc in each stitch around. (18)
Rnd 18: [1 sc, dec] 6 times. (12)
Rnds 19–21: Sc in each stitch around. (12)
Rnd 22: Dec 6 times. (6)
FO, leaving a long tail. Thread the tail through the remaining front loops and pull closed. Weave it into the inside of the hat.
The white brim should remain open, while the cranberry crown gradually narrows toward its tip.
White Crochet Pom-Pom
Use ivory yarn.
Rnd 1: Work 6 sc in a MR. (6)
Rnd 2: Inc in each stitch around. (12)
Rnd 3: [1 sc, inc] 6 times. (18)
Rnds 4–5: Sc in each stitch around. (18)
Rnd 6: [1 sc, dec] 6 times. (12)
Stuff the little pom-pom lightly.
Rnd 7: Dec 6 times. (6)
FO, leaving a long tail. Close the opening and sew the pom-pom firmly onto the cranberry hat tip.
Place several sewing stitches around the attachment, not just one stitch through the center.
Shape the Santa Hat
Try the hat over the puppy's head before sewing it down. The ivory brim should sit across the upper forehead, with a little caramel-colored face still showing above the closed eyes.
Fold the cranberry crown sideways so the pom-pom hangs beside the longer ear. The pom-pom can rest close to the same surface as the puppy's paws.
The hat should look oversized without completely swallowing the puppy's face. If the brim fits loosely, you can snug it in slightly with a hidden running stitch along the inside. If it is too tight, check the hook size and gauge rather than forcing it over the head.
Once you're happy with the fit, remove the hat temporarily. We'll attach it after the puppy is assembled.
Assemble the Sleeping Puppy and Embroider Its Face
Spread the pieces on your table before sewing anything together. The body should be lying sideways with the fuller haunch toward the back, the head toward the front, and the paws tucked into the space underneath the muzzle.
Don't rush this part. The very same crocheted pieces could make an ordinary sitting puppy if you position them differently, and that's not the little fellow we're making.
1. Position and Attach the Head
Place the narrow starting end of the body toward the puppy's front. Hold the head against that end, allowing the lower back of the head to overlap approximately body Rounds 2–8.
Angle the face downward and slightly toward the inside of the body's curve. The forehead should sit higher than the muzzle, giving the impression that the puppy has lowered its head to sleep.
Pin the head in place. Check that it doesn't point straight forward or upward.
Using the long caramel sewing tail, sew the lower back of the head securely onto the front of the body. Catch several stitches on both pieces as you work around the attachment area. Make a second reinforcing pass through the lower seam before hiding the tail.
The head should remain firmly attached when you gently lift the puppy by its body.
2. Attach the Front Paws
Position the caramel ends of the two front legs along the lower front of the chest, approximately near body Rounds 5–8.
Point the ivory tips forward beneath the muzzle. The paws should lie beside one another, with their rounded tips visible in front of the chest.
Pin them first and set the puppy on a flat surface. Adjust until the muzzle appears to rest gently against the paws.
Sew the caramel ends of the legs to the lower chest. Add a few stitches along the undersides to keep the paws from swinging away from the sleeping position.
Leave the ivory toes visible. They should not disappear underneath the head.
3. Attach the Hind Paws
Place one hind foot on the lower visible side of the rounded body, approximately near body Rounds 19–23. Turn its ivory sole outward so the embroidered paw pads show.
Angle the foot slightly forward, toward the puppy's head. The rounded hind foot should nestle against the haunch rather than hang straight downward.
Sew the flattened upper end securely to the body. Add a small hidden stitch behind the paw to hold the angle.
Attach the second hind foot on the opposite lower side of the body. It can sit a little farther underneath, where it will be partly concealed when the puppy rests on a table.
4. Attach the Curled Tail
Position the narrow base of the tail at the back of the rump, near the closing end of the body.
Curve the tail forward along the outside of the haunch. Its tip should point toward the hind foot rather than away from the puppy.
Sew the base securely, then make two or three hidden stitches along the underside of the curved tail to hold it against the body.
Keep the tail compact. A long tail sticking out behind the puppy would change the rounded sleeping silhouette.
5. Attach the Floppy Ears
Find the upper sides of the head, approximately around head Rounds 8–10. Pin the longer ear on the side facing the viewer and the shorter ear on the opposite side.
Let the longer ear fall across the side of the cheek, with its rounded tip pointing down toward the front paws.
The shorter ear should hang naturally along the far side of the head. It can be partly concealed by the Santa hat, but its rounded end should still be recognizable.
Sew the flattened bases securely using matching caramel yarn. Keep the lower portions free to drape naturally.
6. Embroider the Closed Sleepy Eyes
With the head attached, it's much easier to see where the eyes belong.
Thread a needle with black embroidery floss. On each side of the muzzle, work a short, gently downward-curving line across the caramel face, approximately around head Rounds 10–13.
Use two or three small backstitches for each closed eye, following a shallow crescent shape. The outer ends should sit slightly higher than the inner ends.
Add one or two very small eyelashes at the outer corner of each eye.
Keep both eyes closed. The finished puppy should look peacefully asleep, not like it's winking or looking toward the camera.
With soft pink embroidery floss, add two or three tiny horizontal stitches beneath the outer area of each eye to suggest rosy cheeks.
Hide all embroidery tails inside the head.
7. Attach the Santa Hat
Set the hat back on the head. Place the white brim across the forehead, just above the embroidered eyes.
Looking directly at the puppy's face, fold the cranberry crown toward your left so the white pom-pom falls beside the longer floppy ear, as shown in the finished example.
Pin the brim in place. Sew the inner lower edge of the ivory brim to the head at several points, including the front, back and sides. Keep the stitches small enough that they disappear into the crocheted fabric.
The cranberry crown should remain flexible and drape sideways. If necessary, add one tiny hidden anchoring stitch where the crown folds so it keeps its shape without looking stiff.
8. Check the Finished Sleeping Pose
Place the puppy on a table and look at it from the front, side and back.
From the front, you should see the embroidered closed eyes, ivory muzzle, drooping ears and both little front paws.
From the side, the body should form a soft resting curve, with the rounded back, tucked hind foot and curled tail visible.
From the back, the tail should sit close to the haunch. The hat should drape toward the head instead of sticking straight up.
If a paw or ear needs moving, do it now, before adding the hanging loop. A couple of careful placement stitches can make a surprising difference.
And there he is, sound asleep before Santa even arrives.
Finished Puppy: Front, Side, Back and Paw Details
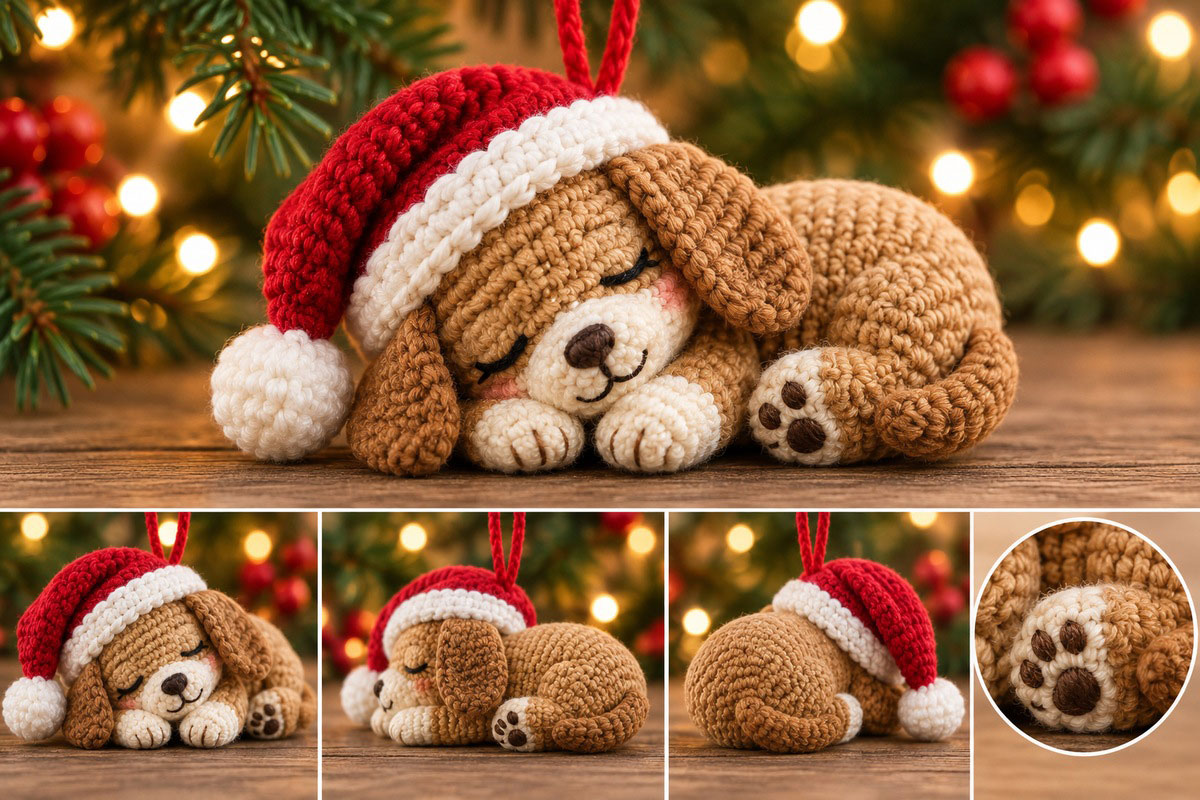
The additional views show how the muzzle rests against the front paws, how the visible hind foot turns outward, and how the short tail follows the curve of the body. Use them when positioning the pieces rather than trying to make the puppy sit upright.
Attach the Christmas Ornament Hanging Loop
Now that our puppy is completely assembled, we can add the cranberry hanging loop. Because this ornament is wider than it is tall, the attachment point needs a little more thought than it would on a simple round Christmas ball.
If you attach the loop only to the floppy hat tip, the puppy may tip sideways or pull the hat out of shape. We want the ornament's weight supported by the body.
Crochet the Loop
Using cranberry yarn, leave a starting tail approximately 10 inches long.
Ch 20 loosely. FO, leaving another tail approximately 10 inches long.
Fold the chain into a loop, bringing its two ends together. Do not tie the ends to one another yet.
Find the Balance Point
Lay the finished puppy in its sleeping position. Because the rounded body is heavier than the floppy Santa hat, the best hanging point may be farther back than the head-and-body seam.
Start by checking the upper surface of the caramel body, approximately between Body Rounds 12 and 20. Thread a separate piece of scrap yarn beneath two neighboring crochet stitches at your chosen point and tie its ends together to make a temporary lifting loop.
Gently lift the puppy by the temporary loop just above a padded surface. If the head drops too far, move the attachment toward the head. If the rounded back drops too far, move it toward the rump. Try neighboring stitches until the puppy hangs in a gently reclined position with its face visible.
Mark the successful balance point and remove the temporary lifting loop.
Take the folded cranberry hanging loop you crocheted earlier. To match the finished example, first try positioning the loop so it emerges through the upper cranberry Santa hat, just behind the ivory brim.
Using a yarn needle, guide both long loop tails through neighboring stitches in the hat crown and down toward the marked balance point on the caramel body. Check that the yarn can reach the body without pulling the hat out of shape. Then pass the two tails through the upper body fabric at the marked position, spacing the entry points approximately one or two stitches apart.
The actual weight-bearing attachment must remain at the body's balance point. If routing the loop through the hat pulls the crown, changes the hanging angle or requires an excessively tight strand, let the loop emerge just behind the hat instead. Do not attach the hanging loop only to the hat to imitate the photograph.
Sew each long yarn tail securely through several stitches of the upper body, making at least three reinforcing passes with each tail. Catch the crochet fabric itself rather than relying on the stuffing to hold the attachment.
Secure the yarn tails, weave them into the body and trim the excess. Remove any temporary markers.
Lift the puppy again and check that its head, paws and rounded body hang in a gently reclined position. The hanging loop should carry the weight through the body, not through the floppy Santa hat.
The finished loop should be long enough to slip over a Christmas tree branch without stretching the hat or distorting the puppy's sleeping pose.
Finishing Tips and Safety for Your Crochet Christmas Puppy Ornament
Before you hang your little puppy on the Christmas tree, take another look at the places where the pieces meet. The floppy ears, paws, tail and Santa hat should all be securely attached, and there shouldn't be any stuffing peeking through the stitches.
Quick Finishing Checklist
- Check that both closed eyes have the same gentle, sleepy curve.
- Make sure the ivory muzzle sits centered beneath the nose.
- Check that the two front paws stay tucked beneath the chin.
- Confirm that the hind foot and embroidered paw pads remain visible from the side.
- Make sure the tail is curled close against the body.
- Secure the white pom-pom firmly to the hat tip.
- Weave in all remaining yarn tails and trim any loose fibers.
- Remove all sewing pins, stitch markers and temporary positioning yarn.
- Check that the hanging loop supports the puppy without pulling the hat out of position.
What If the Puppy Doesn't Look Curled Up?
The most common problem with this type of construction is positioning the head too high or attaching the legs as though the puppy were sitting.
If the finished puppy looks upright, check the head angle first. It should tilt down toward the front paws. Then check the hind paws and tail. Both belong close to the rounded body rather than pointing outward.
Don't solve the problem by overstuffing or bending the crochet fabric sharply. Repositioning the sewn pieces is a better fix.
Ornament Safety
This pattern is intended for a decorative Christmas ornament, not a baby toy, teether or sleep companion. The hanging loop, attached parts and stuffing make it unsuitable for an infant to handle.
Use embroidered facial features rather than plastic eyes, beads or small glued decorations. Check every sewn attachment, especially the pom-pom, ears and hanging loop.
Keep the ornament away from candles, heaters and other heat sources. If you display it in a nursery, place it well outside a baby's reach and never attach it to a crib or other sleep space.
A Little Christmas Gift for a Dog Lover
A sleeping puppy wearing a Santa hat makes a sweet Christmas keepsake, especially for someone who loves dogs. You could make one in caramel like our example or change the body yarn to resemble a favorite family pet. Keep the curled pose, tucked paws and floppy hat if you want the same finished design.
And if you're making more Christmas decorations, a sleeping puppy would look right at home beside the Santa, reindeer and snowman ornaments in a handmade crochet Christmas garland.
I'd let this little fellow have his own special spot on the tree. After all, he's already dreaming about Christmas treats.
When you click on links to various merchants on this site and make a purchase, this may result in this site earning a commission. This does not affect the price you pay.

UBGI Gold Standard 2026
Reviewed under the site's
editorial checklist.
Photos, decorating ideas, party setups and reader submissions are shared for inspiration unless a page is specifically presented as a pattern, tutorial, reference guide or step-by-step project. Follow the instructions, measurements, safety guidance and manufacturer directions provided for the particular project or product.
About Jan | Contact | Baby Nursery Ideas (Blog) | Site Map | Privacy Policy | Disclosure Policy | Disclaimer | Affiliate Disclosure | Earnings Disclosure | Facebook | Pinterest
I am a participant in the Amazon Services LLC Associates Program, an affiliate advertising program designed to provide a means for us to earn fees by linking to Amazon. As an Amazon Associate I earn from qualifying purchases.
Copyright © 2006-2026. All Rights Reserved.