Free Crochet Snowman Ornament Pattern
By Jan Bay
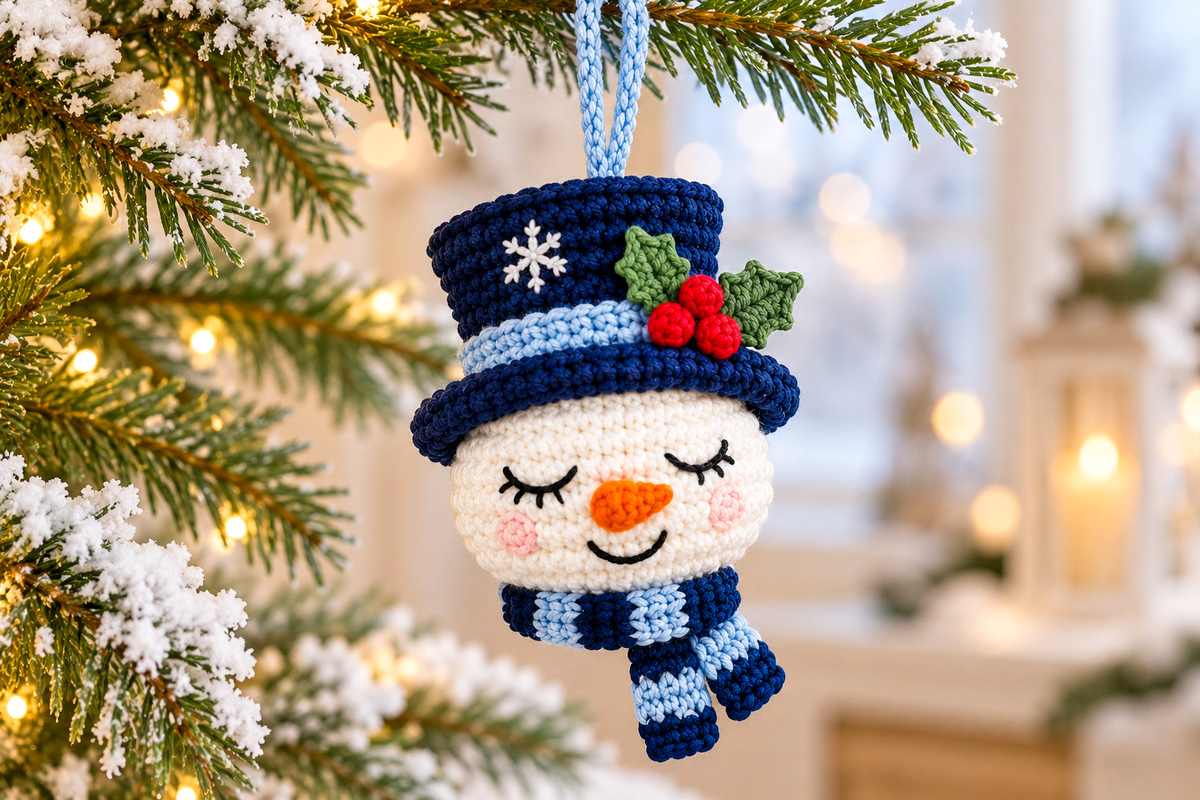
This free crochet snowman ornament pattern makes a sweet little Christmas keepsake with the same sleepy smile, navy top hat, icy-blue band, holly decoration and striped scarf as my matching snowman lovey, baby rattle and quilt set. With its soft crocheted face, embroidered details and hanging loop, this little snowman will look right at home on your Christmas tree or tucked into a handmade holiday gift collection.
Explore More Snowman and Christmas Patterns
Matching Crochet Snowman Lovey Blanket
Matching Crochet Snowman Baby Rattle
See Supplies for This Project Here.
Jump to the Free Crochet Snowman Ornament Pattern
Materials and Supplies for Your Crochet Snowman Ornament
You won't need much yarn for this little snowman, but I would stick with the same navy, icy blue and ivory shades used in the matching snowman projects. The colors are a big part of what makes the pieces look like a set.
Choose smooth, firmly plied medium-weight yarn. Cotton or a cotton-acrylic blend is a good choice for showing off the little stitches in the hat, scarf and face. I would avoid fluffy yarn here. It tends to hide the embroidery, and those sleepy eyes deserve to be seen.
Yarn colors and estimated amounts:
Ivory or soft white: Approximately 35 to 45 yards for the snowman's head.
Dark navy: Approximately 25 to 35 yards for the top hat, brim and scarf stripes.
Icy blue: Approximately 10 to 15 yards for the hatband, scarf stripes and hanging loop.
Olive or holly green: Approximately 3 to 5 yards for two holly leaves.
Cranberry red: Approximately 2 to 3 yards for the three berries.
Carrot orange: A short length for the crocheted nose.
Soft pink: A small amount of medium-weight yarn for two crocheted cheek patches.
Black: Embroidery floss or fine yarn for the eyes, eyelashes and smile.
White: Embroidery floss or fine yarn for the tiny snowflake on the hat.
Other supplies:
3.0 mm crochet hook, polyester fiberfill, yarn needle, embroidery needle, stitch marker, scissors and a few removable pins for positioning the decorations.
The yarn amounts are planning estimates, not amounts measured from a completed sample. You can use leftovers from the matching snowman lovey or rattle if you have enough of each color.
Skill level: Intermediate beginner. You'll use single crochet, increases, invisible decreases, basic color changes and some small decorative pieces. The embroidery takes a little patience, but there aren't any complicated stitches hiding in this pattern.
Finished Size and Gauge
The ornament is designed to be small enough for a Christmas tree but large enough to show the embroidered face, decorative hat and striped scarf.
Estimated finished height: Approximately 6 to 7 inches from the top of the hat to the end of the longest scarf tail, excluding the hanging loop. This is a planning estimate based on the intended proportions. Measure the fully assembled ornament to establish its actual height.
Head: Approximately 3 1/2 to 4 inches across at the widest point.
Hat brim: Approximately 4 to 4 1/4 inches across.
Scarf: Approximately 11 inches long and just under 1 inch wide before wrapping.
Hanging loop: Approximately 2 to 2 1/2 inches high when folded.
Target gauge: 18 single crochet stitches and 22 rounds over 4 inches, using medium-weight yarn and a 3.0 mm hook.
Scarf row gauge target: Approximately 22 worked rows over 4 inches. At that row gauge, 60 rows should measure about 10.9 inches. Check your flat-row gauge separately from the head's spiral-round gauge, since the two can differ slightly.
These measurements are calculated estimates for the finished design, not dimensions taken from a completed crochet sample. The photographs illustrate the intended appearance. The stitch counts have been checked mathematically, but the complete pattern has not yet been physically test-crocheted. I'd make one ornament and check the head shape, hat fit and scarf length before starting a batch.
For the closest match, use a hook that makes a firm fabric without noticeable gaps between stitches. You don't want the white stuffing showing through the face.
If your gauge is a little different, the ornament can still be made, but the hat and head need to be worked at the same gauge so their attachment edges line up. Don't use one yarn weight for the hat and a noticeably different weight for the head.
I'd check the size before making several ornaments. Make one complete sample, measure it, and adjust your hook if necessary. That's much easier than finding out the whole batch is larger than you intended.
Stitches and Abbreviations
This pattern uses US crochet terminology.
MR: Magic ring.
ch: Chain.
sc: Single crochet.
hdc: Half double crochet.
dc: Double crochet.
sl st: Slip stitch.
inc: Work 2 single crochet stitches in the same stitch.
dec: Invisible single crochet decrease. Insert the hook through the front loops of the next two stitches and complete one single crochet.
BLO: Work through the back loop only.
FLO: Work through the front loop only.
st/sts: Stitch or stitches.
Rnd: Round.
RS: Right side, or the outside of the work.
Picot: Chain 2, then slip stitch into the first of those two chains to make a small point.
Unless otherwise stated, work the head, hat crown, nose and berries in continuous spiral rounds. Don't join each round with a slip stitch. Move your stitch marker up as you complete each round.
The scarf is worked back and forth in rows. Its turning chains do not count as stitches.
Reading the repeats: Instructions inside parentheses followed by "6 times" mean to repeat everything inside the parentheses six times. The number in square brackets at the end of each round is the stitch count after completing that round.
Free Crochet Snowman Ornament Pattern: Make the Head
Start with the ivory yarn and your 3.0 mm hook. The head is worked from the top down, increasing to its widest point and then decreasing underneath the chin.
Keep your stitches firm and even. You want a softly rounded snowman face, not a tightly packed ball with stretched stitches.
Make the Ivory Snowman Head
Rnd 1: Make a magic ring and work 6 sc into the ring. Pull closed. [6 sts]
Rnd 2: Inc in each stitch around. [12 sts]
Rnd 3: (1 sc, inc) 6 times. [18 sts]
Rnd 4: (2 sc, inc) 6 times. [24 sts]
Rnd 5: (3 sc, inc) 6 times. [30 sts]
Rnd 6: (4 sc, inc) 6 times. [36 sts]
Rnd 7: (5 sc, inc) 6 times. [42 sts]
Rnd 8: (6 sc, inc) 6 times. [48 sts]
Rnd 9: (7 sc, inc) 6 times. [54 sts]
Rnds 10-18: Work 1 sc in each stitch around for 9 rounds. [54 sts per round]
The head should now have a rounded upper section and enough depth for the embroidered face.
Rnd 19: (7 sc, dec) 6 times. [48 sts]
Rnd 20: (6 sc, dec) 6 times. [42 sts]
Stop here to add the face. Mark the center front and follow the embroidered-face instructions in the next section. You'll have much better access to the inside of the head for securing the embroidery before closing the remaining rounds.
Once the eyes, cheeks, nose and smile have been attached, begin filling the head with small pieces of polyester fiberfill. Spread the stuffing evenly and keep the face gently rounded. Avoid packing the nose area so firmly that it pushes the embroidery out of shape.
Rnd 21: (5 sc, dec) 6 times. [36 sts]
Rnd 22: (4 sc, dec) 6 times. [30 sts]
Rnd 23: (3 sc, dec) 6 times. [24 sts]
Rnd 24: (2 sc, dec) 6 times. [18 sts]
Add any remaining stuffing now. Shape the lower part into a rounded chin, keeping the bottom slightly narrower than the cheeks.
Rnd 25: (1 sc, dec) 6 times. [12 sts]
Rnd 26: Dec 6 times. [6 sts]
Remove the stitch marker before closing the head. Fasten off, leaving a 10-inch tail. Thread the tail through the front loops of the final 6 stitches and pull gently to close the opening. Weave the end securely inside the head.
Head shaping check: The widest section has 54 stitches. Both the increase and decrease sequences change the total by 6 stitches per shaping round. The final opening closes from 6 stitches, so no extra decrease round is needed.
Don't flatten the face when you're done. A little fullness through the cheeks is part of the snowman's expression, and the scarf will sit beneath that fullness once the ornament is assembled.
Embroidered Snowman Face and Crochet Carrot Nose
The sleepy expression is what gives this snowman his personality. Keep the eyes gently curved, add just a few eyelashes, and leave enough room beneath the nose for that little smile.
Before you begin, turn the unfinished head so the opening is at the bottom. Choose the front center and mark it with a removable stitch marker. All of the facial details should be arranged around that center.
Embroider the Sleepy Eyes
Use black embroidery floss or a fine strand of black yarn and a sharp embroidery needle.
Step 1: Place the center of each eye approximately 6 to 7 stitches to either side of the front center, around Rnds 13-14. Each closed eye should span approximately 5 to 6 stitches.
Step 2: Stitch a slightly curved black line for the first closed eyelid. Keep the outside end a little higher than the middle so the eye has a relaxed, sleeping expression.
Step 3: Add three short eyelashes along the lower edge of the eyelid. Make the lashes small and angle them slightly outward.
Step 4: Repeat for the second eye, mirroring the curve and eyelash placement.
Check the two eyes together before securing your thread. They don't have to be perfectly identical, but they should sit at about the same height.
The eyes in the finished example are embroidered directly onto the crochet fabric. There are no plastic safety eyes.
Crochet the Carrot Nose
Use orange yarn and the 3.0 mm hook. Work in continuous rounds, beginning at the narrow tip of the carrot.
Rnd 1: Make a magic ring and work 4 sc into the ring. [4 sts]
Rnd 2: Work 1 sc in each stitch around. [4 sts]
Rnd 3: (1 sc, inc) 2 times. [6 sts]
Rnd 4: Work 1 sc in each stitch around. [6 sts]
Fasten off, leaving a long sewing tail. Do not close the wider end.
The finished nose should be a small, tapered cone. You can tuck a tiny scrap of orange yarn or fiberfill into the wider end if it needs more shape. Don't stuff it so firmly that it becomes bulky.
Attach the nose: Position the wider opening at the center of the face around Rnds 16-17, below the eyes. The narrow tip should project outward and angle slightly toward the viewer's right, as shown in the finished photograph.
Sew all six stitches around the open base securely to the face, keeping the carrot's tapered shape. Pass the tail through the inside of the head and secure it.
Add the Smile
Thread your needle with black embroidery floss.
Begin approximately two rounds beneath the base of the nose. Work a shallow curved smile, spanning about 5 to 6 stitches and dipping slightly lower at its center, around Rnds 18-20.
Keep the smile narrow enough to sit between the cheeks. One smooth embroidered curve looks better here than a series of heavy, uneven stitches.
Crochet and Attach the Rosy Cheeks
Using soft-pink medium-weight yarn and a 3.0 mm hook, make a magic ring and work 6 sc into the ring. Pull the ring closed, sl st into the first sc, and fasten off, leaving an 8-inch sewing tail. [6 sc]
Make a second identical cheek patch. Both pieces should be small, round and slightly raised. Do not stuff them.
Position one cheek just below and slightly outside each embroidered eye, approximately around Rnds 16-17. Keep both cheeks at the same height, with their centers evenly spaced from the carrot nose.
Using the sewing tails, stitch around the outer edge of each patch, catching all six crochet stitches and securing them to the ivory head. Keep the patches gently rounded rather than pulling them completely flat.
Pass the sewing tails through to the inside of the still-open head and secure them before adding the final stuffing.
The finished cheeks should appear as two small pink crocheted circles, matching the raised texture in the finished ornament photograph.
Check the face before closing the head: The eyes should look relaxed, the nose should point slightly sideways, the smile should curve upward, and the cheeks should sit below the eyes. Make any adjustments now while the inside of the head is still accessible.
Once you're happy with the expression, secure the embroidery tails inside the head and return to Rnd 21 of the snowman-head instructions to finish stuffing and closing it.
Crochet the Navy Top Hat, Snowflake and Holly
The hat brings the whole snowman collection together. It has the same deep navy color, icy-blue band, white snowflake and little holly decoration as the other projects.
Keep the brim noticeably wider than the crown. A straight tube with a narrow edge won't give you the shape shown in the photograph.
Crochet the Navy Hat Crown
Using navy yarn and the 3.0 mm hook, begin at the top of the hat and work downward in continuous rounds.
Rnd 1: Make a magic ring and work 6 sc into the ring. [6 sts]
Rnd 2: Inc in each stitch around. [12 sts]
Rnd 3: (1 sc, inc) 6 times. [18 sts]
Rnd 4: (2 sc, inc) 6 times. [24 sts]
Rnd 5: (3 sc, inc) 6 times. [30 sts]
Rnd 6: (4 sc, inc) 6 times. [36 sts]
Rnd 7: (5 sc, inc) 6 times. [42 sts]
Rnd 8: Working in BLO, sc in each stitch around. [42 sts]
This back-loop round turns the fabric downward to form the sides of the hat.
Rnds 9-11: Work 1 sc in each stitch around for 3 rounds. [42 sts per round]
Keep your tension even so the sides stand reasonably straight. You should now have a closed top with an open cylindrical crown.
Add the Icy-Blue Hatband
Change to icy-blue yarn on the final yarn-over of the last navy stitch of Rnd 11.
Rnd 12: Sc in each stitch around. [42 sts]
Rnd 13: Sc in each stitch around. [42 sts]
Change back to navy on the final yarn-over of the last stitch of Rnd 13.
Rnd 14: Sc in each stitch around. [42 sts]
The hatband is exactly two rounds of icy blue, framed by the navy crown above and navy brim below.
Crochet the Flared Navy Brim
Rnd 15: Working in FLO, (6 sc, inc) 6 times. [48 sts]
Rnd 16: Working through both loops again, (7 sc, inc) 6 times. [54 sts]
Rnd 17: (8 sc, inc) 6 times. [60 sts]
Rnd 18: Sc in each stitch around. [60 sts]
Slip stitch into the next stitch and fasten off. Weave in the ending tail, but leave the lower opening of the hat completely open.
The front-loop round gives the brim a natural place to fold outward. Gently shape it with your fingers so it curves around the snowman's forehead rather than hanging straight down.
Don't sew the brim flat against the head. The free, outward-curving edge is part of the finished design.
Embroider the White Snowflake
Use white embroidery floss or a fine strand of white yarn.
Position the snowflake on the front left side of the navy crown, approximately two rounds above the icy-blue band.
Step 1: Make one short vertical stitch through the center of the snowflake.
Step 2: Add one diagonal stitch crossing the same center point.
Step 3: Add a second diagonal stitch crossing through the center in the opposite direction. You now have six spokes radiating from the center.
Step 4: Add tiny forked stitches near the ends of the spokes to give the snowflake its delicate branching appearance.
Keep the entire snowflake small, approximately 3/8 to 1/2 inch across. It shouldn't compete with the holly leaves on the opposite side of the hat.
Secure the embroidery ends inside the crown.
Crochet Two Green Holly Leaves
Make exactly two leaves with green yarn and the 3.0 mm hook.
Leaf foundation: Ch 7.
First side: Beginning in the second chain from the hook, work 1 sc in the first chain, 1 hdc in the next, and 1 dc in the next. Make a picot (ch 2, sl st into the first of those 2 chains). Work 1 dc in the next foundation chain and 1 hdc in the next. Make another picot. Work 1 sc in the last foundation chain. [6 body stitches and 2 picots]
Second side: Rotate around the base of the foundation chain without turning the fabric over. Working into the unused loops along the opposite side of the foundation chain, make 1 sc, 1 hdc and 1 dc in the next three foundation chains. Make a picot. Work 1 dc and 1 hdc in the next two chains. Make another picot. Work 1 sc in the final foundation chain near the pointed tip. [6 body stitches and 2 picots]
Leaf tip: Ch 2 and sl st into the first of those 2 chains to form the pointed tip. Sl st to the first sc of the leaf.
Fasten off, leaving a 10-inch sewing tail.
Leaf count: Each leaf has 12 body stitches worked around the foundation chain, four side picots and one tip picot. Make exactly two identical leaves.
Make sure you have exactly two matching holly leaves. Gently shape each one into a narrow oval with pointed edges. The finished leaves should lie flat against the hat rather than sticking out like separate stems.
For a little extra definition, run a single green embroidery stitch along the center of each leaf. Keep the leaves flexible and flat.
Crochet Three Red Holly Berries
Make three small berries using cranberry-red yarn.
Rnd 1: Make a magic ring and work 6 sc into the ring. [6 sts]
Rnd 2: Work 1 sc in each stitch around. [6 sts]
Rnd 3: Dec 3 times. [3 sts]
Fasten off, leaving a long sewing tail. Draw the tail through the front loops of the final 3 stitches and close the opening.
Roll the tiny berry gently between your fingers to make it round. No separate stuffing is needed.
Make two more identical berries.
Arrange the Holly on the Hat
Place the two leaves on the front right side of the hat, just above the navy brim. Angle one leaf upward and slightly left, and the other upward and right.
The leaves should overlap a little at their bases while their tips remain visible.
Position the three red berries in a close triangular cluster over the overlapping leaf bases. Place one berry slightly higher and two beneath it.
Sew each leaf securely through its base and center, then attach the berries individually with several passes of the sewing yarn.
Don't rely on glue. The berries are small enough that they need proper stitching to stay attached.
The white snowflake should remain visible to the left, while the red berries and green leaves form a small, colorful accent on the right.
Set the decorated hat aside until you're ready to attach the hanging loop and sew the hat onto the snowman's head.
Crochet the Navy and Icy-Blue Striped Scarf
The scarf needs to be narrow enough to sit under the snowman's chin without hiding his smile. I would keep the stripes simple and let the contrast between navy and icy blue do the work.
We're making one long crocheted strip, wrapping it around the lower part of the head, and leaving two short tails hanging down on the right side of the face. One tail will be a little longer than the other, just like the finished example.
Crochet the Scarf
Using navy yarn and a 3.0 mm hook, ch 5.
Row 1: Sc in the second chain from the hook and in each remaining chain. Ch 1, turn. [4 sts]
Rows 2-3: Sc in each of the 4 stitches across. Ch 1 and turn after each row. [4 sts per row]
Row 4: Sc in the first 3 stitches. Work the final sc, completing its last yarn-over with icy-blue yarn. Ch 1 with icy blue and turn. [4 sts]
Rows 5-7: Sc in each of the 4 stitches using icy blue. Ch 1 and turn after every row. [4 sts per row]
Row 8: Sc in the first 3 stitches using icy blue. Complete the last yarn-over of the fourth sc with navy yarn. Ch 1 with navy and turn. [4 sts]
Rows 9-60: Work 4 sc in every row, following the color sequence below. On Rows 12, 16, 20, 24, 28, 32, 36, 40, 44, 48, 52 and 56, complete the final yarn-over of the fourth sc with the next stripe color. After every row through Row 59, ch 1 once and turn. Use the new color for that turning chain whenever you have just changed yarn. After Row 60, do not chain or turn. [4 sts per row]
Each stripe contains exactly 4 rows. The scarf begins and ends with navy.
Color sequence for the remaining rows:
Rows 9-12: Navy.
Rows 13-16: Icy blue.
Rows 17-20: Navy.
Rows 21-24: Icy blue.
Rows 25-28: Navy.
Rows 29-32: Icy blue.
Rows 33-36: Navy.
Rows 37-40: Icy blue.
Rows 41-44: Navy.
Rows 45-48: Icy blue.
Rows 49-52: Navy.
Rows 53-56: Icy blue.
Rows 57-60: Navy.
After completing Row 60, fasten off and weave in the yarn ends.
Scarf stitch check: 60 rows, 4 stitches in each row, for 240 single crochet stitches in the completed strip. There are 15 four-row color sections, beginning and ending with navy.
At the target gauge, the scarf should measure approximately 11 inches long and a little under 1 inch wide. Measure yours before attaching it, since working tension affects the length.
Wrap the Scarf Around the Snowman
Place the middle section of the scarf against the back of the snowman's lower head, approximately around Rnds 21-23.
Bring both ends toward the front, just underneath the embroidered smile. The scarf should follow the narrowing lower edge of the head without pulling it out of shape.
Cross the ends toward the viewer's right side, leaving one tail approximately 1 to 1 1/2 inches long and the other approximately 2 inches long. Adjust their lengths to suit the head's finished circumference.
Overlap the scarf at the crossing point and make several small, hidden stitches to hold the crossing in place.
Add two or three more attachment stitches along the back and sides so the scarf stays in position when the ornament is hanging.
Don't pull the attachment stitches tight enough to create dents in the head.
The two tails should hang naturally with their navy end sections visible. There's no fringe on this scarf. The short, neatly finished ends are a better match for the ornament and the coordinating baby rattle.
If the scarf seems slightly too long after wrapping, tuck the extra length beneath the back of the scarf and secure it with hidden stitches. Keep the full 60 rows intact, with navy sections at both ends.
Assembly, Hanging Loop and Finishing
All the pieces are ready now. Take a minute to check the snowman's face and make sure the hat decorations are secure before putting everything together.
Crochet the Hanging Loop
Using icy-blue yarn and the 3.0 mm hook, leave a starting tail approximately 10 inches long.
Ch 30, then fasten off, leaving another 10-inch tail at the opposite end.
Fold the chain in half to form a loop. Bring its two ends together without twisting the chain.
The loop should stand above the center of the navy hat and measure approximately 2 to 2 1/2 inches high when folded, depending on your chain tension.
Attach the Hanging Loop to the Hat
Thread one starting tail onto a yarn needle and pass it through the top center of the hat, close to the original magic ring.
Bring the second tail through an adjacent stitch at the top of the hat.
Turn the hat over. Secure the two tails through several neighboring stitches on the inside of the crown. Use multiple sewing passes so the attachment doesn't depend on a single knot.
Weave the tails through different directions of the crown fabric and trim the excess.
Gently pull upward on the loop to check that it stays firmly attached. The hat should hang straight beneath it.
Attach the Hat to the Snowman's Head
Position the hat over the top of the finished head. The snowflake belongs on the front left, and the holly cluster belongs on the front right.
Center the crown over the head with the icy-blue band sitting above the forehead. The closed top of the head should fit inside the open hat crown.
The attachment edges are designed to match: the head has 42 stitches at Rnd 7, and the hat has 42 stitches at Rnd 14, immediately above the outward-flaring brim.
Thread a yarn needle with a length of navy yarn. Working from beneath the brim, sew the inside base of the crown at Rnd 14 to the head around Rnd 7. Match the stitches evenly around the circumference.
Work small, firm stitches and keep them hidden beneath the brim. The attached crown should sit securely on the head without bunching up the ivory fabric.
Leave the remaining brim rounds free so they can flare outward. You should still be able to see the full icy-blue band and the navy brim beneath it.
Check the front before securing the final stitches. The brim should frame the sleepy eyes without covering them, and the hanging loop should sit above the center of the hat.
Fasten off and bury the sewing ends inside the ornament.
Finish the Scarf and Check the Details
If you haven't attached the scarf yet, wrap it around the lower head as described in the striped-scarf section. Keep the two tails on the right side, with one slightly longer than the other.
Check the carrot nose and make sure its wider base is sewn firmly against the face. Confirm that both crocheted cheek patches are securely attached around their outer edges. Look over the embroidered eyelashes and smile for loose threads.
Give each holly berry and leaf a gentle tug. Every decoration needs to be stitched securely to the hat.
Remove every temporary pin and marker. Smooth the brim outward, straighten the scarf, and check that the snowman hangs facing forward. Look over the entire ornament for loose yarn ends or unfinished sewing tails before hanging it on the tree.
That's your finished snowman ornament. The navy hat and icy-blue scarf give it the same look as the matching projects without needing any extra embellishments.

The side view shows how the hat sits over the rounded head and how the scarf wraps beneath the chin. Keep the brim separate from the head except where the crown is sewn underneath it.
Crochet Snowman Ornament Safety and Care
This snowman is a Christmas decoration, not a baby toy. Although it coordinates with the snowman lovey and baby rattle, its hanging loop and small holly decorations make it unsuitable for handling or play by a baby.
Hang the ornament high enough on the Christmas tree that babies and young children cannot reach it. Don't attach it to a crib, bassinet, stroller or other baby equipment.
The eyes and smile are embroidered, while the carrot nose and two pink cheek patches are crocheted and sewn securely to the head. The holly leaves and three red berries are also crocheted rather than made from beads or plastic pieces. All attached pieces must be stitched firmly, but this ornament is for decoration only and must remain out of children's reach.
The American Academy of Pediatrics' holiday decoration safety advice explains why decorations with small removable parts should be kept out of children's reach.
Cleaning: Gently spot clean with a damp cloth and mild soap if needed. Avoid soaking the ornament, which could distort the stuffing, hat brim or little holly pieces. Allow it to dry completely before storing.
Storage: Place the ornament in a small box or soft storage bag where the brim won't be crushed. Keep it dry and away from anything that might snag the embroidered eyelashes or scarf.
Before hanging it each Christmas, check the loop, berries and other attached pieces for loose stitches. Repair anything that has come loose before displaying it again.
Frequently Asked Questions About the Crochet Snowman Ornament
Can I make the snowman ornament smaller?
Yes. You can try a lighter-weight yarn and smaller hook while keeping the same stitch counts. That will change the overall size, so make both the head and hat with the same yarn and hook combination. I wouldn't make just the head smaller while leaving the hat unchanged.
What if the navy hat brim curls too much?
First, check that you worked Rnd 15 through the front loops only and that you have 60 stitches after Rnd 17. The brim needs those increases to spread outward.
You can gently shape the brim with your fingers after sewing the hat in place. If it still folds down, check whether your navy stitches are tighter than the ivory head stitches. The hat should be firm enough to hold its shape without stiffening products.
Can I use this for a Baby's First Christmas ornament?
Absolutely. It makes a sweet keepsake to hang on the tree, especially when you're giving the coordinating snowman projects as a gift. You can attach a separate dated gift tag to the packaging rather than adding anything to the ornament itself.
Keep the ornament as a display piece rather than something for the baby to play with.
Where can I find the other matching snowman patterns?
The crochet snowman lovey blanket carries the same sleepy face, navy hat and icy-blue details into a four-section pinwheel blanket.
There's also a crochet snowman baby rattle pattern with a coordinating snowman head and a wooden ring.
If you enjoy quilting as well as crochet, the snowman quilt pattern and templates carry the same winter colors into a larger patchwork project.
You can make just the ornament or put several of the pieces together for a matching Christmas collection. The navy, icy blue and sleepy snowman face are what tie them together.
When you click on links to various merchants on this site and make a purchase, this may result in this site earning a commission. This does not affect the price you pay.

UBGI Gold Standard 2026
Reviewed under the site's
editorial checklist.
Photos, decorating ideas, party setups and reader submissions are shared for inspiration unless a page is specifically presented as a pattern, tutorial, reference guide or step-by-step project. Follow the instructions, measurements, safety guidance and manufacturer directions provided for the particular project or product.
About Jan | Contact | Baby Nursery Ideas (Blog) | Site Map | Privacy Policy | Disclosure Policy | Disclaimer | Affiliate Disclosure | Earnings Disclosure | Facebook | Pinterest
I am a participant in the Amazon Services LLC Associates Program, an affiliate advertising program designed to provide a means for us to earn fees by linking to Amazon. As an Amazon Associate I earn from qualifying purchases.
Copyright © 2006-2026. All Rights Reserved.