Free Crochet Bow Pattern: Large Bow and Small Bow Applique
By Jan Bay
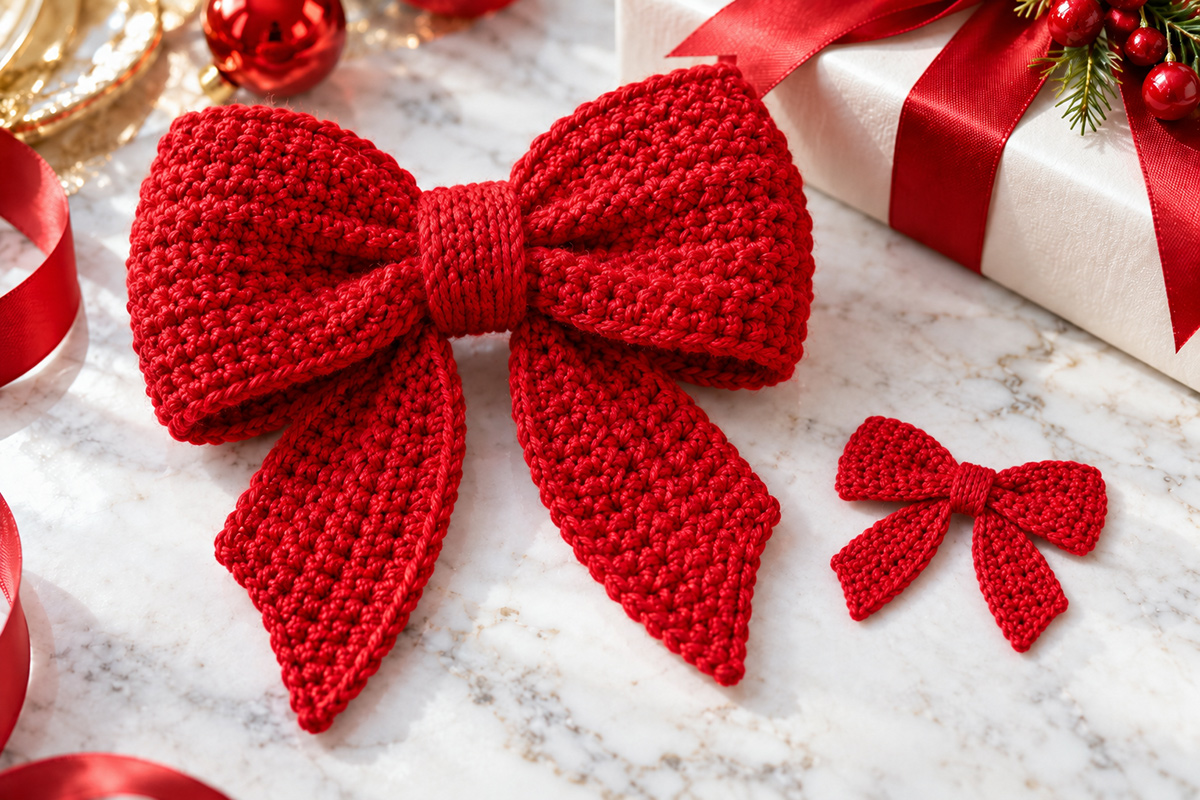
This free crochet bow pattern gives you two useful sizes: a large statement bow with wide loops and long tails for gifts and holiday decorating, plus a smaller crochet bow appliqué for hats, blankets, bags, garlands and other handmade projects. Make the big one when the bow is supposed to be the focal point. Use the smaller version when you just need a little bow tucked onto something else. While the timing of this pattern may bring a big red Christmas bow to mind, it also looks beautiful stitched in blue, pink or any other color that strikes your fancy...with the important word here being just that...fancy.
Explore More Free Crochet Patterns
Worsted Weight Yarn for This Crochet Bow Pattern
Jump to a Section
Crochet Bow Pattern Overview
The two bows in the example are related, but they aren’t built the same way. I wanted the big bow to have those fat loops and long tails you’d expect on a really good package bow, while the little one needed to stay flatter so it could work as an appliqué.
The large bow is made from four pieces: one long loop panel, two pointed tails and one center wrap. The loop panel is joined into a ring before it’s pinched at the center. That extra layer is what gives the loops their dimension without stuffing them.
The small bow also has two tails and a center wrap, but its main strip is folded flat instead of being joined into a ring. That keeps the loops close to the surface like the small bow shown beside the larger one.
If you make both bows, you’ll have eight crocheted pieces before assembly: four for the large bow and four for the small one.
The expected measurements below are calculated from the stitch counts, target gauge and construction. This pattern has not been physically test crocheted, so check your measurements before you make all of the pieces. If your gauge is quite different, adjust your hook before going any farther.
Finished Sizes
Large statement bow: approximately 8 1/2 to 9 inches wide and about 8 1/2 to 9 inches tall after the loops and tails are arranged.
Large loop panel before assembly: approximately 18 inches long and 4 1/2 to 4 3/4 inches wide.
Large tail: approximately 2 3/4 inches wide at the top and about 6 1/4 to 6 1/2 inches long. Make 2.
Large center wrap: approximately 1 1/2 inches wide and about 4 1/4 to 4 1/2 inches long.
Small bow appliqué: approximately 4 inches wide and about 3 to 3 1/4 inches tall.
Small loop strip before folding: approximately 8 inches long and 1 1/2 to 1 3/4 inches wide.
Small tail: approximately 1 1/2 inches wide at the top and about 2 1/4 inches long. Make 2.
Small center wrap: approximately 3/4 inch wide and about 3 inches long.
Don’t worry about making the assembled bows perfectly ruler-straight. The final width changes a little depending on how far you open the loops and how you angle the tails. That’s part of shaping the bow, not a gauge failure.
Supplies
- Yarn: smooth #4 worsted weight yarn in the color of your choice
- Estimated yarn for the large bow: approximately 135 to 150 yards
- Estimated yarn for the small bow: approximately 20 to 25 yards
- Estimated yarn for both bows: approximately 160 to 180 yards, including sewing and finishing
- Hook: G/6 4.0 mm crochet hook
- Tapestry needle
- Scissors
- Rustproof pins and blocking mat: optional
A smooth worsted yarn makes the bow shape much easier to see than a fuzzy yarn. Cotton, a cotton blend or a smooth acrylic can all work. The main thing is getting a fabric that holds its shape without becoming stiff.
The bows in the example are red because, well, Christmas. Change the color and the whole personality changes. Pink can look sweet, navy makes a nice gift bow, and a bright color can turn the small one into an everyday hat or bag appliqué.
Abbreviations
This pattern uses standard U.S. crochet terminology.
ch = chain
hdc = half double crochet
hdc2tog = half double crochet 2 stitches together
hdc3tog = half double crochet 3 stitches together
st/sts = stitch/stitches
If you need a refresher on a crochet abbreviation, the Craft Yarn Council crochet abbreviation list is a useful reference.
Pattern Notes
Target gauge for the calculated sizes: approximately 16 hdc and 12 rows = 4 inches with the 4.0 mm hook.
Ch 1 at the beginning of a row does not count as a stitch anywhere in this pattern.
Before you make the full large loop panel, make a small gauge swatch or work enough sample fabric to measure accurately. Measure 16 hdc across; they should span about 4 inches. Measure 12 rows vertically; they should also span about 4 inches. A little difference won’t ruin a bow, but a large difference will change the finished size quickly because the large panel contains 72 stitches across.
The right side is the face you want showing on the finished bow. For the large loop panel, join the short ends with right sides facing as directed below, then turn the finished ring so the right side faces outward. For the tails and the small bow, keep the chosen right side facing the front of the finished bow during assembly.
The large bow gets its depth from a crocheted ring. There is no stuffing in the loops.
The small bow is meant to stay flatter. Don’t puff or stuff the loops.
Light blocking is optional but helpful for the tail pieces. Dampen them lightly, straighten the sides and pin the points into shape. Let them dry completely and remove every pin before assembly.
Weave in unused starting tails before you assemble the bows. Keep only the tails you deliberately leave for sewing.
How to Crochet a Bow
A crochet bow looks more complicated than it is once you separate it into pieces.
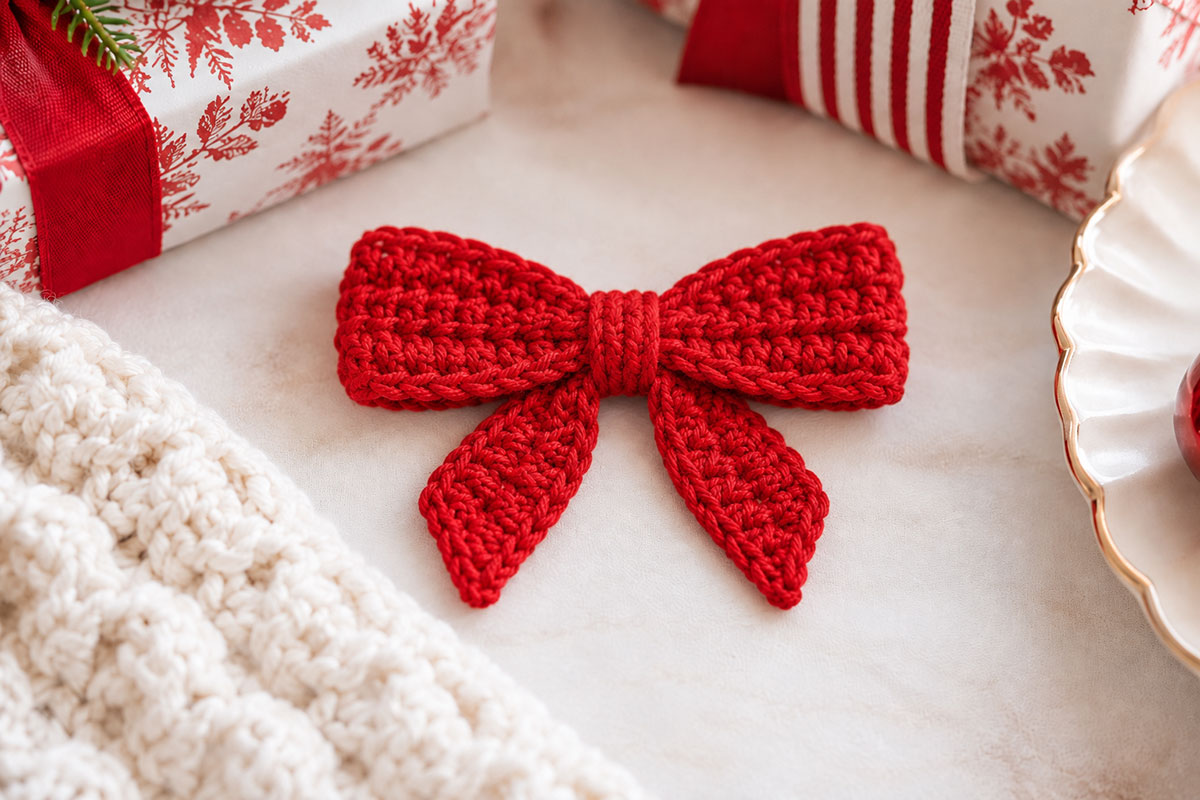
For the large bow, crochet a long rectangle and sew its short ends together to make a ring. Flatten the ring, pinch the middle and you have the two big loops. The two pointed tails sit behind that loop section. A narrow crocheted strip wraps around the entire center and holds the shape together.
The little bow skips the ring. Its loop strip stays flat and the two short ends fold toward the middle on the back. That gives you a much thinner bow that works better as an appliqué.
Keep those two constructions separate. Trying to make the large bow tiny with a smaller hook would give you a bulky little bow. Trying to build the big bow like the appliqué would make the large loops look too flat.
Large Crochet Bow Pattern
Make 1 loop panel, 2 tails and 1 center wrap.
Large Loop Panel
Foundation: Ch 73.
Row 1: Hdc in 2nd ch from hook and in each ch across. (72)
Rows 2 through 14: Ch 1, turn. Hdc in each st across. (72)
Fasten off, leaving a sewing tail about 18 inches long.
The panel should measure approximately 18 inches long and 4 1/2 to 4 3/4 inches wide. Check that measurement before seaming. If the panel is much shorter than 18 inches, the finished loops will also be noticeably smaller than the example.
Join the Loop Panel: Bring the two short ends together with right sides facing. Use the long finishing tail to whip stitch the 14-row ends together. Match each row edge to the corresponding row edge so the seam doesn’t twist.
Fasten securely and weave in the remaining tail.
Turn the ring right side out. Lay it flat with the seam centered on the back. The flattened ring should measure close to 9 inches from side to side before the center is pinched.
Large Pointed Tails
Make 2.
Foundation: Ch 12.
Row 1: Hdc in 2nd ch from hook and in each ch across. (11)
Rows 2 through 4: For each row, ch 1, turn. Hdc in each st across. (11)
Row 5: Ch 1, turn. Hdc2tog, hdc in next 7 sts, hdc2tog. (9)
Rows 6 through 8: For each row, ch 1, turn. Hdc in each st across. (9)
Row 9: Ch 1, turn. Hdc2tog, hdc in next 5 sts, hdc2tog. (7)
Rows 10 through 12: For each row, ch 1, turn. Hdc in each st across. (7)
Row 13: Ch 1, turn. Hdc2tog, hdc in next 3 sts, hdc2tog. (5)
Rows 14 through 16: For each row, ch 1, turn. Hdc in each st across. (5)
Row 17: Ch 1, turn. Hdc2tog, hdc in next st, hdc2tog. (3)
Row 18: Ch 1, turn. Hdc in each st across. (3)
Row 19: Ch 1, turn. Hdc3tog across the remaining 3 sts. (1)
Fasten off and weave in the end.
Each tail should measure approximately 2 3/4 inches wide across the top and about 6 1/4 to 6 1/2 inches long. Make sure the second tail matches the first before assembly.
Large Center Wrap
Foundation: Ch 7.
Row 1: Hdc in 2nd ch from hook and in each ch across. (6)
Rows 2 through 13: Ch 1, turn. Hdc in each st across. (6)
Fasten off, leaving a sewing tail about 18 inches long.
The wrap should measure approximately 1 1/2 inches wide and about 4 1/4 to 4 1/2 inches long. A little overlap at the back is fine and gives you room to sew the wrap securely around the pinched center.
Small Crochet Bow Pattern
Make 1 loop strip, 2 short tails and 1 narrow center wrap.
The small bow is deliberately flatter than the large one. That difference matters if you want the finished appliqué to look like the little bow in the example instead of a mini stuffed package bow.
Small Loop Strip
Foundation: Ch 33.
Row 1: Hdc in 2nd ch from hook and in each ch across. (32)
Rows 2 through 5: Ch 1, turn. Hdc in each st across. (32)
Fasten off, leaving a 12-inch sewing tail.
The strip should measure approximately 8 inches long and 1 1/2 to 1 3/4 inches wide.
Small Pointed Tails
Make 2.
Foundation: Ch 7.
Row 1: Hdc in 2nd ch from hook and in each ch across. (6)
Row 2: Ch 1, turn. Hdc in each st across. (6)
Row 3: Ch 1, turn. Hdc2tog, hdc in next 2 sts, hdc2tog. (4)
Row 4: Ch 1, turn. Hdc in each st across. (4)
Row 5: Ch 1, turn. Hdc2tog twice. (2)
Row 6: Ch 1, turn. Hdc in each st across. (2)
Row 7: Ch 1, turn. Hdc2tog. (1)
Fasten off and weave in the end.
Each tail should measure approximately 1 1/2 inches wide across the top and about 2 1/4 inches long.
Small Center Wrap
Foundation: Ch 4.
Row 1: Hdc in 2nd ch from hook and in each ch across. (3)
Rows 2 through 9: Ch 1, turn. Hdc in each st across. (3)
Fasten off, leaving a 12-inch sewing tail.
The wrap should measure about 3/4 inch wide and approximately 3 inches long. Any small overlap stays on the back of the appliqué.
Assembling the Large and Small Crochet Bows
Large Bow
Lay the loop ring flat with the seam centered at the back. Keep the right side facing out.
Pinch the center of the flattened ring so the top and bottom edges draw inward and the two loops stay roughly the same size. Don’t crush the loops flat. You want that little bit of depth you see in the example.
Lay the two large tails behind the pinched loop section. Center the straight 11-stitch ends behind the middle of the loop panel and overlap them slightly at the center. Angle the pointed ends down and outward. From the front, the loop panel should hide the straight upper edges of the tails, while the center wrap will cover the overlapped middle.
Use a separate length of matching yarn to stitch through the pinched loop panel and both tail tops several times. Pull those stitches snugly enough to hold the shape. Knot securely at the back and weave in the ends.
Center the large wrap over the front of the bow. Take both ends around the back and pull it snugly around the pinched center. The short ends should meet or overlap slightly at the back.
Use the long wrap tail to sew the two short ends together. Take a few additional stitches through the back of the loop panel so the center wrap cannot slide sideways.
Fasten off and weave in the tail on the back.
Shape the two loops with your fingers and angle the pointed tails until the bow measures approximately 8 1/2 to 9 inches across. Keep the loops rounded rather than flattening them.
Small Bow Appliqué
Lay the small loop strip right side down. Bring one short end toward the center, then bring the opposite short end in to meet it. The strip should now measure approximately 4 inches from side to side.
Use the long tail to tack the two short ends securely together at the center back. Don’t sew through the full width of the strip. You only need enough stitches to hold the fold in place.
Don’t fasten off that sewing tail yet. Keep it available to secure the tail pieces to the center of the bow in the next steps.
Turn the folded strip right side up and pinch the center gently. Keep the loops flat rather than puffing them outward.
Lay the two short tails behind the bow with their straight ends tucked under the center and their points angled slightly down and outward.
Stitch through the center of the folded loop strip and both tail tops several times. Fasten securely on the back.
Wrap the narrow center strip around the bow. Bring the ends to the back and sew them together with the long finishing tail. Add a few small anchoring stitches through the back of the bow so the wrap stays centered.
The finished small bow should measure about 4 inches wide and about 3 to 3 1/4 inches tall.
If you sew the small bow to a baby item, keep it flat and attach it securely. Stitch through the center wrap and add small anchoring stitches along the outer portions of both loops and tails so they can’t be pulled away from the item. Fasten the attachment yarn securely on the wrong side and weave in the ends so no loose yarn remains. I would keep the large dimensional bow for decorative projects rather than baby items.
If you add the small bow to a baby blanket, keep that blanket out of an infant sleep space. The U.S. Consumer Product Safety Commission recommends keeping an infant sleep space bare except for a fitted sheet.
How to Make a Crochet Bow Garland
The little bow is the one I’d use for a garland. The big bow would turn the whole thing into a wall treatment in a hurry.
Make as many small bows as you need for the length you want. Finish and assemble every bow before you make the garland cord.
Crochet a plain chain in a matching or contrasting color until it reaches the finished garland length you want. Fasten off and weave in both ends.
Lay the chain flat and arrange the bows before sewing anything down. About 4 to 6 inches between bows gives each one enough room to show, but you can move them closer if you want a fuller garland.
Use matching yarn to sew the chain securely to the back of each center wrap. Keep the chain behind the bow instead of running it across the front. Fasten securely and weave in the sewing ends on the back of each bow.
That’s all it needs. The bows already do the decorating.
Ways to Use the Crochet Bows
The large bow is meant to be seen. Put it on a wreath, a holiday gift basket, a decorative pillow, a Christmas stocking display or a large handmade package. You can also add another crocheted appliqué at the center if you want to dress it up even more.
The small bow has a lot more places to go. Sew one to a hat, bag, scarf, blanket corner or gift pouch, or make several for the garland above.
And don’t let the red example boss you around. Work the exact same pattern in pink, lavender, green, cranberry, white or whatever color fits what you’re making. The construction doesn’t change.
If you’re putting a bow on something that gets washed, check the attachment stitches after laundering before using the item again. A couple of extra sewing stitches are a much better fix than a loose appliqué later.
If Christmas crafting is what's on your mind, you can find more projects in my free Christmas crochet patterns collection.
When you click on links to various merchants on this site and make a purchase, this may result in this site earning a commission. This does not affect the price you pay.

UBGI Gold Standard 2026
Reviewed under the site's
editorial checklist.
Photos, decorating ideas, party setups and reader submissions are shared for inspiration unless a page is specifically presented as a pattern, tutorial, reference guide or step-by-step project. Follow the instructions, measurements, safety guidance and manufacturer directions provided for the particular project or product.
About Jan | Contact | Baby Nursery Ideas (Blog) | Site Map | Privacy Policy | Disclosure Policy | Disclaimer | Affiliate Disclosure | Earnings Disclosure | Facebook | Pinterest
I am a participant in the Amazon Services LLC Associates Program, an affiliate advertising program designed to provide a means for us to earn fees by linking to Amazon. As an Amazon Associate I earn from qualifying purchases.
Copyright © 2006-2026. All Rights Reserved.