Free Christmas Miss Kissy Moose Crochet Lovey Pattern
By Jan Bay
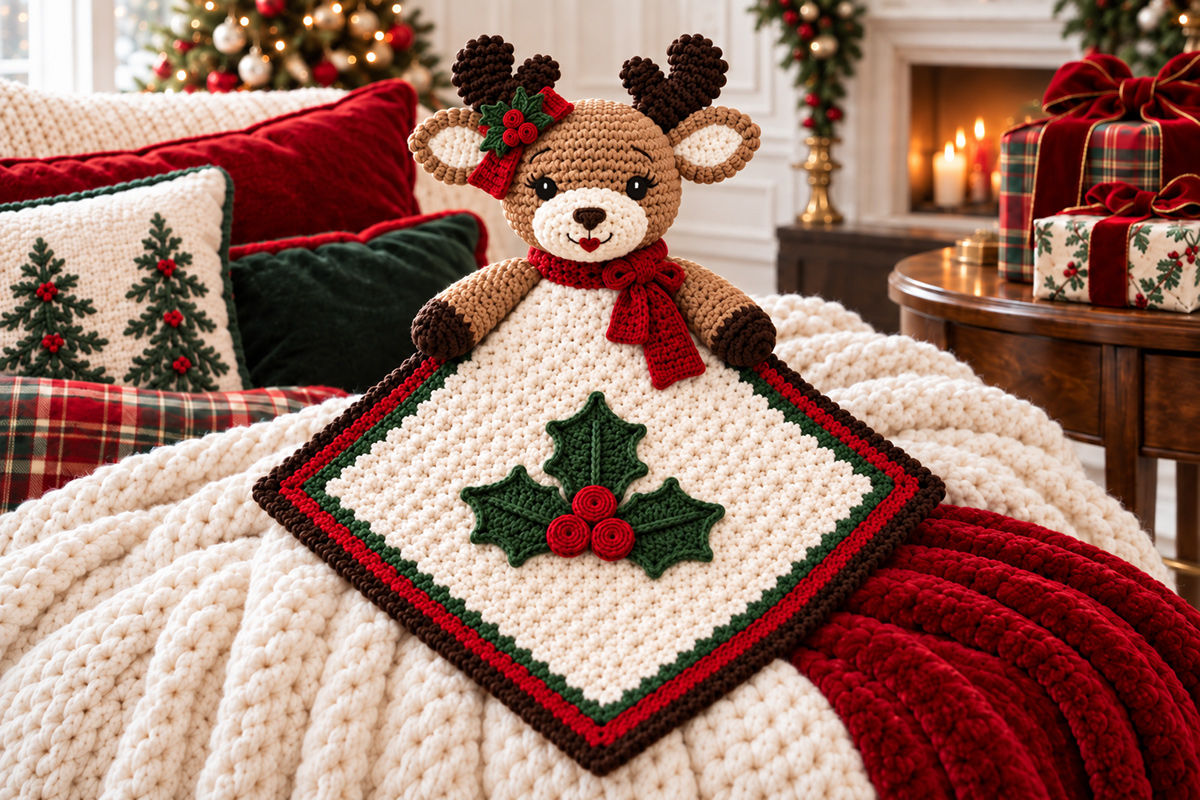
This free Christmas Miss Kissy Moose crochet lovey pattern gives our woodland moose family a festive feminine twist. I designed Miss Kissy with classic Christmas colors, sweet embroidered features, a girly-girl moose personality and enough holiday details to make her a perfect match for Manley the Christmas moose, her male companion. Enjoy the pattern. Miss Kissy says, “Merry Kiss-Moose, everybody!”
Explore More Free Crochet Baby Patterns
Christmas Moose Lovey Crochet Pattern
Yarn for This Project
Choose smooth Medium #4 yarn in coordinated moose brown, cream, cranberry, evergreen and the other Christmas shades used in the finished design.
Jump to the Pattern
Christmas Miss Kissy Moose Crochet Lovey Pattern Details
Miss Kissy belongs in the same moose family as Christmas Manley the Moose, but I didn't want her to look like Manley with eyelashes added. Her cream lemon-peel blanket keeps the family resemblance, while the holly, little cranberry bow and heart-shaped lips give her a Christmas look of her own.
The blanket is crocheted as a square and turned on the diagonal for assembly. The center stays warm ivory with an evergreen, cranberry and dark chocolate border. Instead of Manley's Christmas tree, Miss Kissy has one flat holly appliqué centered on the lower half of the blanket. It uses three pointed green leaves and three flat crocheted berries.
She gets a second, smaller version of that same three-leaf holly motif at the base of her right antler, which is the left side when you're looking straight at her. I paired that one with a small cranberry crochet bow. The bow and holly are sewn down securely so they stay part of the finished lovey rather than becoming removable decorations.
Her face is where Miss Kissy gets her personality. The eyes are embroidered in black satin stitch with subtle lashes and one tiny stitched catch-light. Her muzzle keeps the broad moose shape, but the little cranberry heart-shaped lips and shallow smile make it pretty clear which moose you're looking at.
If you'd like the holly by itself for another project, the full crochet holly leaf pattern with berries includes both large and small versions. The separate crochet bow pattern has larger bow options too. For Miss Kissy, we're keeping both decorations smaller and flatter so they fit the lovey.
Pattern status: The stitch counts, proportions and expected measurements below have been calculated and checked against the finished design. This pattern has not been physically test-crocheted. Check your gauge and the stated checkpoints as you work.
Materials
Yarn: Smooth worsted weight, Category 4 yarn. The amounts below are calculated estimates with a little working room included.
- Warm ivory: approximately 250 to 280 yards for the blanket, muzzle and inner ears
- Medium moose brown: approximately 120 to 140 yards for the head, outer ears and arms
- Dark chocolate brown: approximately 55 to 65 yards for the antlers, hoof ends and outer blanket border
- Evergreen: approximately 45 to 55 yards for the blanket border and both holly clusters
- Cranberry red: approximately 75 to 90 yards for the blanket border, scarf, antler-base bow, heart lips and flat berries
- Black embroidery floss: a small amount for the eyes, lashes, eyebrows and smile
- Warm ivory embroidery floss or a separated strand of ivory yarn: a tiny amount for the stitched eye catch-lights
Crochet hooks:
- 5 mm hook for the lemon-peel blanket and border
- 4 mm hook for the blanket holly leaves and flat berries
- 3.5 mm hook for Miss Kissy's head, muzzle, ears, antlers, arms, scarf and cranberry bow
- 3 mm hook for the smaller holly cluster at the antler-base bow
You'll also need:
- Polyester fiberfill for the head, muzzle, antlers, hoof ends and lower portions of the arms
- Tapestry needle with a blunt tip
- Locking stitch markers
- Rustproof pins or removable positioning markers
- Scissors
- Measuring tape
No plastic safety eyes or buttons are used on Miss Kissy. Her eyes, lashes, nose, smile and heart-shaped lips are embroidered. The berries used on both holly clusters are flat crocheted discs rather than stuffed berry balls.
Finished Size & Gauge
The finished lovey blanket is expected to measure approximately 19 inches square after all three border rounds are added. It is shown turned on the diagonal in the finished design.
Miss Kissy's finished head should measure approximately 4 1/4 to 4 1/2 inches across. Each arm should measure about 6 1/2 to 7 inches long. Her compact antlers should extend approximately 2 to 2 1/2 inches above their attachment area.
The blanket holly leaves should finish at roughly 2 1/4 to 2 1/2 inches long each. Once the three leaves and berries are arranged together, the cluster should be large enough to make a clear focal point without covering most of the blanket.
The miniature holly leaves at Miss Kissy's antler-base bow should be approximately 1 3/4 to 2 inches long when worked with the smaller hook. The finished antler-base cranberry bow should be approximately 2 1/2 to 3 inches wide.
The finished scarf should measure approximately 1 to 1 1/4 inches wide and 13 1/2 to 14 inches long.
Blanket gauge: approximately 15 1/2 stitches and 15 1/2 rows = 4 inches in lemon-peel stitch using the 5 mm hook.
Stuffed-piece gauge: approximately 18 single crochet stitches and 20 rounds = 4 inches using the 3.5 mm hook.
The holly and bow measurements matter more than an exact gauge number for those pieces. Make one component first and compare it with the checkpoint before making the rest. A bow that ends up an inch wider than expected will cover too much of Miss Kissy's ear and antler. That's worth catching early.
These are expected measurements calculated from the stitch counts and target gauge rather than measurements taken from a physically test-crocheted sample.
Abbreviations
This pattern uses standard U.S. crochet terminology.
ch = chain
sc = single crochet
hdc = half double crochet
dc = double crochet
tr = treble crochet
sl st = slip stitch
st/sts = stitch/stitches
inc = work 2 sc in the same stitch
dec = single crochet 2 stitches together
hdc2tog = half double crochet 2 stitches together
MR = magic ring
RS = right side
WS = wrong side
Before You Start Miss Kissy Moose
Work the blanket back and forth in rows. Any beginning ch 1 used to start a flat row or joined round in this pattern does not count as a stitch unless the instructions specifically say otherwise. This includes the blanket, border, bow pieces and scarf.
The lemon-peel texture is made by alternating sc and dc across every row. Because the piece is turned, the sc falls over the previous row's dc and the dc falls over the previous sc.
The head, muzzle, outer ears, antler pieces and arms are worked in continuous rounds unless an instruction specifically tells you to join. Place a stitch marker in the first stitch of the round and move it up as you work.
Stuff the head firmly enough to hold its rounded shape, but don't pack it hard. Stuff the muzzle lightly. Use only a little stuffing in the antler pieces and hoof ends. Leave the upper portions of the arms soft so they can drape naturally over the blanket.
Piece check: Before final assembly, you should have 32 crocheted pieces: 1 blanket, 1 head, 1 muzzle, 2 outer ears, 2 inner ears, 2 arms, 2 main antler stems, 4 antler branches, 3 blanket holly leaves, 3 blanket flat berries, 1 scarf, 1 antler-base bow loop strip, 2 antler-base bow tails, 1 antler-base bow center wrap, 3 miniature holly leaves and 3 miniature flat berries.
A handmade lovey is for supervised awake-time use rather than an infant sleep space. The U.S. Consumer Product Safety Commission recommends keeping an infant sleep space bare except for a fitted sheet. You can read the current CPSC safe sleep guidance.
Warm Ivory Lemon-Peel Lovey Blanket
Use warm ivory and the 5 mm hook.
Foundation: Ch 69.
Row 1: Sc in the second ch from the hook, dc in the next ch. Repeat (sc in next ch, dc in next ch) across. [68 sts]
Row 2: Ch 1 and turn. Sc in the first st, dc in the next st. Repeat (sc in next st, dc in next st) across. [68 sts]
Rows 3 through 68: Repeat Row 2. [68 sts]
After Row 68, the ivory center should be close to square and measure approximately 17 1/2 inches at the stated gauge. If it is noticeably rectangular, check your gauge before adding the border.
Fasten off the warm ivory.
Border Round 1, evergreen: Join evergreen in any corner. Ch 1. Work 3 sc in that corner. Work 68 sc evenly across the next side, then 3 sc in the next corner. Repeat around until each side has 68 sc between corners and each corner contains 3 sc. Join with a sl st to the first sc. [284 sc]
On the two row-end sides, aim for approximately one sc in each of the 68 row ends. Across the foundation edge and final-row edge, work one sc corresponding to each of the 68 stitches. Keep the three corner stitches separate from those 68 side stitches.
Border Round 2, cranberry: Fasten off the evergreen. Join cranberry with a sl st in the center stitch of any 3-sc corner and ch 1. Sc in each st around, working 3 sc in the center stitch of each 3-sc corner from the previous round. Join with a sl st to the first sc. [292 sc]
Border Round 3, dark chocolate brown: Fasten off the cranberry. Join dark chocolate brown with a sl st in the center stitch of any 3-sc corner and ch 1. Sc in each st around, again working 3 sc in the center stitch of each corner. Join with a sl st to the first sc. [300 sc]
Fasten off and weave in the blanket ends securely.
The finished square should measure close to 19 inches. Block it gently into a square if needed. Don't stretch the lemon-peel texture flat. We want to straighten the edges, not iron the personality out of it.
Crochet Miss Kissy Moose's Head
Use medium moose brown and the 3.5 mm hook. Work in continuous rounds.
Rnd 1: Make 6 sc in a MR. [6]
Rnd 2: Inc in each st around. [12]
Rnd 3: (Sc in next st, inc in next st) 6 times. [18]
Rnd 4: (Sc in next 2 sts, inc in next st) 6 times. [24]
Rnd 5: (Sc in next 3 sts, inc in next st) 6 times. [30]
Rnd 6: (Sc in next 4 sts, inc in next st) 6 times. [36]
Rnd 7: (Sc in next 5 sts, inc in next st) 6 times. [42]
Rnd 8: (Sc in next 6 sts, inc in next st) 6 times. [48]
Rnd 9: (Sc in next 7 sts, inc in next st) 6 times. [54]
Rnd 10: (Sc in next 8 sts, inc in next st) 6 times. [60]
Rnds 11 through 18: Sc in each st around. [60]
At this point the head should look broad and rounded. Don't stretch it into a long oval. That broad face is one of the things that keeps Miss Kissy looking like a moose.
Rnd 19: (Sc in next 8 sts, dec) 6 times. [54]
Rnd 20: (Sc in next 7 sts, dec) 6 times. [48]
Rnd 21: (Sc in next 6 sts, dec) 6 times. [42]
Rnd 22: (Sc in next 5 sts, dec) 6 times. [36]
Rnd 23: (Sc in next 4 sts, dec) 6 times. [30]
Rnd 24: (Sc in next 3 sts, dec) 6 times. [24]
Begin stuffing. Shape the sides as you fill so the cheek area stays broad.
Rnd 25: (Sc in next 2 sts, dec) 6 times. [18]
Rnd 26: (Sc in next st, dec) 6 times. [12]
Add the final stuffing.
Rnd 27: Dec around. [6]
Fasten off, leaving a tail. Thread the tail through the front loops of the remaining 6 sts and pull the opening closed. Secure and weave in the end.
Muzzle and Miss Kissy's Embroidered Face
Use warm ivory and the 3.5 mm hook for the muzzle.
Rnd 1: Ch 9. Work 2 sc in the second ch from the hook, sc in the next 6 ch, 4 sc in the last ch. Turn to work along the unused loops on the opposite side of the foundation chain. Sc in the next 6 ch, then work 2 sc in the last ch. [20]
Rnd 2: Inc in each of the first 2 sts, sc in the next 6 sts, inc in each of the next 4 sts, sc in the next 6 sts, inc in each of the last 2 sts. [28]
Rnd 3: (Sc in next st, inc in next st) twice, sc in the next 6 sts, (sc in next st, inc in next st) 4 times, sc in the next 6 sts, (sc in next st, inc in next st) twice. [36]
Rnds 4 through 6: Sc in each st around. [36]
Fasten off with a long sewing tail.
Center the muzzle across the lower front of the head, with the top edge sitting approximately around Head Rnd 12 and the lower edge around Rnd 18. Pin it in place. Sew about three quarters of the way around, add a small amount of fiberfill, then finish sewing the edge.
Using dark chocolate brown yarn or embroidery floss, embroider a small nose near the upper center of the muzzle.
Use black embroidery floss for the eyes. Position them just above the muzzle around Head Rnds 10 to 11, leaving approximately 8 visible head stitches between the inner edges. Build each open eye with several short satin stitches until you have a compact black oval.
Add two or three short black embroidery stitches at the outer edge of each eye for Miss Kissy's subtle lashes. Keep them short. She needs eyelashes, not windshield wipers.
Using black embroidery floss, add one shallow curved eyebrow above each eye. Center each brow over the eye and follow the curve of the upper eye line, keeping the two brows light and symmetrical.
For the tiny catch-light, add one very short warm-ivory stitch near the upper outer portion of each black eye. The catch-light is embroidered too.
Using cranberry yarn or embroidery floss, make the little heart-shaped lips below the nose. Work two tiny satin-stitch lobes side by side, letting them meet at a small point underneath. Keep the finished heart petite.
Finish the expression with a shallow black or dark-brown embroidered smile curve extending just beyond the heart lips on both sides.
Crochet Miss Kissy's Ears and Antlers
Outer ears, make 2: Use medium moose brown and the 3.5 mm hook.
Rnd 1: Make 8 sc in a MR. [8]
Rnd 2: Inc in each st around. [16]
Rnd 3: (Sc in next st, inc in next st) 8 times. [24]
Rnds 4 and 5: Sc in each st around. [24]
Fasten off with a long sewing tail. Do not stuff.
Inner ears, make 2: Use warm ivory and the 3.5 mm hook.
Ch 5. Work 2 sc in the second ch from the hook, sc in the next 2 ch, 4 sc in the last ch. Turn to work along the unused loops on the opposite side. Sc in the next 2 ch, then work 2 sc in the last ch. [12]
Fasten off with a sewing tail.
Flatten each brown ear into a softly rounded leaf shape. Center one ivory piece on the front, leaving a brown rim visible around it, and sew completely around the ivory edge.
Fold the lower edge of each finished ear slightly inward and tack the fold with two or three stitches. Position the ears around Head Rnds 8 through 12 with the tips angled outward. Sew the folded bases firmly to the head.
Antlers, make 2 sets: Use dark chocolate brown and the 3.5 mm hook. Each finished antler has three short rounded prongs: the end of the main stem plus two side branches.
Main stem, make 2:
Rnd 1: Make 6 sc in a MR. [6]
Rnd 2: (Sc in next st, inc in next st) 3 times. [9]
Rnds 3 through 11: Sc in each st around. [9]
Add a small amount of fiberfill. Keep the stem softly rounded rather than firmly packed. Fasten off with a long sewing tail.
Lower side branch, make 2:
Rnd 1: Make 6 sc in a MR. [6]
Rnds 2 through 5: Sc in each st around. [6]
Stuff very lightly and fasten off with a long sewing tail.
Upper side branch, make 2:
Rnd 1: Make 6 sc in a MR. [6]
Rnds 2 through 4: Sc in each st around. [6]
Stuff very lightly and fasten off with a long sewing tail.
Sew the longer side branch to the outside of each main stem around Rnds 8 to 9. Angle it outward and upward. Sew the shorter branch higher on the main stem around Rnds 5 to 6. Angle that branch upward without laying it directly against the first one.
From the front, you should see three compact rounded prongs on each antler. Keep them chunky and close together rather than stretching them into tall deer antlers.
Pin the antlers to the upper sides of the head around Head Rnds 5 through 8. Angle them slightly outward. Check the face straight on before sewing so the ears remain visible beneath them.
Floppy Moose Arms
Make 2. Begin with dark chocolate brown and the 3.5 mm hook.
Rnd 1: Make 6 sc in a MR. [6]
Rnd 2: Inc in each st around. [12]
Rnd 3: (Sc in next st, inc in next st) 6 times. [18]
Rnds 4 and 5: Sc in each st around. [18]
Rnd 6: Sc in the first 17 sts. Begin the final sc with dark chocolate brown, then complete the final yarn-over and pull-through with medium moose brown. [18] Cut the dark chocolate brown yarn, leaving a tail long enough to weave in securely.
Lightly stuff the dark hoof end.
Rnd 7: With medium moose brown, (sc in next st, dec) 6 times. [12]
Rnds 8 through 33: Sc in each st around. [12]
Add a small amount of stuffing to the first few brown rounds if needed to soften the transition from the hoof. Leave the upper half of the arm unstuffed so it stays floppy.
Flatten the open top. Sc through both layers across the opening to close it. [6 sc]
Fasten off with a long sewing tail.
Each arm should measure approximately 6 1/2 to 7 inches long. Make the second arm to match before attaching either one.
Christmas Details for Miss Kissy Moose
Flat Holly Appliqué for the Blanket
The blanket motif uses three green holly leaves and three flat cranberry berry discs. Use the 4 mm hook for these pieces.
Small Holly Leaf, make 3:
Foundation: Ch 10.
Round 1: Sc in the second ch from the hook and in the next 7 ch. You will have 8 sc before the final chain. Work 3 sc in the last ch.
Rotate the work and crochet along the opposite side of the foundation chain. Work 1 sc in each of the 8 unused loops. Do not join. [19 sc]
Round 2, first side: *Sl st in next st, sc in next st, work (hdc, dc, ch 2, sl st in 2nd ch from hook, dc, hdc) all in next st, sl st in next st.* Repeat from * to * once more.
Leaf tip: Sc in next st. In the next st work (hdc, dc, tr, ch 3, sl st in 2nd ch from hook and in next ch, tr, dc, hdc). Sc in next st.
Round 2, second side: *Sl st in next st, sc in next st, work (hdc, dc, ch 2, sl st in 2nd ch from hook, dc, hdc) all in next st, sl st in next st.* Repeat from * to * once more. Join with a sl st to the first sl st of Round 2 at the base.
You should have four side points and one longer tip point.
Fasten off.
Add the center vein: With the RS facing, join evergreen at the base directly over the foundation chain. Work loose surface slip stitches along the center toward the leaf tip. Stop just below the long tip. Fasten off, pull the ends to the WS and weave them in securely.
Each finished blanket leaf should measure roughly 2 1/4 to 2 1/2 inches long.
Flat berries, make 3: Use cranberry.
Rnd 1: Make a MR. Work 5 sc into the ring. Pull the ring firmly closed. Join with a sl st to the first sc. [5]
Rnd 2: Ch 1; this does not count as a st. Work 2 sc in each st around. Join with a sl st to the first sc. [10]
Fasten off, leaving a long sewing tail.
Do not stuff the berries or cup them into balls. Lay each one flat and shape it into a small circle.
Because these berries are small appliqué pieces on a baby-use item, sew each one down around its entire outer edge and anchor the center securely. If any berry begins to lift, loosen or pull away from the fabric, stop using the lovey until the attachment has been repaired.
Turn the blanket into its finished diamond orientation. Center the holly cluster on the lower half of the blanket.
Arrange one holly leaf pointing upward with the other two fanning down and outward. Overlap the three leaf bases by about 1/4 inch. Sew every leaf securely around its outer perimeter and add a few extra stitches through the overlapping center.
Arrange the three flat berries over the center join in a compact triangle, with one berry slightly higher and the other two below it. Sew completely around the outer edge of every berry, then add one small anchoring stitch through its center.
Mini Cranberry Bow for the Antler Base
Use cranberry and the 3.5 mm hook.
Bow loop strip:
Foundation: Ch 25.
Row 1: Hdc in the second ch from the hook and across. [24]
Rows 2 and 3: Ch 1, turn. Hdc in each st across. [24]
Fasten off, leaving a 10 to 12 inch sewing tail. The strip should measure approximately 5 1/4 to 5 1/2 inches long.
Pointed tails, make 2:
Foundation: Ch 5.
Row 1: Hdc in the second ch from the hook and across. [4]
Rows 2 and 3: Ch 1, turn. Hdc in each st across. [4]
Row 4: Ch 1, turn. Hdc2tog twice. [2]
Row 5: Ch 1, turn. Hdc2tog. [1]
Fasten off and weave in the end.
Center wrap:
Foundation: Ch 3.
Row 1: Hdc in the second ch from the hook and in the next ch. [2]
Rows 2 through 6: Ch 1, turn. Hdc in each st across. [2]
Fasten off with a long sewing tail.
Lay the loop strip RS down. Bring both short ends toward the center back and tack them together. Turn the piece RS up and pinch the middle gently. Keep the loops mostly flat.
Place the two pointed tails behind the center with their tips angled down and outward. Stitch securely through the center of the bow and both tail tops.
Wrap the narrow center strip around the middle. Sew the ends together at the back and add a few anchoring stitches through the back of the bow so the wrap cannot slide.
The finished bow should measure approximately 2 1/2 to 3 inches wide.
Mini Holly for Miss Kissy's Bow
Make three more holly leaves and three more flat berries using the same instructions as the blanket holly above, but change to the 3 mm hook.
The smaller hook should bring each leaf down to approximately 1 3/4 to 2 inches long. These are expected measurements, so make one leaf first and check it against the bow before making all three.
Arrange one leaf upward and the other two fanning outward. Sew the leaf edges down to the bow and to the head attachment area rather than leaving the points loose.
Add the three miniature flat berries in the same compact triangular arrangement used on the blanket. Sew around the whole edge of each berry and add one small anchoring stitch through the center of each disc, just as you did for the blanket berries.
Position the completed bow and holly decoration at the base of Miss Kissy's right antler, which appears on the left when you're looking directly at her. Keep the ear visible and don't cover the antler prongs.
Sew the bow center securely to the head. Stitch around the outer edges of both loops, secure both tail edges and tips, and anchor the center wrap so no part of the bow can lift into a loose loop. Add anchoring stitches through the holly leaves and around the berry edges. Nothing in this decoration should be hanging by one little stitch.
Cranberry Crochet Scarf
Use cranberry and the 3.5 mm hook.
Foundation: Ch 6.
Row 1: Sc in the second ch from the hook and across. [5]
Rows 2 through 70: Ch 1, turn. Sc in each st across. [5]
Fasten off, leaving a long sewing tail.
The finished scarf should measure approximately 13 1/2 to 14 inches long. If yours is a little short for the neck and knot, add another two to four rows before fastening off.
Wait until Miss Kissy's head has been attached before installing the scarf. Wrap it once around the neck and tie a loose single knot slightly to one side at the front. Arrange the two short tails downward like the example.
Use cranberry yarn to sew through the knot several times so it cannot loosen. Tack the scarf band securely to the neck area at the back and both sides, then tack both scarf tails discreetly to the upper blanket or chest. The scarf should look tied, but no part of it should lift away as a loose loop or function as a removable accessory.
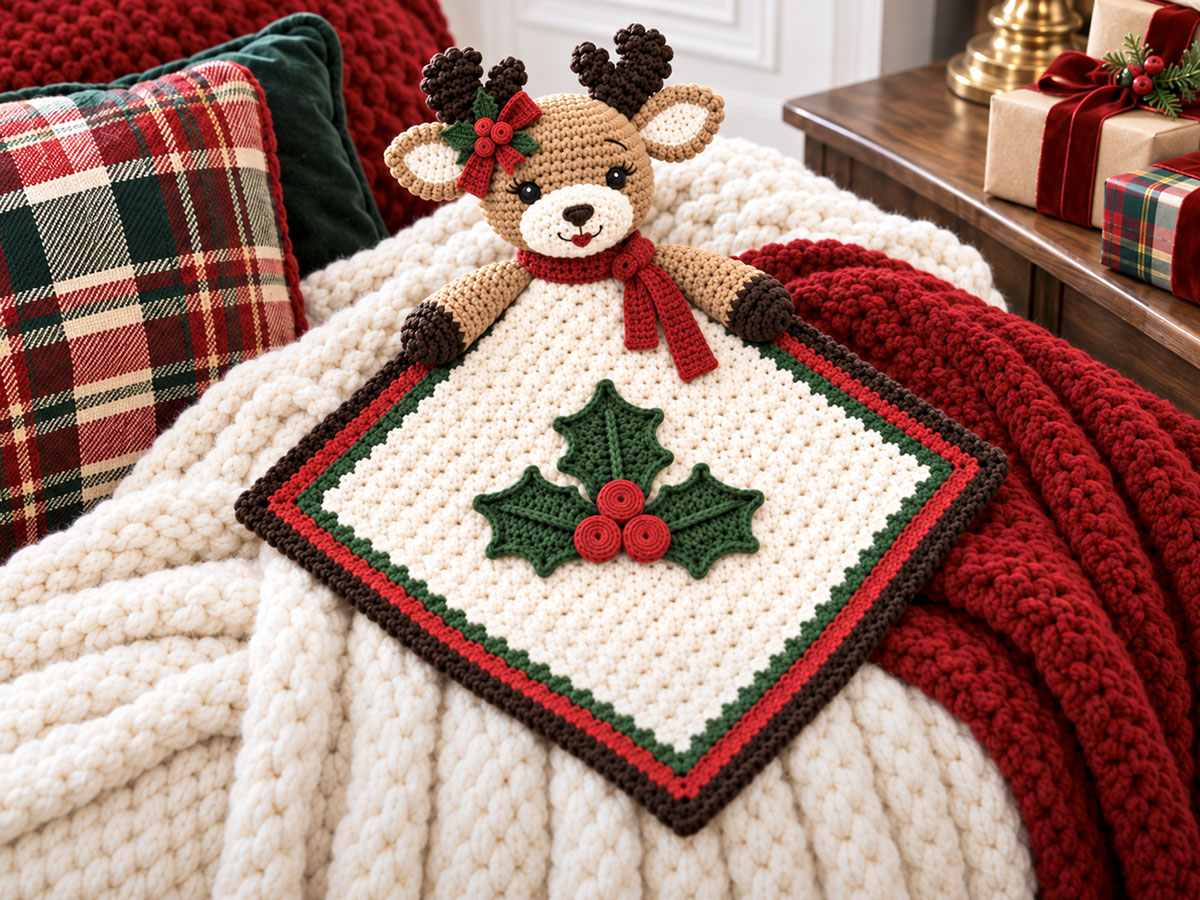
Assemble the Christmas Miss Kissy Moose Lovey
Lay the finished blanket flat and turn it so one corner points down. The opposite corner will sit behind Miss Kissy's head.
1. Finish the face. Sew on the muzzle and complete the embroidered eyes, catch-lights, lashes, eyebrows, nose, heart lips and smile before attaching the head to the blanket. Look at her straight on before you move on. This is the easiest time to correct anything that isn't level.
2. Attach the ears and antlers. Pin both ears and both antlers first. Keep the ears visible beneath the antlers. Sew the ear bases and full lower antler attachment areas securely to the head.
3. Add the antler-base bow and miniature holly. Position the finished bow at the base of Miss Kissy's right antler. Sew it down using the full loop-edge, tail-edge, tip and center-wrap attachment described above. Secure the three miniature holly leaves and all three flat berries as described above.
4. Position the arms. Lay the two arms across the upper portion of the blanket with the dark hoof ends facing forward and slightly down. Place the flattened tops approximately 2 to 2 1/2 inches to either side of the upper center line. Sew them firmly to the blanket.
5. Attach the head. Center Miss Kissy's head over the arm attachment points. The lower portion of the head should overlap enough of the upper blanket corner to hide those seams without crowding the holly appliqué below.
Pin the head from several directions. Sew the lower back and sides of the head securely to the blanket. Make another pass through the attachment area if needed. The head shouldn't wobble loosely when you lift the blanket.
6. Add the scarf. Wrap and knot the scarf as described above. Sew through the knot, tack the scarf band securely at the back and both sides, and tack both tails down securely.
7. Position the blanket holly. With the blanket still in its diamond orientation, center the three-leaf holly cluster on the lower half as described above. Keep enough ivory space around it that the motif looks intentional rather than squeezed between the borders and Miss Kissy's arms.
Sew every holly leaf around its perimeter. Sew completely around each flat berry and add its center anchoring stitch.
8. Finish the back. Weave every remaining yarn tail back and forth through matching crochet fabric before trimming. Don't clip tails right beside a knot.
9. Do a final shape check. Redistribute the stuffing in the head, muzzle, antlers and hoof ends if needed. Straighten the ears, shape the three antler prongs on each side and smooth the blanket without flattening its lemon-peel texture.
10. Check every attachment. Remove every pin and stitch marker. Gently tug the head, ears, antlers, arms, scarf, antler-base bow, six holly leaves and six flat berries. Check the facial embroidery and the back of the blanket for loose yarn or forgotten construction pieces.
The finished lovey is designed with a broad moose face, compact dark antlers, floppy arms, heart-shaped cranberry lips, a secured side scarf, a small bow-and-holly accent at one antler and one larger flat three-leaf holly appliqué with three flat berries centered on the blanket.
Washing and Caring for Miss Kissy Moose
Follow the washing instructions for the yarn you used. If it is machine washable, place the lovey in a mesh laundry bag or pillowcase so the antlers, bow and holly appliqués aren't pulled around during the wash.
Use a gentle cycle with cool or lukewarm water unless the yarn label directs otherwise. Avoid high heat.
Reshape Miss Kissy's head, muzzle, ears, antlers and blanket while they're damp. Lay the lovey flat to dry if possible.
After laundering, check the scarf, bow, leaves, berries and facial embroidery. Repair any loosened attachment before the lovey is used again.
Christmas Miss Kissy Moose Pattern Questions
Can I use plastic safety eyes instead of embroidered eyes?
No. Miss Kissy's face is designed around black satin-stitch eyes with embroidered lashes and tiny stitched catch-lights. Plastic eyes would not reproduce the finished example.
Can I use the dimensional holly berries instead of the flat discs?
Not on this lovey. Use the flat crocheted berry discs and sew around the entire outside edge of each one. Save the dimensional berry version for decorative projects that aren't intended as baby-use items.
Can I make the blanket larger?
Yes. Start with a longer odd-numbered foundation chain so skipping the first chain leaves an even number of working chains for the sc, dc repeat. Continue the lemon-peel rows until the center is square, then add the border. If you make the blanket substantially larger, the holly cluster will look smaller in proportion.
Can I leave off the holly appliqué?
You can make the lovey without it, but it won't reproduce Christmas Miss Kissy as shown here. The holly is one of the details that separates her from Christmas Manley and gives this pattern its own finished look.
Can the scarf be removable?
I wouldn't make it removable for this version. Tie it in position, sew through the knot, tack the scarf band securely at the back and both sides, and tack the tails down so the entire scarf stays part of the finished lovey.
Is this pattern physically test-crocheted?
No. The stitch counts, construction and expected measurements have been calculated and checked against the finished design, but these instructions have not been physically test-crocheted. Check your own gauge and the measurement checkpoints as you work.
More Christmas and Woodland Crochet Patterns
If you'd like the other Christmas moose in the family, see the Christmas Manley the Moose lovey pattern. His Christmas tree blanket keeps him visually related to Miss Kissy without making the two projects duplicates.
You can also make Fall Manley the Moose for a completely different seasonal version.
For more characters, head back to the free crochet animal lovey patterns collection.
When you click on links to various merchants on this site and make a purchase, this may result in this site earning a commission. This does not affect the price you pay.

UBGI Gold Standard 2026
Reviewed under the site's
editorial checklist.
Photos, decorating ideas, party setups and reader submissions are shared for inspiration unless a page is specifically presented as a pattern, tutorial, reference guide or step-by-step project. Follow the instructions, measurements, safety guidance and manufacturer directions provided for the particular project or product.
About Jan | Contact | Baby Nursery Ideas (Blog) | Site Map | Privacy Policy | Disclosure Policy | Disclaimer | Affiliate Disclosure | Earnings Disclosure | Facebook | Pinterest
I am a participant in the Amazon Services LLC Associates Program, an affiliate advertising program designed to provide a means for us to earn fees by linking to Amazon. As an Amazon Associate I earn from qualifying purchases.
Copyright © 2006-2026. All Rights Reserved.