Free Christmas Moose Lovey Crochet Pattern
By Jan Bay
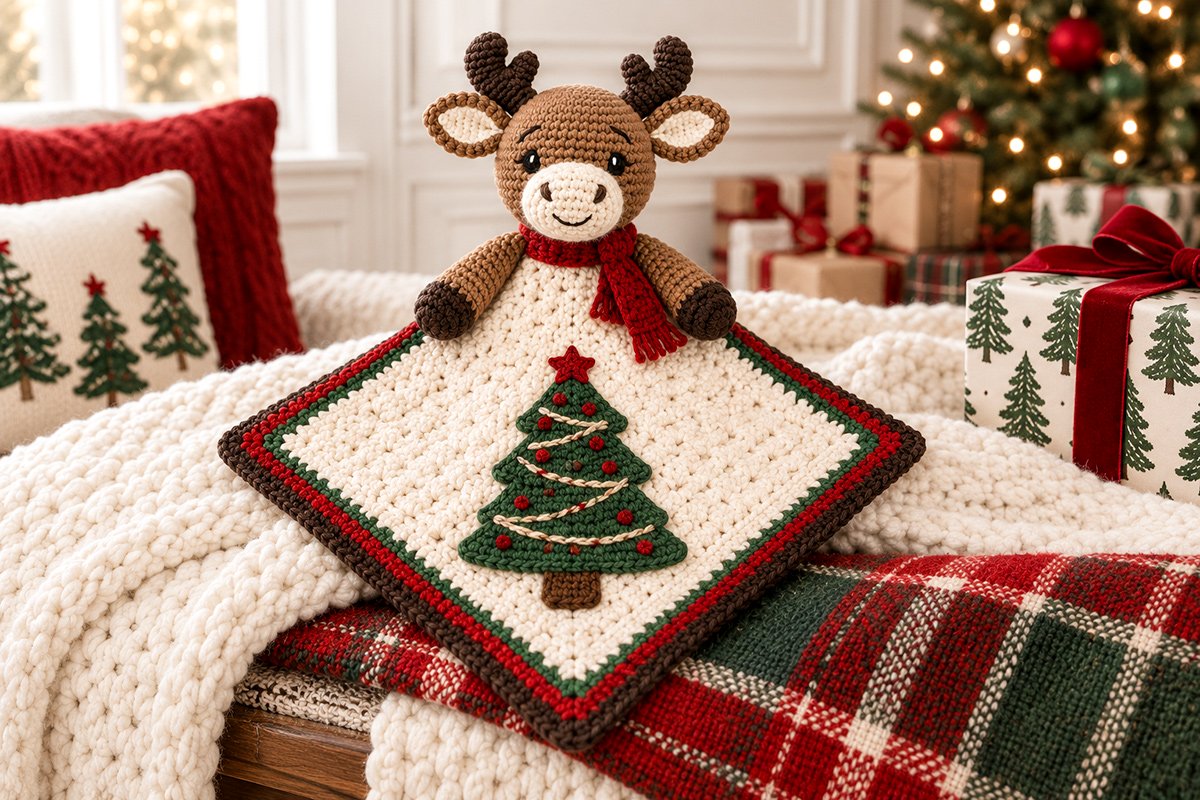
This free Christmas moose lovey crochet pattern has Manley the Moose decked out and ready for the Christmas holidays. This is a festive version of our floppy woodland friend that was such a fun fall project. Manley keeps all of his familiar features, including his antlers, embroidered face and soft cuddly shape. Now he's dressed up in a holiday color palette that makes him especially cute to make and give as a Christmas gift to a winter baby for a woodland nursery.
Explore More Free Crochet Baby Patterns
Supplies for the Christmas Moose Lovey
Jump to:
Christmas Moose Lovey Crochet Pattern Details
Christmas Manley is meant to look related to the original fall Manley the Moose lovey without looking like the same project with different yarn colors. His head, muzzle, ears, antlers and floppy arms keep the familiar Manley shape. The blanket is where Christmas takes over.
For this version, I chose a warm ivory lemon-peel blanket with cranberry, evergreen and dark brown around the edge. The little scarf gives Manley some Christmas color up near his face, while the flat tree appliqué carries the holiday theme across the otherwise simple blanket. I like the tree better than scattering little decorations everywhere. You can tell what the project is immediately, but it still looks like a baby lovey instead of a Christmas ornament.
The blanket is worked as a square and shown turned on the diagonal in the example image. You do not need to shape a diamond. That matters when you're checking your measurements later.
Pattern status: The stitch counts and expected measurements below were calculated to reproduce the finished example. This pattern has not been physically test-crocheted, so check the stated measurements as you work, especially if your yarn or tension differs from the gauge given.
Materials
Yarn: Worsted weight, Category 4 yarn in the following colors. Yardage is an expected amount and includes a little working room.
- Warm ivory: approximately 250 to 280 yards for the blanket, muzzle, inner ears and Christmas tree garland
- Medium moose brown: approximately 120 to 140 yards for the head, ears and arms
- Dark chocolate brown: approximately 50 to 60 yards for antlers, hoof ends and blanket edging
- Evergreen: approximately 35 to 45 yards for the blanket border and Christmas tree
- Cranberry red: approximately 45 to 55 yards for the blanket border, scarf, star and ornament details
- Small amount of brown for the tree trunk if you want it slightly different from the antler color
Hooks: 5 mm crochet hook for the blanket and 3.5 mm crochet hook for Manley, the scarf and the Christmas tree appliqué.
You'll also need polyester fiberfill, black embroidery floss for the face, a tapestry needle, scissors, stitch markers and rustproof pins for positioning the pieces before sewing.
Use a washable yarn that gives you a firm fabric for the stuffed pieces. Manley's head, muzzle, hoof ends and antlers shouldn't have gaps large enough for fiberfill to work through. Stuff the antlers only lightly so they keep the rounded shape shown in the example without becoming stiff or bulky.
Finished Size
The finished blanket is expected to measure approximately 19 inches square after the three border rounds are added.
Manley's finished head is expected to measure approximately 4 1/2 to 5 inches across. Each arm should measure approximately 6 1/2 to 7 inches long after the extended arm rounds are completed. Each completed antler should extend approximately 2 to 2 1/2 inches from its attachment area, depending on yarn, tension and how you angle the branches.
The completed Christmas tree appliqué is approximately 5 to 6 inches tall, including the trunk and star. The scarf is approximately 1 to 1 1/4 inches wide and 10 1/2 to 11 inches long.
Those measurements are checkpoints rather than something to chase stitch by stitch. If your head is coming out an inch larger than expected, for example, stop and check your gauge before making the remaining pieces.
Gauge
Blanket gauge: approximately 15 1/2 stitches and 15 1/2 rows = 4 inches in lemon-peel stitch with the 5 mm hook.
Stuffed-piece gauge: approximately 18 single crochet stitches and 20 rounds = 4 inches with the 3.5 mm hook.
Gauge is most important for the blanket because the Christmas tree appliqué is sized for the finished 19-inch square. Gauge on the stuffed pieces can vary a little as long as your fabric is firm, the stuffing doesn't show and Manley's proportions stay close to the expected measurements.
Abbreviations
This pattern uses standard U.S. crochet terminology.
- ch = chain
- dc = double crochet
- dec = single crochet decrease
- hdc = half double crochet
- hdc2tog = half double crochet 2 stitches together
- inc = 2 single crochet in the same stitch
- MR = magic ring
- rnd = round
- sc = single crochet
- sl st = slip stitch
- st/sts = stitch/stitches
Pattern Notes
Work the head, muzzle, ears, arms and antler pieces in continuous spirals unless the instructions specifically tell you otherwise. Place a marker in the first stitch of every round and move it up as you work.
Do not join continuous rounds with a slip stitch. That keeps the stuffed pieces smooth and avoids a visible seam running up Manley's face or arms.
The blanket uses lemon-peel stitch, which alternates one single crochet and one double crochet across an even number of stitches. On the following row you work the same sc, dc sequence again. Because the work is turned, the single crochet naturally sits over the previous double crochet and the double crochet sits over the previous single crochet.
Chain 1 at the beginning of blanket rows and when instructed for the Christmas tree tiers, tree trunk and scarf. These turning chains do not count as stitches unless the pattern specifically says otherwise.
Stuff Manley's head firmly enough to hold its shape, but don't pack it hard. Stuff the muzzle lightly. Stuff each antler piece very lightly, using only enough fiberfill to keep the rounded shape. Stuff the dark hoof ends and the first portion of the arms lightly, then leave the upper arms soft so they stay floppy.
All facial features are embroidered. Manley's open eyes are worked with black embroidery floss using compact satin stitches. There are no plastic safety eyes and no buttons on this project.
The Christmas tree, star and ornament details are attached flat to the blanket. Sew around the tree pieces rather than relying on a stitch at each corner. The scarf is also secured after it is wrapped around Manley's neck so it does not remain as a loose removable loop.
Piece check: Before final assembly, you should have 1 head, 1 muzzle, 2 brown ears, 2 ivory inner-ear pieces, 2 arms, 2 completed moose antlers, 1 blanket, 3 green Christmas tree tiers, 1 tree trunk, 1 red star, 1 cream tree garland and 1 scarf. Each completed antler is assembled from 1 main stem and 1 short side branch.
Baby safety: A handmade lovey is for supervised awake-time use, not for an infant sleep space. The U.S. Consumer Product Safety Commission recommends keeping a baby's sleep space bare except for a fitted sheet. You can read the current guidance on the CPSC Safe Sleep page.
Crochet Manley the Moose Head
Use medium moose brown and the 3.5 mm hook. Work in continuous rounds.
Rnd 1: Make 6 sc in a MR. [6]
Rnd 2: Inc in each st around. [12]
Rnd 3: (Sc in next st, inc in next st) 6 times. [18]
Rnd 4: (Sc in next 2 sts, inc in next st) 6 times. [24]
Rnd 5: (Sc in next 3 sts, inc in next st) 6 times. [30]
Rnd 6: (Sc in next 4 sts, inc in next st) 6 times. [36]
Rnd 7: (Sc in next 5 sts, inc in next st) 6 times. [42]
Rnd 8: (Sc in next 6 sts, inc in next st) 6 times. [48]
Rnd 9: (Sc in next 7 sts, inc in next st) 6 times. [54]
Rnd 10: (Sc in next 8 sts, inc in next st) 6 times. [60]
Rnds 11 through 18: Sc in each st around. [60]
At this point the head should have the broad, rounded shape shown in the example rather than a long deer-shaped face.
Rnd 19: (Sc in next 8 sts, dec) 6 times. [54]
Rnd 20: (Sc in next 7 sts, dec) 6 times. [48]
Rnd 21: (Sc in next 6 sts, dec) 6 times. [42]
Rnd 22: (Sc in next 5 sts, dec) 6 times. [36]
Rnd 23: (Sc in next 4 sts, dec) 6 times. [30]
Rnd 24: (Sc in next 3 sts, dec) 6 times. [24]
Begin stuffing. Shape the sides with your fingers as you fill so the head stays broad through the cheek area.
Rnd 25: (Sc in next 2 sts, dec) 6 times. [18]
Rnd 26: (Sc in next st, dec) 6 times. [12]
Add the final stuffing.
Rnd 27: Dec around. [6]
Fasten off, leaving a tail. Thread the tail through the remaining front loops and pull closed. Weave the end securely into the head.
Muzzle
Use warm ivory and the 3.5 mm hook. The muzzle is an oval rather than a separate round ball. That wider shape is part of what keeps Manley looking like a moose.
Rnd 1: Ch 9. Work 2 sc in the second ch from the hook, sc in the next 6 ch, 4 sc in the last ch. Turn to work along the unused loops on the opposite side of the foundation chain. Sc in the next 6 ch, 2 sc in the last ch. [20]
Rnd 2: Inc in each of the first 2 sts, sc in the next 6 sts, inc in each of the next 4 sts, sc in the next 6 sts, inc in each of the last 2 sts. [28]
Rnd 3: (Sc in next st, inc in next st) twice, sc in the next 6 sts, (sc in next st, inc in next st) 4 times, sc in the next 6 sts, (sc in next st, inc in next st) twice. [36]
Rnds 4 through 6: Sc in each st around. [36]
Fasten off with a long sewing tail.
Lightly stuff the muzzle before the final portion is sewn to the face. Keep it softly rounded rather than making it project like a long snout.
Center the muzzle across the lower front of the head. The top edge should sit approximately around Rnd 12 and the bottom around Rnd 18. Pin it first and look straight at Manley before you sew. A muzzle shifted even a little to one side changes the whole expression.
Sew around the edge with small, even stitches.
Using dark brown yarn or embroidery floss, embroider two short nostril stitches on the upper half of the muzzle and a simple curved smile below them.
Use black embroidery floss for the eyes. Place the open satin-stitch eyes just above the muzzle at approximately Rnds 10 to 11. Build each eye with several short horizontal satin stitches until you have a compact dark oval. Keep the two eyes level and leave approximately 8 stitches of facial space between their inner edges.
Add one tiny warm-ivory highlight stitch near the upper inner edge of each black eye. With dark brown embroidery floss or a separated strand of dark brown yarn, add one short curved stitch just above each eye to form the soft upper-eye detail shown in the example. Keep these stitches small so the eyes still read as embroidered features rather than separate appliqués.
Moose Ears
Make 2 with medium brown and the 3.5 mm hook.
Rnd 1: Make 8 sc in a MR. [8]
Rnd 2: Inc in each st around. [16]
Rnd 3: (Sc in next st, inc in next st) 8 times. [24]
Rnds 4 and 5: Sc in each st around. [24]
Fasten off with a long sewing tail. Do not stuff.
Inner ear, make 2: With warm ivory and the 3.5 mm hook, ch 5. Work 2 sc in the second ch from the hook, sc in the next 2 ch, 4 sc in the last ch. Turn to work along the unused loops on the opposite side of the foundation chain. Sc in the next 2 ch, then work 2 sc in the last ch. [12]
Fasten off with a long sewing tail.
Flatten each brown ear so it forms a softly rounded leaf shape. Center one ivory inner-ear piece on the front, leaving a visible brown border around it, and sew completely around the ivory edge.
Fold the lower edge of the finished ear slightly inward and tack the fold with two or three stitches. That small fold gives the ear a cup instead of leaving it flat.
Position the ears at the sides of the head around Rnds 8 through 12. Angle the upper tips slightly outward. Sew the folded base of each ear firmly to the head.
Crochet Moose Antlers
Make 2 antler sets with dark chocolate brown and the 3.5 mm hook. Each antler has one short rounded main stem and one small rounded side branch. The rounded end of the main stem forms one prong and the side branch forms the second, giving Manley the compact two-prong antlers shown in the example.
Main stem, make 2:
Rnd 1: Make 6 sc in a MR. [6]
Rnd 2: (Sc in next st, inc in next st) 3 times. [9]
Rnds 3 through 12: Sc in each st around. [9]
Add a small amount of fiberfill, keeping the stem softly rounded rather than firmly stuffed. Fasten off with a long sewing tail.
Side branch, make 2:
Rnd 1: Make 6 sc in a MR. [6]
Rnds 2 through 6: Sc in each st around. [6]
Stuff very lightly and fasten off with a long sewing tail.
Sew one side branch to the outside of each main stem around Rnds 6 to 7. Angle the branch outward and slightly upward so its rounded end sits beside the rounded top of the main stem. From the front, each completed antler should have two short rounded prongs rather than a tall branching shape.
Pin the completed antlers to the upper sides of the head around Rnds 5 through 8. Angle them slightly outward rather than straight upward. Check Manley from the front before sewing so the antlers are balanced and the ears remain clearly visible.
Sew the base of each main stem securely to the head. After attachment, gently shape the two rounded prongs with your fingers until both antlers match the compact forked silhouette in the example.
Floppy Moose Arms
Make 2. Begin with dark chocolate brown for the hoof ends.
Rnd 1: Make 6 sc in a MR. [6]
Rnd 2: Inc in each st around. [12]
Rnd 3: (Sc in next st, inc in next st) 6 times. [18]
Rnds 4 through 6: Sc in each st around. [18]
Lightly stuff the hoof.
Rnd 7: Change to medium moose brown. (Sc in next st, dec) 6 times. [12]
Rnds 8 through 33: Sc in each st around. [12]
Add a very small amount of stuffing to the first few brown rounds if needed to soften the transition from the hoof. Leave the upper half of the arm unstuffed so it stays floppy.
Flatten the open top. Sc through both layers across the opening to close it. [6 sc]
Fasten off with a long sewing tail.
Each finished arm should measure about 6 1/2 to 7 inches. Make the second arm to match before attaching either one.
Warm Ivory Lemon-Peel Lovey Blanket
Use warm ivory and the 5 mm hook.
The center is worked back and forth in rows. The even stitch count is important because it keeps the sc, dc lemon-peel repeat lined up correctly.
Foundation: Ch 69.
Row 1: Sc in the second ch from the hook, dc in the next ch. Repeat (sc in next ch, dc in next ch) across. [68 sts]
Row 2: Ch 1 and turn. Sc in the first st, dc in the next st. Repeat (sc in next st, dc in next st) across. [68 sts]
Rows 3 through 68: Repeat Row 2. [68 sts]
After Row 68, the center should be close to square and measure approximately 17 1/2 inches at the stated gauge. If your piece is noticeably rectangular, check your gauge before adding the border. A small difference can be blocked out. A large difference means the stitch and row gauge are not matching closely enough.
Fasten off the warm ivory after Row 68.
Border Rnd 1, evergreen: Join evergreen in any corner of the square. Ch 1. Work 3 sc in that corner. Work 68 sc evenly across the next side, then 3 sc in the next corner. Repeat around until all four sides have 68 sc and all four corners have 3 sc. Join with a sl st to the first sc. [284 sc]
On each vertical side, work approximately 1 sc into each of the 68 row ends. Across the foundation edge and the final-row edge, work 1 sc corresponding to each of the 68 stitches. Keep the 3 corner stitches separate from those 68 side stitches so the border lies flat instead of adding or losing stitches at the corners.
Border Rnd 2, cranberry: Change to cranberry. Ch 1. Sc in each st around, working 3 sc in the center stitch of each 3-sc corner from the previous round. Join. [292 sc]
Border Rnd 3, dark chocolate brown: Change to dark brown. Ch 1. Sc in each st around, again working 3 sc in the center stitch of each corner. Join. [300 sc]
Fasten off and weave in all blanket ends securely.
The finished square should be close to 19 inches. Block it gently into a square before adding the tree and Manley. Don't stretch the lemon-peel texture flat. You only want to straighten the sides and corners.
Flat Christmas Tree Appliqué
The tree is built from three flat evergreen tiers so you get the layered Christmas-tree shape shown on the example without using puff stitches, loose ornaments or dangling pieces. Use the 3.5 mm hook.
Lower tree tier:
Ch 21.
Row 1: Hdc in the second ch from the hook and across. [20]
Row 2: Ch 1 and turn. Hdc2tog, hdc in the next 16 sts, hdc2tog. [18]
Row 3: Ch 1 and turn. Hdc2tog, hdc in the next 14 sts, hdc2tog. [16]
Continue in the same manner, decreasing once at each end of every row, until 2 sts remain at the top. The tier has 10 rows total.
Fasten off, leaving a sewing tail.
Middle tree tier:
Ch 15.
Row 1: Hdc in the second ch from the hook and across. [14]
Continue as for the lower tier, decreasing once at each end of every row until 2 sts remain. The middle tier has 7 rows total.
Fasten off with a sewing tail.
Upper tree tier:
Ch 9.
Row 1: Hdc in the second ch from the hook and across. [8]
Continue decreasing at both ends until 2 sts remain. The upper tier has 4 rows total.
Fasten off with a sewing tail.
Tree trunk: With brown, ch 5. Hdc in the second ch from the hook and across. [4]
Ch 1 and turn. Hdc across for 3 more rows. [4]
Fasten off with a sewing tail.
Red star: With cranberry, make a MR. Repeat the following 5 times: ch 4, sl st in the second ch from the hook, sc in the next ch, hdc in the next ch, sl st into the MR. Pull the ring closed and fasten off with a long sewing tail.
Cream tree garland: With warm ivory and the 3.5 mm hook, make a chain approximately 11 to 12 inches long when relaxed. Fasten off, leaving a long sewing tail.
Lay the blanket flat before assembling the tree. Center the trunk first. Place the lower green tier over the upper edge of the trunk. Center the middle tier over the lower tier with approximately 3/4 inch of overlap, then place the upper tier in the same way.
The three green pieces should read as one tree once they are sewn down. Pin everything before sewing.
Sew all outer edges of the trunk and green tiers to the blanket using matching yarn. Keep the pieces flat against the lemon-peel surface rather than stuffing beneath them.
Place the red star at the top and sew around all five points and the center.
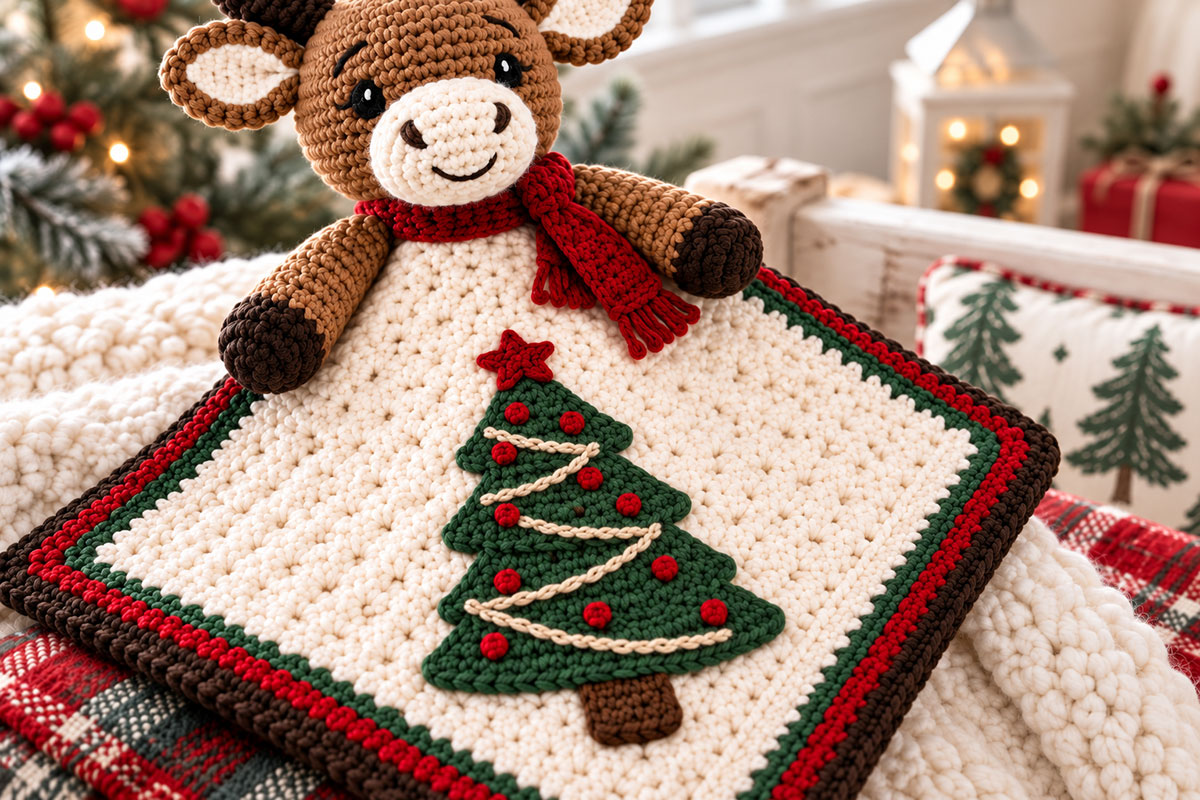
Arrange the warm ivory chain across the tree in four loose diagonal garland swags, working from the upper tier toward the bottom tier as shown in the example image. Pin the garland into position first. Sew it securely to the tree every 1/2 to 3/4 inch so there are no loose loops that can pull away from the appliqué. Weave both ends into the green tree fabric.
Thread a tapestry needle with cranberry yarn and add 10 small ornament details between and around the garland passes. Use short straight stitches or tiny satin-stitched dots. Do not use separate beads, buttons or loose decorative pieces.
Keep the ornaments scattered rather than lining them up in rows. The finished tree should have the red star, cream garland and small cranberry ornament details shown in the example.
Small Cranberry Crochet Scarf
Use cranberry and the 3.5 mm hook.
Ch 6.
Row 1: Sc in the second ch from the hook and across. [5]
Rows 2 through 54: Ch 1 and turn. Sc in each st across. [5]
Fasten off, leaving a long sewing tail.
The scarf should measure approximately 10 1/2 to 11 inches long.
To make the short fringe shown in the example, cut 5 pieces of cranberry yarn approximately 2 inches long. Fold one strand in half, pull the folded center through one stitch along a short end of the scarf, then draw both cut ends through the loop and tighten. Repeat across the 5 end stitches.
Trim the finished fringe to approximately 1/2 inch long. With cranberry yarn and a tapestry needle, take one small securing stitch through each fringe knot and the scarf edge so the short strands stay firmly attached. Do not leave long fringe.
Wait until Manley's head has been attached to the blanket before installing the scarf. Wrap it once around the neck with a small overlap at the front or slightly to one side. Sew through the overlap so the scarf cannot be removed, then tack each short end discreetly to Manley's chest or the upper blanket.
You can leave a little bit of one end visible as shown in the example. Just don't leave a long loose loop hanging from the toy.
Assembly and Finishing
Lay the finished blanket flat with one corner pointing downward. The opposite corner points upward behind Manley. Center the Christmas tree on the blanket before attaching the moose so you can make sure the two focal points line up.
1. Finish the face first. Attach the muzzle, embroider the nostrils and smile, and complete both satin-stitch eyes before the head is sewn to the blanket. It is much easier to adjust Manley's expression while you can still turn the head freely in your hands.
2. Attach the ears and antlers. Pin both ears and both antlers before sewing any of them permanently. Check the head straight on. The antlers should look mirrored but not stiffly identical, and the ears should still be visible beneath them.
3. Position the arms. Lay the two arms over the upper portion of the blanket with the dark hoof ends pointing toward the front. Place the flattened tops roughly 2 to 2 1/2 inches to either side of the blanket's upper center line. Sew each arm firmly through the upper blanket fabric.
4. Add the head. Center Manley's head over the arm attachment points. The lower portion of the head should overlap the top area of the blanket enough to hide the arm seams while keeping the Christmas tree fully visible below.
Pin the head from several directions before sewing. Stitch the lower back and sides of the head securely to the blanket. Make more than one pass through the attachment area if needed. The head should not wobble loosely when the blanket is lifted.
5. Add the scarf. Wrap the completed scarf around the base of the head. Stitch through the overlap, then tack both ends down as described in the scarf section.
6. Check the tree. Run your fingers around the edges of every tier, the trunk and all five star points. Add another stitch anywhere you can easily lift an edge away from the blanket.
7. Finish the back. Weave every yarn tail well into matching crochet fabric. Do not simply clip ends close to a knot. Work them back and forth through several stitches before trimming.
8. Give Manley one last shape check. Gently redistribute the stuffing in the head, muzzle, antlers and hoof ends. Shape the short rounded antler branches so they angle outward like the example. Straighten the blanket without flattening the lemon-peel texture. The finished project should match the example with a broad moose face, chunky dark-brown antlers, floppy arms, small cranberry scarf and one centered flat Christmas tree appliqué.
9. Do a final attachment and tool check. Remove every positioning pin and stitch marker. Tug gently at the head, arms, ears, antlers, scarf, each scarf-fringe knot, tree tiers, trunk, star and cream garland to make sure every attachment is secure. Check the embroidered ornament details and facial features for loose yarn, then check the back of the blanket for loose ends and make sure no temporary construction item remains anywhere in the finished lovey.
If you'd like another version of the same character after Christmas, the fall Manley the Moose lovey pattern uses his familiar woodland look without the Christmas tree and scarf.
Keep Manley Looking Like a Moose
Before you finish sewing everything together, look at Manley straight on. He should read as a moose before the Christmas colors, scarf or tree appliqué even enter the picture.
The broad muzzle matters most. Keep it wide across the lower face and don't pull the sewing stitches so tightly that the sides pinch inward. A narrow pointed muzzle starts moving him toward deer or reindeer territory pretty quickly.
The antlers matter too. Manley's antlers should feel heavier and broader than deer antlers, with two short rounded prongs on each side. Don't lengthen them into tall, delicate points. His ears should remain clearly visible beside and below the antlers.
I would also keep the head fairly round and substantial. A long narrow head combined with tall branching antlers changes the character completely. We're making a Christmas moose here. Not Rudolph's cousin.
Washing and Caring for the Finished Lovey
Check the care instructions on the yarn you used before washing the finished lovey. If the yarn is machine washable, put Manley in a mesh laundry bag or pillowcase to keep the antlers, scarf and tree appliqué from being pulled around during the wash.
Use a gentle cycle and cool or lukewarm water. Avoid high heat unless the yarn manufacturer specifically says the yarn can handle it.
After washing, reshape the head, muzzle, antlers and blanket while they're still damp. Lay the lovey flat to dry if possible. Straighten the blanket into a square again, smooth the Christmas tree appliqué flat and arrange the antlers back into their intended shape.
Give the appliqué, scarf and facial embroidery a quick check after washing too. If any sewing stitch has loosened, repair it before the lovey goes back into use.
Christmas Moose Lovey Pattern Questions
Can I make the blanket larger?
Yes, but keep the foundation chain even so the lemon-peel stitch repeat still works. Add rows until the center is square, then work the border. If you make the blanket substantially larger, the 5 to 6 inch Christmas tree will look smaller in proportion, so you may want to enlarge the appliqué as well.
Can I use a different stitch for the blanket?
You can, but it won't reproduce the Christmas Manley shown here. The lemon-peel stitch is part of this version's finished look and gives the ivory center its pebbled texture without competing with the tree appliqué.
Can I leave off the Christmas tree?
Technically, yes. Manley will still function as a lovey. I wouldn't leave it off if you're trying to make the Christmas version shown on this page, though. The tree is what separates this blanket from simply recoloring the fall version.
Can I make the scarf removable?
I wouldn't for a baby lovey. The pattern has you sew the overlap and tack the ends down so the scarf stays part of the finished piece instead of becoming a separate loose accessory.
Can I use plastic safety eyes instead of embroidery?
No. The example and pattern use black embroidered satin-stitch eyes. Keeping the face embroidered also preserves the softer handmade look of Manley.
Why are there no holly leaves or berries on this version?
Because Manley already has plenty going on with the scarf, Christmas colors and tree appliqué. Keeping the antlers plain also lets their moose shape stay easy to see.
More Woodland Lovey Patterns
If you like Manley's woodland look, you can find more projects on the free crochet animal lovey patterns page.
You can also compare this Christmas version with the fall Manley the Moose lovey. The character stays familiar, but the blanket, colors and Christmas details make the two projects quite different.
For more cold-weather woodland characters, visit the winter woodland animal crochet lovey patterns collection.
When you click on links to various merchants on this site and make a purchase, this may result in this site earning a commission. This does not affect the price you pay.

UBGI Gold Standard 2026
Reviewed under the site's
editorial checklist.
Photos, decorating ideas, party setups and reader submissions are shared for inspiration unless a page is specifically presented as a pattern, tutorial, reference guide or step-by-step project. Follow the instructions, measurements, safety guidance and manufacturer directions provided for the particular project or product.
About Jan | Contact | Baby Nursery Ideas (Blog) | Site Map | Privacy Policy | Disclosure Policy | Disclaimer | Affiliate Disclosure | Earnings Disclosure | Facebook | Pinterest
I am a participant in the Amazon Services LLC Associates Program, an affiliate advertising program designed to provide a means for us to earn fees by linking to Amazon. As an Amazon Associate I earn from qualifying purchases.
Copyright © 2006-2026. All Rights Reserved.