Free Fall Moose Lovey Crochet Pattern
By Jan Bay
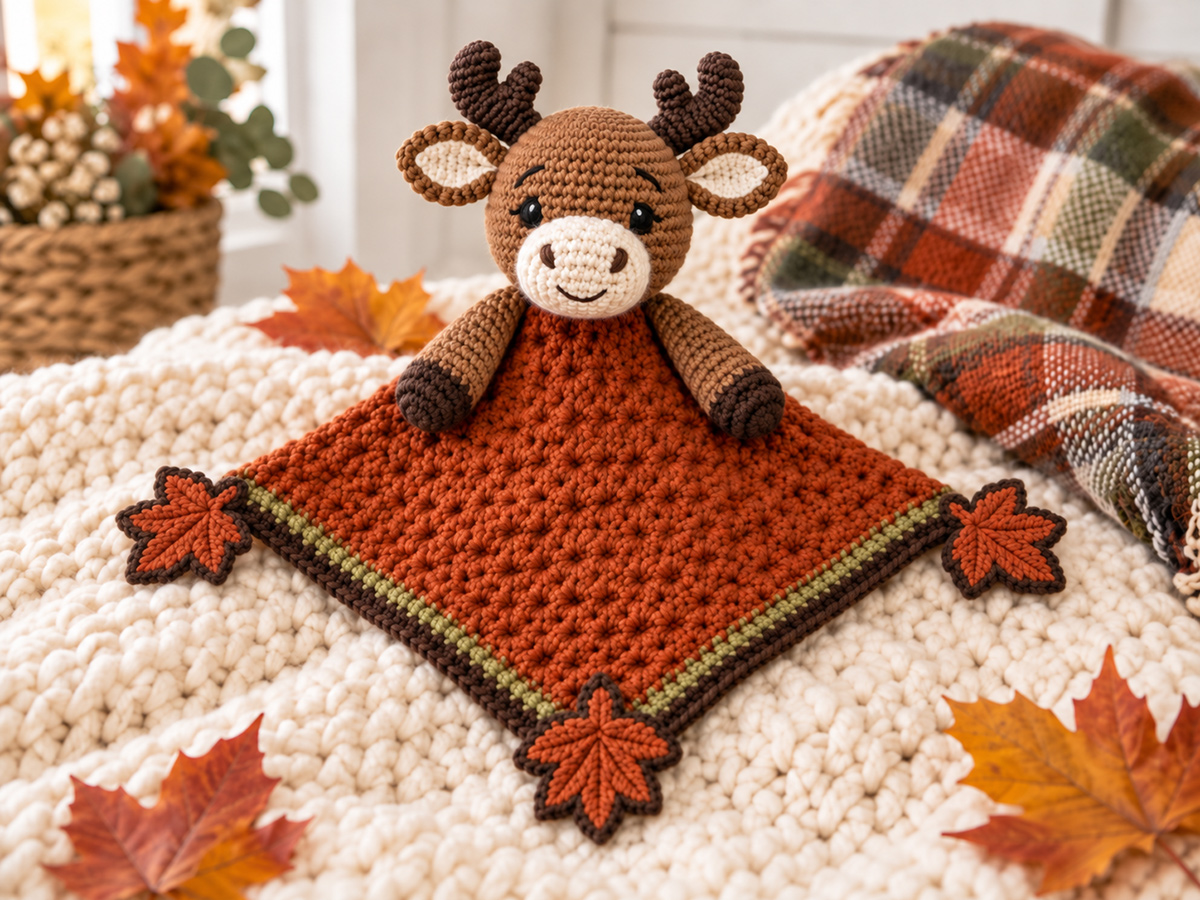
This free fall moose lovey crochet pattern combines a friendly woodland animal with rich autumn color. I designed Manley the Moose with a warm rust-colored blanket and a crocheted fall leaf at each of the three open corners. It makes a baby gift especially suited to the season, with just a touch of the outdoors for that time of year when the air gets crisp and adventure calls.
Explore More Free Crochet Baby Patterns
🐿 Woodland Squirrel Lovey with Acorns
Yarn for This Project
Choose warm moose brown, cream, rust orange, olive green and dark brown shades to recreate the fall palette shown here.
Jump to:
Materials & Supplies for the Fall Moose Lovey Crochet Pattern
For Manley Moose, I’d use a smooth Medium #4 yarn rather than chenille or blanket yarn. The face, antlers and little fall leaves depend on fairly crisp shaping, and a fuzzy yarn would change both the proportions and the look of the finished lovey.
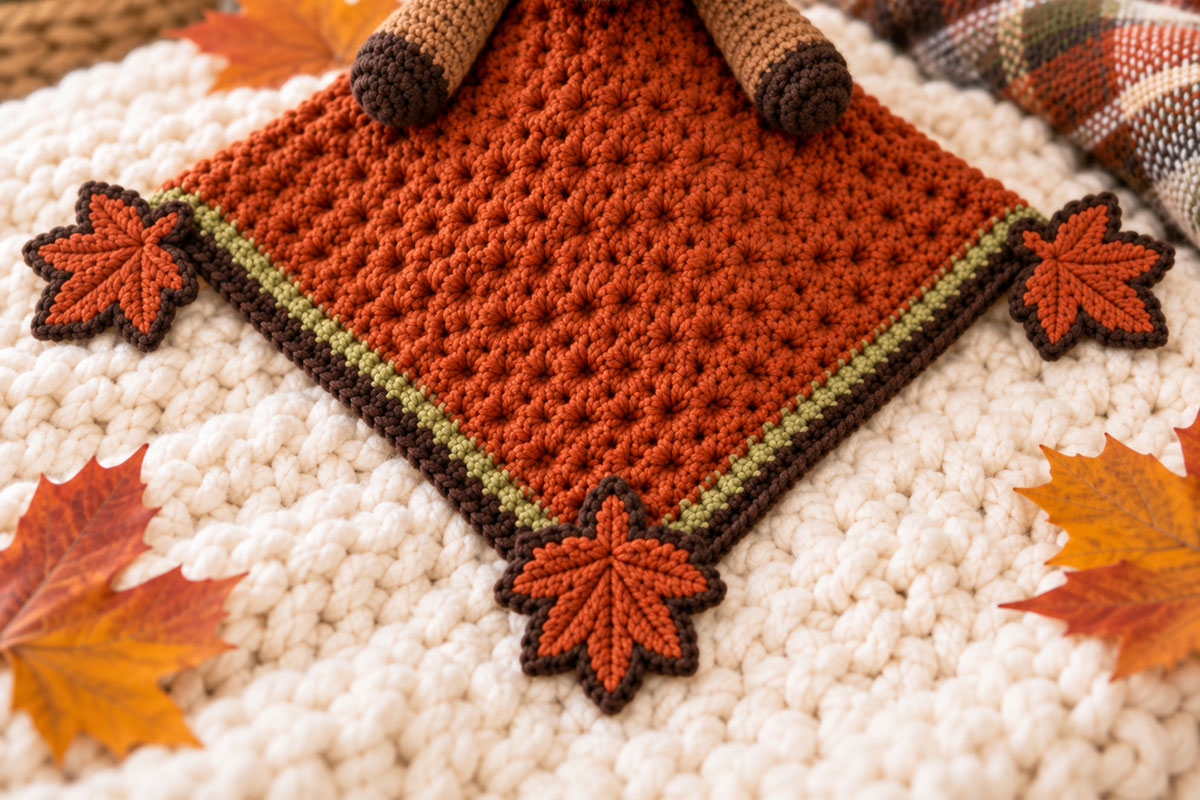
The example uses a deep rust orange for the blanket, medium warm brown for Manley, dark brown for the antlers, hoof ends and outer edging, cream for the muzzle and inner ears, and muted olive for the inner border.
Yarn: Smooth Medium #4 yarn, such as worsted or aran weight.
- Rust orange: approximately 300 yards (275 m) for the blanket and three leaves
- Medium warm brown: approximately 120 yards (110 m) for the head, outer ears and arms
- Dark brown: approximately 50 yards (46 m) for the antlers, hoof ends, blanket edging and leaf edging
- Cream: approximately 40 yards (37 m) for the muzzle and inner ears
- Olive green: approximately 35 yards (32 m) for the blanket border
- Black: a small amount of smooth yarn or embroidery floss for the embroidered eyes
The yarn amounts are calculated estimates for the stated finished size rather than amounts taken from a physically test-crocheted sample. I’d allow a little extra, particularly in rust orange.
Crochet hooks:
- 5 mm (H-8) hook for the blanket and border
- 3.5 mm (E-4) hook for the head, muzzle, ears, antlers, arms and leaves
You’ll also need:
- polyester fiberfill for the head, muzzle, antler stems and lower portions of the arms
- tapestry needle with a blunt tip
- locking stitch markers
- straight pins or removable positioning markers
- scissors
- measuring tape
No plastic safety eyes or buttons are used on Manley Moose. The eyes, nostrils, brows and smile are embroidered.
Finished Size & Gauge
The finished blanket is expected to measure about 19 inches square, including the olive and dark brown edging. At the stated amigurumi gauge, Manley’s head is expected to measure about 4 1/4 inches wide, with the antlers extending approximately another 2 to 2 1/2 inches above the top of the head.
When the finished lovey is laid out in the diamond orientation shown in the example, expect approximately 31 to 32 inches from the top of the antlers to the opposite blanket corner. The fall leaf at the lower corner will extend a little beyond that point. These are calculated expected measurements rather than measurements taken from a physically test-crocheted sample, so your finished size may vary slightly with yarn, hook size and stuffing.
Blanket gauge: approximately 14 stitches and 12 rows = 4 inches in the textured blanket stitch using the 5 mm hook.
Amigurumi gauge: approximately 18 single crochet stitches and 20 rounds = 4 inches using the 3.5 mm hook.
The amigurumi gauge matters more than the exact number on the ruler. The head, arms and antlers should be firm enough that stuffing doesn't show through the stitches. If you can see obvious gaps when the fabric is stretched slightly, move down a hook size.
The dimensions and yarn amounts in this pattern are calculated from the stitch counts and intended gauge. This version has not been physically test-crocheted, so check your measurements as you work rather than waiting until assembly.
Before You Start Manley Moose
The blanket is worked flat in rows using a simple textured stitch, then edged in olive and dark brown. The square is turned so it sits like a diamond in the finished lovey. Manley’s head and arms are attached near the upper corner rather than directly in the center.
The head, muzzle, ears, antlers and arms are crocheted separately. Three maple-style leaves are attached to the open blanket corners during assembly. The upper corner is left without a leaf because it sits behind Manley's head.
Piece count: Before final assembly, you should have 18 crocheted pieces: 1 blanket, 1 head, 1 muzzle, 2 outer ears, 2 inner ears, 2 antler stems, 2 long antler tines, 2 short antler tines, 2 arms and 3 fall leaves.
I wouldn't make the antlers oversized. The compact three-prong shape is part of what keeps Manley looking like the example instead of turning the head into a set of giant antlers with a moose underneath them.
Pattern terms: US crochet terminology.
Working in rounds: The head, muzzle, outer ears, antler stems, antler tines and arms are worked in continuous spirals unless the instructions specifically tell you to join. Place a stitch marker in the first stitch of each round and move it up as you work. The fall leaves are different: Round 1 is joined with a slip stitch as written.
Stuffing: Stuff the head firmly enough to hold its round shape. Use only a small amount beneath the muzzle and inside each antler stem. Stuff the hoof ends and lower arms lightly, but leave the upper part of each arm softer so the arms can lie naturally against the blanket.
Abbreviations
- ch = chain
- sc = single crochet
- hdc = half double crochet
- dc = double crochet
- tr = treble crochet
- sl st = slip stitch
- st / sts = stitch / stitches
- inc = work 2 single crochet stitches in the same stitch
- dec = invisible single crochet decrease over the next 2 stitches
- MR = magic ring
- RS = right side
- WS = wrong side
Crochet the Rust-Orange Lovey Blanket
The rust blanket does most of the work visually, so I kept the stitch interesting without making it fussy. It has enough texture to stand apart from a plain single crochet square, but the leaves and Manley still get to be the stars.
With the 5 mm hook and rust-orange yarn, ch 65.
Row 1: Work (sc, dc) in the 2nd ch from the hook, skip the next ch. *Work (sc, dc) in the next ch, skip the next ch.* Repeat from * to * across. You will have 32 textured pairs and 64 total stitches.
Row 2: Ch 1 and turn. Skip the first dc from the previous row. Work (sc, dc) in the next sc. *Skip the next dc, work (sc, dc) in the next sc.* Repeat across. 64 sts.
Rows 3-54: Repeat Row 2.
At the intended gauge, the rust section should be close to 18 inches square before the border. If yours is noticeably smaller or larger, check the gauge now. Don't try to fix a major size difference by adding a very wide border later.
Olive and Brown Blanket Border
Do not fasten off the rust yarn until you've checked that the blanket is reasonably square.
Fasten off rust. Join olive yarn at one corner with the RS facing.
Border Round 1: Ch 1. Work 3 sc in the starting corner stitch. Sc in each of the next 62 stitches across the first edge, then work 3 sc in the final stitch of that edge. Work 63 sc evenly down the first side across the 54 row ends. Across the foundation edge, work 3 sc in the first corner chain, sc in each of the next 62 chains, then work 3 sc in the final corner chain. Work 63 sc evenly up the remaining side across the 54 row ends. Join with a sl st to the first sc of the starting 3-sc corner. 262 sts total.
The 62 single crochet stitches between each pair of 3-sc corner groups correspond to the 62 interior stitches of each 64-stitch horizontal edge. On each side edge, distribute 63 sc evenly across the 54 row ends so the border follows the physical length of the blanket without drawing inward.
Fasten off olive and join dark brown yarn in the center stitch of any 3-sc corner.
Border Round 2: Ch 1. Work 3 sc in the center corner stitch. Sc in each stitch up to, but not including, the center stitch of the next 3-sc corner. Work 3 sc in that center stitch. Repeat around, working 3 sc in each of the four center corner stitches and 1 sc in every other stitch. Join with a sl st to the first sc. 270 sts total. Fasten off.
Weave in the blanket ends before attaching the leaves. It is much easier to deal with them now than after the corners have another layer sewn over them.
Crochet Manley Moose's Head
Use the 3.5 mm hook and medium warm brown yarn. Work in continuous rounds.
Round 1: 6 sc in MR. 6 sts.
Round 2: Inc in each st around. 12 sts.
Round 3: *Sc in next st, inc in next st.* Repeat around. 18 sts.
Round 4: *Sc in next 2 sts, inc in next st.* Repeat around. 24 sts.
Round 5: *Sc in next 3 sts, inc in next st.* Repeat around. 30 sts.
Round 6: *Sc in next 4 sts, inc in next st.* Repeat around. 36 sts.
Round 7: *Sc in next 5 sts, inc in next st.* Repeat around. 42 sts.
Round 8: *Sc in next 6 sts, inc in next st.* Repeat around. 48 sts.
Round 9: *Sc in next 7 sts, inc in next st.* Repeat around. 54 sts.
Round 10: *Sc in next 8 sts, inc in next st.* Repeat around. 60 sts.
Rounds 11-20: Sc in each st around. 60 sts.
Round 21: *Sc in next 8 sts, dec.* Repeat around. 54 sts.
Round 22: *Sc in next 7 sts, dec.* Repeat around. 48 sts.
Round 23: *Sc in next 6 sts, dec.* Repeat around. 42 sts.
Round 24: *Sc in next 5 sts, dec.* Repeat around. 36 sts.
Begin stuffing. Push the stuffing firmly into the upper and side portions of the head first so the finished head stays rounded rather than becoming pear-shaped.
Round 25: *Sc in next 4 sts, dec.* Repeat around. 30 sts.
Round 26: *Sc in next 3 sts, dec.* Repeat around. 24 sts.
Add the remaining stuffing.
Round 27: *Sc in next 2 sts, dec.* Repeat around. 18 sts.
Round 28: *Sc in next st, dec.* Repeat around. 12 sts.
Round 29: Dec around. 6 sts.
Fasten off, leaving a long tail. Thread the tail through the front loops of the remaining six stitches, pull the opening closed and secure it.
Crochet the Muzzle & Embroider Manley's Face
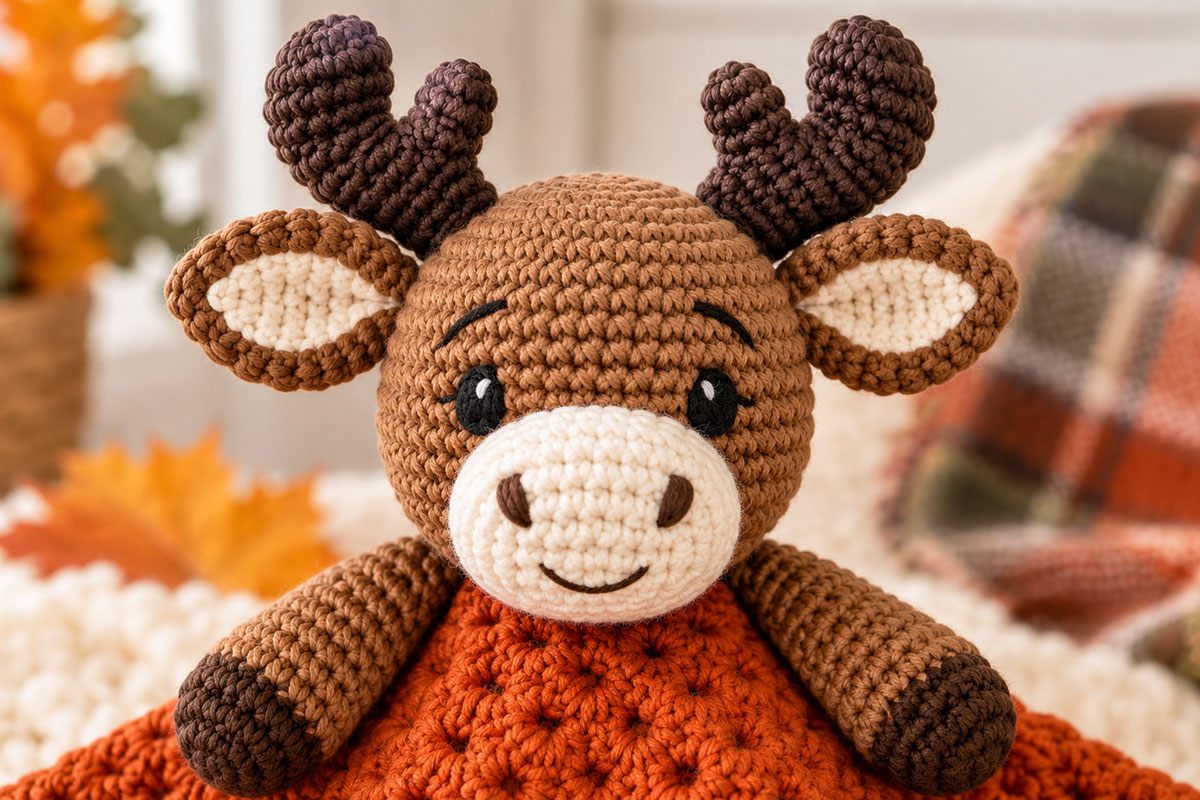
The muzzle is an oval rather than a round patch. That wider shape is important because it gives Manley the broad moose nose shown in the example.
With cream yarn and the 3.5 mm hook, ch 9.
Round 1: Work 2 sc in the 2nd ch from the hook, sc in the next 6 ch, 4 sc in the last ch. Working along the opposite side of the foundation chain, sc in the next 6 ch, then 2 sc in the final ch. 20 sts.
Round 2: Inc in each of the next 2 sts, sc in the next 6 sts, inc in each of the next 4 sts, sc in the next 6 sts, inc in each of the final 2 sts. 28 sts.
Round 3: *(Sc in next st, inc in next st) twice,* sc in next 6 sts, *(sc in next st, inc in next st) 4 times,* sc in next 6 sts, *(sc in next st, inc in next st) twice.* 36 sts.
Fasten off, leaving a long sewing tail.
Center the muzzle horizontally on the lower front of the head, approximately across Head Rounds 14-21. Pin it in place before sewing.
Begin sewing around the outside edge. When roughly three-quarters of the muzzle has been attached, add a small amount of fiberfill underneath. Keep it softly raised rather than firmly stuffed. Finish sewing the remaining edge.
Embroidered Eyes
Use black embroidery floss or smooth black yarn.
Position the eyes approximately between Head Rounds 12 and 14, one on each side just above the muzzle. Keep about 8 visible head stitches between the inner edges of the eyes.
Build each eye with several short satin stitches over an area approximately 2 stitches wide and 2 rounds high. Add one tiny cream stitch near the upper outside portion of each eye if you want the little catchlight shown in the example.
Do not use plastic safety eyes for this version.
Nostrils, Smile and Brows
With dark brown embroidery yarn, place two short vertical or slightly diagonal nostril stitches across the upper half of the cream muzzle. Keep them about 5 stitches apart.
Embroider a short vertical stitch below the center of the nostrils, then form a shallow curved smile beneath it.
Add one short dark brown brow above each eye, angled gently upward toward the outside of the face. Keep them subtle. They should give Manley expression without turning them into heavy cartoon eyebrows.
Crochet the Ears & Antlers
Outer Ears - Make 2
With medium brown yarn and the 3.5 mm hook, ch 7.
Round 1: Work 2 sc in the 2nd ch from the hook, sc in the next 4 ch, 4 sc in the last ch. Working along the opposite side of the foundation chain, sc in the next 4 ch and 2 sc in the final ch. 16 sts.
Round 2: Inc in each of the next 2 sts, sc in next 4 sts, inc in each of the next 4 sts, sc in next 4 sts, inc in each of the final 2 sts. 24 sts.
Fasten off, leaving a sewing tail.
Inner Ears - Make 2
With cream yarn, ch 7.
Repeat Outer Ear Round 1 only. 16 sts.
Fasten off. Center one cream inner ear on each brown outer ear and sew it in place.
Pinch the bottom edge of each finished ear slightly so the sides move toward one another. Sew through the fold a few times to hold the shape.
Position the ears at approximately Head Rounds 9-12, one on each side. Angle them slightly outward rather than straight sideways. Sew the folded base securely to the head.
Antler Main Stems - Make 2
With dark brown yarn, work 8 sc in a MR.
Rounds 2-9: Sc in each st around. 8 sts.
Add a very small amount of stuffing as you work. The stem should remain flexible enough to angle naturally.
Fasten off, leaving a long sewing tail.
Long Antler Tines - Make 2
With dark brown yarn, work 6 sc in a MR.
Rounds 2-5: Sc in each st around. 6 sts.
Fasten off, leaving a sewing tail.
Short Antler Tines - Make 2
With dark brown yarn, work 6 sc in a MR.
Rounds 2-4: Sc in each st around. 6 sts.
Fasten off, leaving a sewing tail.
Assemble Each Antler
Each finished antler has three visible prongs: the tip of the main stem plus one long and one short side tine.
Sew the longer tine to the outside of the main stem around Main Stem Rounds 5-6. Angle it upward.
Sew the shorter tine slightly lower, around Main Stem Rounds 3-4, and angle it outward a little more than the first tine.
Repeat for the second antler, reversing the tine positions so the two antlers mirror one another.
Position the antler bases on the upper head around Head Rounds 6-8, just inside the ears. Sew securely around each base.
If an antler wants to lean too far outward, run one discreet dark brown anchoring stitch from the lower antler stem into the head. That small adjustment is better than stuffing the antler so firmly that it becomes bulky.
Crochet Manley Moose's Arms
Make 2. Begin with dark brown yarn for the hoof end.
Round 1: 6 sc in MR. 6 sts.
Round 2: Inc in each st around. 12 sts.
Round 3: *Sc in next st, inc in next st.* Repeat around. 18 sts.
Rounds 4-7: Sc in each st around. 18 sts.
On the final stitch of Round 7, begin the sc with dark brown yarn but complete the final yarn-over and pull-through with medium brown yarn. Cut the dark brown yarn, leaving a tail long enough to weave in securely.
Rounds 8-21: Continue with medium brown yarn and sc in each st around. 18 sts.
Round 22: *Sc in next st, dec.* Repeat around. 12 sts.
Rounds 23-24: Sc in each st around. 12 sts.
Stuff the hoof and lower half of the arm lightly. Leave the upper several rounds mostly unstuffed so the arm can flatten against the blanket.
Fold the opening flat and crochet through both layers with 6 sc to close.
Fasten off, leaving a long tail for assembly.
At the stated gauge, the finished arms should measure about 4 3/4 to 5 inches long. If yours are considerably longer or shorter, check the amigurumi row gauge before making the second arm.
Crochet the Fall Leaf Corners
Make 3 with rust-orange yarn and the 3.5 mm hook.
These aren't meant to be botanically perfect maple leaves. They're simple five-lobed crochet leaves that read clearly as autumn foliage without putting a complicated appliqué at every corner.
Round 1: Work 10 sc in MR. Join with a sl st to the first sc. 10 sts.
For Round 2, use the 10 stitches of Round 1 to place five lobes with the stem centered between the two lower lobes. Do not turn.
Top lobe: In the same stitch as the Round 1 join work: ch 3, 2 tr, ch 3, sl st in the first of those 3 chains to form the point, 2 tr, ch 3, sl st in the same base st.
Sl st in the next st.
Upper right lobe: In the next st work: ch 2, dc, tr, ch 2, sl st in the first of those 2 chains, tr, dc, ch 2, sl st in the same base st.
Sl st in the next st.
Lower right lobe: In the next st work: ch 2, 2 dc, ch 2, sl st in the first of those 2 chains, 2 dc, ch 2, sl st in the same base st.
Stem: Sl st in the next st. Ch 6. Beginning in the 2nd ch from the hook, sl st in each of the next 5 chains. Sl st again in the same Round 1 stitch at the base of the stem.
Lower left lobe: In the next st work: ch 2, 2 dc, ch 2, sl st in the first of those 2 chains, 2 dc, ch 2, sl st in the same base st.
Sl st in the next st.
Upper left lobe: In the next st work: ch 2, dc, tr, ch 2, sl st in the first of those 2 chains, tr, dc, ch 2, sl st in the same base st.
Sl st in the final st and join to the base of the top lobe.
Fasten off rust yarn, leaving a long sewing tail for attaching the leaf to the blanket.
Dark Brown Leaf Edging
Join dark brown yarn near the base of the stem.
Work slip stitches evenly around the outside edge of the leaf and stem. Keep the stitches relaxed. A tight slip-stitch edge will make the points curl inward.
At each pointed lobe, work 2 slip stitches around the small point space if needed to keep the outline smooth.
Fasten off and weave in the brown end. Leave the rust sewing tail available for attaching the leaf to the blanket.
The finished leaves should measure roughly 3 to 3 1/2 inches from the end of the stem to the upper point.
I'd keep all three leaves rust-colored for the version shown here. If you decide to make a second fall Manley later, changing one or two to mustard or olive would be an easy variation without changing the pattern itself.
Assembly & Finishing
Do the assembly on a flat surface. Pin everything first. A few minutes spent checking the placement now is much easier than removing a firmly sewn moose head later.
1. Orient the Blanket
Turn the finished square so one corner points upward and one points downward, forming the diamond orientation shown in the example.
The upper corner becomes the area behind Manley's head. The opposite corner points down the front of the lovey.
2. Position the Head
Center the head over the upper blanket corner so that the corner extends approximately 1 1/2 to 2 inches up the back of the head. From the front, Manley should look as though he is sitting directly at the top point of the diamond rather than several inches down inside the blanket.
Keep the face pointing straight forward. The upper blanket corner should remain behind the lower portion of the head and should not show above or in front of it.
Pin the blanket to the lower back of the head over an attachment area roughly 2 1/2 inches wide. Check the placement from the front before sewing.
Using medium brown yarn and a tapestry needle, sew repeatedly through the blanket and the lower back rounds of the head. Work around the entire attachment area instead of relying on two or three large stitches.
Pull the attachment snug, but don't cinch the blanket into a puckered lump underneath the head.
3. Attach the Arms
Position one arm on each side of the head with the darker hoof ends pointing slightly downward and outward.
Sew the flattened upper edge of each arm to the blanket just below and slightly behind the head.
Add several stitches through the upper side of each arm into the lower side of the head if needed. That keeps the arms tucked naturally beside Manley instead of hanging straight from the blanket like handles.
4. Attach the Three Fall Leaves
Center one leaf over each of the left, right and lower blanket corners with the stem pointing inward toward the center of the blanket. Leave the upper corner behind Manley's head without a leaf.
Sew around the inner portion of the leaf and through the stem. Leave the pointed outer lobes slightly free rather than stitching every millimeter of the perimeter flat.
Check the back after attaching each leaf. The sewing thread should be secure but shouldn't form long loose floats where little fingers can catch them.
5. Final Face and Shape Check
Look at Manley from straight ahead before weaving in the final assembly tails.
The antlers should sit at similar heights, the ears should angle slightly upward and outward, and the muzzle should remain centered between the eyes.
If an ear or antler is leaning noticeably, correct it with a small anchoring stitch now.
Weave every remaining yarn tail securely into the interior of the crocheted pieces or through several inches of dense blanket fabric. Trim only after you're sure the end can't pull free.
Remove every straight pin, locking stitch marker and temporary positioning marker. Check the front and back once more before the lovey is used or gifted.
That's Manley finished.
Check the Finished Fall Moose Lovey
Before calling it done, spread the blanket flat and compare the finished lovey with the example image. You should have a rust-orange textured diamond, a narrow olive-and-dark-brown border, one rust leaf at each of the three open corners, medium brown arms with dark hoof ends, and compact dark brown antlers above Manley's ears.
If the blanket is the right size but Manley looks too large for it, don't add more border rounds. That changes the proportions and the look of the example. The better correction is to check the amigurumi gauge and use the smaller hook if necessary.
The same applies to the antlers. Keep them compact.
Washing and Care
Follow the washing instructions on the yarn you choose. If the yarn is machine washable, I'd still place the finished lovey in a mesh laundry bag and use a gentle cycle. Reshape the head, ears, antlers and leaves while damp and let the lovey dry completely before storing it.
Check the embroidery, antlers, ears and corner leaves occasionally for loose yarn or damaged stitches, particularly if the lovey is being handled regularly.
This is a comfort lovey and handmade gift, not an item for an infant sleep space. The U.S. Consumer Product Safety Commission safe-sleep guidance recommends keeping blankets, toys and other soft objects out of an infant sleep space.
More Woodland Lovey Patterns
If Manley has you in a woodland mood, the free animal lovey patterns page is the easiest place to find the rest of the collection.
The woodland squirrel lovey crochet pattern has a completely different cream blanket and curled squirrel tail, while the winter woodland animal lovey patterns move the same general woodland idea into a colder-season palette.
Manley will also have room to change with the seasons. The rust blanket and leaves belong to this fall version, so I wouldn't simply swap the yarn colors and call the winter version finished. The seasonal details should earn their place.
Fall Moose Lovey Crochet Pattern FAQ
Can I make Manley Moose in different colors?
Yes. The construction doesn't depend on this exact palette. For the fall version, I'd keep at least one warm autumn color in the blanket or leaves so the seasonal idea doesn't disappear completely.
Can I use blanket yarn instead of worsted weight yarn?
Not without recalculating the pattern. Blanket yarn would make the head, arms, antlers and leaves substantially larger and would change Manley's proportions. A smooth Medium #4 yarn is the better match for the finished example.
Can I make the blanket larger?
Yes. Continue the textured blanket stitch for additional rows and begin with a longer odd-numbered foundation chain. After the first chain is skipped, this leaves an even number of working chains for the two-stitch repeat. If you enlarge it considerably, recalculate the side-border stitch spacing so the edging lies flat.
Can I leave the fall leaves off?
You can, but they are one of the details that separates this particular pattern from a plain moose lovey. If you're making Manley as shown, I'd keep them.
Can I use safety eyes?
I wouldn't for this version. The finished example uses embroidered eyes, and the pattern is written to reproduce that softer face. Embroidery also avoids adding detachable plastic eye components.
Is this pattern physically test-crocheted?
No. The stitch counts, dimensions and construction have been calculated and checked against the finished design, but this version has not been physically test-crocheted. Treat the stated measurements as expected measurements and check your own gauge and dimensions as you work.
When you click on links to various merchants on this site and make a purchase, this may result in this site earning a commission. This does not affect the price you pay.

UBGI Gold Standard 2026
Reviewed under the site's
editorial checklist.
Photos, decorating ideas, party setups and reader submissions are shared for inspiration unless a page is specifically presented as a pattern, tutorial, reference guide or step-by-step project. Follow the instructions, measurements, safety guidance and manufacturer directions provided for the particular project or product.
About Jan | Contact | Baby Nursery Ideas (Blog) | Site Map | Privacy Policy | Disclosure Policy | Disclaimer | Affiliate Disclosure | Earnings Disclosure | Facebook | Pinterest
I am a participant in the Amazon Services LLC Associates Program, an affiliate advertising program designed to provide a means for us to earn fees by linking to Amazon. As an Amazon Associate I earn from qualifying purchases.
Copyright © 2006-2026. All Rights Reserved.