Free Crochet Bunny Ears Pattern for Hats, Headbands and More
By Jan Bay
This free crochet bunny ears pattern gives you reusable rabbit ear pieces you can make for hats, headbands, costumes, baskets and other crochet projects. Choose upright or floppy ears, add optional contrasting inner-ear panels, and use the sizing, shaping and attachment instructions to make two matching ears without adding wire or rigid inserts.
This is a reusable bunny ear pattern, not a complete hat, headband or stuffed rabbit pattern. Choose the ear style and size here, then attach the finished pair to the project you want to make.
Explore More Bunny and Crochet Patterns
Free Crochet Bunny Hat Pattern
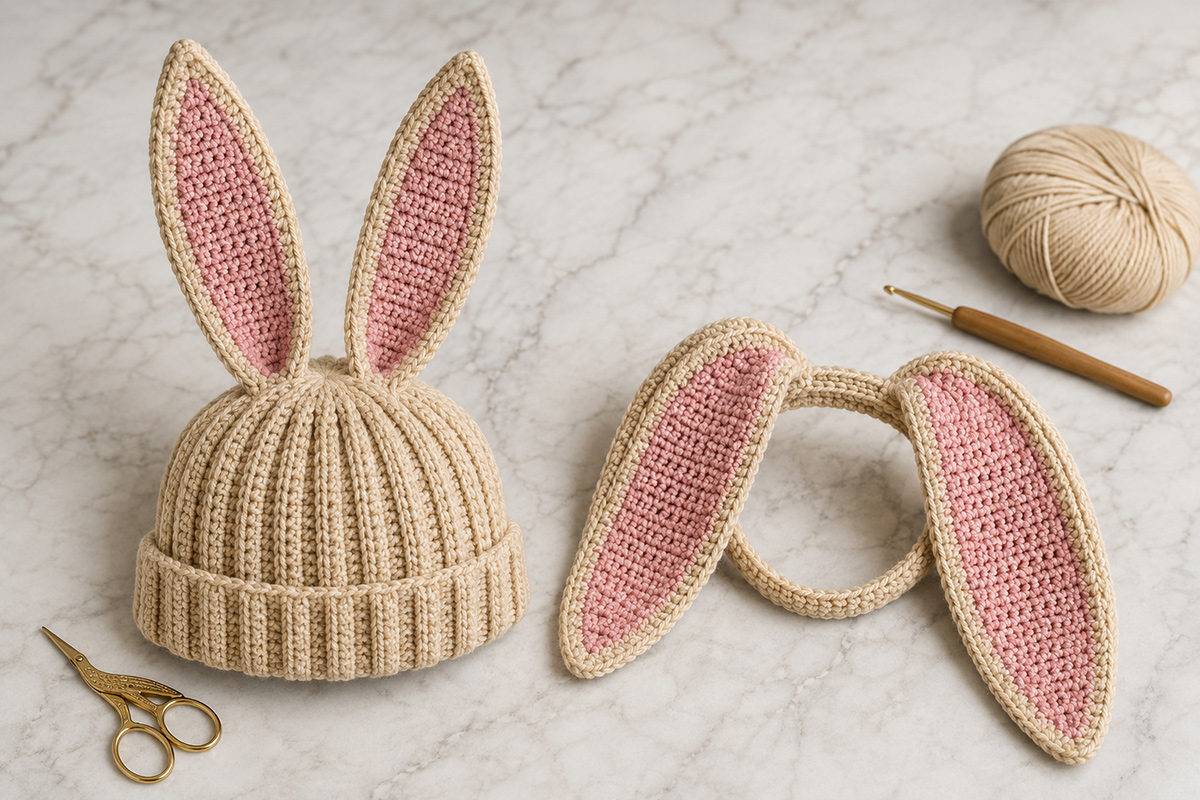
See supplies for this project here
Jump to:
Materials for This Crochet Bunny Ears Pattern
You do not need many supplies to make these ears, which is one reason I like treating them as a separate reusable pattern. Make the ears first, then decide whether they belong on a bunny hat, headband, costume, basket or another crochet project.
- Medium weight #4 yarn in the main ear color
- Small amount of contrasting #4 yarn for optional inner-ear panels
- 4.0 mm crochet hook, or the hook size needed to make a firm fabric with your yarn
- Yarn needle for weaving in ends and sewing the ears in place
- Scissors
- Stitch markers
- Tape measure or ruler
- Rustproof sewing pins or removable stitch markers for positioning the ears before sewing
The yarn does not need to match a specific brand. A smooth worsted-weight yarn makes the shaping easy to see and gives the finished ears enough body to hold their outline. Very fuzzy yarn can hide the edge stitches, which makes it harder to produce two ears that match.
For a pair of small or medium ears, you will generally need only a partial skein of the main color and a small amount of the inner-ear color. Larger floppy ears naturally use more yarn. If the ears will be added to a larger project, using yarn from that project is the easiest way to keep the color, texture and washing instructions consistent.
Hook size matters more than the number printed on the yarn label. The finished fabric should be firm enough that the ear does not look loose or full of visible gaps. At the same time, it should still bend easily enough to shape and sew.
The pattern does not require wire, plastic canvas, pipe cleaners or other rigid inserts. Upright ears get their structure from the crochet fabric, the doubled construction and the way the base is attached. Floppy ears are intentionally softer.
If you plan to attach the ears to something worn by a baby or young child, keep the finished project free of exposed wire, sharp hardware, loose buttons and other detachable decorations. Sew the ear bases securely and check the seams before use.
Standard crochet abbreviations and yarn-weight terminology can vary slightly between publishers. The Craft Yarn Council yarn weight system is a useful reference if you need help identifying a medium #4 yarn.
Pattern notes: This pattern uses U.S. crochet terminology. The ch-1 turning chain does not count as a stitch. Weave in the beginning tail of every panel before assembly. When an inner-ear panel tells you to leave a long ending tail, keep that tail for sewing.
Crochet Bunny Ear Sizes and Finished Measurements
The same bunny ear can look very different depending on its length, width and how firmly the base is attached. A short ear reads as compact and upright. A longer ear can still stand if it is made from firm doubled fabric, while an extra-long ear naturally begins to bend or flop.
For this guide, I use three practical sizes. These are expected finished-size ranges, not guaranteed measurements. Yarn thickness, hook size and tension can change the finished dimensions.
| Size | Expected Finished Length | Expected Widest Width | Good For |
|---|---|---|---|
| Small | 4 to 4 1/2 inches | 1 3/4 to 2 inches | Small hats, compact headbands, baskets and appliqué-style projects |
| Medium | 5 to 5 1/2 inches | 2 to 2 1/4 inches | Bunny hats, headbands and general costume projects |
| Large | 6 1/2 to 7 inches | 2 1/2 to 2 3/4 inches | Large hats, dramatic headbands and longer floppy-ear projects |
These measurements describe the ear itself before it is sewn to another project. A small amount of the base disappears into the attachment seam, so the visible ear will be slightly shorter after assembly.
Do not choose the size by age alone. Choose it according to the finished project. A medium ear can look oversized on a small bonnet but perfectly balanced on an adult costume headband. The width and placement of the hat or band matter just as much as the wearer's age.
Which bunny ear size should you make?
If you are adding ears to a crochet hat, I would start with the medium size unless the hat is especially small. It gives you enough length for a recognizable rabbit shape without making the top of the hat feel top-heavy.
The free crochet bunny hat pattern is the better choice when you want a complete hat with the ear proportions already coordinated with the finished hat. Use this page when you need the ears as separate pieces or want to change their size, shape or final use.
Small ears are useful when the ear is only one detail in a larger project. They also make a good choice for a narrow headband because there is less fabric pulling against the attachment point.
Large ears create more movement and visual impact. They are especially useful for floppy rabbit ears because the extra length gives the upper portion enough weight to fold naturally instead of standing straight up.
Gauge and fabric firmness
Exact gauge is not critical for this pattern because the ears do not have to fit a body measurement. What matters is making a dense, even crochet fabric that keeps its outline.
Before you make all four outer panels, crochet the first several rows of one panel and hold the fabric upright between two fingers. If it collapses immediately and the stitches look loose, use a smaller hook. If the fabric feels stiff and difficult to work into, move up one hook size.
A useful test is to fold the crocheted fabric gently in half lengthwise. It should bend without forming a hard crease. Upright ears need some body, but they should still feel like yarn rather than a rigid insert.
Make every matching panel with the same yarn, hook and tension. Even a small change in tension can become obvious when two long narrow ears sit next to each other on a hat or headband.
Before you begin the first ear
Decide whether you want upright ears or floppy ears before you start. The two versions are shaped differently. Upright ears are slightly broader through the lower half and taper toward a defined tip. Floppy ears are longer, softer and shaped to bend more naturally.
Also decide whether you want a plain one-color ear or a contrasting inner-ear panel. The inner panel is decorative. It does not provide structural support, so you can leave it off without changing the basic construction.
If you are adding inner-ear panels, stop before joining the outer panels. Crochet all four outer panels first, then complete the Optional Inner Ear Panels section and sew one inner panel to each front outer panel. After that, return to the joining instructions for your chosen ear style.
Piece check before assembly: For one pair of doubled ears, you should have four matching outer panels. If you are adding contrasting centers, you should also have two matching inner-ear panels. For the optional single-layer version, you need only two outer panels, one for each ear.
If you are unsure which version you want, make one outer panel first and hold it against the project. That simple check is more useful than judging the length from the row count alone.
Upright Crochet Bunny Ears Pattern
Use this version when you want rabbit ears that stand above a hat, headband or other crochet project without wire or plastic reinforcement. Each finished ear is made from two matching outer panels. Sewing the panels together gives the ear more body while keeping it soft and flexible.
The three sizes below use the same basic shape. The difference is the starting width, the number of straight rows through the middle and the rate of taper near the tip.
Abbreviations used for the bunny ears
- ch = chain
- sc = single crochet
- inc = work 2 sc in the same stitch
- dec = single crochet 2 stitches together
- st = stitch
- sts = stitches
- FO = fasten off
All upright ear panels are worked back and forth in rows. Chain 1 at the beginning of a new row and turn unless the instructions say otherwise. The turning chain does not count as a stitch.
For one pair of finished upright ears, make four outer ear panels. Two panels are joined to make each ear.
Small upright bunny ear
Make four panels.
Foundation: Ch 5.
Row 1: Sc in the second ch from the hook and in each remaining ch. (4 sts)
Row 2: Ch 1, turn. Inc in first st, sc in next 2 sts, inc in last st. (6 sts)
Rows 3 through 11: Ch 1, turn. Sc in each st across. (6 sts)
Row 12: Ch 1, turn. Dec, sc in next 2 sts, dec. (4 sts)
Row 13: Ch 1, turn. Sc in each st across. (4 sts)
Row 14: Ch 1, turn. Dec twice. (2 sts)
Row 15: Ch 1, turn. Dec. (1 st)
FO and weave in the ending tail. Make the remaining panels to match.
The small ear should measure about 4 to 4 1/2 inches long after joining, depending on yarn and tension.
Medium upright bunny ear
Make four panels.
Foundation: Ch 5.
Row 1: Sc in the second ch from the hook and in each remaining ch. (4 sts)
Row 2: Ch 1, turn. Inc in first st, sc in next 2 sts, inc in last st. (6 sts)
Row 3: Ch 1, turn. Inc in first st, sc in next 4 sts, inc in last st. (8 sts)
Rows 4 through 16: Ch 1, turn. Sc in each st across. (8 sts)
Row 17: Ch 1, turn. Dec, sc in next 4 sts, dec. (6 sts)
Row 18: Ch 1, turn. Sc in each st across. (6 sts)
Row 19: Ch 1, turn. Dec, sc in next 2 sts, dec. (4 sts)
Row 20: Ch 1, turn. Sc in each st across. (4 sts)
Row 21: Ch 1, turn. Dec twice. (2 sts)
Row 22: Ch 1, turn. Dec. (1 st)
FO and weave in the ending tail. Make the remaining panels to match.
The medium ear should finish at approximately 5 to 5 1/2 inches long.
Large upright bunny ear
Make four panels.
Foundation: Ch 7.
Row 1: Sc in the second ch from the hook and in each remaining ch. (6 sts)
Row 2: Ch 1, turn. Inc in first st, sc in next 4 sts, inc in last st. (8 sts)
Row 3: Ch 1, turn. Inc in first st, sc in next 6 sts, inc in last st. (10 sts)
Rows 4 through 19: Ch 1, turn. Sc in each st across. (10 sts)
Row 20: Ch 1, turn. Dec, sc in next 6 sts, dec. (8 sts)
Row 21: Ch 1, turn. Sc in each st across. (8 sts)
Row 22: Ch 1, turn. Dec, sc in next 4 sts, dec. (6 sts)
Row 23: Ch 1, turn. Sc in each st across. (6 sts)
Row 24: Ch 1, turn. Dec, sc in next 2 sts, dec. (4 sts)
Row 25: Ch 1, turn. Dec twice. (2 sts)
Row 26: Ch 1, turn. Dec. (1 st)
FO and weave in the ending tail. Make the remaining panels to match.
The large version should measure approximately 6 1/2 to 7 inches from the lower edge to the tip.
How this crochet bunny ears pattern creates an upright shape
The widest section sits below the tapered tip instead of at the base. That shape gives the ear a recognizable rabbit outline while leaving a narrower lower edge for attachment.
The second panel is just as important as the shaping. A single layer of worsted-weight crochet can bend easily, especially after it is sewn to a soft hat. Two matching layers resist that bend without making the ear hard.
I would not stuff these upright ears. Stuffing can turn a flat rabbit ear into a narrow tube and can make the two ears difficult to match. The doubled panels provide enough thickness for this design.
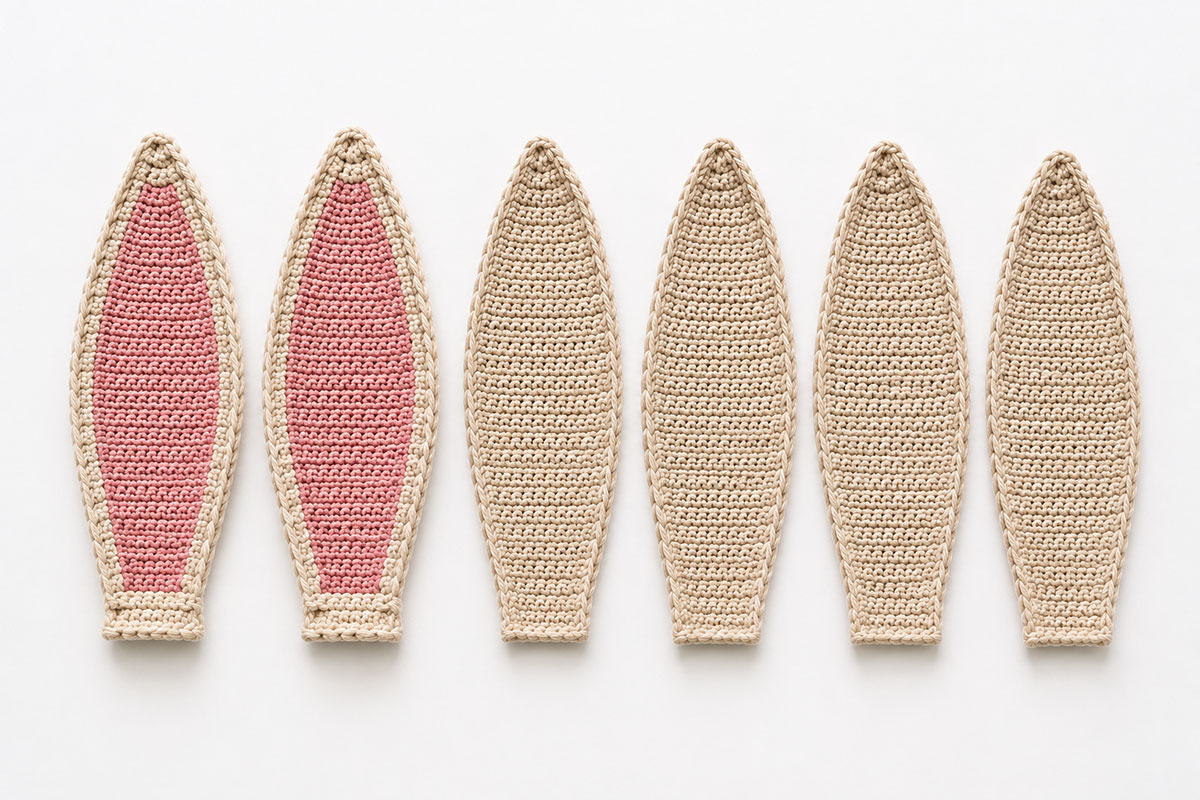
Join the upright ear panels
Complete all four outer panels before you join any of them. Lay the panels side by side and compare their length, width and tip shape.
Pair two matching panels with their rows aligned. Hold the wrong sides together if your crochet fabric has a side that you prefer to display.
Thread a yarn needle with the main-color yarn. Begin at one lower corner and sew through both layers along the first long edge.
Continue around the pointed tip and down the second long edge. Use small, evenly spaced whip stitches through the edge loops. Do not pull the seam tightly enough to gather the fabric.
Leave the bottom edge open. The open base gives you room to adjust the lower corners when the ear is attached to the final project.
Repeat with the other two panels to make the second ear.
After joining, place both ears next to each other again. The pointed tips should reach approximately the same height and the widest sections should begin at the same level.
If one ear looks slightly wider, gently shape it with your fingers before you sew it to the project. Small differences can often be corrected during attachment by adjusting how much of the base is folded inward.
Make the base firmer without wire
If an upright ear needs a little more support, fold each lower corner toward the center of the open base. A small fold removes some width and creates a thicker attachment area.
Pin or hold the fold temporarily. Do not sew it permanently until you have positioned both ears on the hat or headband.
A narrow base makes an ear stand more vertically. A wider base lets the ear open outward. This gives you a useful way to change the finished look without changing the crochet rows.
Do not make a deep fold that closes most of the bottom edge. The ear should still have enough base width to spread the pulling force across several stitches when it is sewn in place.
If you want softer upright ears
You can make the same pattern with only one outer panel per ear when the project does not need much structure. The result will be thinner and more flexible.
For example, a small decorative ear sewn flat against another crocheted piece may not need a second layer. A standing ear on top of a hat benefits much more from the doubled construction.
Check the pair before moving on
Lay the completed ears on a flat surface with the bases even. Compare the tips, side curves and overall lengths.
Then turn one ear over. If the two ears still look like a balanced pair after one is reversed, your shaping is even enough to continue.
Do not worry about making them mechanically identical. Crochet fabric has some movement. What matters is that the pair looks balanced when viewed together.
Keep the bases open and do not attach the ears yet. The later attachment section explains how to position them on hats, headbands and other projects without twisting the finished pair.
Floppy Crochet Bunny Ears Pattern
Floppy bunny ears need a different balance from upright ears. Instead of trying to hold the entire ear above the attachment point, this version is longer through the middle so the upper portion can bend and hang naturally.
The ear begins at the rounded tip, widens through the upper section, stays broad through the middle and then narrows again at the base. That narrower base makes the finished ear easier to sew onto a hat, hood, headband or other project.
Make four outer panels for one pair of doubled floppy ears. Two matching panels are joined to make each finished ear.
Free crochet floppy bunny ears pattern in three sizes
These ears are worked back and forth in rows. Chain 1 and turn at the beginning of each new row. The turning chain does not count as a stitch.
Small floppy bunny ear
Make four panels.
Foundation: Ch 4.
Row 1: Sc in the second ch from the hook and in each remaining ch. (3 sts)
Row 2: Ch 1, turn. Inc in first st, sc in next st, inc in last st. (5 sts)
Row 3: Ch 1, turn. Inc in first st, sc in next 3 sts, inc in last st. (7 sts)
Rows 4 through 11: Ch 1, turn. Sc in each st across. (7 sts)
Row 12: Ch 1, turn. Dec, sc in next 3 sts, dec. (5 sts)
Rows 13 and 14: Ch 1, turn. Sc in each st across. (5 sts)
Row 15: Ch 1, turn. Dec, sc in next st, dec. (3 sts)
Row 16: Ch 1, turn. Sc in each st across. (3 sts)
FO and weave in the ending tail.
This version makes a compact floppy ear that works well when you want visible movement without a long hanging ear.
Medium floppy bunny ear
Make four panels.
Foundation: Ch 4.
Row 1: Sc in the second ch from the hook and in each remaining ch. (3 sts)
Row 2: Ch 1, turn. Inc in first st, sc in next st, inc in last st. (5 sts)
Row 3: Ch 1, turn. Inc in first st, sc in next 3 sts, inc in last st. (7 sts)
Row 4: Ch 1, turn. Inc in first st, sc in next 5 sts, inc in last st. (9 sts)
Rows 5 through 16: Ch 1, turn. Sc in each st across. (9 sts)
Row 17: Ch 1, turn. Dec, sc in next 5 sts, dec. (7 sts)
Rows 18 and 19: Ch 1, turn. Sc in each st across. (7 sts)
Row 20: Ch 1, turn. Dec, sc in next 3 sts, dec. (5 sts)
Row 21: Ch 1, turn. Sc in each st across. (5 sts)
Row 22: Ch 1, turn. Dec, sc in next st, dec. (3 sts)
FO and weave in the ending tail.
The medium version gives you enough length for a clear lop-ear look without becoming difficult to attach to an average-size hat or headband.
Large floppy bunny ear
Make four panels.
Foundation: Ch 4.
Row 1: Sc in the second ch from the hook and in each remaining ch. (3 sts)
Row 2: Ch 1, turn. Inc in first st, sc in next st, inc in last st. (5 sts)
Row 3: Ch 1, turn. Inc in first st, sc in next 3 sts, inc in last st. (7 sts)
Row 4: Ch 1, turn. Inc in first st, sc in next 5 sts, inc in last st. (9 sts)
Row 5: Ch 1, turn. Inc in first st, sc in next 7 sts, inc in last st. (11 sts)
Rows 6 through 21: Ch 1, turn. Sc in each st across. (11 sts)
Row 22: Ch 1, turn. Dec, sc in next 7 sts, dec. (9 sts)
Rows 23 and 24: Ch 1, turn. Sc in each st across. (9 sts)
Row 25: Ch 1, turn. Dec, sc in next 5 sts, dec. (7 sts)
Row 26: Ch 1, turn. Sc in each st across. (7 sts)
Row 27: Ch 1, turn. Dec, sc in next 3 sts, dec. (5 sts)
Row 28: Ch 1, turn. Dec, sc in next st, dec. (3 sts)
FO and weave in the ending tail.
The large version is meant to hang. If you try to force an ear this long into a fully upright position, the attachment seam has to fight the weight of the crochet fabric. Letting it fold or drape gives a better result and keeps the project soft.
Make the tip look rounded instead of pointed
The first three rows form the upper tip of the ear. Because the panel begins with three stitches instead of one, the top stays softly rounded rather than ending in the sharper point used for the upright version.
When you join the two panels, do not pull the seam tightly around the top edge. Keep the stitches even and let the crocheted edge keep its natural curve.
If the top still looks too square after joining, roll the upper edge gently between your fingers. Crochet fabric responds well to light shaping, and a small adjustment is often enough to soften the corners.
Join the floppy ear panels
Finish all four outer panels before assembly. Lay them flat with the narrow bases pointing in the same direction.
Pair two panels that are closest in length and width. Place them together with the sides you want visible facing outward.
Thread the yarn needle with the main-color yarn. Begin at one lower corner.
Sew up one long edge, around the rounded tip and down the opposite long edge. Keep the stitches small and evenly spaced.
Leave the narrow bottom edge open.
Repeat with the second pair of panels.
I would not stuff the floppy ears. The doubled crochet layers give them enough substance, while the empty center lets the ear bend instead of behaving like a stuffed tube.
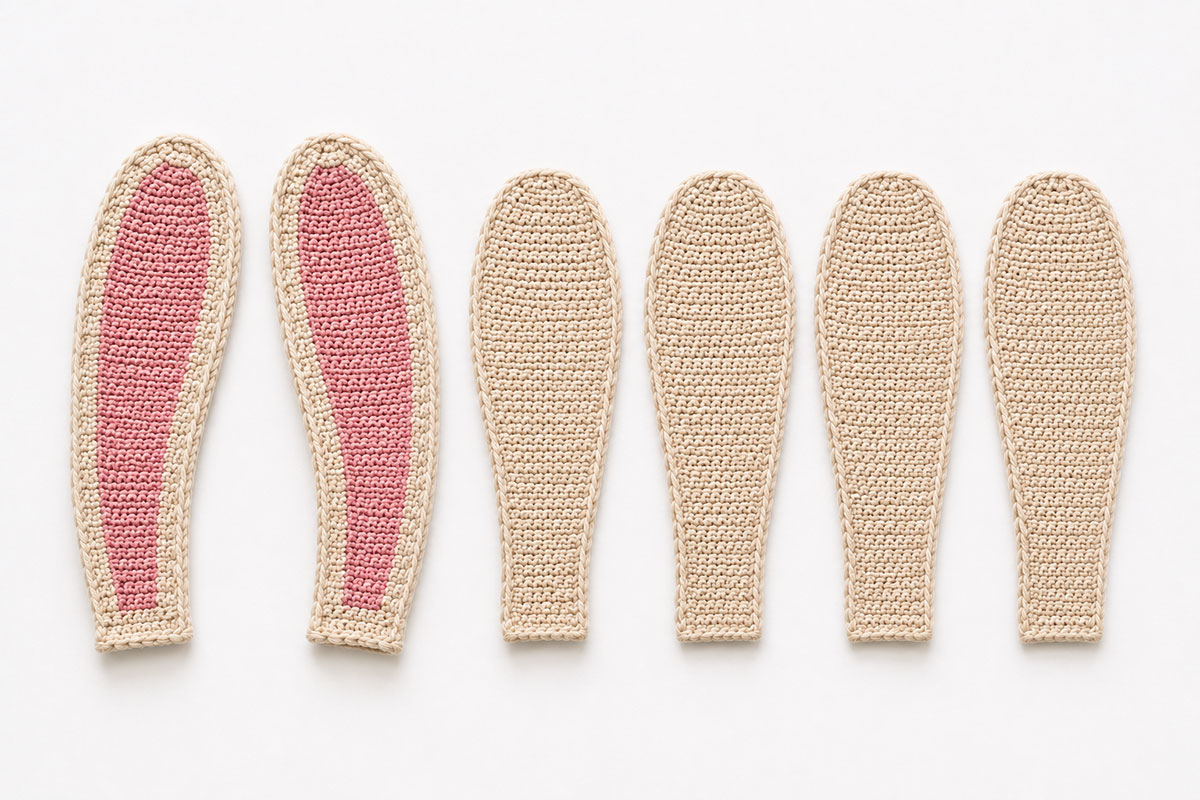
Where the natural fold should happen
Do not create a permanent crease before attaching the ears. First sew them to the project and then let the yarn show you where it wants to bend.
For a medium ear, the fold often looks balanced when it begins somewhere above the midpoint. A large ear can bend higher or lower depending on how much of the ear you want to hang beside the project.
You can encourage the fold by bending the ear gently in the desired direction and holding it there for a moment. There is no need to sew across the fold.
A stitched crease can make the ear look pinched. Leaving the center flexible gives you a softer shape and lets the two ears fall a little differently, which suits a floppy-eared rabbit.
Make both ears bend in a coordinated direction
Before final attachment, place the ears beside each other with both front surfaces facing you.
Decide whether you want them to fall outward, inward or toward the same side. For a balanced pair on a hat or headband, an outward fall is the simplest arrangement.
To encourage that shape, rotate each base slightly outward before pinning it to the project. The change can be small. A few degrees at the base can noticeably change where the upper ear hangs.
Do not twist the base sharply. A twisted attachment can make one edge pull forward while the opposite edge rolls backward.
Single-layer floppy ears
A single crocheted panel can also work as a floppy ear when you want very light, thin ears. Make two panels instead of four and weave in the ends carefully.
The tradeoff is that the back of the stitches remains visible and the edges can curl more easily. That may be perfectly acceptable for a decorative project, but doubled panels give a cleaner finish when both sides of the ear can be seen.
If the finished project will be photographed or viewed from several angles, I prefer the doubled construction because the front and back of each ear have the same finished appearance.
Do not add rigid support just to control the flop
If a floppy ear is hanging lower than you want, shorten the ear or change its attachment angle instead of inserting wire.
You can also move the attachment point slightly farther toward the crown of a hat or use a wider section of the base in the seam. Both changes reduce the amount of unsupported ear extending beyond the attachment.
The goal is not to make every floppy ear hang at an exact angle. The flexible shape is part of the design.
If you want contrasting inner-ear panels, make and attach them to the front outer panels before you join the outer layers. The next section gives those instructions.
Optional Inner Ear Panels
A contrasting inner-ear panel changes the look of the bunny ears without changing their structure. The panel is decorative, so make and attach it before you join the two outer layers of each ear.
You need two inner-ear panels for one pair of ears. Each panel is sewn to the front outer panel only. The back outer panel stays plain.
Choose a yarn that is the same weight as the outer ear yarn. A lighter-weight yarn can also work, but it may create a noticeably thinner patch. I would not use a heavier yarn because the inner panel can pull the outer ear out of shape.
Inner panels for upright crochet bunny ears
These panels have a narrower base and a tapered upper end. Center each one on the front of an upright outer ear with an even border of the main color showing around it.
Small upright inner-ear panel
Make two.
Foundation: Ch 4.
Row 1: Sc in the second ch from the hook and in each remaining ch. (3 sts)
Row 2: Ch 1, turn. Inc in first st, sc in next st, inc in last st. (5 sts)
Rows 3 through 7: Ch 1, turn. Sc in each st across. (5 sts)
Row 8: Ch 1, turn. Dec, sc in next st, dec. (3 sts)
Row 9: Ch 1, turn. Sc in each st across. (3 sts)
Row 10: Ch 1, turn. Dec, sc in last st. (2 sts)
Row 11: Ch 1, turn. Dec. (1 st)
FO, leaving a long tail for sewing.
Medium upright inner-ear panel
Make two.
Foundation: Ch 4.
Row 1: Sc in the second ch from the hook and in each remaining ch. (3 sts)
Row 2: Ch 1, turn. Inc in first st, sc in next st, inc in last st. (5 sts)
Row 3: Ch 1, turn. Inc in first st, sc in next 3 sts, inc in last st. (7 sts)
Rows 4 through 13: Ch 1, turn. Sc in each st across. (7 sts)
Row 14: Ch 1, turn. Dec, sc in next 3 sts, dec. (5 sts)
Row 15: Ch 1, turn. Sc in each st across. (5 sts)
Row 16: Ch 1, turn. Dec, sc in next st, dec. (3 sts)
Row 17: Ch 1, turn. Sc in each st across. (3 sts)
Row 18: Ch 1, turn. Dec, sc in last st. (2 sts)
Row 19: Ch 1, turn. Dec. (1 st)
FO, leaving a long tail for sewing.
Large upright inner-ear panel
Make two.
Foundation: Ch 5.
Row 1: Sc in the second ch from the hook and in each remaining ch. (4 sts)
Row 2: Ch 1, turn. Inc in first st, sc in next 2 sts, inc in last st. (6 sts)
Row 3: Ch 1, turn. Inc in first st, sc in next 4 sts, inc in last st. (8 sts)
Rows 4 through 16: Ch 1, turn. Sc in each st across. (8 sts)
Row 17: Ch 1, turn. Dec, sc in next 4 sts, dec. (6 sts)
Row 18: Ch 1, turn. Sc in each st across. (6 sts)
Row 19: Ch 1, turn. Dec, sc in next 2 sts, dec. (4 sts)
Row 20: Ch 1, turn. Sc in each st across. (4 sts)
Row 21: Ch 1, turn. Dec twice. (2 sts)
Row 22: Ch 1, turn. Dec. (1 st)
FO, leaving a long tail for sewing.
Inner panels for floppy bunny ears
A floppy ear looks softer when its inner panel has a rounded upper end instead of a sharp point. These panels begin narrow, widen through the upper portion and taper again toward the base.
Small floppy inner-ear panel
Make two.
Foundation: Ch 3.
Row 1: Sc in the second ch from the hook and in the remaining ch. (2 sts)
Row 2: Ch 1, turn. Inc in each st. (4 sts)
Row 3: Ch 1, turn. Inc in first st, sc in next 2 sts, inc in last st. (6 sts)
Rows 4 through 8: Ch 1, turn. Sc in each st across. (6 sts)
Row 9: Ch 1, turn. Dec, sc in next 2 sts, dec. (4 sts)
Rows 10 and 11: Ch 1, turn. Sc in each st across. (4 sts)
Row 12: Ch 1, turn. Dec twice. (2 sts)
FO, leaving a long tail for sewing.
Medium floppy inner-ear panel
Make two.
Foundation: Ch 3.
Row 1: Sc in the second ch from the hook and in the remaining ch. (2 sts)
Row 2: Ch 1, turn. Inc in each st. (4 sts)
Row 3: Ch 1, turn. Inc in first st, sc in next 2 sts, inc in last st. (6 sts)
Row 4: Ch 1, turn. Inc in first st, sc in next 4 sts, inc in last st. (8 sts)
Rows 5 through 13: Ch 1, turn. Sc in each st across. (8 sts)
Row 14: Ch 1, turn. Dec, sc in next 4 sts, dec. (6 sts)
Rows 15 and 16: Ch 1, turn. Sc in each st across. (6 sts)
Row 17: Ch 1, turn. Dec, sc in next 2 sts, dec. (4 sts)
Row 18: Ch 1, turn. Sc in each st across. (4 sts)
Row 19: Ch 1, turn. Dec twice. (2 sts)
FO, leaving a long tail for sewing.
Large floppy inner-ear panel
Make two.
Foundation: Ch 4.
Row 1: Sc in the second ch from the hook and in each remaining ch. (3 sts)
Row 2: Ch 1, turn. Inc in first st, sc in next st, inc in last st. (5 sts)
Row 3: Ch 1, turn. Inc in first st, sc in next 3 sts, inc in last st. (7 sts)
Row 4: Ch 1, turn. Inc in first st, sc in next 5 sts, inc in last st. (9 sts)
Rows 5 through 17: Ch 1, turn. Sc in each st across. (9 sts)
Row 18: Ch 1, turn. Dec, sc in next 5 sts, dec. (7 sts)
Rows 19 and 20: Ch 1, turn. Sc in each st across. (7 sts)
Row 21: Ch 1, turn. Dec, sc in next 3 sts, dec. (5 sts)
Row 22: Ch 1, turn. Sc in each st across. (5 sts)
Row 23: Ch 1, turn. Dec, sc in next st, dec. (3 sts)
FO, leaving a long tail for sewing.
How to position the inner-ear panel
Lay one outer panel flat with the side you want to use as the front facing up.
Place the contrasting panel on top. Leave a visible border of the main ear color around the sides and upper end.
Do not place the inner panel all the way down to the bottom edge. Leave part of the outer ear exposed at the base because that area will later be folded, pinned or sewn to the finished project.
Check the second ear before sewing either panel permanently. Place the two outer panels side by side and position both inner panels at the same height. Compare the amount of outer color showing around each one.
A ruler can help, but the visual check matters more. Crochet stitches can vary slightly in width, so two panels positioned at the same measured distance can still look uneven if the outer ears are not exactly identical.
Sew the inner panel in place
Thread the long ending tail onto the yarn needle.
Begin near the lower edge of the inner panel. Sew through the inner panel and only the front outer-ear layer.
Use small stitches around the entire edge of the contrasting panel. Keep the sewing yarn close to the edge so the seam does not pull the panel inward.
Do not pull the yarn tightly. The inner panel should lie flat without puckering the outer ear.
When you reach the starting point, secure the yarn on the back of the front outer panel and weave in the tail.
Repeat for the second ear.
After both panels are attached, compare the ears again before joining the front and back outer layers. This is the easiest stage to correct a panel that sits too high, too low or slightly crooked.
Can you skip the inner-ear color?
Yes. The outer ear patterns are complete without the contrasting panels. A single-color ear can look especially good when the yarn already has noticeable texture or when the finished project includes other details that you do not want the ears competing with.
You can also use the same yarn color for the inner panel and rely on the raised edge to create subtle definition. That gives the ear more surface detail without introducing another color.
I would keep the inner panel flat rather than padding it. Extra stuffing underneath the panel can make the front of the ear bulge and can change the way an upright ear stands or a floppy ear bends.
How to Make Two Matching Crochet Bunny Ears
Bunny ears sit close enough together that small differences can be easy to see. The best way to get a balanced pair is not to finish one ear completely and then try to copy it from memory. Work the pieces as a set and compare them at several checkpoints.
This matters even more with long ears. A difference of one row, a tighter turning chain or a slightly different decrease can change where an ear bends after it is attached.
Work matching panels as a pair
Make the first outer panel through the widest straight section, then make the second panel to the same point before you continue. Place them next to each other with their foundation edges even.
Compare three things:
- the total length
- the width across the same row
- the position where the shaping begins
If they match, finish the taper on both panels. Then repeat the same process for the remaining two outer panels.
This method catches a missing row before the ear is assembled. Counting a long section of identical single crochet rows after the fact is much less pleasant.
Use row markers for long ears
Place a removable stitch marker through the edge of the first straight row and another through the final straight row. Do the same on the matching panel.
The markers give you visible checkpoints without changing the pattern. They are especially useful on the large floppy ears, where several rows can look almost identical.
Remove all markers before joining the panels.
Count stitches at the beginning and end of shaping rows
A missed increase or decrease can change both the width and the final angle of the tip. Check the stitch total whenever a row changes the width of the ear.
If the row should end with 8 stitches, count all 8 before you start the next row. Correcting a stitch at that point is much easier than discovering the problem after several more rows.
Keep the turning edges consistent
Chain 1 and turn in the same direction at the beginning of every row. The turning chain does not count as a stitch.
Work the first single crochet into the first actual stitch. Work the final single crochet into the last actual stitch.
If one side of the panel begins to slope inward during a section that should remain straight, stop and count the stitches. Accidentally skipping the first or last stitch is a common reason a flat piece becomes narrower.
Compare the panels before sewing
Lay all four outer panels flat with the bases aligned.
Match the two panels that are closest in size to make the first ear. Use the remaining two for the second ear.
If one panel is only slightly longer, do not add an extra row to another completed panel unless the pattern itself calls for it. First check whether the difference comes from tension. Crochet fabric can stretch enough that a gentle adjustment brings two pieces into alignment.
If one panel has an actual missing or extra row, correct that panel before assembly.
Check the inner-ear panels separately
If you added contrasting inner panels, compare those before you sew them to the outer ears.
Place them side by side with the bases even. The tips should reach the same height, and the widest sections should occur at approximately the same point.
After pinning them to the outer panels, put the two ears next to each other again. Compare the amount of main-color yarn visible around the inner panels before you sew.
A small difference at this stage becomes much more noticeable after the finished ears are mounted next to each other.
Use the first completed ear as the reference
After you join the first pair of outer panels, lay the finished ear beside the unjoined panels for the second ear.
Check the visible length and width rather than relying only on the row counts. The joining seam can slightly change the outline.
Join the second ear using the same stitch spacing and the same yarn tension that you used on the first.
When both ears are complete, place them with the front sides facing up and the bases even. Then turn one ear over and compare them again.
That second check is useful because the ears will often sit as mirror images on the final project.
Do the ears have to be exactly identical?
No. Handmade crochet pieces can have very small differences without looking uneven on the finished project.
Pay closest attention to the overall length, the widest point, the beginning of the taper and the shape of the tip. Those features affect the finished pair more than a tiny variation along one edge.
The attachment step also gives you some control. One ear can be positioned a fraction lower, folded slightly more at the base or rotated a little differently to create a balanced finished look.
How to Shape Crochet Bunny Ears
Shaping begins after the crochet is complete but before the ears are permanently attached. You can change how upright, open, narrow or floppy an ear looks without adding wire or changing the stitch pattern.
Start with dry ears at room temperature. Lay them flat and smooth the edges gently with your hands.
Shape an upright bunny ear
Hold the ear by its open lower edge.
Fold the lower left corner slightly toward the center. Fold the lower right corner toward the center by the same amount.
Do not overlap the folds deeply. The goal is to narrow and thicken the base, not close the opening.
Hold the folded base and lift the ear upright. Look at the ear from the front.
If the sides spread too widely, increase each fold slightly. If the ear looks pinched at the bottom, reduce the folds.
Repeat with the second ear and compare them before you pin either one to the project.
Create a more open rabbit-ear shape
For an ear that opens outward instead of standing almost straight, leave more of the base unfolded.
A wider attachment base lets the lower edges spread apart. It also makes the ear look broader when viewed from the front.
This works well when the ears are attached near the top of a hat and you want a little space between the inner edges.
Create a narrow upright shape
For a taller, narrower appearance, fold the lower corners inward a little farther.
Pin the folds temporarily and check the ear from the front and side.
Do not make the base so narrow that all of the pull is concentrated into one or two stitches. A standing ear needs a secure attachment area across the bottom.
Shape a floppy bunny ear
Attach the lower portion first in a temporary position with pins or removable markers.
Let the rest of the ear hang without forcing a fold.
Then bend the upper section gently in the direction you want it to fall. Hold it for a moment and release it.
If the bend starts too high, move your fingers lower and reshape it. If too much of the ear hangs down, move the bend upward.
The two floppy ears do not need to fold at precisely the same row. A small difference can keep the finished pair from looking stiff or mechanical.
Change the ear angle at the base
The attachment angle has a large effect on the finished expression of the project.
Rotate both bases slightly toward the outside to make the ears spread apart.
Rotate them slightly inward to make the tips move closer together.
For floppy ears, rotating the base also changes the direction in which the ear hangs.
Make these adjustments before sewing. It is much easier to move a pinned ear than to remove a completed attachment seam.
Check the ears from several directions
Do not judge the placement only from directly in front of the project.
Look from the front, each side and slightly above. An ear that appears straight from the front can lean sharply backward when viewed from the side.
If the ears are being attached to a hat, place the hat over a rounded form while you check the position. A folded flat hat does not show the same crown shape it will have when worn.
A clean mixing bowl, hat form or other smooth object close to the intended size can help you see the placement. Do not stretch the hat over something substantially larger than its intended circumference.
Do crochet bunny ears need blocking?
Usually not. These ears are small shaped pieces, and the final appearance depends more on assembly and attachment than on formal blocking.
If an outer panel curls slightly before assembly, smooth it flat with your fingers and let it rest before joining it to the second panel.
If you choose to wet or steam yarn, follow the care instructions for that specific fiber. Heat that is safe for one yarn may damage another.
I would not depend on aggressive blocking to make a loose ear stand upright. If the fabric lacks enough body, a smaller hook or doubled construction is the better correction.
Keep the tips soft
A pointed upright ear should have a defined top, but it does not need to feel hard.
Do not insert a rigid object into the tip. Shape the point with your fingers after the panels are joined.
For floppy ears, round the upper corners gently and allow the tip to remain flexible.
Once both ears have the shape and angle you want, keep the folds pinned at the bases. They are ready for final attachment.
How to Attach Crochet Bunny Ears to Hats, Headbands and Other Projects
The attachment method matters almost as much as the ear pattern. A well-shaped ear can lean, twist or pull forward if the base is sewn down at the wrong angle. Before you make a permanent seam, pin both ears in place and look at the complete project from several directions.
Keep the finished ear bases open while you test the placement. That lets you fold, spread or rotate the lower edges until the pair sits the way you want.
For doubled ears, the final attachment seam must secure both outer-ear layers across the base. Keep the base open only while positioning and shaping the ear. After attachment, neither outer layer should remain loose at the bottom.
Attach bunny ears to a crochet hat
Place the finished hat over a rounded form that is close to the intended head size. This lets the crown expand to its normal shape while you position the ears.
Mark the center front of the hat with a removable stitch marker.
Place the first ear on one side of the center marker. Place the second ear the same distance from the center on the opposite side.
Do not sew yet.
Look at the hat from the front. Check that the ear tips reach similar heights and that the space between the ears looks balanced.
Then look from the side. Upright ears should rise from the crown instead of leaning sharply toward the face or back of the head.
For a narrower upright ear, fold the lower corners toward the center before pinning the base. For a broader ear, reduce those folds.
When the placement looks right, thread a yarn needle with matching yarn.
For a doubled ear, sew through the hat fabric and both outer-ear layers at the base. For a single-layer ear, sew through the hat fabric and the full base of the ear panel. Continue across the full usable width with small, closely spaced stitches so the ear is securely attached to the hat.
Reverse direction and sew back across the attachment area. The second pass helps secure the base and spreads the pull across more of the hat fabric.
Do not pull the yarn hard enough to gather the crown.
Secure the yarn on the inside of the hat and weave the tail through several stitches.
Repeat for the second ear.
Remove every pin and removable marker before the hat is used.
Attach upright ears so they do not lean backward
If an ear tilts backward, do not immediately tighten the seam. First inspect the base from the side.
The rear edge may be attached farther down the crown than the front edge. Move the rear portion forward slightly and pin it again.
You can also make a shallow fold at the back of the base. That changes the angle without adding anything rigid inside the ear.
Check both ears after every adjustment. Correcting one ear can make the other appear different even when you have not moved it.
Attach floppy ears to a hat or hood
Floppy ears do not need the same narrow folded base as upright ears. A slightly wider attachment gives the lower portion a softer transition into the hat or hood.
Pin the first ear in place and let the rest hang freely.
Rotate the base until the ear falls in the direction you want.
Place the second ear and compare the pair.
When you are satisfied with the position, sew each base securely across its full width. Make a second pass through the attachment area.
Let the upper portion remain free. Do not sew partway up the ear just to force a bend. The floppy shape should come from the ear length and the position of the base.
Attach crochet bunny ears to a fabric headband
A fabric-covered headband provides a better sewing surface than bare plastic because the yarn can be stitched to the covering instead of depending on glue.
Place the headband on a stable surface with the center marked.
Position one ear on each side of the center. Leave enough space between them for the ear bases to sit separately without overlapping.
Fold the base of each upright ear as needed and pin or clip it temporarily to the fabric covering.
Thread a needle that can pass safely through the headband covering. Use thread or yarn that suits the materials you are joining.
Sew around the lower edge of the ear base and through the fabric covering. Make several secure passes through each side of the base.
Do not rely on a few stitches through the center only. Sewing across the width of the base helps keep the ear from rotating.
Repeat for the second ear.
Inspect the entire attachment before use. No needle, pin or temporary clip should remain in the finished headband.
If the headband is for a costume or photo prop for a young child, it should be used with adult supervision and removed when the activity is finished.
Attach the ears to a crocheted headband
A crocheted band is especially convenient because you can sew directly through its stitches.
Lay the band flat and mark its center.
Position the ears an equal distance from that center point.
Try the band around the form or person it is intended to fit before making the attachment permanent. A stretchy band changes width when worn, and that can change the apparent distance between the ears.
Sew each ear base through several band stitches. Make a second pass in the opposite direction.
Weave the tails into the back of the band.
Avoid placing a bulky knot directly against the wearer's head. Secure and bury the yarn tails within the crochet stitches instead.
Attach bunny ears to a basket
Basket ears need a different attachment because the basket wall is heavier and less flexible than a hat.
Position the ears on the upper edge before sewing and check that they are centered in relation to the front of the basket.
Sew through several stitches of the basket wall and across the full base of each ear.
For a large basket, small hat ears can look out of scale. The XXL crochet bunny basket pattern includes ears designed specifically for the heavier basket construction.
Attach bunny ears to a costume hood
For a fabric hood, position the ears while the hood has its normal three-dimensional shape rather than while it is folded flat.
Mark the two attachment points before sewing.
Make sure the ear bases do not interfere with a hood seam, drawstring channel, zipper or other functional part of the garment.
Sew each ear securely through the hood fabric using a needle and thread appropriate for that fabric.
If the hood fabric is thin or stretchy, a small piece of compatible fabric on the inside can help distribute the stitches across a larger area. Keep any reinforcement flat and fully enclosed.
The site's older baby bunny costume ideas can give you additional inspiration for turning simple clothing into a bunny-themed costume.
Pin first and sew second
This simple step prevents a surprising number of placement problems.
Pin both ears before you sew either one.
Compare the distance from each ear to the center of the project.
Compare the angle of the bases.
Compare the visible height of the tips.
Then turn the project around and inspect the back.
If one base is farther forward or backward, correct it while the ear is still pinned.
Once both ears look balanced, sew the first one. Pin the second ear again if the project shifted during sewing, then attach it.
How much of the ear base should be sewn down?
Sew the entire usable width of the base rather than attaching only the center.
An upright ear may have a folded base, but the folded layers should still be secured across the attachment area.
A floppy ear can use a broader seam because it does not need such a narrow standing base.
If the ear twists after sewing, the attachment may be too narrow or one side may be tighter than the other. Remove the problem stitches and resew that section evenly.
Final attachment check
Gently move each ear at its base. The ear can flex, but the attachment seam itself should not open or pull away from the project.
Check the back of every seam for loose yarn ends.
Weave the tails securely into the surrounding stitches.
Remove all temporary pins, clips and stitch markers.
If the item is intended for a baby or young child, inspect the finished project each time it is used. Stop using it if an attachment becomes loose or damaged.
How to Make Crochet Bunny Ears Larger or Smaller
You do not need a completely different bunny ear pattern every time you change projects. Once you understand which rows control length and width, you can adjust these ears without changing the basic outline.
Make one test panel before you commit to all four outer panels. Measure it against the hat, band, basket or costume where the finished ears will be used.
To make an ear longer
Add rows only in the straight middle section.
For an upright ear, add the extra rows before the first decrease row that begins the upper taper.
For a floppy ear, add extra rows during the section where the stitch count remains unchanged.
Add the same number of rows to every matching outer panel.
If you are using inner-ear panels, add fewer rows to those pieces so a border of the outer ear still shows above and below the contrasting panel.
Adding straight rows changes the length without changing the width or tip construction. That makes it the simplest adjustment.
To make an ear shorter
Remove rows from the straight middle section.
Do not remove the shaping rows at the tip unless you also redesign the taper. Those rows create the ear outline.
For example, if a medium upright ear is too long, remove two straight rows from the section worked at 8 stitches. Keep the decrease rows that follow unchanged.
Make the same adjustment on all four outer panels.
To make an ear wider
Add one additional increase row before the long straight section. Work an increase in the first and last stitch, which adds two stitches to the row.
For an upright ear, this extra increase widens the lower part of the ear. Work the straight middle section at the new stitch count, then add one matching decrease row before the existing taper so the ear returns to the original stitch sequence.
For a floppy ear, add the extra increase during the widening near the tip. Work the straight middle section at the new stitch count, then add one matching decrease row when the ear begins narrowing toward the base.
Adding the increase row and its matching decrease row adds two rows to the ear. If you want to keep approximately the original length, work two fewer rows in the straight middle section. If you want the ear both wider and slightly longer, keep the full straight section.
Write down the new stitch counts and row count before you make the remaining panels so all matching pieces use the same adjustment.
To make an ear narrower
Stop increasing one shaping row earlier and work the straight middle section at that smaller stitch count.
For an upright ear, omit the corresponding first decrease stage when you begin the taper toward the tip.
For a floppy ear, omit the corresponding first decrease stage when the ear begins narrowing toward the base.
Removing one increase row and its matching decrease row removes two rows from the ear. If you want to keep approximately the original length, add two rows to the straight middle section.
Use the same stitch counts and row adjustment on every matching outer panel.
A narrower ear often stands more easily because there is less fabric extending sideways from the center line.
Changing yarn weight
Changing yarn weight changes every dimension of the ear at once.
A thicker yarn makes the same stitch pattern longer, wider and heavier. It can also make a floppy ear bend more because the finished fabric weighs more.
A thinner yarn makes a smaller and lighter ear.
If you change yarn weight, make one complete test panel and measure it before making the other three.
Do not assume that changing the hook alone will compensate for a very different yarn thickness. The fabric density and flexibility can change even if the finished width looks close.
Changing hook size
A smaller hook generally creates a denser, slightly smaller panel. It can give an upright ear more body.
A larger hook generally creates a looser, slightly larger panel. The result can drape more easily.
Change hook size in small steps. The ear should remain easy to crochet and flexible enough to shape.
If you need a dramatic size change, adjust the pattern rows rather than forcing the yarn onto a hook that is much too small or too large for it.
Adjust the inner-ear panel after changing the outer ear
Do not automatically make the inner panel the same percentage larger in every direction.
First make the adjusted outer ear.
Lay the original inner panel pattern over it mentally or make one test panel. Decide how much border you want visible.
If the outer ear is only longer, add rows to the straight section of the inner panel.
If the outer ear is wider, add width to the inner panel only if the existing border looks too large.
The contrasting panel should remain clearly inside the outer ear rather than reaching the seam around the edge.
Adjusting ears for very small projects
For a tiny decorative project, reducing the yarn weight can give a cleaner result than trying to remove many shaping rows.
You can also use a single outer panel instead of a doubled ear when the piece will be sewn flat and does not need to stand.
If the ear must remain upright, keep the doubled construction even when you reduce the size.
Adjusting ears for oversized projects
Large projects need ears with enough visual weight to look intentional.
Simply adding many straight rows can make an ear long without making it proportionately wider. If you are enlarging the pattern substantially, increase both width and length.
For a very large basket, the separate crochet bunny basket pattern is a better reference because its ears are designed for a much heavier finished project.
Keep a simple record of your adjustments
If you alter the pattern and like the result, write down three details before you put the project away:
- the yarn weight and hook size
- the number of stitches across the widest section
- the number of straight rows before the taper
Those three notes make it much easier to reproduce the same ears later.
If you also changed the inner panel, note its row count separately.
Reusable pattern pieces become much more useful when you can recreate the version that worked instead of trying to remember which rows you changed.
Ways to Use Crochet Bunny Ears
Once you have a pair of ears that you like, you can reuse the same construction for more than one bunny project. Change the size, color, inner panel or attachment method instead of starting with a completely different ear pattern every time.
That flexibility is the main reason I wanted these ears to stand on their own as a pattern. A good rabbit ear shape should be useful beyond one finished hat.
Add bunny ears to a crochet hat
A hat is the most obvious place to use upright crochet bunny ears. Medium ears are a practical starting point because they are large enough to be easy to see without adding the weight of the large version.
Match the ear yarn to the hat for a seamless look, or use a contrasting inner panel to make the shape more noticeable.
Before sewing, put the hat over a rounded form and pin both ears in place. Hat crowns curve in several directions, so ear placement that looks even on a flat hat can change when the hat is opened to its normal shape.
Make a crochet bunny ear headband
A headband lets the ears become the main feature of the project. Small and medium upright ears work well because the base does not need as much room for attachment.
You can also use medium floppy ears if you want them to fall beside the band rather than stand above it.
For a crocheted headband, make sure the band is complete and stretches to its intended size before you position the ears. If you sew the ears onto an unstretched band without checking the fit, the space between them can change when the band is worn.
Keep the base seam flat and weave all yarn tails into the back of the crochet fabric.
Use floppy ears on a hood
Long floppy ears work especially well on a hood because the fabric underneath gives you a broad attachment area.
Position the ears toward the upper sides of the hood rather than directly on top if you want them to hang beside the face.
Pin the hood over a rounded form before final placement. A hood lying flat can make the ears appear much farther apart than they will be when worn.
If you are building an Easter or dress-up outfit, the older baby bunny costume ideas page gives you another way to carry the rabbit theme through the finished look.
Add ears to a bunny basket
Small crochet ears can turn a simple basket into a rabbit-themed container for decorative storage, an Easter display or a handmade gift presentation.
Match the ear base to the scale of the basket. A narrow little ear attached to a heavy basket wall can disappear visually, while a very large ear can pull the top edge out of shape.
If you are making a substantial basket rather than adapting a small one, use the XXL crochet bunny basket pattern. Its ear proportions are designed for that heavier project instead of for a hat or headband.
Use a single-layer ear as an appliqué
You do not always need two layers.
One flat outer panel can be used as a rabbit-ear appliqué when it will be sewn directly onto another crocheted surface. Make two matching panels, position them side by side and stitch around the edges.
This works best when the ears are meant to lie flat rather than stand away from the project.
You can also add the inner-ear panels before sewing the appliqués down. Keep the stitches neat because the entire front surface will remain visible.
Coordinate bunny ears with a stuffed rabbit
The separate ear pattern can also help when you want to alter the look of another handmade rabbit project. A shorter upright pair creates a compact silhouette, while longer ears make the rabbit look more lop-eared.
If you want the complete stuffed animal rather than separate ear pieces, use the free crochet bunny pattern. That project includes its own body, limbs, ears, face and assembly instructions.
Coordinate the ears with a bunny lovey
A lovey needs ears that stay soft because the finished piece is meant to remain flexible. If you adapt this pattern for a lovey, choose the small size or reduce the medium size rather than adding extra structure.
Do not add wire or rigid reinforcement.
The crochet bunny lovey pattern is the better choice when you want the full lovey construction rather than only the ears.
Use the ears for Easter photo props
A finished bunny-ear headband or hat can also become part of an Easter photo setup. Keep the surrounding styling simple enough that the ears still read clearly as the focal detail.
If the project will be used with a baby or young child, treat wearable bunny ears as a supervised prop rather than something to leave on during sleep or unsupervised play.
You can find more ideas for arranging the setting on the baby Easter bunny picture ideas page.
Change the look without changing the pattern
Color alone can make the same ear pattern feel completely different.
White outer ears with pale pink centers create the familiar Easter bunny look. Gray, brown or black ears can coordinate with more natural rabbit colors. A same-color inner panel gives subtle texture without introducing another shade.
You can also omit the inner panel completely.
For a cleaner finished pair, keep both ears the same yarn weight and construction even when you use two colors. Mixing a firm outer yarn with a much softer or heavier inner yarn can distort the front panel.
Save the version that fits your project
If you adjust the pattern, keep a short note with the finished project.
Record the ear size, yarn weight, hook size and any rows you added or removed. If you changed the attachment fold, note that too.
That turns one successful pair into a reusable pattern you can repeat without measuring and experimenting again.
Crochet Bunny Ears FAQ
How do I make crochet bunny ears stand up?
Use a firm crochet fabric, make two outer panels for each ear, join the panels around the sides and tip, and narrow the open base with shallow folds before attachment.
The seam across the base also matters. Sew across the full usable width instead of attaching the ear with only a few stitches through the center.
If the ear still collapses, try a slightly smaller hook before adding anything rigid inside it.
Do crochet bunny ears need wire?
No. The upright ears on this page are designed to work without wire.
Doubled crochet fabric, a shaped base and secure attachment provide the support. Floppy ears are intentionally flexible and do not need internal reinforcement.
For projects intended for babies or young children, leaving out wire and other rigid inserts also keeps the construction simpler and avoids a hard piece working its way through the crochet fabric.
Should I stuff crochet bunny ears?
I would not stuff these ears.
Stuffing changes the flat ear into a thicker tube and can make it difficult to create a clean rabbit-ear outline. It also makes matching two ears harder.
The doubled-panel construction supplies enough thickness for upright ears while still allowing them to flex.
Can I make the ears with one layer instead of two?
Yes, when the ear does not need to stand.
A single panel can work for a flat appliqué, a very soft floppy ear or another decorative use. For an upright hat or headband ear, two layers give a more reliable result.
Why is one bunny ear longer than the other?
First compare the row counts. A missing or extra straight row is the easiest difference to correct.
If the row counts match, compare your tension. One panel may have been worked more tightly than the other.
Gently smooth both pieces without stretching them aggressively. If the difference remains obvious, remake the panel that is out of proportion rather than trying to hide a large mismatch during assembly.
Why are the sides of my ear getting narrower before the decrease rows?
You may be skipping the first or last stitch of a row.
The turning chain does not count as a stitch. After you chain 1 and turn, work the first single crochet into the first actual stitch. Continue across and make sure you work into the final stitch at the opposite edge.
During every straight section, the stitch count should stay unchanged.
Why is my upright bunny ear flopping over?
Check the fabric first. Loose crochet fabric will bend more easily than dense fabric.
Next, check whether you made the doubled version. A single layer may not have enough body for a long upright ear.
Then inspect the base. A broad flat base lets the ear spread outward, while shallow folds at the lower corners create a narrower and thicker support area.
Finally, check the attachment angle. An ear sewn too far back on a curved hat crown can lean backward even when the ear itself is firm.
How do I make floppy bunny ears hang outward instead of forward?
Rotate the base slightly outward before sewing.
Pin both ears first and let them hang freely. If one falls toward the face, move the front portion of its base slightly outward or backward until the ear drapes in the direction you want.
Do not twist the ear sharply above the seam. Make the adjustment at the base.
Can I crochet larger bunny ears with the same pattern?
Yes.
Add rows to the straight middle section to increase length. Add another increase row if you also need more width.
If you add width, adjust the taper with an additional decrease stage so the tip still narrows gradually.
Make one test panel before repeating the changes on all four outer panels.
Can I make smaller bunny ears?
Yes. Remove rows from the straight section for a shorter ear.
For a much smaller ear, using a lighter yarn can preserve the proportions better than removing too many shaping rows.
Keep the increase and decrease sections balanced so the finished outline still looks intentional.
What yarn weight is best for crochet bunny ears?
Medium #4 yarn is a practical choice for the patterns on this page because it creates a visible stitch structure without making the ears excessively heavy.
You can use another yarn weight, but expect the finished measurements and drape to change.
Whatever yarn you choose, use the same yarn and hook for both ears.
What hook size should I use?
The pattern starts with a 4.0 mm hook and medium #4 yarn.
If your fabric looks loose or the upright ear collapses too easily, move down one hook size. If the stitches are difficult to work and the fabric feels hard, move up one size.
The correct hook is the one that gives you dense, even fabric without making the ear rigid.
Can I use a different color for the inside of the ears?
Yes. Make two optional inner-ear panels and sew one to the front outer panel of each ear before joining the outer layers.
Use yarn close to the same weight as the main ear yarn so the contrasting panel lies flat.
Do the inner-ear panels provide support?
No. They are decorative.
The support in an upright ear comes from the outer panels, fabric density, folded base and attachment seam.
Should I crochet around the edge after joining the panels?
You can, but it is not necessary for this pattern.
A crocheted edging adds width and can make the outline heavier. Sewing the two panels together with matching yarn keeps the edges flatter and preserves the proportions given here.
How far apart should bunny ears be on a hat?
There is no single measurement that works for every hat size and ear size.
Mark the center front of the hat, place one ear on each side and adjust the spacing while the hat is opened over a rounded form.
Judge the pair from the front and sides before sewing. The visible balance is more useful than applying one fixed distance to every size.
Can I use these ears on a baby hat?
You can adapt the smaller sizes to a baby hat, but keep the finished hat soft and securely assembled.
Do not add wire, buttons, beads or other hard detachable decorations to the ears. Remove every pin and stitch marker after assembly.
A decorative hat or headband should not remain on a sleeping or unsupervised baby.
Can I use these bunny ears for a costume?
Yes. Upright ears work well on hats and headbands, while the longer floppy version can be attached to a hood.
Choose the size according to the costume rather than age alone. Large ears create more visual impact but also add more weight to the attachment point.
Which ear pattern should I use for a bunny basket?
The small or medium ears can work on a lightweight basket when the proportions look right.
For a large crocheted basket, use the ear construction included with the XXL crochet bunny basket pattern. A heavy basket needs ears scaled for its thicker structure.
What should I do if I want a complete bunny project instead of separate ears?
Choose the project first and use its complete pattern when available.
Choose the complete hat, stuffed rabbit or lovey pattern when you want the entire finished project rather than separate reusable ears.
Use this bunny ears guide when the ears themselves are what you need, especially when you want to change the size, choose between upright and floppy styles or attach them to a project of your own.
Before You Use or Gift the Finished Bunny Ears
Give the finished project one last inspection after the ears are attached. The crochet can look finished from the front while a loose yarn tail or weak attachment stitch is still hiding underneath.
Hold each ear near its base and move it gently from side to side. The ear itself should flex, but the seam should stay firmly connected to the hat, band, hood or other project.
Check that:
- both ear bases are sewn securely across their full attachment area
- all yarn tails are woven in
- no pins, clips or stitch markers remain
- there are no exposed sharp or rigid parts
- contrasting inner panels are completely sewn down around their edges
- the two ears still sit at the intended angle after the project is handled
If the project is washable, follow the care instructions for the yarn and the item the ears are attached to. Reshape the ears while they are drying if needed. Floppy ears can be smoothed into their natural bend, while upright ears can be gently returned to their original shape with your fingers.
For a handmade gift, I would include the yarn care information with the finished project. That small detail is especially helpful when the ears are attached to a hat, lovey or other item that may be washed regularly.
Wearable bunny ears for babies and young children are best treated as supervised costume or photo accessories. Remove hats, headbands and similar accessories before sleep and whenever an adult is not actively supervising.
The useful thing about this pattern is that you do not have to crochet the same bunny ears every time. Start with the upright or floppy version, make the size that suits the project, and then adjust the length, width, inner panel and attachment angle until the pair looks right where you plan to use it.
Once you have made one pair of bunny ears that fits the project exactly the way you want, keep your yarn, hook and row adjustments with the pattern. That small record turns this guide into a repeatable set of ears you can use again without starting from scratch.


When you click on links to various merchants on this site and make a purchase, this may result in this site earning a commission. This does not affect the price you pay.

UBGI Gold Standard 2026
Reviewed under the site's
editorial checklist.
About Jan | Contact | Baby Nursery Ideas (Blog) | Site Map | Privacy Policy | Disclosure Policy | Disclaimer | Affiliate Disclosure | Earnings Disclosure | Facebook | Pinterest
I am a participant in the Amazon Services LLC Associates Program, an affiliate advertising program designed to provide a means for us to earn fees by linking to Amazon. As an Amazon Associate I earn from qualifying purchases.
Copyright © 2006-2026. All Rights Reserved.