Free Bear Snuggler Crochet Pattern for a Soft Floppy Teddy
By Jan Bay
This free bear snuggler crochet pattern makes a soft, floppy teddy with a stuffed head, flexible unstuffed body, long cuddly arms and legs, and a securely embroidered face. Unlike a traditional bear lovey with a separate blanket base, this snuggler keeps the recognizable shape of a teddy bear while leaving the body soft and easy to fold, hold and tuck into a handmade baby gift basket.
Explore More Free Crochet Baby Patterns
Crochet Baby Snuggler Patterns
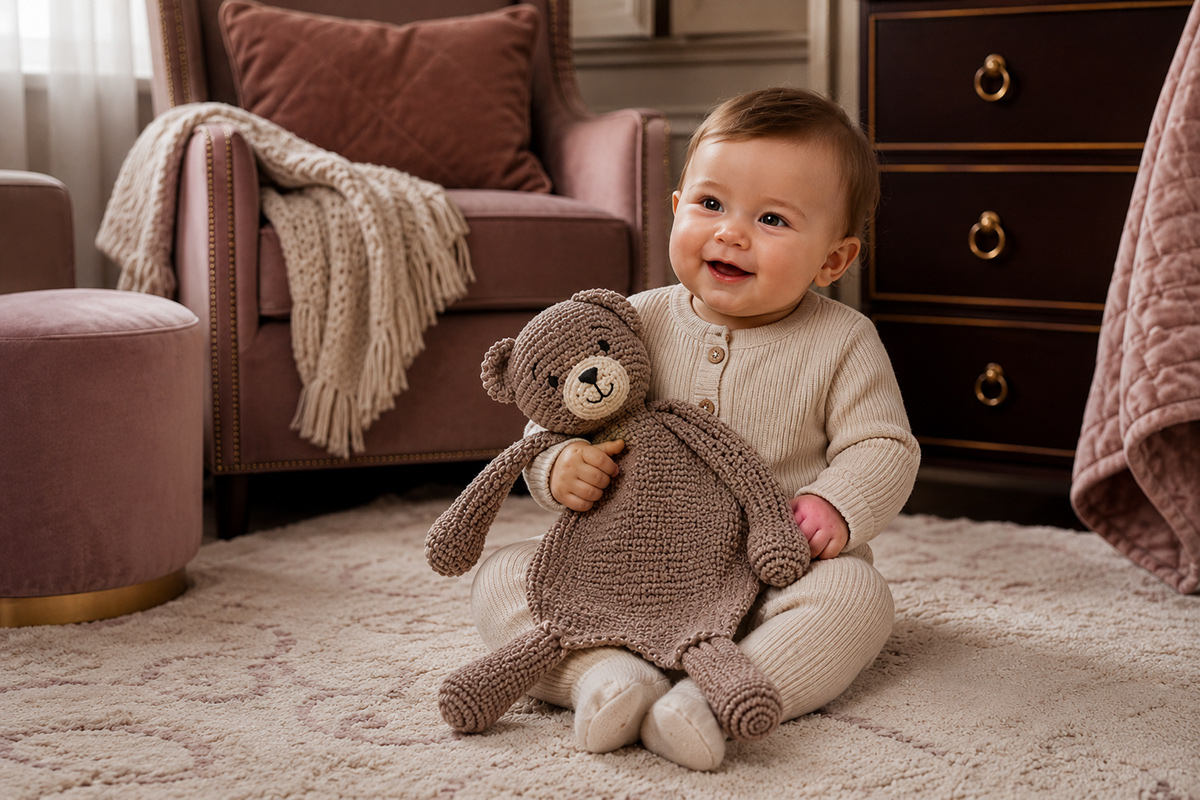
See the Yarn and Crochet Supplies for This Bear Snuggler
Jump to the Bear Snuggler Pattern
Supplies and Materials for the Bear Snuggler
This pattern uses worsted weight yarn and a fairly small hook so the stuffed parts have a close, tidy fabric. The Craft Yarn Council's Standard Yarn Weight System classifies worsted, afghan and aran yarns in the medium weight 4 category. The body is made from two flat crochet panels that are joined without stuffing. That construction gives the bear enough substance to hold its shape while keeping the middle soft and flexible.
The head is fully stuffed. Only the rounded ends of the arms and legs receive a small amount of filling. The upper portions of the limbs stay unstuffed so they remain floppy rather than becoming stiff like the limbs on a traditional amigurumi bear.
- Approximately 250 to 300 yards of size 4 worsted weight yarn in the main bear color
- Approximately 15 to 20 yards of size 4 worsted weight yarn in a lighter or contrasting color for the muzzle
- Small amount of black embroidery floss or smooth black yarn for the eyes, nose and mouth
- 4 mm (G-6) crochet hook, or the hook size needed to make a dense fabric
- Approximately 2 ounces of polyester fiberfill
- Yarn needle for assembly
- Embroidery needle suitable for the face yarn or floss
- Stitch marker
- Scissors
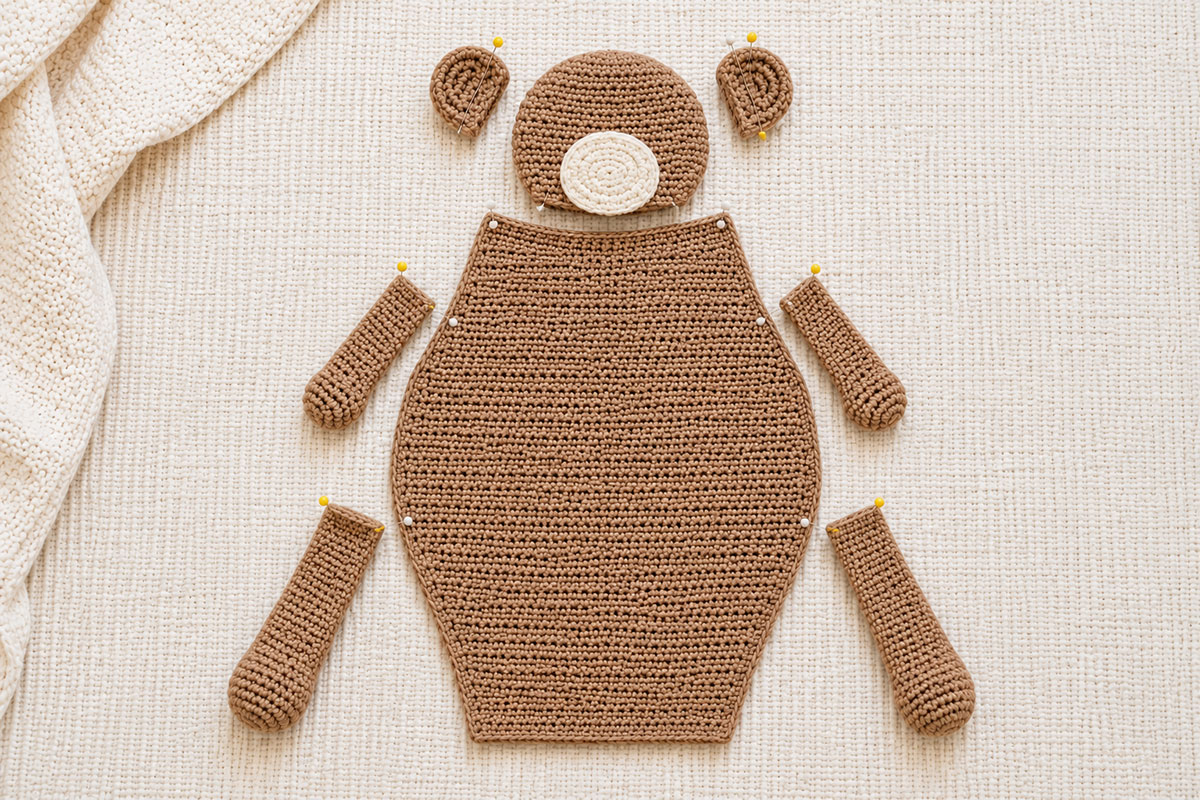
- Several removable stitch markers or safety pins for positioning pieces before sewing
Yarn and fiberfill use varies with tension and how firmly you stuff the head, paws and feet, so treat the amounts above as supply allowances rather than exact consumption.
Choose a yarn that can handle the washing the finished snuggler is likely to receive. Smooth yarn also makes it easier to see the stitches and check the seams. I would skip fuzzy novelty yarn for this particular project because the face, shaping and embroidered details are easier to control when the stitches remain visible.
Do not use plastic safety eyes, buttons, beads or other small attached pieces for the face if the snuggler is being made for a baby. The pattern below uses embroidery for every facial feature.
Free Bear Snuggler Crochet Pattern Size and Gauge
At the target gauge below, this pattern is designed to finish at about 14 inches from the top of the head to the bottom of the feet when laid flat. Yarn, tension, stuffing and sewing placement can shift the finished measurement slightly.
- Expected finished length: approximately 14 inches
- Head: approximately 3 1/4 to 3 1/2 inches across after stuffing
- Body at widest point: approximately 4 1/2 inches across before the side seams are joined
- Skill level: advanced beginner
- Terminology: U.S. crochet terms
Target gauge: approximately 16 single crochet stitches and 18 rows or rounds = 4 inches.
Gauge does not need to match as precisely as it would for a sweater or baby hat, but the fabric should be tight enough that the filling does not show between stitches. If you can easily see fiberfill through the head or paws, go down a hook size rather than pulling every stitch unusually tight.
The two body panels should match each other before assembly. Lay one directly over the other after both are complete. Their top, side and bottom edges should line up without stretching either panel. That simple comparison is more useful here than trying to force a floppy crochet body to an exact finished width.
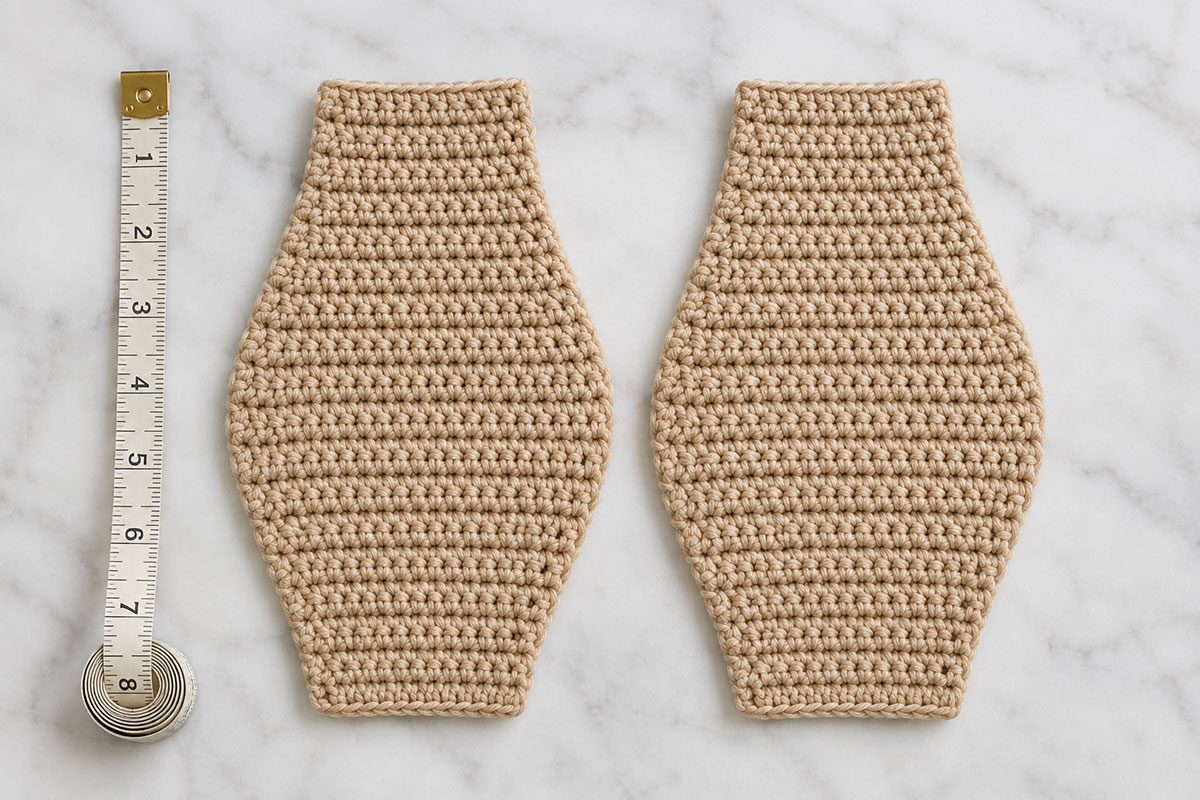
Crochet Abbreviations and Pattern Notes
- ch = chain
- sc = single crochet
- inc = work 2 single crochet stitches in the same stitch
- inv dec = invisible single crochet decrease
- sl st = slip stitch
- st = stitch
- sts = stitches
- rnd = round
The head, arms, legs, ears and muzzle are worked in continuous rounds unless a section says otherwise. Do not join at the end of these rounds. Place a stitch marker in the first stitch and move it up after each round.
After Round 1 of each magic-ring piece, pull the starting tail firmly so the center closes. After several rounds, secure that tail and weave it into the inside of the piece before stuffing or flattening it.
The body is different. It is worked back and forth in rows because the snuggler needs two matching flat panels rather than a stuffed amigurumi torso. The turning chain at the beginning of a body row does not count as a stitch.
When the pattern says inv dec, insert the hook through the front loop only of the next stitch, then through the front loop only of the following stitch. Yarn over and pull through both front loops. Yarn over again and pull through the two loops remaining on the hook. This completes one invisible decrease.
Stitch counts are shown in parentheses at the end of shaping rounds and rows. Count before moving on whenever you increase or decrease. A missed increase near the beginning of the head can shift the shaping for several rounds, while an extra stitch in one body panel can make the two sides difficult to align later.
Keep the body completely unstuffed. The head gets firm, even filling, but it should still yield when gently pressed. Add only a small amount of fiberfill to the rounded ends of the arms and legs. Stop the filling before the long straight portion of each limb begins.
Leave generous yarn tails on pieces that will be sewn to the bear. A tail of about 12 to 18 inches is easier to work with than joining a second piece of yarn halfway through a seam.
Piece check before assembly: You should have 10 crochet pieces when all of the pattern pieces are complete: 1 head, 2 body panels, 2 arms, 2 legs, 2 ears and 1 muzzle.
Crochet the Bear Head
The head gives this bear its teddy shape, so keep the increases and decreases evenly spaced and check the stitch count after every shaping round. It begins at the top of the head and is worked down toward the neck.
Use the main bear color.
Round 1: Make a magic ring. Work 6 sc into the ring. (6 sts)
Round 2: Inc in each st around. (12 sts)
Round 3: *Sc in next st, inc in next st.* Repeat from * to * around. (18 sts)
Round 4: *Sc in next 2 sts, inc in next st.* Repeat from * to * around. (24 sts)
Round 5: *Sc in next 3 sts, inc in next st.* Repeat from * to * around. (30 sts)
Round 6: *Sc in next 4 sts, inc in next st.* Repeat from * to * around. (36 sts)
Round 7: *Sc in next 5 sts, inc in next st.* Repeat from * to * around. (42 sts)
Rounds 8 through 13: Sc in each st around. (42 sts)
At this point the piece should look like a rounded cup rather than a flat circle. If it still spreads outward, check that Round 7 has exactly 42 stitches before continuing.
Round 14: *Sc in next 5 sts, inv dec.* Repeat from * to * around. (36 sts)
Round 15: *Sc in next 4 sts, inv dec.* Repeat from * to * around. (30 sts)
Round 16: *Sc in next 3 sts, inv dec.* Repeat from * to * around. (24 sts)
Begin stuffing the head. Add small pieces of fiberfill at a time and push them against the inside edges before filling the center. Shape the head with your fingers as you work so one side does not become firmer than the other.
Round 17: *Sc in next 2 sts, inv dec.* Repeat from * to * around. (18 sts)
Add more fiberfill before the opening becomes too small. The finished head should feel filled and rounded, but it should not be packed so tightly that the stitches spread apart.
Round 18: *Sc in next st, inv dec.* Repeat from * to * around. (12 sts)
Round 19: Inv dec around. (6 sts)
Fasten off, leaving a yarn tail about 18 inches long for attaching the head to the body. Thread the tail through the front loops of the remaining 6 stitches and pull the opening closed. Knot securely, but do not weave in the long tail.
Roll the head gently between your hands to even the stuffing. The lower portion will be hidden where the head overlaps the top of the body, so concentrate on making the forehead, cheeks and sides smooth and balanced.
Crochet the Floppy Body
The floppy body is what separates this bear snuggler crochet pattern from a conventional stuffed teddy bear. Instead of crocheting a hollow torso and filling it with fiberfill, make two matching flat panels and join them around the edges. Leave the entire body unstuffed.
Use the main bear color. Make two panels from the instructions below.
Beginning chain: Ch 11.
Row 1: Sc in second ch from hook and in each remaining ch. Ch 1 and turn. (10 sts)
Row 2: Inc in first st, sc in next 8 sts, inc in last st. Ch 1 and turn. (12 sts)
Row 3: Sc across. Ch 1 and turn. (12 sts)
Row 4: Inc in first st, sc in next 10 sts, inc in last st. Ch 1 and turn. (14 sts)
Rows 5 and 6: Sc across. Ch 1 and turn. (14 sts)
Row 7: Inc in first st, sc in next 12 sts, inc in last st. Ch 1 and turn. (16 sts)
Rows 8 through 10: Sc across. Ch 1 and turn. (16 sts)
Row 11: Inc in first st, sc in next 14 sts, inc in last st. Ch 1 and turn. (18 sts)
Rows 12 through 14: Sc across. Ch 1 and turn. (18 sts)
Row 15: Inv dec over first 2 sts, sc in next 14 sts, inv dec over last 2 sts. Ch 1 and turn. (16 sts)
Rows 16 through 18: Sc across. Ch 1 and turn. (16 sts)
Row 19: Inv dec over first 2 sts, sc in next 12 sts, inv dec over last 2 sts. Ch 1 and turn. (14 sts)
Rows 20 through 22: Sc across. Ch 1 and turn. (14 sts)
Row 23: Inv dec over first 2 sts, sc in next 10 sts, inv dec over last 2 sts. Ch 1 and turn. (12 sts)
Rows 24 and 25: Sc across. Ch 1 and turn. (12 sts)
Row 26: Inv dec over first 2 sts, sc in next 8 sts, inv dec over last 2 sts. Ch 1 and turn. (10 sts)
Row 27: Sc across. Ch 1 and turn. (10 sts)
Row 28: Sc across. (10 sts)
Fasten off the first panel and weave in the tail. Make a second panel exactly the same way.
Lay the two finished panels directly on top of each other. The beginning-chain ends form the narrower upper body where the head will be attached. The widest portion forms the soft belly, and the tapered end becomes the lower body.
If one panel is visibly longer or wider than the other, recount the rows and shaping stitches before joining them. Do not stretch one panel to make it fit the other. Two matching panels will give the snuggler a neater outline and a body that folds naturally instead of twisting to one side.
Join the Two Body Panels
Lay the two panels together with the beginning-chain edges aligned at the top and the Row 28 edges aligned at the bottom. Keep the sides you want visible facing outward. Join the main-color yarn through both layers at the upper right corner.
Work 1 sc through both layers in the end of each of the 28 rows down the first side. Work 2 sc in the first lower corner, 1 sc through both layers in each of the 10 stitches across Row 28, and 2 sc in the second lower corner. Work 1 sc through both layers in the end of each of the 28 rows up the second side. Finish with 1 sc through both layers in each of the 10 stitches across the beginning-chain edge at the top. (80 edging sc)
Join with a sl st to the first sc. Fasten off and weave the tail securely into the joined edge. The body stays completely unstuffed.
A finished body that feels almost like a small padded piece of fabric without actual padding is exactly what you want here.
Give the panel a gentle tug from top to bottom after joining. It should bend easily in the middle and fold over your hand without springing back into a rigid shape.
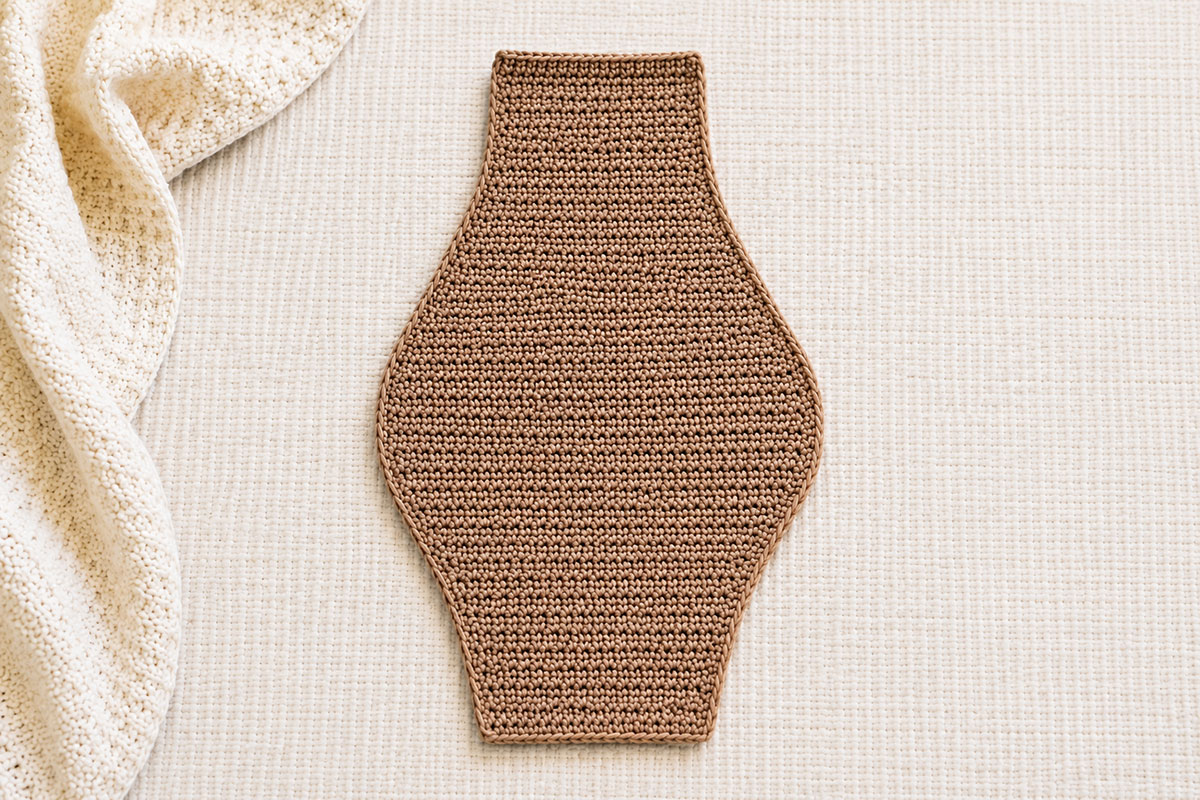
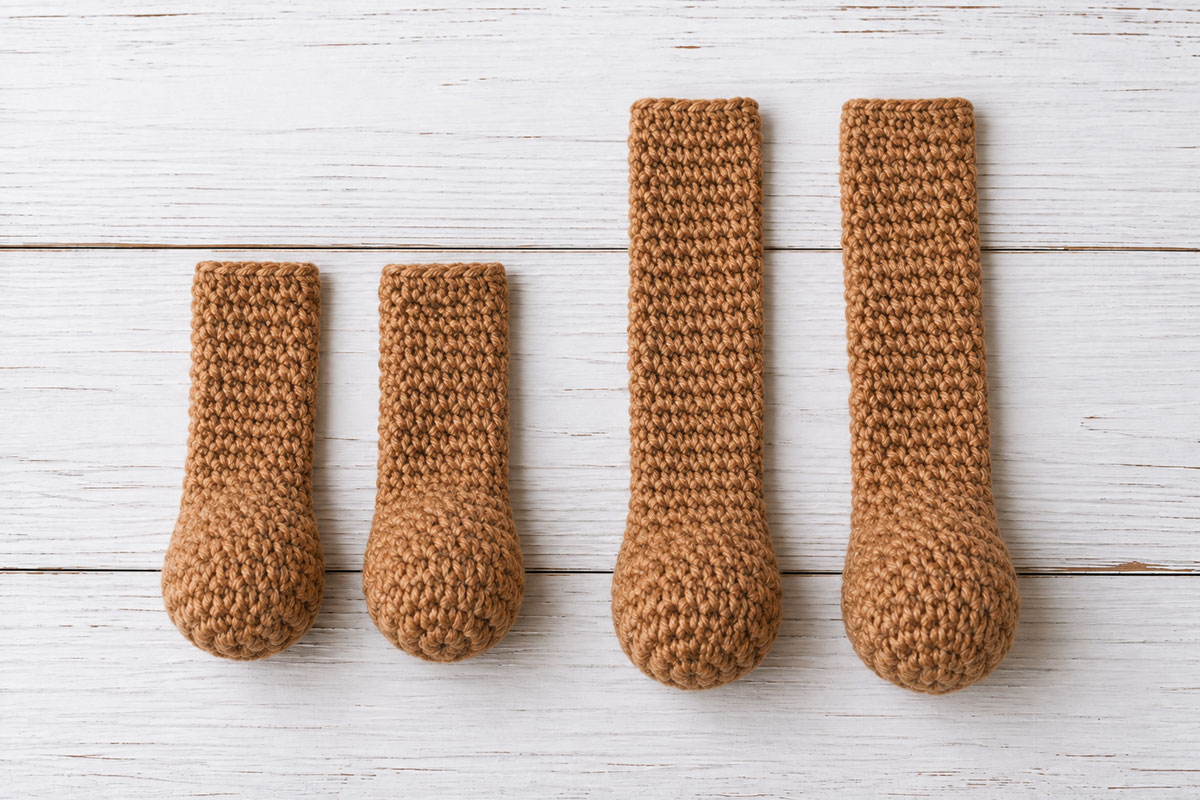
Crochet the Bear Snuggler Arms and Legs
The arms and legs need a little more structure at the ends than they do near the body. Lightly stuffing only the paws and feet gives the bear a recognizable full-body silhouette while allowing the long upper sections to flop and drape with the body.
Make Two Arms
Use the main bear color.
Round 1: Make a magic ring. Work 6 sc into the ring. (6 sts)
Round 2: Inc in each st around. (12 sts)
Round 3: *Sc in next st, inc in next st.* Repeat from * to * around. (18 sts)
Rounds 4 and 5: Sc in each st around. (18 sts)
Round 6: *Sc in next st, inv dec.* Repeat from * to * around. (12 sts)
Place a small amount of fiberfill into the rounded end. The stuffing should fill approximately the first 1 to 1 1/2 inches of the arm. Do not push filling farther up the tube.
Rounds 7 through 18: Sc in each st around. (12 sts)
Do not stuff these rounds.
Flatten the open end so the 12 stitches form two layers of 6 stitches. Ch 1, then work 6 sc across the opening through both layers to close it.
Fasten off, leaving an 18-inch yarn tail for assembly.
Make the second arm the same way. Before fastening off the second one, lay the arms side by side. The stuffed ends and overall lengths should match closely.
Make Two Legs
Use the main bear color.
Round 1: Make a magic ring. Work 6 sc into the ring. (6 sts)
Round 2: Inc in each st around. (12 sts)
Round 3: *Sc in next st, inc in next st.* Repeat from * to * around. (18 sts)
Round 4: *Sc in next 2 sts, inc in next st.* Repeat from * to * around. (24 sts)
Rounds 5 and 6: Sc in each st around. (24 sts)
Round 7: *Sc in next 2 sts, inv dec.* Repeat from * to * around. (18 sts)
Round 8: *Sc in next st, inv dec.* Repeat from * to * around. (12 sts)
Add a small amount of fiberfill to the rounded foot. Keep the stuffing below Round 9 so the long portion of the leg remains flexible.
Rounds 9 through 22: Sc in each st around. (12 sts)
Do not stuff these rounds.
Flatten the opening so the 12 stitches form two layers of 6 stitches. Ch 1 and work 6 sc through both layers to close the top of the leg.
Fasten off, leaving an 18-inch tail for sewing.
Make the second leg the same way, then compare them side by side before assembly. A small difference caused by stuffing is easy to reshape. A difference of a full round is not, so check the round count if one leg is noticeably longer.
The finished limbs should bend easily near the body. If an arm or leg stays straight when you lift the bear, too much fiberfill has probably traveled up the tube. Pull some of it back toward the paw or foot before the pieces are attached.
Crochet the Bear Ears and Muzzle
The ears and muzzle add the teddy-bear character without making the face bulky. Neither piece needs stuffing. Keep them soft and fairly flat against the head.
Make Two Ears
Use the main bear color.
Round 1: Make a magic ring. Work 6 sc into the ring. (6 sts)
Round 2: Inc in each st around. (12 sts)
Round 3: *Sc in next st, inc in next st.* Repeat from * to * around. (18 sts)
Rounds 4 and 5: Sc in each st around. (18 sts)
Do not stuff the ear.
Flatten the piece so it forms a shallow semicircle. Fasten off, leaving approximately 12 inches of yarn for sewing.
Make the second ear the same way. Lay the two ears together before attaching them. Their height, width and curved edges should match.
Make the Muzzle
Use the lighter or contrasting yarn.
Round 1: Make a magic ring. Work 6 sc into the ring. (6 sts)
Round 2: Inc in each st around. (12 sts)
Round 3: *Sc in next st, inc in next st.* Repeat from * to * around. (18 sts)
Round 4: Sc in each st around. (18 sts)
Fasten off, leaving approximately 15 inches of yarn for sewing.
The muzzle will look almost round when it comes off the hook. Gently stretch it from side to side before pinning it to the face. That slight oval shape gives the nose and mouth enough room without adding another stuffed piece to the head.
Assemble the Bear Snuggler
Pin every piece in place before sewing. A few minutes spent checking the proportions now can prevent a tilted head, uneven arms or legs that point in different directions.
Attach the Arms
Place the body flat with the narrower 10-stitch edge at the top.
Position one arm along each side of the body approximately 1 to 1 1/2 inches below the top edge. On the row count, the upper edge of each arm should fall near Rows 5 through 7 of the body panel.
The closed flat end of each arm should overlap the body edge by approximately 1/2 inch. The rounded stuffed paw points away from the body.
Check that both arms begin at the same height. Use the long yarn tail from each arm to sew through the flattened end and both layers of the body edge.
Sew across the attachment once, then work back across it a second time. Keep the stitches firm enough to secure the arm without gathering the body.
After the seam is secure, pass the yarn tail into the body edge for several stitches before trimming the excess.
Attach the Legs
Position one leg at each lower corner of the body. The flattened top of each leg should overlap the joined body by approximately 1/2 inch.
Angle the legs only slightly outward. A wide angle can make the finished bear look stiff when it is laid flat.
Pin both legs before sewing either one. Check that the feet end at approximately the same level and that the stuffed portions face forward.
Sew through the closed top of each leg and both layers of the body. Work across the attachment twice, just as you did for the arms.
The upper portions of the legs should remain completely unstuffed after assembly. They should fold naturally where they meet the body.
Attach the Head
Center the finished head over the narrow top edge of the body. Approximately the lower 3/4 to 1 inch of the head should overlap the body.
Pin the head in at least four places before sewing. Look at the bear from the front and check that the center of the head lines up with the center of the body.
Use the long head tail to sew the lower back of the head across the 10-stitch top edge of the joined body. Take each stitch through the head fabric and both body layers. Work from one side of the attachment to the other with small, closely spaced stitches.
Return across the same attachment line for a second reinforcing pass. Add one small securing stitch at each outer end of the seam, then bury the yarn tail inside the crochet fabric. The head should sit centered without a loose gap at the neck.
Do not pull the seam so tight that the body bunches beneath the head.
Attach the Ears
Place the ears near the upper sides of the head between approximately Rounds 5 and 9.
Leave about 1 1/2 to 2 inches between the inner edges of the ears. The exact spacing can vary slightly depending on how firmly the head was stuffed.
Pin both ears before sewing. View the face straight on and make sure the ears sit at the same height.
Sew the flattened lower edge of each ear securely to the head. Work through the ear and the head fabric with small stitches. Do not sew through the entire head from one side to the other.
Position the Muzzle
Center the muzzle on the lower front of the head. Its upper edge should sit around Round 10 or 11, with the lower edge extending toward Round 16.
Gently shape the muzzle into a horizontal oval and pin it in four places.
Before sewing, check that an equal amount of the head shows on the left and right sides. The muzzle should sit below the future eye line rather than in the middle of the face.
Sew around the outer edge with the matching yarn tail. Keep the muzzle flat. Do not add fiberfill beneath it.
If this floppy animal style tickles your fancy, the animal lovey patterns collection has more handmade security-blanket projects with animal faces and soft shapes. For a fully stuffed project instead, the crochet teddy bear pattern keeps the traditional three-dimensional teddy construction.
Another floppy favorite is my rabbit design. My crochet bunny snuggler pattern features a stuffed head, flat unstuffed body, long ears and flexible arms and legs that are so cute and sure to charm the little ones.
Embroider the Bear Face
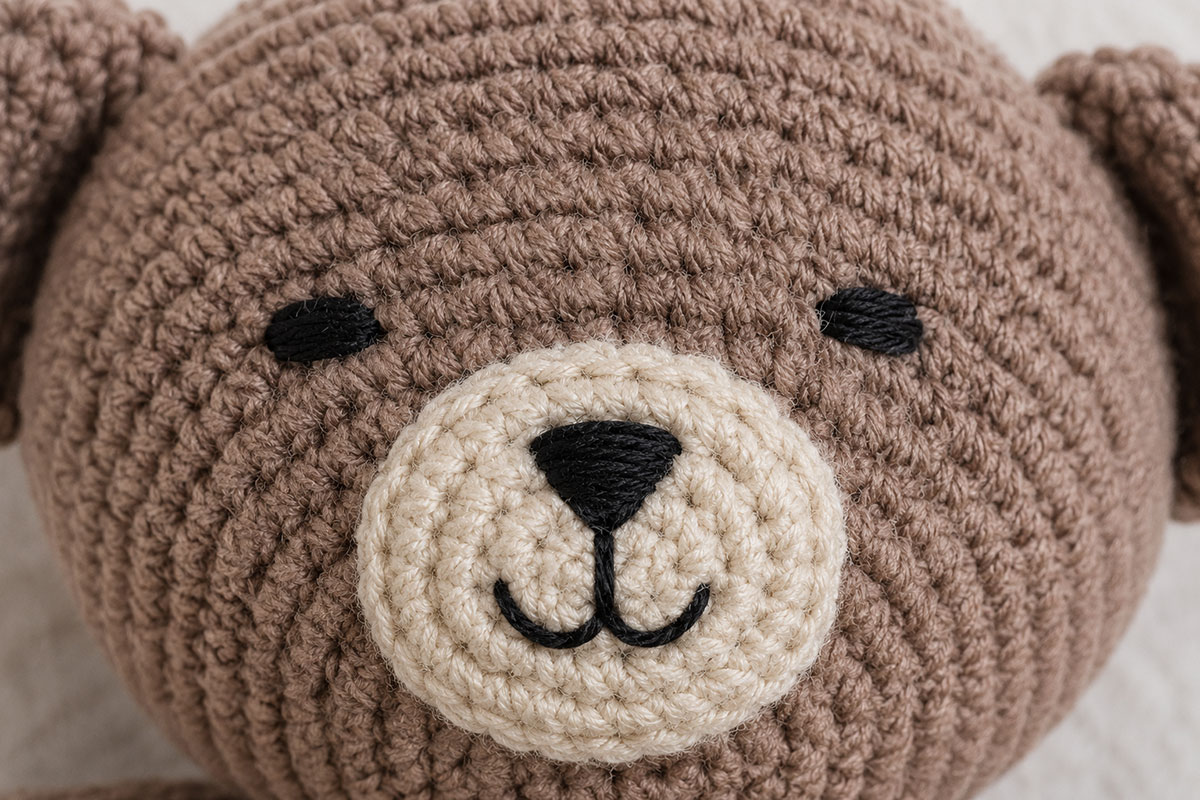
The expression can change with only a few stitches, so mark the eye and nose positions before threading the needle. I prefer a simple face here because it keeps the bear looking soft and recognizable without adding hard pieces.
Embroider the Eyes
Place one eye on each side of the muzzle. Position them approximately between Head Rounds 9 and 11.
The eyes should sit approximately 1 1/4 to 1 1/2 inches apart, measured from the center of one eye to the center of the other.
Use black embroidery floss or smooth black yarn. Make each eye with several short horizontal satin stitches placed closely together.
Keep the finished eyes small, approximately 1/4 inch wide. Count the visible crochet stitches between the muzzle and each eye before completing the second one so the spacing remains balanced.
Do not pull the embroidery tightly enough to indent the head.
Embroider the Nose
Center the nose near the upper middle of the muzzle.
Make a small horizontal triangle or softly rounded triangle with closely packed black satin stitches. The finished nose should measure approximately 3/8 to 1/2 inch across.
Build the shape gradually rather than trying to cover the full area with one long stitch. Shorter stitches lie more securely against the crochet fabric.
Add the Mouth
Bring the black floss down from the center bottom of the nose for approximately 1/4 inch.
From that point, make one short diagonal stitch toward the lower left and one toward the lower right. The result should form a small inverted Y shape.
Keep the mouth compact. Long embroidered lines can catch more easily and can make the expression look harsher than the rest of the bear.
When the face is complete, secure the floss inside the crochet fabric. Pass the yarn or floss through several stitches within the head before trimming the end. Do not leave knots or loose ends on the surface.
Finishing and Final Bear Snuggler Check
Lay the completed snuggler on a flat surface before weaving away any remaining assembly tails. This final check is easier when you can still correct a seam without cutting out finished work.
- The head is centered over the body and does not twist to one side.
- Both ears sit at approximately the same height.
- The embroidered eyes are secure and evenly spaced.
- The nose and mouth have no loose loops.
- The muzzle lies flat against the head.
- The arms attach at the same height on both sides.
- The legs are similar in length and point in the same general direction.
- The paws and feet contain only light stuffing.
- The long portions of all four limbs remain flexible.
- The body contains no fiberfill.
- The body seam has no gaps large enough for fingers to enter.
- Every attachment seam has been sewn securely in both directions.
- Every positioning pin and removable stitch marker has been removed.
- All remaining yarn tails are buried inside the crochet fabric.
Once those points look right, shape the head and paws gently with your hands. Flatten the body between your palms if the joining seam has curled during assembly.
The finished bear should look like a teddy when it is laid out, but it should not behave like a conventional stuffed animal when you pick it up. The middle should fold, the arms should drop naturally, and the legs should move with the body rather than staying rigid.
If you are deciding whether to call the finished project a lovey or a plushie, the construction falls closer to an animal lovey because the torso stays unstuffed. The crochet animal lovey patterns page shows related blanket-based designs, while this bear keeps the recognizable outline of a full teddy.
Important for infant sleep: This handmade snuggler is not an infant sleep product. Keep it out of a crib, bassinet, play yard or other infant sleep space. The U.S. Consumer Product Safety Commission safe sleep guidance recommends a bare infant sleep space with only a fitted sheet.
Washing and Caring for a Crochet Bear Snuggler
Follow the care directions for the yarn used in the project. If the yarn label allows machine washing, place the snuggler in a mesh laundry bag or pillowcase before washing to reduce friction on the ears, limbs and embroidery.
A gentle wash and cool or low-heat drying method is the safer choice when you are unsure how the finished seams will respond. Air drying flat also makes it easy to reshape the body, head and paws before they are completely dry.
Check the snuggler after every wash. Look closely at the face embroidery, ear seams, limb attachments and body edge. Repair any loose yarn before returning the item to use.
A handmade snuggler should also be checked regularly as it wears. Crochet fabric can stretch with repeated washing and handling, especially around attachment points.
Bear Snuggler Crochet Pattern FAQ
What is the difference between a bear snuggler and a bear lovey?
A traditional bear lovey often has a stuffed bear head attached to a small square, round or shaped blanket. This snuggler keeps the full outline of a teddy bear. It has a stuffed head, long limbs and a flat unstuffed torso instead of a separate blanket base.
You can see the more traditional construction in the teddy bear lovey crochet pattern.
Should the body of a crochet snuggler be stuffed?
Not in this pattern. The two body panels are joined around the edges and left completely unstuffed. That is what gives the center its soft, foldable feel.
How much should I stuff the arms and legs?
Use only enough fiberfill to round the paw and foot portions. Stop before the long straight sections begin. If stuffing travels too far toward the body, the limbs will lose much of their floppy movement.
Can I use safety eyes on the bear?
I recommend embroidered facial features when making the snuggler as a baby gift. This pattern is designed around satin-stitch eyes and an embroidered nose and mouth, so no plastic facial pieces are necessary.
Can I make the bear larger or smaller?
You can change the overall size by changing yarn weight and hook size, but that also changes the density of the fabric and the amount of filling required. Keep the hook small enough for the selected yarn that fiberfill cannot work through the stitches.
Is this the same as amigurumi?
Parts of the construction use amigurumi techniques, including continuous single crochet rounds, increases, decreases and stuffed shaping. The finished project is different from a standard amigurumi teddy because the main body remains flat and unstuffed.
If you want a bear with a fully stuffed torso instead, use the free crochet teddy bear pattern.
When you click on links to various merchants on this site and make a purchase, this may result in this site earning a commission. This does not affect the price you pay.

UBGI Gold Standard 2026
Reviewed under the site's
editorial checklist.
Photos, decorating ideas, party setups and reader submissions are shared for inspiration unless a page is specifically presented as a pattern, tutorial, reference guide or step-by-step project. Follow the instructions, measurements, safety guidance and manufacturer directions provided for the particular project or product.
About Jan | Contact | Baby Nursery Ideas (Blog) | Site Map | Privacy Policy | Disclosure Policy | Disclaimer | Affiliate Disclosure | Earnings Disclosure | Facebook | Pinterest
I am a participant in the Amazon Services LLC Associates Program, an affiliate advertising program designed to provide a means for us to earn fees by linking to Amazon. As an Amazon Associate I earn from qualifying purchases.
Copyright © 2006-2026. All Rights Reserved.