Country Goose Crib Quilt Pattern – Miss Sissy the Prissy Goose
By Jan Bay
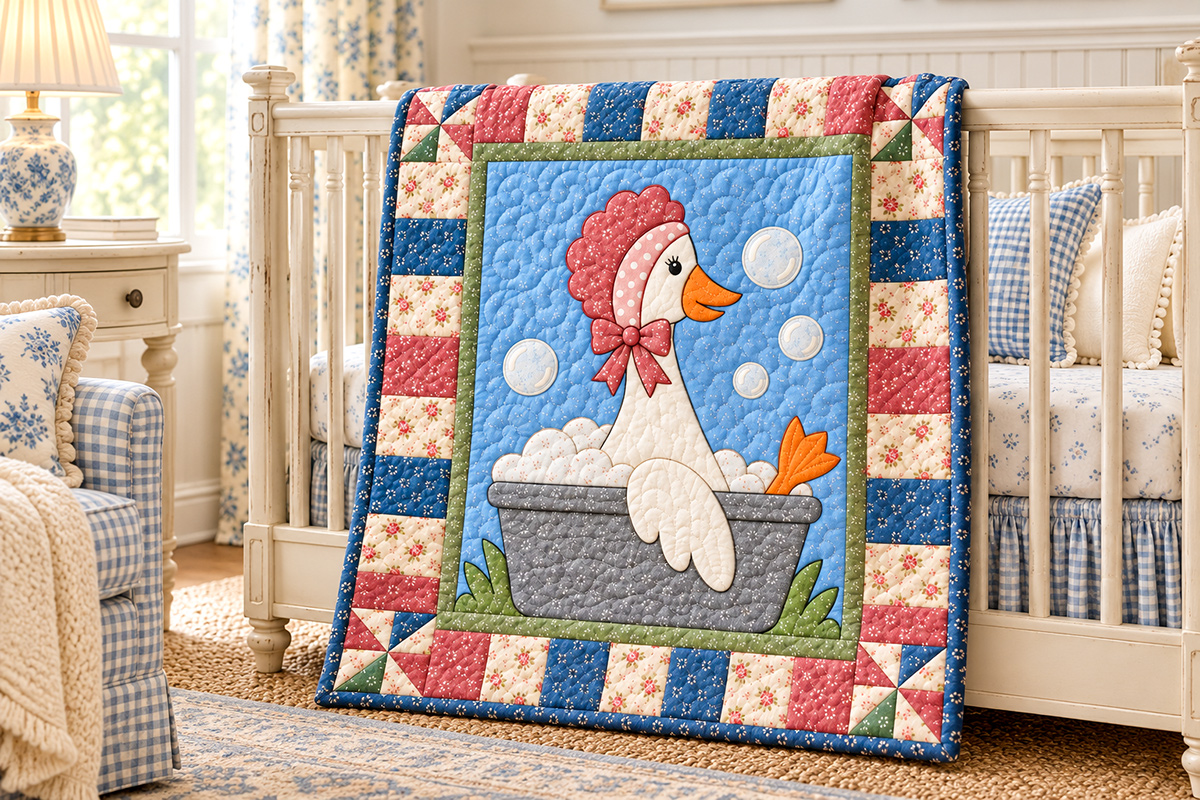
My free country goose crib quilt pattern features Miss Sissy the Prissy Goose enjoying a soak on wash day. This original 40" × 50" appliqué quilt has a center medallion, traditional patchwork border and four matching pinwheel corner blocks. Miss Sissy is not only prissy, she’s a bit sassy, lounging in her gray washtub in a scalloped bonnet with one orange foot draped over the side and four bubbles floating around her. The fresh colors and old-fashioned country atmosphere give the design its personality, while the downloadable PDF makes the project very doable with full-scale reversed templates for the appliqué pieces.
Explore More Baby Quilt Patterns
Helpful supplies for this project.
Jump to:
About the Miss Sissy Quilt Pattern
Country & Pastel Spring Colorways
About This Country Goose Crib Quilt Pattern
Miss Sissy is meant to be the star of this quilt, so I kept the construction centered around one large appliqué scene rather than scattering little motifs all over the top. She sits right in the middle of a 28" × 38" soft blue field, soaking in her gray washtub with her bonnet on, one wing draped down and one orange foot resting over the side. Four bubbles float around her. No more, no less.
A narrow 1" finished inner border frames that center scene before the quilt moves into a 5" finished patchwork outer border. The outer border uses 28 plain squares plus four matching pinwheel corner blocks. That combination gives the quilt some traditional country character without taking attention away from Miss Sissy herself.
The finished quilt measures 40" × 50", which makes it a useful crib-quilt size and also a nice size for displaying over a nursery chair, quilt rack or wall when it isn't being used. Because quilts and other loose bedding should not be placed in an infant sleep space, the U.S. Consumer Product Safety Commission recommends keeping a baby's crib bare except for a fitted sheet. You can read the current CPSC safe-sleep guidance here.
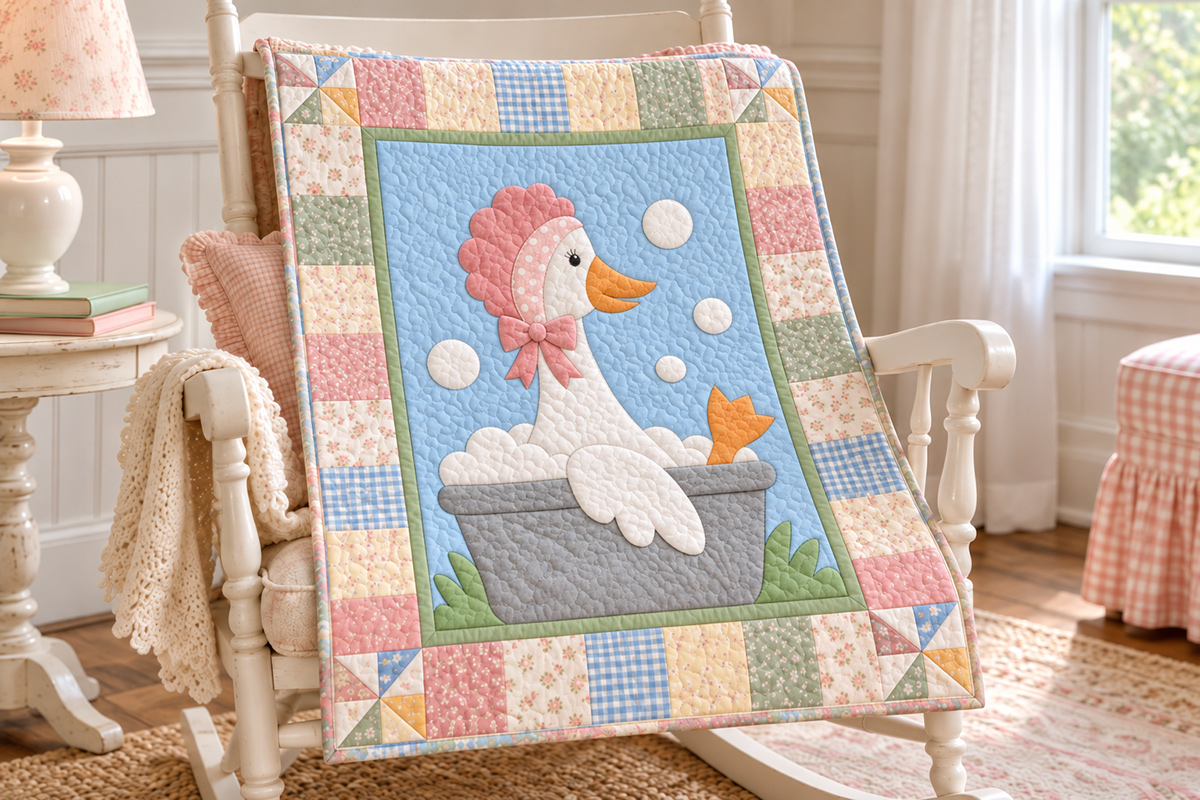
The country version is the main colorway for Miss Sissy. The soft blue center, white goose, orange beak and foot, gray washtub and traditional patchwork border suit her old-fashioned wash-day personality. If you'd rather make her lighter and sweeter for spring, the same appliqué templates and quilt construction can be used with a pastel palette. Nothing about the pattern pieces changes.
I wouldn't change the proportions of the appliqué just to make the tracing or cutting faster. The large goose, tub, bonnet, wing, foot, foam, greenery, bow and bubbles were designed to work together as one center medallion. Keeping those proportions intact is what gives Miss Sissy her recognizable shape and keeps the scene balanced inside the blue field.
The downloadable pattern gives you the actual construction information rather than leaving you to work backward from a finished picture. The full-scale appliqué pieces are already reversed for fusible-web tracing, and the larger pieces are tiled across multiple pages so you can print them at Actual Size / 100%, join the sections and use them at the intended scale.
Before tracing anything, check the 1" calibration square on the printed template pages. If that square doesn't measure exactly 1", stop there and correct the printer settings. A small printing error gets much larger once it reaches the goose body or washtub, and those pieces need to fit the 28" × 38" center field as designed.
What You Get in the Miss Sissy Quilt PDF
The PDF is meant to give you the information you need to make the quilt without having to enlarge a tiny diagram, guess at appliqué proportions or work out the border math yourself.
Inside you'll find the complete 40" × 50" quilt dimensions and cutting information, the layout for the 28" × 38" center appliqué field, the 1" finished inner border and the 5" finished patchwork outer border. The outer border is built with 28 plain squares and four matching pinwheel corner blocks.
You'll also get placement guidance for Miss Sissy and all of the visible parts of her wash-day scene. That includes the goose body, scalloped bonnet and face band, two-part orange beak, single draped wing, raised orange foot, gray tub body and rim, bath foam, greenery, bow and exactly four floating bubbles.
The appliqué templates are full size. The larger pieces are tiled across more than one sheet where necessary, so you won't need to take a small drawing to a copy shop and figure out an enlargement percentage.
The templates are also already reversed for fusible-web tracing. That's worth pointing out because you do not need to flip them again. Trace them as printed onto the paper side of your fusible web, following the manufacturer's directions for the product you're using.
The PDF also includes printing instructions, appliqué placement information and the quilting, binding and finishing guidance needed to take the project from the center panel through the completed quilt.
If you're deciding whether this pattern suits the quilt you have in mind, the main thing to know is that Miss Sissy is a fairly large appliqué medallion surrounded by straightforward patchwork. You're not piecing the goose from dozens of tiny blocks. The character comes from the appliqué scene, while the borders give the quilt its traditional structure.
Country Goose Crib Quilt Pattern Size and Construction
The finished quilt measures 40" × 50". The center begins with a 28" × 38" blue appliqué field, which gives Miss Sissy enough room to be the clear focal point instead of looking squeezed into the middle of the quilt.
A 1" finished inner border goes around that center field. It acts as a simple frame between the large appliqué scene and the busier patchwork border outside it.
The outer border finishes at 5" wide. It uses 28 plain border squares with four matching pinwheel blocks at the corners. I like the pinwheels here because they give the corners a definite finish without competing with the goose in the center.
The construction sequence is easier to understand if you think of the quilt in three parts:
- Center: the 28" × 38" blue appliqué field with Miss Sissy and her washtub scene.
- Frame: the 1" finished inner border.
- Outer border: the 5" finished patchwork border with 28 plain squares and four matching pinwheel corner blocks.
That structure also makes fabric planning easier. You can choose the center-field fabric and Miss Sissy's appliqué fabrics first, then pull the border fabrics from those colors instead of trying to choose every print at once.
Miss Sissy herself should stay large. Her body, bonnet, tub and raised foot were proportioned as one scene. Shrinking individual pieces to save fabric or make them fit a smaller sheet of fusible web would change the way the appliqué fits together.
The same goes for the border dimensions. The finished measurements work as a system. The 28" × 38" center, 1" inner border and 5" outer border are what bring the quilt to the intended 40" × 50" finished size.
Country and Pastel Spring Colorways
The country colorway is the main version of Miss Sissy. That's the one I'd start with if you want the design to have the old-fashioned wash-day feeling that inspired her in the first place.
Keep the goose white, the beak and raised foot orange and the tub gray. From there, the blue center field and patchwork border give you room to bring in the country colors you like without changing the actual design.
I would let the border carry most of the print and color variation. Miss Sissy already has plenty going on between the bonnet, bow, tub, greenery, foam and bubbles. The center doesn't need a busy background competing with all of that.
If country isn't the look you're after, the pattern also works as a pastel spring quilt. You can change the blue, border prints, bonnet and bow fabrics while using the exact same appliqué templates and construction.
Nothing needs to be redrawn for the spring version. Miss Sissy stays the same size, the washtub stays the same size, and the four bubbles stay exactly where they belong. You're changing the fabric story, not the quilt pattern.
For a spring version, I'd keep enough contrast between the white goose and the center field that her body shape doesn't disappear. The same applies to the gray tub. Very pale fabrics can be pretty, but if every piece is close in value, the whole center scene can start blending together.
So change the colors freely. Keep the structure.
Printing the Full-Scale Appliqué Templates
Print the template pages at Actual Size / 100%. Do not use Fit to Page, Shrink to Fit or another automatic scaling setting.
Before you print the entire set, check the page that contains the 1" calibration square. Measure that square with a ruler after printing. It should measure exactly 1" in both directions.
If it doesn't, fix the printer settings before tracing or cutting anything. Don't try to compensate later by trimming a little more off one piece or stretching the placement. Large appliqué pieces magnify even a small printing error.
Some of the larger templates are tiled over multiple sheets. Print them all at the same 100% setting, then align the tiled sections using the markings provided in the PDF before tracing the complete shape.
The templates are already reversed for fusible-web appliqué. That means you should trace the printed shapes directly onto the paper side of the fusible web. Do not mirror them a second time.
Follow the instructions supplied with your particular fusible web for fusing temperature, pressing time and whether steam should be used. Different products are not identical, so the package directions should take priority for the actual bonding step.
You'll need about 1 1/2 to 2 yards of fusible web, depending on the width of the product you're using. There are several substantial appliqué pieces in Miss Sissy's scene, so I would rather have enough on hand than try to squeeze the goose body, tub and other large pieces into too little web.
Before You Cut the Appliqué Pieces
I would print and assemble the large tiled templates before cutting fabric. Lay the major shapes together and make sure you can see how the goose, tub, wing, foot and bonnet relate to one another.
That quick check matters because Miss Sissy isn't a collection of separate decorations. The pieces overlap to create one character. The goose sits down into the washtub, the rim crosses the body where intended, the wing drapes over the front and the raised foot belongs on the viewer's right.
There is no separate ankle template. The ankle is part of the raised foot piece. If you're looking through the template pages and wondering where the little ankle piece went, nothing is missing.
There is also only one wing. Don't cut a second one for symmetry. The single draped wing is part of Miss Sissy's pose.
And there are four floating bubbles. It's an oddly specific little detail, but it matters to the finished composition. Cut four.
Once you're comfortable with the arrangement, trace the reversed shapes onto the fusible web and keep each traced piece identified until you're ready to fuse it to fabric. A small label on the paper backing can save a lot of sorting later, especially with the bonnet pieces, tub pieces and greenery.
Putting Miss Sissy Together on the Center Field
Use the placement guidance in the PDF rather than trying to center every appliqué piece independently. Start with the large shapes that establish the scene, then add the smaller pieces around them.
The gray washtub is one of the important anchors. Miss Sissy sits down into it rather than floating above it, so the relationship between the goose body, tub body and tub rim needs to stay intact.
Her raised orange foot belongs on the viewer's right. The other visible movement comes from the single white wing draped down over the front of the scene.
Place the scalloped bonnet and face band so they frame her head without covering the two-part beak. The bonnet is part of what makes Miss Sissy look like Miss Sissy, so I wouldn't simplify it to a plain cap.
After the large character pieces are in place, add the rounded bath foam, greenery, bow and four bubbles. Those smaller elements finish the scene, but the goose and tub should be doing most of the visual work.
Before fusing, step back and look at the whole 28" × 38" field. It's much easier to move a paper-backed appliqué piece by half an inch now than after it has been permanently fused.
Finishing the Quilt with the Patchwork Border
Once the center appliqué field is complete, the narrow inner border gives it a clean stopping point before you add the patchwork.
The outer border uses 28 plain squares and four matching pinwheel corner blocks. Keep the four corner blocks alike. Repeating the same pinwheel at each corner gives the border some order and keeps the corners from looking like four separate experiments.
If you're using several fabrics in the plain border squares, spread them around before sewing the rows together. I wouldn't put all of one print down one side or accidentally bunch the darkest squares into one corner.
You can lay the squares around the finished center on a table or floor before joining them. Move them until the color feels reasonably balanced, then stack each side in order. It doesn't need to be fussy. You're just avoiding an obvious clump of one color or print.
The border should support Miss Sissy, not take over the quilt. If you're choosing between a very bold print and a quieter country print, I'd usually let the smaller patchwork pieces carry the busier fabric and keep the larger areas more settled.
Quilting, Binding and Finishing
The PDF includes the finishing information for completing the quilt after the top is assembled. You can choose quilting that suits your equipment and comfort level, but you don't need dense decorative quilting over every part of the appliqué to make the design readable.
I would keep the quilting from visually fighting with Miss Sissy's face, bonnet and other small details. The appliqué already supplies the drawing in the center of the quilt.
Whatever quilting method you choose, secure the appliqué edges appropriately for the fusible product and appliqué technique you're using. Fusible web holds the pieces in position, but the PDF's finishing instructions should be followed for the completed quilt rather than treating the fused edges as the entire finishing process.
After quilting, trim and square the quilt as directed, then bind the outer edge. Take a final look at the corners before finishing the binding so the four pinwheel blocks remain visually even at the edge.
If the quilt will be used in a baby's room, remember that a finished quilt is for supervised use, display or use outside the infant sleep space. Keep loose quilts and other soft bedding out of an occupied crib during sleep.
Download the Miss Sissy the Prissy Goose Quilt Pattern
If Miss Sissy has won you over, you can download the complete pattern below.
Miss Sissy the Prissy Goose Crib Quilt Pattern
Finished size: 40" × 50"
The PDF includes complete quilt dimensions and cutting information, appliqué placement guidance, full-scale tiled appliqué templates, printing instructions, and quilting, binding and finishing information.
Download the Miss Sissy Quilt Pattern PDF
Print the appliqué templates at Actual Size / 100% and check the 1" calibration square before tracing.
Save the PDF before you begin so you'll have the cutting information, placement pages and full-size templates together while you're working.
More Baby Quilt Ideas
If you'd like to look through more quilt ideas before choosing your next project, start with my baby quilts page. It gives you a wider look at crib quilts and quilt ideas rather than another version of Miss Sissy.
You can also browse the animal quilt block patterns if it's the animal appliqué side of this project that caught your attention.
When you click on links to various merchants on this site and make a purchase, this may result in this site earning a commission. This does not affect the price you pay.

UBGI Gold Standard 2026
Reviewed under the site's
editorial checklist.
Photos, decorating ideas, party setups and reader submissions are shared for inspiration unless a page is specifically presented as a pattern, tutorial, reference guide or step-by-step project. Follow the instructions, measurements, safety guidance and manufacturer directions provided for the particular project or product.
About Jan | Contact | Baby Nursery Ideas (Blog) | Site Map | Privacy Policy | Disclosure Policy | Disclaimer | Affiliate Disclosure | Earnings Disclosure | Facebook | Pinterest
I am a participant in the Amazon Services LLC Associates Program, an affiliate advertising program designed to provide a means for us to earn fees by linking to Amazon. As an Amazon Associate I earn from qualifying purchases.
Copyright © 2006-2026. All Rights Reserved.