Salt Dough Reindeer Footprint Ornament with Easy Painted Details
By Jan Bay
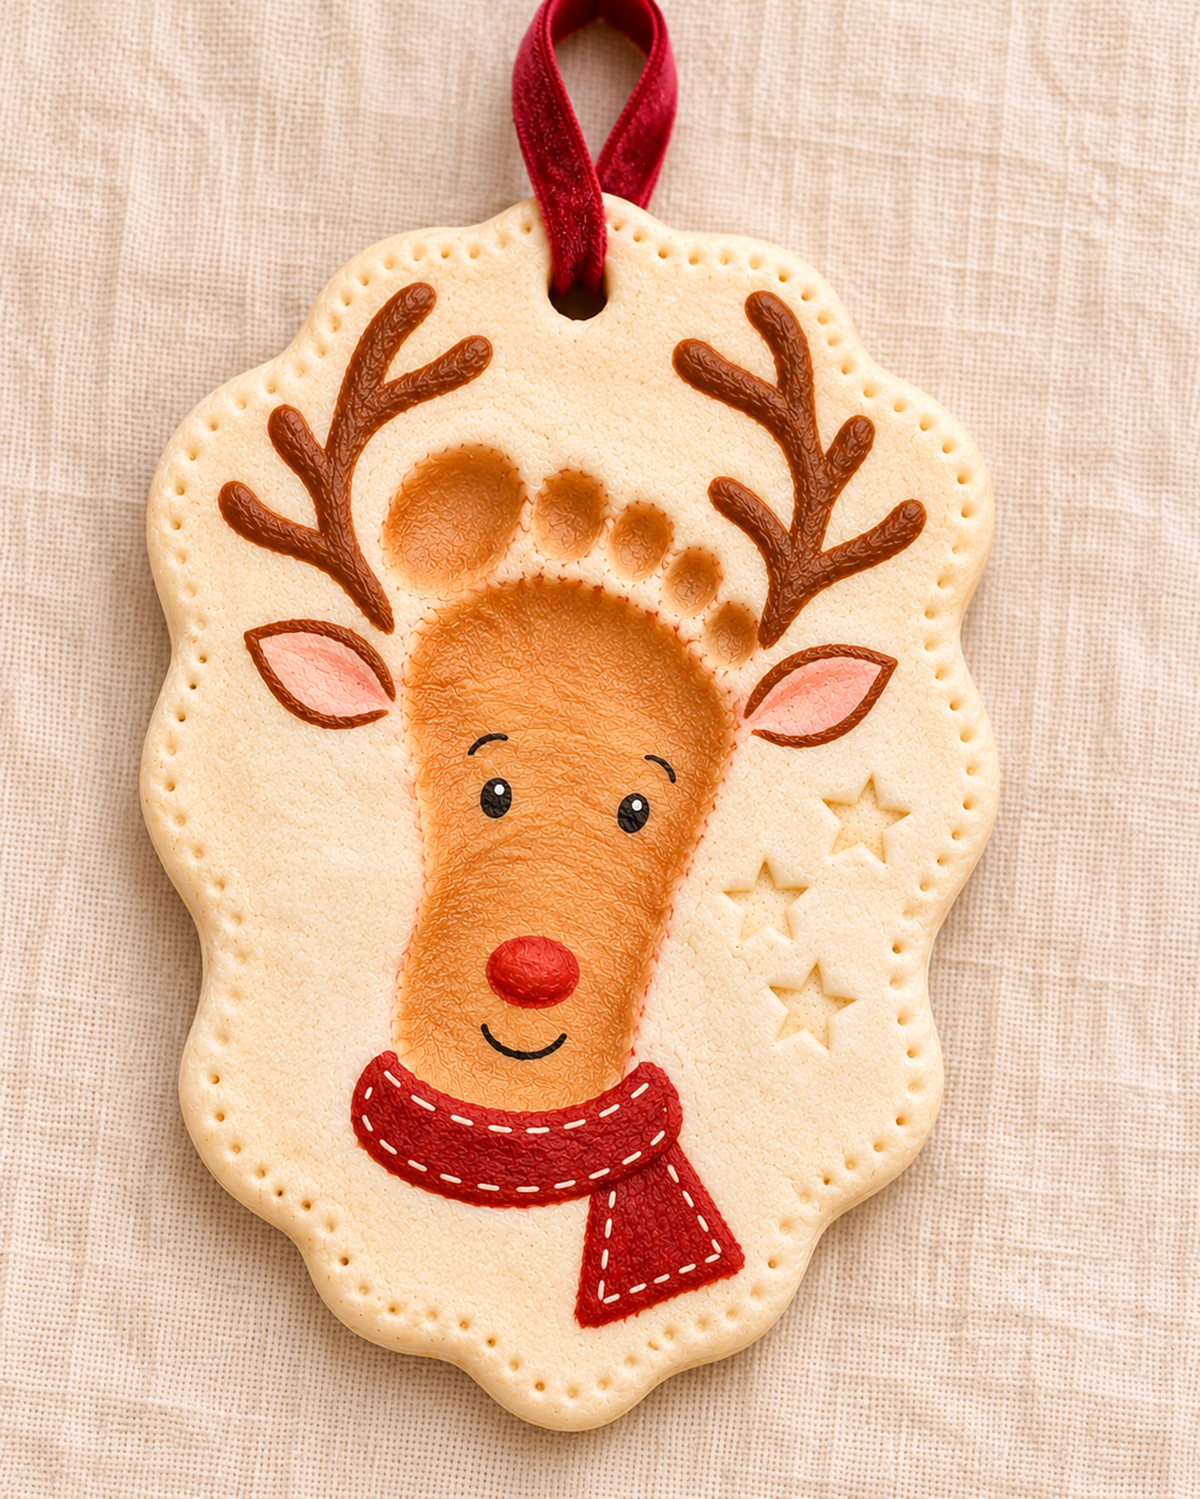
This Salt Dough Reindeer Footprint Ornament turns your baby's tiny footprint into a classic Christmas keepsake with a red nose, painted antlers, little pink ears and a simple red scarf. The gently scalloped border, tiny impressed stars and burgundy hanging ribbon give the ornament a special handmade look without making the project too difficult for beginners.
Explore More Baby Christmas Crafts and Keepsakes
Baby Footprint Christmas Ornament Ideas
Baby Christmas Crafts and Keepsakes
Baby Footprint Crafts and Keepsake Ideas
See Supplies for This Project Here.
Jump to a Section
Supplies You'll Need
You won't need many special supplies to make this salt dough reindeer footprint ornament. Most of what you'll use is probably already in your kitchen or craft supplies.
For the salt dough:
- 1 cup all-purpose flour, plus a little extra for dusting
- 1/2 cup fine table salt
- Up to 1/2 cup water
- Mixing bowl and spoon
- Rolling pin
- Parchment paper and baking sheet
For shaping the ornament:
- Two 3/8-inch-thick rolling guides, optional but helpful
- Paper and pencil for making the scalloped outline
- Small craft knife or butter knife for adult use
- Drinking straw for the hanging hole
- Blunt toothpick or wooden skewer for border dots
- Small star-shaped clay stamp or blunt modeling tool
For painting and finishing:
- Warm brown acrylic craft paint for the footprint
- Darker brown paint for the antlers and ear outlines
- Red or burgundy paint for the nose and scarf
- Pale pink paint for the inside of the ears
- Black paint for the eyes, eyebrows and smile
- Cream paint for the little scarf stitches
- Small round paintbrush and fine detail brush
- Optional clear, water-based acrylic craft sealer
- About 10 to 12 inches of burgundy velvet ribbon, approximately 3/8 inch wide
Finished size: Plan on approximately 5 1/2 inches wide and 7 inches tall for a small baby's footprint. The exact size will depend on your child's foot and how much room you leave for the antlers, stars and scarf. A larger ornament may be better displayed as a hanging keepsake rather than on a Christmas tree.
I'd keep the decorating supplies simple. The little scarf in the example is painted directly onto the ornament, not made from fabric or clay. That's much easier, and you can get the same cheerful look with just two paint colors.
Before you begin: This is an adult-led keepsake project, not a toy or an edible dough. Don't use salt dough on broken or irritated skin. Keep the mixture away from your baby's mouth, and stop if your baby becomes uncomfortable. Wash and dry the foot immediately after making the impression, and keep all craft materials out of reach when they're not being used.
Easy Salt Dough Recipe for Footprint Ornaments
This recipe makes a firm dough that you can roll, shape and press with your baby's foot. It should be thick enough to hold a footprint without becoming so bulky that the ornament is difficult to dry.
The recipe makes enough for approximately one larger baby footprint plaque, with the exact yield depending on the size of the ornament and how thick you roll the dough.
Mix the Dough
- Combine the dry ingredients. Put 1 cup of flour and 1/2 cup of fine salt into a mixing bowl. Stir until the salt is evenly mixed through the flour.
- Add the water gradually. Begin with about 1/3 cup of water and stir. Add more, a tablespoon at a time, until the mixture comes together. You may not need the entire 1/2 cup.
- Knead the dough. Turn it onto a clean surface and knead for about 3 to 5 minutes, until it's smooth and holds together.
- Check the texture. The dough should feel firm and pliable, not sticky or crumbly. Add a light dusting of flour if it sticks to your hands. If it cracks as you fold it, knead in a few drops of water.
- Let it rest. Cover the dough and give it about 10 minutes to relax before rolling.
Don't add extra flour unless you need it. Too much can make the dough dry and harder to press without cracking.
How Thick Should the Salt Dough Be?
For this particular ornament, aim for approximately 3/8 inch thick before making the footprint.
A thinner piece won't give you much depth for the toes and heel. On the other hand, a very thick plaque will take longer to dry and may be too heavy for a Christmas tree branch.
If you have two strips of wood or other rolling guides that measure 3/8 inch thick, place one on either side of the dough and roll until your rolling pin rests on both guides.
That gives you a fairly even thickness without having to guess.
How to Make the Salt Dough Reindeer Footprint Ornament
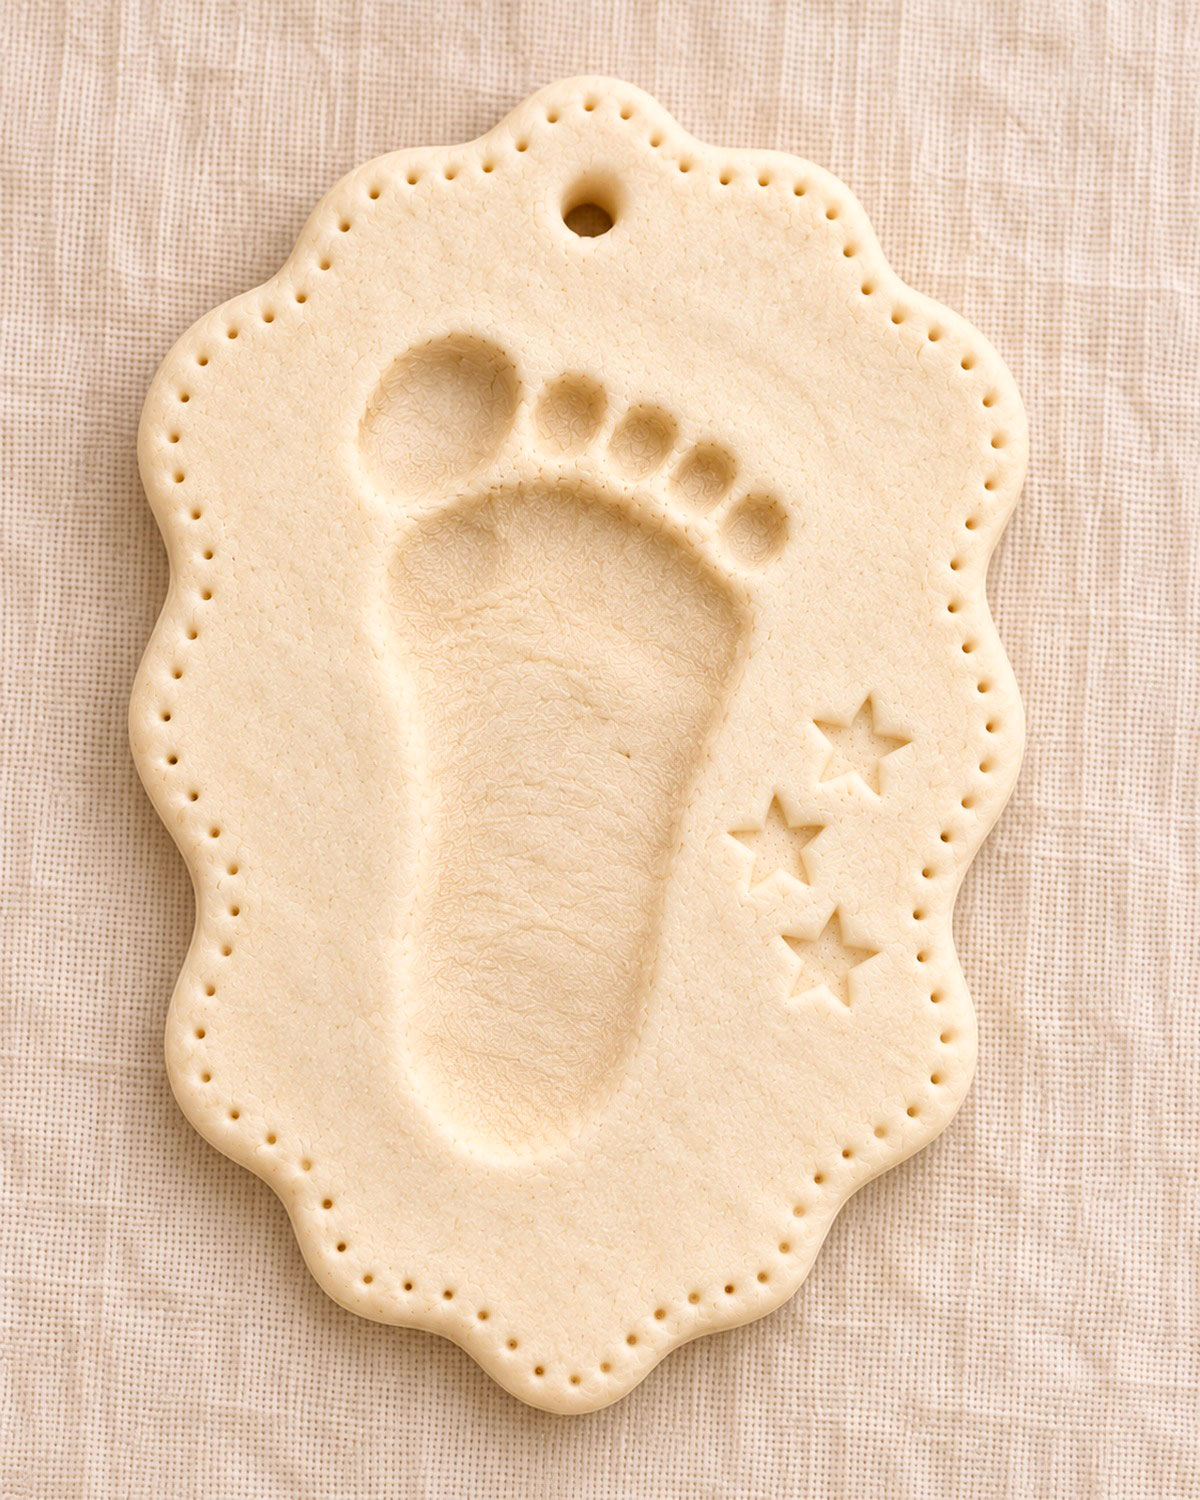
The reindeer begins with one real footprint pressed into the dough. Everything else is arranged around it, so make the footprint first and give yourself plenty of room for the little details.
Step 1. Roll Out the Dough
Place a sheet of parchment paper on your baking sheet and lightly dust it with flour. Roll the dough directly on the parchment until it's about 3/8 inch thick.
Make the sheet several inches wider and longer than your baby's foot. You'll be trimming away the extra dough after making the impression.
Rolling directly on the parchment means you won't have to pick up the finished ornament while the dough is still soft. That helps preserve the footprint.
Step 2. Make Your Baby's Footprint
Have another adult help you support your baby if needed. Gently lower one clean, dry bare foot onto the dough, placing the heel down first and then bringing the toes into contact with the surface.
Apply only enough gentle, even pressure to make a visible impression. You're aiming for a shallow recess, roughly 1/8 inch at its deepest point, without pressing through the dough. Don't force the foot down if your baby pulls away.
Lift the foot straight up, helping the toes release without dragging through the dough. Wash and dry your baby's foot right afterward.
Look for a clear heel, the main part of the foot and five separate toe impressions. The big toe should be easy to recognize.
If your first impression is badly smudged, just gather the dough, knead it briefly and roll it out again. It's easier to start over than to try repairing individual toes.
Step 3. Turn the Footprint into the Reindeer's Face
Position the ornament so the toes point toward the top and the heel points toward the bottom.
The broad area near the toes becomes the upper part of the reindeer's face. The narrower heel becomes its little muzzle.
Don't erase the natural footprint lines or try to sculpt a different face shape. Those tiny impressions are what make the ornament a personal keepsake.
Step 4. Cut the Scalloped Ornament Shape
Make a loose paper outline around the footprint, leaving space above the toes for antlers, beside the footprint for ears and stars, and below the heel for the scarf.
For a small baby's footprint, the finished shape might measure about 5 1/2 inches wide by 7 inches tall.
Instead of making a perfect oval, draw about 10 to 12 broad, shallow rounded scallops around the outside. They should look like gentle waves rather than little pointed teeth.
Cut out your paper shape and keep it beside the dough as a guide. Don't lay the paper over the fresh footprint, because it could flatten the impressions. Have an adult trim the dough into broad scallops with a small knife, following the paper outline as closely as practical. Lift away the excess dough and smooth the cut edges with a slightly damp fingertip.
Design checkpoint: Before moving on, make sure there's room for two antlers above and beside the toes, two ears beside the upper footprint, three stars on the right and a short scarf below the heel.
Step 5. Add the Tiny Dotted Border
Use the rounded end of a small wooden tool to press a row of shallow dots just inside the scalloped edge.
Keep the dots approximately 1/4 inch apart and about 1/4 inch from the outer edge. They don't have to be perfectly spaced.
Press lightly. These are decorative little dimples, not holes that go through the ornament.
The border is one of the details that gives this reindeer its special look, so I'd include it even if you decide to leave off some of the other decorations.
Step 6. Add Three Little Stars
On the right side of the footprint, press three small stars into the dough. Arrange them diagonally, with one near the upper side of the face and two below it.
A miniature star-shaped modeling stamp works well. You can also draw the five points of each star with a blunt clay tool and press the center slightly lower.
Keep the stars shallow and leave a little space between them and the footprint. They should look like small impressions in the dough, not raised decorations attached afterward.
Step 7. Make the Hanging Hole
Use a drinking straw to cut a clean hole near the top center of the ornament.
Allow at least 1/2 inch of solid dough between the top edge and the nearest edge of the hole. A hole approximately 3/8 inch across will give you room for the ribbon.
Remove the dough from inside the hole and check that the opening goes all the way through. Smooth any rough edges carefully.
Do this now, before drying. Trying to drill through a finished salt dough ornament could crack it.
Step 8. Check the Shape Before Drying
Look over the entire ornament while the dough is still soft:
- Can you see the big toe and four smaller toes?
- Is the heel impression clear enough to become the reindeer's muzzle?
- Is the scalloped edge smooth, without thin or ragged sections?
- Are the border dots and three stars visible?
- Is the ribbon hole completely open?
- Is there enough blank space around the footprint for the painted antlers, ears and scarf?
Make any small corrections now. Once the dough is dry, the shape and impressions are permanent.
Drying and Finishing Your Salt Dough Ornament
Give the ornament plenty of time to dry before you start painting. The surface needs to be firm, but the middle and back need to dry too. Otherwise, moisture trapped inside can cause problems later.
Option 1. Dry the Ornament in the Oven
For the 3/8-inch-thick ornament in this project, I'd use a low oven temperature rather than trying to hurry the process.
- Preheat your oven to 200°F (about 93°C).
- Keep the ornament on its parchment-lined baking sheet. Don't lift it by the scalloped edges.
- Place the baking sheet on the middle rack.
- Begin checking after approximately 3 hours. A large or thick footprint plaque may need several additional hours.
- If the ornament is still pliable or the back feels damp, continue drying in 30-minute intervals.
- If the back needs more drying, remove the baking sheet from the oven and let the ornament cool enough to handle. Once the front is firm and the ornament can be moved without damage, carefully turn it over and return it to the oven. Use oven mitts when handling the hot baking sheet.
- Remove it from the oven when the ornament is hard throughout, then allow it to cool completely.
These are starting times, not a guarantee. The size of the plaque, moisture in the dough and your oven can all affect drying time. Don't increase the temperature just to finish faster. Too much heat can cause puffing, browning or cracks.
Drying checkpoint: The ornament should feel completely firm, including the center and back. It shouldn't bend when carefully supported in your hands, and there shouldn't be any damp or pliable areas. If you're uncertain, give it more drying time before painting.
Option 2. Air-Dry the Ornament
If you'd rather skip the oven, leave the ornament on its parchment in a dry, well-ventilated room.
A thick footprint ornament may take several days, sometimes a week or longer, to dry completely. Once the top is firm enough to handle, carefully turn it over so moisture can escape from the underside.
Don't place it near a sink, humidifier or damp window. Salt dough absorbs moisture, and you don't want your finished keepsake becoming soft again.
Smooth the Edges Before Painting
Once the ornament has dried and cooled, check the scalloped edges and hanging hole.
If you find a sharp, rough spot, smooth it gently with fine-grit sandpaper. Don't sand the actual footprint or the tiny impressed stars. You want to preserve those details.
Brush away the dust with a dry, soft brush.
Now the ornament is ready for its reindeer face. The clear sealer and hanging ribbon will go on after the painted details have dried.
How to Paint the Reindeer Footprint and Easy Red Scarf
Here's where the footprint begins looking like the little Christmas reindeer in the example image. The decorating is mostly simple shapes painted with a small brush. You don't need to be an artist to make it cute.
Keep the natural cream-colored dough visible around the footprint. That gives the brown reindeer, red scarf and little stars a nice contrast.
Step 1. Paint the Brown Footprint
Use warm, medium-brown acrylic paint to fill the recessed footprint, including the heel, main foot impression and all five toes.
Follow the original edges of the impression rather than trying to draw a new outline. A small round brush will help you get into the toe impressions without spreading brown paint across the background.
Apply one thin coat, let it dry and add a second thin coat if needed. Don't fill the impressions with thick layers of paint. You want to keep their depth visible.
The original footprint should still be easy to recognize after painting.
Step 2. Paint the Antlers
Use a darker brown for the antlers. Place one on each side of the toe impressions, extending upward into the cream-colored background.
Each antler needs just one gently curved main branch and about three shorter branches coming off it.
- Paint a curved brown line rising from the upper left side of the footprint.
- Add two short branches pointing outward and one near the top.
- Repeat on the opposite side, reversing the direction of the branches.
- Thicken the main branches slightly so they look like antlers rather than thin twigs.
Keep the antlers clear of the hanging hole and dotted border. They don't need to be perfectly symmetrical. A slightly different curve on each side makes the reindeer look more natural.
Don't paint over the toe impressions. The toes should remain visible between the two antlers.
Step 3. Give the Reindeer Two Little Ears
Paint one almond-shaped ear on each side of the upper footprint, just below the antlers.
Use dark brown to outline each ear, then fill the center with pale pink. Angle the ears slightly upward and outward.
Keep them fairly small. They should frame the footprint without taking attention away from the reindeer's face.
Step 4. Paint the Eyes, Eyebrows and Red Nose
With a fine brush and black paint, add two small oval eyes across the upper half of the main footprint impression.
Space them evenly on either side of the center. If you want the little sparkle shown in the example, add one tiny cream or white dot near the top of each black eye after the paint dries.
Above each eye, paint one short curved eyebrow.
Now add a small round red nose near the lower part of the footprint, in the heel area. Leave enough room beneath it for a little smile.
Use the tip of your fine brush to paint a shallow black smile below the nose.
That's the face finished. There's no need to add eyelashes, cheeks or lots of extra lines.
Step 5. Paint the Simple Red Scarf
The scarf is much easier than it looks. You're painting one curved band and one short hanging end. No sewing, extra clay pieces or tiny fabric fringe.
- Using burgundy or deep red paint, make a slightly curved band across the bottom of the reindeer's muzzle, near the heel of the footprint.
- Make the band about 3/8 to 1/2 inch wide, depending on the size of your footprint.
- Extend the band just beyond the sides of the heel so it looks as though the scarf wraps around the reindeer's neck.
- On the right side, paint a short scarf tail hanging diagonally downward.
- Give the tail a slightly wider, angled end, like a simple little trapezoid.
- Let the red paint dry completely before adding any decorations.
Now take a fine brush and cream paint and add a row of short dashes along the upper and lower edges of the scarf band.
Repeat the dashes around the hanging end.
They should look like simple little stitches. You don't need dozens of them, just enough to suggest the edge of a handmade scarf.
Keep this part simple. Skip the knitted patterns, snowflakes and fancy fringe. A plain red scarf with cream dashes matches the finished design and is much easier for a beginner to paint neatly.
Step 6. Leave the Three Stars Cream-Colored
The three stars on the right side of the reindeer are already pressed into the dough, so there's no need to paint them.
Leave them the natural cream color of the ornament. The tiny shadows inside the impressions will help their shapes stand out.
If you accidentally get brown or red paint in one of the stars, wipe it away carefully before it dries.
Step 7. Check the Painted Design
Before sealing the ornament, compare it with the finished example.
- The original footprint is painted warm brown and all five toes remain visible.
- There are two dark brown antlers above the face.
- Two pink-centered ears sit beside the footprint.
- The reindeer has two black eyes, curved eyebrows, a red nose and a little smile.
- The red scarf wraps across the lower muzzle with one short end hanging on the right.
- Cream painted dashes decorate the scarf.
- Three impressed stars remain visible beside the reindeer.
- The scalloped cream border and its little dots are still visible.
Let the paint dry completely before adding the finishing coat.
Step 8. Seal and Hang Your Ornament
If you'd like to protect the painted surface, use a clear water-based acrylic craft sealer that's labeled for use with your paint and craft material.
Follow the manufacturer's directions and apply thin coats to the front, back and edges. Keep the hanging hole open and let each coat dry as directed. A sealer can help protect the surface, but it won't make salt dough waterproof.
Once the ornament and sealer are completely dry, thread a length of burgundy velvet ribbon through the hole. Pass the ribbon through once and tie the two ends together above the ornament to form a hanging loop.
Check that the knot holds before hanging it. Salt dough ornaments can be surprisingly heavy, particularly when they're made with a larger footprint.
Hang your reindeer where it won't be bumped or pulled down. If it's too heavy for a tree branch, it makes a lovely hanging keepsake on a sturdy wall hook or ornament stand.
Helpful Tips for Making a Reindeer Footprint Keepsake
There are a few little decisions that can make a big difference in how your ornament turns out. Most have to do with getting a good footprint and not trying to add too many decorations.
Keep the Footprint as the Main Feature
The whole idea is to preserve your baby's footprint, so I'd resist the temptation to cover it with extra paint or decorations.
Use the natural shape of the foot for the reindeer's face. Let the toes remain separate, keep the antlers outside the impressions and place the scarf low enough that it doesn't hide the heel.
That will make the finished keepsake feel much more personal than a reindeer ornament with a footprint hidden underneath the decorations.
Don't Make the Scallops Too Small
Broad, rounded scallops are much easier to cut and less likely to have fragile points.
If you're making the ornament with an older baby's larger footprint, increase the overall outline rather than squeezing the antlers, ears and stars into a narrow border.
There's no reason every reindeer footprint ornament needs to be exactly the same size.
Try a Plain Scarf for an Even Easier Version
If painting those little cream stitches feels like too much, leave the scarf solid burgundy.
You can still paint the curved neck band and short hanging end. It will look like a scarf without the extra detail.
I'd keep the red nose and pink ears, though. Those two little touches give the reindeer much of its personality.
Protect the Ornament from Moisture
Once the ornament is finished, store it somewhere dry when Christmas is over.
Wrap it loosely in clean tissue paper and place it in a sturdy box where the scalloped edges won't get chipped. Avoid damp basements, garages and other places where moisture collects.
Salt dough isn't designed for outdoor displays or places where it may get wet.
Keep Salt Dough Away from Pets
Salt dough contains a large amount of salt, and it isn't edible. Keep the dough, scraps and finished ornaments away from young children who might put them in their mouths.
It's particularly important to keep salt dough away from dogs and cats. The ASPCA's information on salt dough and pets explains that even a small amount can cause serious salt poisoning if an animal eats it.
Keep the ornament out of your pet's reach even after it's completely dry and painted. If a pet eats any salt dough, contact your veterinarian or an animal poison control service immediately.
Make a Second Impression While the Dough Is Fresh
If you have enough dough left, making a second footprint is worth considering.
You don't have to paint both ornaments right away. You can dry the second impression and save it for another Christmas craft or a gift for a grandparent.
Just remember to keep the unused dough covered while you're working so it doesn't begin drying out.
Looking for another Christmas project that uses a baby's tiny footprint? Try the baby footprint candy cane keepsake, or browse the baby Christmas crafts collection for more handmade ideas.
Salt Dough Reindeer Footprint Ornament FAQs
Can I use self-rising flour instead of all-purpose flour?
I'd stick with regular all-purpose flour. Self-rising flour contains leavening ingredients that can make the dough puff as it heats. That isn't what you want when you're trying to preserve the little details of a baby's footprint.
Why did my salt dough ornament puff up in the oven?
The oven may have been too hot, or the center of the dough may have heated unevenly. Drying at a low temperature is better for a keepsake with shallow impressions. If the ornament has already puffed and lost the footprint details, you'll probably get a better result by making a new impression rather than trying to flatten the dried one.
Can I make this ornament with a toddler's footprint?
Yes. You'll need to make the plaque larger to leave room for the antlers, ears, stars and scarf. Just remember that a larger ornament will also be heavier. A decorative wall hanging or keepsake stand may be a better choice than a Christmas tree branch.
Can I use washable children's paint to decorate the ornament?
You can use paint that's compatible with the dried dough, but some washable paints may rub off or react poorly to moisture. For a keepsake you want to store and bring out again, I'd choose acrylic craft paint labeled for decorative projects and have an adult handle the painting. Always check the paint and sealer labels before using them.
Can a salt dough ornament be displayed outdoors?
No. Even with a clear finish, salt dough can absorb moisture and become damaged. Keep your finished reindeer indoors in a dry location.
Does the scarf need to be made separately?
Not at all. The scarf is painted directly onto the ornament. Make a curved red band around the lower part of the footprint, add one little hanging end and finish with a few cream stitches. There's no need for a fabric scarf or extra clay pieces.
And that's your little reindeer finished! Between the tiny footprint, scalloped border and cheerful painted face, you've got a Christmas ornament that feels personal without requiring a lot of complicated decorating.
When you click on links to various merchants on this site and make a purchase, this may result in this site earning a commission. This does not affect the price you pay.

UBGI Gold Standard 2026
Reviewed under the site's
editorial checklist.
Photos, decorating ideas, party setups and reader submissions are shared for inspiration unless a page is specifically presented as a pattern, tutorial, reference guide or step-by-step project. Follow the instructions, measurements, safety guidance and manufacturer directions provided for the particular project or product.
About Jan | Contact | Baby Nursery Ideas (Blog) | Site Map | Privacy Policy | Disclosure Policy | Disclaimer | Affiliate Disclosure | Earnings Disclosure | Facebook | Pinterest
I am a participant in the Amazon Services LLC Associates Program, an affiliate advertising program designed to provide a means for us to earn fees by linking to Amazon. As an Amazon Associate I earn from qualifying purchases.
Copyright © 2006-2026. All Rights Reserved.