Baby Footprint Candy Cane Keepsake Craft for Baby's First Christmas
By Jan Bay
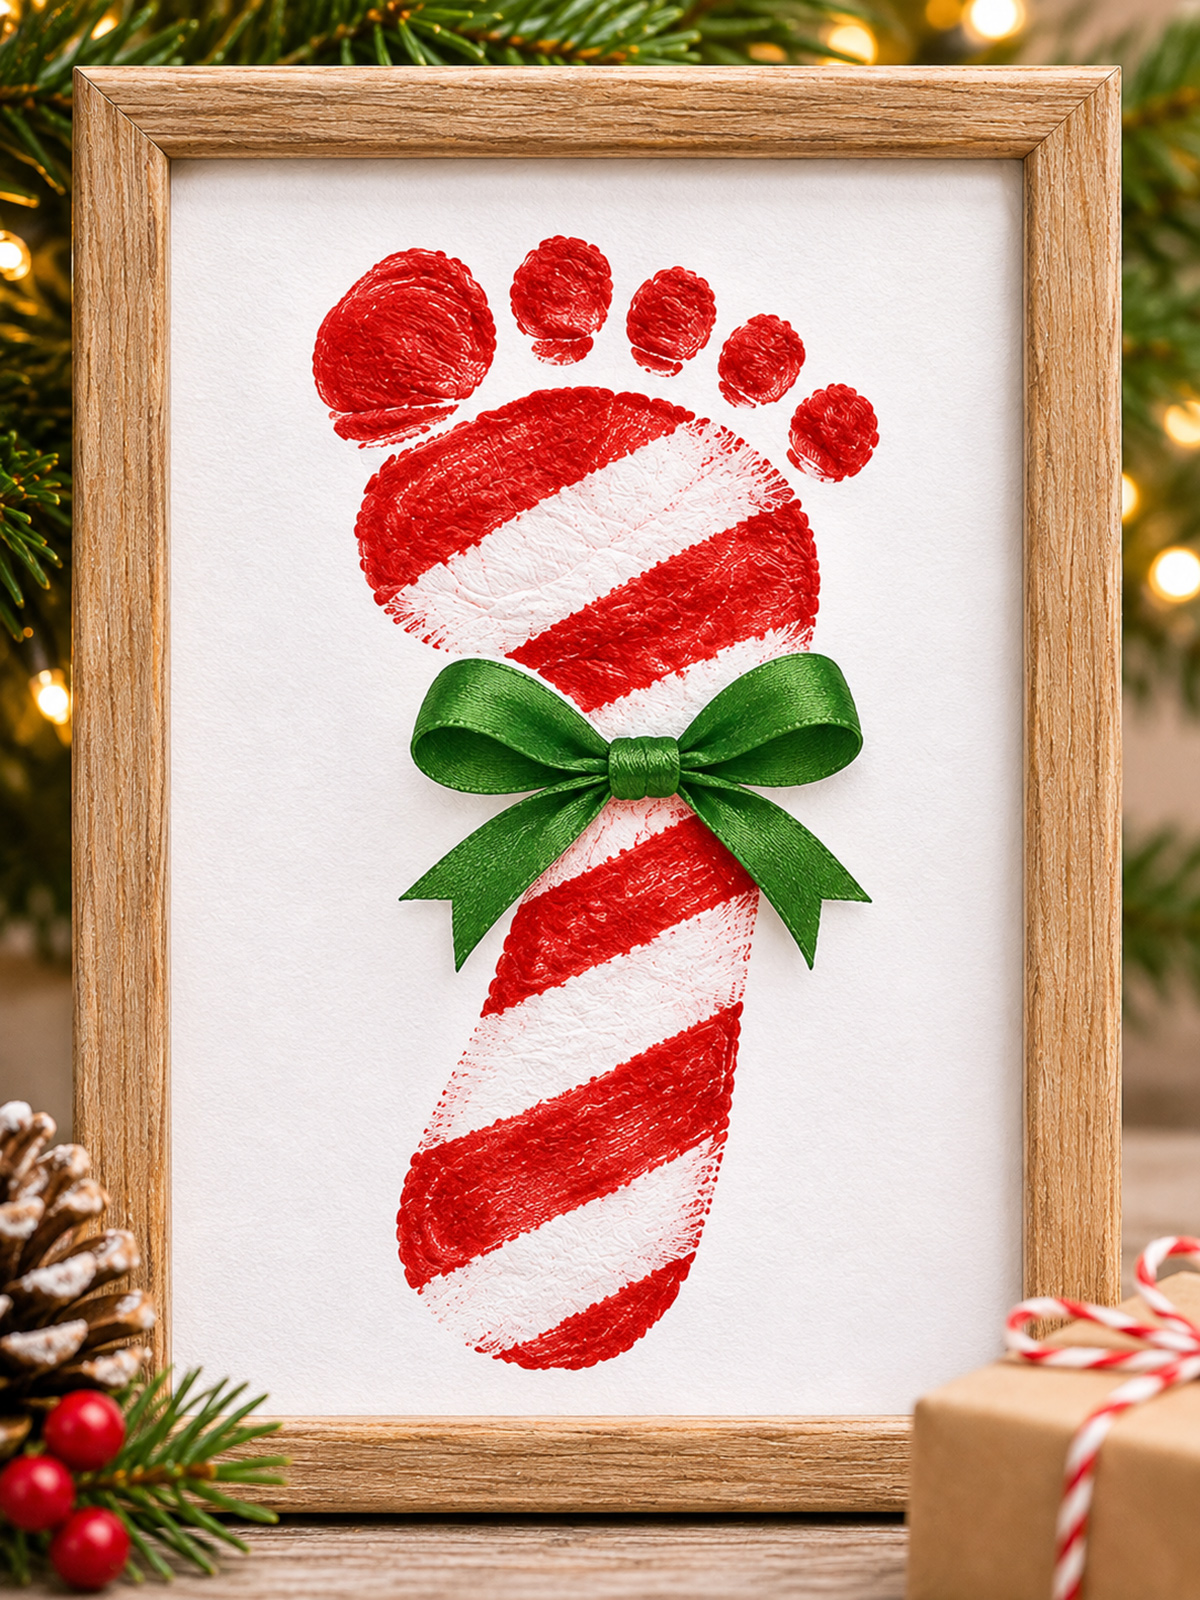
I love a Christmas craft that saves something you can never get back: how tiny those little baby feet were. This Baby Footprint Candy Cane Keepsake turns one precious footprint into a red-and-white striped Christmas design with a pretty green bow across the arch. You can frame it for baby's first Christmas or make a matching paper ornament for the tree. Either way, it's a little piece of Christmas you'll be glad you saved.
Explore More Baby Christmas Crafts and Keepsakes
Baby Christmas Crafts and Keepsakes
Baby Footprint Christmas Ornaments
See Supplies for This Project Here.
On This Page
Supplies You'll Need
You won't need a long list of supplies for this one. I'd put the money into good white cardstock and a pretty green ribbon. The footprint is what makes this keepsake special, so there's no reason to cover it with extra decorations.
Here's what you'll need for the framed version and the matching paper ornament:
- White heavyweight cardstock, preferably acid-free, for the framed print
- Extra plain paper for practice prints
- Red footprint ink or paint specifically labeled for the intended contact with a baby's skin and appropriate for the baby's age
- A clean-touch baby footprint kit as an alternative if you'd rather keep ink off the baby's skin
- Opaque white water-based craft paint for adding stripes to the dried paper print
- One small flat paintbrush and one fine detail brush
- Green satin ribbon, approximately 3/8 inch wide
- Acid-free craft adhesive suitable for paper and ribbon
- An 8-by-10-inch shadow-box frame or a deep frame with a spacer
- Extra cardstock for the paper ornament backing
- Small scissors, a pencil and a single-hole punch
- Red ribbon for hanging the ornament
- A damp washcloth, mild soap and a clean towel for immediate cleanup
My choice for the bow: I'd use a rich Christmas green rather than a pale or glittery ribbon. A satin bow looks lovely against the painted footprint, and the little bit of shine is plenty.
Choose a frame with enough depth for the ribbon. A regular frame that presses the glass against the bow will flatten it. If you're using a shallow frame, make a flat paper bow instead.
A note about paint and baby's skin: Washable and non-toxic don't automatically mean a paint is intended for use on skin. Use a product whose manufacturer specifically permits the planned skin contact and baby's age. Do not use ordinary decorative acrylic paint directly on the baby's foot. Save that for the paper after the footprint has been made.
Poison Control's guidance on art products explains why reading the label and following the manufacturer's directions matters, especially when paint might touch skin.
How to Make the Baby Footprint Candy Cane Keepsake Print
Start with one good red footprint on white paper. Don't worry about the stripes or ribbon yet. Those come later, after the print has dried and you've cleaned baby's foot.
The finished design has five separate red toe prints at the top, a recognizable sole, and a rounded heel at the bottom. You want that natural footprint shape to show through the Christmas decorations.
Step 1: Prepare the Paper
For an 8-by-10-inch frame, use an 8-by-10-inch sheet of white cardstock. If you're making a larger keepsake, choose the frame and paper size before printing.
Place the cardstock on a firm, flat surface. Aim to position the footprint upright and approximately centered, with the toes toward the top and enough white space around the heel and sides.
Lay out a practice sheet, your chosen footprint product and the cleanup supplies. I'd also have another adult help hold the baby while you handle the paper.
Step 2: Prepare the Foot
Choose a time when baby is comfortable and settled. Make sure the sole is clean and dry before using the marking product.
If you're using a red paint or ink specifically approved by its manufacturer for the intended infant skin contact, follow the label directions. Where the product calls for an applicator, use a thin, even coating rather than a thick puddle. You want to capture the heel, ball of the foot and individual toes.
If you're using a clean-touch kit instead, follow its instructions without putting ink directly on the baby's skin. You can scan the resulting footprint and change a copy to red before making the Christmas design.
Step 3: Make the Footprint
- Have one adult support the baby and gently hold the ankle in a natural position.
- Bring the heel into contact with the paper first.
- Lower the remaining sole gently onto the paper without sliding it.
- Let the toes make contact without forcing them flat.
- Lift the foot straight away from the paper to avoid smearing the print.
- Clean the baby's foot promptly, following the product directions, and dry it thoroughly.
Check the result. Can you see the heel, the main shape of the sole and the little toes? If so, you've got what you need.
Don't keep trying for a perfect print if the one you have already looks like your baby's foot. A tiny missing spot won't spoil the keepsake.
If the print is badly smeared or the heel is missing, try another sheet after checking your technique. My guide to getting a clear baby footprint has more help with curled toes, faint prints and smudges.
Step 4: Let the Print Dry
Lay the paper flat and allow the red print to dry completely according to the product instructions.
Before decorating it, I'd also make a good scan or photograph of the original. Keep an untouched copy. That way, you can make a paper ornament or another Christmas gift later without needing another session with the baby.
If you used a clean-touch kit that produced a black or gray footprint, recolor a digital copy red and print it on white cardstock. Keep the original unchanged.
Add the Candy Cane Stripes and Green Bow
Now we get to the part that turns an ordinary red footprint into a Christmas candy cane design. The trick is to keep the little toes red and add the white stripes only across the sole.
Step 1: Paint the White Stripes
Make sure the red footprint is completely dry. The white paint goes on the paper, never on the baby's foot.
- Put a small amount of opaque white water-based craft paint on a palette or scrap of paper.
- Using a fine or small flat brush, paint the first diagonal white band across the upper ball of the footprint, just below the toes.
- Keep the band inside the natural outline of the footprint. Leave all five toe prints red.
- Paint another white diagonal band across the middle of the sole, leaving a red band between the two white stripes.
- Continue toward the heel with additional white bands, keeping their direction and spacing fairly even.
- Allow the white paint to dry completely before adding the bow.
For a footprint about 4 to 5 inches long, I'd start with white bands roughly 1/3 to 1/2 inch wide, adjusting them to fit the actual foot. A smaller newborn print needs narrower stripes.
Three or four white bands are generally enough. The exact number depends on the length of the footprint. Keep the red and white bands fairly similar in width and angle, with the stripes slanting upward toward the right.
Here's what I'd avoid: Don't paint stripes across the individual toe marks. Those five little red toes are one of the sweetest details in the design, and I wouldn't hide them.
Use light brushstrokes when possible so some of the natural texture of the footprint remains visible. If the white isn't opaque enough, let the first coat dry before adding a second thin coat.
Step 2: Tie the Green Satin Bow
Cut a length of green satin ribbon, approximately 8 inches to start. Tie it into a small, balanced bow with two loops and two short tails.
For an average baby footprint, aim for a bow approximately 1 1/2 to 2 inches across. Adjust it to the width of the actual print. I prefer a bow that doesn't extend much farther than the widest part of the footprint.
Trim the ribbon tails at an angle. They should be long enough to look like a real bow but not so long that they cover most of the striped heel.
Step 3: Position the Bow Across the Arch
Place the bow across the arch, below the broad upper part of the sole and above the rounded heel.
Center the knot over the footprint and arrange the tails so they point downward and slightly outward.
Before attaching it, check that you can still see the separate toes, the top white stripe and the striped lower heel.
Once you're happy with the placement, attach the knot with a small amount of acid-free adhesive suitable for both ribbon and paper. Let the adhesive cure according to its directions.
I'd leave the bow right there rather than moving it up around the big toe. It gives the design a pretty, finished Christmas look without hiding what makes the print personal.
Make a Framed Christmas Keepsake
For the framed version, I'd keep the background white and the design centered, just like the finished example. The red stripes and green satin bow already make it feel like Christmas.
An 8-by-10-inch shadow box is a good starting choice for a small baby footprint. If the print is larger, choose the frame based on the finished artwork rather than trying to squeeze the foot into a space that's too small.
- Let the finished painted footprint and ribbon adhesive dry completely.
- Place the artwork on a clean, acid-free backing board.
- If the frame is larger than the paper, use a white or ivory mat with an opening that leaves the entire footprint visible.
- Check that the green bow has enough clearance beneath the glass or acrylic front.
- Close the frame without pressing the glass against the ribbon.
- Write the baby's name, age and Christmas year on the back of the backing board or an attached keepsake label.
If you want the keepsake to look just like the example image, skip decorative lettering on the front. The footprint is enough.
You can always put the baby's name and date on the back. That keeps the front simple while preserving the details you'll want to remember.
Display the framed print on a secure shelf or properly mounted wall hook, away from the crib and outside baby's reach.
Make a Matching Paper Ornament
If you'd rather hang those little toes on the Christmas tree, you can turn the same footprint design into a paper ornament. I especially like this idea for making a few extra keepsakes for grandparents.
You don't have to take another footprint. Use a scan of the original and make as many copies as you need.

Step 1: Make a Copy of the Footprint
Scan or photograph the red-and-white striped print before attaching its dimensional bow. If you've already finished the framed version, use your earlier red footprint scan and add the same white stripes to a new printed copy.
Print the design on heavyweight white cardstock. Keep it at its actual size if you want the ornament to record how big baby's foot was. You can also make a smaller gift copy, but I'd label that one as a resized version.
Make sure the individual toes remain clear and the entire striped heel fits on the paper.
Step 2: Cut Out the Footprint Shape
Instead of cutting directly against the red paint, leave approximately 1/4 inch of white paper around the footprint.
Follow the rounded heel and the sides of the sole. Around the toes, connect the white spaces into a gently scalloped outline rather than cutting deep between every little toe.
At the top, above the toes, leave a small rounded white tab approximately 1/2 inch wide for the hanging hole.
Before cutting the final ornament, you can draw the shape lightly with a pencil. If the outline looks uneven, adjust your pencil line first. It's easier than trying to repair the paper after cutting.
Step 3: Add a Backing
Trace the cut ornament onto another sheet of heavyweight cardstock and cut out a matching backing piece.
Apply a thin, even layer of suitable craft adhesive and attach the two pieces. Keep the edges aligned, press them flat and let the adhesive dry completely.
The extra layer makes the ornament less likely to bend when you hang it or pack it away.
Step 4: Add the Green Bow
Tie a smaller version of the green satin bow used on the framed keepsake. For a small footprint ornament, a bow approximately 1 to 1 1/2 inches across is a good starting point.
Attach it across the arch of the striped footprint, with the knot centered and the ribbon tails pointing toward the heel.
Use just enough adhesive to hold the knot. Allow it to dry before handling the ornament further.
Step 5: Add the Hanging Ribbon
Punch one hole through the rounded tab above the toes. Keep the hole centered and leave enough cardstock between the hole and the top edge so the paper won't tear easily.
Thread a piece of red satin ribbon through the hole and tie the ends together to form a hanging loop. A loop approximately 2 to 3 inches tall is plenty for a small ornament.
I'd skip beads, bells and extra dangling decorations. The little red toes, candy cane stripes and green bow already look like Christmas.
Hang the ornament on a branch where it can be seen without getting knocked around. Keep it and its ribbon out of baby's reach. It's a decoration, not a toy.
If you'd like to explore clay and other kinds of keepsakes, my baby footprint Christmas ornament ideas page has more options.
Personalize Your Baby Footprint Candy Cane Keepsake
There's something special about knowing exactly whose tiny foot made the print and how old that baby was at Christmas.
I wouldn't add a lot of writing around the footprint. A name, date and maybe one short Christmas message are enough.
For the Framed Version
Write the baby's name, age and Christmas year on the back of the artwork or on a keepsake label attached to the backing board.
For example:
Emma Rose
Baby's First Christmas
December 2026
Age: 4 months
Another option is to add a small handwritten name and date below the footprint, leaving enough white space so the lettering doesn't crowd the heel.
I'd choose the back-of-frame label for the design in the example image. The plain white background makes those bright stripes and the green bow stand out.
For the Paper Ornament
Write the baby's name and Christmas year on the back of the ornament before attaching the hanging ribbon.
If you're making copies for grandparents, you can add a small handwritten message such as:
A little Christmas love from Emma, 2026.
Let the lettering dry completely before putting the ornament away.
Make a Matching Gift Set
Here's a combination I really like: keep the original footprint in a frame and use printed copies to make two matching ornaments.
That gives you one piece to display at home and two small Christmas gifts without having to put baby's foot through another printing session.
Use the same red-and-white stripe pattern and green ribbon on all three pieces. They'll look like a matching set, even though one is framed and the others hang on the tree.
Tips for Getting a Clear Baby Footprint
The baby's part of this project should be quick. All the painting, cutting, bow tying and decorating can be done later, when you have time to enjoy it.
Here are a few things I'd keep in mind before getting started.
Choose the Right Time
Try making the footprint when baby is rested, comfortable and settled. If those little toes are curled tight or the feet are kicking, it's fine to try another time.
Don't force the toes flat or hold the ankle in an awkward position just to get a better print.
Use Less Paint
If your chosen skin-contact product uses paint, follow its application directions and avoid thick layers. Too much material can fill the spaces between the toes and blur the natural lines in the sole.
I'd rather have a slightly lighter print that clearly shows five little toes than a dark red blob with no definition.
Keep the Paper Still
Place the cardstock on a firm surface and keep it from moving. A slippery sheet can cause the foot to slide and leave a double impression.
If you're working with a young baby, having one adult support the baby while another handles the printing is a good idea.
Keep the Craft Materials Away From Baby
Use only a marking product appropriate for the baby's age and the intended contact. Follow the manufacturer's directions and avoid using anything on irritated or broken skin. Stop if irritation develops.
Keep the printing material away from the baby's eyes and mouth, and clean the foot promptly. Do all the decorative painting, gluing and cutting after the baby has been moved away from the work area.
The white decorative paint, scissors, ribbon, adhesives, hole punch and any optional sealers are for adult use. Keep all of them out of baby's reach.
Let Everything Dry Before Framing
Don't rush the drying. Paint that feels dry on the surface may still transfer onto glass or another sheet of paper if it hasn't fully cured.
Follow the product's drying directions before adding the ribbon, assembling the frame or packing the ornament away.
If you're making this as a keepsake to save for many Christmases, use acid-free paper and backing where practical. Store it away from direct sunlight and damp conditions. Pack the paper ornament flat in a protective envelope or box so the ribbon doesn't get crushed.
Baby Footprint Candy Cane Keepsake FAQ
What kind of paint should I use on my baby's foot?
Choose a marking product whose label specifically permits the intended skin contact and the baby's age. Don't assume ordinary washable craft paint is suitable for direct skin use. A clean-touch footprint kit is another option if you want to avoid putting ink on the baby's skin.
Do I paint the red-and-white stripes directly on the baby's foot?
No. Make one red footprint using an appropriate product, clean the baby's foot and let the print dry. Then paint the white stripes onto the paper. The baby's foot only supplies the original print.
How many white stripes should the candy cane footprint have?
I'd start with three or four diagonal white bands across the sole. A small newborn footprint may need fewer or narrower bands. Leave the five toe prints red and keep the stripes fairly even from top to bottom.
Can I make this keepsake without using paint on my baby?
Yes. Use a clean-touch baby footprint kit that keeps the ink separated from the baby's skin. Scan the finished footprint, change a copy to red, and print it on white cardstock. Then add the candy cane stripes and green bow.
Should I put the green bow across the arch or around the big toe?
I'd put it across the arch. That leaves all five toes visible and gives the stripes room to show. Keep the bow small enough that it doesn't cover most of the footprint.
Can I use a regular picture frame?
You can if you use a flat painted or paper bow. For the dimensional satin bow shown in the example, choose a shadow box or a frame with enough space between the artwork and the glass.
Do I need a printable template?
No. Your baby's actual footprint is the shape you need. You can use the original for framed art, then scan or photograph it to make the paper ornament. No separate footprint template is necessary.
Can I make more than one ornament from the same footprint?
Absolutely. Save a digital copy before cutting or decorating the original. You can print as many copies as you need, add matching stripes and bows, and personalize each ornament for the person receiving it.
I think the nicest part of this project is how little you need to add to make it special. Five tiny toes, a handful of red-and-white stripes and one green bow. Add the baby's name and Christmas year on the back, and you've made something that will mean a little more each time you bring it out for Christmas.
When you click on links to various merchants on this site and make a purchase, this may result in this site earning a commission. This does not affect the price you pay.

UBGI Gold Standard 2026
Reviewed under the site's
editorial checklist.
Photos, decorating ideas, party setups and reader submissions are shared for inspiration unless a page is specifically presented as a pattern, tutorial, reference guide or step-by-step project. Follow the instructions, measurements, safety guidance and manufacturer directions provided for the particular project or product.
About Jan | Contact | Baby Nursery Ideas (Blog) | Site Map | Privacy Policy | Disclosure Policy | Disclaimer | Affiliate Disclosure | Earnings Disclosure | Facebook | Pinterest
I am a participant in the Amazon Services LLC Associates Program, an affiliate advertising program designed to provide a means for us to earn fees by linking to Amazon. As an Amazon Associate I earn from qualifying purchases.
Copyright © 2006-2026. All Rights Reserved.