Free Crochet Santa Face Stocking Pattern for Baby and Family
By Jan Bay
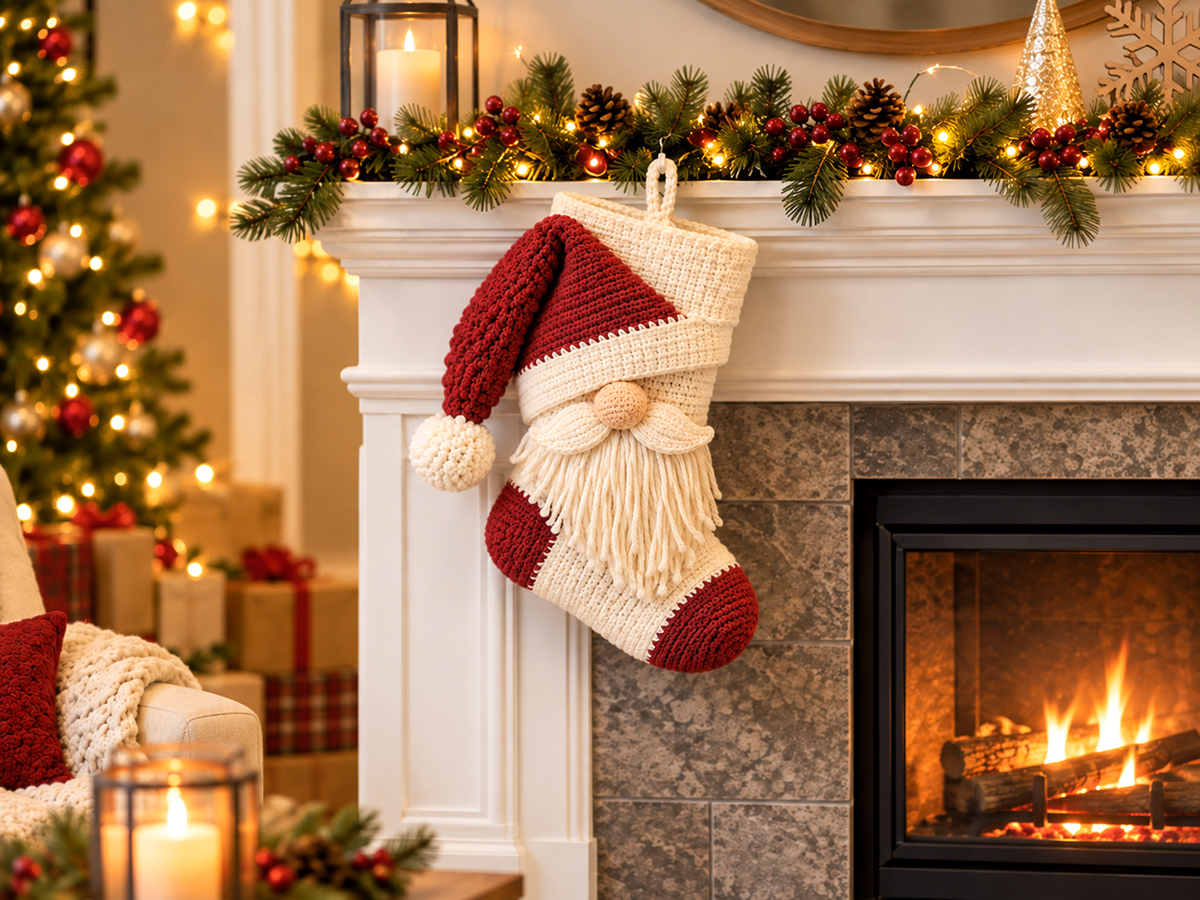
This free crochet Santa face stocking pattern brings a little extra personality to the Christmas mantelpiece. The stockings are truly unique with a red Santa Claus hat with a long tail and pom pom, a round nose, a wonderfully droopy mustache and a flowing white yarn beard. The hat sits at a playful angle across an ivory stocking with cranberry-red heel and toe accents, leaving the top wide open for Christmas surprises. Make one for Baby's First Christmas or crochet a matching set that the whole family can hang up year after year.
More Christmas Crochet Patterns to Make
Traditional Crochet Santa Stocking
Long Santa Hat Crochet Pattern
Jump to the Pattern
Design note: The featured image illustrates the intended finished appearance of this original stocking design. The written pattern has been mathematically reviewed, but a physical sample has not yet been completed to verify every construction detail.
A Santa Stocking With a Little Extra Personality
This Santa has a hat that flops to one side, a mustache that droops over his beard and plenty of room for Christmas surprises. His round nose peeks out just beneath the white hat brim, while long strands of ivory yarn form a soft, flowing beard.
The detail that gives this stocking its personality is the placement of the hat. Its white brim sits diagonally across the upper front of the stocking, several inches below the actual opening. The red hat is crocheted separately, with a long tip that drapes naturally to one side.
The stocking itself is worked in three sizes. Make a miniature version for a keepsake, a smaller stocking for Baby's First Christmas or a larger stocking that can become part of your family's holiday decorating traditions.
For more handmade holiday ideas, browse my free Christmas crochet patterns, including smaller keepsakes, festive accessories and character projects.
Materials for the Crochet Santa Face Stocking Pattern
- Bulky-weight (#5) yarn in warm ivory
- Bulky-weight (#5) yarn in cranberry red
- Small amount of peach-colored yarn for Santa's nose
- 5.5 mm crochet hook, or size needed to obtain gauge
- Stitch markers, including two contrasting markers for the heel
- Large tapestry needle
- Sharp scissors
- Pom-pom maker or sturdy cardboard
- Small amount of polyester fiberfill for the nose
- Optional embroidery thread and fabric for personalization
Estimated yarn purchase allowances: Mini Keepsake: approximately 100 yards ivory and 60 yards cranberry. Baby: approximately 175 yards ivory and 100 yards cranberry. Family: approximately 250 yards ivory and 125 yards cranberry. Each size also needs a small scrap of peach yarn. These are generous purchasing estimates, not measured yarn consumption. Actual usage depends on gauge, yarn choice, beard fullness and pom-pom density.
Choose a firm, smooth yarn that produces clearly defined stitches. The stocking needs enough structure to hold its shape, while Santa's hat and beard should remain soft enough to drape naturally. If you're unsure which yarn to use, the Craft Yarn Council's yarn weight guide explains the different yarn categories, including bulky-weight yarn.
Gauge
Working gauge: approximately 12 single crochet stitches and 14 rounds per 4 inches (10 cm), using bulky-weight yarn.
Measure an unblocked sample before beginning. A different gauge will change the circumference, heel depth, hat proportions and finished length. The dimensions below are estimates based on this working gauge.
Sizes and Working Measurements
The pattern includes Mini Keepsake, Baby and Family sizes. The measurements below are calculated from the proposed stitch and round gauge. They are construction estimates, not measurements of completed stockings.
| Size | Flat body width | Toe-to-heel working length |
|---|---|---|
| Mini Keepsake | About 4 inches | About 5 1/4 inches |
| Baby | About 5 1/3 inches | About 7 1/4 inches |
| Family | About 6 2/3 inches | About 9 1/2 inches |
The toe-to-heel figures describe the crocheted foot before the heel is added. They are not the vertical hanging height. The leg continues upward from the heel opening, and the upper cuff folds outward over the leg.
The finished hanging height, heel projection and overall appearance have not been physically measured. Match the stated gauge and check the component proportions as you work.
Abbreviations
- ch = chain
- sc = single crochet
- hdc = half double crochet
- sl st = slip stitch
- inc = 2 sc in the same stitch
- sc2tog = single crochet 2 together
- hdc2tog = half double crochet 2 together
- st(s) = stitch(es)
- rnd = round
- BLO = back loop only
Work in continuous rounds unless the instructions say otherwise. Move your stitch marker at the beginning of every round. Turning chains are not counted as stitches.
Free Crochet Santa Face Stocking Pattern: Toe and Foot
Begin at the toe with cranberry yarn. All three sizes use the same increase sequence, stopping at the stitch count indicated for your chosen size. Work in continuous rounds, moving your stitch marker as you go.
Cranberry Toe
Rnd 1: Work 8 sc into a magic ring. (8)
Rnd 2: (Sc 1, inc) 4 times. (12)
Rnd 3: (Sc 2, inc) 4 times. (16)
Rnd 4: (Sc 3, inc) 4 times. (20)
Rnd 5: (Sc 4, inc) 4 times. (24)
Mini: Stop increasing.
Rnds 6–7: Sc in each stitch around. (24)
Baby: Continue from Round 5.
Rnd 6: (Sc 5, inc) 4 times. (28)
Rnd 7: (Sc 6, inc) 4 times. (32)
Rnds 8–10: Sc in each stitch around. (32)
Family: Continue through Round 7.
Rnd 8: (Sc 7, inc) 4 times. (36)
Rnd 9: (Sc 8, inc) 4 times. (40)
Rnds 10–13: Sc in each stitch around. (40)
Follow the increase rounds exactly as written, keeping the stated stitch total at the end of each round. The increases are distributed at four locations around the toe. Slightly defined shaping lines may remain visible; do not add or omit stitches to change the shape.
Ivory Foot
Change to ivory yarn. Continue working in single crochet without increases or decreases.
Mini: Rnds 8–18: Sc around. (24)
Baby: Rnds 11–25: Sc around. (32)
Family: Rnds 14–33: Sc around. (40)
After completing the ivory foot rounds, flatten the tubular foot with the closed toe pointing to the right. Decide which broad surface will be the underside (sole) and which will be the upper surface (instep). Place a marker at each side fold, separating the sole and instep halves. The heel opening must be made across the sole half: 12 stitches for the Mini, 16 for the Baby or 20 for the Family size. The opposite half remains the instep. Keep these markers in place until the heel opening is completed.
Create the Heel Opening
After completing the final ivory foot round, fasten off and weave in that yarn end. Rejoin ivory yarn at the side marker immediately before the reserved sole stitches, without working any extra positioning stitches. Place the beginning-of-round marker at this new joining point. Begin the heel-opening round here, chaining across the reserved sole stitches and continuing in single crochet across the instep stitches as directed below.
Mini, Rnd 19: Ch 12, skip the next 12 stitches, sc in each of the remaining 12 stitches. (24 working positions)
Baby, Rnd 26: Ch 16, skip the next 16 stitches, sc in each of the remaining 16 stitches. (32 working positions)
Family, Rnd 34: Ch 20, skip the next 20 stitches, sc in each of the remaining 20 stitches. (40 working positions)
The skipped stitches form the lower edge of the heel opening. The chain bridge forms its upper edge. Do not work into the skipped stitches until you return to make the cranberry heel.
On the following round, work one sc into each chain of the bridge and one sc into every regular stitch, preserving the original circumference of 24, 32 or 40 stitches.
Keep the heel opening untwisted and avoid adding extra stitches at either end of the bridge. The leg will continue upward from this point, and the contrasting cranberry heel will be added later.
Construction checkpoint: Before continuing the leg, count the working positions around the heel bridge. You should have 24 for the Mini, 32 for the Baby or 40 for the Family size. The bridge must lie flat, and the skipped stitches must remain accessible for the heel. Check that the toe is rounded and that the foot length is consistent with the working measurements for your size.
Crochet the Stocking Leg and Upper Cuff
After making the heel opening, continue crocheting the ivory leg without increasing or decreasing. Keep the full circumference all the way to the top so the stocking is easy to fill.
Ivory Stocking Leg
The first round below is worked into the heel bridge chains and the regular stitches, as described in the previous section.
Mini: Rnds 20–40: Sc around. (24)
Baby: Rnds 27–58: Sc around. (32)
Family: Rnds 35–76: Sc around. (40)
Check the heel bridge after the first two rounds. The chain should remain flat, without twisting or pulling the sides of the stocking together.
Thick Ivory Upper Cuff
The stocking's actual upper cuff is separate from Santa's decorative hat brim. It forms the sturdy opening used to place gifts inside the stocking.
Continue in ivory, maintaining the same stitch count.
Mini: Rnds 41–47: Sc around. (24)
Baby: Rnds 59–67: Sc around. (32)
Family: Rnds 77–87: Sc around. (40)
Fasten off with a long tail. Fold only the final portion of the cuff outward and downward over the preceding cuff rounds: fold Rnds 45–47 over Rnds 42–44 for the Mini, Rnds 64–67 over Rnds 60–63 for the Baby, or Rnds 83–87 over Rnds 78–82 for the Family. The remaining first cuff round forms the transition from the leg. The fold becomes the upper rim of the stocking, with the final crocheted edge lying lower against the cuff. Sew that edge securely to the underlying cuff stitches with small, evenly spaced stitches, without catching the opposite wall or narrowing the opening.
Do not pull the stitches tightly enough to reduce the circumference. The folded cuff should remain comfortable to open with one hand.
Santa's cranberry hat and separate white hat brim will be positioned farther down the front of the stocking. Do not attach them to this upper cuff.
Make the Rounded Cranberry Heel
Return to the opening reserved between the foot and leg. The cranberry heel will be worked directly into this opening, forming a rounded contrasting section.
Join cranberry yarn at one corner of the reserved heel opening. The first heel round listed for your size is the pickup round, not an additional round worked afterward. For this round, work one sc into each unused stitch along the original foot edge and one sc into the underside of each chain along the bridge edge. Continue around the complete opening, working each position exactly once. Do not make a separate setup round before Heel Rnd 1.
The required stitch counts at the end of Heel Rnd 1 are:
- Mini: 12 stitches along each edge, 24 stitches total.
- Baby: 16 stitches along each edge, 32 stitches total.
- Family: 20 stitches along each edge, 40 stitches total.
Pick up exactly 24 stitches for the Mini, 32 for the Baby or 40 for the Family size, without adding extra stitches at the corners. Pull the joining yarn snugly to minimize gaps. If a small opening remains at either corner after the heel is completed, close it with a few secure stitches using the yarn tail. Keep the stated heel-round stitch counts unchanged.
Mini Heel
Rnd 1: Sc around. (24)
Rnd 2: (Sc 4, sc2tog) 4 times. (20)
Rnd 3: Sc around. (20)
Rnd 4: (Sc 3, sc2tog) 4 times. (16)
Rnd 5: (Sc 2, sc2tog) 4 times. (12)
Rnd 6: (Sc 1, sc2tog) 4 times. (8)
Baby Heel
Rnd 1: Sc around. (32)
Rnd 2: (Sc 6, sc2tog) 4 times. (28)
Rnd 3: Sc around. (28)
Rnd 4: (Sc 5, sc2tog) 4 times. (24)
Rnd 5: Sc around. (24)
Rnd 6: (Sc 4, sc2tog) 4 times. (20)
Rnd 7: (Sc 3, sc2tog) 4 times. (16)
Rnd 8: (Sc 2, sc2tog) 4 times. (12)
Rnd 9: (Sc 1, sc2tog) 4 times. (8)
Family Heel
Rnd 1: Sc around. (40)
Rnd 2: (Sc 8, sc2tog) 4 times. (36)
Rnd 3: Sc around. (36)
Rnd 4: (Sc 7, sc2tog) 4 times. (32)
Rnd 5: Sc around. (32)
Rnd 6: (Sc 6, sc2tog) 4 times. (28)
Rnd 7: Sc around. (28)
Rnd 8: (Sc 5, sc2tog) 4 times. (24)
Rnd 9: (Sc 4, sc2tog) 4 times. (20)
Rnd 10: (Sc 3, sc2tog) 4 times. (16)
Rnd 11: (Sc 2, sc2tog) 4 times. (12)
Rnd 12: (Sc 1, sc2tog) 4 times. (8)
Close the Heel
For all three sizes, fasten off after reaching eight stitches, leaving a long yarn tail. Thread the tail through the front loops of the remaining stitches and draw the opening closed.
Secure the yarn on the inside of the heel. Gently shape the finished heel with your hands so the cranberry section forms a rounded curve between the foot and leg.
Crochet Santa's Long Drooping Hat
Santa's cranberry hat is crocheted separately, beginning at its wide lower edge and gradually narrowing into a long, flexible tip. The white hat brim is attached directly to the red foundation edge, and the entire hat is positioned diagonally across the stocking front.
Keep the hat hollow and unstuffed so its long end can bend and droop naturally.
Mini Santa Hat
Rnd 1: Ch 24, join without twisting. Sc in each chain. (24)
Rnds 2–3: Sc around. (24)
Rnd 4: (Sc 4, sc2tog) 4 times. (20)
Rnds 5–6: Sc around. (20)
Rnd 7: (Sc 3, sc2tog) 4 times. (16)
Rnds 8–9: Sc around. (16)
Rnd 10: (Sc 2, sc2tog) 4 times. (12)
Rnds 11–12: Sc around. (12)
Rnd 13: (Sc 1, sc2tog) 4 times. (8)
Rnds 14–15: Sc around. (8)
Rnd 16: Sc2tog 4 times. (4)
Rnds 17–20: Sc around. (4)
Fasten off and close the final four stitches securely.
Baby Santa Hat
Rnd 1: Ch 32, join without twisting. Sc in each chain. (32)
Rnds 2–3: Sc around. (32)
Rnd 4: (Sc 6, sc2tog) 4 times. (28)
Rnds 5–6: Sc around. (28)
Rnd 7: (Sc 5, sc2tog) 4 times. (24)
Rnds 8–9: Sc around. (24)
Rnd 10: (Sc 4, sc2tog) 4 times. (20)
Rnds 11–12: Sc around. (20)
Rnd 13: (Sc 3, sc2tog) 4 times. (16)
Rnds 14–15: Sc around. (16)
Rnd 16: (Sc 2, sc2tog) 4 times. (12)
Rnds 17–18: Sc around. (12)
Rnd 19: (Sc 1, sc2tog) 4 times. (8)
Rnds 20–21: Sc around. (8)
Rnd 22: Sc2tog 4 times. (4)
Rnds 23–28: Sc around. (4)
Fasten off and close the tip securely.
Family Santa Hat
Rnd 1: Ch 40, join without twisting. Sc in each chain. (40)
Rnds 2–3: Sc around. (40)
Rnd 4: (Sc 8, sc2tog) 4 times. (36)
Rnds 5–6: Sc around. (36)
Rnd 7: (Sc 7, sc2tog) 4 times. (32)
Rnds 8–9: Sc around. (32)
Rnd 10: (Sc 6, sc2tog) 4 times. (28)
Rnds 11–12: Sc around. (28)
Rnd 13: (Sc 5, sc2tog) 4 times. (24)
Rnds 14–15: Sc around. (24)
Rnd 16: (Sc 4, sc2tog) 4 times. (20)
Rnds 17–18: Sc around. (20)
Rnd 19: (Sc 3, sc2tog) 4 times. (16)
Rnds 20–21: Sc around. (16)
Rnd 22: (Sc 2, sc2tog) 4 times. (12)
Rnds 23–24: Sc around. (12)
Rnd 25: (Sc 1, sc2tog) 4 times. (8)
Rnds 26–27: Sc around. (8)
Rnd 28: Sc2tog 4 times. (4)
Rnds 29–36: Sc around. (4)
Fasten off and close the tip.
Crochet the Ivory Hat Brim
Turn the completed red hat so its starting edge is accessible. Join ivory yarn at the foundation edge. Brim Rnd 1: Work one sc into each original starting chain, making 24 sc for the Mini, 32 sc for the Baby or 40 sc for the Family size.
Continue in even rounds without increasing or decreasing:
- Mini: Brim Rnds 2–4, maintaining 24 stitches.
- Baby: Brim Rnds 2–5, maintaining 32 stitches.
- Family: Brim Rnds 2–6, maintaining 40 stitches.
Fasten off with a long sewing tail. The red hat should meet the ivory brim continuously along the full foundation edge, without a gap or an exposed strip of stocking fabric.
Position the Hat Below the Stocking Cuff
Lay the stocking flat with its front facing upward. Identify the lower edge of the actual ivory stocking cuff. Santa's separate hat brim belongs several rows below that cuff, not attached to it.
For the initial placement, measure down from the lower edge of the actual stocking cuff at center front. Mark the position where the upper edge of Santa's ivory hat brim meets the red hat. Do not measure to the middle or lower edge of the ivory brim. Use the following distances:
- Mini: approximately 5 rounds.
- Baby: approximately 6 rounds.
- Family: approximately 8 rounds.
Angle the brim so its heel-facing side sits approximately two rounds lower than its center position and its toe-facing side sits approximately two rounds higher. On the family size, the difference may be increased to three rounds on each side. With the toe pointing right, the brim should rise gently from left to right, matching the finished design.
Flatten the lower ivory brim of the separate hat into two layers, keeping the red crown above it free and hollow. Align the side folds so the brim lies evenly without twisting.
The flattened brim contains 12 stitches across each layer for the Mini, 16 for the Baby and 20 for the Family size. Its visible front width should correspond approximately to the flattened width of the stocking body at the same gauge.
Place the flattened brim against the outside of the stocking's upper front, following the diagonal placement marks. The heel-facing end sits lower than the toe-facing end. The entire red foundation edge must meet the white brim without a gap.
Pin through both brim layers and the front wall of the stocking only. Beginning at the heel-facing end, sew across the lower edge of the flattened brim toward the toe-facing end, catching both brim layers and the stocking front. Continue with secure stitches up the toe-facing end, then return along the upper brim edge toward the heel-facing end. Finish by securing that end.
Keep the sewing stitches within the stocking's front wall. Do not catch the back wall, close the stocking opening or attach the hat to the actual upper cuff.
After securing the brim, arrange the red crown above it and allow the narrowing tip to droop toward the heel. The hat crown remains hollow and flexible. If necessary, add a small concealed support stitch near the bend to hold the droop without sewing the entire crown flat.
Open the stocking and check that the attachment has not narrowed the opening or joined its front and back walls.
Make Santa's Nose and Drooping Mustache
The round peach-colored nose and two curved ivory mustache pieces give this stocking its unmistakable Santa expression. The mustache should look full near the nose and taper toward the drooping outer ends.
Crochet Santa's Nose
Work in continuous rounds using peach-colored yarn.
Mini Nose
Rnd 1: 6 sc in a magic ring. (6)
Rnd 2: Inc in each stitch. (12)
Rnd 3: Sc around. (12)
Rnd 4: Sc2tog 6 times. (6)
Baby Nose
Rnd 1: 6 sc in a magic ring. (6)
Rnd 2: Inc in each stitch. (12)
Rnd 3: (Sc 1, inc) 6 times. (18)
Rnd 4: Sc around. (18)
Rnd 5: (Sc 1, sc2tog) 6 times. (12)
Rnd 6: Sc2tog 6 times. (6)
Family Nose
Rnd 1: 6 sc in a magic ring. (6)
Rnd 2: Inc in each stitch. (12)
Rnd 3: (Sc 1, inc) 6 times. (18)
Rnd 4: (Sc 2, inc) 6 times. (24)
Rnds 5–6: Sc around. (24)
Rnd 7: (Sc 2, sc2tog) 6 times. (18)
Rnd 8: (Sc 1, sc2tog) 6 times. (12)
Rnd 9: Sc2tog 6 times. (6)
For every size, add a small amount of fiberfill before the final decrease round. Fasten off, close the opening and leave a long sewing tail.
Mini Mustache: Make Two
Row 1: Ch 6. Hdc in the third chain from the hook and across. (4)
Rows 2–3: Ch 1, turn, hdc across. (4)
Row 4: Ch 1, turn, hdc2tog, hdc 2. (3)
Row 5: Ch 1, turn, hdc2tog, hdc 1. (2)
Row 6: Ch 1, turn, hdc2tog. (1)
Baby Mustache: Make Two
Row 1: Ch 7. Hdc in the third chain from the hook and across. (5)
Rows 2–3: Ch 1, turn, hdc across. (5)
Row 4: Ch 1, turn, hdc2tog, hdc 3. (4)
Row 5: Ch 1, turn, hdc across. (4)
Row 6: Ch 1, turn, hdc2tog, hdc 2. (3)
Row 7: Ch 1, turn, hdc2tog, hdc 1. (2)
Row 8: Ch 1, turn, hdc2tog. (1)
Family Mustache: Make Two
Row 1: Ch 8. Hdc in the third chain from the hook and across. (6)
Rows 2–3: Ch 1, turn, hdc across. (6)
Row 4: Ch 1, turn, hdc2tog, hdc 4. (5)
Row 5: Ch 1, turn, hdc across. (5)
Row 6: Ch 1, turn, hdc2tog, hdc 3. (4)
Row 7: Ch 1, turn, hdc across. (4)
Row 8: Ch 1, turn, hdc2tog, hdc 2. (3)
Row 9: Ch 1, turn, hdc2tog, hdc 1. (2)
Row 10: Ch 1, turn, hdc2tog. (1)
Shape the Mustache
Fasten off each crocheted mustache piece with a long sewing tail at its narrow final row. Make two identical pieces for the chosen stocking size.
Each piece has a broad starting edge and a tapered outer tip. Instead of leaving the pieces flat, curl the two long side edges of each piece toward the wrong side until they meet underneath, forming a narrow, rounded lobe.
Beginning at the tapered tip, use the sewing tail to whipstitch the two long edges together along the underside, working toward the broad starting edge. Stitch through the edge loops without pulling so tightly that the piece becomes flat.
Before finishing the seam at the broad end, add a very small amount of polyester fiberfill if needed to round the lobe. Do not pack it firmly. Close the remaining seam, leaving enough tail to attach the broad end beneath Santa's nose.
Shape the second piece in the same way. Turn it into the opposite orientation so both broad ends meet beneath the nose and the tapered ends extend outward in opposite directions. Keep both underside seams facing the stocking fabric.
Set the two shaped mustache pieces aside until the beard foundation has been attached to the stocking. Do not sew the mustache to the stocking yet. The broad ends will meet beneath Santa's nose, while the tapered ends will curve outward and downward over the completed beard. Keep each remaining sewing tail available for final attachment.
The completed mustache should have two softly rounded, raised sections that taper toward the outer ends. The seams and attachment stitches should remain concealed beneath the crocheted lobes.
Add Santa's Long Ivory Yarn Beard
The beard is made from individual lengths of yarn attached to a narrow crocheted foundation. The separate foundation makes it easier to create a dense beard and position it beneath Santa's mustache.
Crochet the Beard Foundation
Using ivory yarn, make one foundation strip in the appropriate size.
Mini: Ch 11. Sc in the second chain from the hook and across. (10)
Baby: Ch 15. Sc in the second chain from the hook and across. (14)
Family: Ch 19. Sc in the second chain from the hook and across. (18)
For all sizes, ch 1, turn, and work one additional row of sc. Fasten off with a long sewing tail.
Cut the Beard Fringe
Cut lengths of ivory yarn as follows:
- Mini: 20 strands, approximately 8 inches long.
- Baby: 28 strands, approximately 12 inches long.
- Family: 36 strands, approximately 16 inches long.
Fold each strand in half. Insert a crochet hook through a foundation stitch, pull the folded loop through, then draw both loose ends through the loop to form a lark's-head knot.
Attach one folded strand per foundation stitch along both rows. This produces 40 hanging yarn ends for the mini, 56 for the baby and 72 for the family size.
Position and Attach the Beard
Place the foundation strip horizontally beneath the center of Santa's nose, allowing it to curve slightly around the upper front of the stocking.
Using the long sewing tail, secure the beard foundation to the front wall of the stocking only. Begin at one short end of the foundation, sew along its upper edge to the opposite end with small, evenly spaced stitches, then secure both short ends. Do not sew through the back wall or catch the loose fringe strands in the seam.
Allow the fringe to hang freely over the upper foot. Gently separate the strands so the beard forms an even curtain beneath Santa's face.
Arrange the strands so the beard appears full without large gaps. Position the mustache over the top of the beard to conceal its attachment foundation.
Trim the Beard
After the mustache and nose are attached, carefully trim the lower fringe. Leave the center slightly longer than the sides, creating a gently rounded, irregular outline.
Approximate finished beard lengths:
- Mini: 3 to 3 1/2 inches.
- Baby: 4 1/2 to 5 inches.
- Family: 5 3/4 to 6 1/2 inches.
Trim conservatively. The beard should look generous and flowing, but the cranberry heel and toe must remain visible beneath it.
Make the Pom-Pom and Reinforced Hanging Loop
Ivory Pom-Pom
Make a thick ivory yarn pom-pom using a pom-pom maker or two cardboard circles.
Suggested finished sizes:
- Mini: approximately 1 1/4 inches across.
- Baby: approximately 1 3/4 inches across.
- Family: approximately 2 1/4 inches across.
Wind the yarn generously, tie the center tightly with a separate strong length of matching yarn, and cut the loops. Trim into a rounded, fluffy ball.
Reinforced Pom-Pom Attachment
Using ivory yarn, crochet a small reinforcement disk.
Rnd 1: 6 sc in a magic ring. (6)
Rnd 2: Inc in every stitch. (12)
Fasten off with a long sewing tail. Sew the disk against the closed tip of Santa's red hat, capturing the pom-pom's center ties beneath it.
Stitch securely through the central bundle several times. The pom-pom should hang from the very end of the drooping hat.
Crochet the Hanging Loop
Make the loop using ivory yarn.
Mini: Ch 10. Sc in the second chain from the hook and across. (9)
Baby: Ch 12. Sc in the second chain from the hook and across. (11)
Family: Ch 16. Sc in the second chain from the hook and across. (15)
For every size, ch 1, turn, and work one sc in each stitch across to complete Row 2: 9 stitches for the Mini, 11 for the Baby or 15 for the Family size. Fasten off with a long sewing tail for securing the loop ends inside the stocking cuff.
Crochet the Hanging Loop Reinforcement Patch
Make one ivory reinforcement patch for any stocking size.
Row 1: Ch 5. Sc in the second chain from the hook and across. (4)
Row 2: Ch 1, turn, sc across. (4)
Row 3: Ch 1, turn, sc across. (4)
Fasten off with a long sewing tail. At the stated gauge, the patch measures approximately 1 1/3 inches wide by 7/8 inch high before attachment.
Fold the crocheted strip into a loop, bringing both short ends together. Position them against the inside of the actual upper stocking cuff, slightly toward the toe-facing side. With the stocking hanging heel-left and toe-right, the loop should sit just right of center, as shown in the finished design.
Sew through both ends, the cuff and several rows of the underlying stocking body.
Place the completed four-stitch-wide, three-row-high ivory reinforcement patch over the two joined loop ends on the inside of the stocking. Position it so both loop ends are completely covered. Using the patch's sewing tail, stitch around all four edges, securing the patch through the loop ends and the back wall of the stocking. Do not sew through the stocking's front wall or close any part of its opening.
Make sure the hanging loop does not pull the upper opening inward. It should support the stocking independently of Santa's decorative hat.
This loop is intended for an empty stocking or one containing lightweight treats. Use a sturdy hanger and place heavy gifts beneath the stocking rather than inside it.
Putting Your Crochet Santa Stocking Together
Before permanently attaching the facial pieces, lay the stocking flat and arrange everything to match the finished design. The hat, nose, mustache and beard should look like one complete Santa face rather than separate decorations.
Step 1: Check the Hat Position
Lay the stocking with its toe facing right and heel facing left. Position Santa's white hat brim diagonally across the upper front, below the actual stocking cuff.
The brim should slope gently upward toward the toe, with its lower end on the heel side. The red hat must extend across the full width of the white brim, with its long tip drooping toward the heel.
Check that the actual stocking opening remains unobstructed.
Step 2: Check the Hat Attachment
The hat brim was sewn into place in the earlier hat section. Check that its lower edge, upper edge and both ends are firmly secured. Add a reinforcing stitch only if an attachment point is loose.
Confirm that the stitching catches the front wall of the stocking only and that the functional top opening remains clear.
Leave the red crown hollow and flexible. The narrow tip should remain free to droop naturally rather than being sewn flat against the stocking.
Step 3: Check the Beard Foundation
The beard foundation was attached in the earlier beard section. Check that its upper edge and both ends are securely fastened to the stocking's front wall. Add a reinforcing stitch only if an attachment point is loose.
Distribute the fringe strands evenly and confirm that the beard hangs freely without interfering with the upper stocking opening. Leave the fringe untrimmed until the nose and mustache are fully assembled.
Step 4: Attach the Mustache
With the beard foundation already attached, position the two shaped ivory mustache lobes across its upper edge. Bring their broad inner ends together beneath the planned nose position, with the concealed seams facing the stocking.
Using the remaining sewing tail from each mustache piece, stitch its broad inner end securely to the front wall of the stocking. Work several small stitches around the broad end, concealing them underneath the crocheted lobe. Do not stitch through the back wall of the stocking.
Curve the tapered ends outward and downward over the beard. Using a separate short length of ivory yarn, anchor each tapered tip to the stocking front. Add a discreet underside support stitch if needed to maintain the curve.
Keep the rounded upper portions raised rather than pulling them flat against the stocking. Secure and conceal all sewing tails.
Step 5: Sew on Santa's Nose
Center the round peach-colored nose above the joining point of the two mustache halves, directly below the hat brim.
Sew the nose securely in place without flattening its rounded shape.
Step 6: Check the Pom-Pom and Hat Drape
The ivory pom-pom was attached to the end of Santa's hat during the reinforcement step. Check that its center ties and crocheted disk are securely fastened and that the yarn strands cannot easily pull loose.
Arrange the red hat so its long tip drops naturally toward the heel. Add one or two discreet support stitches near the bend only if needed to prevent twisting.
Step 7: Final Shaping
Hang the stocking temporarily and check its overall appearance. Santa's hat should sit at a relaxed angle, with the mustache and beard centered beneath the brim.
Trim any uneven beard ends carefully. The beard should cover part of the upper stocking but leave the cranberry heel, ivory foot and cranberry toe clearly visible.
Open the top cuff and reach inside to confirm that none of the Santa decorations restrict access. Check the heel corners and all attachments for loose stitches.
Remove all temporary pins and stitch markers. Check that no loose tools or yarn scraps remain inside the stocking. Weave in every remaining yarn end, inspect the nose, mustache, beard foundation, pom-pom and hanging loop for secure attachment, and arrange the stocking for display.
Personalize Your Santa Stocking for Baby's First Christmas
One of the sweetest uses for this stocking is making a keepsake for a baby's first Christmas. The playful Santa face gives it plenty of character, while the ivory stocking body leaves room for a name or a small embroidered date.
Add Baby's Name
For a personalized stocking, embroider the baby's name onto a small piece of coordinating fabric. Choose cranberry thread to match Santa's hat, heel and toe.
Attach the finished name panel to the ivory foot, below the beard. Keep the lettering simple and large enough to read when the stocking is hanging.
A flat embroidered panel is easier to position neatly than individually crocheted letters, particularly on the mini and baby sizes.
Add the First Christmas Year
The year can be embroidered discreetly on the back of the stocking or on a small fabric keepsake label sewn inside the upper cuff.
Use flat embroidery and secure all thread ends carefully. Avoid beads, buttons or other detachable embellishments on a stocking that may be handled around babies and young children.
Make Matching Family Stockings
The mini, baby and family sizes share the same Santa design. That makes it possible to crochet a small keepsake for baby or a matching collection for parents, children and grandparents.
Use cranberry and ivory for a traditional Christmas look, or try a rustic oatmeal-and-brown variation for a quieter color scheme.
Keep the same diagonal hat brim, full mustache and fringe beard on every stocking so the collection looks coordinated.
Tips for Matching the Finished Santa Stocking
- Keep the actual stocking cuff and Santa's white hat brim as two separate bands.
- Place the decorative hat brim diagonally below the stocking opening.
- Make the cranberry hat wide enough to extend across the entire white brim.
- Allow the long red tip to droop toward the heel.
- Position the round nose directly above the center of the mustache.
- Let the mustache curve downward over the long fringe beard.
- Trim the beard only after all facial pieces have been attached.
- Keep the upper opening wide enough to fill without disturbing Santa's hat.
Displaying Your Handmade Santa Stocking
Hang the finished stocking from a sturdy mantel hook or another secure decorative hanger, well away from open flames and heat sources.
The dimensional nose, yarn fringe and pom-pom make this a decorative Christmas keepsake rather than a baby toy. Keep it out of a baby's reach and use it for lightweight treats or display.
When Christmas is over, gently arrange the beard and hat before storing the stocking flat in a clean, dry place. Avoid placing heavy decorations on top of the pom-pom or folded hat tip.
Bring it out again next December, and the stocking can become one of those handmade Christmas decorations that grows more meaningful with every passing year.
Pattern Development Note
Pattern development note: The stitch counts and construction have been reviewed mathematically for internal consistency. The finished dimensions and yarn quantities are estimates, and the pattern has not been physically test-crocheted. The heel shaping, diagonal hat attachment, facial proportions and completed drape still require verification with a finished sample.
When you click on links to various merchants on this site and make a purchase, this may result in this site earning a commission. This does not affect the price you pay.

UBGI Gold Standard 2026
Reviewed under the site's
editorial checklist.
Photos, decorating ideas, party setups and reader submissions are shared for inspiration unless a page is specifically presented as a pattern, tutorial, reference guide or step-by-step project. Follow the instructions, measurements, safety guidance and manufacturer directions provided for the particular project or product.
About Jan | Contact | Baby Nursery Ideas (Blog) | Site Map | Privacy Policy | Disclosure Policy | Disclaimer | Affiliate Disclosure | Earnings Disclosure | Facebook | Pinterest
I am a participant in the Amazon Services LLC Associates Program, an affiliate advertising program designed to provide a means for us to earn fees by linking to Amazon. As an Amazon Associate I earn from qualifying purchases.
Copyright © 2006-2026. All Rights Reserved.