Free Crochet Mistletoe Pattern for a Christmas Swag & Ornament
By Jan Bay
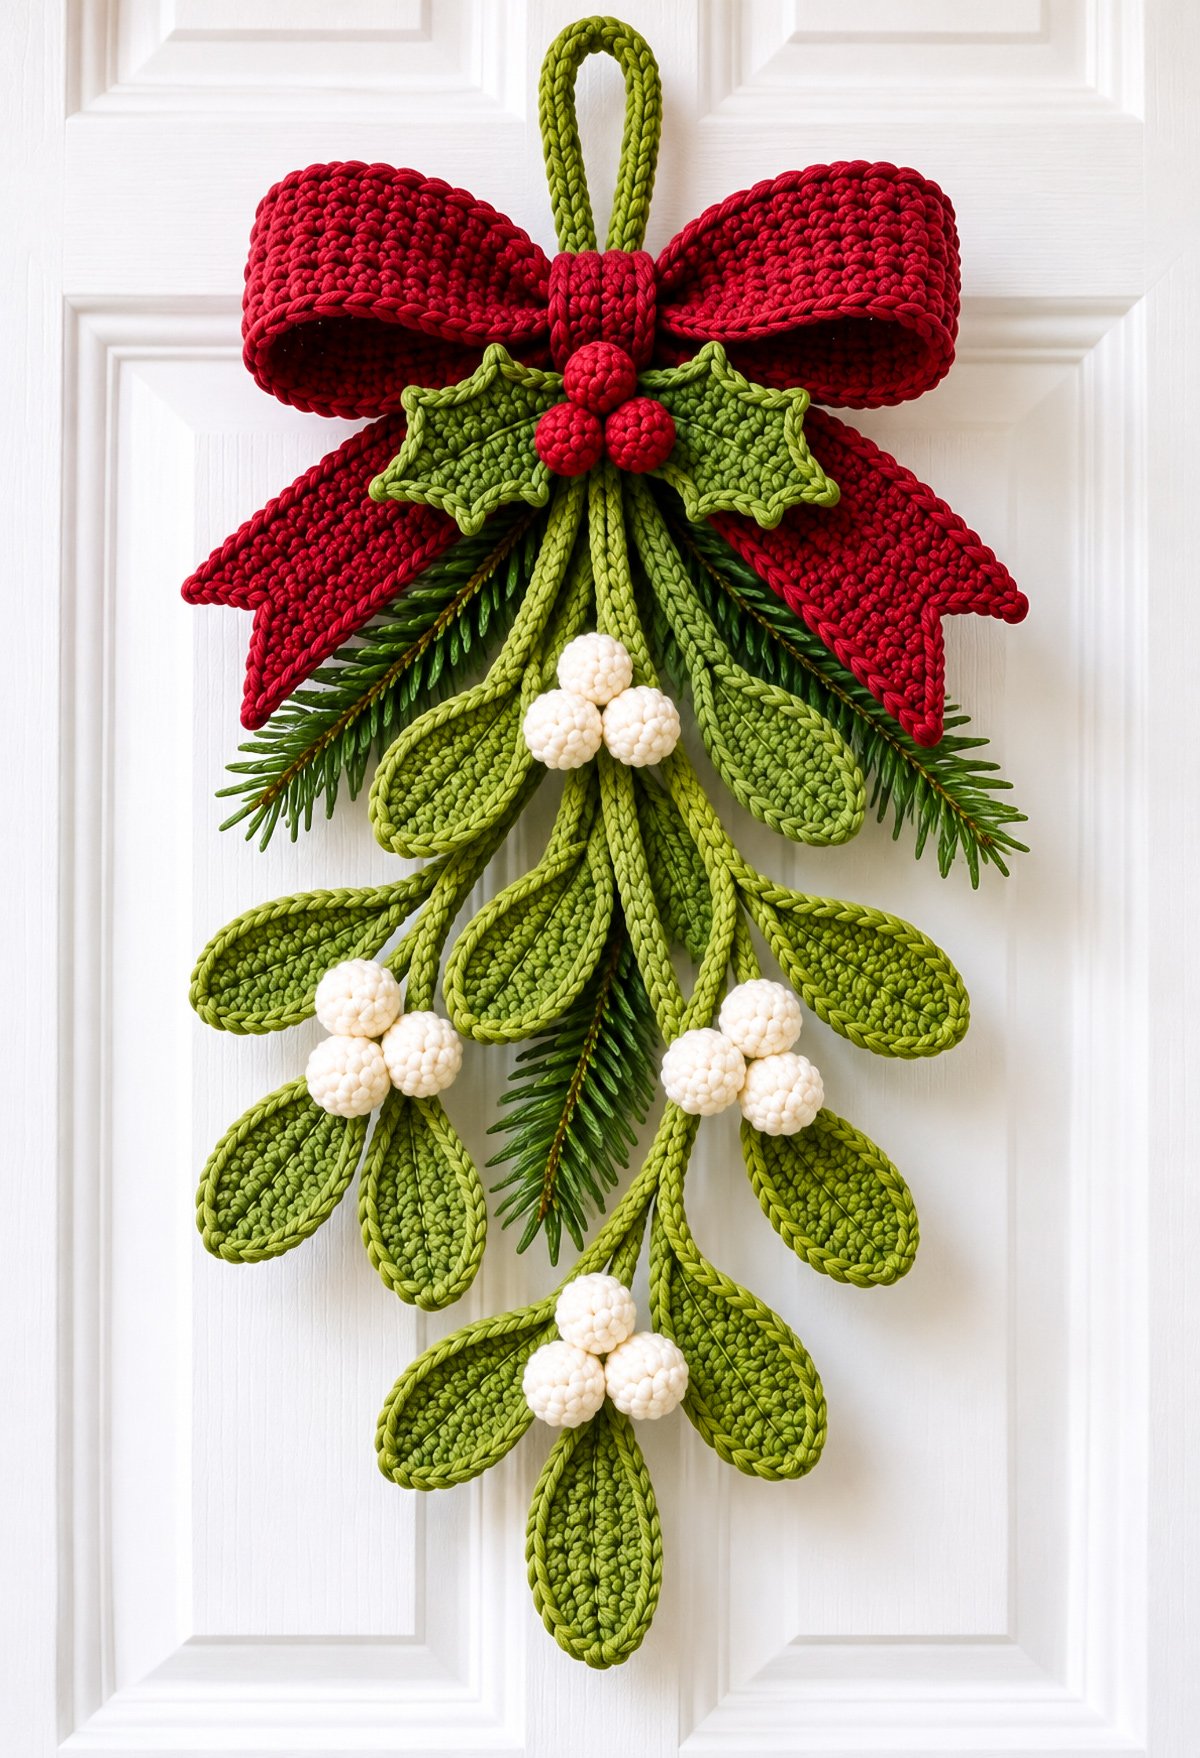
This free crochet mistletoe pattern makes a cascading Christmas swag with shaped green leaves, clusters of ivory berries, a beautiful crochet bow and a little holly decoration. Three optional artificial evergreen sprigs add fullness behind the crochet without hiding the mistletoe. Hang the finished arrangement on a door, use it as a Christmas wall decoration, or make a smaller version for a handmade ornament. I'll show you how to make the crocheted pieces and put everything together in time for mommy to be kissing Santa Claus.
Explore More Free Christmas Crochet Patterns
Free Christmas Crochet Patterns
Free Crochet Applique Patterns
See Supplies for This Project Here.
Jump to:
Materials for the Free Crochet Mistletoe Pattern
You can make the entire mistletoe arrangement with crochet, then add three artificial evergreen sprigs if you want the fuller Christmas swag shown in the example image. I'd gather everything before starting because this project has quite a few small pieces.
Yarn and Crochet Supplies
- Smooth #4 worsted-weight cotton or cotton-blend yarn in medium olive green, approximately 100 to 130 yards
- Red worsted-weight yarn for the large bow and holly berries, approximately 150 to 170 yards
- Ivory or warm white worsted-weight yarn for the mistletoe berries, approximately 20 to 30 yards
- Small amount of darker green yarn for the holly leaves
- G/6, 4.0 mm crochet hook
- Tapestry needle
- Stitch markers
- Scissors
- Small amount of polyester fiberfill for the berries
- Rustproof blocking pins and mat, optional
Supplies for Assembling the Christmas Swag
- Three short artificial evergreen sprigs, approximately 4 to 6 inches long
- Dark green felt for a concealed backing, approximately 1 inch wide and 11 inches long
- A second piece of felt to cover the back of the attachment area
- Green sewing thread or embroidery floss
- Needle suitable for sewing through felt
- Two lengths of 16-gauge green floral wire for supporting the left and right crocheted branches
- Wire cutters and needle-nose pliers
- Four small pieces of dark green felt, one for covering each wire end
- Flexible measuring tape
Choose artificial greenery with fairly fine needles. Large, stiff branches would cover too much of the crocheted mistletoe, and I want those green leaves and white berries to remain the main attraction.
If your greenery has a wire center, the cut ends will need to be folded inward and covered during assembly. Don't leave bare wire ends sticking out behind the decoration.
The evergreen is optional. You can leave it out and keep all the visible greenery crocheted. The concealed felt backing and reinforced side branches will still support the full-size swag.
Finished Size and Crochet Pattern Notes
The full-size version is intended for a door, wall or holiday display. It isn't a tiny tree ornament. The large bow and long hanging branches are what give it the cascading shape shown in the finished example.
Expected Finished Measurements
- Full cascading swag: approximately 16 to 18 inches tall, including the hanging loop
- Maximum width: approximately 9 to 11 inches
- Large mistletoe leaf: approximately 2 3/4 to 3 1/4 inches long
- Small mistletoe leaf: approximately 2 1/4 to 2 3/4 inches long
- Ivory berry: approximately 3/4 inch in diameter
- Large crochet bow: approximately 8 1/2 to 9 inches across
- Smaller ornament variation: approximately 5 to 6 inches tall, depending on the hanging loop
These are expected measurements based on the yarn, hook and stitch construction. The complete swag hasn't been physically test-crocheted, so check the measurements as you go. You can adjust the branch lengths before sewing everything together.
Skill Level: Intermediate. You should be comfortable working around a foundation chain, making increases and decreases, adding surface slip stitches, and sewing crocheted pieces together. The full-size swag also includes simple wire reinforcement and assembly over a felt backing.
Gauge
For the mistletoe leaves, aim for approximately 17 single crochet stitches and 18 rows over 4 inches with a 4.0 mm hook.
The existing large bow pattern uses a target gauge of approximately 16 half double crochet stitches and 12 rows over 4 inches.
Gauge doesn't need to be perfect for a decoration, but the pieces need to stay in proportion. I'd check the first leaf, the first berry and the bow panel before making multiples.
Stitches and Abbreviations
- ch = chain
- sc = single crochet
- hdc = half double crochet
- dc = double crochet
- tr = treble crochet
- sl st = slip stitch
- sc2tog = single crochet two stitches together
- hdc2tog = half double crochet two stitches together
- hdc3tog = half double crochet three stitches together
- st/sts = stitch/stitches
- rnd = round
- RS = right side
- WS = wrong side
All instructions use U.S. crochet terminology. If you need to check a stitch abbreviation, the Craft Yarn Council's crochet abbreviation reference is a useful guide.
Before You Start
Make the crocheted pieces separately and assemble the swag afterward. The leaves are worked around a foundation chain, the berries are worked in rounds, and the long stems are made from reinforced crochet chains.
You'll make ten large mistletoe leaves and two smaller ones. The twelve ivory berries are arranged in four groups of three.
The large bow and holly decoration use the same construction as my separate bow and holly patterns, with the holly arranged as two small leaves and three red berries to match this particular design.
Keep long sewing tails on the berries and at the bases of the leaves. They'll be useful when you attach everything to the stems.
Pattern note: This is a decorative Christmas project, not a toy or a baby accessory. The dimensional berries, concealed branch-support wires, optional wire-backed artificial greenery and hanging loop should be kept away from babies and young children. Don't hang the swag over a crib or within a child's reach. Check that all wire ends remain enclosed before hanging the decoration.
How to Crochet the Mistletoe Leaves
The leaves are the feature I wouldn't compromise on. They need to look like mistletoe, not little holly leaves or pointed Christmas tree shapes.
We'll make them long and slightly rounded, with a narrower base, a fuller upper half and a raised center vein. The small leaves use the same construction with fewer foundation stitches.
Large Mistletoe Leaf
Make 10 in medium olive green.
You'll work around both sides of a foundation chain to form one complete leaf. The five half double crochet stitches at the far end create the rounded tip.
Foundation: Ch 12.
Round 1, first side: Sc in 2nd ch from hook and in next ch, hdc in next 2 ch, dc in next 4 ch, hdc in next 2 ch. Work 5 hdc in the last ch.
Rotate the work so you can crochet back along the unused loops on the opposite side of the foundation chain.
Round 1, second side: Hdc in next 2 unused loops, dc in next 4 loops, hdc in next 2 loops, sc in final 2 loops. Join with a sl st to the first sc. (25 sts)
Stitch count checkpoint: You have 10 sts on the first side, 5 hdc around the rounded tip and 10 sts on the second side. Total: 25.
Round 2: Ch 1 (does not count as a stitch). Sc in the same stitch as the joining sl st, sc in next 9 sts, work 2 sc in next st, sc in next 3 sts, work 2 sc in next st, sc in final 10 sts. Join with a sl st to the first sc. (27 sts)
The two increases sit at the shoulders of the rounded tip. They give that end a little more fullness without making the entire leaf wide.
Round 3, raised edging: Work 1 loose sl st in each of the 27 sts around. Join with a sl st to the first sl st. (27 edging sl sts)
Fasten off, leaving a 12-inch tail for assembly.
Add the Raised Center Vein
Choose the side you want facing forward. Join green yarn at the narrow base of the leaf.
Insert your hook through the fabric directly above the original foundation chain and pull up a loop. Continue working loose surface slip stitches along the middle of the leaf, following the foundation chain toward the rounded tip.
Stop just below the tip, usually after about 10 surface stitches. Fasten off and pull both vein ends to the back.
Keep that raised line loose. If you pull it tight, the leaf will curl lengthwise, and you'll lose the broad mistletoe shape.
Weave in the two vein ends on the back, but keep the original 12-inch sewing tail at the base.
Large Leaf Measurement Checkpoint
The expected finished length is approximately 2 3/4 to 3 1/4 inches, with a width of about 1 1/4 to 1 3/4 inches across the broadest area.
Your first leaf should have a narrow stem end, a fuller upper half and a rounded tip. If it is noticeably wider than it is long, check the foundation chain length and your double crochet tension before making the other nine.
If the leaf curls, check the tension of the slip stitch edging and center vein. Both need to be loose enough to let the fabric lie flat.
Small Mistletoe Leaf
Make 2 in medium olive green.
These two leaves sit near the upper part of the swag, just below the bow. They're intentionally a little smaller than the lower leaves.
Foundation: Ch 10.
Round 1, first side: Sc in 2nd ch from hook and in next ch, hdc in next 2 ch, dc in next 2 ch, hdc in next 2 ch. Work 5 hdc in the last ch.
Rotate the work and crochet along the unused loops of the foundation chain.
Round 1, second side: Hdc in next 2 loops, dc in next 2 loops, hdc in next 2 loops, sc in final 2 loops. Join with a sl st to the first sc. (21 sts)
Stitch count checkpoint: Eight stitches along each side plus five at the tip equals 21.
Round 2: Ch 1 (does not count as a stitch). Sc in the same stitch as the joining sl st, sc in next 7 sts, work 2 sc in next st, sc in next 3 sts, work 2 sc in next st, sc in final 8 sts. Join with a sl st to the first sc. (23 sts)
Round 3: Work 1 loose sl st in each of the 23 sts around. Join to the first sl st. (23 edging sl sts)
Fasten off, leaving a 12-inch sewing tail.
Add the raised center vein exactly as described for the large leaf. Follow the original foundation chain from the narrow base toward the rounded tip, stopping just below the end.
The expected length is approximately 2 1/4 to 2 3/4 inches. Make both small leaves the same size.
Before Making All Twelve Leaves
Lay one large leaf beside one small leaf. They should look like the same plant, with only a modest difference in length.
If you want to try two shades of green, use the lighter olive for the two upper leaves and a slightly deeper green for the ten larger leaves. That's optional. I'd keep the colors fairly close because the branching shape and white berries already give us plenty of detail.
Make all twelve leaves before moving on to the berries. That way you can compare their sizes and adjust any that are noticeably different.
Crochet the Ivory Mistletoe Berries
The mistletoe gets twelve little ivory berries, arranged in four clusters of three.
These are plain crocheted berries. No pearls, beads or other decorations in the centers. The crochet texture is enough.
Small Round Ivory Berry
Make 12 in ivory yarn.
Work in continuous rounds without joining. Use a stitch marker to mark the beginning of each round.
Round 1: Make a magic ring and work 6 sc into the ring. Pull the ring closed. (6)
Round 2: Work 2 sc in each st around. (12)
Round 3: Sc in each st around. (12)
Round 4: Sc2tog six times. (6)
Remove the stitch marker. Check that the starting ring is closed, then secure its tail inside the berry.
Add a small pinch of polyester fiberfill. Don't pack it tightly. These berries should be rounded rather than hard little balls.
Cut the yarn, leaving a 10-inch sewing tail. Thread the tail through the front loops of the remaining six stitches and pull the opening closed.
Keep the sewing tail attached.
Berry Size Checkpoint
Each berry should be approximately 3/4 inch across with the suggested yarn and hook. A little variation is fine, but all twelve berries should be close to the same size.
Before making the remaining eleven, check that the first berry is small enough to sit between two mistletoe leaves without hiding them.
Arrange the Berry Clusters
Separate the twelve berries into four groups of three.
- Cluster 1: Three berries for the upper center of the swag
- Cluster 2: Three berries for the left branch
- Cluster 3: Three berries for the right branch
- Cluster 4: Three berries for the bottom center branch
Arrange each group in a small triangle, with one berry above the other two. Rotate the berries so their closing seams face inward or toward the back.
Using the sewing tail from the upper berry, pass the needle through the lower sides of the other two berries. Take two or three small securing stitches, then tie off and weave the tail into the cluster.
Repeat with the remaining three clusters. Keep one long sewing tail available on each cluster for attaching it to the stems.
There's no need to sew the berries into a rigid triangle. A little rounded shape between them will look more natural.
Checkpoint: You should now have four separate clusters containing three ivory berries each, for a total of twelve berries.
Make the Crochet Mistletoe Branching Stems
The stems are what give the swag its long, cascading outline. Rather than crochet one thick stem and attach everything to it, we'll make five separate cords and gather them beneath the bow.
That lets the branches spread out naturally. You'll also have more control over where the leaves and berries go.
How to Make a Reinforced Crochet Stem
Using olive-green yarn, leave a 12-inch starting tail and make the number of chains listed for the stem you're working.
Work a sl st in the 2nd ch from the hook and in every remaining chain back toward the starting tail. Keep these slip stitches loose enough that the finished cord stays flexible.
Fasten off, leaving another 12-inch tail.
You now have a slightly raised crochet cord with a braided appearance. The cord has a starting tail at one end and a finishing tail at the other. The sewing tails will be used to secure the stems and hide the joins.
Make the Five Stems
Stem A: Upper Center
Ch 26. Sl st in 2nd ch from hook and in each remaining ch. (25 sl sts)
Expected length: approximately 4 3/4 to 5 1/2 inches.
Stem B: Left Branch
Ch 43. Sl st in 2nd ch from hook and in each remaining ch. (42 sl sts)
Expected length: approximately 8 1/2 to 9 1/2 inches.
Stem C: Right Branch
Repeat Stem B. Ch 43, then work 42 sl sts back along the chain.
Match its finished length to Stem B. The left and right branches should balance each other.
Stem D: Center Filler Branch
Ch 37. Sl st in 2nd ch from hook and in each remaining ch. (36 sl sts)
Expected length: approximately 7 to 8 inches.
Stem E: Long Bottom Branch
Ch 58. Sl st in 2nd ch from hook and in each remaining ch. (57 sl sts)
Expected length: approximately 11 1/2 to 12 1/2 inches.
Check the Stem Lengths
These lengths are targets, not physically measured results. The finished cord length depends on how tightly you make your foundation chains and slip stitches.
Measure Stem A first. If it is considerably shorter or longer than expected, adjust the number of foundation chains before completing the other stems. Use the same tension for all five.
The main goal is to keep the bottom branch noticeably longer than the side branches, and to make the left and right branches match.
Reinforce the Two Side Branches
The left and right branches need a little support to hold the spreading shape shown in the example image. We'll hide two pieces of green floral wire behind the crocheted cords. The wire won't show from the front.
Measure Stem B and Stem C after crocheting them. Prepare one piece of 16-gauge green floral wire for each branch, starting with a piece approximately as long as its crocheted cord.
Using needle-nose pliers, bend both wire ends inward to form small, tightly closed loops. Measure the wire again after bending the ends. Adjust the wire length as needed so the finished piece, including its closed loops, is approximately 1 inch shorter than the crocheted cord.
Cover each of the four folded wire ends with a separate small piece of dark green felt. Stitch the felt securely around each closed loop so no metal is exposed.
Lay one prepared wire along the back of Stem B, centering it so the covered ends sit approximately 1/2 inch inside the two ends of the crocheted cord.
Using matching green yarn and a tapestry needle, make small securing stitches around the wire and crocheted cord approximately every 1/2 inch. Keep the wire against the back of the crochet rather than wrapping it around the front.
Repeat with Stem C.
Check that both wires are securely attached and that no metal ends can work through the felt coverings.
Don't bend the branches into their final positions yet. We'll shape them after the stems have been attached to the backing.
Make the Hanging Loop
With green yarn, ch 14. Join with a sl st to the first ch, taking care not to twist the chain.
Work 1 sl st into each of the 14 chains around the loop. Join to the first sl st. (14 sl sts)
Fasten off, leaving a 12-inch tail.
Fold the loop in half with the joining point at the bottom. Secure the bottom of the loop with several stitches of the sewing tail.
The expected upright loop height is approximately 1 1/4 to 1 3/4 inches, depending on your chain tension.
Keep the remaining tail for attaching the loop behind the bow.
Stem Layout Before Assembly
Lay all five stems on a flat surface with their upper ends together.
- Stem A goes down the upper center and carries the two small leaves and upper berry cluster.
- Stem B angles toward the left side.
- Stem C angles toward the right side.
- Stem D fills the space through the middle.
- Stem E hangs down the center and carries the lowest mistletoe leaves.
Fan the stems out without pulling them perfectly straight. The branches should overlap a little in the middle and become more open toward their lower ends.
Don't attach the bow yet. We'll arrange the leaves and berries first, then cover the upper joins with the bow and holly.
Assemble the Crochet Mistletoe Christmas Swag
Now we'll put those separate pieces together. Don't worry about making every branch perfectly symmetrical. The arrangement should look full and balanced, but the individual leaves can sit at different angles.
I'd assemble the crochet over a narrow felt backing. It keeps the stems from pulling apart at the top, and it gives you somewhere to secure the artificial greenery later.
Step 1: Prepare the Backing
Cut a strip of dark green felt approximately 1 inch wide and 11 inches long. Round the lower corners so they won't show beneath the finished crochet.
Lay the felt vertically on your work surface. The upper end will sit behind the bow, and the lower end will support the long center branch.
If you have a longer or shorter finished swag, adjust the backing length so it remains hidden behind the leaves and stems.
Step 2: Position the Five Branches
Gather the upper ends of all five crocheted stems together at the top of the felt.
Place Stem E, the longest branch, down the center. Lay Stem A above it, with Stem D slightly to one side. Angle Stems B and C outward to the left and right.
The five stems should share one gathering point at the top.
Use green yarn and a tapestry needle to sew through the gathered upper ends and the felt. Take several stitches through the cords and backing, then knot securely on the back.
Attach Stem E along the center of the felt backing, using small securing stitches approximately every 2 to 3 inches. Keep the stem straight enough to support the long lower portion of the swag.
Secure Stem A and Stem D to the felt wherever their upper portions overlap the backing. Leave their lower ends free to drape naturally.
Attach Stems B and C securely at the upper gathering point and for approximately the first inch below it. Their reinforced lengths should extend away from the narrow felt backing rather than being sewn back toward the center.
Hold the swag upright by its gathering point. Gently bend Stem B outward to the left and Stem C outward to the right. Shape the reinforced branches into a shallow, downward-curving arrangement.
Check that the side branches remain spread apart when the swag hangs freely. Adjust their curves before attaching the mistletoe leaves and berries.
The long center stem should hang downward while the left and right branches spread outward to form the cascading outline shown in the example image.
Step 3: Attach the Two Upper Leaves
Take the two small mistletoe leaves.
Position one to the left and one to the right of Stem A, approximately 3 to 4 inches below the upper gathering point. Angle their rounded tips down and outward.
Overlap the narrow leaf bases with the stem. Use the 12-inch sewing tail from each leaf to stitch through the leaf base and around the crocheted cord three or four times.
Take one additional anchoring stitch through the lower center of the leaf and the cord beneath it. Keep the broad outer portion of the leaf free.
Secure the tails on the back and weave them into the crochet.
Step 4: Attach the Left Branch Leaves
Take two large mistletoe leaves.
Attach the first to Stem B approximately 5 to 5 1/2 inches below the gathering point. Angle it outward to the left.
Attach the second approximately 7 1/2 to 8 inches below the gathering point, with its rounded tip pointing down and slightly left.
Sew each leaf at its narrow base, wrapping the sewing tail around the stem. Add a small anchoring stitch at the inner third of each leaf.
Keep the outer portions of the leaves free so they have a little dimension.
Step 5: Attach the Right Branch Leaves
Repeat Step 4 with two more large leaves on Stem C.
Place them at approximately the same heights as the left leaves, but turn their rounded tips toward the right.
Lay the branches flat and compare the two sides before fastening the final tails. You can move a leaf slightly higher or lower to keep the arrangement balanced.
Step 6: Add the Three Center Leaves
Take three large mistletoe leaves and attach them to Stem D.
Position the first leaf approximately 4 inches below the gathering point, with its rounded tip pointing down and slightly left.
Attach the second leaf approximately 5 1/2 inches below the gathering point, angled down and left.
Position the third leaf approximately 7 inches below the gathering point, angled down and right.
Sew each leaf securely at its narrow base. Add a small anchoring stitch through the inner third of the leaf where it overlaps the stem.
These three leaves fill the center of the swag without making it too wide. Keep the upper leaf slightly behind the other two so the finished arrangement has the layered look shown in the example image.
Step 7: Add the Three Bottom Leaves
Take the last three large leaves and Stem E, the longest center branch.
Attach one leaf approximately 9 1/2 inches below the gathering point, angled down and left.
Attach the second approximately 10 inches below the gathering point, angled down and right.
Attach the final leaf near the lower end of the stem, with the rounded tip pointing straight down.
That last leaf is important. It finishes the bottom of the swag with a natural point instead of leaving several stems dangling at the same height.
Secure all three leaves at their narrow bases. Add a few small anchoring stitches where the leaves overlap.
Step 8: Attach the Ivory Berry Clusters
Take the four clusters of three ivory berries.
Upper cluster: Sew the first cluster to Stem A, approximately 2 1/2 inches below the upper gathering point. Center it above the two small leaves.
Left cluster: Attach the second cluster to Stem B, approximately 6 1/2 inches below the gathering point. It should sit between the two large leaves.
Right cluster: Repeat on Stem C, positioning the third cluster approximately opposite the left cluster.
Bottom cluster: Attach the fourth cluster to Stem E, approximately 10 1/2 inches below the gathering point, just above the lowest group of leaves.
To attach each cluster, pass its remaining sewing tail through the bases of all three berries, around the crocheted stem and back through the berry bases. Repeat two or three times.
Fasten the tail securely behind the stem and weave it into the crocheted cord.
Don't sew the berries to the outer tips of the leaves. The clusters should sit near the branching stems, as they do in the example image.
Step 9: Check the Arrangement
Lay the entire swag flat and compare it with the example image.
You should have:
- Two small leaves near the upper center
- Two large leaves on the left branch
- Two large leaves on the right branch
- Three large leaves filling the middle
- Three large leaves at the lower end
- Four ivory berry clusters containing three berries each
That's twelve mistletoe leaves and twelve ivory berries altogether: ten large leaves, two smaller leaves and four clusters of three ivory berries.
The lower leaves should make the swag look longer and narrower toward the bottom. The upper leaves and side branches should create the fullness.
Hold the arrangement upright by the upper gathering point. If a branch twists backward, add a small stitch between that branch and a neighboring cord or the felt backing.
Make these adjustments before adding the evergreen and bow. It's much easier to move a leaf now than after the upper decorations are attached.
Add Three Optional Evergreen Sprigs
The artificial evergreen is a small addition, but I like what it does for this arrangement. Those darker needles fill the spaces behind the mistletoe without asking you to crochet dozens of tiny pine needles.
You only need three short pieces. That's plenty.
Choosing the Evergreen
Look for an artificial pine or fir pick with flexible branches and fairly fine needles. The greenery should be a darker green than the crocheted leaves.
Cut three sprigs approximately 4 to 6 inches long, depending on their shape.
Remove any decorations, glitter, artificial snow or oversized berries that might already be attached to the greenery.
We're using the evergreen for its shape and texture, not to turn the swag into a completely different decoration.
Step 1: Position the Left Sprig
Place the first artificial sprig behind the upper left branch, with its tip extending approximately 1 to 2 inches beyond the crocheted stems.
Keep the greenery behind the leaves. Only the needles and a little of the branch should show from the front.
Step 2: Position the Right Sprig
Repeat on the right side with the second sprig.
Adjust both pieces until they look reasonably balanced beneath the bow.
Step 3: Add the Center Sprig
Take the third sprig and tuck it behind the middle portion of the swag.
Angle its tip downward so it fills the open space between the center and lower branches.
Don't extend it beyond the lowest mistletoe leaf. The bottom should finish with crochet, not artificial pine.
Step 4: Secure the Artificial Greenery
Turn the arrangement over while keeping the three sprigs in position.
If the artificial stems contain wire, bend the cut ends back on themselves so no sharp ends point outward.
Lay the secured stem ends against the felt backing. Use dark green sewing thread or embroidery floss to make several tight wraps around each stem and through the felt.
Make at least two separate attachment points along each artificial sprig so it cannot rotate freely.
Cover the wired ends and thread wraps with a second piece of felt. Stitch the covering felt to the original backing around its edges.
Check the back with your fingers. There should be no exposed wire points or loose ends.
Step 5: Check the Front
Turn the swag right side up again.
You should see a little darker evergreen behind the upper branches and another small section through the middle. The crocheted leaves and ivory berries should still be easy to see.
If the greenery is hiding a berry cluster, trim or reposition that sprig before finishing.
And if you'd rather make the whole decoration from yarn, leave the evergreen out. The mistletoe branches are already a complete crocheted arrangement.
Add the Crochet Bow and Holly Berry Motif
Now for the finishing touches. The red bow is the first thing you'll see at the top of the swag, and the little holly cluster makes a nice decoration right in the center.
We'll use the large version of my free crochet bow pattern and the small leaves with dimensional berries from my crochet holly leaf pattern.
The bow has four crocheted pieces: one loop panel, two pointed tails and one center wrap. The holly has two small leaves and three red berries for this particular arrangement.
Large Red Crochet Bow
Make one bow in red worsted-weight yarn.
Use a 4.0 mm hook and a target gauge of 16 hdc and 12 rows over 4 inches. Beginning chains do not count as stitches.
Bow Loop Panel
Foundation: Ch 73.
Row 1: Hdc in 2nd ch from hook and in each ch across. (72)
Rows 2 through 14: Ch 1, turn. Hdc in each st across. (72 sts in every row)
Fasten off, leaving an 18-inch sewing tail.
The panel should measure approximately 18 inches long and 4 1/2 to 4 3/4 inches wide.
Bring the short ends together with the right sides facing. Use the long tail to whip stitch the two 14-row ends together, matching the row edges.
Fasten securely, weave in the tail and turn the ring right side out.
Lay the ring flat with the seam centered on the back. It should measure approximately 9 inches across before you pinch the middle.
Large Pointed Bow Tails
Make 2 in red.
Foundation: Ch 12.
Row 1: Hdc in 2nd ch from hook and in each ch across. (11)
Rows 2 through 4: Ch 1, turn. Hdc in each st across. (11)
Row 5: Ch 1, turn. Hdc2tog, hdc in next 7 sts, hdc2tog. (9)
Rows 6 through 8: Ch 1, turn. Hdc in each st across. (9)
Row 9: Ch 1, turn. Hdc2tog, hdc in next 5 sts, hdc2tog. (7)
Rows 10 through 12: Ch 1, turn. Hdc in each st across. (7)
Row 13: Ch 1, turn. Hdc2tog, hdc in next 3 sts, hdc2tog. (5)
Rows 14 through 16: Ch 1, turn. Hdc in each st across. (5)
Row 17: Ch 1, turn. Hdc2tog, hdc in next st, hdc2tog. (3)
Row 18: Ch 1, turn. Hdc in each st across. (3)
Row 19: Ch 1, turn. Hdc3tog across the final 3 sts. (1)
Fasten off and weave in the end.
Each completed tail should measure approximately 2 3/4 inches wide at the straight upper edge and 6 1/4 to 6 1/2 inches long.
Make the second tail to match the first.
Bow Center Wrap
Foundation: Ch 7.
Row 1: Hdc in 2nd ch from hook and in each ch across. (6)
Rows 2 through 13: Ch 1, turn. Hdc in each st across. (6)
Fasten off, leaving an 18-inch sewing tail.
The wrap should measure approximately 1 1/2 inches wide and 4 1/4 to 4 1/2 inches long.
Assemble the Large Bow
Lay the loop ring flat with the seam at the back.
Pinch the middle so the top and bottom edges gather toward the center and the two large loops form on either side.
Place the two pointed tails behind the pinched center. Overlap their straight upper edges slightly and angle the pointed ends downward and outward.
Use a separate length of red yarn to sew through the pinched loop panel and both tail tops several times. Secure the sewing yarn on the back.
Wrap the narrow center piece around the pinched middle. Bring the ends together at the back and sew them securely.
Take two or three extra stitches through the back of the loop panel to keep the center wrap from sliding.
Shape the loops with your fingers. They should look full and rounded, without stuffing.
For this mistletoe swag, angle the tails outward so they frame the upper leaves rather than hanging straight down over the ivory berries. If the tails extend too far into the greenery, turn their lower ends slightly behind the outer branches and tack the hidden folds in place.
Crochet the Two Small Holly Leaves
Make 2 in darker green yarn.
These are the small leaves from the separate holly pattern. We're using two rather than three because the example swag has a paired holly accent beneath the bow.
Foundation: Ch 10.
Round 1: Sc in 2nd ch from hook and in next 7 ch. Work 3 sc in the last ch.
Rotate the work and sc in each of the 8 unused loops on the opposite side of the foundation chain. Do not join. (19 sc)
Round 2, first side: Sl st in next st, sc in next st, work (hdc, dc, ch 2, sl st in 2nd ch from hook, dc, hdc) all in next st, sl st in next st.
Repeat that four-stitch sequence once more. You have used the first 8 stitches and formed two side points.
Leaf tip: Sc in next st. In the following st, work (hdc, dc, tr, ch 3, sl st in 2nd ch from hook and in next ch, tr, dc, hdc). Sc in next st.
Round 2, second side: Sl st in next st, sc in next st, work (hdc, dc, ch 2, sl st in 2nd ch from hook, dc, hdc) all in next st, sl st in next st.
Repeat that four-stitch sequence once more. Join with a sl st to the first sl st of Round 2.
You should have four small side points and one longer point at the tip.
Fasten off, leaving a 12-inch sewing tail.
Center vein: Join darker green yarn at the base of the leaf on the right side. Work loose surface slip stitches along the original foundation chain toward the pointed tip.
Fasten off, pull the vein ends to the back and weave them in securely. Keep the original sewing tail.
Repeat for the second leaf.
The expected length of each small holly leaf is approximately 2 1/4 to 2 1/2 inches.
Crochet the Three Red Holly Berries
Make 3 in red yarn.
Work in continuous rounds, using a stitch marker to mark the beginning of each round.
Round 1: Work 6 sc into a magic ring. Pull the ring closed. (6)
Round 2: Work 2 sc in each st around. (12)
Round 3: Sc in each st around. (12)
Round 4: Sc2tog six times. (6)
Secure the starting tail inside the berry and add a small pinch of fiberfill.
Cut the yarn, leaving a 10-inch sewing tail. Thread the tail through the front loops of the remaining six stitches and pull closed.
Repeat for the other two berries.
Each red berry should measure approximately 3/4 to 7/8 inch across.
Assemble the Holly Decoration
Arrange the two holly leaves beneath the center of the bow, with their pointed tips extending outward to the left and right.
Overlap the narrow bases by approximately 1/2 inch and sew them together with green yarn.
Arrange the three red berries in a compact triangle over the joined leaf bases.
Use the berry sewing tails to stitch all three berries securely to the leaves and one another. Fasten the tails on the back.
Position the holly cluster directly below the bow's center wrap. It should sit on the front of the crocheted stems, not disappear behind the bow tails.
Sew the holly leaves and berry cluster to the bow's center area with matching yarn.
Attach the Bow, Holly and Hanging Loop
Turn the mistletoe swag over and position the green hanging loop behind the upper gathering point.
Using its remaining tail and additional green yarn if needed, stitch the bottom of the loop through the felt backing and the gathered crochet stems. Make several passes through all three layers.
Tug gently on the loop to check the attachment before adding the bow.
Turn the arrangement right side up.
Center the red bow over the gathered upper stems. The bow should cover the stem joins and the upper part of the felt backing.
Use a separate strand of matching red yarn to stitch through the back of the bow's center wrap, the gathered crochet stems and the felt backing.
Make several attachment stitches, securing the bow at the center and behind the bases of its two loops.
Fasten off securely and weave in the ends.
Hang the swag temporarily and look at the complete arrangement.
The bow should stay centered, the red holly berries should be visible immediately below it, and the ivory berries should remain visible along the mistletoe branches.
If a bow tail covers one of the upper ivory berry clusters, move the tail outward and add a discreet anchoring stitch behind it.
That's the full-size mistletoe swag. The last thing I'd do is check the back one more time, remove any remaining pins and straighten the lower leaves.
Make a Smaller Crochet Mistletoe Ornament
If you like the mistletoe but don't want a full-size door decoration, you can make a smaller version with just two leaves, three ivory berries and a little crochet bow.
This one is made entirely from yarn. You won't need the artificial evergreen or felt backing.
Materials and Pieces
- Two small mistletoe leaves
- Three ivory crocheted berries
- One short green crochet stem
- One green hanging loop
- One small red crochet bow
- 4.0 mm crochet hook
- Tapestry needle and scissors
Use the small mistletoe leaf instructions and ivory berry instructions given earlier on this page. Make two leaves and three berries.
Make the Short Stem
With green yarn, leave a 10-inch starting tail and ch 12.
Sl st in 2nd ch from hook and in each remaining ch. (11 sl sts)
Fasten off, leaving another 10-inch tail.
Keep the finished cord straight. Its upper end will hold the hanging loop and bow. The two mistletoe leaves and three ivory berries will be attached near the lower end.
The expected cord length is approximately 2 to 2 1/2 inches. Check this measurement before assembling the ornament.
Make the Small Hanging Loop
Ch 12 and join with a sl st to the first ch, taking care not to twist the chain.
Work 1 sl st into each chain around. Join to the first sl st. (12 sl sts)
Fasten off, leaving a 10-inch sewing tail.
Make the Small Crochet Bow
This is the smaller version of my crochet bow pattern. It has a flat loop strip, two short pointed tails and a narrow center wrap.
Small loop strip:
Foundation: Ch 33.
Row 1: Hdc in 2nd ch from hook and in each ch across. (32)
Rows 2 through 5: Ch 1, turn. Hdc in each st across. (32)
Fasten off, leaving a 12-inch sewing tail.
Small pointed tails: Make 2.
Foundation: Ch 7.
Row 1: Hdc in 2nd ch from hook and in each ch across. (6)
Row 2: Ch 1, turn. Hdc in each st across. (6)
Row 3: Ch 1, turn. Hdc2tog, hdc in next 2 sts, hdc2tog. (4)
Row 4: Ch 1, turn. Hdc in each st across. (4)
Row 5: Ch 1, turn. Hdc2tog twice. (2)
Row 6: Ch 1, turn. Hdc in each st across. (2)
Row 7: Ch 1, turn. Hdc2tog. (1)
Fasten off and weave in the end. Repeat for the second tail.
Small center wrap:
Foundation: Ch 4.
Row 1: Hdc in 2nd ch from hook and in each ch across. (3)
Rows 2 through 9: Ch 1, turn. Hdc in each st across. (3)
Fasten off, leaving a 12-inch sewing tail.
Assemble the Small Bow
Lay the loop strip right side down. Bring both short ends toward the center until they meet.
Use the long sewing tail to tack those ends together at the center back.
Turn the folded strip over and pinch the center slightly to form the two loops.
Place the two small pointed tails behind the center, with the points angled down and outward.
Use red yarn to stitch the tails and folded loops together at the middle.
Wrap the narrow center piece around the middle of the bow. Sew the ends together at the back and secure the wrap to the folded loop strip.
The expected finished width is approximately 4 inches.
Assemble the Ornament
Lay the short crocheted stem vertically on your work surface.
Position the narrow bases of the two small mistletoe leaves approximately 1/2 inch above the lower end of the stem.
Angle one leaf down and left and the other down and right, allowing their bases to overlap slightly.
Using their sewing tails, stitch the overlapping leaf bases securely to the stem and to one another.
Arrange the three ivory berries in a small triangle directly above the joined leaf bases. Sew the berries to one another and through the crocheted stem, keeping the berry cluster visible from the front.
Attach the green hanging loop behind the upper end of the stem. Take several stitches through the cord and both sides of the loop base, then fasten securely.
Place the small red crochet bow over the upper join. Sew through the back of the bow's center wrap, the upper stem and the base of the hanging loop.
Hold the ornament upright by its loop. The two leaves should hang downward with the ivory berries centered above them. If either leaf twists, add a small anchoring stitch through its narrow base.
The finished ornament should have two rounded mistletoe leaves, three plain ivory berries and a red bow at the top.
Use it as a hanging Christmas decoration, a gift-wrap accent or a little handmade addition to a holiday garland. For a flat appliqué, leave off the hanging loop and sew the backs of the leaves, stem and berries securely to the project.
I'd keep this smaller version simple. It doesn't need the artificial evergreen because the two mistletoe leaves and berry cluster are the whole design.
Frequently Asked Questions About the Crochet Mistletoe Pattern
Can I make the full mistletoe swag without artificial evergreen?
Yes. All twelve mistletoe leaves, twelve ivory berries, five branching stems, bow and holly motif are crocheted. The three artificial evergreen sprigs are optional accents. Leave them off if you prefer an arrangement with only crocheted greenery. The full-size swag still uses concealed felt backing and reinforced side branches.
Do I need to use cotton yarn?
No. A smooth worsted-weight acrylic or cotton-blend yarn can also work. Try to keep the same yarn thickness across the leaves, berries and stems. If you change the yarn weight, check your finished measurements because the size of the decoration will change.
Can I make this crochet mistletoe pattern as an appliqué?
Yes. The individual leaves and berry clusters can be sewn onto a decorative Christmas stocking, gift bag or wall hanging. For a flat appliqué, skip the artificial greenery and hanging loop, and sew the leaves and berries securely around their bases and edges. I'd also leave off the dimensional bow if the project needs to lie completely flat.
How do I keep the long branches from twisting?
Before attaching the bow, hold the swag upright and let the branches hang naturally. Sew any twisting cords to the felt backing or add a discreet stitch between neighboring stems. Keep the lower ends free enough to drape rather than pulling every branch tightly against the backing.
How should I clean the finished mistletoe swag?
I'd dust it gently rather than put the assembled swag in a washing machine. The artificial evergreen and felt backing make machine washing a poor choice. If needed, spot-clean the crochet carefully, avoid soaking the artificial stems and let the decoration dry completely before hanging it again.
Can I use real evergreen branches instead?
I'd stay with artificial greenery for a reusable Christmas decoration. Real evergreen can dry, shed needles and change shape. Flexible artificial sprigs can be attached behind the crochet and reused without replacing them each season.
Can I change the bow color?
Of course. Burgundy, cranberry or deep forest green could all look pretty with the olive mistletoe leaves and ivory berries. I'd keep the white berries plain and let the bow supply most of the Christmas color.
If you enjoy making separate Christmas motifs, you can find more projects in my free Christmas crochet appliqué patterns collection.
Whether you make the full cascading swag or the little ornament, the mistletoe leaves and ivory berries are the important pieces. The bow, holly and evergreen just give you different ways to finish it.
When you click on links to various merchants on this site and make a purchase, this may result in this site earning a commission. This does not affect the price you pay.

UBGI Gold Standard 2026
Reviewed under the site's
editorial checklist.
Photos, decorating ideas, party setups and reader submissions are shared for inspiration unless a page is specifically presented as a pattern, tutorial, reference guide or step-by-step project. Follow the instructions, measurements, safety guidance and manufacturer directions provided for the particular project or product.
About Jan | Contact | Baby Nursery Ideas (Blog) | Site Map | Privacy Policy | Disclosure Policy | Disclaimer | Affiliate Disclosure | Earnings Disclosure | Facebook | Pinterest
I am a participant in the Amazon Services LLC Associates Program, an affiliate advertising program designed to provide a means for us to earn fees by linking to Amazon. As an Amazon Associate I earn from qualifying purchases.
Copyright © 2006-2026. All Rights Reserved.