Free Crochet Elf Hat Pattern in Baby, Child and Adult Sizes
By Jan Bay
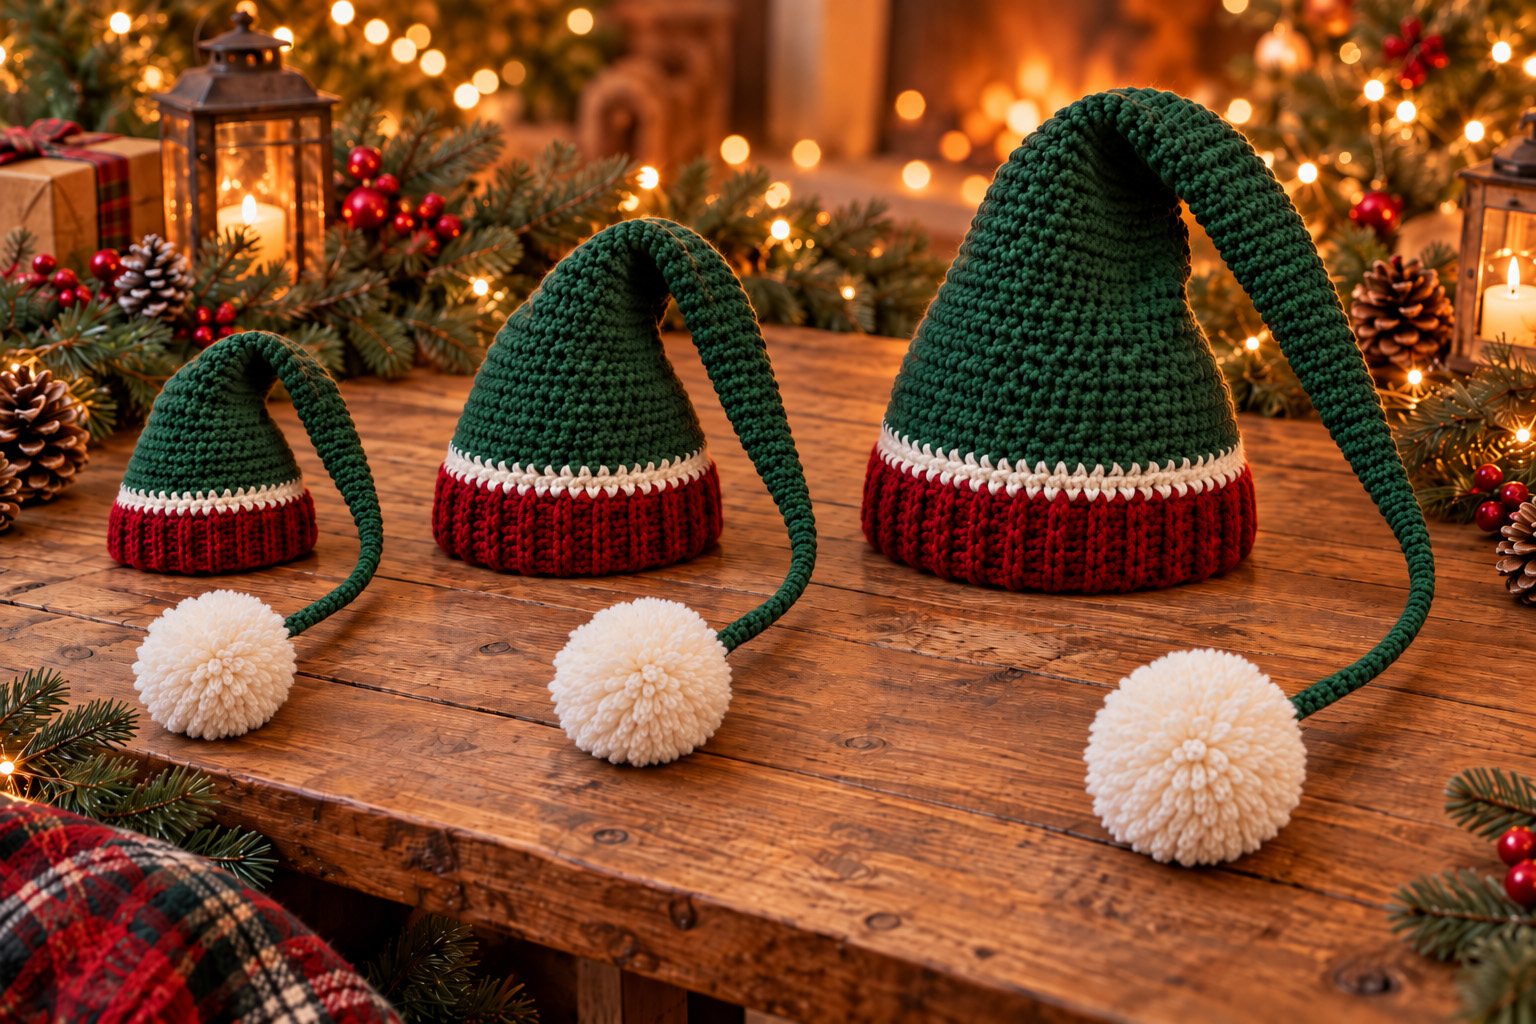
A free crochet elf hat pattern for the whole family sounds like the perfect excuse for a little Christmas mischief, doesn't it? I've designed this set with three sizes, baby, child and adult, so everyone can join in the fun with matching hats. The holly green crowns taper into long, playful tails with big fluffy pom poms, while cranberry red ribbing and a narrow ivory accent add that unmistakable Christmas elf look. They're playful enough for family holiday photographs but comfy enough to enjoy wearing with your favorite pair of pajamas, ugly (or not) Christmas sweaters or while out for a winter stroll.
Explore More Free Christmas Crochet Patterns
Crochet Elf Baby Hat with Long Tail
Christmas Elf Baby Booties Pattern
Free Crochet Elf Doll Lovey Pattern
See Supplies for this project here.
Jump to the Elf Hat Pattern
Before you pick up your crochet hook and get started, let's talk about the shape of these hats. The long green tail is what gives them their personality. The crown gradually narrows into an extra-long, floppy tail that keeps getting thinner and thinner until it ends in a slender little tip with a big, fluffy ivory pom-pom attached. There are no extra pieces to sew along the tail and no stuffing to make it look thick or straight. We want that wonderful floppy look and flipping it around when you wear it is a big part of the fun.
The cranberry brim is crocheted separately in short rows, which gives it real vertical ribbing instead of a flat band with decorative lines. After joining the brim, you'll add one round of ivory and work the entire green crown and tail in one continuous piece.
Free Crochet Elf Hat Pattern: Sizes and Finished Measurements
I've included three sizes so you can make a matching set without trying to stretch a child's hat over an adult head. The hats have the same colors and finishing details, but the larger sizes have wider crowns and considerably longer tails.
- Baby: Approximately 13.7 inches around the green crown, with a 1.7-inch-deep brim and a green crown-and-tail length of approximately 15.1 inches before it curls. Suggested head circumference: 14 to 15 inches.
- Child: Approximately 18.3 inches around the crown, with a 2.3-inch-deep brim and a green length of approximately 19.6 inches. Suggested head circumference: 19 to 20 inches.
- Adult: Approximately 20.6 inches around the crown, with a 2.6-inch-deep brim and a green length of approximately 24 inches. Suggested head circumference: 21 to 22 inches.
These are calculated measurements based on the gauge below, not measurements from finished samples. The length includes the entire green section, from the ivory stripe to the little tip underneath the pom-pom. When the hat is on your head, that long tail folds over and hangs down. There's nothing stiff about it and that's what we want. That's also why it's not stuffed.
Measure around the head just above the eyebrows and ears before choosing your size. If you're making a gift and don't have a measurement, the Craft Yarn Council's head circumference chart is a useful reference. Remember that crochet hats need a comfortable fit, and yarns vary in how much they stretch.
If you're making one for a newborn, I would choose a smaller, newborn-specific hat rather than trying to make this larger baby size work. My crochet elf baby hat is better for your little one's photo shoot.
Yarn and Materials for the Three Elf Hats
I'd choose a soft, smooth medium-weight yarn that holds its stitches nicely without making the long tails stiff. A heavy worsted acrylic or acrylic blend is a practical starting point, especially if you're making several hats that may need washing.
Materials:
- Medium-weight (#4) yarn in holly green for the crowns and tails
- Matching medium-weight yarn in cranberry red for the ribbed brims
- Ivory yarn for the narrow stripes and fluffy pom-poms
- 5.5 mm (I-9) crochet hook, or the size needed to match gauge
- Yarn needle with a large eye
- Stitch marker
- Scissors
- Flexible measuring tape
- Pom-pom maker or sturdy cardboard templates in the appropriate sizes
Estimated yarn allowances:
- Baby: Approximately 150 to 225 yards green, 35 to 65 yards cranberry, and 40 to 75 yards ivory.
- Child: Approximately 225 to 325 yards green, 50 to 85 yards cranberry, and 50 to 100 yards ivory.
- Adult: Approximately 300 to 425 yards green, 70 to 110 yards cranberry, and 75 to 125 yards ivory.
These are preliminary shopping allowances, not measured yarn consumption. Your yarn thickness, tension and the fullness of your pom-poms will affect how much you use. The unusually extra long tails take more green yarn than an ordinary Christmas hat, so I wouldn't start one with a nearly empty skein.
You'll make one red brim, one ivory dividing round, one continuous green crown and tail, and one ivory pom-pom for each hat.
Crochet Gauge, Abbreviations and Important Pattern Notes
Gauge matters here because the same stitches determine both the fit around the head and the length of that wonderful drooping tail. Take a few minutes to make a sample before starting, especially if you're making the adult version.
Required gauge for this pattern:
- 14 single crochet stitches = 4 inches
- 18 single crochet rows or rounds = 4 inches
- 18 rows of back-loop-only single crochet ribbing = approximately 4 inches measured along the length of the ribbed strip
Make a swatch at least 5 inches wide and tall, measure the middle 4 inches, and change your hook size if needed. Check the red ribbing separately. Its row gauge determines the circumference of the brim, so it needs to match as well.
US crochet abbreviations:
- ch: Chain
- sc: Single crochet
- sc2tog: Single crochet two stitches together, making one decrease
- sl st: Slip stitch
- BLO: Back loop only
- st/sts: Stitch/stitches
- rnd: Round
- rep: Repeat
How to make sc2tog: Insert your hook into the next stitch and pull up a loop. Insert it into the following stitch and pull up another loop. Yarn over and pull through all three loops on your hook. You've turned two stitches into one.
Working the ribbed brim: The red band is worked in short, back-and-forth rows. Crochet in the back loop only after the first row. This makes little raised ridges that run vertically when you join the band into a circle.
Working the green crown: After the ivory stripe, work in continuous spiral rounds. Don't join the rounds or turn your work. Move your stitch marker to the first stitch of each new round so you can keep track of the shaping. After completing the final green round, remove the stitch marker before fastening off and closing the tip. No stitch markers should remain in the finished hat.
Reading the decrease instructions: Every decrease round removes exactly four stitches, spaced evenly around the hat. The instructions will show the number of single crochets to make before each sc2tog. Repeat the sequence four times to complete that round.
Any round not specifically listed as a decrease round is worked evenly, with one single crochet in every stitch. That includes the rounds between decreases. Don't skip those plain rounds. They're what make the tail long and gently tapered like we want.
Baby Elf Hat Crochet Instructions
We'll start with the smallest hat. It has the same festive colors as the larger versions, including that extra-long green tail and fluffy ivory pom-pom. The tail is scaled down to suit the smaller hat, but it's still long enough to curl over and hang well below the brim.
Baby size: Approximately 13.7 inches around the crown, with a green crown-and-tail length of approximately 15.1 inches at the stated gauge.
Step 1: Crochet the Cranberry Ribbed Brim
Using cranberry yarn, ch 7.
Row 1: Sc in the second chain from the hook and in each remaining chain. You should have 6 sc. Ch 1 and turn.
Row 2: Sc in the BLO of each of the 6 stitches. Ch 1 and turn.
Rows 3 through 60: Repeat Row 2. Maintain 6 stitches in every row. After Row 60, fasten off, leaving a long tail for sewing.
Lay the ribbed strip flat. At the stated ribbing gauge, it should measure approximately 13.3 inches along its long edge, before stretching. Bring the foundation-chain edge and the last-row edge together, taking care not to twist the strip. Sew the two short ends together, matching all 6 stitches. You now have a circular cranberry brim with vertical ribs.
Keep the seam at the back and the ribbing running up and down. Zig zag or slanted doesn't work.
Step 2: Add the Narrow Ivory Stripe
With the upper edge of the cranberry brim facing you, join ivory yarn at the back seam.
Working around the upper edge of the ribbing, make 1 sc into each of the next 4 row ends, then skip the next row end. Repeat this sequence 12 times altogether. You will have worked across all 60 ribbing rows and made 48 sc.
Sl st into the first ivory sc to close the round. Fasten off ivory.
Ivory stripe stitch count: 48 sc.
This single round is our little ivory accent. Don't add several more rounds or it will become a wide white band instead of the narrow dividing stripe in the example image.
Step 3: Crochet the Holly-Green Crown and Long Tail
Join holly-green yarn into the first ivory stitch at the back. Work in continuous spiral rounds from here onward. Place a marker in the first stitch of each round.
Rounds 1 through 4: Sc in each stitch around. (48 sc)
Now begin shaping the crown. Work every unlisted round evenly in sc, using the stitch count from the preceding round. Work the following decrease rounds at the exact round numbers shown:
- Round 5: (Sc in next 10 sts, sc2tog) 4 times. (44 sts)
- Round 9: (Sc in next 9 sts, sc2tog) 4 times. (40 sts)
- Round 13: (Sc in next 8 sts, sc2tog) 4 times. (36 sts)
- Round 17: (Sc in next 7 sts, sc2tog) 4 times. (32 sts)
- Round 21: (Sc in next 6 sts, sc2tog) 4 times. (28 sts)
- Round 26: (Sc in next 5 sts, sc2tog) 4 times. (24 sts)
- Round 31: (Sc in next 4 sts, sc2tog) 4 times. (20 sts)
- Round 37: (Sc in next 3 sts, sc2tog) 4 times. (16 sts)
- Round 44: (Sc in next 2 sts, sc2tog) 4 times. (12 sts)
- Round 52: (Sc in next 1 st, sc2tog) 4 times. (8 sts)
- Round 61: Sc2tog 4 times. (4 sts)
Rounds 62 through 68: Sc in each of the 4 remaining stitches. (4 sts in every round)
Fasten off, leaving a 12-inch yarn tail. Thread it through the front loops of the final 4 stitches, pull gently to close the opening, and secure the yarn. Weave the remaining end down inside the tail.
There should be no flare at the end. The final few rounds form a narrow little cord that will disappear beneath the ivory pom-pom.
Remember, leave the green tail empty. Its own weight, together with the finished pom-pom, is what keeps the natural drape.
Baby hat stitch-count check: 48 stitches at the beginning, 11 decrease rounds removing 4 stitches each, and 4 stitches remaining at the tip. Total green rounds: 68.
Step 4: Baby Pom-Pom
Make one fluffy ivory pom-pom approximately 2 1/2 inches across. Leave the center tying strands long enough for a secure attachment. Follow the pom-pom finishing instructions below after you've completed the hats.
Child Elf Hat Crochet Instructions
The child-size hat has a roomier crown and a longer green tail. You'll follow the same construction as the baby version, but don't simply add stitches to the brim and keep the smaller tail. The extra rounds are what give this hat its nicely exaggerated shape.
Child size: Approximately 18.3 inches around the crown, with a green crown-and-tail length of approximately 19.6 inches at the stated gauge.
Step 1: Crochet the Cranberry Ribbed Brim
Using cranberry yarn, ch 9.
Row 1: Sc in the second chain from the hook and in each remaining chain. (8 sc) Ch 1 and turn.
Row 2: Sc in BLO across all 8 stitches. Ch 1 and turn.
Rows 3 through 80: Repeat Row 2, maintaining 8 sc per row.
Fasten off with a long sewing tail. The ribbed strip should measure approximately 17.8 inches along its long edge at the stated gauge.
Bring the foundation-chain edge and final-row edge together without twisting. Sew the two short ends together, matching all 8 stitches. Keep the seam at the back.
Step 2: Add the Ivory Stripe
Join ivory yarn at the back seam along the upper edge of the red brim.
Work 1 sc into each of the next 4 row ends, then skip the next row end. Repeat this sequence 16 times, working across all 80 ribbing rows.
Sl st into the first sc and fasten off ivory.
Ivory stripe stitch count: 64 sc.
Step 3: Crochet the Green Crown and Tail
Join holly-green yarn at the first ivory stitch. Work in continuous rounds, moving your stitch marker at the beginning of each new round.
Rounds 1 through 4: Sc in each stitch around. (64 sc)
Work every round not listed below evenly in sc. Use the stitch count established by the most recent decrease round.
- Round 5: (Sc in next 14 sts, sc2tog) 4 times. (60 sts)
- Round 9: (Sc in next 13 sts, sc2tog) 4 times. (56 sts)
- Round 13: (Sc in next 12 sts, sc2tog) 4 times. (52 sts)
- Round 17: (Sc in next 11 sts, sc2tog) 4 times. (48 sts)
- Round 21: (Sc in next 10 sts, sc2tog) 4 times. (44 sts)
- Round 25: (Sc in next 9 sts, sc2tog) 4 times. (40 sts)
- Round 29: (Sc in next 8 sts, sc2tog) 4 times. (36 sts)
- Round 34: (Sc in next 7 sts, sc2tog) 4 times. (32 sts)
- Round 39: (Sc in next 6 sts, sc2tog) 4 times. (28 sts)
- Round 44: (Sc in next 5 sts, sc2tog) 4 times. (24 sts)
- Round 49: (Sc in next 4 sts, sc2tog) 4 times. (20 sts)
- Round 55: (Sc in next 3 sts, sc2tog) 4 times. (16 sts)
- Round 62: (Sc in next 2 sts, sc2tog) 4 times. (12 sts)
- Round 70: (Sc in next 1 st, sc2tog) 4 times. (8 sts)
- Round 78: Sc2tog 4 times. (4 sts)
Rounds 79 through 88: Sc in each of the 4 stitches around. (4 sts in every round)
Fasten off, leaving a 12-inch tail. Thread the end through the front loops of the last 4 stitches, pull the opening closed and weave the end down inside the tail.
Don't stuff the tail. Let it flop over on its own. If you lay the finished hat on a table, the tail should curl naturally rather than holding a stiff pointed shape.
Child hat stitch-count check: 64 stitches at the beginning, 15 decrease rounds removing 4 stitches each, and 4 stitches remaining. Total green rounds: 88.
Step 4: Child Pom-Pom
Make one full ivory pom-pom approximately 3 inches across. The child-size hat deserves a generous pom-pom too, not a tiny little one lost at the end of that long tail. Leave the center strands long for attachment during finishing.
Adult Elf Hat Crochet Instructions
Now for the grown-up elf hat! This one has a deeper cranberry brim, a roomier green crown and an extra-long tail that should make quite an entrance at a Christmas party. It's meant to look just as playful as the smaller hats, so don't shorten the tail simply because you're making an adult size.
Adult size: Approximately 20.6 inches around the crown, with a green crown-and-tail length of approximately 24 inches at the stated gauge. The ribbed brim can stretch to accommodate a somewhat larger head, but check the fit before making the full crown.
Step 1: Crochet the Cranberry Ribbed Brim
Using cranberry yarn, ch 10.
Row 1: Sc in the second chain from the hook and in each remaining chain. (9 sc) Ch 1 and turn.
Row 2: Sc in BLO across all 9 stitches. Ch 1 and turn.
Rows 3 through 90: Repeat Row 2, maintaining 9 stitches per row.
Fasten off, leaving a long sewing tail. At the stated gauge, the red strip should measure approximately 20 inches along its long edge.
Bring the foundation-chain edge and final-row edge together without twisting. Sew the two short ends together, matching all 9 stitches. This creates the adult brim with vertical ribbing.
Try the brim on before continuing. It should stretch comfortably without slipping down over the eyes or leaving a tight mark around the forehead. If the fit is wrong, correct the gauge before working the crown rather than hoping the finished hat will stretch enough.
Step 2: Crochet the Narrow Ivory Band
Join ivory yarn at the back seam along the upper edge of the brim.
Work 1 sc into each of the next 4 row ends, then skip the next row end. Repeat this sequence 18 times, working across all 90 ribbing rows.
Sl st into the first ivory sc and fasten off.
Ivory stripe stitch count: 72 sc.
Keep this stripe just one round deep. We want a slim ivory line between the two Christmas colors, not a thick white cuff.
Step 3: Crochet the Holly-Green Crown and Extra-Long Tail
Join holly-green yarn in the first ivory stitch at the back seam. Work in continuous spiral rounds, moving your stitch marker to the first stitch of every new round.
Rounds 1 through 4: Sc in each stitch around. (72 sc)
Now follow the decrease schedule below. Every round not listed is worked evenly in sc, using the stitch count from the previous round. Keep those plain rounds in place because they provide the length needed for the adult tail.
- Round 5: (Sc in next 16 sts, sc2tog) 4 times. (68 sts)
- Round 9: (Sc in next 15 sts, sc2tog) 4 times. (64 sts)
- Round 13: (Sc in next 14 sts, sc2tog) 4 times. (60 sts)
- Round 17: (Sc in next 13 sts, sc2tog) 4 times. (56 sts)
- Round 21: (Sc in next 12 sts, sc2tog) 4 times. (52 sts)
- Round 25: (Sc in next 11 sts, sc2tog) 4 times. (48 sts)
- Round 30: (Sc in next 10 sts, sc2tog) 4 times. (44 sts)
- Round 35: (Sc in next 9 sts, sc2tog) 4 times. (40 sts)
- Round 40: (Sc in next 8 sts, sc2tog) 4 times. (36 sts)
- Round 45: (Sc in next 7 sts, sc2tog) 4 times. (32 sts)
- Round 51: (Sc in next 6 sts, sc2tog) 4 times. (28 sts)
- Round 57: (Sc in next 5 sts, sc2tog) 4 times. (24 sts)
- Round 63: (Sc in next 4 sts, sc2tog) 4 times. (20 sts)
- Round 70: (Sc in next 3 sts, sc2tog) 4 times. (16 sts)
- Round 78: (Sc in next 2 sts, sc2tog) 4 times. (12 sts)
- Round 87: (Sc in next 1 st, sc2tog) 4 times. (8 sts)
- Round 99: Sc2tog 4 times. (4 sts)
Rounds 100 through 108: Sc in each of the 4 stitches around. (4 sts in every round)
Fasten off, leaving a 12-inch tail. Thread the yarn through the front loops of the final 4 stitches and pull the opening closed. Secure the end and weave it down inside the tail.
Take a look at that last little section before adding the pom-pom. It should stay very narrow right to the end, without a widened tip or a bump where the yarn ball will attach. That smooth finish is an important part of this particular elf hat design.
Leave the tail hollow and flexible. Once the pom-pom is attached, the long green section should fold over and hang down rather than standing upright like a pointed party hat.
Adult hat stitch-count check: 72 stitches at the beginning, 17 decrease rounds removing 4 stitches each, and 4 stitches remaining at the tip. Total green rounds: 108.
Step 4: Adult Pom-Pom
Make one generous ivory pom-pom approximately 3 1/2 inches across. Keep the center tying strands long for attachment. This is the biggest pom-pom in the set, so trim it into a full, rounded shape without making it too heavy for the narrow tail.
Making the Ivory Pom-Poms and Finishing the Elf Hats
Those big fluffy pom-poms are the finishing touch, and I'd give them just as much attention as the hats themselves. A neat, rounded pom-pom looks wonderful at the end of a long green tail. A loose, uneven one? Not quite the same thing!
How to Make the Pom-Poms
Use ivory yarn and a pom-pom maker or sturdy cardboard templates in the following sizes:
- Baby hat: Approximately 2 1/2 inches across
- Child hat: Approximately 3 inches across
- Adult hat: Approximately 3 1/2 inches across
Step 1: Using a pom-pom maker, wrap ivory yarn around the arms until they're full. If you're using cardboard instead, cut two matching cardboard rings with an outside diameter equal to your desired pom-pom size and a center opening approximately 1 inch across. Cut a slit from the outside edge to the center opening on each ring. Hold the rings together and wrap ivory yarn around them until the center opening becomes quite small.
Step 2: With a pom-pom maker, cut the loops and secure the middle according to the maker's instructions. For cardboard rings, carefully cut the yarn around the outside edge between the two pieces of cardboard. Before removing the rings, slide a long, doubled strand of ivory yarn between them, wrap it around the center of the yarn bundle and tie it very tightly. Remove the cardboard and secure the center with another firm knot. Leave the long tying strands approximately 12 to 18 inches long.
Step 3: Fluff the pom-pom with your fingers and trim around the outside until it's nicely rounded. Work slowly and keep those long center ties separate from the strands you're trimming. They're what you'll use to attach the pom-pom to the hat.
Step 4: Thread one long pom-pom tying strand through a yarn needle. Pass it through the closed green tip, then weave it under stitches along one side of the narrow tail for approximately 1 inch. Bring the needle back toward the tip through stitches on the opposite side. Repeat with the second tying strand, following a different path through the same narrow section. This spreads the attachment across several rounds instead of relying on the final four stitches alone.
Step 5: Pull the pom-pom snugly against the end of the tail and tie the center strands securely. Weave the remaining ends back through the narrow green section in different directions. Trim only after everything is firmly attached. The end of the tail should stay thin and smooth, with no extra crocheted bump underneath the pom-pom.
Final finishing check: Turn each hat inside out and weave in any remaining yarn ends from the cranberry brim seam, ivory stripe and green yarn join. Work the ends securely through several stitches of the matching color, then trim them. Check that the brim seam is firmly joined from top to bottom and that no loose yarn ends remain. Turn the hat right side out, straighten the ribbing and let the long green tail fall naturally. There's no need to stuff or stiffen it. Give the pom-pom attachment one final check before wearing the hat.
Give the pom-pom a gentle pull to check the attachment. It shouldn't wobble loosely or expose the tying knot. Check for loose strands as well, particularly on the baby hat.
Getting That Long, Floppy Elf Hat Shape
Here's where a little patience pays off. The tails aren't supposed to be stiff, and they shouldn't end in a chunky little crocheted knob. The whole idea is to have the green crown gradually narrow until it becomes a slim, flexible tail with the ivory pom-pom sitting directly at the end.
If your tail doesn't look quite right, check these things before making another one:
- Tail too short? Check that you worked every plain round between the listed decrease rounds. Missing those rounds can take several inches off the finished length.
- Tail getting wider near the end? Check your stitch counts. There should be no increases anywhere in the green section, and each decrease round should remove exactly four stitches.
- Tail too stiff? Compare your yarn and gauge with the materials listed above. A firm yarn or unusually tight tension may prevent the finished tail from folding naturally.
- Brim too loose or too snug? Check the gauge of the red ribbing. Its row count determines the circumference, and a different ribbing gauge can change the fit considerably.
- Pom-pom pulling the tail out of shape? Trim the pom-pom a little more evenly and check its weight. It should help the tail hang naturally without putting too much strain on the last few stitches.
I wouldn't add bells, dangling beads or extra decorations to these hats. Between the long green tails, cranberry ribbing and oversized ivory pom-poms, they already have plenty of Christmas personality.
Wearing Your Matching Christmas Elf Hats
Now imagine everyone wearing their matching hats for Christmas morning photographs! The baby hat has the same playful styling as the child and adult versions, so the whole set looks like it belongs together without being exactly the same size.
For a Christmas baby outfit, you might like the Jingle Bells Christmas Crochet Baby Booties too. And if you're making a little handmade Christmas gift to go along with the hat, my crochet elf lovey pattern gives you another project to explore.
The baby-size hat is intended for brief, closely supervised Christmas photographs while baby is awake. Keep the long tail and pom-pom in view and away from baby's neck and face. Remove the hat after photographs and don't use it during sleep, play, or car-seat and stroller rides. Check the pom-pom attachment and yarn strands before each use.
You can find more seasonal projects in my free Christmas crochet patterns collection if you're planning several handmade gifts this year.
A Few Final Notes Before You Start
If you're making all three sizes, I'd start with the smallest one to get familiar with the ribbing and decrease schedule. After that, the construction will feel familiar even though the larger tails take quite a few more rounds.
And please don't rush those last narrow rounds just because you're getting close to the pom-pom. That long, smooth taper is what gives these hats their distinctive shape.
Pattern development note: The stitch counts and decrease schedules have been reviewed mathematically for internal consistency. Finished measurements and yarn quantities are calculated estimates, and the pattern has not been physically test-crocheted. Actual fit, tail drape and pom-pom attachment require verification with completed samples.
When you click on links to various merchants on this site and make a purchase, this may result in this site earning a commission. This does not affect the price you pay.

UBGI Gold Standard 2026
Reviewed under the site's
editorial checklist.
Photos, decorating ideas, party setups and reader submissions are shared for inspiration unless a page is specifically presented as a pattern, tutorial, reference guide or step-by-step project. Follow the instructions, measurements, safety guidance and manufacturer directions provided for the particular project or product.
About Jan | Contact | Baby Nursery Ideas (Blog) | Site Map | Privacy Policy | Disclosure Policy | Disclaimer | Affiliate Disclosure | Earnings Disclosure | Facebook | Pinterest
I am a participant in the Amazon Services LLC Associates Program, an affiliate advertising program designed to provide a means for us to earn fees by linking to Amazon. As an Amazon Associate I earn from qualifying purchases.
Copyright © 2006-2026. All Rights Reserved.