Free Crochet Dove Ornament Pattern with Metallic Gold Christmas Bow
By Jan Bay
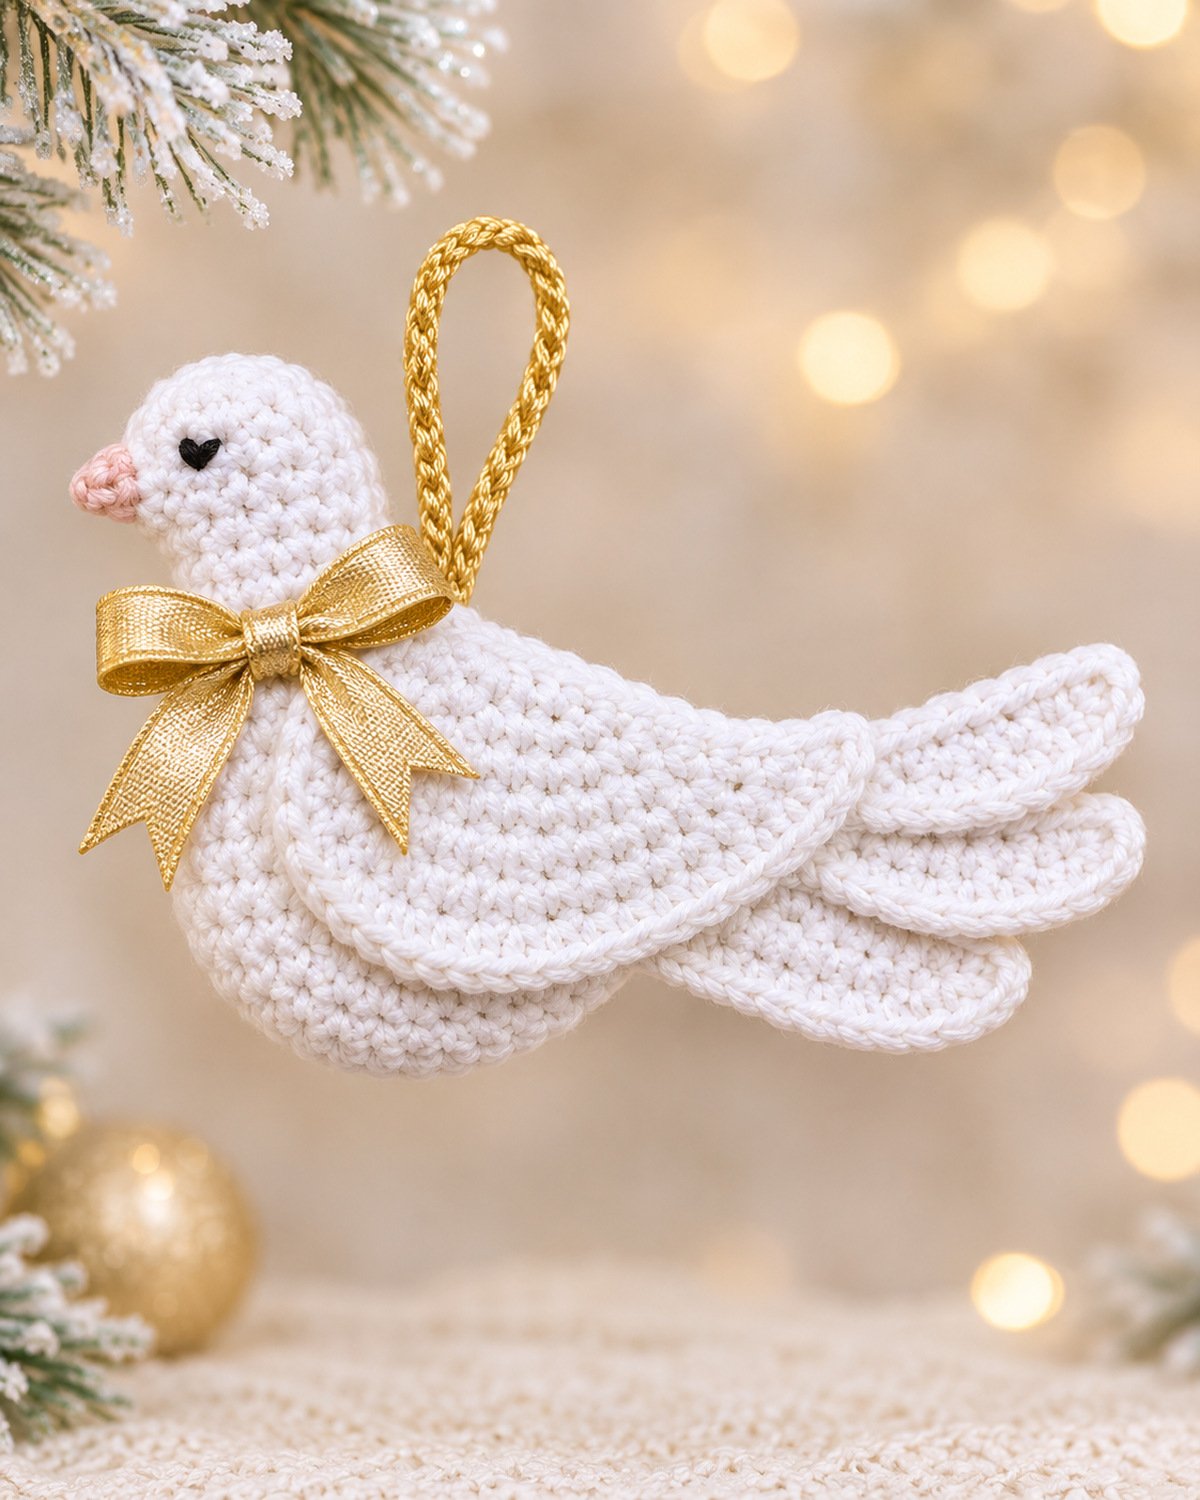
This free crochet dove ornament pattern features a graceful white Christmas bird with a long, sweeping wing, three overlapping tail feathers and a little touch of gold provided by the metallic gold bow. This little dove of peace has an elegant silhouette that would look pretty hanging on baby's first Christmas tree. The short, rounded beak and tiny embroidered eyes keep the face simple, while a ¼-inch metallic gold satin bow and matching crocheted gold hanging loop give it a festive touch for the holidays. My favorite part is the layered tail. It gives this little dove a beautiful shape. It adds detail without making the design overly complicated for a crafter to manage.
Explore More Free Crochet Christmas Patterns
Free Crochet Christmas Ornament Patterns
See Supplies for This Project Here.
Jump to a Section
- Crochet Dove Ornament Pattern Details
- Materials and Supplies
- Crochet Abbreviations and Stitch Notes
- Crochet the Dove Body and Head
- Make the Beak and Embroider the Eyes
- Crochet the Long Curved Wings
- Crochet the Three Layered Tail Feathers
- Assemble the Crochet Dove
- Add the Metallic Gold Satin Bow
- Crochet the Gold Hanging Loop
- Finishing and Shaping
- Crochet Dove Ornament FAQs
Free Crochet Dove Ornament Pattern Details
This little white dove is made from a stuffed body, a separate head and neck, two long wings and three individual tail feathers. The wing and feather pieces are crocheted flat, then arranged around the body to give the ornament its graceful shape.
It's the long tail that makes this design a little different. Instead of crocheting one solid tail, you'll make three separate feathers. The upper feather is the longest, the middle one is slightly shorter, and the lower feather is the shortest. Their bases disappear beneath the wings, leaving the pretty overlapping ends showing.
I prefer the dove without feet. The white body and flowing feathers already give it a lovely silhouette, and adding little crocheted feet would change the look I wanted.
Pattern at a glance:
- Skill level: Intermediate beginner with experience working in rounds and making simple increases and decreases.
- Crochet terminology: US terms.
- Construction: Continuous rounds for the body, head and beak; turned rows for the wings and tail feathers.
- Finished size: Approximately 9 to 10 inches long, depending on gauge and feather placement.
- Wings: Two matching shaped panels.
- Tail: Three individually crocheted feathers.
- Finishing: Embroidered eyes, metallic gold ribbon bow and crocheted gold hanging loop.
The example image shows the intended finished design rather than a photographed, completed crochet sample. The pattern has been checked for stitch-count consistency, but it has not been physically crocheted from these instructions. Measurements are calculated estimates based on the stated gauge, and your finished size and shaping may vary with your yarn, tension, stuffing and assembly.
Make all the white crochet pieces before sewing everything together. You'll have an easier time arranging the three feathers and checking how the long wings fall across the sides of the body.
Materials for the White Crochet Dove Ornament
I'd keep the materials simple. White cotton gives the dove clear stitch definition, and the metallic gold accents add enough Christmas sparkle without covering up the crocheted feathers.
- Approximately 120 to 150 yards of medium-weight white cotton yarn, category 4.
- A small amount of pale peach or blush yarn for the beak.
- A small amount of black embroidery floss or thin black cotton yarn for the eyes.
- A small amount of metallic gold crochet yarn or thread for the hanging loop.
- Approximately 10 to 12 inches of 1/4-inch-wide metallic gold satin ribbon for the bow.
- A small amount of matching gold sewing thread and a suitable sewing needle for permanently attaching the satin bow.
- 3.5 mm crochet hook for the white body, wings and feathers, adjusted if necessary to obtain gauge.
- Approximately 2.5 to 2.75 mm crochet hook for the metallic gold hanging loop, depending on the metallic yarn.
- Polyester fiberfill for the body and head.
- Yarn needle with a blunt tip.
- Embroidery needle.
- Stitch markers.
- Scissors.
- Measuring tape.
Yarn choice: A smooth cotton yarn is my first choice for the wings and tail. You want to see those nice, even rows of crochet stitches, especially along the feather edges. A fluffy or fuzzy yarn would hide some of that detail.
Stuffing: The body and head are lightly stuffed. The wings and tail feathers stay flat. Don't stuff the feather pieces or they'll lose the neat overlapping shape shown in the finished ornament.
Gold ribbon: The bow is made from satin ribbon, not crocheted yarn. The ribbon is 1/4 inch wide, but the finished bow is much larger once its loops and tails are arranged.
Decorative use: This is a Christmas ornament, not a baby toy. It contains ribbon and a hanging loop and isn't intended for a crib or an infant's sleep space.
Crochet Abbreviations, Gauge and Stitch Notes
The pattern uses US crochet terms. There's nothing terribly complicated here, but the stitch counts matter because the wings and tail feathers have to keep their shape.
- ch: Chain.
- sc: Single crochet.
- sl st: Slip stitch.
- inc: Work 2 single crochet stitches into the same stitch.
- sc2tog: Single crochet decrease, working 2 stitches together into 1 stitch.
- st / sts: Stitch / stitches.
- rnd: Round.
- RS: Right side.
- BLO: Back loop only.
- MR: Magic ring.
These abbreviations follow standard US crochet terminology. If you'd like a reference for unfamiliar stitches, the Craft Yarn Council crochet abbreviation list includes the standard terms used in published crochet patterns.
Gauge
Target gauge: 18 single crochet stitches and 20 rows measure approximately 4 inches by 4 inches using the main white yarn.
Make a small single crochet gauge square before beginning. Work at least 22 stitches across and 24 rows, then measure the middle 18 stitches and 20 rows rather than the outer edges.
If your stitches are too large, try a smaller hook. If they're too small, try a larger hook. Keep the fabric firm enough that the fiberfill won't show through the finished body.
Working in Rounds
The body, head and beak are made in continuous spiral rounds. Don't join the rounds with a slip stitch unless the instructions specifically say to do so. Place a marker in the first stitch of each round and move it up as you work.
The number in parentheses at the end of each round or row is the stitch count after completing that round or row. Move the round marker into the first stitch of each new round. Remove the marker before closing the final six-stitch opening of the body or head. Remove the temporary face-position marker after embroidering the eyes, before assembling the dove.
Working the Flat Pieces
The wings and tail feathers are worked back and forth in rows. Chain 1 and turn at the end of each row unless you're about to work the edging. The turning chain never counts as a stitch.
Each flat piece also gets a separate border. Work that border after finishing the final shaping row, before fastening off. It gives the feathers and wings the raised outline visible in the example image.
Keep this part simple. Count the stitches at the end of each shaping row. Fixing a missed increase or decrease is much easier before you've added the border.
Crochet the Dove Body and Head
We'll begin with the plump white body. It's worked from the rounded breast toward the narrower rear, where the three tail feathers will eventually be attached.
Part A: Crochet the Dove Body
Use: White yarn and 3.5 mm hook. Work in continuous rounds.
Round 1: Make a magic ring and work 6 sc into the ring. Pull the ring closed. (6 sts)
Round 2: Work 2 sc in every stitch around. (12 sts)
Round 3: Repeat [1 sc, inc] 6 times. (18 sts)
Round 4: Repeat [2 sc, inc] 6 times. (24 sts)
Round 5: Repeat [3 sc, inc] 6 times. (30 sts)
Round 6: Repeat [4 sc, inc] 6 times. (36 sts)
Round 7: Repeat [5 sc, inc] 6 times. (42 sts)
Rounds 8–15: Work 1 sc in every stitch around for 8 rounds. (42 sts in each round)
You've made the rounded front section of the body. It will look like a short, wide tube with a closed end. The next rounds gradually narrow the rear rather than closing it all at once.
Round 16: Repeat [5 sc, sc2tog] 6 times. (36 sts)
Rounds 17–19: Work 1 sc in every stitch around for 3 rounds. (36 sts in each round)
Round 20: Repeat [4 sc, sc2tog] 6 times. (30 sts)
Rounds 21–23: Work 1 sc in every stitch around for 3 rounds. (30 sts in each round)
Begin adding fiberfill. Fill the front of the body evenly, keeping it rounded rather than making it hard or overstuffed.
Round 24: Repeat [3 sc, sc2tog] 6 times. (24 sts)
Rounds 25–27: Work 1 sc in every stitch around for 3 rounds. (24 sts in each round)
Round 28: Repeat [2 sc, sc2tog] 6 times. (18 sts)
Rounds 29–30: Work 1 sc in every stitch around for 2 rounds. (18 sts in each round)
Add a little more fiberfill if necessary. The narrowing rear section must remain soft enough to accept the tail feather attachments without distorting.
Round 31: Repeat [1 sc, sc2tog] 6 times. (12 sts)
Round 32: Work sc2tog 6 times. (6 sts)
Fasten off, leaving a 10-inch yarn tail. Thread the tail onto a yarn needle, pass it through the front loops of the remaining 6 stitches, and pull the opening closed. Secure the yarn and weave the end inside the body.
Body checkpoint: The widest section contains 42 stitches. The body has 32 completed rounds and narrows gradually toward its closed rear. At the stated gauge, its maximum calculated circumference is approximately 9 1/3 inches, corresponding to a rounded diameter near 3 inches. Stuffing and shaping affect the actual measurements.
Part B: Crochet the Upright Head and Neck
Make the head and neck as one piece. There's no separate round head to sew onto a little tube. The neck narrows gently before widening into the head, which gives the dove a more natural shape.
Use: White yarn and 3.5 mm hook. Work from the bottom of the neck upward, in continuous rounds.
Foundation: Chain 24. Join with a slip stitch into the first chain to form a ring, being careful not to twist the chain. Leave the bottom of this ring open for attachment to the dove's body.
Round 1: Chain 1, which does not count as a stitch. Work 1 sc into the same foundation chain as the join and 1 sc into each of the remaining 23 foundation chains. Do not join the round. Mark the first sc and continue working in a spiral. (24 sts)
Rounds 2–4: Work 1 sc in every stitch around for 3 rounds. (24 sts in each round)
Rounds 5–7: Work 1 sc in every stitch around for 3 rounds. (24 sts in each round)
Round 8: Repeat [2 sc, sc2tog] 6 times. (18 sts)
Rounds 9–10: Work 1 sc in every stitch around for 2 rounds. (18 sts in each round)
The slight narrowing at the top of the neck is intentional. Don't pull it completely tight. The next two rounds widen the head above it.
Round 11: Repeat [2 sc, inc] 6 times. (24 sts)
Round 12: Repeat [3 sc, inc] 6 times. (30 sts)
Rounds 13–15: Work 1 sc in every stitch around for 3 rounds. (30 sts in each round)
Decide which side of the head will face forward toward the beak. Place a temporary marker on that front centerline. This will make the eye and beak positions easier to find later.
Begin lightly stuffing the rounded head through the upper opening. Keep the 24-stitch foundation ring at the bottom of the neck open. After closing the top of the head in round 19, add the remaining fiberfill through that lower opening. Fill the neck gently so it stays upright without becoming stiff or overstuffed. The lower opening will be closed when the neck is sewn to the body.
Round 16: Repeat [3 sc, sc2tog] 6 times. (24 sts)
Round 17: Repeat [2 sc, sc2tog] 6 times. (18 sts)
Round 18: Repeat [1 sc, sc2tog] 6 times. (12 sts)
Round 19: Work sc2tog 6 times. (6 sts)
Fasten off, leaving a 10-inch yarn tail. Close the remaining opening through the front loops of the 6 stitches. Weave the yarn end inside.
Head checkpoint: The head and neck contain 19 completed rounds. The widest part of the head has 30 stitches, compared with 18 stitches at the narrower part of the neck. The expected height is approximately 3 3/4 inches before the neck is attached and shaped.
Set the head and body aside separately. They'll be joined after the remaining pieces are crocheted.
Make the Short Crochet Beak and Embroider the Dove's Eyes
The beak is small and rounded, not a long pointed triangle. I prefer this softer shape because it keeps the dove's face sweet and simple, and it doesn't require any unusual shaping.
Part A: Short Rounded Beak
Use: Pale peach yarn and the 3.5 mm hook, or a slightly smaller hook if the fabric has visible gaps.
Round 1: Make a magic ring and work 4 sc into the ring. (4 sts)
Round 2: Work 1 sc in each stitch around. (4 sts)
Round 3: Repeat [1 sc, inc] 2 times. (6 sts)
Fasten off, leaving a 10-inch yarn tail for sewing. Don't close the six-stitch base opening. The beak is so small that it doesn't require separate stuffing.
Position the open base against the front center of the head, approximately across rounds 13 and 14. The closed four-stitch tip points forward.
Using the peach yarn tail, sew the six-stitch base evenly to the head with six anchoring stitches. Secure the yarn inside the head.
Keep the beak nearly horizontal. It may angle very slightly downward, but it shouldn't hang like a long pointed nose.
Part B: Embroider the Eyes
Use black embroidery floss or a thin black cotton strand. There are no plastic eyes, beads or buttons on this ornament.
- Locate round 14 on the first side of the head.
- Count approximately 4 stitches backward around the head from the front centerline where the beak is attached.
- Bring the needle through the fabric and make two or three very short overlapping stitches to form a tiny rounded black eye, approximately 1/8 inch across.
- Secure the thread inside the head without pulling the fabric inward.
- Repeat on the opposite side, using round 14 and the same distance from the beak centerline.
The two eyes belong at the same height. They don't need an elaborate embroidered outline. A tiny dark eye is enough against the white yarn.
Face checkpoint: You now have a rounded white head, one short peach beak and two matching embroidered eyes. Check that the beak points forward and that both eyes sit level before assembling the dove.
Crochet the Dove's Long, Sweeping White Wings
These wings give the dove most of its graceful shape. They're wide and softly rounded near the shoulders, then gradually narrow toward the tail.
You'll make two matching wings. One sits on each side of the dove, although only one is visible when the ornament is photographed from the side.
Make 2 identical wings.
Use: White yarn and 3.5 mm hook. Work in turned rows.
Wing Shaping Instructions
Foundation: Chain 11.
Row 1: Sc in the second chain from the hook and in every remaining chain. Ch 1, turn. (10 sts)
Row 2: Inc in the first stitch, sc in the next 8 stitches, inc in the last stitch. Ch 1, turn. (12 sts)
Row 3: Inc in the first stitch, sc in the next 10 stitches, inc in the last stitch. Ch 1, turn. (14 sts)
Rows 4–7: Sc in every stitch across each row. Ch 1 and turn after each row. (14 sts in each row)
Row 8: Sc2tog, sc in the next 10 stitches, sc2tog. Ch 1, turn. (12 sts)
Rows 9–11: Sc in every stitch across each row. Ch 1 and turn after each row. (12 sts in each row)
Row 12: Sc2tog, sc in the next 8 stitches, sc2tog. Ch 1, turn. (10 sts)
Rows 13–16: Sc in every stitch across each row. Ch 1 and turn after each row. (10 sts in each row)
Row 17: Sc2tog, sc in the next 6 stitches, sc2tog. Ch 1, turn. (8 sts)
Rows 18–21: Sc in every stitch across each row. Ch 1 and turn after each row. (8 sts in each row)
Row 22: Sc2tog, sc in the next 4 stitches, sc2tog. Ch 1, turn. (6 sts)
Rows 23–25: Sc in every stitch across each row. Ch 1 and turn after each row. (6 sts in each row)
Row 26: Sc2tog, sc in the next 2 stitches, sc2tog. Ch 1, turn. (4 sts)
Rows 27–28: Sc in every stitch across each row. Ch 1 and turn after each row. (4 sts in each row)
Row 29: Work sc2tog twice. Ch 1, turn. (2 sts)
Row 30: Sc in each of the 2 stitches. (2 sts)
Don't fasten off yet. Work the edging directly around the wing.
Wing Edging
The border gives the wing a neat, slightly raised outline. Work it loosely so the long edges don't pull inward.
- After row 30, don't turn. Chain 1, which does not count as a stitch.
- Work 1 sc into the end of each of the 30 rows along the first long side of the wing. (30 sc)
- At the starting foundation edge, work 2 sc in the first foundation stitch, 1 sc in each of the next 8 foundation stitches, and 2 sc in the last foundation stitch. (12 sc)
- Work 1 sc into the end of each of the 30 rows along the opposite long side. (30 sc)
- Work 1 sc into each of the 2 stitches across the narrow end of row 30. (2 sc)
- Join with a slip stitch to the first edging sc. (74 edging stitches)
- Without turning, work 1 loose slip stitch through the back loop of each of the 74 edging stitches, skipping the joining slip stitch. Join to the first new slip stitch and fasten off.
After completing the edging, fasten off at the narrow end and weave in that yarn tail. Cut a separate 16-inch strand of white yarn and thread it through a yarn needle. Bring the strand through the wide foundation edge of the wing, leaving a short tail secured beneath the crochet stitches. Use the longer end to sew the wing to the dove's shoulder during assembly.
Wing edging checkpoint: Lay the finished wing flat before attaching it to the dove. The broad end should remain open and rounded, with a long, gradually narrowing tip. A gentle curve is fine, but the border shouldn't pull the wing into a tight crescent.
If the edges curl inward, check the final 74 slip stitches. Tight slip stitches can shorten the border. Remove only that decorative slip-stitch round and work it again with a slightly larger hook or looser tension, keeping all 74 stitches. If the single crochet border ripples outward instead, first confirm that it contains exactly 30 stitches along each long side, 12 across the foundation edge and 2 across the tip. Slight fullness at the rounded corners is normal. If the border still flares noticeably, rework that border with slightly firmer tension, keeping the same 74 stitches.
Make the second wing in the same way. Before moving on, check that both wings have matching dimensions, smooth borders and tapered tips.
Wing Measurements and Shaping
At the stated gauge, each wing is expected to measure approximately 6 inches long and just over 3 inches wide at its broadest point, including small variations from the edging.
The broad end will be attached near the neck. The narrow end points toward the tail. Both wings are worked flat, without fiberfill.
They may look fairly straight while lying on your work surface. That's fine. Their sweeping shape develops when the broad front and upper edge are sewn against the rounded body and the lower edge remains free.
Wing checkpoint: Each wing has 30 shaping rows, a maximum width of 14 stitches and a final narrow end of 2 stitches. Both wings have a 74-stitch edging round and a matching slip-stitch finish.
Make sure both wing panels are the same size before moving on to the tail.
Crochet the Three Long, Layered Dove Tail Feathers
Now for my favorite detail. The tail is made from three separate white feathers rather than one solid crocheted piece. They're nearly the same shape, but each is a different length.
The feathers are narrow at the base, wider through the middle and gently tapered at the ends. Each one gets the same raised edging as the wings.
We'll make the longest feather first, then the medium feather and finally the short one.
Use: White yarn and 3.5 mm hook. Work in turned rows. Make one feather in each of the three sizes below.
Feather A: Long Upper Tail Feather
Foundation: Chain 5.
Row 1: Sc in the second chain from the hook and in each remaining chain. Ch 1, turn. (4 sts)
Row 2: Inc in the first stitch, sc in the next 2 stitches, inc in the last stitch. Ch 1, turn. (6 sts)
Row 3: Inc in the first stitch, sc in the next 4 stitches, inc in the last stitch. Ch 1, turn. (8 sts)
Rows 4–15: Sc in every stitch across each row. Ch 1 and turn after each row. (8 sts in each row)
Row 16: Sc2tog, sc in the next 4 stitches, sc2tog. Ch 1, turn. (6 sts)
Rows 17–18: Sc in every stitch across each row. Ch 1 and turn after each row. (6 sts in each row)
Row 19: Sc2tog, sc in the next 2 stitches, sc2tog. Ch 1, turn. (4 sts)
Row 20: Sc in every stitch across. Ch 1, turn. (4 sts)
Row 21: Work sc2tog twice. (2 sts)
Do not fasten off. Work the feather edging given below.
Long feather checkpoint: 21 shaping rows. Maximum width: 8 stitches. Final tip: 2 stitches. Expected length before edging: approximately 4 1/4 inches at the stated row gauge.
Feather B: Medium Tail Feather
Foundation: Chain 5.
Row 1: Sc in the second chain from the hook and in each remaining chain. Ch 1, turn. (4 sts)
Row 2: Inc in the first stitch, sc in the next 2 stitches, inc in the last stitch. Ch 1, turn. (6 sts)
Row 3: Inc in the first stitch, sc in the next 4 stitches, inc in the last stitch. Ch 1, turn. (8 sts)
Rows 4–13: Sc in every stitch across each row. Ch 1 and turn after each row. (8 sts in each row)
Row 14: Sc2tog, sc in the next 4 stitches, sc2tog. Ch 1, turn. (6 sts)
Rows 15–16: Sc in every stitch across each row. Ch 1 and turn after each row. (6 sts in each row)
Row 17: Sc2tog, sc in the next 2 stitches, sc2tog. Ch 1, turn. (4 sts)
Row 18: Sc in every stitch across. Ch 1, turn. (4 sts)
Row 19: Work sc2tog twice. (2 sts)
Do not fasten off. Work the feather edging given below.
Medium feather checkpoint: 19 shaping rows. Maximum width: 8 stitches. Final tip: 2 stitches. Expected length before edging: approximately 3 3/4 inches.
Feather C: Short Lower Tail Feather
Foundation: Chain 5.
Row 1: Sc in the second chain from the hook and in each remaining chain. Ch 1, turn. (4 sts)
Row 2: Inc in the first stitch, sc in the next 2 stitches, inc in the last stitch. Ch 1, turn. (6 sts)
Row 3: Inc in the first stitch, sc in the next 4 stitches, inc in the last stitch. Ch 1, turn. (8 sts)
Rows 4–11: Sc in every stitch across each row. Ch 1 and turn after each row. (8 sts in each row)
Row 12: Sc2tog, sc in the next 4 stitches, sc2tog. Ch 1, turn. (6 sts)
Rows 13–14: Sc in every stitch across each row. Ch 1 and turn after each row. (6 sts in each row)
Row 15: Sc2tog, sc in the next 2 stitches, sc2tog. Ch 1, turn. (4 sts)
Row 16: Sc in every stitch across. Ch 1, turn. (4 sts)
Row 17: Work sc2tog twice. (2 sts)
Do not fasten off. Work the feather edging given below.
Short feather checkpoint: 17 shaping rows. Maximum width: 8 stitches. Final tip: 2 stitches. Expected length before edging: approximately 3 1/2 inches.
Raised Edging for All Three Tail Feathers
Each feather gets a single crochet border followed by a loose slip-stitch finish. The edging adds definition and gives the feather ends a slightly rounded appearance.
- After the last shaping row, don't turn. Chain 1, which does not count as a stitch.
- Work 1 sc into the end of every row along the first long side of the feather. The stitch count will equal the number of shaping rows.
- At the four-stitch foundation edge, work 2 sc in the first foundation stitch, 1 sc in each of the middle 2 stitches and 2 sc in the final foundation stitch. (6 sc along the base)
- Work 1 sc into the end of every row along the opposite long side of the feather.
- Work 1 sc into each of the 2 stitches across the narrow tip.
- Join with a slip stitch to the first edging sc.
- Without turning, work 1 loose slip stitch in the back loop of each edging stitch, skipping the joining slip stitch. Join to the first new slip stitch and fasten off.
Exact edging counts:
- Long feather: 21 + 6 + 21 + 2 = 50 sc, followed by 50 slip stitches.
- Medium feather: 19 + 6 + 19 + 2 = 46 sc, followed by 46 slip stitches.
- Short feather: 17 + 6 + 17 + 2 = 42 sc, followed by 42 slip stitches.
After completing each feather's edging, fasten off near its tapered tip and weave in the working yarn end. Cut a separate 14-inch strand of white yarn for each feather. Secure one end of that strand through the four-stitch foundation edge, leaving the longer end available for attaching the feather to the body. Repeat for all three feathers.
Check the Three Finished Feathers
Lay the feathers side by side with their foundation ends lined up.
All three must be 8 stitches wide at their broadest points, with the same increase and decrease pattern. Their lengths are different because the straight middle sections have different row counts.
The long feather has 21 rows, the medium feather has 19 and the short feather has 17. Each step changes the length by exactly two rows.
At the stated row gauge, that creates approximately a 2/5-inch difference between neighboring feathers before edging.
The edges may have a gentle curve from the increases and decreases. That's fine. They don't need to become perfectly flat, rigid panels.
Do not add stuffing or wire. The finished feathers are folded lengthwise to create narrow, double-layer shapes. Their length and gentle taper come from the original rows, increases and decreases.
Fold and Secure the Three Tail Feathers
Each feather is now ready for its final shaping. Folding the crocheted fabric lengthwise gives the tail a slimmer appearance while preserving the stitch counts and lengths you've already worked.
- Lay the longest feather flat with its right side facing upward and its narrow tip pointing away from you.
- Fold it lengthwise along the middle, bringing the two long bordered edges together. Keep the wrong sides together so the right side of the crochet fabric faces outward.
- Line up the foundation ends and tapered tip. The feather is now approximately half its original width, with two layers of crochet fabric lying against each other.
- Cut a separate 24-inch length of white yarn. Thread it through a yarn needle.
- Beginning at the tapered tip, sew the two long bordered edges together with small whip stitches through their facing edge loops. Place approximately one sewing stitch for every two shaping rows, adding a stitch where necessary to keep the edges aligned.
- Continue along the entire long edge toward the foundation end. Keep the seam loose enough that the feather lies flat without puckering.
- Secure the sewing strand at the foundation end and weave in both ends. Leave the folded foundation edge available for attachment to the body.
- Repeat for the medium and short feathers.
The finished feathers are narrow, lightly rounded, double-layer pieces. They remain unstuffed. The folded edge forms one side of each feather, while the sewn border forms the other.
Arrange the three feathers with their sewn edges facing the underside of the dove. Their smooth folded edges will remain visible along the upper portions of the layered tail.
Feather checkpoint: You now have three finished feathers measuring approximately 4 1/4, 3 3/4 and 3 1/2 inches long before final assembly. Each is approximately half the width of its original flat panel. Their foundation ends remain available for sewing to the body.
Before attaching the feathers, lay each one flat with its folded edge facing upward. The two layers should lie together without twisting, and the sewn border should run smoothly from the foundation end to the narrow tip.
If a feather puckers along its sewn edge, check that the row ends of both layers are lined up evenly. Remove only the whip stitches back to the first misaligned pair of row ends. Match those rows again and resew them without pulling the yarn tight. Keep the original feather rows and stitch counts unchanged.
A gentle curve is fine. A twisted tip or tightly gathered seam is not. Correct either problem before sewing the feather to the dove's body.
Assemble the Crochet Dove with Overlapping Tail Feathers
Now you'll bring all the pieces together. The order matters here. We'll attach the head, arrange the tail feathers and then position the wings so they cover the feather bases.
Before sewing, lay the pieces beside the body and check their proportions. The longest feather belongs at the upper rear, and the shorter feathers sit beneath it.
Step 1: Attach the Head and Neck
- Place the body horizontally with its rounded breast at the front and its narrow closed end at the rear.
- Position the head and neck on the upper front of the body. The center of the neck's bottom sits approximately over body rounds 7–9, and its circular base spans roughly body rounds 5–12.
- Turn the head so the beak points in the same direction as the rounded breast. The head should stand above the chest rather than leaning backward toward the tail.
- Check that the head and neck are evenly stuffed and that the 24-stitch foundation ring remains open. Position this opening against the upper front of the stuffed body.
- Using white yarn and a yarn needle, sew through each of the 24 foundation-chain loops around the lower neck and through the adjacent body fabric. Work all the way around the opening, matching the neck edge to the curved surface of the body. The seam closes the lower neck opening as it joins the two pieces.
- Distribute the 24 attachment stitches around the entire base. Don't pull the yarn so tightly that the neck becomes pinched.
- Secure the sewing yarn and bury the end inside the body.
Look at the dove from the side. The neck rises above the breast and the rounded head points forward. A slight forward tilt is fine, but the neck must remain supported by its sewn base.
Step 2: Position the Three Tail Feathers
Arrange the tail feathers at the narrow rear of the body. All three point backward, not outward like a wide fan.
Attach them in this order:
- Lower feather C: Place the 17-row feather against the lower rear side of the body, with its foundation end overlapping approximately body rounds 26–30. Angle it slightly downward.
- Middle feather B: Place the 19-row feather above feather C. Its foundation end overlaps approximately body rounds 25–29. Point its narrow end backward, almost horizontally.
- Upper feather A: Place the 21-row feather over the upper portion of feather B, with its foundation end overlapping approximately body rounds 23–27. Angle its far end very slightly upward.
The three feathers should overlap like shingles, with their rounded tips still visible. The top feather sits closest to the upper edge of the body, the middle feather shows beneath it, and the short feather peeks out below.
Step 3: Sew the Tail Feathers in Place
Each folded feather has two pairs of original foundation stitches, with one stitch from each layer in a pair. Using the separate 14-inch attachment strand, make two securing passes through both layers of each paired foundation stitch and into the body. This gives four foundation attachment passes.
Next, locate rows 1 and 2 immediately beyond the feather's foundation edge. Along the folded side, make one securing stitch through both layers of crocheted fabric at the crease of row 1 and another at the crease of row 2. These are stitches through the fabric at the fold, not through row ends. (2 additional attachment passes)
Along the opposite, sewn edge, make one securing stitch through both joined row-end borders at row 1 and another at row 2. Pass each stitch into the body. (2 additional attachment passes)
The feather is now attached with eight securing passes: four through the paired foundation stitches, two along the folded side and two along the sewn side. Keep the stitches close to the base without pulling the feather into a gathered or twisted shape.
Keep these attachment stitches close to the feather's base so the long outer portion remains free. Secure the strand inside the body after completing the attachment.
Pass the needle through the crochet fabric and into the body. Keep the seam close to the feather's base so the long outer portion remains free.
Repeat for all three feathers, starting with the lowest and finishing with the upper feather.
Check the feathers from both sides before tightening the final sewing stitches. If one feather is covering another completely, move its base slightly upward or downward so all three ends remain visible.
The feathers aren't supposed to separate into three widely spread points. They belong close together, with a gentle stagger at their tips.
Step 4: Attach the First Wing
- Place a wing on the first side of the body with the broad 10-stitch foundation edge near the shoulder, just behind the neck.
- Point the wing's narrow 2-stitch end backward toward the tail.
- Allow the broad portion of the wing to curve down over the side of the body.
- Using the white sewing tail, secure the 10 foundation stitches to the shoulder area.
- Continue securing the upper edge of the wing along approximately the first 8 row ends, following the curve of the upper body.
- Leave the lower curved border free so its raised edging remains visible.
- Position the wing tip over the upper portion of the tail feather bases. Add one small concealed holding stitch near the narrow wing tip if it doesn't stay close to the body.
Don't sew the entire wing flat against the body. The lower edge needs a little freedom to keep the layered look shown in the finished dove.
Step 5: Attach the Second Wing
Repeat the same process on the opposite side. Turn the second wing so its right side faces outward and its broad end sits beside the neck.
Sew the 10-stitch foundation edge and the upper edge across approximately the first 8 rows. Leave its lower border free and add one concealed stitch near the tip if needed.
Check that both wing tips point toward the tail and that the two wings sit at approximately the same height.
Step 6: Check the Side Silhouette
Hold the dove at eye level and look at it from either side.
You want to see the round head, upright neck, full breast, sweeping wing and three overlapping tail feathers.
The wing should cover the rougher attachment area where the tail feathers meet the body. The feather tips remain separate and visible beyond the wing.
If the tail appears too widely spread, loosen the attachment stitches at the bases and reposition the feathers closer together. There's no reason to change the feather stitch counts.
Once everything looks balanced, secure the remaining yarn ends inside the body.
Add the 1/4-Inch Metallic Gold Satin Bow
I chose metallic gold rather than red for this dove. The white crochet and the gold ribbon look lovely together, and the little bit of shine doesn't compete with the feather detail.
Although the satin ribbon is only 1/4 inch wide, the bow itself is fairly generous. It belongs near the base of the neck, where the wings meet the shoulders.
Make the Gold Bow
- Cut approximately 10 to 12 inches of 1/4-inch-wide metallic gold satin ribbon.
- Form two loops, each extending about 1 inch outward from the center knot.
- Tie the loops into a full bow, leaving two ribbon tails approximately 1 to 1 1/2 inches long.
- Adjust the loops until the finished bow measures approximately 2 1/2 to 3 inches across.
- Trim the ribbon tails into small V-shaped ends, matching the ornament's finished appearance.
Place the bow on the visible side of the neck, just above the broad front of the wing. The loops should lie open rather than being pulled tight against the crochet stitches.
Using matching gold sewing thread, stitch through the center knot and into the crocheted neck and shoulder. Make several small securing stitches so the bow is permanently attached rather than simply tied around the neck.
Hide the thread ends beneath the bow. Don't add a bead, button or other hard embellishment to its center.
The bow is meant to be noticeable and can extend beyond the width of the dove's head, as shown in the finished example. Keep its finished width approximately 2 1/2 to 3 inches, and arrange the ribbon tails over the upper shoulder without covering the entire wing.
That's plenty. The gold hanging loop will provide the other decorative detail.
Crochet the Metallic Gold Hanging Loop
The hanging loop is crocheted with metallic gold thread instead of using another piece of satin ribbon. I like the way the little gold crochet stitches tie in with the white feathers. The metallic color matches the bow, but the texture is different.
The loop attaches behind the neck, near the upper back. It doesn't come out of the top of the dove's head.
Gold Hanging Cord Pattern
Use: Metallic gold crochet yarn or thread and a hook approximately 2.5 to 2.75 mm, adjusted for the thread.
Foundation: Chain 50, leaving an 8-inch starting tail.
Row 1: Work 1 slip stitch into the second chain from the hook and into each remaining chain. (49 slip stitches)
Fasten off, leaving another 8-inch yarn tail.
You now have a narrow crocheted cord. At a suitable metallic-thread gauge, the finished cord is expected to measure approximately 7 inches long.
Measure the cord before attaching it. If it differs substantially from 7 inches, remake it with enough additional or fewer foundation chains to reach that length. Keep the same one-row slip-stitch construction.
Attach the Gold Hanging Loop
- Fold the finished gold cord into a U shape, bringing its two ends together.
- Locate the upper back of the dove immediately behind the neck, approximately around body rounds 12–14.
- Hold the two cord ends together at this point and allow the folded loop to rise above the dove.
- Using the two yarn tails, sew the cord ends through several neighboring body stitches.
- Pass each securing strand through the body fabric several times so the hanging loop cannot slide through the attachment point.
- Secure the strands inside the body and weave in the ends.
The finished loop should rise approximately 3 inches above its attachment point, depending on the metallic thread and how closely the cord ends are joined. Shape it into a tall, softly rounded loop behind the neck, as shown in the finished example.
Before finishing the attachment completely, suspend the dove from the loop. If its tail drops too far or its head tips downward, reposition the loop a few body stitches toward the heavier end until the bird hangs approximately level.
Don't attach the loop to the ribbon bow. The crocheted cord carries the ornament's weight, so its sewn attachment belongs directly in the body stitches.
Hanging loop checkpoint: One crocheted gold cord, beginning with 50 chains and finished with 49 slip stitches. The completed cord measures approximately 7 inches before folding. Both ends are secured to the upper back, and the finished loop rises approximately 3 inches behind the neck as shown in the dove ornament.
Finish and Shape Your White Crochet Dove Ornament
Your dove is nearly finished. Before hanging it on the Christmas tree, take a few minutes to arrange the feathers and check how the wings sit against the body.
The details make a difference here. The head should be rounded, the neck upright, and the white wings should sweep backward without hiding all three tail feathers.
Final Shape Check
- Hold the dove horizontally with the beak pointing forward.
- Check that the head remains upright and slightly forward of the shoulders.
- Arrange each wing so the broad front sits against the shoulder and the narrow end points toward the tail.
- Keep the curved lower wing borders visible rather than sewing them flat against the body.
- Separate the three tail tips gently so the feather layers can be seen.
- Check that the short lower feather remains visible below the middle and upper feathers.
- Smooth the bow loops and arrange the two gold ribbon tails across the shoulder.
- Hang the dove from its gold loop and check its balance.
Expected Finished Measurements
The following measurements are calculated estimates based on the pattern gauge. They are not measurements from a physically completed sample.
- Overall length: Approximately 9 to 10 inches from beak to the longest tail feather.
- Overall dove height: Approximately 5 1/2 to 6 1/2 inches from the top of the head to the underside of the body, excluding the gold loop.
- Maximum body diameter: Approximately 3 inches.
- Head diameter: Approximately 2 inches at the widest point.
- Wing length: Approximately 6 inches before attachment and shaping.
- Upper tail feather: Approximately 4 1/4 inches long.
- Middle tail feather: Approximately 3 3/4 inches long.
- Lower tail feather: Approximately 3 1/2 inches long.
- Gold bow: Approximately 2 1/2 to 3 inches across.
- Visible hanging loop: Approximately 3 inches high.
What If the Wings or Tail Don't Lie the Way You Want?
If the feathers spread too far apart: Move their attachment bases closer together. The three feathers should overlap, not open into a wide fan. The longest feather belongs above the other two.
If a tail feather twists or curls after assembly: Check that its foundation end is secured across all eight attachment passes. Gently reposition the feather so its folded edge remains smooth and its sewn edge faces the underside of the dove. If you're using cotton yarn, lightly dampen only the feather, smooth it into position and allow it to dry completely before hanging the ornament. Don't add wire to the feather.
If the neck leans: Check the neck's sewn attachment around the shoulder. Add a few concealed white sewing stitches along the rear lower neck to support its upright position. Don't alter the head or neck rounds.
If the ornament doesn't hang level: Move the gold loop attachment slightly toward the heavier end of the bird. The loop belongs behind the neck, but its exact attachment point can vary by a few stitches to account for differences in stuffing and yarn weight.
Once you're happy with the shape, weave in any remaining yarn ends. Keep the satin ribbon tails neat and make sure the knot is securely stitched to the neck.
You don't need to add anything else. The layered white feathers, embroidered eyes and gold accents already give the dove its finished appearance.
A Handmade Christmas Keepsake
This dove is intended as a hanging decoration for a Christmas tree, seasonal display or decorative gift arrangement. It's not designed to stand upright on little feet, and it isn't a stuffed toy for a baby.
If you're making a collection of handmade Christmas ornaments, my free crochet Christmas present ornament pattern is another small project with a completely different shape.
I especially like the white-and-gold combination for this dove. It's pretty enough on its own, and the long tail gives it a recognizable shape even when you see it from across the room.
Crochet Dove Ornament Pattern FAQs
Can I make this dove with acrylic yarn instead of cotton?
Yes. Smooth medium-weight acrylic yarn can be substituted, although it may produce softer wings and tail feathers. Check your gauge and use a hook that produces firm, even stitches without noticeable gaps. The finished measurements may change slightly.
Can I make a smaller crochet dove ornament?
You can make a smaller version using finer yarn and a matching smaller hook while keeping the same stitch counts. The shape will follow the same construction, but the dimensions and feather stiffness will change. The measurements in this pattern apply to the original medium-weight cotton version.
Why does the dove have no crocheted feet?
I wanted a long, flowing silhouette rather than a bird designed to stand on a shelf. The wings and three tail feathers are the main features, so I left the feet off entirely. The finished dove is intended to hang from its gold crochet loop.
Are the wings and tail feathers stuffed?
No. Only the body and the head-and-neck piece contain fiberfill. The wings remain flat crocheted panels with finished edges. The three tail feathers are crocheted flat, then folded lengthwise and sewn along their edges to make narrow, double-layer feathers. None of these pieces needs stuffing or wire.
Is the crochet dove suitable for a baby's crib?
No. This design is a decorative Christmas ornament with a satin ribbon bow and a hanging cord. It isn't an infant toy and should not be placed inside a crib or within a baby's reach.
The finished dove has just a few decorative details, but together they make a lovely Christmas ornament. The long white wing, three overlapping feathers and little gold bow give it a look that's quite different from a round crocheted bird.
And that's the finished dove.
When you click on links to various merchants on this site and make a purchase, this may result in this site earning a commission. This does not affect the price you pay.

UBGI Gold Standard 2026
Reviewed under the site's
editorial checklist.
Photos, decorating ideas, party setups and reader submissions are shared for inspiration unless a page is specifically presented as a pattern, tutorial, reference guide or step-by-step project. Follow the instructions, measurements, safety guidance and manufacturer directions provided for the particular project or product.
About Jan | Contact | Baby Nursery Ideas (Blog) | Site Map | Privacy Policy | Disclosure Policy | Disclaimer | Affiliate Disclosure | Earnings Disclosure | Facebook | Pinterest
I am a participant in the Amazon Services LLC Associates Program, an affiliate advertising program designed to provide a means for us to earn fees by linking to Amazon. As an Amazon Associate I earn from qualifying purchases.
Copyright © 2006-2026. All Rights Reserved.