Free Crochet Christmas Bell Ornament Pattern & Matching Appliqué
By Jan Bay
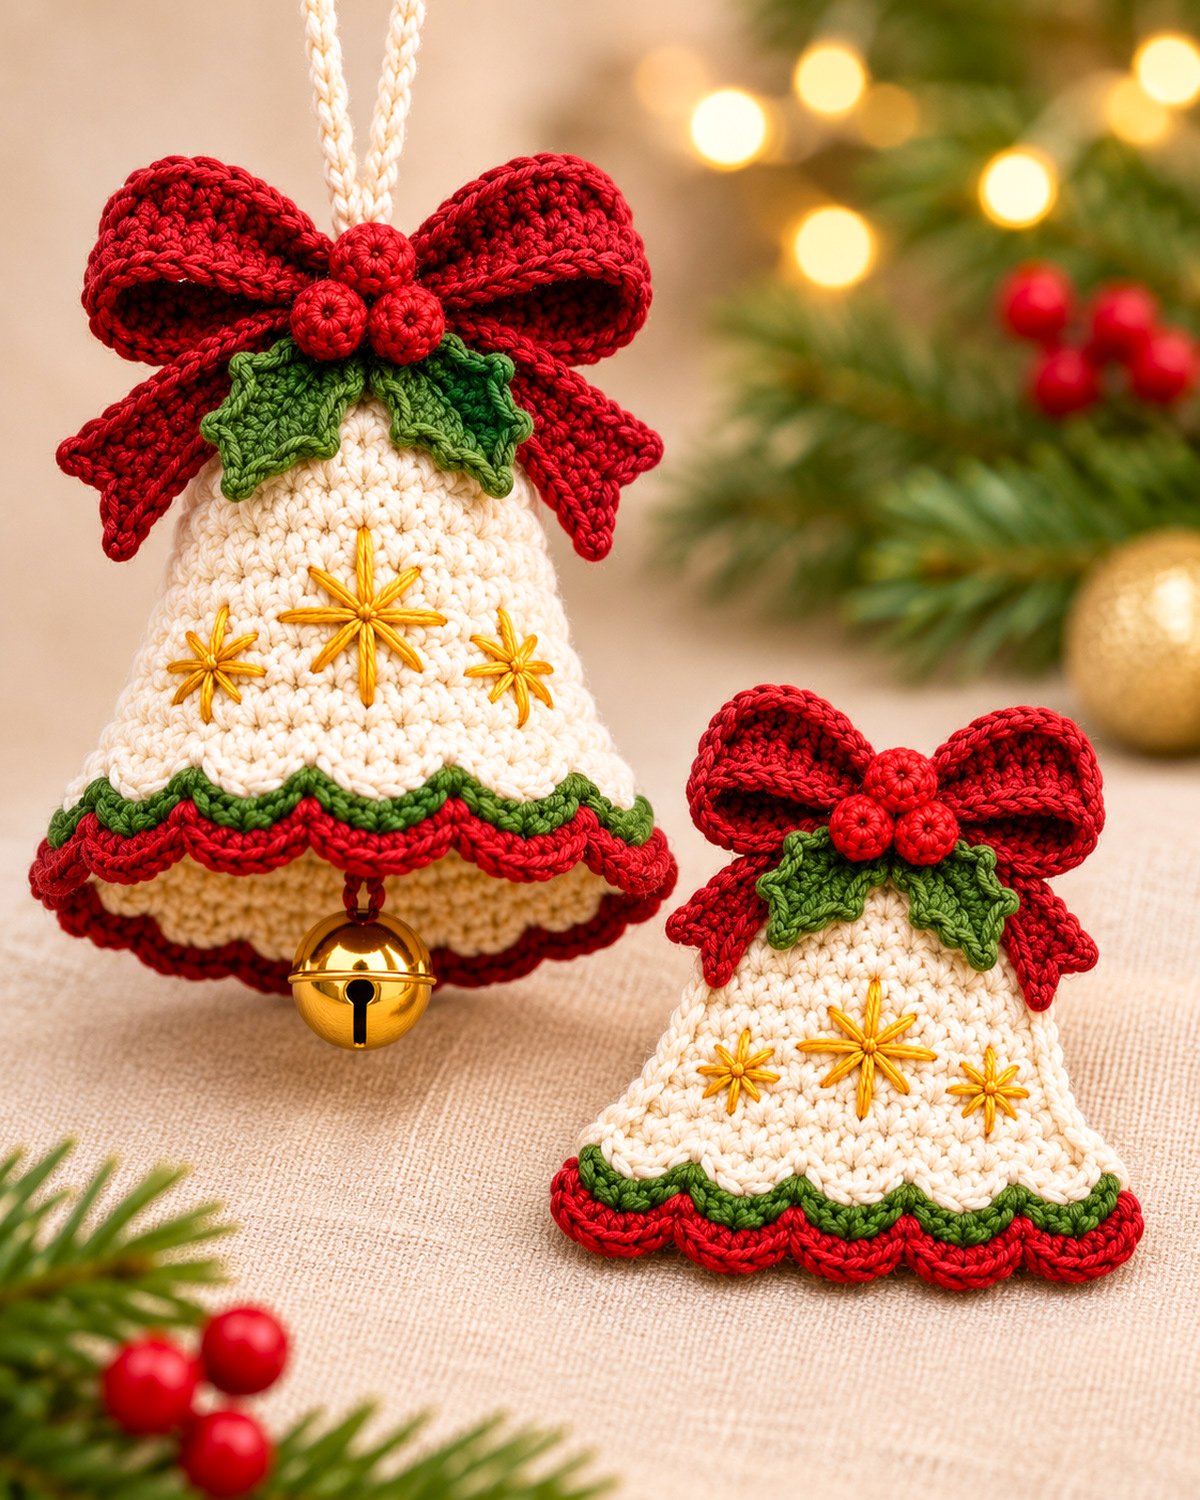
This crochet Christmas bell has a pretty ivory body, a big cranberry bow with holly leaves and berries, three little gold stars, and a red-and-green scalloped edge. I've always liked Christmas bells, especially the little ones you can hang on the tree and bring out again every December. I like them so well that I'm including two versions: a dimensional ornament with a hanging jingle bell and a matching flat appliqué for stockings, gifts, and other Christmas projects. Both have the same festive details, without a lot of fussy extras to make.
Explore More Free Christmas Crochet Patterns
Free Crochet Santa Face Appliqué & Ornament
See Supplies for This Project Here.
Jump to a Section
Crochet Christmas Bell Ornament Pattern at a Glance
We're making two Christmas bells from the same basic design. The first is a hollow ornament with a little gold jingle bell underneath. The second is a flat appliqué that you can sew onto a Christmas stocking, gift bag, or another holiday project.
The nice thing about making them as a set is that you only have to learn the decorations once. Both bells get the same red bow, two green holly leaves, three little berries, and three embroidered gold stars.
I've kept the actual bell shapes fairly simple. Most of the work is single crochet, and the bottom scallops use ordinary half double crochet and double crochet stitches.
Finished Sizes
- Hanging ornament: Approximately 3¾ to 4 inches wide and about 4 inches tall, measured vertically from the crown to the lower edge, not including the bow, hanger, or metal bell. The finished height depends on how the shell is shaped.
- Flat appliqué: Approximately 3½ to 3¾ inches wide and 3½ to 3¾ inches tall before adding its bow.
- Large bow: Approximately 4½ to 4¾ inches across.
- Small bow: Approximately 4 to 4¼ inches across.
About the example image: The picture shows the intended finished design rather than a physically test-crocheted sample. The stitch counts have been calculated, but the final measurements, shaping, and drape still need to be confirmed with a completed crochet sample.
How the Two Bells Are Made
The ornament starts at the very top and grows wider as you work downward in joined rounds. You'll leave the bottom open, just like a real bell.
The appliqué starts with a short chain. You'll work back and forth in rows, adding stitches along both sides until you have a flared bell shape.
For both versions, the last ivory stitches give you a place to attach two layers of scalloped edging. That little detail is worth doing carefully. It's what gives the bells their pretty red-and-green finish.
The larger bell may need light stiffening to hold its shape when hanging, especially after you add the bow. The appliqué stays flat and doesn't need stuffing or a stiff insert.
Skill level: Confident beginner for the basic bell shapes. The bow, little holly leaves, and embroidery take a bit more patience, but I'll walk you through each piece.
Materials and Supplies
I'd use DK cotton yarn for these bells. Cotton gives the stitches a nice, clean look, and a fairly small hook makes the hollow ornament firmer than a loose, open fabric would be.
Yarn
Use category 3 DK or light worsted cotton yarn in these colors:
- Warm ivory: Bell bodies and hanging loop, approximately 80 yards.
- Cranberry red: Bows, tails, berries, and lower scallops, approximately 50 yards.
- Evergreen green: Holly leaves and upper scallops, approximately 20 yards.
- Gold: Embroidery floss or fine decorative yarn for the stars, approximately 5 yards.
These are generous estimated allowances for making one ornament and one appliqué. Yarn use will vary, especially if you adjust the bows.
Tools and Other Supplies
- 3.5 mm (E/4) crochet hook for the main pieces
- 2.75 mm (C/2) crochet hook for the little berries
- Yarn needle with a blunt tip
- Embroidery needle suitable for your gold thread
- Scissors
- Stitch markers
- Measuring tape
- One gold metal jingle bell, approximately 15 to 20 mm across
- Rustproof pins and a blocking mat
- Optional fabric stiffener for the hollow ornament
You won't need stuffing for either bell. The ornament is hollow, and the appliqué is a single flat piece. The small berries can be shaped with their yarn tails instead of using loose filling.
Gauge
Target gauge: 20 single crochet stitches and 22 rows or rounds measure approximately 4 inches in a firm, even fabric.
For the bow strips, expect approximately 16 to 17 half double crochet rows in 4 inches. Check the length of the actual strip before folding it.
Make a small swatch before starting. If your stitches are much larger, try a smaller hook. If the fabric feels too stiff to work comfortably, go up one hook size and check the measurements again.
Why gauge matters: A 60-stitch circumference at the target gauge measures about 12 inches around. That gives the ornament an expected opening diameter of approximately 3.8 inches before allowing for the decorative edging.
A Note About the Metal Jingle Bell
The metal bell is for a hanging Christmas decoration, not a baby toy. It contains small parts, and the crocheted berries are also attached decorations.
Keep finished ornaments out of children's reach and away from cribs and sleeping spaces. Don't attach the dimensional ornament or its metal clapper to baby clothing, blankets, or toys.
Keep both finished bells for decorative projects rather than baby clothing, toys, or blankets intended for young children. Even without the raised berries, the large bow and separate holly leaves can be pulled or caught. For a baby-facing project, choose a simpler flat appliqué with embroidered details instead.
Stitches and Abbreviations
This pattern uses US crochet terms.
- ch: Chain
- sc: Single crochet
- hdc: Half double crochet
- dc: Double crochet
- tr: Treble crochet
- sl st: Slip stitch
- st/sts: Stitch/stitches
- rnd: Round
- RS: Right side
- BLO: Back loop only
- FLO: Front loop only
- inc: Increase by working two single crochet stitches into one stitch
- sc2tog: Single crochet two stitches together
- sk: Skip
- rep: Repeat
If you need a reminder about an unfamiliar abbreviation, the Craft Yarn Council's crochet abbreviation guide is a handy reference.
How to Work the Increases
When the instructions say to increase, work two single crochet stitches into the same stitch. That adds one stitch to your total.
For example, if you start with 16 stitches and make four evenly spaced increases, you'll finish with 20 stitches.
How to Work sc2tog
Insert your hook into the next stitch, yarn over, and pull up a loop. Insert your hook into the following stitch, yarn over, and pull up another loop. Yarn over and pull through all three loops on your hook.
You've turned two stitches into one.
How to Make a Scallop
A scallop is a small fan of stitches worked into one stitch, with shorter stitches on either side. The red scallops are slightly larger than the green ones so both colors remain visible.
Don't pull the slip stitches too tightly. They need to hold the scallops in place without gathering the bottom of the bell.
Working in Front and Back Loops
Look at the top of a single crochet stitch. You'll see two little loops forming a V.
Working in the back loop leaves the front loop free. We'll use that extra loop to make the second layer of edging without sewing a separate strip around the bell.
Important: Beginning chains and turning chains do not count as stitches anywhere in this pattern. On joined rounds, the joining slip stitch doesn't count either.
Free Crochet Christmas Bell Ornament Pattern
Let's start with the hanging bell. You'll work from the narrow top down to the wide opening, adding a few stitches at a time to make the bell flare naturally.
Use ivory yarn and your 3.5 mm hook.
Part A: Crochet the Bell Body
Before you begin: Work in joined rounds. At the beginning of each round, chain 1 and work your first single crochet into the first stitch of the previous round. Join with a slip stitch into the first single crochet of the current round. Do not count the chain or joining slip stitch as a stitch.
Round 1: Ch 2. Work 8 sc into the second chain from your hook. Join. (8 sts)
Round 2: Ch 1. Work 2 sc into each stitch around. Join. (16 sts)
Round 3: Ch 1. Sc in each stitch around. Join. (16 sts)
Round 4: Ch 1. *Sc in next 3 sts, 2 sc in next st.* Repeat from * to * 4 times. Join. (20 sts)
Round 5: Ch 1. Sc in each stitch around. Join. (20 sts)
Round 6: Ch 1. *Sc in next 4 sts, 2 sc in next st.* Repeat 4 times. Join. (24 sts)
Round 7: Ch 1. Sc in each stitch around. Join. (24 sts)
Round 8: Ch 1. *Sc in next 5 sts, 2 sc in next st.* Repeat 4 times. Join. (28 sts)
Round 9: Ch 1. Sc in each stitch around. Join. (28 sts)
Round 10: Ch 1. *Sc in next 6 sts, 2 sc in next st.* Repeat 4 times. Join. (32 sts)
Round 11: Ch 1. Sc in each stitch around. Join. (32 sts)
Round 12: Ch 1. *Sc in next 7 sts, 2 sc in next st.* Repeat 4 times. Join. (36 sts)
Round 13: Ch 1. Sc in each stitch around. Join. (36 sts)
Round 14: Ch 1. *Sc in next 8 sts, 2 sc in next st.* Repeat 4 times. Join. (40 sts)
Round 15: Ch 1. Sc in each stitch around. Join. (40 sts)
Round 16: Ch 1. *Sc in next 9 sts, 2 sc in next st.* Repeat 4 times. Join. (44 sts)
Round 17: Ch 1. Sc in each stitch around. Join. (44 sts)
Round 18: Ch 1. *Sc in next 10 sts, 2 sc in next st.* Repeat 4 times. Join. (48 sts)
Round 19: Ch 1. Sc in each stitch around. Join. (48 sts)
Round 20: Ch 1. *Sc in next 11 sts, 2 sc in next st.* Repeat 4 times. Join. (52 sts)
Round 21: Ch 1. *Sc in next 12 sts, 2 sc in next st.* Repeat 4 times. Join. (56 sts)
Round 22: Ch 1. *Sc in next 13 sts, 2 sc in next st.* Repeat 4 times. Join. (60 sts)
Round 23: Ch 1. Sc in each stitch around. Join. (60 sts)
Round 24: Ch 1. Sc in each stitch around. Join. (60 sts)
Fasten off the ivory yarn, leaving a tail long enough to secure neatly inside the bell.
Check the Shape Before Adding the Edging
You should now have a hollow, flared bell with 60 stitches around its bottom opening.
At the target gauge, the opening measures approximately 3.8 inches across. The 24 rounds give approximately 4.4 inches of fabric along the sloping side of the bell. Its vertical height should be around 4 inches, depending on how you shape the shell.
Hold the bell by its top and look at the shape. It should widen gradually toward the bottom, without a sudden bulge or tight band.
If the lower edge is gathering, check that you made all the increases in Rounds 20, 21, and 22. Those three rounds bring the stitch count from 48 to 60.
If the bell seems much longer or narrower than expected, check your gauge before going on. Correcting the body now is easier than trying to reshape it after adding the decorations.
Part B: Add the Cranberry Scalloped Edge
Now we're going to make the larger red scallops. The important trick is to work the first red round into the back loops of Round 24. That leaves the front loops available for the green layer.
Round 25: With the outside of the bell facing you, join cranberry yarn in the back loop of the first stitch of Round 24. Ch 1. Sc in the back loop of each of the 60 stitches around. Join with a slip stitch into the first sc. (60 sts)
Look just above the new red row. You should be able to find 60 unused ivory front loops from Round 24.
Round 26, red scallops: Ch 1. Start with the first sc of Round 25, the same stitch used for the Round 25 joining slip stitch. *Sl st in next unworked sc, sk next sc, work 5 dc into next sc, sk next sc, sl st in next sc.* Repeat from * to * 12 times around. For the first repeat, the first "next unworked sc" means the first sc of Round 25. Do not add another slip stitch after the twelfth scallop. (12 scallops; all 60 foundation stitches used)
Each repeat uses five stitches from Round 25 and makes one scallop.
After the twelfth repeat, fasten off and weave the red yarn end into the back of the edging.
Checkpoint: You should have 12 red scallops around the bottom. They should be evenly spaced and curve outward slightly without pulling the bell opening closed.
Part C: Crochet the Evergreen Scallops
Here's where the two-color edging comes together. The green scallops sit just above the red ones, so you'll still see plenty of cranberry underneath.
With the outside of the bell facing you, find the unused front loops of ivory Round 24.
Place a slip knot of evergreen yarn on your hook. Start the following repeat in the very first unused front loop of Round 24. The first slip stitch of the repeat attaches the green yarn. Do not make a separate joining slip stitch or skip that first loop.
Green scallop round: *Sl st in next front loop, sk next front loop, work 3 hdc into next front loop, sk next front loop, sl st in next front loop.* Repeat 12 times around.
Fasten off, leaving a tail to weave into the inside of the bell.
You'll now have 12 green scallops and 12 red scallops. The green layer is shorter, so the red scallops can show underneath.
If the edging curls: Check your tension first. A little outward curve is part of the design, but the entire bottom shouldn't roll upward. If it does, try making the scallop stitches with a hook one size larger. If that doesn't help, return to the smaller hook and work the fan stitches a little more loosely.
Don't pull the bottom into a tight circle while finishing. We want an open bell, not a gathered pouch.
Part D: Set the Bell Aside for Shaping
At this point, the hollow shell is complete. Don't add the bow or metal clapper yet.
Check whether the bell keeps its flared shape when you hold it from the top. Firm cotton stitches may hold their shape without additional stiffening.
If the shell needs support, you can gently arrange it over a smooth, plastic-covered cone or another form that supports the flared opening. Don't apply fabric stiffener yet. You'll want the crochet fabric to remain flexible while you embroider the three gold stars.
After the embroidery is finished, we'll shape the shell during final assembly and add stiffener only if it's needed.
The bell should remain hollow, with its bottom open for the hanging clapper.
Matching Flat Crochet Christmas Bell Appliqué Pattern
Now for the little matching appliqué. This version is worked flat, so you don't have to crochet a hollow bell and try to squash it into shape.
Start at the narrow top and work toward the wider bottom. We'll make five increases along each side, spread over the first 15 rows.
Use ivory yarn and your 3.5 mm hook.
Part A: Crochet the Flat Bell Shape
Foundation: Ch 9.
Row 1: Sc in second ch from hook and in each remaining chain. Ch 1, turn. (8 sts)
Row 2: Sc in each stitch across. Ch 1, turn. (8 sts)
Row 3: Work 2 sc in first st, sc in next 6 sts, 2 sc in last st. Ch 1, turn. (10 sts)
Row 4: Sc in each stitch across. Ch 1, turn. (10 sts)
Row 5: Sc in each stitch across. Ch 1, turn. (10 sts)
Row 6: Work 2 sc in first st, sc in next 8 sts, 2 sc in last st. Ch 1, turn. (12 sts)
Row 7: Sc in each stitch across. Ch 1, turn. (12 sts)
Row 8: Sc in each stitch across. Ch 1, turn. (12 sts)
Row 9: Work 2 sc in first st, sc in next 10 sts, 2 sc in last st. Ch 1, turn. (14 sts)
Row 10: Sc in each stitch across. Ch 1, turn. (14 sts)
Row 11: Sc in each stitch across. Ch 1, turn. (14 sts)
Row 12: Work 2 sc in first st, sc in next 12 sts, 2 sc in last st. Ch 1, turn. (16 sts)
Row 13: Sc in each stitch across. Ch 1, turn. (16 sts)
Row 14: Sc in each stitch across. Ch 1, turn. (16 sts)
Row 15: Work 2 sc in first st, sc in next 14 sts, 2 sc in last st. Ch 1, turn. (18 sts)
Row 16: Sc in each stitch across. Ch 1, turn. (18 sts)
Row 17: Sc in each stitch across. Ch 1, turn. (18 sts)
Row 18: Sc in each stitch across. (18 sts)
Fasten off the ivory yarn.
Check the Flat Bell Shape
Lay the piece on a flat surface with the right side facing up. Treat the side worked on odd-numbered rows as the right side.
You should have a straight, narrow top and two sides that flare outward. The bottom has 18 stitches, and the top has 8.
At the target gauge, the ivory piece should be approximately 3.6 inches across the bottom and 3.3 inches tall before the scalloped trim.
The sides don't need to be perfectly rigid. They just need to widen evenly without pulling the center into a cup.
If one side sticks out farther than the other, go back and check Rows 3, 6, 9, 12, and 15. Each increase row should add one stitch at both ends.
Part B: Make the Red Appliqué Scallops
The flat bell gets the same two-color treatment as the ornament, but with six scallops instead of twelve.
Turn the appliqué so the right side faces you. Join cranberry yarn at the beginning of the bottom edge, where Row 19 will start.
Row 19: Working into the back loops of Row 18, sc in each stitch across. (18 sts)
Fasten off.
Row 20, red scallops: With the right side facing you, place a slip knot of cranberry yarn on your hook. Starting with the first sc of Row 19, *sl st in next unworked sc, work 4 dc in next sc, sl st in next sc.* Repeat 6 times across. The first slip stitch of the first repeat also joins the yarn, so do not make a separate joining slip stitch. (6 scallops; all 18 foundation stitches used) Fasten off.
You'll have six red scallops along the bottom edge.
Part C: Make the Green Appliqué Scallops
With the right side facing you, find the 18 unused ivory front loops from Row 18, just above the red edging.
Place a slip knot of evergreen yarn on your hook. Start the following green scallop repeat in the very first unused front loop of Row 18. The first slip stitch of the repeat attaches the yarn. Do not make a separate joining slip stitch or skip that first loop.
Green scallop row: *Sl st in next front loop, work 3 hdc in next front loop, sl st in next front loop.* Repeat 6 times across.
Fasten off and weave the yarn ends into the back.
Checkpoint: The appliqué should have six green scallops layered over six larger red ones. It should lie nearly flat when you set it down.
There may be a little curve along the bottom because of the decorative shells. That's fine. What you don't want is a tight band that pulls both lower corners together.
If the appliqué cups, loosen the bottom edging and block the piece flat. If the scallops are simply curling at their tips, gently arrange them during blocking instead of adding extra stitches to the bell body.
That's the basic appliqué finished. We'll add its smaller bow, holly, and three gold stars after making the decorations.
Crochet the Christmas Bow, Holly Leaves and Berries
Now we get to the decorations. The big red bows give these bells their Christmas look, and the green holly leaves and little berries finish them off.
We're making a slightly larger bow for the hanging ornament and a smaller one for the flat appliqué. Both use the same method.
Each bow has one long strip that folds into two loops, plus two separate tails. I prefer this arrangement because you can position the tails exactly where you want them without trying to twist one long piece into a complicated bow.
Part A: Crochet the Large Bow for the Ornament
Use cranberry yarn and the 3.5 mm hook.
Foundation: Ch 8.
Row 1: Hdc in the third chain from the hook and in each remaining chain. (6 hdc)
Rows 2 through 38: Ch 2, turn. Hdc in each of the 6 stitches across. (6 hdc per row)
Fasten off, leaving an 18-inch yarn tail for sewing.
You now have a narrow rectangular strip, expected to measure approximately 9 to 9½ inches long and about 1¼ inches wide.
If your strip measures much longer than 9½ inches, check your half double crochet row gauge before continuing. The finished bow should be a little wider than the bell, not twice its width.
Fold the Large Bow
- Lay the strip horizontally with its right side facing down.
- Mark the center of the strip.
- Fold the left short end inward until it meets the center mark.
- Fold the right short end inward until it meets the same point.
- Overlap the two short ends slightly at the center and sew them in place.
- Turn the bow over so the joined ends are hidden at the back.
- Pinch the middle of the bow together and wrap cranberry yarn around it several times.
- Secure the wrapping at the back, leaving a sewing tail.
You should have two rounded loops, one on each side of the center.
Don't flatten the loops completely. Give them a little fullness with your fingers. The bow will be easier to shape if the stitches aren't pulled too tightly.
Part B: Crochet the Two Large Bow Tails
Before making the bow tails: For each of the four tails, leave a 12-inch starting yarn tail before making the foundation chain. Keep this starting tail at the straight upper edge. You'll use it to sew the tail behind the bow center. The finishing yarn end at the diagonal point is only for weaving in.
Make two tails in cranberry.
Foundation for each tail: Ch 7.
Row 1: Hdc in third chain from hook and in each remaining chain. (5 hdc)
Rows 2 through 8: Ch 2, turn. Hdc in each stitch across. (5 hdc)
Row 9, first tail: Ch 1, turn. Sl st in first st, sc in next st, hdc in next st, dc in next st, tr in last st. (5 sts)
Fasten off and weave the finishing yarn end into the back of the angled tip. Keep the 12-inch starting tail for assembly.
Make the second tail the same way through Row 8.
Row 9, second tail: Ch 1, turn. Tr in first st, dc in next st, hdc in next st, sc in next st, sl st in last st. (5 sts)
Fasten off and weave the finishing yarn end into the back of the angled tip. Keep the 12-inch starting tail for assembly.
The different stitch heights give the lower ends of the tails opposite diagonal slopes.
Assembly: Place the straight upper ends behind the center of the folded bow. Angle one tail down toward the left and the other down toward the right. Sew both ends firmly to the back of the bow center.
Arrange the tails so they spread outward rather than hanging straight down across the ivory bell.
Set this bow aside until you're ready to attach the holly.
Part C: Crochet the Smaller Bow for the Appliqué
Use cranberry yarn and the 3.5 mm hook.
Foundation: Ch 8.
Row 1: Hdc in third chain from hook and in each remaining chain. (6 hdc)
Rows 2 through 34: Ch 2, turn. Hdc in each stitch across. (6 hdc per row)
Fasten off, leaving an 18-inch sewing tail.
Fold this strip into two loops exactly as you did for the larger bow, bringing both short ends to the center and sewing them to the back.
Wrap the center with cranberry yarn and secure it from behind.
The finished bow should measure approximately 4 to 4¼ inches across. It will extend a little beyond the upper sides of the flat bell, as shown in the example image.
Part D: Crochet the Two Smaller Bow Tails
Make two cranberry tails.
Foundation for each tail: Ch 6.
Row 1: Hdc in third chain from hook and in each remaining chain. (4 hdc)
Rows 2 through 6: Ch 2, turn. Hdc in each stitch across. (4 hdc)
Row 7, first tail: Ch 1, turn. Sl st in first st, hdc in next st, dc in next st, tr in last st. (4 sts)
Fasten off and weave the finishing yarn end into the back of the angled tip. Keep the 12-inch starting tail for assembly.
For the second tail, repeat Rows 1 through 6.
Row 7, second tail: Ch 1, turn. Tr in first st, dc in next st, hdc in next st, sl st in last st. (4 sts)
Fasten off and weave the finishing yarn end into the back of the angled tip. Keep the 12-inch starting tail for assembly.
Sew the two tails behind the smaller bow center, angling them outward in opposite directions.
Keep the upper ends covered by the bow. The lower pointed ends should remain visible on either side of the bell.
Part E: Crochet the Holly Leaves
We'll need four green leaves altogether, two for each bell.
These are small, shaped leaves with little points along their edges. You don't need to make a separate center vein.
Use evergreen yarn and the 3.5 mm hook.
Foundation: Ch 9.
You'll work along one side of the foundation chain, around the last chain, and back along the opposite side.
First side: Sc in second chain from hook. Hdc in next chain. Dc in next chain.
Make a small point by chaining 2 and slip stitching into the second chain from the hook. This is a picot. It doesn't use another foundation-chain stitch.
Continue with hdc in next foundation chain, dc in next foundation chain, and make another ch-2 picot. Hdc in next foundation chain, then sc in next foundation chain.
Rounded base: Work 3 sc into the last foundation chain.
Opposite side: Working into the unused loops along the other side of the foundation chain, sc in the next chain, hdc in the next, dc in the next, and make a ch-2 picot.
Continue with hdc in the next chain, dc in the next, another ch-2 picot, hdc in the next chain, and sc in the last available chain loop.
Sl st into the beginning sc to close the leaf.
Fasten off, leaving a 10-inch sewing tail.
Count check: Each leaf has 17 sc, hdc, or dc stitches worked into the foundation chain, plus four small picots. The joining slip stitch is not included.
The narrow joined end forms the leaf tip. The rounded group of three single crochet stitches at the opposite end forms the base that will sit beneath the berries.
Bring the sewing tail along the back of the leaf to its base before attaching it.
Make three more leaves the same way.
Part F: Crochet the Holly Berries
Each bow gets three little raised berries. Make six berries altogether.
Use cranberry yarn and the 2.75 mm hook. Work these tiny pieces in continuous rounds, without joining. Use a stitch marker if you need one.
Round 1: Ch 2. Work 6 sc into the second chain from the hook. (6 sts)
Round 2: *Sc in next st, 2 sc in next st.* Repeat 3 times. (9 sts)
Round 3: Sc in each stitch around. (9 sts)
Round 4: *Sc in next st, sc2tog over next 2 sts.* Repeat 3 times. (6 sts)
Fasten off, leaving a 10-inch sewing tail.
Thread the tail through the front loops of the remaining six stitches. Pull gently to close the opening.
Push a small amount of the beginning yarn tail inside if the berry needs a little more fullness. Shape the berry into a small round ball with your fingers.
Don't overfill it. These berries should remain small enough to sit together in a group of three.
Make five more the same way.
Part G: Arrange the Holly Cluster
Lay the two leaves behind the center of one red bow. Point one leaf toward the lower left and the other toward the lower right.
Let the leaves overlap slightly at their rounded bases. Sew the bases to the bow center, keeping the pointed ends free.
Now arrange three berries over the joined leaf bases. Put one berry at the top center and the other two just below it, making a little triangle.
Sew each berry to the leaves and the bow center with several firm passes of its yarn tail. Keep the stitches hidden as much as possible.
Repeat for the second bow.
Don't attach the completed decorations to the bell bodies just yet. It's easier to embroider the stars while the ivory fronts are clear.
How to Embroider the Three Gold Stars
The three little gold stars are one of my favorite details on this design. They give the ivory bell a bit of sparkle without covering it with more crochet pieces.
Make one larger star in the middle and two smaller stars on either side. Use gold embroidery floss or a fine decorative yarn that will pass through the crochet stitches without making large holes.
I'd choose a gold that looks like thread rather than a heavy metallic cord. The star stitches should sit neatly on top of the ivory crochet.
Make the Large Center Star
- Mark the center front of the bell with a removable stitch marker.
- For the hanging ornament, position the center of the large star around Rounds 15 and 16. For the flat appliqué, place it around Rows 10 and 11.
- Thread the gold floss into your embroidery needle and bring it up through the middle of the marked spot.
- Make a straight stitch from the center to a point above it, approximately three crochet rows away.
- Bring the needle back up at the center and make a matching stitch downward.
- Repeat to the left and right, forming four main spokes.
- Add four shorter diagonal spokes between the first four.
- If you want the thicker raised look shown in the example image, repeat each main spoke once, placing the second stitch beside the first.
You should now have an eight-point starburst, with four longer rays and four shorter ones.
Keep the thread firm enough to lie neatly against the stitches, but don't pull it so tightly that it puckers the ivory fabric.
Make the Two Smaller Stars
Place the smaller stars to the left and right of the center star, a little lower on the bell.
On the ornament, the smaller star centers should fall around Rounds 18 and 19. Space them approximately 8 to 10 crochet stitches to either side of the center-front line, adjusting for the curved surface.
On the appliqué, position them around Rows 13 and 14, approximately halfway between the large center star and each outer edge.
Use the same method as the large star, but make the eight spokes shorter.
Each small star should measure approximately ⅜ to ½ inch across. The large star may measure approximately ¾ to 1 inch across.
Those measurements are guides. What matters most is the arrangement: one larger star in the center, with two smaller stars balanced on either side.
Finish the Embroidery
Turn the appliqué over and weave the gold thread ends securely through several stitches on the back.
For the ornament, reach inside the hollow bell and secure the embroidery ends against the inside surface. A small piece of temporary cardboard placed inside while stitching can help support the fabric; remove it afterward.
Before moving on: Hold each bell at arm's length and check the stars. They should be easy to see below the bow, with enough ivory space between them that they look like three separate decorations.
If the stars sit too close to the lower scallops, adjust their placement before securing the thread ends.
You don't need beads or sequins for this part. The embroidery gives the design its gold accents without adding more separate pieces.
Assemble and Finish Your Crochet Christmas Bells
All the crocheting is finished. Now we're going to put everything together so the bells look like the example image.
Take your time arranging the bows. They're fairly large compared with the bell bodies, and the way they sit makes a noticeable difference in the finished project.
Step 1: Block the Bell Bodies
Start with the ivory bell bodies before attaching the decorative pieces.
Now that the three gold stars are embroidered, gently shape the hollow ornament so the lower opening is round and the sides flare evenly. The scallops should curve outward, with the green layer resting above the red.
If the shell holds its shape, you can skip the stiffener. If it collapses, place it over a smooth, plastic-covered form that supports the flared opening.
Test a fabric stiffener suitable for your yarn on a small sample first, especially where the red and green colors meet the ivory. Follow the product instructions, keep the scallops evenly arranged, and let the shell dry completely before removing the form.
Don't attach the bow, hanging loop, or metal clapper until the shell is completely dry and holds its intended shape.
For the flat appliqué, lay it right side up on a blocking mat. Arrange the lower corners so the sides slope outward evenly. Straighten the scallops without stretching them.
If your yarn is suitable for damp blocking, lightly dampen the appliqué, pin it into shape, and leave it until completely dry. Check the yarn label first.
Step 2: Attach the Large Bow to the Ornament
- Find the center front of the hollow bell, with the joining seam positioned toward the back.
- Place the large completed bow across the upper portion of the bell. Its center should sit around Rounds 3 through 6.
- Arrange the two loops so they extend to the left and right of the bell.
- Let the two ribbon tails angle downward and outward over the upper sides.
- Make sure the center gold star remains visible below the bow.
- Use the reserved cranberry yarn tail to sew the bow center firmly to the bell.
- Add a few small stitches behind the lower edges of the loops and tails wherever necessary to keep them in position.
Don't sew down the entire bow. The loops should keep their rounded shape, and the lower portions of the tails can remain free.
Check the balance: Hold the bell upright by its top. The bow should sit evenly, without pulling the narrow top of the bell to one side.
If the bow is too heavy for the shell and makes it lean forward, secure its center through several neighboring stitches rather than one small spot. You may also need to stiffen the upper shell before finishing.
Step 3: Attach the Holly and Berries
If you haven't already attached the holly clusters to the bow centers, do that now.
The two green leaves should angle down and outward beneath the three berries. Keep their pointed ends visible against the ivory background.
Arrange the berries in a little triangle, one above and two below.
Sew the cluster securely to the middle of the bow. Pass the yarn through the bow fabric and the backs of the holly pieces several times, taking care not to squash the berries.
Repeat this arrangement on the smaller appliqué bow.
Step 4: Make the Ornament Hanging Loop
Use ivory yarn and the 3.5 mm hook.
Hanging cord: Ch 32, leaving a 10-inch yarn tail at both ends. Fasten off.
Fold the chain in half to form a loop.
Using a yarn needle, sew one end to the crown of the ornament near Round 1. Sew the second end to an opposite stitch of the crown, approximately ¼ inch from the first attachment.
Pass the yarn through several crown stitches to reinforce both attachment points. Weave the remaining ends into the inside of the bell.
At the target gauge, the folded chain should give approximately 2½ inches of hanging height. Adjust the chain length if your gauge produces a much shorter or longer loop.
Check the hanger: Lift the ornament by the loop. The bell should hang upright, with the bow facing forward and the lower scallops remaining level.
Step 5: Make and Attach the Jingle Bell Clapper
The little gold jingle bell hangs beneath the center of the hollow ornament. You don't need to crochet a separate clapper ball.
Use cranberry yarn and the 3.5 mm hook.
Clapper cord: Ch 24, leaving a 10-inch tail at each end. Fasten off.
Using a yarn needle, attach one end of the chain to two neighboring stitches on the inside of the crown near Round 1. Pass through the crown stitches several times and secure the end.
Attach the opposite end to the small metal loop at the top of your gold jingle bell. Pass the yarn through the metal loop several times before securing it.
Check the hanging length before weaving in the final end.
The metal loop at the top of the jingle bell should sit approximately level with the finished lower scalloped edge. Most of the gold bell should hang just below the opening.
Adjusting the cord: The chain length is a starting estimate because chain gauge varies. If the metal bell hangs too low, remove a few chains and reattach it. If it sits too far inside the ornament, add a few chains.
Don't leave a long loose cord inside the ornament. Keep it just long enough for the bell to hang in the correct position.
Once the length looks right, secure the attachment and weave in the yarn end.
Step 6: Attach the Smaller Bow to the Appliqué
- Lay the flat bell right side up.
- Center the smaller red bow over the narrow top of the appliqué.
- Position the bow center across Rows 1 through 3.
- Spread the loops evenly to the left and right.
- Angle the two tails outward so they frame the upper part of the ivory bell.
- Check that all three gold stars remain visible.
- Sew the bow center securely to the appliqué.
- Make a few additional stitches behind the tails if they need help staying in place.
There is no hanging cord or metal clapper on the appliqué.
When you lay it down, the appliqué itself should remain flat. The bow, leaves, and berries will be raised slightly from its surface.
Step 7: Secure All Yarn Ends
Turn each project over and check the backs of the decorations.
Weave every loose yarn tail through several nearby stitches, changing direction at least once before trimming it.
Check that the berries, holly leaves, and bows are firmly attached. Give each one a gentle tug with your fingers.
Look inside the hanging ornament and check the clapper cord and hanger attachments as well.
Don't trim a loose tail close to a knot and assume it will stay put. Work the ends into the crochet fabric.
Before hanging or attaching either bell, remove all stitch markers, blocking pins, temporary cardboard, and shaping forms. Check inside the hollow ornament, underneath the bow, and along the scalloped edging for anything left behind.
Step 8: Final Appearance Check
Set the two finished bells side by side and compare them with the example image.
- The dimensional ornament has a hollow ivory bell-shaped body.
- The matching appliqué is flat and has the same flared silhouette.
- Both have one large red bow with two loops and two tails.
- Both have two shaped green holly leaves.
- Both have three raised red berries at the bow center.
- Both have one large gold star and two smaller ones.
- Both have overlapping green and red scalloped edging.
- Only the ornament has an ivory hanging loop and a gold metal jingle bell.
If everything looks balanced, you're finished!
I'd leave the appliqué flat until you're ready to sew it onto something. That keeps the edges from curling while it's stored.
Christmas Bell Color Variations and Decorating Ideas
I like the ivory, cranberry, and evergreen combination for this design. It has plenty of Christmas color without making the three embroidered stars disappear against the background.
But if you'd rather make a few different bells for the tree, you can change the yarn colors without changing the stitch counts.
Classic Christmas Bells
Use warm ivory for the bell body, cranberry for the bow and lower scallops, and deep evergreen for the holly leaves and upper edging.
Keep the gold stars and metal jingle bell. This is the version shown in the example image.
Winter White and Sage Bells
Try white for the bell body, dusty sage for the scalloped edging and holly leaves, and muted red for the bow and berries.
I'd keep the three stars gold rather than making them white. They'll be easier to see against the light background.
Burgundy and Cream Bells
A deep burgundy bow with olive-green holly leaves would make a pretty variation if you prefer darker Christmas colors.
Use the same ivory bell body and scallop pattern. There's no need to change the construction.
Ways to Use the Hanging Ornament
- Hang it on a Christmas tree where there's room for the bow to spread.
- Add one to a holiday wreath.
- Use it as a removable decoration on a wrapped Christmas gift.
- Make several matching bells for a Christmas garland.
- Hang a pair on a decorative wall hook or cabinet knob.
The little metal bell is optional for alternate versions, although it's part of the featured design. If you leave it off, keep the hollow opening and the hanging loop.
Ways to Use the Flat Appliqué
The flat bell is the better choice when you want a decoration that lies against fabric or paper. If you're looking for other motifs to go with it, take a look at my free Christmas crochet appliqué patterns. You can make a matching group without putting every Christmas decoration on the same project.
- Sew it onto a Christmas stocking.
- Attach it to a handmade gift bag.
- Use it as a decoration on a Christmas table runner.
- Sew it onto a decorative pillow cover.
- Add it to a fabric Christmas banner or wall hanging.
When sewing the appliqué to fabric, use matching ivory yarn or sturdy sewing thread around the outer edges of the bell body. Keep your stitches close enough to stop the appliqué from lifting away from the fabric.
You can leave the scalloped tips slightly free if they're going on a decorative item that won't be handled much. For something that will be used regularly, stitch around more of the scalloped edge so it doesn't catch.
The appliqué has raised berries and a large bow, so I wouldn't choose it for baby clothing or anything a young child will handle.
If you're making a collection of handmade Christmas decorations, you might also enjoy the free crochet flying angel ornament pattern. It gives you a different shape to mix with your bells.
Frequently Asked Questions About Crochet Christmas Bells
Can I make this crochet Christmas bell with worsted-weight yarn?
Yes, but you'll need to expect a larger finished bell unless you adjust the hook and gauge. Category 4 worsted yarn is generally thicker than the DK yarn used for this pattern.
I'd make a gauge swatch first and check the bottom diameter before adding the edging. If you change the yarn weight, the finished sizes given above will no longer be reliable.
How can I keep the hanging bell from losing its shape?
Start with firm, even single crochet stitches. A cotton yarn and a hook that produces a close fabric are helpful.
If the bell still folds inward, shape it over a covered form and use a suitable fabric stiffener. Let it dry completely before attaching the bow or metal clapper.
A hollow crochet bell won't behave exactly like a rigid metal ornament, so a little movement is normal.
What if my crocheted bow won't stay open?
Make sure both short ends of the bow strip are sewn securely at the center. Then pinch and wrap the center before attaching the tails.
If the loops still collapse, give them a little shape with your fingers and add a couple of small securing stitches near the back of each loop. Don't stitch the entire loop flat.
Can I use sewing thread instead of embroidery floss for the stars?
You can use metallic sewing thread, but a single strand may look very thin against the crochet stitches.
Try several strands together, or make a second pass along each spoke. You want the stars to stand out without becoming bulky.
How should I clean the finished ornament?
I'd start with gentle spot cleaning. The metal bell, raised decorations, and any fabric stiffener can complicate washing.
If the ornament needs more than spot cleaning, check the care instructions for the yarn and stiffener first. Avoid soaking a piece with an attached metal clapper unless the hardware is suitable for water exposure.
The flat appliqué is easier to care for when it's not attached to anything, but the red and green yarn should be checked for color bleeding before washing it against ivory fabric.
Can I make the flat appliqué without the holly berries?
Yes. If you'd like a flatter decoration, leave off the raised berries and embroider three small red circles where the holly cluster would go.
Keep the two green leaves and the bow in the same positions. You'll still have the Christmas look without the little crocheted balls.
Do I need to make both patterns?
Not at all. The hollow ornament and the flat appliqué are complete projects on their own.
If you're making Christmas tree decorations, I'd start with the dimensional ornament. If you're decorating a stocking or gift bag, the flat bell will make more sense.
Either way, keep the three little stars and the two-color scalloped edging. Those are the details that give this particular Christmas bell design its personality.
When you click on links to various merchants on this site and make a purchase, this may result in this site earning a commission. This does not affect the price you pay.

UBGI Gold Standard 2026
Reviewed under the site's
editorial checklist.
Photos, decorating ideas, party setups and reader submissions are shared for inspiration unless a page is specifically presented as a pattern, tutorial, reference guide or step-by-step project. Follow the instructions, measurements, safety guidance and manufacturer directions provided for the particular project or product.
About Jan | Contact | Baby Nursery Ideas (Blog) | Site Map | Privacy Policy | Disclosure Policy | Disclaimer | Affiliate Disclosure | Earnings Disclosure | Facebook | Pinterest
I am a participant in the Amazon Services LLC Associates Program, an affiliate advertising program designed to provide a means for us to earn fees by linking to Amazon. As an Amazon Associate I earn from qualifying purchases.
Copyright © 2006-2026. All Rights Reserved.