Free Crochet Christmas Present Applique & Mini Ornament Pattern
By Jan Bay
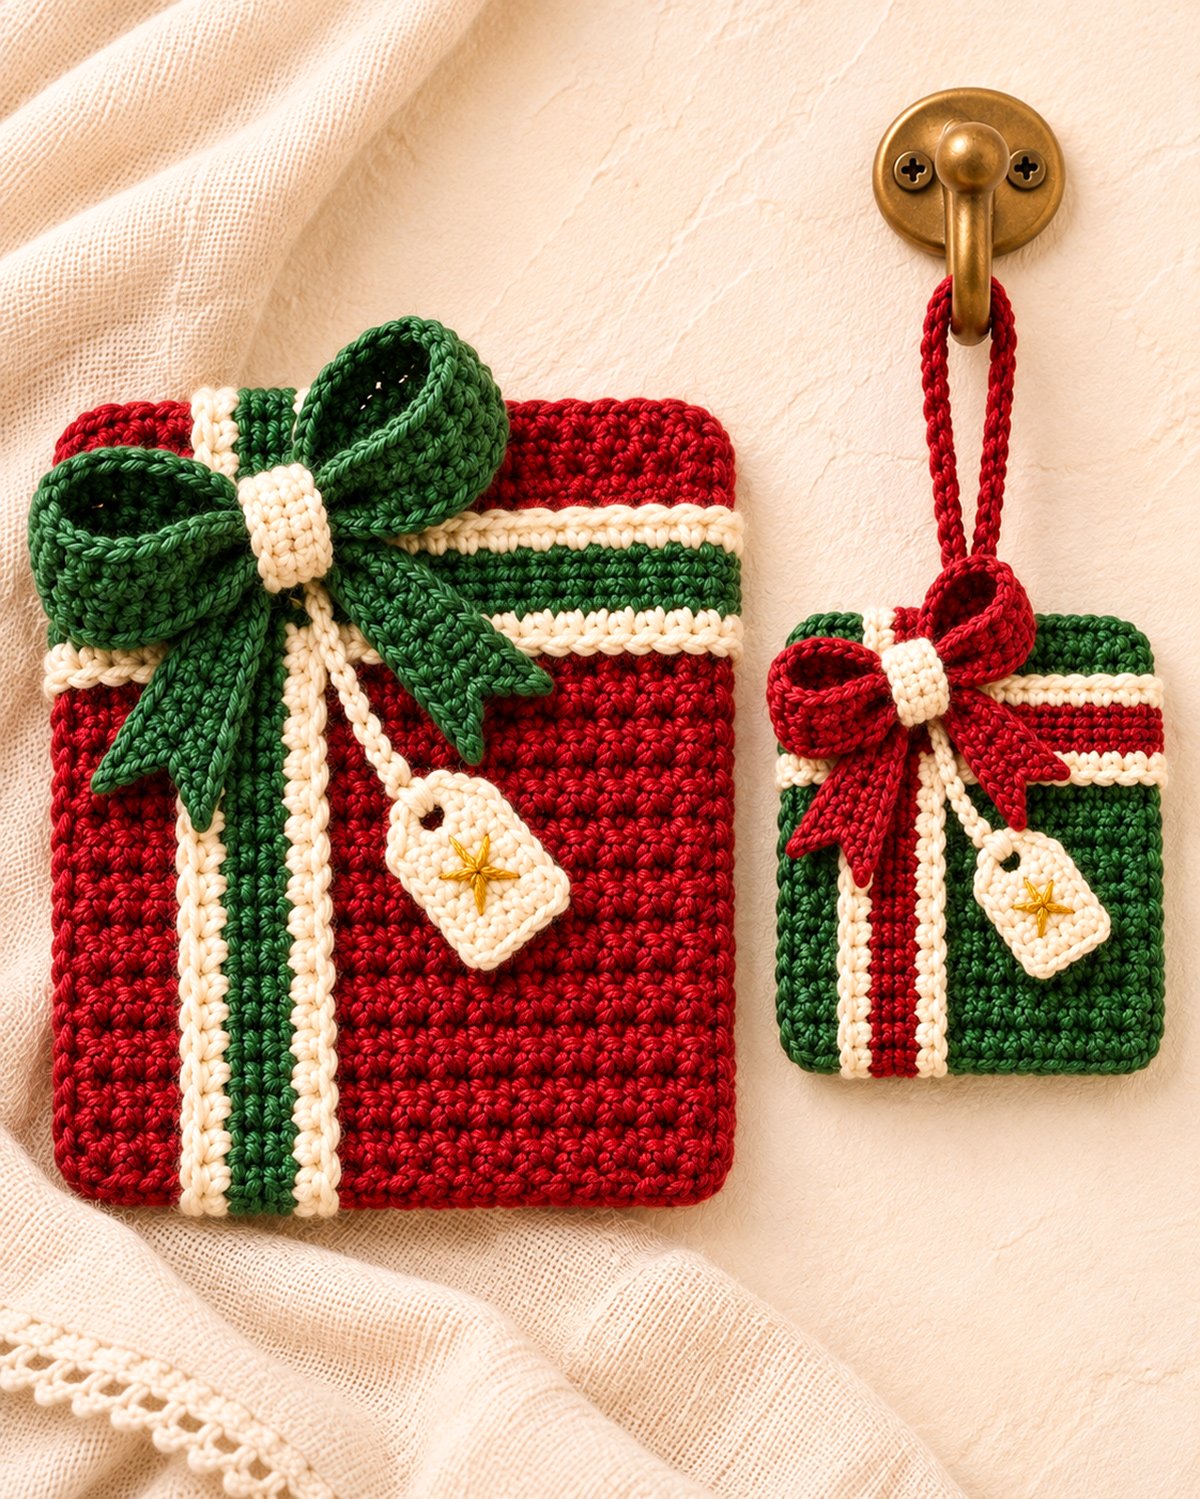
This free crochet Christmas present applique and matching mini ornament pattern gives you two festive little packages to make, with cranberry red for the larger appliqué and deep evergreen for the hanging ornament. Both have an off-center ribbon, a dimensional bow with shaped tails, and the sweetest miniature gift tag embroidered with a golden star. Sew the appliqué onto a Christmas stocking, pillow, or handmade gift bag, or hang the smaller present on your Christmas tree. I love a beautifully wrapped Christmas present almost as much as the surprise inside, especially when it's topped with a big, gorgeous bow! And these two sport some very impressive crocheted bows. They're the first two pieces in a whole matching collection of crocheted Christmas gifts we're putting together.
Explore More Free Christmas Crochet Patterns
Free Crochet Applique Patterns
See Supplies for This Project Here.
Jump to a Section
Free Crochet Christmas Present Pattern
Christmas Present Applique Instructions
Materials and Supplies
These little Christmas presents use ordinary single crochet for most of their construction. The bows are what give them their personality, so I'd choose a yarn that holds its shape nicely instead of something very fuzzy. A smooth DK-weight cotton yarn is a good choice because you can see your stitches, and the ribbon loops won't disappear into a cloud of fibers.
Skill level: Intermediate. The basic stitches are straightforward, but shaping the bow tails, assembling the layered ribbons, and attaching the dimensional bows and embroidered gift tags require some crochet and finishing experience.
Yarn: DK weight, Category 3, in the following colors:
- Cranberry red: approximately 80 yards
- Deep evergreen: approximately 75 yards
- Warm ivory: approximately 45 yards
- Antique gold embroidery floss or fine embroidery yarn: less than 1 yard
These are generous working estimates for both presents, including the ribbons, bows and gift tags. Actual amounts will depend on your yarn and tension.
Additional supplies:
- 3.5 mm (E/4) crochet hook, or size needed to obtain gauge
- Tapestry needle for joining and weaving in ends
- Small embroidery needle for the gold stars
- Scissors
- Stitch markers
- Rustproof pins or removable clips for positioning the ribbons
- Measuring tape
You won't need stuffing, wire, plastic inserts, beads or anything rigid inside these presents. They're made as flat decorations, with the extra dimension coming from the bows and ribbon layers.
Color arrangement: Use cranberry for the large present's base, evergreen for its center ribbon and bow, and ivory for the ribbon borders, bow center and gift tag. Reverse the main colors for the miniature ornament. Both gift tags have embroidered gold stars.
Finished Size and Gauge
At the gauge below, the large appliqué should measure approximately 6 inches wide by 7 inches high, including its narrow outer border. The smaller ornament should measure approximately 4 inches wide by 4¾ inches high, not counting the hanging loop or any bow tips that extend beyond the upper edge.
Gauge: 20 single crochet stitches and 22 rows = 4 inches, measured in a flat, unblocked single-crochet swatch.
Large present before edging: Approximately 5.6 inches wide by 6.55 inches high.
Mini ornament before edging: Approximately 3.6 inches wide by 4.36 inches high.
Those measurements are calculated from the stitch counts and gauge, not measurements taken from finished crocheted samples. The example image is a design mockup, not a photograph of a test-crocheted pair.
Make a small gauge swatch before beginning. You don't need to worry about a tiny difference if you're making decorations, but you do want the stitches firm enough that the presents hold their rectangular shape.
Checkpoint: If your base is noticeably wider or shorter than the calculated measurements, check both your stitch gauge and your row gauge before making the ribbons. Changing the number of rows without adjusting the ribbon lengths would leave the pieces mismatched.
Stitches and Abbreviations
This pattern uses US crochet terminology throughout.
- ch = chain
- sc = single crochet
- sl st = slip stitch
- st = stitch
- sts = stitches
- sc2tog = single crochet two stitches together
- RS = right side
- WS = wrong side
- FO = fasten off
Single crochet decrease (sc2tog): Insert your hook into the next stitch, yarn over and pull up a loop. Insert your hook into the following stitch, yarn over and pull up another loop. Yarn over and pull through all three loops on your hook. Two stitches become one.
Turning chains: Chain 1 at the beginning of each new row unless otherwise instructed. The turning chain does not count as a stitch.
Working flat: Turn your work after every row. Crochet through both loops of the stitches unless an instruction tells you otherwise.
If you need a reminder of the standard terms, the Craft Yarn Council's crochet abbreviations guide is a useful reference.
Before you begin: We're making two different sizes, but the construction is almost identical. Each starts with a flat rectangle. The ribbons are crocheted separately and sewn on, which keeps their contrasting ivory edges neat without working complicated color changes into every row of the base.
Free Crochet Christmas Present Applique Ornament Pattern
We'll make the larger cranberry present first. Once you've put that one together, the smaller ornament will feel familiar. The main differences are the dimensions, the reversed colors and the hanging loop.
I like the ribbon crossing above and to the left of center. It leaves a generous patch of red showing on the lower-right portion of the present, which balances the oversized bow and hanging gift tag. There's no need to fill that space with another decoration.
Christmas Present Applique Instructions
Part A: Cranberry Present Base
Using cranberry yarn and your 3.5 mm hook:
Foundation: Ch 29.
Row 1: Sc in the second ch from the hook and in each remaining chain. (28 sc)
Rows 2-36: Ch 1, turn, sc in each of the 28 sts across. (28 sc per row)
At the end of Row 36, you should have a rectangle measuring approximately 5.6 inches across and 6.55 inches from bottom to top.
Fasten off and weave in the starting and ending tails.
Part B: Cranberry Outer Border
Choose which side of the rectangle you want to face outward. Both sides are usable, but keep the same side facing you throughout assembly. Place the foundation-chain edge at the bottom and Row 36 at the top.
Join cranberry yarn with a slip stitch at the upper-right corner.
Border Round 1: Ch 1. Work 3 sc in the upper-right corner stitch. Work 1 sc in each of the next 26 top-edge stitches. Work 3 sc in the upper-left corner stitch. Working down the left side, work 33 sc evenly across the 36 row-ends, skipping the row-ends of Rows 30, 18 and 6. Work 3 sc in the bottom-left corner stitch. Work 1 sc in each of the 26 foundation-chain loops between the bottom corners. Work 3 sc in the bottom-right corner stitch. Work 33 sc up the right side, skipping the row-ends of Rows 6, 18 and 30. Join with a sl st to the first sc of the round. (130 sc)
Fasten off and weave in the ends.
The three single crochets at each corner should give the present a slight, tidy rounding without turning it into an oval.
Checkpoint: Your rectangle should still lie flat. Count 33 sc along each side, 26 sc between the corners across both the top and bottom, and 3 sc in each corner. You should have 130 sc altogether. If the edging pulls inward or begins to ripple, check your stitch spacing and gauge before fastening off.
Part C: Ivory Horizontal Ribbon Background
This is the wider ivory strip that will sit behind the evergreen stripe across the upper portion of the present.
With ivory yarn, ch 29.
Row 1: Sc in the second ch from the hook and across. (28 sc)
Rows 2-6: Ch 1, turn, sc across. (28 sc per row)
Fasten off, leaving a sewing tail.
You should have a strip approximately 5.6 inches long and 1.1 inches high.
Part D: Evergreen Center for the Horizontal Ribbon
With evergreen yarn, ch 29.
Row 1: Sc in the second ch from the hook and across. (28 sc)
Rows 2-4: Ch 1, turn, sc across. (28 sc per row)
Fasten off, leaving a sewing tail.
Center this green strip lengthwise over the ivory horizontal ribbon. Leave approximately one row of ivory showing along the upper and lower edges.
Using the green sewing tail, sew the long edges of the green strip to the ivory strip. Catch only the ivory stitches beneath it. Keep your sewing tension even so the strip doesn't gather.
Tack the two short ends as well. The finished ribbon should be one continuous horizontal band with a green center and ivory borders.
Part E: Ivory Vertical Ribbon Background
With ivory yarn, ch 6.
Row 1: Sc in the second ch from the hook and across. (5 sc)
Rows 2-36: Ch 1, turn, sc across. (5 sc per row)
Fasten off, leaving a sewing tail.
This strip should measure approximately 1 inch wide and 6.55 inches long.
Part F: Evergreen Center for the Vertical Ribbon
With evergreen yarn, ch 4.
Row 1: Sc in the second ch from the hook and across. (3 sc)
Rows 2-36: Ch 1, turn, sc across. (3 sc per row)
Fasten off, leaving a sewing tail.
Center this narrow green strip on the ivory vertical ribbon. You should see one ivory stitch column along each side.
Sew the green strip to the ivory background along both long edges and secure its ends.
Ribbon Placement Checkpoint
Lay the cranberry rectangle with Row 36 at the top.
Position the horizontal ribbon across the front so its six rows cover approximately Rows 26-31 of the cranberry base. This leaves five rows of red visible above the horizontal ribbon.
Position the vertical ribbon over stitch columns 7-11, counting from the left edge of the original 28-stitch rectangle. Keep the ribbon straight, with its bottom and top ends stopping at the inner edges of the outer border.
Place the horizontal ribbon against the base first, then lay the vertical ribbon over it. Their intersection should be above and left of center.
Pin everything in place and check the proportions before sewing. The bow will cover most of the ribbon intersection later, so don't try to make a decorative knot from the two strips themselves.
Sew the horizontal ribbon to the base along its upper and lower edges and secure the ends. Then sew the vertical ribbon along both long edges and secure its ends. Use small stitches and avoid pulling the strips tightly against the base.
Check the rectangle again. The ribbon should lie flat, the base should not pucker, and you should still have a broad uninterrupted red area below and to the right of the crossing.
Set the large appliqué aside. We'll add its bow and miniature gift tag after making the smaller present.
Mini Hanging Ornament Instructions
Now for the little evergreen present. We're using the same basic construction, but with fewer stitches and rows. The ribbon and bow will be cranberry red this time, and we'll add a hanging loop during assembly.
Keep the smaller present flat. It doesn't need stuffing to look like a gift, and leaving it unstuffed makes it lighter on a Christmas tree branch.
Part A: Evergreen Ornament Base
With evergreen yarn, ch 19.
Row 1: Sc in the second ch from the hook and in every remaining chain. (18 sc)
Rows 2-24: Ch 1, turn, sc in each stitch across. (18 sc per row)
Fasten off and weave in the ends.
Your rectangle should measure approximately 3.6 inches wide and 4.36 inches high before edging.
Part B: Evergreen Outer Border
Choose the front of the rectangle. Keep the foundation edge at the bottom and Row 24 at the top.
Join evergreen yarn at the upper-right corner.
Border Round 1: Ch 1. Work 3 sc in the upper-right corner stitch. Sc in each of the next 16 stitches across the top. Work 3 sc in the upper-left corner stitch. Work 22 sc down the left side, skipping the row-ends of Rows 18 and 6. Work 3 sc in the bottom-left corner stitch. Sc across the 16 foundation-chain loops between the bottom corners. Work 3 sc in the bottom-right corner stitch. Work 22 sc up the right side, skipping the row-ends of Rows 6 and 18. Join with a sl st to the first sc. (88 sc)
Fasten off and weave in the ends.
The finished bordered rectangle should measure approximately 4 inches wide and 4¾ inches high.
Checkpoint: Lay the ornament flat and check that all four corners remain gently rounded. Don't pull the border stitches tightly when fastening off.
Part C: Ivory Horizontal Ribbon Background
With ivory yarn, ch 19.
Row 1: Sc in the second ch from the hook and across. (18 sc)
Rows 2-5: Ch 1, turn, sc across. (18 sc per row)
Fasten off, leaving a sewing tail.
Part D: Cranberry Center for the Horizontal Ribbon
With cranberry yarn, ch 19.
Row 1: Sc in the second ch from the hook and across. (18 sc)
Rows 2-3: Ch 1, turn, sc across. (18 sc per row)
Fasten off, leaving a sewing tail.
Center the cranberry strip on the ivory ribbon, leaving one row of ivory visible above and below it. Sew along the long edges and secure the short ends.
That's your smaller two-color horizontal ribbon.
Part E: Ivory Vertical Ribbon Background
With ivory yarn, ch 5.
Row 1: Sc in the second ch from the hook and across. (4 sc)
Rows 2-24: Ch 1, turn, sc across. (4 sc per row)
Fasten off, leaving a sewing tail.
Part F: Cranberry Center for the Vertical Ribbon
With cranberry yarn, ch 3.
Row 1: Sc in the second ch from the hook and in the next chain. (2 sc)
Rows 2-24: Ch 1, turn, sc across. (2 sc per row)
Fasten off, leaving a sewing tail.
Center the cranberry strip over the ivory ribbon. Leave one ivory stitch column visible on each side. Sew the cranberry strip along its long edges and secure both ends.
Part G: Position the Ornament Ribbons
Place the evergreen rectangle right side up, with Row 24 at the top.
Lay the horizontal ribbon across the front so its five rows cover approximately Rows 16-20 of the base. Four rows of evergreen should remain visible above the ribbon.
Place the vertical ribbon over stitch columns 5-8 of the original 18-stitch rectangle, counting from the left edge.
Both strips should reach the inner edges of the outer border without being stretched.
Pin the ribbons in place. Sew the horizontal ribbon to the base first, stitching along its upper and lower edges and securing the ends. Lay the vertical ribbon over the horizontal strip, then sew it down along both long edges and secure its ends.
Checkpoint: The cranberry and ivory ribbons should form an off-center cross near the top-left of the evergreen present. The lower-right part of the gift should remain plain green.
Don't add any little decorations to the bottom corner. The bow and gift tag will provide all the detail this ornament needs.
We now have both wrapped presents ready for their bows.
Ribbon and Dimensional Bow
Here's the part that gives these presents their dressed-up Christmas look. Instead of tying loose yarn into a bow, we'll crochet the loops and tails separately. The loops form a dimensional double bow, while the two pointed tails fall toward the lower corners.
I'd take a little extra time with the shaping here. The bow is the most noticeable detail in the entire project, and it should look like a real ribbon bow rather than a flat butterfly shape.
Part A: Large Evergreen Bow Loops
With evergreen yarn, ch 8.
Row 1: Sc in the second ch from the hook and across. (7 sc)
Rows 2-42: Ch 1, turn, sc across. (7 sc per row)
Fasten off, leaving a long sewing tail.
You should have a strip approximately 1.4 inches wide and 7.6 inches long.
Forming the Bow Loops
Bring the two short ends of the strip together without twisting it. Whipstitch the seven corresponding stitches of the beginning and ending edges together to form a continuous ring.
Flatten the ring with the seam at the middle of the back. The flattened ring should measure approximately 3.8 inches from end to end.
Pinch the flattened ring at its midpoint. This divides it into two oval loops, each extending approximately 1.9 inches from the center before shaping.
Bring the upper and lower edges slightly inward at the pinch to give the center a gathered look. Thread the sewing tail through the pinched center several times to hold the folds in place.
Don't sew the outer ends of the loops together. Those ends need to remain rounded and open so the bow has dimension.
Set the bow loops aside while you make the tails.
Part B: Large Evergreen Bow Tails
Make two identical tails in evergreen.
Foundation: Ch 8.
Row 1: Sc in the second ch from the hook and across. (7 sc)
Rows 2-3: Ch 1, turn, sc across. (7 sc per row)
Row 4: Ch 1, turn, sc2tog, sc in the next 3 sts, sc2tog. (5 sc)
Rows 5-7: Ch 1, turn, sc across. (5 sc per row)
Row 8: Ch 1, turn, sc2tog, sc in the next st, sc2tog. (3 sc)
Rows 9-10: Ch 1, turn, sc across. (3 sc per row)
Row 11: Ch 1, turn, sc2tog, sc in the last st. (2 sc)
Row 12: Ch 1, turn, sc2tog. (1 sc)
Fasten off and weave in the pointed end. Leave a sewing tail at the wide end if you haven't already reserved one.
Repeat for the second tail.
Each tail should measure approximately 2.2 inches long before final shaping.
Tail-Shaping Checkpoint: Both tails begin with seven stitches, narrow to five, then three, two and finally one stitch at the tip. The two pieces should match when placed side by side.
Turn one tail slightly to the left and the other slightly to the right when assembling the bow. That's how we'll get the two angled ribbon ends in the example image.
Part C: Large Ivory Bow Center
With ivory yarn, ch 4.
Row 1: Sc in the second ch from the hook and across. (3 sc)
Rows 2-12: Ch 1, turn, sc across. (3 sc per row)
Fasten off, leaving a long sewing tail.
Wrap this narrow ivory strip around the pinched middle of the evergreen bow loops. Bring its two short ends together at the back and stitch them securely.
It should hold the center firmly without flattening the two loops. The 12-row length is calculated to allow for the doubled bow fabric; check the fit before sewing the ends together. If it is too short to meet without stretching, add one or two rows. If it is loose, overlap the ends slightly at the back.
Keep the ivory band centered so the bow looks evenly gathered.
Part D: Mini Cranberry Bow Loops
Now we'll repeat the same bow construction in a smaller size.
With cranberry yarn, ch 6.
Row 1: Sc in the second ch from the hook and across. (5 sc)
Rows 2-30: Ch 1, turn, sc across. (5 sc per row)
Fasten off, leaving a long sewing tail.
Bring the short ends together without twisting the strip. Whipstitch the five corresponding stitches together to form a ring.
Flatten the ring with the seam at the middle of the back and pinch its midpoint to form two matching oval loops.
At the calculated gauge, the flattened bow should measure approximately 2.7 inches across before shaping.
Secure the pinched center with several small stitches, leaving the rounded ends of the loops open.
Part E: Mini Cranberry Bow Tails
Make two identical tails.
With cranberry yarn, ch 6.
Row 1: Sc in the second ch from the hook and across. (5 sc)
Rows 2-3: Ch 1, turn, sc across. (5 sc per row)
Row 4: Ch 1, turn, sc2tog, sc in the next st, sc2tog. (3 sc)
Rows 5-6: Ch 1, turn, sc across. (3 sc per row)
Row 7: Ch 1, turn, sc2tog, sc in the last st. (2 sc)
Row 8: Ch 1, turn, sc across. (2 sc)
Row 9: Ch 1, turn, sc2tog. (1 sc)
Fasten off and weave in the pointed end.
Make the second tail the same way.
Each miniature tail should measure approximately 1.6 inches long before shaping.
Part F: Mini Ivory Bow Center
With ivory yarn, ch 3.
Row 1: Sc in the second ch from the hook and in the next chain. (2 sc)
Rows 2-9: Ch 1, turn, sc across. (2 sc per row)
Fasten off, leaving a long sewing tail.
Wrap the ivory strip around the pinched center of the miniature cranberry bow. Sew the short ends together at the back.
Check that the band holds the loops without squeezing them flat. Add a row if the ends won't meet without stretching, or overlap them slightly if there's extra length.
Bow Checkpoint
Before attaching the bows, place both on your work surface.
The large evergreen bow should have two rounded, dimensional loops, two matching pointed tails and a contrasting ivory center.
The miniature cranberry bow should be a smaller version with the same proportions.
If either bow looks too flat, gently open the loops with your fingers and shape the outer curves. You can make a small hidden tack at the lower inside edge of each loop during final assembly to help preserve the shape. Don't stitch down the entire loop.
There's no need for stuffing or wire inside the bows.
Miniature Gift Tag
I think these little tags are worth the few extra stitches. They make the presents look as though someone has actually wrapped and labeled them, and the embroidered gold stars add a pretty finishing touch without needing buttons or beads.
Make the larger tag first, then a smaller version for the hanging ornament.
Part A: Large Ivory Gift Tag
With ivory yarn, ch 7.
Row 1: Sc in the second ch from the hook and across. (6 sc)
Rows 2-6: Ch 1, turn, sc across. (6 sc per row)
Row 7: Ch 1, turn, sc2tog, sc in the next 2 sts, sc2tog. (4 sc)
Row 8: Ch 1, turn, sc in the first st, ch 2, skip the next 2 sts, sc in the last st. (2 sc and one ch-2 space)
Row 9: Ch 1, turn, sc in the first sc, sc in each of the next 2 chain stitches (work into the chains themselves, not the space beneath them), sc in the last sc. (4 sc)
Fasten off and weave in the ends.
You should have a small tag approximately 1.2 inches wide at the bottom and 1.6 inches high, with gently narrowed upper corners and a little opening near the top.
Check that the chain opening remains visible. We'll use it to attach the hanging cord.
Part B: Mini Ivory Gift Tag
With ivory yarn, ch 6.
Row 1: Sc in the second ch from the hook and across. (5 sc)
Rows 2-4: Ch 1, turn, sc across. (5 sc per row)
Row 5: Ch 1, turn, sc2tog, sc in the next st, sc2tog. (3 sc)
Row 6: Ch 1, turn, sc in the first st, ch 1, skip the next st, sc in the last st. (2 sc and one ch-1 space)
Row 7: Ch 1, turn, sc in the first sc, sc into the chain stitch itself rather than the space beneath it, sc in the last sc. (3 sc)
Fasten off and weave in the ends.
The smaller tag should measure approximately 1 inch wide and 1.3 inches high.
The opening near the top is smaller than the one on the large tag. That's fine. You only need enough space to pass a yarn needle and the hanging cord through it.
Part C: Embroider the Gold Stars
Thread an embroidery needle with two strands of antique-gold embroidery floss or a similarly fine gold-colored embroidery yarn.
Place the larger ivory tag right side up, with its narrow end at the top.
Mark a small center point in the lower rectangular portion of the tag, roughly halfway between the side edges.
Make three straight stitches that cross at that center point:
- Work one short vertical stitch.
- Work one diagonal stitch from lower-left to upper-right, crossing the vertical stitch at its center.
- Work another diagonal stitch from upper-left to lower-right, crossing at the same center point.
You should have six little star points radiating from the center. Keep the entire embroidered star approximately ¼ inch across so it doesn't crowd the tag.
Secure the embroidery ends on the back with small woven stitches. Avoid a bulky knot.
Repeat on the miniature tag, making the star slightly smaller to suit its narrower front.
Part D: Crochet the Gift Tag Cords
For the large present, leave a sewing tail, then use ivory yarn to ch 11. Fasten off, leaving another sewing tail.
For the mini ornament, leave a sewing tail, ch 8, and fasten off with another sewing tail.
These are simple chain cords, not straps. They only need to support the little crochet tags.
Use a yarn needle to pass one end of each cord through the opening near the top of its matching gift tag. Stitch the cord end back into itself to secure it.
Leave the other cord end available for attaching beneath the corresponding bow during assembly.
Gift Tag Checkpoint: Both tags should have their embroidered stars facing outward. The larger tag belongs with the cranberry present and the smaller tag belongs with the evergreen ornament.
Set them aside without pulling the cords tight. They should hang naturally beside the bows rather than looking stretched across the front of the gifts.
Assembly and Finishing
We've made all the pieces. Now we can put the presents together and give those bows their final shape. I would arrange everything with pins first, especially the tails and gift tags. A small adjustment in their placement makes quite a difference.
Step 1: Attach the Large Evergreen Bow Tails
Lay the completed cranberry present right side up, with its ribbon crossing toward the upper-left.
Position the two evergreen bow tails with their wide ends meeting near the vertical ribbon, around stitch column 9 and Row 31 or 32 of the base.
Angle the first tail downward and slightly left. Angle the second tail downward and right. The tapered points should extend away from the bow center, leaving the lower-right portion of the present mostly uncovered.
Adjust the angles until the tails look balanced. They don't have to form a perfect V.
Using the reserved starting tails or a separate length of matching evergreen yarn, sew the wide ends to the ribbon and base. Stitch through the top two or three rows of each tail to hold it in position.
Don't sew down the entire length of the tails. Leave their lower portions free enough to show the shaped edges and tapered points.
Step 2: Attach the Large Bow Loops
Position the large evergreen bow above the tails, covering their joined upper edges.
Center the ivory bow band over the vertical ribbon near Rows 31-32, just above the horizontal ribbon's upper edge.
Allow the bow loops to extend outward on either side. The left loop may project slightly beyond the edge of the present, while the right loop should sweep across the upper front.
Thread a yarn needle with evergreen yarn and sew through the back of the bow's center band, the gathered bow fabric and the underlying ribbon. Make several firm attachment stitches.
Do not stitch through the front of the ivory band where the stitches would show.
Shape each oval loop with your fingers. If the loops sag, make one small hidden anchoring stitch between the lower inside edge of each loop and the present. Leave the curved outer portion open.
Step 3: Attach the Large Gift Tag
Bring the ivory gift tag to the right side of the evergreen bow.
Position its embroidered star facing outward and angle the tag slightly toward the center of the cranberry present.
Use the free end of its ivory chain cord to attach the tag beneath the bow center. Sew the cord end into the back of the bow and underlying ribbon, then weave it in.
Let the tag hang just below and to the right of the bow.
If you want the appliqué to remain flatter when it's attached to another project, make one tiny hidden stitch through the lower back edge of the tag and into the cranberry base. That keeps the tag positioned without spoiling its hanging appearance.
Step 4: Attach the Mini Cranberry Bow Tails
Lay the evergreen ornament right side up.
Position the two cranberry tails near stitch column 7 and Rows 20-21 of the base, just above the horizontal ribbon crossing.
Angle one tail downward-left and the other downward-right.
The miniature tails should stop well above the bottom edge of the ornament. Adjust them so the bow doesn't hide most of the evergreen background.
Use the reserved starting tails or separate cranberry sewing yarn to secure the wide upper ends to the base. Leave the pointed ends free.
Step 5: Attach the Mini Cranberry Bow Loops
Place the miniature cranberry bow over the joined upper ends of the tails.
Center the ivory bow band slightly above the horizontal ribbon, close to Rows 20-21.
Sew the gathered bow center firmly through the underlying ribbon and evergreen base.
Gently open and round the two loops. Use a small hidden anchoring stitch beneath each loop if needed to help it retain its dimensional shape.
The smaller bow should look like a scaled-down companion to the large evergreen bow, not an entirely different style.
Step 6: Attach the Miniature Gift Tag
Place the smaller ivory gift tag just to the lower-right of the cranberry bow.
Attach its chain cord beneath the bow center, making sure the embroidered gold star faces outward.
Let the tag hang naturally. If it turns backward, use one small hidden stitch at the back of its lower edge to keep it facing forward.
Step 7: Crochet the Ornament Hanging Loop
With cranberry yarn, leave a 10-inch sewing tail and ch 32.
Starting in the second chain from the hook, work 1 sl st in each chain back toward the beginning. (31 sl sts)
Fasten off, leaving another 10-inch sewing tail.
This gives you a narrow reinforced cord rather than a single loose chain.
Bring the rounded far end of the crocheted cord back to the starting end, where both sewing tails are located, to form a hanging loop. Keep the cord flat and untwisted. Using one sewing tail, stitch through the rounded end and the starting end several times to join them securely. Weave that tail through the joined section.
Place the joined section against the back of the evergreen present at the center of its top edge, directly behind the space between stitch columns 9 and 10. Using the remaining sewing tail, stitch securely through both joined cord ends, the upper two rows of the base and the top border. Make several passes so both ends are firmly attached, then weave the tail into the back of the ornament.
Keep the loop centered on the present itself, rather than attaching it only to the off-center bow. The ornament will hang more evenly when its weight is supported at the middle of the top edge.
Hanging Checkpoint: Hold the ornament by its loop. It should hang with the lower edge approximately level. If it tilts noticeably, adjust the attachment point before securing the ends completely.
The hanging loop should be firmly attached to the body of the ornament and should not rely on the bow to support its weight.
Step 8: Final Shaping and Finishing
Lay both completed presents on a clean towel.
Check that the bases are flat and that neither ribbon has pulled the fabric into a curve.
Gently shape the four bow loops with your fingers. Straighten the ivory center bands and arrange the tapered tails so they fall naturally beneath the bows.
Check that the embroidered stars face forward and that each gift tag hangs in the intended position.
Weave in any remaining yarn ends on the backs of the presents. Keep the ends short enough that they don't show from the front, but weave them through several stitches rather than simply cutting them close to a knot.
Remove any temporary positioning pins, clips or stitch markers left from assembly. If the bases need a little help lying flat, lightly dampen the crochet fabric and pin the rectangular bases to their intended measurements. Keep the bows raised and unpinned so you don't flatten their loops. Allow everything to dry completely before removing the blocking pins. Check once more that no pins or clips remain in either finished present.
I'd avoid pressing the bows with an iron. We want those loops to keep their rounded shape.
Final Measurements and Construction Check
- Large cranberry present: approximately 6 inches wide by 7 inches high, excluding any projecting bow tips.
- Mini evergreen present: approximately 4 inches wide by 4¾ inches high, excluding the hanging loop and projecting bow tips.
- Both presents have ivory-edged, off-center crossing ribbons.
- Both bows have two dimensional loops, two tapered tails and ivory centers.
- Both gift tags have embroidered gold stars.
- The smaller present has a reinforced hanging loop attached at the top center.
- Neither present has additional corner motifs.
These are expected finished measurements based on the gauge and instructions. Check your own finished work before relying on the dimensions for a fitted project.
Important finishing note: These are decorative crochet projects, not baby toys. The hanging cords, dimensional bows and small gift tags are unsuitable for items an infant might handle or sleep with. Keep ornaments out of reach of babies and young children, and don't attach them to crib bedding or other infant sleep items.
And there you have them. Two beautifully wrapped little Christmas presents, complete with their own bows and gift tags. You can stop with the pair, or make several in different colors for a coordinating holiday display.
Ways to Use Your Crochet Presents
Now that you've made both versions, there are quite a few ways to use them without changing the pattern. I especially like the idea of making several in matching colors. A few cranberry and evergreen presents mixed with ivory and gold decorations would make a pretty Christmas collection.
Christmas tree ornaments: Use the miniature present as shown, or make several in different color combinations. Keep the ribbon and bow arrangement the same so they look like a coordinated set. You could also hang them from hooks or pegs as part of a decorative Christmas display.
Christmas stockings: The larger appliqué makes a nice focal decoration on a plain stocking. I would place it slightly above the center of the stocking body rather than crowding it against the cuff. Sew around the outer edges of the present and secure the bow and tag firmly.
Handmade gift bags: Sew the larger present to a simple fabric gift bag or reusable holiday tote. A solid background gives the contrasting ribbons room to show. You don't need much additional decoration.
Christmas garlands: Make several miniature presents and attach them to a crocheted cord. Space the gifts evenly and alternate their colors. This would be a lovely decoration for a mantel or holiday shelf, out of reach of small children.
Decorative pillows: You can sew the flat appliqué onto a plain holiday pillow cover. Use several small concealed attachment stitches beneath the bow and gift tag so they won't shift when the cover is handled. For a larger statement piece, a full crochet gift box pillow with its own construction pattern is a better choice.
Gift toppers: The little hanging present is also a nice substitute for an ordinary bow on a wrapped gift. Tie it to the package using its crocheted loop, and it can be kept afterward as an ornament.
If you enjoy making small holiday decorations, take a look at my free crochet applique patterns. There are other Christmas motifs along with animal designs you can use for handmade projects.
You can also browse the Christmas crochet patterns collection for more holiday gifts, ornaments and decorations.
These two presents are designed to coordinate with a larger gift-box collection, including a three-dimensional hanging gift box ornament, a decorative gift box pillow and a matching gift box granny square. Each will have its own construction method while keeping the same cranberry, evergreen, ivory and gold details.
For this first pair, I'd keep the arrangement exactly as it is. The oversized bows, contrasting ribbons and little gold-star tags give them plenty of Christmas character without adding anything else.
When you click on links to various merchants on this site and make a purchase, this may result in this site earning a commission. This does not affect the price you pay.

UBGI Gold Standard 2026
Reviewed under the site's
editorial checklist.
Photos, decorating ideas, party setups and reader submissions are shared for inspiration unless a page is specifically presented as a pattern, tutorial, reference guide or step-by-step project. Follow the instructions, measurements, safety guidance and manufacturer directions provided for the particular project or product.
About Jan | Contact | Baby Nursery Ideas (Blog) | Site Map | Privacy Policy | Disclosure Policy | Disclaimer | Affiliate Disclosure | Earnings Disclosure | Facebook | Pinterest
I am a participant in the Amazon Services LLC Associates Program, an affiliate advertising program designed to provide a means for us to earn fees by linking to Amazon. As an Amazon Associate I earn from qualifying purchases.
Copyright © 2006-2026. All Rights Reserved.