Free Crochet Christmas Mitten Ornament Pattern with Holly-Trimmed Cuffs
By Jan Bay
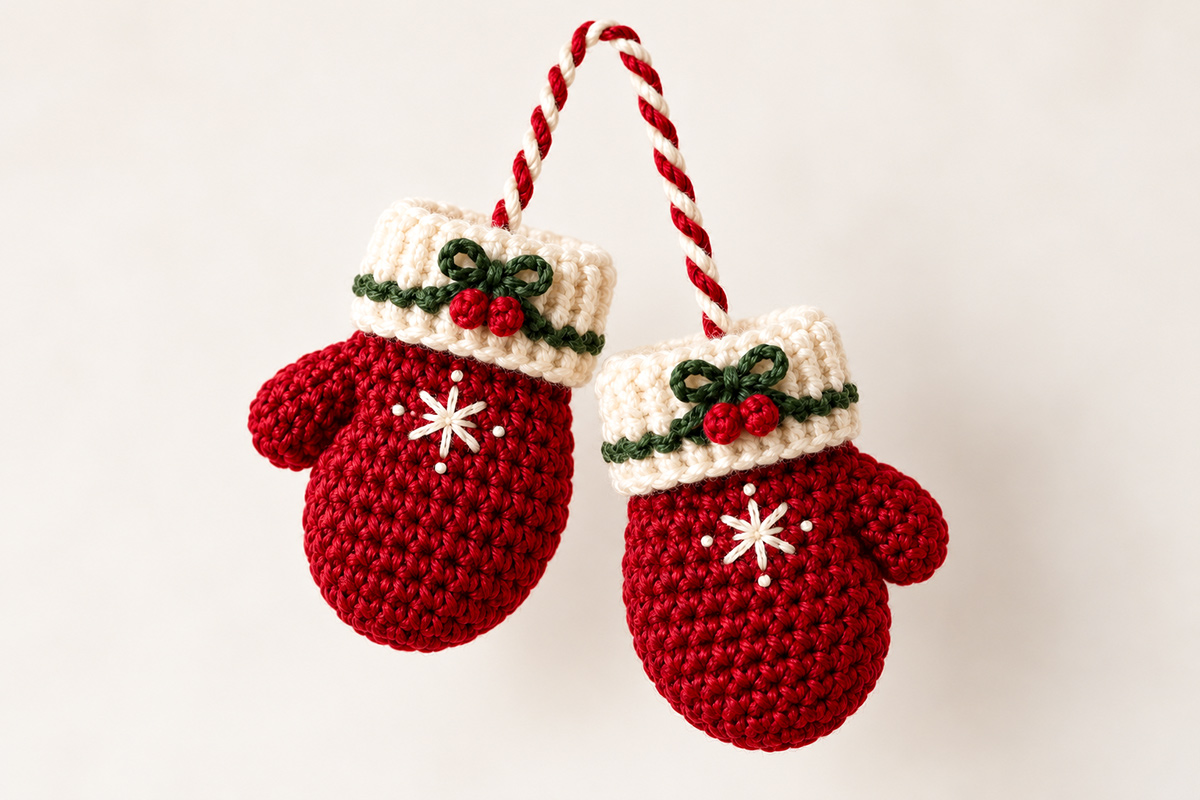
A pair of little red mittens hanging together reminds me of old-fashioned Christmas decorations. Most of the ones from my childhood that survive are very plain, and that's why I wanted a little more detail on this pair. This free crochet Christmas mitten ornament pattern has two matching mittens with ivory folded cuffs, tiny green bows, red holly berries and embroidered stars. A twisted red-and-ivory cord holds them together, with one mitten hanging a little lower than the other. You can also make the mittens separately for gift toppers or a Christmas garland.
Explore More Free Christmas Crochet Patterns
Free Christmas Crochet Patterns
Mini Crochet Christmas Stocking Pattern
Crochet Candy Cane and Peppermint Pattern
See Supplies for This Project Here.
Jump to a Section
- Pattern Details and Finished Size
- Materials and Supplies
- Stitches and Abbreviations
- Crochet the Red Mittens
- Make the Folded Ivory Cuffs
- Add the Green Bows and Holly Berries
- Embroider the Ivory Stars
- Make the Twisted Hanging Cord
- Assembly and Finishing
- Make a Single Mitten for a Garland
- Troubleshooting and Helpful Tips
- Frequently Asked Questions
Free Crochet Christmas Mitten Ornament Pattern: Size and Construction
You'll make two little mittens separately, then connect them with the twisted hanging cord. Each mitten starts at the rounded fingertip and works upward toward the wrist. The thumb is added through a small opening left in the side.
The ivory cuffs are made separately. They're folded over just like the cuffs on a real pair of mittens. The green bands, bows and little red berries go on afterward.
I'd keep the finished mittens fairly small. Around three inches tall is plenty for a Christmas tree ornament, and the individual mittens will also work nicely on a garland.
- Skill level: Advanced beginner
- Terminology: US crochet terms
- Construction: Continuous rounds for the mitten bodies and thumbs; turned rows for the cuffs
- Expected height: Approximately 2 3/4 to 3 inches per mitten, not counting the hanging cord
- Expected hand width: Approximately 1 1/2 to 1 2/3 inches across when rounded and lightly filled; the unstuffed fabric has an expected flattened width of approximately 2 1/2 inches
- Hanging cord: Approximately 6 to 6 1/2 inches long before arranging it into an arch, including the ends concealed inside the cuffs
- Finished appearance: Lightly padded, rounded mittens with firm cuffs and small crocheted decorations
Gauge: Aim for approximately 6 single crochet stitches and 7 rounds per inch, measured over the red mitten fabric. Aim for approximately 6 rows per inch across the ivory ribbing, measured along the length of the unfolded strip.
At that gauge, 30 stitches give the rounded hand approximately 5 inches of circumference. The 24-stitch wrist opening measures approximately 4 inches around. A cuff made with 24 rows should fit the wrist without heavy stretching. The folded cuff is expected to be about 5/6 inch tall, giving each finished mitten a calculated height of approximately 2 3/4 to 3 inches.
These measurements are calculated, not taken from a physically crocheted sample. The stitch counts and planned assembly have been checked, but the complete pattern has not been physically crocheted from these instructions.
I'd make one mitten through its folded cuff before starting the second. Check that the thumb points outward, the rounded hand looks like the finished example, and the cuff fits without pulling the wrist inward. If something needs adjusting, it's much easier to find out before you've made the matching mitten.
A note about use: These are decorative ornaments, not mittens to wear or toys for a baby. Keep the cords and small decorations out of children's reach, and don't hang them on a crib.
Materials and Supplies
Small amounts of yarn are all you'll need. I'd choose a smooth worsted-weight yarn with stitches you can see clearly. Very fuzzy yarn would hide the little stars and the neat edges around the cuffs.
Yarn
- Deep Christmas red, medium weight #4: Approximately 35 to 50 yards for the mitten bodies, wrist caps and part of the hanging cord
- Warm ivory, medium weight #4: Approximately 25 to 40 yards for the deeper folded cuffs, embroidered stars and hanging cord
- Evergreen, medium weight #4: Approximately 5 to 10 yards for the cuff bands and bows
- Cherry red, medium weight #4: Approximately 2 to 4 yards for the four little holly berries
You can use the same red yarn for the mittens and berries, although a slightly brighter red will make the berries easier to see.
Other Supplies
- 3.25 mm (D/3) crochet hook
- Optional 3.5 mm (E/4) hook if your cuff ribbing is too tight
- Yarn needle with a blunt tip
- Small amount of polyester fiberfill
- Stitch marker
- Scissors
- Measuring tape
- Two small removable markers or pins for positioning the embroidered stars
The yarn amounts are estimates for the calculated size. Keep a little extra of each color available until both mittens are finished.
You won't need buttons, plastic eyes, glue or ready-made decorations. Even the little berries are crocheted.
Stitches and Crochet Abbreviations
This pattern uses US crochet terms. The mittens are mostly single crochet, with a few increases and decreases to give them their rounded shape.
- ch: Chain
- sc: Single crochet
- sl st: Slip stitch
- inc: Work 2 single crochet stitches into the same stitch
- sc2tog: Single crochet decrease, working 2 stitches together into 1
- BLO: Back loop only
- sk: Skip
- st/sts: Stitch/stitches
- rnd: Round
- rep: Repeat
- MR: Magic ring
How to Make the Decreases
For a single crochet decrease, insert your hook into the next stitch and pull up a loop. Insert it into the following stitch and pull up another loop. Yarn over and draw through all three loops on your hook. Two stitches have become one.
For a less noticeable decrease, you may pick up the front loops of the next two stitches before completing the single crochet.
How to Work the Rounds
Use a stitch marker to show the first stitch of each round. Work in a continuous spiral unless the instructions say otherwise. Don't join the rounds with slip stitches, and don't add a beginning chain.
Move the marker after each completed round. The stitch count shown in parentheses is the total you should have at the end.
How to Make the Ribbing
The cuffs use single crochet worked through the back loop only. Look at the top of the stitch and you'll see two little loops. Work into the one farther from you. This leaves the other loop free and makes the raised rib that you see on the folded cuffs.
If you need to check a stitch abbreviation, the Craft Yarn Council crochet abbreviations reference lists standard US terms.
Important: Turning chains on the ribbed cuffs do not count as stitches. Chains that form the thumb opening do count as stitches in that round.
Crochet the Red Mittens
Start with the red mitten bodies. Make both the same way. We'll turn them in opposite directions before adding the stars so the thumbs point outward.
Work from the rounded fingertip toward the wrist. Don't start at the cuff. This direction lets us shape the hand first and keep the upper opening ready for the folded cuff.
Part A: Mitten Body
Make 2 in deep Christmas red.
Rnd 1: Make a magic ring. Work 6 sc into the ring. Pull the ring closed. (6 sc)
Rnd 2: Work 2 sc into each stitch around. (12 sc)
Rnd 3: Repeat [1 sc in the next stitch, 2 sc in the following stitch] 6 times. (18 sc)
Rnd 4: Repeat [1 sc in each of the next 2 stitches, 2 sc in the following stitch] 6 times. (24 sc)
Rnd 5: Repeat [1 sc in each of the next 3 stitches, 2 sc in the following stitch] 6 times. (30 sc)
Rnds 6–8: Work 1 sc in every stitch around for 3 rounds. (30 sc in each round)
Count your stitches now. You should have exactly 30. The fingertip should be rounded, and the hand should already look wider than the wrist we're going to make.
Part B: Leave an Opening for the Thumb
Rnd 9: Work 1 sc in each of the next 3 stitches. Ch 4. Skip the next 4 stitches from Round 8. Work 1 sc in each of the remaining 23 stitches. (30 positions total: 26 sc and 4 chains)
Those four chains make a bridge over the skipped stitches. Leave the opening beneath the bridge. We'll crochet the thumb into it later.
Rnd 10: Work 1 sc in each of the first 3 stitches. Work 1 sc under the top two strands of each of the 4 chains, leaving the back bumps on the underside available for the thumb. Work 1 sc in each of the remaining 23 stitches. (30 sc)
Rnd 11: Work 1 sc in every stitch around. (30 sc)
Part C: Shape the Wrist
Rnd 12: Repeat [1 sc in each of the next 3 stitches, sc2tog] 6 times. (24 sc)
Rnd 13: Work 1 sc in every stitch. (24 sc)
Rnd 14: Work 1 sc in every stitch. (24 sc)
Fasten off, leaving a 6-inch tail. Weave the tail through several stitches on the inside of the wrist, keeping the upper edge free for attaching the cap and cuff.
Checkpoint: Each mitten has 14 completed body rounds, 24 stitches at the wrist and a four-stitch opening beneath the chain bridge. The rounded hand has 30 stitches at its widest point and narrows to 24 at the wrist. At the planned gauge, the red body is approximately 2 inches tall.
Part D: Crochet the Thumb
Now work into the opening left in Round 9.
Hold the mitten with the wrist at the top and the rounded fingertip pointing down. You'll see four exposed stitches along the lower edge of the thumb opening and four chain stitches along the upper edge.
Join red yarn at the first exposed stitch along the lower edge.
Thumb Rnd 1: Work 1 sc into each of the 4 exposed skipped stitches along the lower edge. Continue around the upper edge, working 1 sc into the unused back bump of each of the 4 chains. Do not work into the 4 single crochets made above the chains in Round 10. (8 sc)
Thumb Rnd 2: Work 1 sc in each stitch around. (8 sc)
Thumb Rnd 3: Repeat [1 sc in each of the next 2 stitches, sc2tog] twice. (6 sc)
Thumb Rnd 4: Work 1 sc in each stitch around. (6 sc)
Thumb Rnd 5: Work sc2tog 3 times. (3 sc)
Before closing the thumb, check its shape. If it needs a little more fullness, add a tiny wisp of filling through the three-stitch opening. Use only enough to round the tip without stretching the stitches.
Cut the yarn, leaving a 10-inch tail. Thread the tail onto your yarn needle and pass it through the front loop of each of the 3 remaining stitches. Pull gently to close the tip. Pass the needle down through the thumb and bring it out through a red stitch near the base. Weave the tail through the nearby red crochet fabric and trim it.
Thumb checkpoint: The thumb should extend about 1/2 to 3/4 inch from the hand. It needs to point to the side, not straight down beside the fingertip.
Make the second mitten and thumb in exactly the same way.
Mark the fronts before adding the cuffs: Place both mittens on the table with their wrists at the top. Turn the first mitten so its thumb points left and the second so its thumb points right. These are the positions they'll have in the finished ornament.
Mark the center front of each red mitten with a short, removable piece of contrasting yarn. The front is the side facing you, opposite the center back. Keep these marks in place while attaching the wrist caps, ivory cuffs, green bands, bows and berries.
Position each ivory cuff seam at the back, opposite its front marker. Center the green bow and two berries above that same front marker. Don't turn the mittens to a different front after attaching the decorations. The embroidered stars will go directly beneath the bows.
Part E: Make the Hidden Wrist Caps
Since we're giving the mittens a little filling, I prefer closing the wrist opening before adding the cuffs. Otherwise, the filling can show through the top.
These small red circles will sit inside the ivory cuffs. They won't change the outside appearance.
Make 2 in red.
Cap Rnd 1: Make a magic ring and work 6 sc into it. (6 sc)
Cap Rnd 2: Work 2 sc in each stitch around. (12 sc)
Cap Rnd 3: Repeat [1 sc in the next stitch, 2 sc in the following stitch] 6 times. (18 sc)
Cap Rnd 4: Repeat [1 sc in each of the next 2 stitches, 2 sc in the following stitch] 6 times. (24 sc)
Fasten off with an 18-inch sewing tail.
Give each mitten a small amount of filling. Spread it toward the rounded fingertip, leaving the wrist area fairly empty. Don't pack it tightly or the mitten will look like a ball with a thumb attached.
Place one wrist cap over the 24-stitch opening. Using the long sewing tail, whipstitch each of its 24 outer stitches to one corresponding stitch around the wrist. Catch the inner part of the wrist edge so the outside of that edge remains available for attaching the cuff. Complete the full circle and secure the sewing tail inside the seam.
Repeat for the other mitten. Both wrist openings should now be closed, with the caps sitting flat beneath the future cuffs.
Final body checkpoint: Before going on, put both mittens on the table. Make sure they have similar height and fullness, their thumb openings are closed, and neither wrist cap bulges upward.
Make the Folded Ivory Cuffs
The thick ivory cuffs are what make these look like little winter mittens instead of red Christmas balls. They also hide the seam around the wrist caps.
We'll crochet each cuff as a flat ribbed strip, join the ends into a ring, sew it onto the wrist and fold the top half down.
Crochet the Ribbed Cuff
Make 2 in ivory.
Foundation: Ch 11.
Row 1: Starting in the second chain from the hook, work 1 sc in each chain across. (10 sc)
Row 2: Ch 1, turn. Work 1 sc in the back loop only of each of the 10 stitches. (10 sc)
Rows 3–24: Ch 1, turn. Work 1 sc in the back loop only of each of the 10 stitches. (10 sc in each row)
After Row 24, fasten off, leaving an 18-inch ivory yarn tail for joining the two short ends of the cuff.
You'll have a strip 10 stitches wide and 24 rows long. The raised ribs should run across the width of the strip.
At the planned gauge, the strip is approximately 1 2/3 inches wide and 4 inches long before joining. We'll fold its width in half to make the deeper ivory cuff in the finished example.
Check the Fit Before Joining
Wrap the long edge of the strip around the 24-stitch wrist opening. The two short ends should meet without pulling the red wrist inward or leaving a large gap.
The cuff needs to fit after its short ends are joined, not just while the strip is lying flat. Pin or hold the ends together first and try the ring around the 24-stitch wrist. If it's too tight, remake the 24-row strip with the optional 3.5 mm hook. If it's too loose, try a smaller hook.
The target is 24 rows around the wrist, with one row end attached to each wrist stitch. Don't force the cuff into place just to keep the count. If you cannot get a comfortable fit with the planned row count, check your actual row gauge before attaching anything permanently.
Once the fit looks right, bring Row 1 and Row 24 together. Using the 18-inch yarn tail, whipstitch the two short edges together across all 10 stitches to make a ring. Secure the seam and weave the remaining tail into the back of the ivory ribbing. Position the joined seam at the back of the mitten.
Attach and Fold the Cuff
Turn the cuff ring so its ribbed side faces outward. Slip it over the closed wrist, leaving one long edge of the cuff next to the red wrist edge.
Cut a fresh 30-inch length of ivory yarn and thread your yarn needle. Sew the lower long edge of the cuff to the wrist, matching each of the 24 cuff row ends to one corresponding wrist stitch. Work all the way around the opening, then secure the yarn and weave the remaining tail into the concealed seam. Keep the attachment stitches even so the cuff doesn't gather or stretch.
The other long edge of the ivory cuff should extend upward. Fold that upper half outward and down over the lower half, dividing the ten-stitch depth into two sections of approximately five stitches each.
You should now have a doubled cuff approximately 5/6 inch tall. The fold is at the top, and the free outer edge rests near the red mitten body.
Secure the folded cuff with a few small ivory stitches on the back and sides. Keep the front neat. The green trim will go across it next.
Checkpoint: The ivory cuff should look full and folded, with approximately five stitch widths visible from its folded top edge to its lower edge. It should sit evenly on the red mitten without squeezing the wrist. You should no longer see the wrist-cap seam.
Repeat on the second mitten. Both cuffs should be the same height, even though we'll hang one mitten a little lower later.
Add the Green Bows and Holly Berries
Keep these decorations small. I wouldn't add big holly leaves or a pile of berries. The narrow green band, little bow and two red berries on each cuff are enough to give the mittens their Christmas look.
Part A: Crochet the Evergreen Cuff Band
Make 2 in evergreen yarn.
Ch 30 as a starting trial. Before joining, wrap the chain around the middle of the folded ivory cuff. Add or remove chains until the ends meet without stretching or gathering the ribbing.
Count the chains in your fitted length. Join with a slip stitch to the first chain, taking care not to twist the chain, and check the ring around the cuff once more. Fasten off, leaving an 18-inch green yarn tail for sewing the band onto the cuff.
Record the number of chains you used so you can make the second green band the same size. At the planned gauge, the cuff circumference is approximately 4 inches, but the actual chain count must be checked against your finished cuff.
Use the green yarn tail to sew the chain ring in place. Secure it at the back seam and at several evenly spaced points around the cuff.
You'll see a narrow green line running across the ivory ribbing.
Part B: Crochet the Tiny Green Bow
Make 2 bows in evergreen yarn.
First loop: Ch 7. Slip stitch into the first chain to form a small loop.
Second loop: Ch 7 again. Slip stitch into that same first chain to form another loop.
Fasten off, leaving a 12-inch tail.
Arrange the two loops side by side like a tiny bow. Wrap the tail twice around the center where the loops meet and pull it snug enough to define the middle.
Use the remaining tail to sew the bow onto the front of the evergreen cuff band, slightly above the center of the folded cuff.
Each bow should have two little green loops. If they stand too far away from the cuff, add one small securing stitch through the back of each loop.
Part C: Crochet the Holly Berries
Make 4 berries in cherry red yarn, 2 for each mitten.
Berry Rnd 1: Make a magic ring and work 5 sc into it. Pull the ring closed. (5 sc)
Berry Rnd 2: Work 1 sc in each stitch around. (5 sc)
Fasten off, leaving a 10-inch sewing tail.
Thread the tail through the front loops of the 5 stitches from Round 2. Pull gently to close the opening and form a little rounded berry. The yarn tails inside should be enough to fill it. Add a tiny wisp of filling only if needed.
Make the other three berries the same way.
Part D: Sew the Berries Beneath the Bows
Place two berries immediately below the center of the green bow on the first cuff. Let them sit side by side, touching lightly.
Using the sewing tails, secure each berry through several stitches of the ivory cuff. Catch the base of the berry rather than wrapping yarn around its outside.
Repeat on the second cuff.
Placement checkpoint: Each cuff should now have one narrow green band, one centered two-loop bow and two red berries just below the bow. All four berries should remain rounded, and none should hang loose from a single stitch.
That's all the cuff decoration I'd use. The stars will add the last little touch of ivory below.
Embroider the Ivory Stars on the Mittens
Each mitten gets one small ivory star on its red front. Keep the stars simple. You want them to look like a few careful stitches, not large snowflake appliqués covering the whole mitten.
Check the Front of Each Mitten
Lay both decorated mittens on the table with their ivory cuffs at the top. The first mitten's thumb should point left, and the second mitten's thumb should point right.
Check the front markers you placed earlier. Each green bow and pair of berries should be centered above its marker, with the ivory cuff seam at the back.
Mark the center of each exposed red front around Rounds 9 and 10 of the mitten body, directly beneath the bow. This is approximately four or five rounds below the wrist opening.
Keep this same front-facing arrangement while embroidering both stars. Remove the temporary markers after the embroidery and final assembly are finished.
Embroider an Eight-Spoke Star
Thread your yarn needle with approximately 18 inches of ivory yarn. Lift the folded cuff at the back of the mitten, where the sewing ends can be hidden. Pass the needle through the red mitten body and bring it out at the marked star center on the front. Leave approximately 2 inches of the starting yarn beneath the back of the cuff.
Keep that starting tail out of the way while you embroider. Don't pull it all the way through the mitten.
Your needle is now at the marked center, ready for the first embroidered spoke.
Make eight straight stitches radiating from the marked center, matching the eight-pointed ivory stars in the finished example:
- One straight stitch upward, ending approximately two rounds above the center.
- One straight stitch downward, ending approximately two rounds below the center.
- One straight stitch to the left, ending approximately two stitch widths from the center.
- One straight stitch to the right, ending approximately two stitch widths from the center.
- One diagonal stitch toward the upper left, ending approximately two stitch widths left and one round above the center.
- One diagonal stitch toward the upper right, ending approximately two stitch widths right and one round above the center.
- One diagonal stitch toward the lower left, ending approximately two stitch widths left and one round below the center.
- One diagonal stitch toward the lower right, ending approximately two stitch widths right and one round below the center.
Bring the needle back through the center between each spoke. Don't pull so tightly that the red fabric puckers.
The finished star should be approximately 1/2 to 3/4 inch across, depending on your gauge.
Add the Four Little Ivory Dots
Work four tiny French knots around the eight-spoke star, as shown in the finished example. Place one approximately one stitch width beyond the upper spoke, one beyond the lower spoke, one beyond the left spoke and one beyond the right spoke.
Keep the knots separate from the embroidered spokes so they look like four little ivory dots surrounding the star. Use the same spacing on both mittens.
For each knot, bring the needle up through the fabric, wrap the ivory yarn around the needle once, then insert the needle back into the fabric immediately beside the starting point. Hold the yarn gently while pulling the needle through.
Keep the knots small and evenly spaced. They should look like little stitched dots, not beads.
After finishing the star and four dots, pass the needle through the filled mitten and bring it out beneath the folded cuff at the back, close to the starting tail.
Tie the two ivory ends together beneath the cuff, taking care not to pull the star inward. Weave both ends through several concealed cuff stitches, trim them, and smooth the folded cuff back into place.
Repeat on the second mitten, using the same placement, eight-spoke design and four surrounding ivory dots.
Checkpoint: With the thumbs pointing outward, both ivory stars should face forward. Their centers should sit at about the same distance below the cuffs. The stars don't have to be perfectly identical, but one shouldn't be noticeably larger than the other.
Make the Twisted Red-and-Ivory Hanging Cord
The hanging cord is made with red and ivory yarn twisted together. It connects the two mittens and gives the pair its candy-cane-colored arch.
I prefer a twisted cord here instead of a plain chain. It looks finished from every side, and it doesn't distract from the decorations on the cuffs.
Make the Two-Color Cord
- Cut one 15-inch length of red yarn and one 15-inch length of ivory yarn.
- Place the strands side by side. Tie the red and ivory strands together at one end, then tie them together at the other end.
- Secure one knotted end to a fixed point or have someone hold it firmly.
- Hold the opposite end and twist the two strands clockwise approximately 18 to 25 turns, keeping gentle tension on the yarn. Stop when the strands form a firm, even spiral without curling into hard knots.
- Without letting either end spin freely, bring the two knotted ends together. The twisted strands will fold in half and twist back around each other.
- Hold the folded end in one hand and both original knotted ends in the other. Let the new cord settle into an even spiral.
- Tie the two original knotted ends together firmly with a short length of matching yarn. Keep the folded end intact. You now have a finished cord with a folded end on one side and a tied end on the other.
- Smooth the cord gently and measure its total length. Aim for approximately 6 to 6 1/2 inches before attaching it to the mittens. This includes one inch at each end that will be concealed inside the ivory cuffs.
The finished cord should measure approximately 6 to 6 1/2 inches after twisting and folding. If your cord finishes longer, shorten it and secure the new ends before attaching it. If it's too short, make another using slightly longer starting strands. Its final length depends on the yarn and how tightly you twist it.
If it looks too loose, repeat the process with a few more turns. If it forms hard little kinks, untwist it slightly.
Position the Cord for the Uneven Hanging Pair
Place the finished mittens beside each other with their thumbs facing outward.
Arrange the cord into an upside-down U. Allow approximately 1 inch at each end for sewing inside the cuffs. With a 6- to 6 1/2-inch cord, you'll have approximately 4 to 4 1/2 inches visible between the attachment points.
Divide the visible cord so the left side measures approximately 1 3/4 to 2 inches and the right side measures approximately 2 1/4 to 2 1/2 inches, measured along the cord from the upper bend toward each cuff. Include the rounded bend when dividing the length. The right side should be about 1/2 inch longer, so the right mitten hangs slightly lower.
That little difference in length will let the right mitten hang slightly lower, as shown in the finished example.
Mark the top of the arch temporarily with a removable marker or a contrasting piece of yarn. This is the point where you'll hold the finished ornament. Leave the cord in a natural curve rather than tying the two sides together.
When you attach the cord, hide its folded end inside one mitten cuff and its tied end inside the other. Sew through both layers at each attachment point so neither end can slip free.
Keep the cord ends ready for attachment inside the backs of the cuffs.
Checkpoint: Hold the cord by its upper bend. The red-and-ivory spiral should stay together, and the two cord ends should hang at slightly different heights.
Assembly and Finishing the Christmas Mitten Ornament
All the crocheting is finished. Now we can put the two mittens together.
Before attaching the hanging cord, lay the mittens side by side and take a good look at the fronts. Their thumbs should face outward, and the little bows and embroidered stars should be visible on both.
Attach the Hanging Cord
- Place the shorter side of the twisted cord against the center back of the left mitten's ivory cuff, opposite its green bow.
- Slip approximately 1 inch of the cord end down inside the cuff. The end should reach the wrist-cap seam beneath the folded cuff.
- Thread a yarn needle with a separate 18-inch length of matching ivory or red yarn. Begin at the concealed wrist-cap seam and sew through the cord end, the inner cuff layer and several stitches along the red wrist-cap edge.
- Continue securing the cord end along its concealed length with several small stitches. Return toward the wrist-cap seam, secure the yarn, and weave the remaining sewing tail through the concealed cuff stitches.
- Repeat with the longer side of the cord on the right mitten, using a fresh 18-inch sewing length. Keep the attachment at the center back, opposite the bow.
- Hold the ornament from the upper bend of the cord and check that both stars face forward. Confirm that the right mitten hangs slightly lower and that neither cord end pulls free when the ornament's weight is supported.
- Weave in any remaining sewing tails and trim them.
Hold the ornament from the top of the cord. The left mitten should hang a little higher, with the right mitten below and slightly to the side.
Check the Final Shape
Look at each mitten from the front and sides.
- The fingertip ends should be rounded and similar in size.
- The thumbs should point outward and hold their shape.
- The cuffs should stay folded without rolling upward.
- Each green band should follow the cuff without gathering it.
- The green bows should sit above the two red berries.
- Both ivory stars should face forward.
- The hanging cord should remain twisted without unraveling.
If one mitten looks a little fuller than the other, gently move the filling with your fingers. You can often even out a slight difference without opening the stitching.
Check that the berries, bows and hanging cord are firmly sewn on. The knots and yarn tails should be hidden in the crochet fabric. Remove every temporary stitch marker, pin and positioning thread, including the marker used to find the center of the hanging cord.
Final size check: At the planned gauge, each mitten should be close to 2 3/4 to 3 inches tall, with the pair hanging at slightly different heights.
That's the finished double-mitten Christmas ornament. I'd leave the decorations just as they are. The red mittens, ivory cuffs and small holly details give the pair plenty of character without adding anything else.
Make a Single Crochet Christmas Mitten for a Garland
There is no reason to write a completely different mitten pattern for a garland. Use the same mitten body, thumb, cuff, holly decorations and embroidered star. Just leave off the long cord that joins the pair.
You'll have one finished red mitten that you can hang separately.
Make the Single Mitten
- Follow the red mitten instructions in the mitten pattern section, Rounds 1 through 14.
- Make the thumb and close the wrist with one 24-stitch cap.
- Make one ivory cuff using the same 24-row, 10-stitch-wide instructions.
- Add one evergreen band and one green bow.
- Make two red berries and sew them beneath the bow.
- Embroider one ivory eight-spoke star and four small dots on the front, following the same instructions used for the matching pair.
- Leave off the connecting cord used for the double-mitten ornament.
Make an Individual Hanging Loop
If you'd rather hang the single mitten on its own, use red or ivory yarn.
Step 1: Ch 14.
Step 2: Slip stitch into the first chain to form a small hanging loop.
Step 3: Fasten off, leaving a 10-inch sewing tail.
Step 4: Sew the base of the loop to the inside back of the folded cuff, catching several stitches of the cuff and wrist-cap seam.
Keep the little loop centered so the mitten hangs upright.
Use the Single Mitten on a Christmas Garland
For a garland, you can skip the individual hanging loop and sew or tie the mitten directly to the garland cord at the back of its cuff.
I'd mix the single mittens with our crochet Christmas stocking ornaments and crochet candy cane ornaments.
Keep the mitten thumbs facing outward where possible, and let the individual ornaments hang freely rather than crowding them together.
For now, you only need the single-mitten variation. The larger mixed garland will have its own instructions for spacing, cord length and arranging all three ornaments.
Troubleshooting and Helpful Tips
My Mitten Looks Pointed Instead of Rounded
Check the first five rounds. They should have 6, 12, 18, 24 and 30 stitches. Missing an increase can pull the fingertip out of shape.
Also check the filling. Spread it around the rounded end instead of pressing it into one small spot. If the beginning of your magic ring makes a tiny point, gently work that point inward with your fingers.
There's a Hole Beside the Thumb
Small gaps can appear at the two corners of the thumb opening. First check that Thumb Round 1 has exactly eight stitches: four from the skipped stitches and four from the unused underside of the chains.
If a corner remains open, use the red yarn tail to sew one or two small stitches across that gap. Don't add permanent extra stitches to the thumb round, because the following decreases are calculated for eight.
The Thumb Points Downward
The thumb should grow outward from the opening in Round 9. Check that you worked around the opening itself, rather than crocheting down along the body.
A little shaping with your fingers can help. If the thumb is sewn or pulled tightly against the mitten, loosen the yarn that is holding it down.
Both Thumbs Point the Same Way
Check the thumb positions before attaching the ivory cuffs and decorations. Place both red mitten bodies on the table with their wrists at the top. Turn one body until its thumb points left and the other until its thumb points right.
Mark the front of each mitten while they're in those positions. Keep those fronts facing forward when attaching the cuffs, green bows and berries. Place each cuff seam at the back.
If you've already attached the cuffs and decorations and discover that both thumbs point the same way, turn one mitten until its thumb points outward. This will also move its cuff seam to the front and its bow and berries to the back.
Carefully remove the stitches attaching that ivory cuff to the red wrist. Keep the cuff, green band, bow and berries together. Rotate the entire decorated cuff around the wrist until the bow and berries face forward and the cuff seam faces back.
Reattach the cuff by matching its 24 row ends to the same 24 wrist stitches. Secure the sewing yarn and check that the cuff remains evenly folded. Both thumbs should now point outward, both cuff seams should be at the back, and both bows should face forward. Confirm the arrangement before embroidering the stars.
The Ivory Cuff Won't Fit the Wrist
First check that the red wrist has 24 stitches and the ivory cuff has 24 rows.
If the cuff strip is too short, your row gauge is probably tighter than the planned six rows per inch. Remake it with a slightly larger hook.
If the strip is too long, try a smaller hook. You want the cuff to fit without making the red wrist wrinkle.
Don't add or remove rows casually. The 24-row count was chosen so each row end has a matching stitch on the 24-stitch wrist opening.
The Cuff Keeps Unfolding
Add a few small ivory stitches at the back and sides to hold the folded edge in place. Catch only the back of the ribbing where possible so the stitches don't show on the front.
Check that the cuff wasn't pulled too tightly when you attached it. The folded section should rest naturally over the lower half.
The Green Band Looks Uneven
Remove the band and check its length before sewing it down. It should go around the cuff without stretching the ivory ribbing.
Line the band up with the middle of the folded cuff. Secure it at the back first, then the sides, and finally beneath the bow.
My Holly Berries Look Flat
Check that each berry has five stitches in both rounds. Pull the final opening closed gently rather than flattening the whole berry.
A tiny bit of yarn tail tucked inside can help it stay round. I wouldn't stuff such small berries firmly.
The Embroidered Star Looks Crooked
Mark the center before stitching. Make the upper, lower, left and right spokes first, then add the four diagonal spokes between them. That gives you a guide for keeping all eight spokes balanced.
If the stitches pull the red fabric inward, loosen them. They should rest on the surface, not squeeze the filling.
The Ornament Hangs Unevenly
A little unevenness is intentional. The right mitten should hang slightly lower.
If the difference is too large, move the bend at the top of the twisted cord before securing it permanently. Aim for about 1/2 to 3/4 inch of difference between the mitten heights.
If the mittens twist around and show their backs, check that the cord ends are attached near the center back of each cuff. Move the attachment points slightly until both embroidered stars face forward.
The Finished Mittens Are Larger or Smaller Than Expected
Check your gauge before changing the number of rounds. If you have fewer than six stitches per inch, the mitten will be wider. If you have more, it will be smaller.
You can try another hook size to bring the gauge closer to the planned measurement. Keep the stitch counts and increase sequence unchanged so the mitten, thumb and cap continue to fit together.
The measurements on this page are calculated. If you're making a pair for a gift, finish one complete mitten first and check its proportions before making the second.
Frequently Asked Questions
Can I Use Cotton Yarn for the Christmas Mittens?
Yes. A smooth medium-weight cotton yarn can work for the same pattern, but it may make the mittens feel firmer. Cotton also has less stretch than many acrylic yarns, so check the cuff fit carefully before joining the ends.
The finished size may change even when the yarn label shows the same weight category.
What If I Don't Know How to Make a Magic Ring?
You can use the chain-two method instead. Chain 2 and work the required number of single crochet stitches into the second chain from the hook.
For the red mitten body and wrist cap, work six single crochet stitches into the second chain from the hook. For each little holly berry, work five stitches instead. Follow the same increases and round counts given for each piece.
Close the center as neatly as possible so you don't leave a visible hole.
Can I Leave Out the Fiberfill?
Yes, although the mittens will look flatter than the finished example. The light filling helps the rounded fingertip and the small thumb hold their shape.
If you prefer a flatter ornament, you can leave out the filling while keeping the same stitch counts and wrist caps. Press the finished pieces gently with your hands instead of trying to stretch them flat.
Can I Use These Mittens as Gift Decorations?
Yes. A single mitten looks nice tied to a wrapped package, especially when you keep the little holly cuff facing outward. Use the short hanging loop or attach the mitten with a separate piece of yarn.
Since the berries and cord are small decorative pieces, keep the ornaments away from babies and young children.
How Should I Clean and Store the Finished Ornaments?
I'd start with gentle spot cleaning rather than putting them in the washing machine. The folded cuffs, tiny bows and twisted cord could shift if the ornaments are handled roughly.
Let them dry completely before storing. Lay the pair flat in a small box or wrap them loosely in tissue so the cord and embroidered stars don't become crushed.
The pattern has not been physically wash-tested, so follow the yarn manufacturer's care instructions and use caution with any cleaning method.
When you click on links to various merchants on this site and make a purchase, this may result in this site earning a commission. This does not affect the price you pay.

UBGI Gold Standard 2026
Reviewed under the site's
editorial checklist.
Photos, decorating ideas, party setups and reader submissions are shared for inspiration unless a page is specifically presented as a pattern, tutorial, reference guide or step-by-step project. Follow the instructions, measurements, safety guidance and manufacturer directions provided for the particular project or product.
About Jan | Contact | Baby Nursery Ideas (Blog) | Site Map | Privacy Policy | Disclosure Policy | Disclaimer | Affiliate Disclosure | Earnings Disclosure | Facebook | Pinterest
I am a participant in the Amazon Services LLC Associates Program, an affiliate advertising program designed to provide a means for us to earn fees by linking to Amazon. As an Amazon Associate I earn from qualifying purchases.
Copyright © 2006-2026. All Rights Reserved.