Free Crochet Baby Boy Diaper Cover Pattern with Suspenders and Newsboy Hat
By Jan Bay
This free crochet baby boy diaper cover pattern comes in three sizes and includes a matching vintage style newsboy hat, a high-waisted soaker with buttoned suspenders, and a beautiful chevron-textured front. The soft taupe and brown yarn gives the whole outfit that Victorian era little-gentleman look that photographs so beautifully.
Explore More Free Crochet Baby Patterns
Free Basic Crochet Diaper Cover Pattern
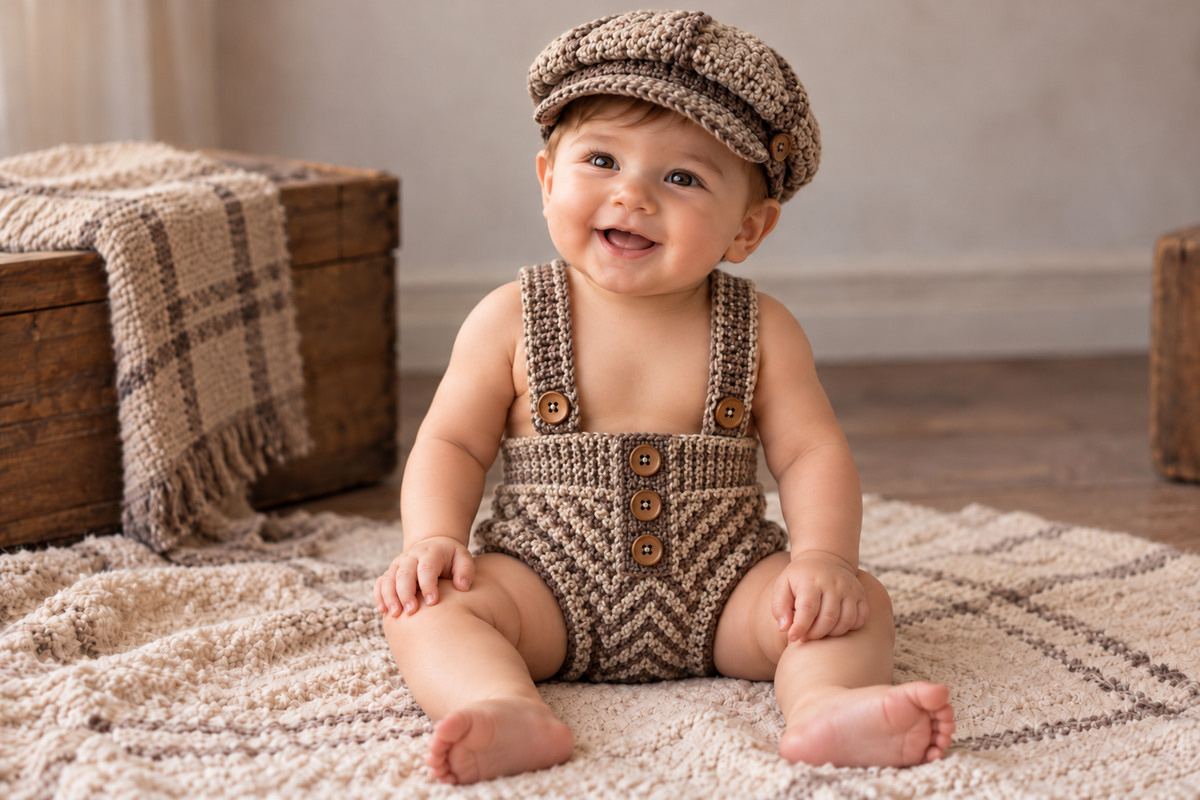
See supplies for this project here.
Jump to the Free Crochet Pattern
Sizes and Finished Measurements
This vintage crochet outfit is written in three sizes: newborn/0–3 months, 3–6 months and 6–12 months. You'll make the high-waisted diaper cover, its buttoned suspenders and the matching newsboy cap. The little details are what give it that old-fashioned look, but none of them requires complicated garment construction.
Choose the size using the baby's measurements rather than age alone. The diaper cover should fit over the diaper without stretching tightly across the crotch or pulling at the leg openings. Measure around the waist with the diaper on, and measure the head separately for the cap.
| Expected measurement | 0–3 months | 3–6 months | 6–12 months |
|---|---|---|---|
| Soaker waist circumference before ribbing | 15.1 in. | 16.9 in. | 18.7 in. |
| Front rise including waistband | About 7.2 in. | About 7.9 in. | About 8.6 in. |
| Crotch width | 2.7 in. | 3.1 in. | 3.6 in. |
| Newsboy cap band circumference | 14.2 in. | 16 in. | 17.8 in. |
The waist and crotch widths are calculated using 18 single crochet stitches per 4 inches. The front rise estimates use the stated row gauge and assume that the three-round ribbed waistband adds approximately one inch of height. Because the waistband uses double crochet and post stitches, its actual height and circumference must be checked separately. These measurements are calculated targets, not dimensions taken from a completed sample. The pattern has not been physically test-crocheted.
The Craft Yarn Council head circumference chart gives a useful starting point for hat sizing. Measure the baby's head before choosing the cap size, especially if the head measurement falls between two sizes.
This is a decorative crochet diaper cover, not a waterproof cloth-diaper shell. It works over an ordinary diaper for a supervised portrait or dressed-up occasion.
Yarn, Supplies and Gauge
I'd choose a soft, washable medium-weight yarn with a little heathered color variation. That gives the cap and diaper cover their vintage tweed appearance without making you change yarn every few stitches. You don't need expensive yarn to get the look. The stitch texture is what will get the job done.
Yarn colors:
- Color A: Light heathered taupe for the waistband, chevron highlights, leg trim and lighter cap sections.
- Color B: Medium brown-taupe for the soaker body and suspenders.
- Color C: Dark cocoa brown for the center placket, cap band and small accents.
Estimated total yarn: Approximately 250 (300, 350) yards for the three sizes, divided among the three colors. These are planning allowances rather than quantities measured from finished samples. Allow extra yarn if you lengthen the suspenders or change the fit.
Other supplies:
- Approximately 4.5 mm crochet hook for the soaker, or the size needed to match gauge
- Approximately 4.5–5 mm hook for the newsboy cap, adjusted to its separate gauge
- A hook about 0.5 mm smaller for the short, firm cap brim
- Six securely attached wood-look buttons, approximately 14–16 mm across
- Matching strong sewing thread and sewing needle for buttons
- Yarn needle
- Stitch markers
- Measuring tape
- Scissors
Five buttons go on the diaper cover: two for the suspenders and three down the center front. The sixth goes on the side of the cap. A crocheted or embroidered button imitation can be used for the decorative positions, but functional suspender fastenings must be secure.
Soaker gauge: 18 single crochet stitches and 20 rows measure 4 inches in a washed and relaxed swatch.
Hat crown gauge: 18 half double crochet stitches and approximately 14 rounds measure 4 inches in the same yarn.
Hat band gauge: 18 single crochet stitches measure 4 inches. The calculated band circumferences of 14.2 (16, 17.8) inches depend on achieving this separate stitch gauge.
Make separate swatches for the soaker, hat crown and hat band. You may need a different hook for the single crochet band than for the half double crochet crown. Check the band's circumference after its first round, before completing the remaining rounds. If it doesn't match the intended size, adjust the band hook and check again. Don't assume that matching the crown gauge automatically gives you the correct hat fit.
Stitches and Abbreviations
This pattern uses US crochet terms.
- ch: Chain
- sc: Single crochet
- hdc: Half double crochet
- dc: Double crochet
- sl st: Slip stitch
- st/sts: Stitch/stitches
- BLO: Back loop only
- sc2tog: Single crochet two stitches together
- hdc2tog: Half double crochet two stitches together
- FPdc: Front post double crochet
- BPdc: Back post double crochet
Single crochet decrease: Insert the hook into the next stitch, yarn over and pull up a loop. Insert the hook into the following stitch, yarn over and pull up another loop. Yarn over and pull through all three loops. Two stitches have become one.
Half double crochet decrease: Yarn over, insert the hook into the next stitch and pull up a loop. Yarn over, insert the hook into the following stitch and pull up another loop. Yarn over and pull through all five loops.
Front post double crochet: Work a double crochet around the post of the indicated stitch from front to back to front.
Back post double crochet: Work a double crochet around the post of the indicated stitch from back to front to back.
The beginning chain 1 or chain 2 does not count as a stitch unless a particular instruction says otherwise. Join rounds with a slip stitch into the first actual stitch, not the beginning chain.
Numbers in parentheses refer to the larger sizes. For example, 34 (38, 42) stitches means 34 stitches for 0–3 months, 38 for 3–6 months and 42 for 6–12 months.
Free Crochet Baby Boy Diaper Cover Pattern
We'll start with the shaped diaper cover. It looks rather tailored in the photograph, but the main piece is made in one continuous strip. You'll work from the front waist down through the crotch and back up to the rear waist. A pair of short side seams turns that flat piece into the soaker.
The wide front, narrow crotch and matching back are important. Don't substitute a straight rectangle here. It won't produce the same fitted shape, no matter how pretty the stitches are.
Crochet the Front of the Soaker
Begin with Color B and the hook that gives you the correct single crochet gauge.
0–3 months: Chain 35.
3–6 months: Chain 39.
6–12 months: Chain 43.
Row 1: Sc in the second chain from the hook and in every chain across. Turn. 34 (38, 42) sc.
Rows 2–6 (2–7, 2–8): Ch 1, sc in each stitch across. Turn after each row. Keep the stitch count unchanged.
These first 6 (7, 8) rows form the smoother upper section of the soaker. The separate ribbed waistband will be added later.
Continue in Color B after the first 6 (7, 8) straight rows. Keep the body color consistent as the front narrows toward the crotch. Color A will be added separately for the lighter ribbed waistband, raised chevrons and leg edging.
Shape the Front Toward the Crotch
Now we'll narrow both sides evenly. Each decrease row removes two stitches, one at each edge, while leaving the center of the front undisturbed.
Decrease Row: Ch 1. Sc2tog over the first two stitches. Sc in each stitch across until two stitches remain. Sc2tog over the last two stitches. Turn. Two stitches decreased.
Plain Row: Ch 1, sc in every stitch across. Turn. No decreases.
Work one Decrease Row followed by one Plain Row:
- 0–3 months: Repeat the two-row sequence 11 times, ending after Row 28. There are 12 stitches remaining.
- 3–6 months: Repeat the two-row sequence 12 times, ending after Row 31. There are 14 stitches remaining.
- 6–12 months: Repeat the two-row sequence 13 times, ending after Row 34. There are 16 stitches remaining.
Count the final row before going farther. You should have exactly 12 (14, 16) stitches. If the count is wrong, correct it now rather than trying to compensate in the crotch.
Work the Crotch
Continue in Color B.
Next 6 (7, 8) Rows: Ch 1, sc in every stitch across, turning after each row. Keep 12 (14, 16) stitches throughout.
The crotch is deliberately plain and fairly compact. The raised chevrons belong on the front, not underneath the baby where they would add unnecessary bulk.
Widen the Back
The back reverses the front shaping. You'll increase at both outer edges until the original waist stitch count returns.
Increase Row: Ch 1. Work 2 sc in the first stitch, 1 sc in each stitch across until the last stitch, then 2 sc in the last stitch. Turn. Two stitches increased.
Plain Row: Ch 1, sc in each stitch across. Turn.
Work one Increase Row followed by one Plain Row:
- 0–3 months: Repeat 11 times. The back returns to 34 stitches.
- 3–6 months: Repeat 12 times. The back returns to 38 stitches.
- 6–12 months: Repeat 13 times. The back returns to 42 stitches.
Continue in Color B for another 6 (7, 8) straight rows. For each row, ch 1, sc in every stitch across and turn. Keep 34 (38, 42) stitches on every row, including the final row.
Fasten off, leaving a long tail for finishing.
Check the complete shaped piece:
- 0–3 months: 62 total rows, starting and ending with 34 stitches
- 3–6 months: 69 total rows, starting and ending with 38 stitches
- 6–12 months: 76 total rows, starting and ending with 42 stitches
Lay the piece flat with the front and back waist edges at opposite ends. The center is narrow, and both ends are equally wide. The medium brown-taupe front should face outward when the soaker is assembled. The lighter ribbed waistband will be added afterward.
Join the Side Seams
Fold the front and back up toward one another, with the right sides together. Bring the two waist edges level and match the left and right corners.
Keep the right sides together and align both waist corners. Use the long yarn tail left at the back waist edge to sew the first side seam. Beginning at the waist edge, match the first 8 (9, 10) row ends of the front with the last 8 (9, 10) row ends of the back. Whipstitch through the corresponding edge loops, working from the waist toward the leg opening. Secure the yarn at the bottom of the seam and weave in the tail on the wrong side.
For the opposite seam, cut a separate 24-inch length of Color B. Thread the yarn needle and repeat the same joining method on the other side, matching exactly 8 (9, 10) pairs of row ends. Secure both ends and weave them into the wrong side of the fabric.
Stop after the specified number of joined rows on each side. Leave all remaining row ends unsewn to form the two leg openings. Turn the soaker right side out before adding the waistband.
Turn the soaker right side out. The center front should be even, with the shaped lower section tapering smoothly into the crotch.
Make the Deep Ribbed Waistband
Change back to Color A. This lighter waistband gives the soaker the tailored, high-waisted finish shown in the example image.
Join the yarn at one side seam, working around the entire top opening.
Round 1: Ch 2. Work 1 dc into each stitch across the front foundation edge and each stitch across the back finishing edge. Join to the first dc. 68 (76, 84) dc.
Round 2: Ch 2. Work *FPdc around the next stitch, BPdc around the following stitch*. Repeat around. Join to the first FPdc. 68 (76, 84) stitches.
Round 3: Ch 2. Work FPdc around each raised front-post stitch and BPdc around each recessed back-post stitch. Join. 68 (76, 84) stitches.
Fasten off and weave in the yarn end.
You'll have a deeper, vertically ribbed waistband that pulls in a little without needing elastic or a drawstring. Work these rounds loosely enough that the opening doesn't become smaller than the intended fit.
Finish the Leg Openings
Use Color A to add the light edging that separates the leg openings from the darker soaker body.
Join Color A at the bottom of one side seam. Each leg opening contains 46 (51, 56) exposed row ends between the two ends of the side seam.
Edging Round: Ch 1. Work one sc into each exposed row end except at the skipped positions listed for your size. Count the exposed row ends consecutively from the starting side seam.
- 0–3 months: Skip row ends 9, 18, 27 and 36. Work 42 sc.
- 3–6 months: Skip row ends 9, 18, 27, 36 and 45. Work 46 sc.
- 6–12 months: Skip row ends 9, 18, 27, 36, 45 and 54. Work 50 sc.
Join with a slip stitch to the first sc. Keep the edging relaxed and check that it lies flat against the shaped opening.
You should have 42 (46, 50) sc around the leg opening. These pickup counts are calculated to keep the edging close to the physical length of the exposed edge at the stated gauge. Check that the edging lies flat without puckering or flaring.
Fasten off. Repeat around the second leg opening.
Keep this trim simple. A bulky border would compete with the chevrons and change the shape of the finished soaker.
Chevron Front and Three-Button Placket
Now for the detail that makes this diaper cover different from an ordinary pair of crochet bloomers. The front has five nested chevrons, each one following the narrowing shape of the soaker. A dark center placket sits over the upper portion of those chevrons, with three buttons running down the middle.
We'll add the chevrons as raised surface crochet. That gives us control over the V shapes without interrupting the carefully counted increases and decreases in the main fabric.
Mark the Chevron Positions
Lay the finished soaker flat, front facing up. Count the original front body rows downward from the seam beneath the added waistband. Do not count the waistband rounds as body rows.
Each V has two outside endpoints at the same row and a center point six rows lower. The outside endpoints sit at the third stitch from each side edge of the specified row. The center point sits between the two middle stitches of its specified row.
For the 0–3 month size:
- Chevron 1: Outside endpoints on Row 7, center point on Row 13.
- Chevron 2: Outside endpoints on Row 10, center point on Row 16.
- Chevron 3: Outside endpoints on Row 13, center point on Row 19.
- Chevron 4: Outside endpoints on Row 16, center point on Row 22.
- Chevron 5: Outside endpoints on Row 19, center point on Row 25.
For the 3–6 month size:
- Chevron 1: Outside endpoints on Row 8, center point on Row 14.
- Chevron 2: Outside endpoints on Row 11, center point on Row 17.
- Chevron 3: Outside endpoints on Row 14, center point on Row 20.
- Chevron 4: Outside endpoints on Row 17, center point on Row 23.
- Chevron 5: Outside endpoints on Row 20, center point on Row 26.
For the 6–12 month size:
- Chevron 1: Outside endpoints on Row 9, center point on Row 15.
- Chevron 2: Outside endpoints on Row 12, center point on Row 18.
- Chevron 3: Outside endpoints on Row 15, center point on Row 21.
- Chevron 4: Outside endpoints on Row 18, center point on Row 24.
- Chevron 5: Outside endpoints on Row 21, center point on Row 27.
Use stitch markers to identify the three points of each V before adding any decoration. Check that all five chevrons look evenly nested when viewed together.
Counted Chevron Stitch Paths
Use the following stitch paths to mark each diagonal. Each sequence gives seven stitch positions on seven consecutive front rows, starting at the outside endpoint and ending beside the center point.
For the left arm, count each stitch position from the physical left edge of that row while looking at the front of the soaker. For the right arm, use the same seven numbers but count from the physical right edge. Follow the right-hand sequence in reverse order as you work away from the bottom point.
| Size | V | Seven stitch positions |
|---|---|---|
| 0–3 mo. | 1 | 3, 5, 6, 8, 10, 11, 13 |
| 0–3 mo. | 2 | 3, 5, 6, 8, 9, 11, 12 |
| 0–3 mo. | 3 | 3, 4, 5, 7, 8, 9, 10 |
| 0–3 mo. | 4 | 3, 4, 5, 6, 7, 8, 9 |
| 0–3 mo. | 5 | 3, 4, 4, 5, 6, 6, 7 |
| 3–6 mo. | 1 | 3, 5, 7, 9, 11, 13, 15 |
| 3–6 mo. | 2 | 3, 5, 7, 9, 10, 12, 14 |
| 3–6 mo. | 3 | 3, 5, 6, 8, 9, 11, 12 |
| 3–6 mo. | 4 | 3, 4, 6, 7, 8, 10, 11 |
| 3–6 mo. | 5 | 3, 4, 5, 6, 7, 8, 9 |
| 6–12 mo. | 1 | 3, 5, 8, 10, 12, 15, 17 |
| 6–12 mo. | 2 | 3, 5, 7, 10, 12, 14, 16 |
| 6–12 mo. | 3 | 3, 5, 7, 9, 10, 12, 14 |
| 6–12 mo. | 4 | 3, 5, 6, 8, 10, 11, 13 |
| 6–12 mo. | 5 | 3, 4, 6, 7, 8, 10, 11 |
For example, Chevron 1 in the smallest size begins at stitch 3 of Row 7. Move to stitch 5 of Row 8, stitch 6 of Row 9 and continue through the listed positions until reaching stitch 13 of Row 13. The opposite arm follows the mirrored positions from the other edge.
At the bottom of each V, bring the two arms together between the two center stitches. Work one relaxed surface slip stitch at that central turning point. Repeat for the remaining chevrons. These paths follow the changing front stitch counts rather than assuming every row is the same width.
Work the Raised Chevron Lines
The finished example has substantial raised chevrons rather than thin, single strands of surface stitching. To reproduce that wider appearance, work two closely spaced surface slip-stitch paths along each arm of every V. Use Color A throughout.
First path: Bring Color A from the wrong side to the front at the left endpoint of Chevron 1. Insert the hook beneath the surface strands at the first marked stitch and draw up a loop.
Follow the seven positions listed for the left arm in the chevron chart. Each position belongs to the next consecutive body row. Work surface slip stitches between the marked positions, passing the hook through the underlying fabric frequently enough that no long, loose yarn strand spans several stitches.
At the center point, join the two arms with one relaxed surface slip stitch between the two middle body stitches. Continue outward along the mirrored right-arm positions, following the sequence in reverse.
Fasten off on the wrong side and secure the yarn tail.
Second path: Work a parallel raised line immediately outside the first line on both arms of the same V. Use the same seven body rows and the same sequence, but place each second-path anchor one stitch closer to its corresponding outside edge.
For example, if the first left-arm path uses stitch positions 3, 5, 6, 8, 10, 11 and 13, the second left-arm path uses positions 2, 4, 5, 7, 9, 10 and 12. Use the mirrored positions for the right arm.
Work the second path with the same relaxed surface slip-stitch method. At the bottom of the V, finish each outer line beside the central turning point of the first path. Fasten off and secure the ends on the wrong side.
Repeat both paths for Chevrons 2 through 5, using the existing counted chart for each size. All five chevrons retain their original starting rows and center-point rows.
The two raised paths should sit closely together, giving each V a broader textured appearance. Don't pull the yarn tightly. The front fabric must remain flat, and the chevrons must not shorten the soaker or draw the leg openings inward.
Before sewing on the center placket, lay the diaper cover flat and check that the five V shapes are centered, evenly spaced and visibly raised. Their points should follow the taper of the lower front. Correct any puckering before adding the placket.
Crochet the Center Placket
Use Color C to make the narrow dark strip that runs vertically down the middle of the soaker.
Chain 6.
Row 1: Sc in the second chain from the hook and across. Turn. 5 sc.
Rows 2–19 (2–21, 2–23): Ch 1, sc in each stitch across. Turn. 5 sc.
Fasten off, leaving a long sewing tail.
Center the strip vertically on the front of the diaper cover, with its upper end immediately below the finished top edge of the waistband. Pin it in place, making certain that the center line runs straight down between the suspenders.
Sew both long edges to the underlying fabric with small, even stitches. Tack the top and bottom ends flat.
Add the Three Front Buttons
Position three buttons down the center of the dark placket.
- 0–3 months: Center buttons near placket Rows 3, 10 and 17.
- 3–6 months: Center buttons near placket Rows 4, 11 and 18.
- 6–12 months: Center buttons near placket Rows 5, 12 and 19.
Sew the buttons through the placket and underlying soaker fabric using strong matching thread. Reinforce the stitches on the wrong side and secure the ends thoroughly.
The three center buttons are decorative. They don't open the diaper cover. Keeping the front closed preserves the continuous chevron design and avoids unnecessary gaps in the fabric.
Crochet Suspenders with Front Buttons
The suspenders are simple strips of crochet, but their placement matters. Too close together and they'll disappear behind the center placket. Too far apart and the whole outfit starts looking more like overalls.
We'll place them on either side of the center front and cross them behind the baby. The two front buttons will hold the shoulder straps in place.
Make Two Suspender Straps
Use Color B and the soaker hook.
Chain 5.
Row 1: Sc in the second chain from the hook and in each remaining chain. Turn. 4 sc.
Rows 2–59 (2–64, 2–69): Ch 1, sc in each stitch across. Turn. 4 sc.
The final row will contain the buttonhole.
Row 60 (65, 70): Ch 1, sc in the first stitch, ch 3, skip the next two stitches, sc in the last stitch. Fasten off, leaving a yarn tail for reinforcing the buttonhole.
Before attaching the straps, pass the actual suspender button through each opening. It should fit without forcing the stitches apart and should not slip through loosely. If necessary, remake the buttonhole row with an opening that fits your chosen button, keeping both straps identical. Reinforce the finished buttonhole edges with matching yarn.
At the planned row gauge, the straps measure approximately 12 (13, 14) inches before fitting adjustments. The actual length depends on the baby's torso, so check the strap length before fastening the back ends permanently. Add or remove complete plain rows before the buttonhole row if necessary.
Use Color A to work a narrow line of loose surface slip stitches along each long edge of both straps. Keep the trim flat without shortening the straps.
Make the second suspender the same way.
Attach the Suspenders
With the soaker lying flat and the front facing up, locate Round 3, the topmost round of the finished ribbed waistband. Count across the front from the left side seam and mark the two front button positions on this round, using the stitch numbers below.
- 0–3 months: Front waistband stitches 9 and 26, counting across from the left side seam.
- 3–6 months: Stitches 10 and 29.
- 6–12 months: Stitches 11 and 32.
After marking both positions, center one suspender button at each mark on Round 3. Use strong matching sewing thread to secure each button through several strands of the waistband stitches, reinforcing the attachment through the adjacent ribbed stitches below the button. Keep the thread firm without pulling the upper waistband edge out of shape.
Check that the buttonholes on both suspenders fit their corresponding buttons securely. The buttons should not pull against the top edge when the straps are fastened.
Turn the soaker over and locate Round 3 along the top of the back waistband. Count across from the left side seam while looking at the back. Mark stitches 9 and 26 for 0–3 months, stitches 10 and 29 for 3–6 months, or stitches 11 and 32 for 6–12 months.
Position the plain starting ends of both suspenders inside the back waistband at the marked attachment points. Keep each starting edge level with the top of the waistband. Temporarily baste the ends in place with contrasting yarn, without permanently sewing them yet.
Cross the suspenders over the back to form an X. Remember that the front button positions were counted while looking at the front of the soaker, while the back attachment positions were counted while looking at the back. Turning the garment over reverses left and right from your viewpoint.
The strap attached at the left back position, as viewed from the back, crosses diagonally toward the wearer's right shoulder and fastens to the left front button, as viewed from the front.
The strap attached at the right back position, as viewed from the back, crosses diagonally toward the wearer's left shoulder and fastens to the right front button, as viewed from the front.
Before permanent attachment, check the back of the outfit. The two straps should form a clear X, with the crossing centered between the shoulders. Neither strap should twist or pull the waistband upward.
Bring both straps over the shoulder positions and fasten their buttonholes to the front buttons. Check their length and crossing against the intended fit. The straps should lie flat without twisting, sliding off the shoulders or pulling the back waistband upward.
If adjustment is needed, undo the buttonhole row of each strap and add or remove plain rows before remaking the buttonholes. Keep the two straps the same finished length unless individual fitting measurements require otherwise. Recheck their position before permanent attachment.
Once the length is correct, unbutton the straps and sew each plain starting end securely to the inside of the back waistband. Work several rows of small reinforcement stitches through the full waistband depth, distributing the pull across the ribbing rather than securing each strap to a single top-edge loop.
Remove the temporary basting yarn. Fasten the suspenders at the front again and confirm that both straps lie flat, the back crossing is centered and the waistband remains level. Secure and weave in all sewing ends.
That's the soaker finished. It should have a high ribbed waist, five neatly nested chevrons, three center buttons and two straps framing the front without covering the decorative texture.
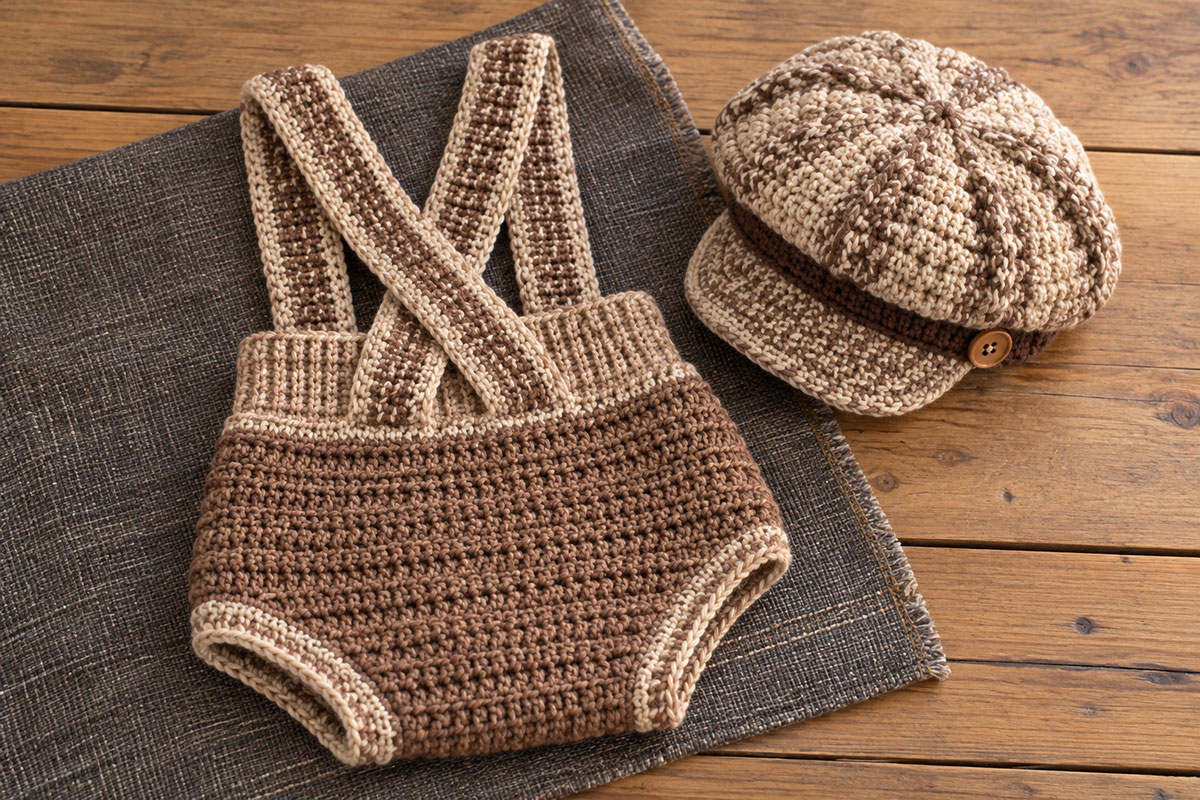
Crochet Newsboy Hat Pattern in Three Sizes
Now for the cap that gives the outfit its vintage little-gentleman look. This isn't a regular beanie with a brim stuck on the front. The crown is made with eight expanding sections, followed by a slightly narrower band that brings the fullness into a rounded newsboy shape.
We'll keep the crown in the same heathered taupe family as the diaper cover, use a darker band and finish with a short curved brim.
Make the Rounded Crown
Use Color A and the hook that matches the hat gauge.
Work in joined rounds. The beginning chain 1 does not count as a stitch. Join each round into the first actual half double crochet.
Round 1: Work 8 hdc into an adjustable ring. Pull the ring closed and join. 8 hdc.
Place a removable stitch marker in each of the eight stitches. These markers identify the eight crown sections. As you finish each increase round, move each marker to the last stitch of its corresponding repeated section. Each section gains one stitch per increase round.
Keep the eight markers in position through the straight crown rounds and move them to the corresponding section endpoints after the decrease round. They will guide the eight decorative surface lines later. The crown should always contain eight equal sections, even though the number of stitches in each section changes.
Round 2: Ch 1, work 2 hdc in each stitch around. Join. 16 hdc.
Round 3: Ch 1, repeat *1 hdc, 2 hdc in next stitch* eight times. Join. 24 hdc.
Round 4: Ch 1, working in the BLO, repeat *hdc in next 2 stitches, 2 hdc in next stitch* eight times. Join. 32 hdc.
Round 5: Ch 1, repeat *hdc in next 3 stitches, 2 hdc in next stitch* eight times. Join. 40 hdc.
Round 6: Ch 1, working in the BLO, repeat *hdc in next 4 stitches, 2 hdc in next stitch* eight times. Join. 48 hdc.
Round 7: Ch 1, repeat *hdc in next 5 stitches, 2 hdc in next stitch* eight times. Join. 56 hdc.
Round 8: Ch 1, working in the BLO, repeat *hdc in next 6 stitches, 2 hdc in next stitch* eight times. Join. 64 hdc.
Round 9: Ch 1, repeat *hdc in next 7 stitches, 2 hdc in next stitch* eight times. Join. 72 hdc.
0–3 months: Stop increasing here.
3–6 months and 6–12 months: Continue as follows.
Round 10: Ch 1, working in the BLO, repeat *hdc in next 8 stitches, 2 hdc in next stitch* eight times. Join. 80 hdc.
3–6 months: Stop increasing here.
6–12 months only, Round 11: Ch 1, repeat *hdc in next 9 stitches, 2 hdc in next stitch* eight times. Join. 88 hdc.
You should now have 72 (80, 88) stitches around the crown. The increasing rounds form the eight sections, while the BLO rounds add soft horizontal texture between them.
Build the Crown Depth
Continue working even, without increasing. Use both loops of every stitch and keep the eight crown-section markers in position.
0–3 months: Work Rounds 10–16, keeping 72 hdc throughout. Seven straight rounds.
3–6 months: Work Rounds 11–18, keeping 80 hdc throughout. Eight straight rounds.
6–12 months: Work Rounds 12–20, keeping 88 hdc throughout. Nine straight rounds.
These straight rounds give the newsboy cap its depth beneath the rounded crown. Don't add increases during this section. The crown should remain gently full above the contrasting band.
Shape the Crown into the Band
In the next round, decrease eight stitches evenly. This pulls the bottom of the rounded crown inward before the fitted hat band begins.
0–3 months, Round 17: Ch 1. Repeat *hdc2tog, hdc in next 7 stitches* eight times. Join. 64 hdc.
3–6 months, Round 19: Ch 1. Repeat *hdc2tog, hdc in next 8 stitches* eight times. Join. 72 hdc.
6–12 months, Round 21: Ch 1. Repeat *hdc2tog, hdc in next 9 stitches* eight times. Join. 80 hdc.
Don't pull the decrease round too tightly. The crown should retain a gentle fullness above the band rather than collapsing into puckers.
Add the Contrasting Hat Band
Change to Color C.
Band Round 1: Ch 1, sc in every stitch around. Join. 64 (72, 80) sc.
Band Round 2: Ch 1, sc in every stitch around. Join. 64 (72, 80) sc.
Band Round 3: Ch 1, sc in every stitch around. Join. 64 (72, 80) sc.
Check the Cap Depth Before Adding the Brim
Measure from the center of the crown to the bottom edge of the completed contrasting band. As a starting point, the expected depth is approximately 5.5 inches for 0–3 months, 6 inches for 3–6 months, or 6.5 inches for 6–12 months. These are calculated targets, not measurements from a physically completed sample.
Check the depth and circumference before fastening off and adding the brim. If the cap is too shallow, undo the three band rounds and the single decrease round. Add the needed number of plain half double crochet rounds to the crown, keeping 72 (80, 88) stitches throughout. Then repeat the decrease round and all three band rounds at the original stitch counts.
If the cap is too deep, remove the necessary plain crown rounds before repeating the decrease round and band. Do not add or remove stitches from the decrease or band rounds to adjust the depth.
Once the depth and circumference are satisfactory, fasten off and continue to the short newsboy brim.
Fasten off. The dark band should sit immediately beneath the fuller crown, forming a neat horizontal line around the cap.
Crochet the Short Newsboy Brim
The short brim needs to project forward just enough to give the hat that old-fashioned newsboy shape. A long brim would change the style completely.
Use Color A and the smaller hook for a firmer fabric.
Position the cap with the round joins at the center back. Count around the band from that join to locate the opposite center-front gap. In the three sizes, this gap falls between stitches 32 and 33, 36 and 37, or 40 and 41.
Count 12 (14, 16) stitches to each side of this gap and mark the two outside boundaries. Work the brim across exactly 24 (28, 32) consecutive band stitches. Count them before beginning Row 1.
Brim Row 1: Join Color A at the first marked stitch. Ch 1, sc in each of the marked stitches across. Turn. 24 (28, 32) sc.
Brim Row 2: Ch 1, work 2 sc in the first stitch, 1 sc in each stitch until the last stitch, then 2 sc in the last stitch. Turn. 26 (30, 34) sc.
Brim Row 3: Ch 1, work 2 sc in the first stitch, 1 sc in each stitch across until the last stitch, then 2 sc in the last stitch. Turn. 28 (32, 36) sc.
Brim Row 4: Ch 1, sc in every stitch across. 28 (32, 36) sc.
Fasten off and weave in the yarn tail. Gently shape the brim into a shallow curve while the fabric is relaxed. It should extend forward rather than hanging down over the forehead.
If the brim feels too soft, use a smaller hook for that section rather than adding several extra rows. We want the shape to stay short.
Define the Eight Crown Sections
For a more tailored finish, use Color A to add subtle raised lines between the eight crown sections.
Locate the eight increase sections around the crown. At the widest increase round, each section contains 9 (10, 11) stitches. Mark the eight evenly spaced boundaries.
Beginning near the center of the crown, work a relaxed line of surface slip stitches outward along each section boundary toward the top of the contrast band. Follow the existing increase lines through the crown rounds.
Repeat for all eight sections. Keep the lines subtle and even, and stop just short of the center ring so the top doesn't become bulky.
These raised divisions give the cap its segmented newsboy appearance.
Add the Side Button
Sew the final wood-look button to the wearer's left side of the cap, just above the brim attachment at the contrast band.
Pass the sewing thread securely through the band and underlying hat fabric several times. Reinforce it inside the hat and finish the thread ends.
The finished cap should have a softly rounded crown, eight understated sections, a contrasting dark band, a short curved brim and one small side button.
There's no need to add a pom-pom or any other decoration. The traditional shape is the whole point of this little hat.
Assembly and Finishing
Before calling the outfit finished, lay the pieces together and check that they look like a matching set. The light waistband, dark front placket, chevron highlights and cap band should complement one another without every part being exactly the same shade.
Check the following details:
- The five front chevrons are centered and lie flat.
- The three center buttons follow a straight vertical line.
- The suspender buttons sit at matching heights.
- The crossed straps are firmly attached to the back waistband.
- The leg openings are smooth and do not curl inward.
- The newsboy crown is rounded, with eight visible sections.
- The short brim projects forward evenly.
- All yarn tails are woven in, all buttons are securely attached, and every temporary stitch marker and pin has been removed from the finished outfit.
If the chevrons have drawn the front fabric inward, loosen those surface stitches before finishing. They should decorate the soaker, not change its fit.
Give the finished pieces a gentle wash according to the yarn label, then lay them flat and shape them while drying. Avoid stretching the ribbed waistband or the newsboy brim out of shape.
Fit, Adjustments and Care
Checking the Diaper Cover Fit
Try the cover over the type of diaper it will actually be worn with. A thick cloth diaper needs more room than a thin disposable one, particularly through the crotch and rise.
The waistband should sit comfortably above the diaper. The sides should cover the diaper without pulling, and the leg openings shouldn't leave deep marks.
If you're between sizes, compare both the waist measurement and the rise before choosing. Going up a size may give more room through the diaper, but it also makes the waistband taller and the leg openings larger.
Adjusting the Suspenders
Button the suspenders at the front and check how they sit over the shoulders. If they pull the waistband upward, add a few rows to each strap before completing the buttonholes. If they droop, shorten both straps by the same number of rows.
Make these changes before permanently sewing the back attachments. The straps should rest in place without needing to be stretched.
Getting the Newsboy Hat to Fit
The cap band should fit without squeezing the forehead or slipping down over the eyes. If the band is too tight, don't try to fix it by stretching the brim. Adjust the hook size or choose the next cap size after checking the baby's actual head measurement.
The cap depth and circumference should already have been checked before adding the brim. For the finished fitting, confirm that the cap rests comfortably on the head without sliding over the eyes or pressing tightly around the forehead.
If the cap does not fit, recheck the crown and band measurements before making further adjustments. Changes to crown depth require removing the affected finishing rounds and reworking them in the correct construction order.
If the crown looks overly gathered, check the increase counts and the final eight decreases. The band should shape the crown gently, not force a large amount of fabric into a small opening.
A Note About Buttons and Baby Photos
This outfit is intended as a decorative baby garment or supervised photo prop, not sleepwear. Check every button and suspender attachment before use. Loose buttons can become choking hazards, and the outfit should be removed before sleep.
Keep the photo session simple. The cap, suspenders and textured soaker already make a complete vintage outfit. You don't need extra accessories or anything tied around the baby's neck.
Other Baby Crochet Projects
If you'd rather make a plain diaper cover without the suspenders and cap, the crochet diaper cover patterns collection has other designs to choose from. You can also browse the free baby crochet hat patterns for a different style to go with a handmade baby outfit.
Pattern development note: The stitch counts, shaping, and construction sequence have been reviewed mathematically for internal consistency. Finished dimensions and yarn quantities are estimates, and the pattern has not been physically test-crocheted. The cap shaping, raised chevron placement, and finished garment fit still require verification with a completed sample.
When you click on links to various merchants on this site and make a purchase, this may result in this site earning a commission. This does not affect the price you pay.

UBGI Gold Standard 2026
Reviewed under the site's
editorial checklist.
Photos, decorating ideas, party setups and reader submissions are shared for inspiration unless a page is specifically presented as a pattern, tutorial, reference guide or step-by-step project. Follow the instructions, measurements, safety guidance and manufacturer directions provided for the particular project or product.
About Jan | Contact | Baby Nursery Ideas (Blog) | Site Map | Privacy Policy | Disclosure Policy | Disclaimer | Affiliate Disclosure | Earnings Disclosure | Facebook | Pinterest
I am a participant in the Amazon Services LLC Associates Program, an affiliate advertising program designed to provide a means for us to earn fees by linking to Amazon. As an Amazon Associate I earn from qualifying purchases.
Copyright © 2006-2026. All Rights Reserved.