DIY Paper Star Decorations: Pink and Silver Christmas Starburst Craft Tutorial
By Jan Bay
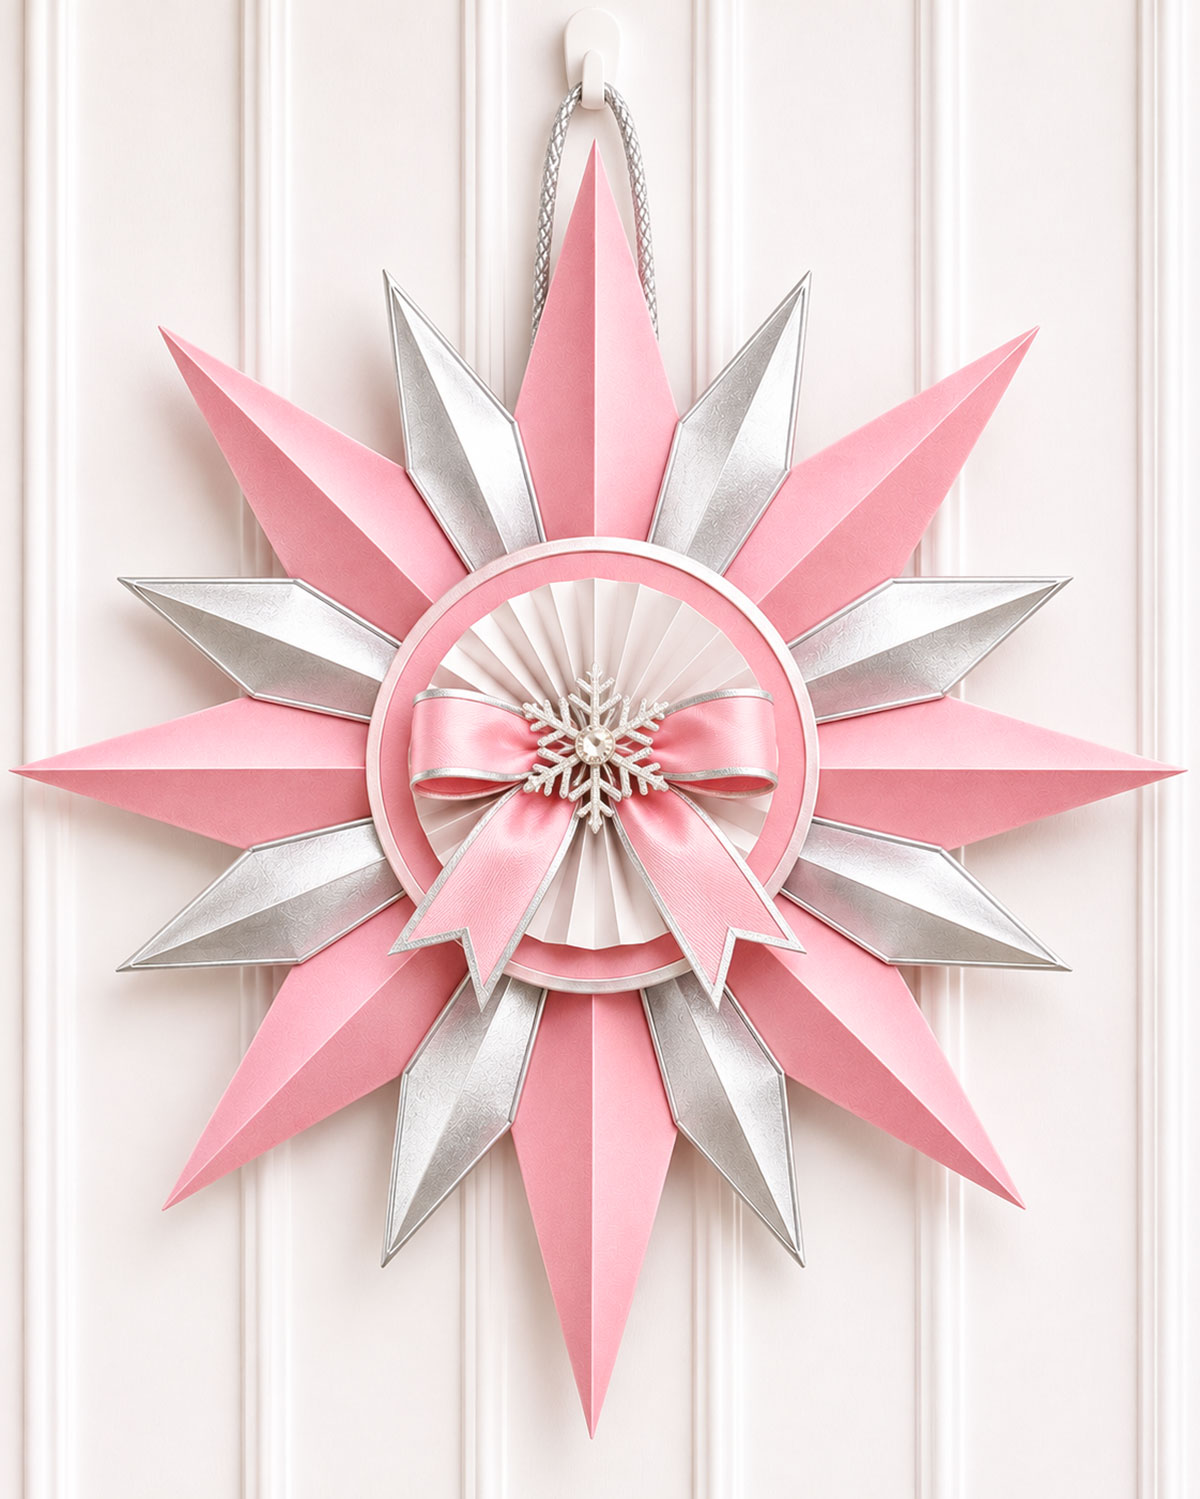
DIY paper star decorations are a lovely way to dress up your home for Christmas without spending a fortune. This pink and silver Christmas starburst you can make using this craft tutorial is made with folded cardstock points, an ivory paper rosette, a pink satin bow, and a silver snowflake in the center. I've included free printable templates and step-by-step instructions to help you make your own for Christmas decorating or a baby girl Christmas shower.
Explore More Christmas Crafts and Decorating Ideas
DIY Pink Christmas Decorations
See Supplies for This Project Here.
Jump to a Section
- Free Printable Starburst Templates
- Materials and Supplies
- Cut the Pink and Silver Paper Rays
- Score and Fold the Paper Rays
- Cut the Backing and Center Pieces
- Assemble the Sixteen-Point Starburst
- Reinforce the Hanging Support
- Make the Pink and Silver Medallion
- Make the Ivory Paper Rosette
- Make and Attach the Pink Satin Bow
- Make the Silver Snowflake
- Check the Completed Starburst
- Final Shaping and Hanging Instructions
- Christmas Baby Shower Decorating Ideas
For this Christmas starburst, I'd use dusty-rose pink and metallic-silver cardstock. The pink gives it a pretty Christmas look, while the silver adds just enough sparkle. Those folded points make the decoration much more interesting than a flat paper star.
The finished starburst should measure about 17 to 18 inches across, with a raised center that's about 1 to 2 inches deep. It has eight long pink points, eight shorter silver points, and a layered center made from cardstock, pleated ivory paper, ribbon, and a silver snowflake.
You won't need a cutting machine, although you can use one if you prefer. A ruler, scissors, scoring tool, and the printable templates will do the job.
Free DIY Paper Star Decorations Templates
I've put the cutting patterns and assembly guides together in one five-page PDF. It includes the full-size paper points, the backing circle, the larger center pieces, the ivory rosette strips, and the little snowflake guide.
Free printable pattern: Download the Pink and Silver Christmas Starburst Templates and Assembly Guide.
Print the PDF on US Letter paper at 100% or Actual Size. Turn off any setting that says Fit to Page or Shrink to Fit. Before cutting anything, measure the 1-inch test square on the printed pages. It needs to measure exactly 1 inch.
Here's what you'll find in the download:
- Page 1: Full-size long pink and shorter silver ray templates, with scoring guides.
- Page 2: Five-inch backing disk with all sixteen placement marks.
- Page 3: Pink and silver center circles and the six-arm snowflake guide.
- Page 4: Three ivory rosette strips and the hanging-support measurements.
- Page 5: Assembly order, size checkpoints, and the finished design reference.
Keep the printed pages nearby as you work. It's much easier to check the placement marks than to guess where each point belongs.
Materials for the Pink and Silver Christmas Starburst
You can make this with ordinary papercrafting supplies. I'd choose cardstock that folds cleanly without feeling flimsy. Metallic cardstock is pretty, but some types will crack if you try to make a sharp fold without scoring first.
- Approximately five sheets of dusty-rose cardstock, 65 to 80 lb cover weight, US Letter size
- Approximately five sheets of metallic-silver cardstock in a similar weight
- One sheet of ivory paper for the pleated rosette
- Firm cardstock or thin chipboard for the backing and hanging reinforcement
- About 24 inches of pink satin ribbon with silver edging, approximately 7/8 to 1 inch wide
- A small silver snowflake embellishment, approximately 1 1/2 inches across, or extra silver cardstock to cut one
- One small clear or silver craft gem for the snowflake center
- About 8 to 10 inches of braided silver cord for hanging
- Clear-drying craft glue suitable for cardstock
- Strong double-sided craft tape or small adhesive foam squares
- Matching sewing thread and a hand-sewing needle for securing the ribbon bow
- Sharp scissors or a craft knife and cutting mat
- A metal ruler, pencil, scoring tool, and bone folder
- Small clips for holding glued pieces while they dry
- A small hole punch or large needle for the hanging support
- The printed templates
Before you start: Cut one extra pink and silver point from scrap paper if you have enough cardstock. You can use those pieces to practice your folds before working on the sixteen finished points.
The finished decoration is fairly large, but the pieces are simple. The important thing is keeping the folds and spacing consistent.
Cut the Pink and Silver Paper Rays
Start with the sixteen pointed pieces that form the outside of the starburst. The pink rays are longer than the silver ones, so the finished decoration has two levels of points.
Cut the Eight Long Pink Rays
- Print page 1 of the PDF at actual size.
- Cut out the template labeled LONG PINK RAY, following the solid outside line.
- Place the template on the wrong side of the dusty-rose cardstock.
- Trace around it lightly with a pencil.
- Cut out the first point, keeping its narrow tip as neat as possible.
- Repeat until you have eight identical pink rays.
- Check the length from the wide base to the pointed tip. Each ray should measure approximately 7 1/8 inches.
- Keep the eight pink pieces together so they don't get mixed in with the silver ones.
Checkpoint: You should have eight long pink points, all the same size and shape.
Cut the Eight Shorter Silver Rays
- Cut out the SHORT SILVER RAY template from page 1.
- Trace it onto the back of the metallic-silver cardstock.
- Cut out the first silver point along its solid outside line.
- Repeat until you have eight matching silver rays.
- Check their length. Each should measure approximately 5 3/4 inches.
- Keep the metallic surface free of pencil marks, glue, and scratches.
Checkpoint: You should now have sixteen points altogether: eight long pink ones and eight shorter silver ones.
Don't cut along the dashed or dotted lines inside the templates. Those are folding guides, not cutting lines.
Score and Fold the Rays for Your DIY Paper Star Decorations
These folds are what give the starburst its raised shape. Without them, the points would look much flatter.
If you've never scored cardstock before, it simply means pressing a shallow groove where you want the paper to fold. You aren't trying to cut through it. Cricut's cardstock-scoring guide explains why scoring helps prevent cracking along folded edges.
Fold the Pink Points
- Lay one pink ray on your work surface with its finished side facing down.
- Find the dashed line running from the middle of the wide base toward the pointed tip.
- Place your ruler along this line.
- Run the scoring tool gently along the guide, making a shallow groove in the cardstock.
- Fold the point along the scored line so its finished pink side forms a raised ridge down the center.
- Don't fold the two halves completely together. Open them into a shallow V shape.
- Leave the wide lower GLUE section flat enough to attach to the backing disk.
- Repeat with the remaining seven pink points.
Look at the first point from the tip toward its base. You should see a raised ridge along the middle, with the paper sloping gently away on both sides.
Pink-point checkpoint: Eight pink rays, each with one raised center fold and a flatter attachment section at the base.
Fold the Silver Points
The silver points need a little more attention. They have the same raised center ridge as the pink ones, plus two narrow folds along their outer edges. That gives the metallic points the faceted look shown in the finished decoration.
- Lay one silver ray metallic side down.
- Score the dashed centerline from the wide base toward the tip.
- Fold along that line to form a raised ridge on the silver side.
- Open the fold slightly, as you did with the pink ray.
- Find the two additional dotted lines running near the outside edges of the silver template.
- Carefully score the first dotted edge line.
- Turn the narrow strip of cardstock beside that line slightly toward the back.
- Repeat on the opposite edge.
- Keep both edge folds shallow. They should frame the silver point without making it curl tightly.
- Leave the lower attachment area flat enough to glue down.
- Repeat for the remaining seven silver rays.
Silver-point checkpoint: Each of your eight silver rays should have a raised center ridge and two narrow outer folds turned slightly toward the back.
If the silver coating starts to crack, don't force the fold. Practice on your spare piece, use a lighter scoring pressure, or try a different metallic cardstock. You want the silver surface to stay smooth.
Cut the Backing and Center Pieces
Next, we'll prepare the circles that hold the starburst together. There are two different jobs here: the smaller backing disk supports the rays, and the larger pink-and-silver circles make the decorative center you see from the front.
- Using page 2 of the PDF, cut one 5-inch circle from firm cardstock or thin chipboard.
- Transfer the sixteen placement marks from the template onto the front of the backing disk.
- Keep the P and S marks visible for now. P means pink, and S means silver.
- Using page 3, cut one 6 1/2-inch circle from metallic-silver cardstock.
- Cut one 6 1/4-inch circle from dusty-rose cardstock.
- Cut a separate 1-inch circle from a small scrap of firm paper. This will support the pleated rosette at its center.
- Cut one chipboard strip measuring 1/2 inch wide by 8 1/2 inches long for the hanging support.
- Set the two decorative circles aside where they won't get creased or scratched.
Cutting checkpoint: You should have a 5-inch backing disk, a 6 1/2-inch silver circle, a 6 1/4-inch pink circle, a 1-inch rosette support disk, and a 1/2 x 8 1/2-inch hanging reinforcement strip.
The decorative circles are supposed to be larger than the backing disk. Once they're attached, they'll hide the overlapping ends of the paper rays and make the center look finished.
Assemble the Sixteen-Point Christmas Starburst
Now for the part where it starts looking like a Christmas decoration. We'll attach the eight pink points first, then fill the spaces between them with the silver points.
Keep the placement guide on page 2 of the PDF beside you. It shows exactly where each color belongs, and you won't have to measure sixteen separate angles.
Attach the Eight Long Pink Points
- Place the 5-inch backing disk on your work surface with its P and S placement marks facing upward.
- Find the P mark at the top of the disk. Think of it as the 12 o'clock position.
- Pick up one long pink ray, keeping its raised center ridge facing toward you.
- Place it over the top P mark with its tip pointing straight upward.
- Position the wide lower end approximately 1 1/2 inches from the center of the disk. This leaves about 1 inch of the ray overlapping the backing.
- Check that its center fold follows the placement line.
- Apply a thin amount of craft glue to the flat GLUE section underneath the ray.
- Press that section against the backing disk without flattening the raised part of the point.
- Attach the next pink ray at the 3 o'clock mark, pointing directly right.
- Add the third pink ray at 6 o'clock, pointing down.
- Attach the fourth at 9 o'clock, pointing left.
- Fill the four diagonal P positions with the remaining pink rays.
- Look at the arrangement from above and make sure the eight points are evenly spaced.
- Adjust any crooked pieces before the glue sets.
Pink-ray checkpoint: You should have eight long pink points radiating from the backing disk. There should be one at the top, bottom, left, right, and each diagonal position.
The bases will overlap near the center. That's fine. They'll disappear beneath the decorative circles.
Add the Eight Shorter Silver Points
Each silver ray goes between two pink ones. Because the silver rays are shorter, the pink points should stand out farther around the outside.
- Pick up one folded silver ray with its raised center ridge facing forward.
- Find the first S mark between the top pink point and the upper-right diagonal pink point.
- Position the silver ray along that mark, keeping its tip pointed outward.
- Place its wide lower end approximately 1 1/2 inches from the center of the disk.
- Check that the silver point sits between the neighboring pink points without covering their raised center folds.
- Apply a thin layer of glue to the flat attachment section beneath the silver ray.
- Press its base against the backing disk.
- Continue clockwise, attaching the remaining seven silver rays to the S marks.
- Keep the raised center folds facing forward and the narrow beveled edges turned slightly back.
- Once all the rays are in place, count them before the glue dries.
- Adjust their spacing so the pink and silver points alternate evenly around the full circle.
- Leave the starburst flat until the glue has taken hold.
Assembly checkpoint: You should have sixteen points altogether, alternating pink and silver. The eight longer pink points should extend farther outward than the eight shorter silver ones.
Don't add the large center circles yet. We need to make sure the hanging support is attached properly first.
Reinforce the Back of the Starburst for Hanging
I wouldn't hang a decoration this size from a hole punched directly through one paper point. The upper pink ray needs some support behind it, especially where the hanging cord attaches.
We'll use the narrow chipboard strip you cut earlier. It will be hidden behind the top pink point and the central backing.
Prepare the Silver Hanging Cord
- Take the 1/2 x 8 1/2-inch chipboard reinforcement strip.
- At one end, mark two small holes approximately 1/2 inch apart along the strip's length, keeping both holes centered across its width.
- Use a small hole punch or a large needle to make the holes.
- Cut an 8 to 10-inch piece of braided silver cord.
- Fold the cord in half to make a loop.
- Pass one loose end through each hole in the chipboard.
- Secure both ends on the back of the strip with firm knots.
- Check that the knots cannot pull back through the holes. Add a small reinforcing patch of chipboard over the knots if needed.
- Gently tug the loop to check the cord attachment before gluing the strip to the decoration.
Attach the Hanging Reinforcement
- Lay a clean towel or other padded material on your work surface.
- Carefully turn the assembled starburst face down onto it, supporting the folded points so they aren't crushed.
- Find the long pink ray at the top of the design.
- Position the chipboard strip along the back of that ray, running from the central disk toward its pointed tip.
- Keep the strip centered behind the upper pink ray.
- Place the end with the hanging loop near the upper tip, leaving the strip itself approximately 1/2 inch below the point.
- Make sure the silver cord loop extends above the tip and will be visible when the decoration is hanging.
- Apply a suitable craft adhesive where the reinforcement touches the central backing disk and the rear of the pink ray.
- Press the strip firmly into place without flattening the folded point.
- Check that the reinforcement remains hidden when viewed from the front.
- Allow the adhesive to cure fully before lifting the decoration by its cord.
Hanging checkpoint: The silver loop should rise from behind the upper pink point, while the chipboard reinforcement stays hidden behind the decoration.
Don't test the full weight of the starburst while the glue is still wet. We'll check the hanger again after the whole decoration is finished.
Make the Pink and Silver Center Medallion
The center is made from two cardstock circles. The silver one goes underneath, and the slightly smaller pink circle sits on top. That leaves a thin silver border showing all the way around.
Join the Two Center Circles
- Place your 6 1/2-inch metallic-silver circle on a clean, flat surface, finished side facing up.
- Lay the 6 1/4-inch pink circle over it.
- Move the pink circle until it's centered, leaving approximately 1/8 inch of silver showing around the edge.
- Lift the pink circle without changing its position more than necessary.
- Apply a thin, even amount of craft glue to the back of the pink circle.
- Press it onto the silver circle, keeping the borders even.
- Smooth the surface gently to remove any bubbles.
- Place the joined circles beneath a clean, flat weight until dry, protecting the metallic surface from scratches.
Medallion checkpoint: You should have a 6 1/2-inch circular medallion with a dusty-rose center and a narrow silver border.
Attach the Medallion to the Starburst
- Turn the dried starburst face up again.
- Check that all sixteen folded points are firmly attached.
- Lay the pink-and-silver medallion over the middle without gluing it yet.
- Center it so the silver border is evenly positioned between the surrounding points.
- Check that the medallion completely covers the glued ends of the rays.
- Lift the medallion carefully.
- Add strong double-sided tape or adhesive foam squares to the supported attachment areas beneath it.
- Keep the adhesive away from open spaces where the medallion doesn't touch a stable surface.
- Lower the medallion into place, using the center of the backing disk as your guide.
- Press gently over the supported areas without flattening the folded rays.
- Look at the starburst from a short distance away to check that the medallion is centered.
- Allow the adhesive to set before adding the ivory rosette.
Center checkpoint: The medallion should measure 6 1/2 inches across, with its 6 1/4-inch pink face surrounded by a narrow silver border. All sixteen ray bases should be hidden beneath it.
Keep the circle as flat and level as you can. If one side sits higher, check whether a folded ray base or an adhesive square underneath needs adjusting.
Make the Ivory Pleated Paper Rosette
The ivory rosette is probably my favorite detail in this design. Its little paper folds add texture without covering up all that pretty pink cardstock.
We're going to make one large rosette from three joined paper strips. You'll fold them like an accordion, join them into a ring, and bring the pleats together at the center.
Cut and Score the Three Ivory Strips
- Print page 4 of the corrected PDF at actual size.
- Cut out the three ivory strip patterns.
- Using the templates, cut three matching strips from ivory paper.
- Check each strip. It should measure 7 1/2 inches long by 2 3/8 inches wide.
- Place one strip horizontally on your work surface.
- Using the dotted lines on the template, score across the full width of the strip every 1/2 inch.
- Repeat on the remaining two strips.
- Keep all three strips in the same orientation so their folds will line up when joined.
Cutting checkpoint: Three ivory strips, each 7 1/2 x 2 3/8 inches, scored at 1/2-inch intervals.
Accordion-Fold the Ivory Paper
- Take the first scored strip.
- Fold along the first scored line.
- Turn the strip over and fold in the opposite direction at the next line.
- Continue alternating the folds along the entire strip.
- You should end up with a narrow accordion of paper, with mountain and valley folds alternating evenly.
- Repeat with the second and third strips.
- Open the folds slightly and check that all three strips bend in a matching pattern.
Don't press the accordion completely flat. The folds should be neat, but you'll want them to open into a fan when we shape the rosette.
Join the Three Strips into One Ring
- Lay the first and second accordion strips side by side.
- Find the 1/2-inch joining panels at their ends, as marked on the PDF.
- Overlap the last panel of the first strip with the first panel of the second strip.
- Apply a thin amount of glue between the overlapping panels.
- Press them together, making sure the accordion folds continue in the same direction.
- Join the third strip to the second strip in the same way.
- Bring the two remaining ends together so the joined strips form a continuous ring.
- Overlap their final 1/2-inch joining panels.
- Glue the last join and hold it in place until the adhesive grips.
- Let all three joins dry before trying to flatten the ring.
Joining checkpoint: You should have one continuous accordion ring, with all the pleats facing in the correct alternating directions.
Shape the Rosette into a Circle
- Stand the accordion ring on one narrow edge.
- Use both hands to bring the inner edge folds toward the center.
- At the same time, let the outer edges spread outward like a fan.
- Gently lower the gathered inner edge toward your work surface.
- Continue adjusting the folds until the ring spreads into a flat, circular rosette.
- Arrange the pleats so they're evenly spaced around the center.
- Check the diameter. The expected finished size is approximately 4 3/4 inches across.
- Hold the center together while applying a small amount of glue to the underside of the gathered pleats.
- Place the 1-inch paper support disk beneath the center.
- Press the gathered pleats onto the disk until the glue holds them in place.
- Allow the glue to dry while keeping the rosette flat.
- Check that the outer folds remain raised rather than pressed completely flat.
Rosette checkpoint: One ivory pleated circle measuring approximately 4 3/4 inches across, with evenly spaced folds and a secured center.
If the rosette keeps springing open, the center probably needs to be held together a little longer while the glue sets. A small, clean weight over the middle can help, but keep it off the outer pleats.
Attach the Rosette to the Pink Medallion
- Place the finished ivory rosette over the middle of the pink circle.
- Adjust its position until there's a fairly even pink border showing around the outside.
- Apply craft glue to the underside of the rosette's small center support disk.
- Press the rosette onto the medallion.
- Check that it remains centered and that the ivory folds aren't flattened.
- Let the glue dry before attaching the ribbon bow.
Center assembly checkpoint: You should now see three layers: the narrow silver border, the wider dusty-rose circle, and the raised ivory pleated rosette in the middle.
Make and Attach the Pink Satin Bow
Now we'll add the pink ribbon bow. I'd keep it fairly simple because the pleated paper already gives the center plenty of detail.
The finished bow has two rounded loops, two tails with V-shaped ends, and a narrow center wrap. The silver edging on the ribbon will tie it in with the metallic paper points.
Make the Two Bow Loops
- Cut a 10-inch length of pink satin ribbon with silver edging.
- Lay it on your work surface with the finished satin side facing up.
- Bring both cut ends toward the middle, forming one loop on the left and one on the right.
- Overlap the two ends by approximately 1/2 inch at the center.
- Adjust the loops until the bow measures approximately 3 1/2 to 4 inches across.
- Pinch the ribbon together at the middle.
- Wrap matching sewing thread around the pinched center several times.
- Secure the thread firmly at the back with a knot.
- Spread the loops gently so they're about the same size.
Add the Ribbon Tails
- Cut an 8-inch length of the same pink satin ribbon.
- Fold it in half, bringing the two cut ends together.
- Position the folded middle behind the center of the bow loops.
- Let the two ribbon ends hang downward, spreading them slightly apart.
- Adjust the tails so their lengths match.
- Cut a small V-shaped notch into the end of each tail.
- Use a few stitches of matching thread to fasten the folded tail section behind the bow.
- Check that the tails point downward rather than hiding behind the loops.
Finish the Bow Center
- Cut a short piece from the remaining pink satin ribbon.
- Fold its raw sides toward the back to make a neat center band.
- Wrap it around the middle of the bow, hiding the thread and ribbon joins.
- Secure the center wrap at the back with small hand stitches.
- Arrange the bow loops and tails one last time.
Bow checkpoint: One pink satin bow approximately 3 1/2 to 4 inches across, with two loops, two V-notched tails, and visible silver edging.
Attach the Bow to the Ivory Rosette
- Lay the completed starburst flat with the ivory rosette facing upward.
- Position the bow horizontally over the center of the rosette.
- Keep the two loops spread to the left and right.
- Let the V-notched tails hang downward over the lower paper folds.
- Move the bow until it looks centered.
- Apply a small amount of strong craft adhesive to the back of its center wrap.
- Press the bow onto the middle of the rosette.
- Hold it in place until the adhesive grips.
- Make sure the ivory pleats are still visible around the bow.
Bow placement checkpoint: The bow should sit across the middle of the ivory rosette, with two rounded loops and two ribbon tails pointing down. It shouldn't cover the entire rosette.
Make the Detailed Silver Snowflake Center
The little silver snowflake is the final decorative piece. It's small, but the extra branches on its six arms make it much prettier than a plain six-pointed shape.
You can use a detailed precut silver snowflake or make one from metallic cardstock. I've included a guide on page 3 of the PDF if you want to cut your own.
Cut the Snowflake
- Find the six-arm snowflake guide on page 3 of the PDF.
- Use the guide to prepare a silver snowflake approximately 1 1/2 inches across.
- Start with six evenly spaced main spokes.
- On each spoke, include one small pair of outward-pointing branches near the middle.
- Add a second, smaller pair of branches farther toward the outer tip.
- Repeat the same branch arrangement on all six spokes.
- Cut carefully around the outer shape, using fine-point scissors or a craft knife.
- Remove any loose paper fibers from the narrow branches.
- Check that the six arms look reasonably balanced.
Those little branch cuts are fiddly. If you'd rather use a precut snowflake with a similar design, that's fine. Just choose one close to the same size, with six main arms and plenty of detail.
Attach the Snowflake and Center Gem
- Place the completed silver snowflake over the center of the pink bow.
- Turn it until one main spoke points straight upward.
- Check that the other five arms spread evenly around the center.
- Apply a small amount of craft glue to the back of the snowflake where it will touch the bow's center wrap.
- Press the snowflake gently into place.
- Keep the glue away from the delicate branch tips.
- Position a small clear or silver craft gem over the snowflake's center.
- Secure the gem with an adhesive suitable for the materials.
- Let the glue dry completely before moving the starburst.
Snowflake checkpoint: The bow should now have a small silver snowflake at its center, with six detailed arms and a tiny gem covering the middle.
You don't need extra glitter or more decorations here. The silver paper, ribbon edges, and snowflake give the center enough sparkle.
Check Your Completed Christmas Starburst
Before you hang it, take a look at the decoration from the front. It's easier to make small adjustments while it's lying flat.
Check the Outer Points
- Count the long pink rays. There should be eight.
- Count the shorter silver rays. There should also be eight.
- Check that the two colors alternate all the way around.
- Make sure the long pink points extend farther than the silver points.
- Look at the raised center fold on every ray.
- Gently reshape any fold that flattened during assembly.
- Check that the silver rays still have their two narrow beveled edge folds.
- Look for any loose ray bases and secure them if necessary.
Check the Layered Center
- Make sure the silver circle is centered beneath the pink circle.
- Check that a narrow silver border shows all the way around.
- Look at the ivory rosette and make sure its folds are evenly spread.
- Check that the rosette is centered over the pink circle.
- Make sure the pink ribbon bow is level and its tails point downward.
- Check that the silver snowflake is centered over the bow.
- Make sure the little gem is firmly attached.
- Look for any visible glue marks that need attention.
Center checkpoint: You should see a 6 1/2-inch silver-and-pink medallion, a pleated ivory rosette about 4 3/4 inches across, a pink satin bow, and a small detailed silver snowflake in the middle.
Check the Back
- Carefully turn the decoration over onto a clean, padded surface.
- Check that the five-inch backing disk still holds all sixteen rays firmly.
- Inspect the narrow chipboard reinforcement behind the upper pink ray.
- Make sure the reinforcement hasn't pulled away from either the ray or the central backing.
- Inspect the silver hanging cord and its knots.
- Make sure the cord passes through the reinforced support rather than an unsupported paper point.
- Check that the back is free of loose adhesive pieces.
Leave the decoration flat until every glued section is completely dry. Don't rush the hanging test.
Final Shaping and Hanging Instructions
Once you've checked the points, center, and backing, there's no need to go over every detail again. Just make any last adjustments, let the glue dry completely, and test the hanging support.
- Remove all temporary clips, pins, and other tools used during assembly.
- Gently reshape any flattened paper folds, keeping the pink and silver points evenly spaced.
- Allow every glued connection to cure fully according to the adhesive manufacturer's instructions.
- Place the starburst over a padded surface and lift it a short distance by the reinforced silver hanging loop.
- Watch the backing and upper pink ray for any bending, peeling, or movement.
- If something starts pulling loose, put the starburst down and reinforce that connection before trying again.
- Once the support holds firmly, hang the decoration from a sturdy indoor hook.
- Step back and check that it hangs straight, with one long pink point facing upward.
Finished size: The expected measurement is approximately 17 to 18 inches from one long pink tip to the opposite tip, with a raised center about 1 to 2 inches deep.
These sizes are based on the printable templates and planned construction. The project hasn't been physically test-made, so the exact finished measurements may vary with your folds and cardstock.
Keep the starburst indoors, away from moisture, candles, and hot lights. Hang it securely, with the cord, small snowflake, and gem out of reach of babies and young children.
Use Your Paper Star for Christmas Decorating or a Baby Shower
I'd give this starburst a wall of its own rather than crowding it with several other large decorations. At 17 to 18 inches across, it has enough size and detail to stand out.
Above a Christmas Dessert Table
For a Christmas dessert table, hang the starburst on the wall behind the display. I'd use an ivory tablecloth and a few pink and silver decorations below it. The metallic rays and detailed center will provide the sparkle, so you won't need much else.
Keep the starburst above and away from serving dishes, candles, and food preparation areas.
For a Baby Girl Christmas Shower
This would also look lovely behind the gift table at a baby girl Christmas shower. The dusty-rose color makes it feel a little different from ordinary red and green Christmas decorations, while the silver points keep the holiday theme clear.
I'd pair it with ivory linens, a few pink satin bows, and simple silver accents. You could also use the same colors in the invitations and table decorations.
If you're planning more of the party, you'll find additional ideas on my Christmas baby shower ideas page.
Make a Smaller Matching Starburst
You can make a smaller version by reducing the printable pieces to the same percentage. Just remember that all the components need to change together, including the pink and silver rays, backing disk, medallion circles, rosette strips, bow, and hanging reinforcement.
For the first one, I'd stay with the original full-size templates. Once you see how the sixteen points and layered center fit together, it'll be easier to decide whether you want a smaller matching decoration.
And that's it. One pink and silver Christmas starburst with folded paper points, an ivory pleated center, a satin bow, and a detailed silver snowflake. It's a nice way to make a Christmas decoration that looks special without needing a lot of different supplies.
When you click on links to various merchants on this site and make a purchase, this may result in this site earning a commission. This does not affect the price you pay.

UBGI Gold Standard 2026
Reviewed under the site's
editorial checklist.
Photos, decorating ideas, party setups and reader submissions are shared for inspiration unless a page is specifically presented as a pattern, tutorial, reference guide or step-by-step project. Follow the instructions, measurements, safety guidance and manufacturer directions provided for the particular project or product.
About Jan | Contact | Baby Nursery Ideas (Blog) | Site Map | Privacy Policy | Disclosure Policy | Disclaimer | Affiliate Disclosure | Earnings Disclosure | Facebook | Pinterest
I am a participant in the Amazon Services LLC Associates Program, an affiliate advertising program designed to provide a means for us to earn fees by linking to Amazon. As an Amazon Associate I earn from qualifying purchases.
Copyright © 2006-2026. All Rights Reserved.