Felt Snowflake Garland Pattern: Easy Christmas Craft with Free Templates
By Jan Bay
A Felt Snowflake Garland for your Christmas mantel, winter party backdrop, or Christmas baby shower dessert table is a forgiving craft project. It's so hard to make an error because, after all, no two snowflakes are alike! Another bonus is that snowflakes are appropriate way past the holidays..several months at least! I love the idea of making decorations that don't have to go straight into storage when Christmas is over, and snowflakes are perfect for that. For this garland, we'll use warm ivory and white felt to make seven pretty snowflakes in two different designs. No tiny embroidered details, no sequins to sew on, and no hours spent cutting little holes. The shapes themselves will make the garland lovely. I'll show you how to cut, assemble, and hang the snowflakes, and I've included free printable templates so you won't have to draw a single one.
Explore More Handmade Christmas Decorations
DIY Christmas Garland Ideas and Patterns
Free Felt Holly Garland Pattern
Free Felt Crafts and Christmas Ornaments
See Supplies for This Project Here.
Jump to the Felt Snowflake Garland Pattern
Supplies for Your Felt Snowflake Garland
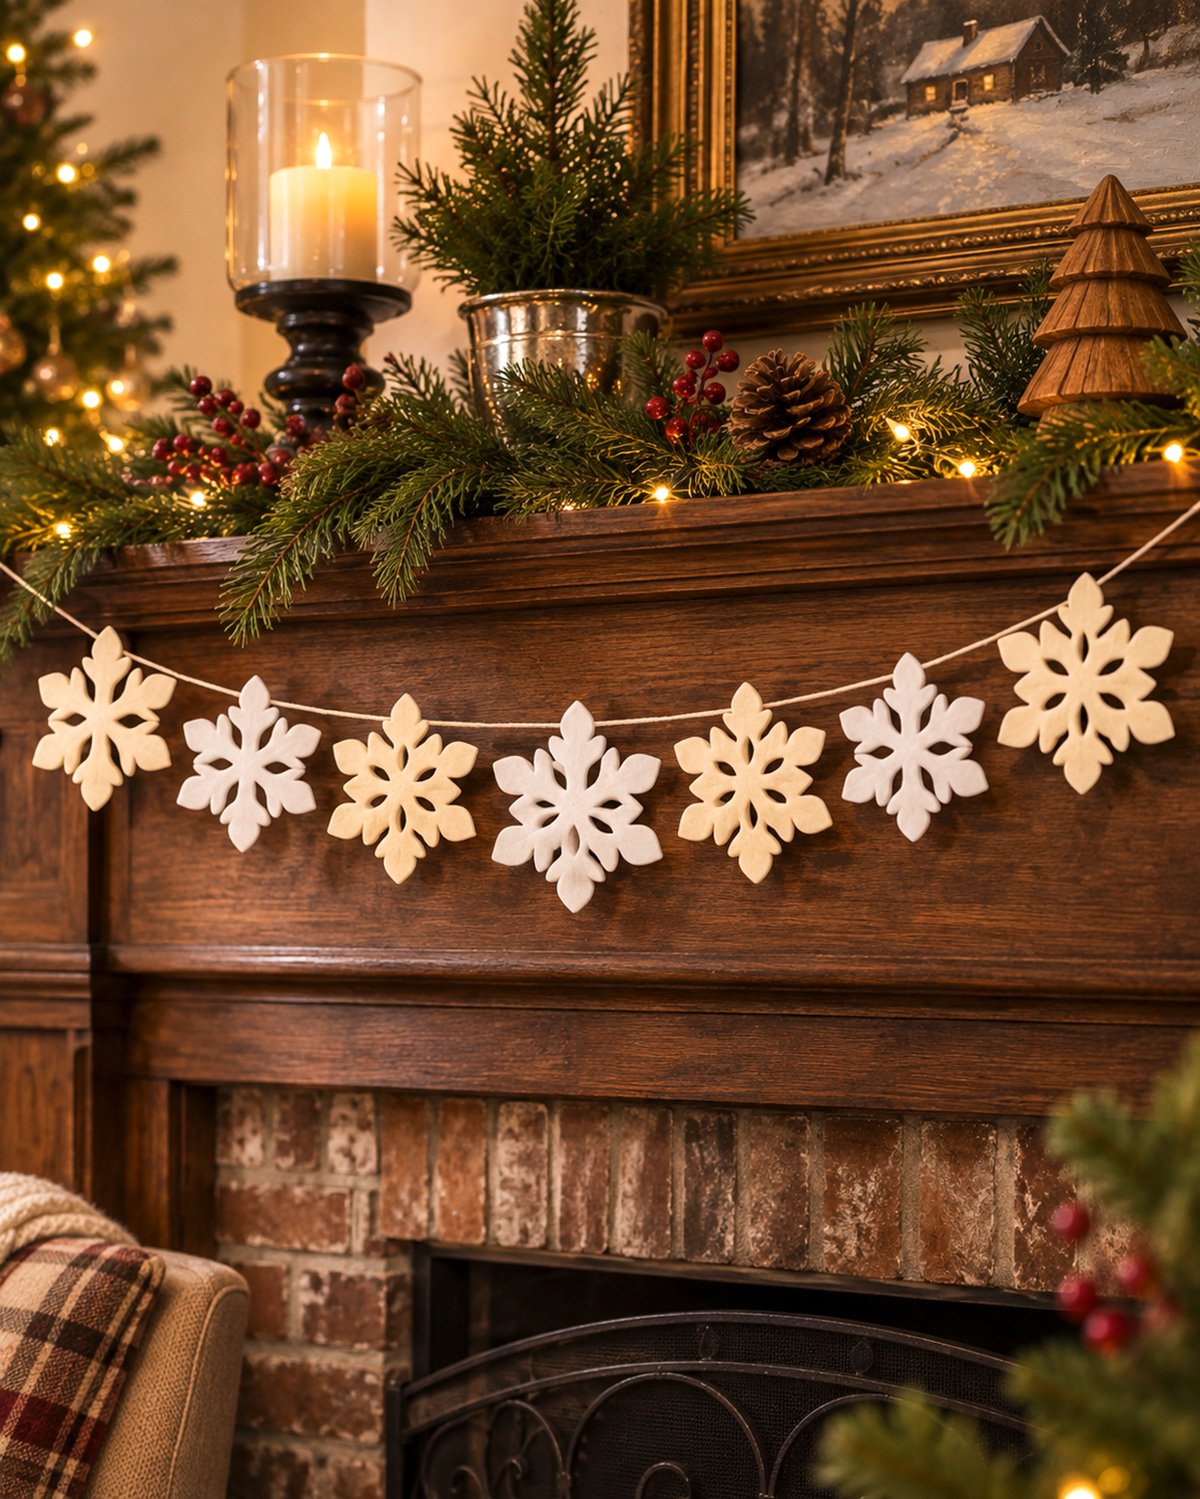
We're making seven snowflakes, with four in warm ivory and three in white. They'll hang in an alternating pattern along a cream-colored cord, just like the ones in the example image.
There are two different snowflake shapes, but you won't have to make seven different patterns. Once you've cut the first one of each design, the others are simply repeats. I think that's a much nicer way to spend an afternoon than trying to invent a new snowflake every time you pick up your scissors!
Finished Felt Snowflake Garland Measurements
- Finished garland: Seven six-pointed felt snowflakes hanging along a cream cord.
- Design A: Four warm ivory snowflakes with rounded, branching arms.
- Design B: Three white snowflakes with narrower branching arms and six simple interior openings.
- Snowflake height: Approximately 5 5/8 inches from top point to bottom point.
- Snowflake width: Approximately 4 7/8 inches across.
- Hanger strips: Seven, each 2 1/2 inches long and 3/8 inch wide.
- Cord length before finishing: 72 inches.
- Usable cord length: 64 inches between the hanging-loop bases.
- Distance between snowflake centers: 8 inches.
- Skill level: Beginner, with careful cutting needed for Design B.
- Construction method: Cut the felt shapes, prepare the cord, and attach each snowflake with a folded felt hanger.
These are the planned measurements for the printable pattern. Your finished garland may hang a little differently depending on the thickness of your felt and how deeply you drape the cord.
Materials and Tools
- Two 9-by-12-inch sheets of warm ivory wool-blend felt, approximately 2 mm thick.
- Two 9-by-12-inch sheets of white wool-blend felt, approximately 2 mm thick.
- 72 inches of cream or ivory cotton decorating cord, approximately 1/8 inch thick.
- About 24 inches of strong ivory sewing thread for securing the cord's two end loops.
- Fabric adhesive recommended for felt, with a flexible bond after drying.
- Sharp fabric scissors.
- Small detail scissors for trimming the snowflake edges.
- Craft knife for the openings in Design B.
- Protective cutting mat.
- Pencil or washable fabric marker.
- Ruler or measuring tape.
- Small pieces of removable tape for marking the cord.
- Printed Felt Snowflake Garland Templates and Instructions.
The four felt sheets should provide enough material for the seven snowflakes when you arrange the templates carefully. You can fit two full-size snowflakes one above the other on a 9-by-12-inch sheet. Leave a little room between the outlines so you don't accidentally cut into the next one.
Keep the leftover felt. You'll use small pieces to make the hanger strips.
Choosing Felt for the Snowflakes
I'd choose felt with enough body to hold the little points and branches without curling badly. Wool-blend felt about 2 mm thick is a good choice for this pattern.
Very thin felt may hang more limply. Thick, stiff felt can be harder to cut neatly, especially around the branches and openings.
The contrast between the two colors doesn't need to be dramatic. Warm ivory and clean white look lovely together, particularly against a dark wooden mantel. If they're almost the same color, the two different snowflake shapes will still add variety.
There are no beads, sequins, embroidered centers, or decorative stitches in this pattern. You won't need them.
Check the Felt and Glue Before Beginning
Cut two small scraps from your leftover felt. Glue them together according to the adhesive manufacturer's directions and let them cure fully.
Try pulling the scraps apart gently. If the bond releases easily or the glue leaves an ugly stiff lump, choose a different adhesive before assembling your garland.
Supply checkpoint: You should have two ivory felt sheets, two white felt sheets, a 72-inch cord, adhesive, cutting tools, and the printed templates before starting.
Download the Free Felt Snowflake Garland Pattern and Templates
You won't have to draw the snowflakes yourself. The printable includes both shapes at their intended finished size, plus the hanger strip and the measurements for arranging all seven snowflakes along the cord.
Design A has a solid center and branching arms. Design B has a slightly different outline and six open slots, one along each arm. The openings are large enough to cut individually without making a lot of tiny decorative cuts.
You'll cut four copies of Design A in ivory and three copies of Design B in white.
Download the Free Felt Snowflake Garland Pattern and Templates (PDF)
What's Included in the Printable?
- Page 1: Actual-size Design A snowflake template for the four ivory snowflakes.
- Page 2: Actual-size Design B template for the three white snowflakes, including the six interior cutting lines.
- Page 3: Complete cutting list, full-size hanger strip template, and attachment diagram.
- Page 4: Garland cord measurements, seven snowflake positions, and finishing instructions.
Print the Templates at Actual Size
- Open the PDF and select US Letter paper.
- Choose 100% or Actual Size in the print settings.
- Turn off Fit to Page or any setting that automatically shrinks the pattern.
- Print Page 1 first.
- Measure the 1-inch test square. It should be exactly 1 inch wide and 1 inch tall.
- If the square measures correctly, print the remaining pages using the same settings.
Check the finished snowflake outline, too. It should be about 5 5/8 inches tall and 4 7/8 inches wide.
If the test square doesn't measure correctly, fix your printer settings before cutting any felt. It would be disappointing to get all seven snowflakes cut and then discover that your printer made them smaller than the pattern calls for.
Prepare Your Cutting Templates
Cut around the outside of each paper snowflake. Keep the paper intact at the narrow places between the branches.
For Design B, you can leave the six printed openings intact while tracing the outer edge. Afterward, carefully cut the openings out of the paper template and use them as your guide for marking the white felt.
If your paper begins to curl or tear after several tracings, transfer the design to thin cardboard. A cereal box works fine for a reusable tracing template.
Template checkpoint: You should have two full-size snowflake patterns and one hanger strip pattern measuring 2 1/2 by 3/8 inch. Keep the printed cord diagram nearby for assembly.
Cut the Felt Snowflakes Using the Free Printable Patterns
Let's start with the ivory snowflakes. They're the easier of the two designs because you only have to cut around the outside. Once those four are finished, we'll move on to the white ones.
Don't rush the pointed branches. The outline is what gives each snowflake its shape, and a few careful cuts here will make the finished garland look much nicer.
Step 1. Trace Four Ivory Snowflakes
- Place one ivory felt sheet flat on your cutting surface.
- Lay the Design A paper template on the felt.
- Trace around the full outside edge with a pencil or washable fabric marker.
- Move the template below the first outline, leaving a little room between the two shapes.
- Trace a second snowflake.
- Repeat on your second ivory felt sheet until you have four complete outlines.
Look over the lines before cutting. Every snowflake should have six main arms, with the little side branches still connected to them.
Step 2. Cut the Ivory Snowflakes
- Cut around the outside of the first outlined snowflake.
- Use the tips of your scissors to work carefully into the spaces between the branches.
- Follow the printed shape without cutting through the narrow places where the branches join the main arms.
- Continue around the entire snowflake until it comes free from the felt sheet.
- Trim any uneven edges or loose fibers.
- Repeat until all four ivory snowflakes are finished.
You'll notice that the ivory snowflakes have plenty of detail without any holes in their centers. The branches do the decorating, which is exactly what I wanted for this design.
Ivory cutting checkpoint: You should have four complete Design A snowflakes. Each should be one continuous piece of felt with six arms and no separate parts.
Step 3. Trace Three White Snowflakes
Next, take the Design B template and your two white felt sheets.
- Lay the first white felt sheet flat.
- Trace two Design B outlines, leaving room between them.
- Trace the third outline onto your second white felt sheet.
- Cut around all three outer outlines using the same careful method you used for Design A.
- Check that the six main arms and their side branches are intact.
Set the finished outer shapes flat on your worktable. We're going to cut their six interior openings next.
Step 4. Cut the Openings in Design B
Design B has six oval openings arranged around its center, one along each main arm. These are part of the finished snowflake design, so don't skip them if you want the exact pattern shown in the printable.
Use a sharp craft knife on a proper cutting mat. Keep your fingers away from the cutting path.
- Lay one white snowflake on the cutting mat.
- Place the Design B paper template over it, matching the outer points.
- Mark the six oval openings through the cutout areas of the paper template.
- Remove the paper template.
- Carefully cut around the first marked oval, removing that small piece of felt.
- Repeat for the other five openings.
- Check that all six openings are clear and that none has been cut through to the outside edge.
- Repeat the process for the remaining two white snowflakes.
You can use small, sharp detail scissors instead of a craft knife if you're comfortable making a small starter cut inside each opening. A knife is often easier because you won't have to fold the felt to reach the middle.
Take your time with the first opening. Once you've made one neat cutout, the other five will be easier.
Don't try to make the holes larger than the printed outlines. Keeping the felt around them intact helps the snowflakes hold their shape.
White cutting checkpoint: You should have three Design B snowflakes, each with six open slots. That makes 18 interior openings altogether.
Step 5. Check All Seven Snowflakes
Lay the snowflakes on your worktable in this order:
Ivory, White, Ivory, White, Ivory, White, Ivory.
Check that all seven have six main arms. The ivory snowflakes should have the broader branching outline, while the white snowflakes have the narrower outline with interior openings.
Don't worry if a few of the outer points vary slightly from one snowflake to another. Hand-cut felt doesn't need to look machine-made. What matters is that the six-arm shape is clear and the branches aren't accidentally cut apart.
Final cutting checkpoint: Seven snowflakes total: four ivory Design A pieces and three white Design B pieces. Every snowflake should be a single, complete felt cutout.
Assemble the Two Felt Snowflake Designs
Here's some good news. The snowflakes themselves don't need to be sewn, stuffed, or pieced together.
Each one is cut from a single layer of felt. The thickness of the felt gives the snowflakes their body, while the little side branches give them their shape.
We're only adding a small felt hanger to the back of each snowflake. That's what will hold it on the cord without showing from the front.
Step 1. Decide Which Point Is the Top
Take one ivory snowflake and turn it until one complete main arm points straight up.
The opposite main arm should point straight down, with two branching arms spreading toward either side.
Place it on your worktable with the front facing down. The upper arm will be where we attach the hanger later.
Repeat this with the other six snowflakes so they're all facing the same way.
Step 2. Cut Seven Felt Hanger Strips
Use the small rectangular template on Page 3 of your printable.
From your leftover felt, cut:
- Four ivory strips measuring 2 1/2 inches long and 3/8 inch wide.
- Three white strips measuring 2 1/2 inches long and 3/8 inch wide.
These narrow pieces will be folded over the garland cord and glued to the backs of the snowflakes.
There's no reason to cut longer hangers unless you want the snowflakes to dangle farther below the cord. The pattern uses the short hanging arrangement shown in the example image.
Step 3. Check the Hanger Placement
Place one matching felt strip behind the upper arm of each snowflake. The strip should line up with the middle of that arm rather than leaning toward one side.
Don't glue anything yet.
We'll fold each hanger around the main cord when we attach the snowflakes. Keeping the pieces separate now will make it easier to position everything evenly.
Step 4. Check the Front of Each Snowflake
Turn the snowflakes face up again and arrange them in their alternating color order.
Look at the shapes rather than trying to make every tiny branch sit in exactly the same position.
You should have two recognizable designs that belong together. The ivory snowflakes have the fuller solid outline. The white ones have the more open look.
If any narrow branch is bent, lay the snowflake flat and gently straighten it with your fingers. Don't pull hard on a little point.
Assembly checkpoint: You should have seven finished snowflake cutouts and seven matching hanger strips. No glue, embroidery, or additional ornament pieces are needed on the fronts.
Prepare the Cord for Your Seven-Snowflake Garland
We're going to mark the cord before attaching the snowflakes. That saves you from discovering that all your lovely snowflakes are crowded together at one end.
The pattern uses an 8-inch distance between neighboring snowflake centers. With seven snowflakes, that gives us a balanced arrangement and enough room to see each shape.
Step 1. Cut the Cord
Measure and cut one 72-inch length of cream or ivory cotton decorating cord.
I'd use a cord about 1/8 inch thick. Something much heavier would draw attention away from the snowflakes, while very fine thread may not give the garland the same gently draped appearance.
Lay the cord straight across your worktable and remove any twists.
Step 2. Make the Hanging Loops
We'll use 4 inches at each end of the cord to make the hanging loops.
- Measure 4 inches inward from the left end of the cord.
- Fold the loose end back to that mark to form a loop.
- Hold the folded section alongside the main cord.
- Use a separate length of strong ivory sewing thread to make approximately 15 close wraps around both cord sections at the base of the loop.
- Tie the wrapping thread with two firm knots.
- Trim the thread ends and add a small amount of suitable glue over the wraps.
- Repeat the same process at the right end, using the last 4 inches of cord.
Let the adhesive set according to its instructions, then gently pull each loop over the worktable to make sure the folded sections don't slip.
Don't cut off the folded cord ends. They're part of the loop construction.
After the two loops are made, you'll have 64 inches of cord between their bases.
Cord checkpoint: The total starting length was 72 inches. Each end loop uses 4 inches, leaving 64 inches of usable cord between the loop bases.
Step 3. Mark the Seven Snowflake Positions
Lay the cord flat without stretching it.
Starting at the base of the left hanging loop, make small temporary tape marks at these positions:
- Snowflake 1: 8 inches.
- Snowflake 2: 16 inches.
- Snowflake 3: 24 inches.
- Snowflake 4: 32 inches.
- Snowflake 5: 40 inches.
- Snowflake 6: 48 inches.
- Snowflake 7: 56 inches.
The fourth snowflake belongs exactly in the middle, at the 32-inch mark.
You'll have six spaces measuring 8 inches each, plus 8 inches of cord at either end before the first and last snowflakes.
That gives us the full 64 inches.
Step 4. Check the Arrangement
Put the cord above your row of snowflakes and line up each snowflake with its marked position.
The order should be:
- Ivory Design A.
- White Design B.
- Ivory Design A.
- White Design B.
- Ivory Design A.
- White Design B.
- Ivory Design A.
You'll notice the ivory snowflakes appear at both ends, with one white snowflake alternating between each pair.
It's a simple arrangement, but I think it looks more intentional than choosing colors at random.
Spacing checkpoint: Seven marks, 8 inches apart, with the middle mark at 32 inches. Keep the marks in place until the snowflakes have been attached.
Attach the Seven Felt Snowflakes to the Garland Cord
Now we're ready to put everything together.
Each snowflake will hang from a narrow piece of matching felt folded over the cord. The joined ends will be hidden behind the upper snowflake arm, so you won't see a bulky knot or a strip of tape on the front.
Step 1. Attach the First Ivory Snowflake
Start with your first ivory Design A snowflake and one ivory hanger strip.
- Lay the first snowflake face down on your protected worktable, with one main arm pointing upward.
- Find the 8-inch mark on the garland cord.
- Hold the cord approximately 1/2 inch above the snowflake's upper point.
- Fold the midpoint of the 2 1/2-inch hanger strip over the cord at that mark.
- Bring the two free ends of the hanger strip down toward the back of the upper snowflake arm.
- Adjust the strip so it hangs straight and both ends reach the back of the felt.
- Glue approximately 3/4 inch of the first strip end to the back of the upper arm.
- Glue the second end over the first, keeping the strip centered and the glued ends hidden behind the snowflake.
- Hold the joined area in place as directed by your adhesive manufacturer.
Don't flatten the folded hanger completely against the cord. Leave enough room around the cord for the small loop shown in the printable diagram.
The snowflake should hang approximately 1/2 inch beneath the cord, depending on the thickness of the felt and how tightly you form the hanger.
If the finished hanger slides along the cord after the adhesive has cured, add a tiny amount of suitable adhesive inside the fold where the hanger meets the cord. Let it cure again before hanging.
Step 2. Check the First Attachment
Allow the adhesive to cure completely before testing the attachment.
Then lift the cord gently over your worktable, supporting the snowflake with your other hand until you know the hanger is holding.
Check three things:
- The felt hanger holds firmly to the back of the snowflake.
- The snowflake hangs with one main arm pointing upward.
- The hanger and glued ends remain hidden when you look at the snowflake from the front.
If the joint starts to pull away, take the snowflake down and try a different felt-compatible adhesive. Don't hang a decoration with a loose attachment.
Step 3. Attach the First White Snowflake
Take one white Design B snowflake and one white hanger strip.
Repeat the same attachment method at the 16-inch mark.
Check that the six openings are visible from the front and that the upper arm points straight up.
I'd avoid turning the white snowflakes sideways just to make their cutouts look different. The alternating shapes already provide enough variation, and keeping an upper arm vertical gives the hanger a consistent attachment point.
Step 4. Attach the Remaining Five Snowflakes
Continue along the cord using your remaining marked positions:
- 24 inches: Ivory Design A.
- 32 inches: White Design B.
- 40 inches: Ivory Design A.
- 48 inches: White Design B.
- 56 inches: Ivory Design A.
Use the matching felt hanger strip for each snowflake. Repeat the same folding, gluing, and drying steps.
Don't glue one snowflake directly to another. Each should hang separately from the cord with a little space between them.
Step 5. Give the Finished Garland a Final Check
Lay the completed garland flat again and count everything.
- Seven snowflakes.
- Four ivory Design A snowflakes.
- Three white Design B snowflakes.
- Seven felt hanger strips.
- Two hanging loops at the cord ends.
- Eight inches between neighboring snowflake centers.
Look for any loose glue joints or bent branches. If a small point is folded underneath another part of the snowflake, straighten it gently.
Once all the adhesive has fully cured, lift the garland by the end loops over your worktable. Check that every snowflake hangs freely and its felt hanger stays attached.
Final assembly checkpoint: All seven snowflakes should hang independently along the cord, in alternating ivory and white, with their decorative faces pointing forward.
Hang and Decorate with Your Felt Snowflake Garland
Now you can put your snowflakes where they'll be seen!
Snowflakes are one of those Christmas decorations that don't have to look quite so Christmasy. The ivory and white felt works just as nicely for a winter gathering, and you can keep the garland up after the Christmas ornaments have been put away.
Hang the Garland Across a Wooden Mantel
The dark wood in the example image gives the ivory and white snowflakes a beautiful background. If you have a dark wooden mantel, I'd try the garland there first.
Hang the end loops from two properly installed supports, then let the cord dip gently through the middle.
The fourth snowflake should hang near the lowest part of the curve, with three snowflakes on either side.
Move the end loops a little closer together or farther apart until you like the curve. The measurements in the pattern are taken along the cord, so the horizontal distance between your hooks will depend on how much drape you want.
I wouldn't stretch the garland completely straight unless that's the look you're after. A gentle curve suits these hanging snowflakes.
Keep felt decorations away from working fireplaces, open flames, hot lights, and candles. The example photograph is a decorating reference, not a guide for placing flammable materials near heat.
Decorate a Christmas Baby Shower
For a Christmas baby shower, you could hang the snowflakes across a backdrop, above a dessert-table display, or along a decorative shelf.
They don't need to be mixed with every Christmas color. Ivory and white can look lovely with simple table linens and a few winter decorations.
If you're decorating for a baby, keep the cord and all hanging pieces well out of reach. This is a decoration, not a baby toy. Don't hang it on a crib, bassinet, or other infant sleep space. The U.S. Consumer Product Safety Commission's infant sleep guidance is a useful reference for keeping sleep spaces free of decorations.
Make a Shorter or Longer Snowflake Garland
Seven snowflakes are the complete version shown here, but you can use the same patterns for a different space.
For a shorter garland, make five snowflakes in this order: ivory, white, ivory, white, ivory. Use a 56-inch cord, make the same 4-inch end loops, and place the snowflake centers at 8, 16, 24, 32, and 40 inches from the left loop base.
For a longer garland, make nine snowflakes. Alternate the designs, beginning and ending with ivory. Use an 88-inch cord with the same 4-inch end loops, then place the centers at 8-inch intervals from 8 through 72 inches.
I'd make the seven-snowflake version first. It's easier to decide whether you need more once you've seen the finished decoration hanging in your own room.
Use the Snowflakes as Individual Ornaments
You can also use either cutting template to make a single snowflake ornament.
Cut one felt snowflake, attach a short hanger using the same method, and make a loop large enough for your intended ornament hook.
Design A is especially convenient if you want to make several ornaments without cutting openings in each one.
If you'd rather make other felt decorations for the tree, my felt Christmas tree ornament patterns have more ideas.
Store Your Garland for Next Winter
Don't fold the snowflakes into a tight bundle when the season is over. Those little branches deserve better treatment than that.
- Take down the garland by its hanging loops.
- Check the felt hangers and glue joints.
- Lay the snowflakes flat in a shallow storage box.
- Arrange the cord in loose curves between them rather than pulling it tightly around the felt shapes.
- Place plain tissue paper between overlapping snowflakes if needed.
- Keep heavy decorations off the top of the box.
- Store everything in a dry place away from dampness and direct sunlight.
If the snowflakes collect a little dust, try a gentle dry brush. Check the felt manufacturer's care instructions before using water, especially on the glued hanger pieces.
When you're ready for another handmade Christmas project, browse my DIY Christmas Garland collection or see the Felt Holly Garland pattern for a completely different look.
Frequently Asked Questions About Felt Snowflake Garlands
Are both felt snowflake designs the same size?
They're designed to be approximately the same finished size, about 5 5/8 inches tall and 4 7/8 inches wide. Their branching details are different, but they fit the same garland spacing. Print both templates at 100% rather than resizing one to match the other.
Can I make the snowflake garland with ordinary craft felt?
Yes. Just choose craft felt with enough body to hold the six-pointed shapes. Very thin felt may droop more than the wool-blend felt used in the pattern. You can cut one sample snowflake first to see whether you like the way it hangs.
Do I have to use a craft knife?
Not for Design A. Ordinary sharp fabric scissors are enough for the four solid ivory snowflakes. Design B has six interior openings, which are easier to cut with a craft knife and a protective cutting mat. Small detail scissors can also work if you make a careful starter cut inside each opening.
Can I leave the openings out of the white snowflakes?
You can, but the finished white snowflakes won't match Design B in the printable. The openings are part of the pattern and help make the two designs look different. If you want the easiest possible version, make all seven snowflakes from the solid Design A template instead.
Do I need to sew the snowflakes together?
No. Each snowflake is one complete piece of felt. The hanger strips are attached with fabric adhesive, and the main cord loops are secured with wrapped and knotted thread. You don't need to embroider or sew the snowflake shapes.
Can I hang the garland outdoors?
I'd keep this one indoors. Ordinary felt and fabric adhesive aren't necessarily made for wet or windy conditions. Moisture can change how the felt looks and may affect the glued attachments. If you want an outdoor garland, use materials specifically intended for outdoor decorations.
Can I wash the felt snowflake garland?
I wouldn't put it in the washing machine. The branching shapes and glued hangers could become distorted. Gentle dry cleaning with a soft brush is a better first choice, followed by the care directions for your particular felt and adhesive.
When you click on links to various merchants on this site and make a purchase, this may result in this site earning a commission. This does not affect the price you pay.

UBGI Gold Standard 2026
Reviewed under the site's
editorial checklist.
Photos, decorating ideas, party setups and reader submissions are shared for inspiration unless a page is specifically presented as a pattern, tutorial, reference guide or step-by-step project. Follow the instructions, measurements, safety guidance and manufacturer directions provided for the particular project or product.
About Jan | Contact | Baby Nursery Ideas (Blog) | Site Map | Privacy Policy | Disclosure Policy | Disclaimer | Affiliate Disclosure | Earnings Disclosure | Facebook | Pinterest
I am a participant in the Amazon Services LLC Associates Program, an affiliate advertising program designed to provide a means for us to earn fees by linking to Amazon. As an Amazon Associate I earn from qualifying purchases.
Copyright © 2006-2026. All Rights Reserved.