Felt Christmas Tree Ornaments: 3 Easy Beginner Patterns
By Jan Bay
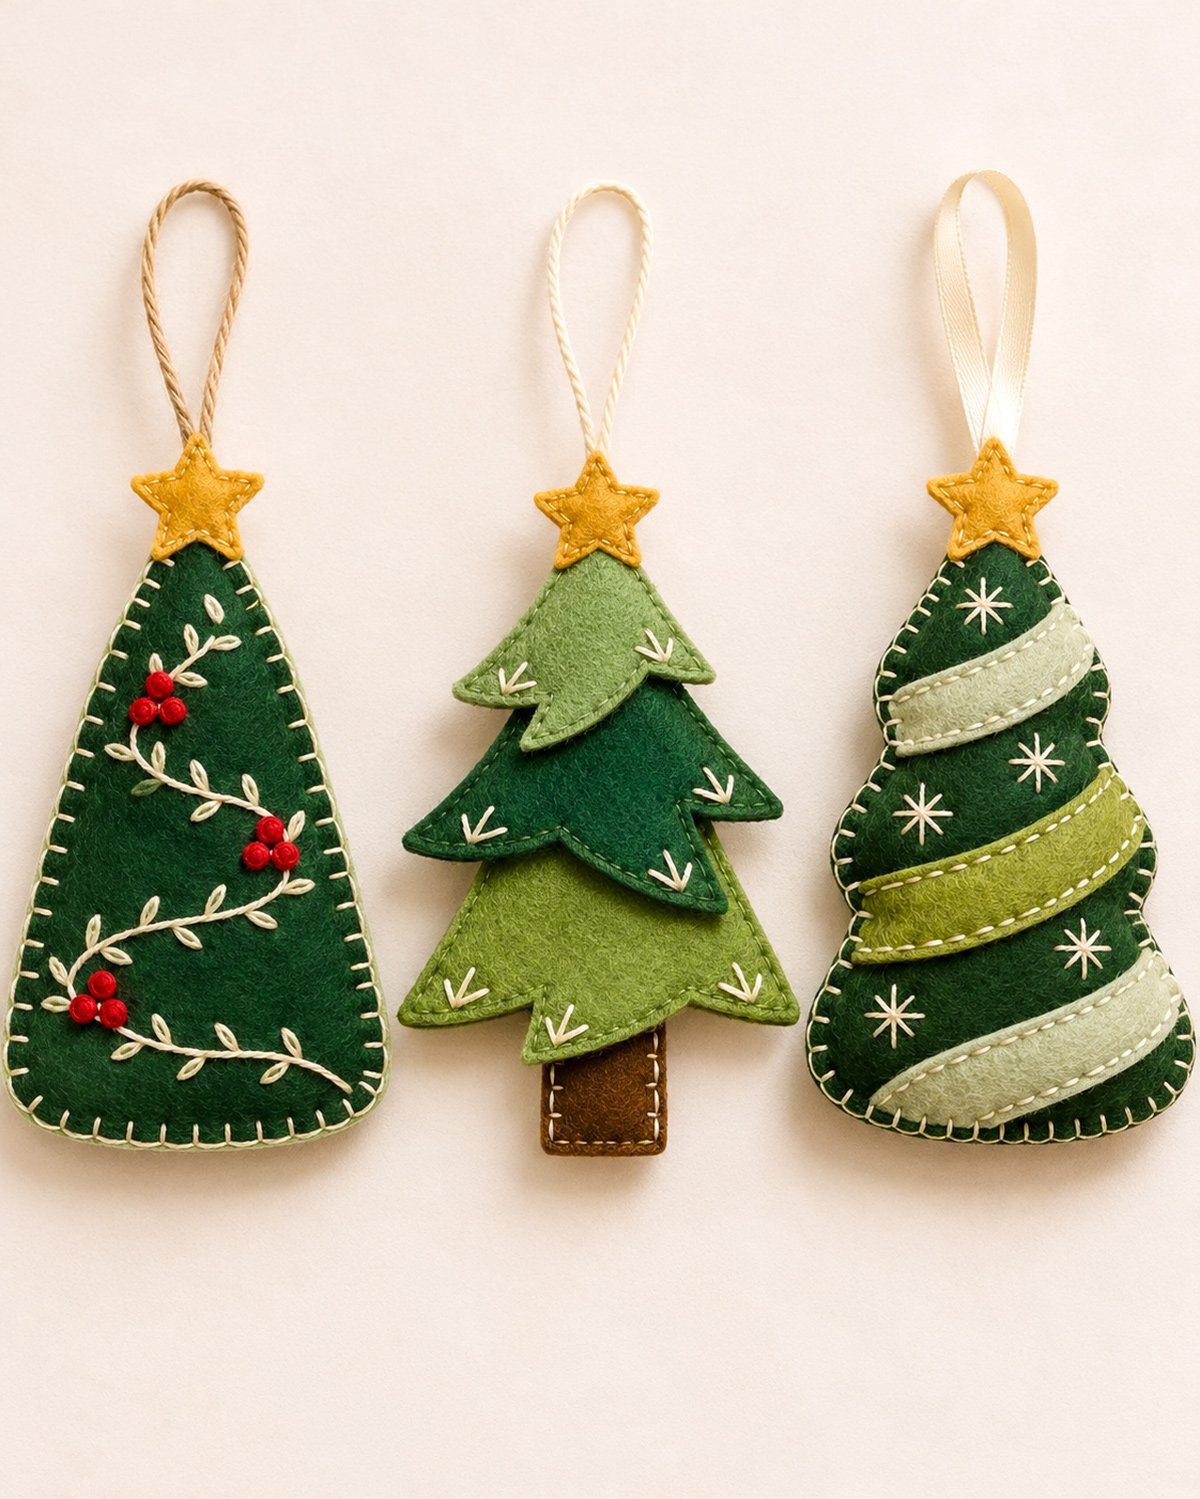
These felt Christmas tree ornaments are a lot of fun to make. Here are three different handmade decorations from one beginner-friendly pattern collection. The free printable templates include a flat tree with an embroidered berry garland, a layered tree with overlapping branches, and a padded tree with curved felt ribbon bands. Each design uses simple hand sewing techniques and makes a pretty decoration for your Christmas tree or a handmade gift.
Explore More Christmas Crafts and Ornament Patterns
Free Felt Cardinal Christmas Ornament
Free Crochet Christmas Ornament Patterns
See Supplies for This Project Here.
Jump to a Section
Free Printable Felt Christmas Tree Ornament Patterns
You can make all three felt Christmas tree ornaments from one printable pattern pack. It includes the full-size tree outlines, the separate branch layers, the curved felt ribbon strips, the little stars, and a placement guide for the embroidery. No drawing your own tree shapes or guessing where the bands should go.
Download the Free Felt Christmas Tree Ornament Patterns (PDF)
The PDF has five US Letter pages. Page 1 shows the finished set and cutting list. Page 2 has the berry garland tree, red berry circles, and star templates. Page 3 has the three layered branch pieces and trunk. Page 4 has the padded tree outline and three curved ribbon pieces. Page 5 gives you the assembly and checking notes.
Print at 100% or Actual Size, not Fit to Page. Measure the 1-inch test square on each template sheet before you cut the felt. All the outlines are cutting lines, so you don't need to add a seam allowance. The sizes below are expected measurements from the templates, not measurements from a physically sewn sample.
Materials and Supplies
I'd start with wool-blend craft felt if you have it. The edges hold their shape nicely, and it's easier to cut the little branch tips without getting ragged corners. Ordinary craft felt works, too. Just choose sheets that aren't too floppy.
- Forest-green felt: enough for the berry tree front, the middle branch tier, and both pieces of the padded tree
- Sage-green felt: the berry tree back, the top branch tier, and two pale ribbon bands
- Olive-green felt: the bottom branch tier and the center ribbon band
- Gold felt: six small five-point stars, two for each ornament
- Brown felt: two trunk pieces for the layered tree
- Red felt: nine circles, each about 3/16 inch across, for the berry clusters
- Ivory pearl cotton size 5, or six strands of embroidery floss, for the visible embroidery and blanket stitching
- Matching green, brown, and gold sewing or embroidery thread for small attachment stitches
- One 8-inch piece of natural twine, one 8-inch piece of ivory twisted cord, and one 8-inch piece of cream satin ribbon about 1/4 inch wide
- Hand-sewing needle, embroidery needle, sharp felt scissors, paper scissors, pins or sewing clips, and removable fabric marker
- A small amount of polyester stuffing for the padded ribbon tree only
- Printer, US Letter paper, and ruler to check the printed template scale
One 9-by-12-inch sheet of each main green is a sensible place to start, with scraps for the little pieces. Arrange the templates on the felt before cutting, especially if you're using smaller sheets. You'll need three different greens for the layered look in the example image.
Expected sizes, without hanging loops: The berry garland tree body is about 3.35 inches wide by 5.48 inches tall. The layered tree is about 3.66 inches wide across its bottom tier, with a 5.5-inch assembled branch section and a trunk below. The padded ribbon tree body is about 3.40 inches wide by 5.25 inches tall. Each gold star adds a little height above its tree.
Beginner Sewing Stitches
You don't need fancy sewing skills for this set. The shapes do most of the work. Try a few stitches on a felt scrap before starting the good pieces, especially if you've never worked a blanket stitch around a corner.
- Running stitch: Bring the needle up and down through the felt in short, even steps. Use stitches about 1/8 to 3/16 inch long for the branch borders and ribbon bands.
- Blanket stitch: Bring the needle through both felt layers near the edge, catching the working thread under the needle to form the loop along the outside. Space the stitches about 3/16 to 1/4 inch apart and take each stitch about 1/8 inch deep.
- Backstitch: Make one small stitch forward, then bring the needle back into the end of the previous stitch. Use this for the ivory winding vine on the berry tree.
- Detached leaf stitch: Make a little loop beside the vine, catch its tip with one short stitch, and pull the thread just tight enough to keep the leaf open. Straight stitches shaped into a small V are an easier alternative.
- Six-spoke starburst: Make three straight stitches crossing at one center point. Space the six ends evenly, like the small embroidered stars on the padded tree.
If you'd like a close look at the edge stitch, the Royal School of Needlework's blanket stitch tutorial has step-by-step drawings. Keep the thread snug, but don't pull so hard that the felt puckers.
Pattern 1: Berry Garland Tree
I'd make this one first. It's a flat tree, so there's no stuffing to manage, and the winding berry garland gives you plenty of room to practice embroidery. Keep the dark green front, ivory vine, three red berry groups, and natural twine loop if you want it to look like the example.
Cutting List for the Berry Garland Tree
- Cut 1 tree front from forest-green felt, using Template A on PDF page 2.
- Cut 1 matching tree back from sage-green felt, using the same outline.
- Cut 9 red circles, each 3/16 inch in diameter.
- Cut 2 gold stars from the star template on page 2.
- Cut one 8-inch piece of natural twine for the hanger.
How to Sew the Berry Garland Tree
- Cut the two tree shapes. Trace the outside line of Template A onto the felt. Cut carefully around the rounded bottom corners. Both pieces should have the same outline, about 3.35 inches wide by 5.48 inches tall.
- Mark the garland. Place the printed template over the forest-green front and transfer the curved dashed vine line and the three berry locations with a removable marker. The line begins near the top, winds from side to side, and ends near the lower right. Keep it inside the cut edge.
- Embroider the winding vine. Use ivory pearl cotton or six strands of ivory floss. Backstitch along the marked curve, making short stitches about 1/8 inch long. Secure the thread on the wrong side at both ends.
- Add the leaves. Work 12 small pairs of detached leaves along the vine, spacing them as evenly as the curves allow. Each leaf should be roughly 1/4 inch long. Place leaves on alternating sides so they look like little sprigs. Leave the marked berry locations clear.
- Sew on the berries. Arrange three red felt circles at each of the three printed berry marks, forming three small triangular groups. Attach each disc through its center with two or three tiny red stitches. Check that all nine berries are firmly sewn down. Don't use loose beads or glue for these pieces.
- Make the hanging loop. Fold the 8-inch twine in half. Place the two cut ends between the front and back at the top point, leaving a loop approximately 3 inches high. Secure the ends with several small stitches through both layers about 1/4 inch below the point.
- Join the tree pieces. Lay the embroidered front over the sage back with wrong sides together. Line up the edges and hold with a few clips. Starting along the bottom, blanket-stitch around the entire tree in ivory, taking stitches about 1/8 inch deep and 3/16 to 1/4 inch apart. Sew through both layers. This tree stays flat; don't stuff it.
- Make the star. Put the two gold star shapes together and whipstitch around their five points with matching thread. Keep the stitching about 1/16 inch from the edge. The star is left flat.
- Finish the top. Center the gold star over the point where the twine meets the tree. Sew through the bottom of the star and the tree front with several small gold stitches, hiding the twine attachment underneath. Fasten off on the back.
Check your work: You should have one uninterrupted ivory vine, 12 small pairs of leaves, exactly three berry clusters with three circles each, a neat ivory edge, and a gold star centered under the twine loop. If the front curls, loosen the edge stitches rather than pulling the felt tighter.
Pattern 2: Layered Branch Tree
This tree is different from the first one. Instead of one full body, it has three separate layers, each with its own pointed branch tips. The top sage layer sits a little left of center. That's deliberate. Keep those staggered points, rather than changing them back to the repeating scallops we considered earlier.
Cutting List for the Layered Branch Tree
- Cut 1 sage upper tier from PDF page 3, about 2.14 by 1.91 inches.
- Cut 1 forest-green middle tier, about 3.13 by 2.30 inches.
- Cut 1 olive-green lower tier, about 3.66 by 2.55 inches.
- Cut 2 brown trunk pieces, about 0.78 by 0.94 inch each.
- Cut 2 gold stars from PDF page 2.
- Cut one 8-inch piece of ivory twisted cord.
How to Sew the Layered Branch Tree
- Cut all five tree and trunk pieces. Use the exact printed outlines. Don't round off the pointed branch tips or cut the deep center points away. Those uneven tips are part of the finished shape.
- Decorate the three tiers. With ivory thread, make the small V-shaped branch-tip stitches shown on page 3: two on the sage top, three on the forest-green middle, and three on the olive lower tier. Keep each V around 1/4 inch across.
- Stitch the branch edges. Work small running stitches in matching green thread about 1/8 inch inside the cut edge of each tier. Follow the outside curves and pointed tips. Keep the stitches around 1/8 to 3/16 inch long. These tiers are single layers, not stuffed pieces.
- Sew the trunk. Place the two brown pieces together. Use brown thread to whipstitch the sides and bottom. Leave the top open. Position the open end behind the center of the olive lower tier, overlapping it by about 1/4 inch. Stitch firmly through the hidden overlap. About 3/4 inch of brown trunk should remain visible below the branches.
- Add the middle tier. Lay the forest-green middle over the olive lower tier, right sides facing out, exactly as shown in the full-size assembly diagram on PDF page 3. Center the middle piece horizontally. Its reference level (M) sits 1 1/8 inches above the lower tier level (L). Pin the pieces, make sure the olive branch tips remain visible, and sew through both layers with short green stitches along their hidden overlap.
- Add the upper tier. Place the sage tier over the middle one, following the same full-size assembly diagram. Its reference level (U) is 2 3/8 inches above the lower tier level (L), and its horizontal center is 1/8 inch to the left of the middle tier center. Sew across the hidden overlapping area with matching green thread. Keep the off-center pointed flap visible.
- Reinforce the joins. Turn the whole tree over. Add a few short green stitches across the two hidden overlap areas from the back, catching the felt layers securely without changing their front arrangement. The three tiers should hang as one piece.
- Attach the ivory loop. Fold the cord in half. Sew the ends to the back of the sage upper point, about 1/4 inch below the tip, leaving a loop about 3 inches tall. Take several small secure stitches through the top felt.
- Add the star. Join two gold star pieces with small gold whipstitches, then center the finished star over the upper point and hanger attachment. Sew it firmly through the sage felt. Hide the final knot at the back.
Check your work: The olive lower tier is the widest, the forest-green tier covers part of it, and the sage tier is smaller and slightly left of center. You should still see all three colors and the little brown trunk. Nothing is stuffed. If a lower tier droops, add a few more small securing stitches through the hidden overlap rather than changing the cut shapes.
Pattern 3: Padded Ribbon Tree
Save the padded tree for last. The shape is still easy to sew, but it has three curved felt bands that need to lie neatly against the dark green front. Don't straighten those bands. Their gentle diagonal sweep is what makes this tree look different from ordinary striped felt ornaments.
Cutting List for the Padded Ribbon Tree
- Cut 1 forest-green front and 1 matching back using the tree outline on PDF page 4. Each is approximately 3.40 by 5.25 inches.
- Cut the top curved ribbon band from pale sage felt.
- Cut the middle curved ribbon band from olive felt.
- Cut the bottom curved ribbon band from pale sage felt.
- Cut 2 gold stars from the template on PDF page 2.
- Cut one 8-inch piece of cream satin ribbon, approximately 1/4 inch wide.
- Set aside a few small pinches of polyester stuffing.
How to Sew the Padded Ribbon Tree
- Prepare the front. Cut both full tree shapes exactly on the outer line. The tree has gently rounded tiers along its sides and a curved bottom. Mark the three dotted ribbon positions and five small starbursts on the forest-green front.
- Lay out the bands. Place the pale sage band across the upper part of the tree, the olive band across the center, and the second pale sage band near the bottom. Match the curved shapes to the dotted placement guides on PDF page 4. Each band rises toward the right side. The ends are meant to reach the outside edge of the green tree.
- Sew the first band. Hold the upper pale band in place with a few pins. Using ivory thread, work small running stitches along both long curved edges about 1/8 inch in from the cut edge. Keep the stitches about 3/16 inch apart.
- Sew the other two bands. Stitch the olive middle and pale lower bands the same way. Don't pull the thread tight enough to gather the fabric. Once all three are attached, trim only the band ends that extend beyond the green body's outline so the outer edges match.
- Make the embroidered stars. Use ivory thread to make one six-spoke starburst at each of the five printed marks in the exposed green spaces. Each burst is made from three crossing straight stitches, roughly 1/4 inch long. Knot or weave in the thread on the wrong side after each group.
- Prepare the hanger. Fold the cream satin ribbon in half, with the shiny side facing out. Tuck both ends between the tree front and back at the top point. Sew back and forth over the two ends several times about 1/4 inch below the tip.
- Join the tree. Place the decorated front and plain back together with wrong sides touching. Starting about 3/4 inch to the left of the bottom center, blanket-stitch around the sides and top through both layers, using ivory thread. Stop about 3/4 inch to the right of the bottom center to leave a 1 1/2-inch opening along the bottom.
- Stuff lightly. Add a small pinch of stuffing at a time through the opening. Spread it gently toward the upper point and rounded side branches. Aim for a little lift, around 1/4 inch at the center, rather than a thick pillow. Keep the banded front smooth.
- Close the opening. Continue the same blanket stitch across the 1 1/2-inch gap, matching the stitch spacing along the rest of the edge. Secure the final thread and hide its tail between the felt layers.
- Sew on the star. Whipstitch the two gold felt star pieces together. Center the star at the top of the tree so it covers the satin-ribbon attachment. Sew it through the tree front with several small gold stitches, then hide the thread end.
Check your work: The finished front should have exactly three rising curved bands, pale sage above and below with olive between them, and five ivory starbursts showing on the dark green. The cream ribbon loop should sit directly behind the gold star. If the felt starts to wrinkle, remove a little stuffing before doing anything else.
Finishing and Hanging the Ornaments
Before you hang them, hold each tree by its loop and check how it balances. The top star should sit flat, the layered tree's brown trunk should hang straight, and the padded tree shouldn't twist to one side. If a loop pulls loose, restitch it from the back and cover the attachment again with the star.
Check the backs for knots and loose thread ends. Carry each thread tail under several stitches on the wrong side before trimming. Give the rounded corners a little help with your fingers, but don't stretch the felt. Set the finished ornaments flat for a while if the layers have been handled a lot.
These are Christmas decorations, not toys. The red felt berries, gold stars, and hanging cords are small parts that should be kept out of reach of babies and young children. Don't hang them over a crib or anywhere a child could grab the loop. Keep felt and ribbon away from candles and other heat sources.
For storage, stack the flat trees between pieces of tissue and give the padded tree a little space so it doesn't get squashed. I'd keep the three together in one small box. They're a matched set, after all.
Beginner Tips for Neater Felt Christmas Tree Ornaments
Cut the paper first. You can stack the paper pieces for the layered tree in their finished order before touching the felt. It's a quick way to see that the branch tips show and the small upper tier hasn't slipped too far to one side.
Do the embroidery before joining layers. You'll have a much easier time hiding knots behind the berry tree or padded ribbon tree while each front is still separate. It's also easier to keep the stitched bands flat.
Use shorter stitches around pointed corners. Long stitches tend to pull across the tips, especially on the gold stars. Two short stitches usually look better than one long one when the edge changes direction.
Don't add extra decorations just because there's room. The berry vine, offset branches, and curved ribbon bands already give the three trees different looks. You don't need beads, bells, or a big bow to make them look finished.
If you'd like another type of hanging project after these, browse my free crochet Christmas ornament patterns. You can mix felt and crochet on the same Christmas tree without making every decoration identical.
Frequently Asked Questions
Are these felt Christmas tree ornaments easy enough for beginners?
Yes, if you're comfortable cutting felt and making simple hand stitches. Start with the flat berry tree, move to the layered tree, and save the lightly stuffed ribbon tree until you've tried blanket stitch around a full outline.
Do I need a sewing machine?
No. All three patterns are written for hand sewing. A sewing machine isn't needed for the decorations, branch attachments, or edges.
Can I make the ornaments without stuffing?
The berry garland and layered branch trees are already flat. The padded ribbon tree needs only a little filling to match the example. You can leave it flat as a variation, but it won't have quite the same rounded finish.
What should I do if my printed patterns come out the wrong size?
Check the printer settings and measure the 1-inch test square on pages 2, 3, and 4. If the square isn't exactly one inch, reprint at Actual Size. Don't try to fix a scaled printout by cutting the fabric a little larger. That can throw off the branch overlaps and curved ribbon placements.
Can I change the colors?
Of course. I'd keep three different shades on the layered tree so its branches still show clearly, and I'd keep the ribbon bands lighter than the dark green body. Beyond that, you can use felt colors that suit your Christmas decorations.
When you click on links to various merchants on this site and make a purchase, this may result in this site earning a commission. This does not affect the price you pay.

UBGI Gold Standard 2026
Reviewed under the site's
editorial checklist.
Photos, decorating ideas, party setups and reader submissions are shared for inspiration unless a page is specifically presented as a pattern, tutorial, reference guide or step-by-step project. Follow the instructions, measurements, safety guidance and manufacturer directions provided for the particular project or product.
About Jan | Contact | Baby Nursery Ideas (Blog) | Site Map | Privacy Policy | Disclosure Policy | Disclaimer | Affiliate Disclosure | Earnings Disclosure | Facebook | Pinterest
I am a participant in the Amazon Services LLC Associates Program, an affiliate advertising program designed to provide a means for us to earn fees by linking to Amazon. As an Amazon Associate I earn from qualifying purchases.
Copyright © 2006-2026. All Rights Reserved.