Felt Holly Garland Pattern: Easy DIY Christmas Decoration with Red Berries
By Jan Bay
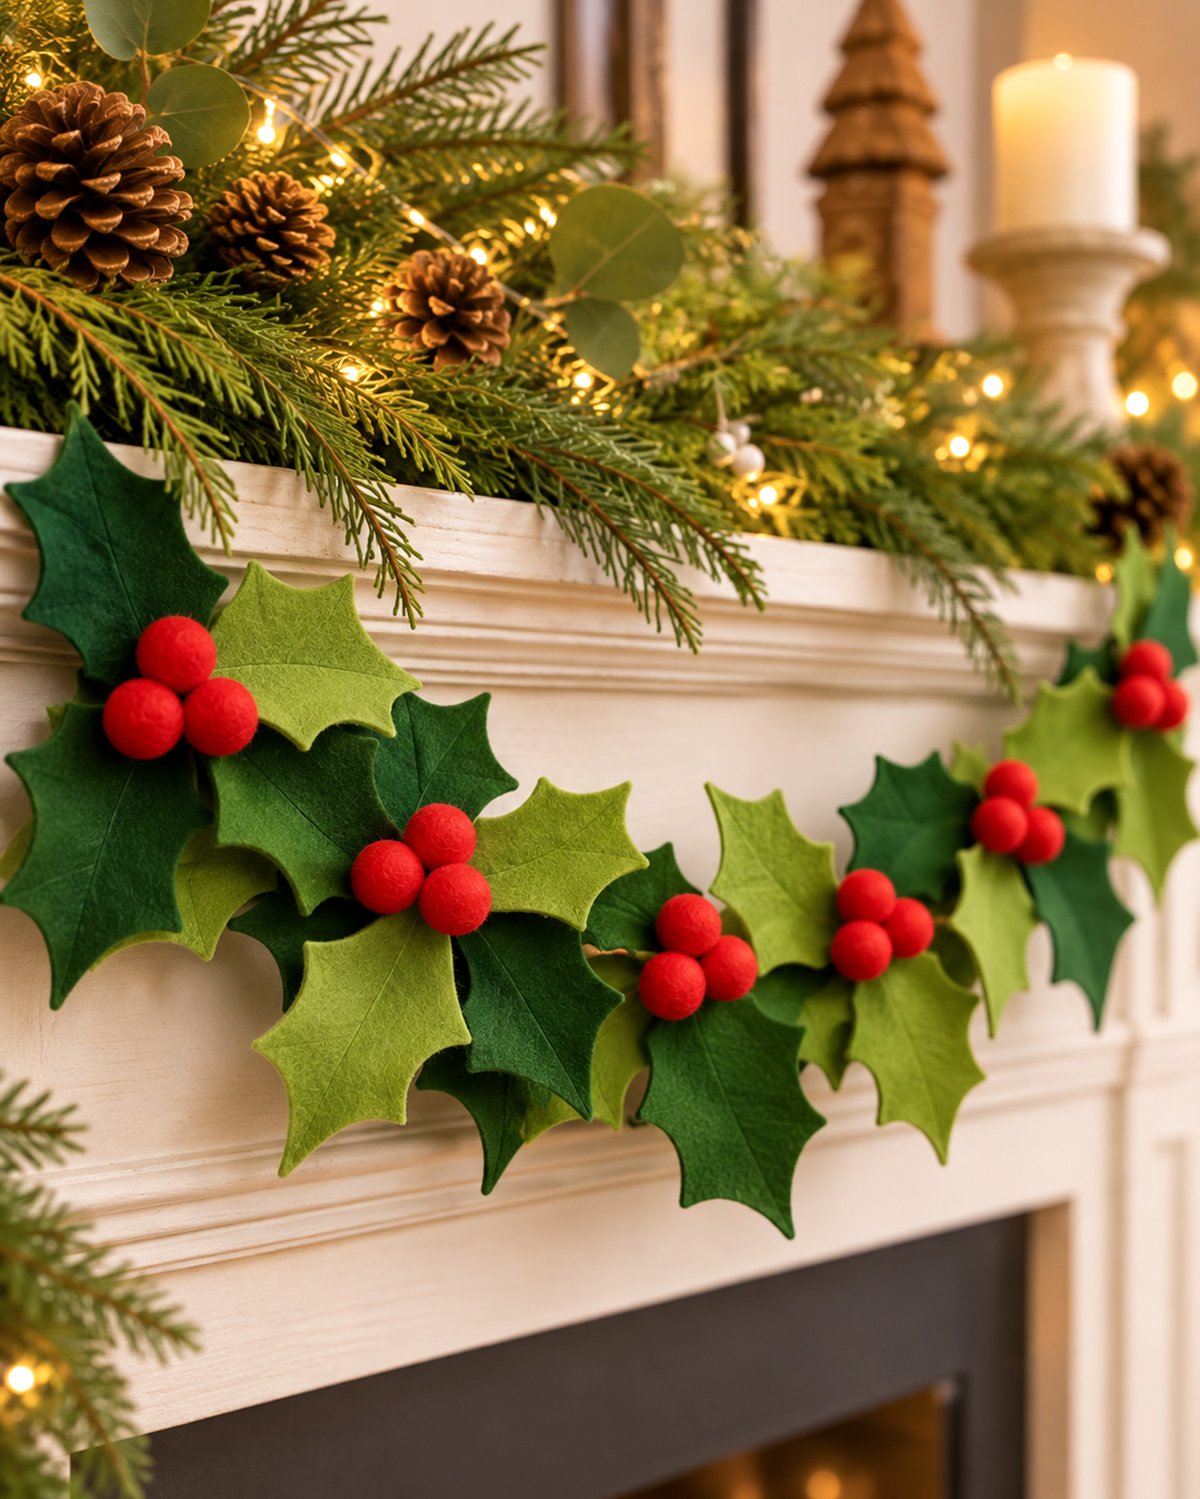
Make a Felt Holly Garland with familiar green leaves and cheerful red berries for your Christmas mantel, holiday party, or Christmas baby shower. This is one of those decorations worth making because you can bring it out and enjoy it year after year. I've chosen two shades of green felt to give the leaves the natural color variation of real holly, with little clusters of red felt balls tucked between them. The secret to making this garland look luxurious and full is arranging the leaves so they overlap. There's no need to spend hours embroidering tiny details. The felt has a lovely texture all its own. Save your time for something else! I'll show you how to cut the leaves, put the holly sprays together, and hang them on a cord. There's a free printable holly leaf pattern to make cutting easier, too.
Explore More Handmade Christmas Crafts
DIY Christmas Garland Ideas and Tutorials
Free Felt Crafts and Ornament Patterns
See Supplies for This Project Here.
Jump to the Felt Holly Garland Pattern
Supplies for Your Felt Holly Garland
We're going to make seven full holly sprays instead of stringing a few individual leaves along a cord. Each spray has four large felt leaves and three red felt berries. When you put them together, the leaves overlap and give the garland that lovely, generous Christmas look.
The leaves are all cut from the same printable template. You won't have to draw different shapes or spend hours adding embroidered veins. Two shades of green felt and the way you arrange the leaves will do the decorating for you.
Finished Felt Holly Garland Measurements
- Finished garland: Seven holly sprays with red berry clusters.
- Leaves per spray: Four.
- Total leaves: 28.
- Leaf size: Approximately 4 3/4 inches long and 2 1/2 inches wide.
- Berries per spray: Three.
- Total berries: 21.
- Berry diameter: Approximately 3/4 inch, or 18 to 20 mm.
- Garland cord: 70 inches before forming the hanging loops.
- Usable cord length: 62 inches between the hanging-loop bases.
- Spray spacing: 8 inches between neighboring centers.
- Skill level: Beginner.
- Construction: Cut felt leaves, glue the holly sprays together, and attach them to a cord.
Those are the planned measurements for the finished project. The leaves may hang a little differently depending on the thickness of your felt and how you arrange each spray. That's fine. Holly doesn't grow in perfectly matched little bunches, and your garland doesn't need to look that way, either.
Materials and Tools
- Three 9-by-12-inch sheets of deep evergreen wool-blend felt.
- Three 9-by-12-inch sheets of lighter forest green wool-blend felt.
- 21 ready-made red wool felt balls, approximately 3/4 inch across.
- 70 inches of dark-green cotton decorating cord, approximately 1/8 inch thick.
- Matching green strong sewing thread for wrapping and tying the two cord ends.
- Low-temperature glue gun and glue sticks suitable for felt.
- Sharp fabric scissors.
- Pencil or washable fabric marker.
- Ruler or measuring tape.
- Small pieces of removable tape for marking the cord.
- Protective craft mat for your worktable.
- Printed Felt Holly Garland Pattern and Templates.
The six felt sheets are a practical buying allowance for the 28 large leaves and the small backing pieces. How many leaves you can cut from a sheet depends on how you arrange the template, so don't assume every scrap will be usable.
I'd spend a little more on decent wool-blend felt if the budget allows. It has a pleasing texture, and the cut edges look finished without any stitching. Thin craft felt can work, but large leaves may hang more limply.
What You Can Skip Buying
You don't need embroidery floss for leaf veins, floral wire, a sewing machine, plastic berry stems, or lots of little embellishments. None of those things are part of this pattern.
The ready-made red felt balls are worth considering. You need 21 berries. Making every one from loose wool would turn a simple garland into a very different project. Buy the balls and save your time for something else.
Choose felt balls rather than tiny plastic beads. They're larger, suit the felt leaves, and give the finished decoration a consistent handmade appearance.
Check Your Supplies Before Starting
Put four cut-leaf-sized areas of felt beside three of your red balls. This will help you see whether you've chosen colors that work well together. I prefer a deep green paired with a lighter, natural-looking green rather than two shades that are almost identical.
Also check your glue on a small felt scrap first. It needs to hold the felt and the wool balls once set, without soaking through the fabric or leaving large visible lumps.
Supply checkpoint: You should have two shades of green felt, 21 red balls, the decorating cord, glue, and the printed pattern before beginning.
Download the Free Felt Holly Garland Pattern and Leaf Templates
I've kept the printable simple. There's one large holly leaf shape, one small oval backing, and one narrow attachment strap. You'll cut the same leaf shape for every spray, so there's no need to keep track of several different sizes.
The printable also includes the measurements for the garland cord and a guide showing exactly where each of the seven holly sprays belongs.
Download the Free Felt Holly Garland Pattern and Templates (PDF)
What's Included in the Printable?
- Page 1: Full-size holly leaf template with a 1-inch print-check square.
- Page 2: Complete cutting list, actual-size oval backing and strap templates, and holly spray assembly instructions.
- Page 3: Garland cord measurements, seven spray positions, and finishing instructions.
Print the Holly Leaf Pattern at Actual Size
Use ordinary US Letter paper and select 100% or Actual Size in your printer settings. Don't select Fit to Page.
After printing, measure the little square on Page 1. It should be exactly 1 inch wide and 1 inch tall.
Next, measure the holly leaf from its narrow base to the opposite tip. It should measure 4 3/4 inches.
If either measurement is wrong, check your printer settings before cutting the felt. A small printing change can make quite a difference when you're cutting 28 leaves.
Cut out the paper leaf template and keep the small backing templates nearby. You can trace the same paper leaf repeatedly or transfer the outline to thin cardboard if you prefer a firmer cutting guide.
Pattern checkpoint: Your printed leaf should measure 4 3/4 inches long. The backing oval measures 2 1/4 by 1 1/4 inches, and the attachment strap measures 1 3/4 by 1/2 inch.
Cut the Felt Holly Leaves for Seven Christmas Sprays
Let's get the cutting done first. Once all the leaves are ready, putting the garland together is much more enjoyable. You won't have to stop halfway through to trace another batch of leaves.
You'll need 28 leaves altogether. Every leaf uses the same template, so the only thing to keep track of is how many you've cut from each green shade.
Step 1. Trace and Cut the Deep Green Leaves
- Lay your deep evergreen felt flat on the worktable.
- Place the printed holly leaf template on the felt.
- Trace around the outside edge using a pencil or washable fabric marker.
- Move the template to an unused area and trace another leaf.
- Continue until you have 14 leaf outlines.
- Cut around each outline with sharp fabric scissors.
- Follow the curves and points carefully, but don't worry about making every leaf look absolutely identical.
Take a look at the first leaf before cutting the other thirteen. It should have a recognizable holly shape with gently curved edges and several pointed lobes.
Don't make the points so narrow that little threads of felt are left hanging from them. A clean, reasonably broad point looks better and is easier to cut.
Deep green checkpoint: You should have 14 evergreen holly leaves, each approximately 4 3/4 inches long.
Step 2. Cut the Lighter Green Leaves
Use the same template to cut 14 leaves from your lighter forest green felt.
Keep these in a separate pile from the dark leaves. We'll mix the colors when we put the sprays together.
If you're using wool-blend felt, you may find that the two shades have slightly different textures. That's not a problem. It can give the finished garland a little more variety.
Leaf checkpoint: You should now have 28 felt holly leaves, 14 in each shade of green.
Step 3. Cut the Hidden Backing Pieces
Now we'll cut the little pieces that hold everything together. None of these should show from the front of the finished garland.
Use the leftover deep green felt and the backing templates on Page 2 of your printable.
- Cut seven oval backing pieces, each 2 1/4 inches long and 1 1/4 inches wide.
- Cut seven narrow attachment straps, each 1 3/4 inches long and 1/2 inch wide.
The oval pieces will sit behind the holly leaves and give you a place to glue their narrow bases.
The little straps will go across the backs later. They'll hold the finished sprays against the decorating cord without showing from the front.
Don't glue the straps onto the ovals yet. We need to leave them separate until we're ready to attach the sprays to the garland.
Step 4. Sort the Pieces into Seven Groups
Divide your cut leaves into seven little piles.
Each pile should contain:
- Two deep evergreen leaves.
- Two lighter forest green leaves.
- One dark-green oval backing.
- One narrow green attachment strap, kept separate for now.
Put three red felt balls beside each pile, too.
That's everything needed for one holly spray. Having the pieces sorted this way makes the next steps much easier.
Final cutting checkpoint: You should have 42 cut felt pieces: 28 leaves, seven oval backings, and seven attachment straps. You should also have 21 separate red felt balls.
Make the Red Felt Holly Berry Clusters
Our berries are probably the easiest part of this whole project. We're using ready-made felt balls, so there's no need to cut tiny red circles, gather fabric around stuffing, or make individual berries with a felting needle.
Three little red balls grouped together look cheerful without taking attention away from the green leaves.
Step 1. Choose Matching Felt Balls
Choose 21 red felt balls approximately 3/4 inch across.
I'd use a traditional Christmas red rather than a very bright, orange-red shade. The darker green felt gives the red plenty of contrast, so you don't need glitter or shiny berry stems.
Check that the balls are reasonably close in size. If one is noticeably larger than the others, save it for another project.
Step 2. Arrange Each Group of Three
Place three felt balls together on your worktable.
- Set two red balls side by side.
- Place the third ball against them so the three form a little triangle.
- Check that all three balls touch one another.
- Apply small amounts of felt-compatible hot glue where the balls meet.
- Press the contact points together gently until the glue has set.
- Repeat until you have seven groups of three berries.
Don't cover the balls with glue. A little at the places where they touch is enough, provided your adhesive bonds the felt properly.
The glue should be tucked between the balls, not spread across their visible surfaces.
Berry checkpoint: You should have seven clusters, each containing three red felt balls. Every cluster should hold together when gently lifted after the glue has fully set.
Step 3. Set the Berries Aside
Keep the completed berry clusters on a protected work surface while you arrange the green leaves.
We'll glue the berries onto the front of each holly spray after its four leaves have been attached to their backing. That way, the berries will hide the leaf ends and the small glued area in the center.
And that's all the berry-making you need to do. No tiny stitches. No individual stems. Nothing fussy.
Arrange the Felt Holly Sprays for a Full Christmas Garland
Now we get to the part that makes the garland pretty.
Rather than lining up four leaves neatly like the points of a compass, we're going to fan them out so they overlap a little. The leaves will point in different directions, with the red berries tucked over the middle.
You'll still use the same four-leaf arrangement for every spray, but changing which green shade sits on top will keep the garland from looking too uniform.
Step 1. Lay Out the First Four Leaves
Take one oval backing, two evergreen leaves, and two lighter green leaves.
Lay the oval vertically on your worktable. Arrange the four leaf bases over the center of the oval, with their pointed ends fanning outward.
- Place one dark-green leaf with its tip pointing toward the upper left.
- Place one lighter green leaf with its tip pointing toward the upper right.
- Add one lighter green leaf pointing diagonally down toward the left.
- Add the second dark-green leaf pointing diagonally down toward the right.
- Bring the narrow bases together over the center of the oval backing.
- Overlap the bases by approximately 3/8 inch so there isn't an open gap in the middle.
The two upper leaves should reach mostly to the left and right, with just a slight upward angle. The lower leaves should point diagonally downward at roughly 45 degrees.
You'll have something that looks like a generous spray of holly rather than a perfectly round flower.
Move the leaves around before reaching for the glue. The upper leaves should spread wide enough to help fill the garland when the sprays are arranged along the cord.
Step 2. Glue the Leaves to the Oval Backing
Once you're happy with the arrangement, lift one leaf at a time and add a small amount of felt-compatible hot glue beneath its narrow base.
- Glue the first upper leaf to the front of the oval backing.
- Glue the second upper leaf beside it, allowing their bases to overlap.
- Attach the lower-left leaf, keeping its base near the center.
- Attach the lower-right leaf in the same way.
- Press the glued bases gently until they hold.
- Leave the pointed outer portions of the leaves free so they can hang naturally.
Try to keep the glue within the central area of the backing. You don't need to glue the full length of every leaf. In fact, leaving the outer portions loose is what gives the finished spray some movement and texture.
If the leaves look too flat, gently bring their narrow bases a little closer together before the glue sets. That small change can let the tips sit at different angles. No wire or embroidery is needed.
Step 3. Add the Red Berry Cluster
Take one of your finished three-ball berry clusters.
- Turn the berry cluster over so the joined contact points face downward.
- Apply a small amount of glue to the underside where it will touch the leaf bases.
- Place the cluster over the center of the holly spray.
- Adjust it so the berries cover the narrow leaf ends and the glued center.
- Hold it gently until the adhesive has set.
Don't spread the berries too far apart. They should look like one little group nestled among the leaves.
Look at the spray from the front. You should see four large green leaves and three round red berries, with the backing hidden behind them.
First spray checkpoint: Your completed spray should have two dark and two lighter green leaves. The leaves should fan outward, with no large opening around the berry cluster. The backing and leaf joins should be hidden from the front.
Step 4. Make the Remaining Six Holly Sprays
Repeat the same steps until you have seven finished sprays.
For the second, fourth, and sixth sprays, try reversing the leaf colors:
- Lighter green on the upper left.
- Dark green on the upper right.
- Dark green on the lower left.
- Lighter green on the lower right.
For the first, third, fifth, and seventh sprays, keep the original arrangement.
Every spray still contains two leaves of each color. We're only changing their positions.
This gives the finished garland some variety without requiring you to cut different templates or make extra pieces.
Assembly checkpoint: You should now have seven holly sprays, each made with four leaves, one concealed oval backing, and one cluster of three red felt balls.
Step 5. Check the Full Arrangement Before Attaching the Cord
Lay all seven sprays in a row on your worktable, with their berries facing up.
Move neighboring sprays close enough that the outer leaf tips overlap slightly. The two upper leaves on each spray help cover the open spaces between the berry clusters.
This is the secret to a garland that looks full without a lot of extra work.
Don't worry if one leaf points a little lower than another. You actually want some variation. What matters is that the finished arrangement looks like one continuous decoration, rather than seven separate ornaments with large spaces between them.
Leave the sprays flat until all the glue has set according to the adhesive instructions.
Assemble Your Felt Holly Garland on the Decorating Cord
With all seven sprays finished, we can put the garland together. The little backing straps are hidden behind the leaves, so the green cord won't distract from the holly and berries.
We're using a measured arrangement rather than just sliding the sprays around until they look even. It's easier to get a balanced result when you know where the middle belongs.
Step 1. Cut the Garland Cord
Measure and cut one 70-inch length of dark-green cotton decorating cord.
A cord approximately 1/8 inch thick will be substantial enough to handle without looking bulky behind the felt leaves.
Lay it flat and check for twists before making the hanging loops.
Step 2. Make the Two Hanging Loops
We're using the first and last 4 inches of the cord to form hanging loops.
- Measure 4 inches inward from the left end of the cord.
- Fold that loose end back to the 4-inch mark, forming a loop at the end.
- Hold the folded section against the main cord.
- Wrap a separate length of strong green sewing thread tightly around both cord sections at the loop base, making approximately 15 close wraps.
- Tie the wrapping thread with two firm knots and trim its ends.
- Add a tiny amount of suitable glue over the wraps to help keep them from loosening.
- Repeat at the right end using the last 4 inches of the cord.
Let the glue set, then give each end loop a firm pull over your worktable to check that the folded cord doesn't slip.
Using 4 inches for each hanging loop leaves 62 inches of usable decorating cord between the loop bases.
Cord checkpoint: You should have one continuous cord with a hanging loop at each end and 62 inches between their bases.
Step 3. Mark the Seven Holly Spray Positions
Lay the finished cord straight on your worktable without stretching it.
Starting at the base of the left hanging loop, measure and mark these positions:
- Spray 1: 7 inches.
- Spray 2: 15 inches.
- Spray 3: 23 inches.
- Spray 4: 31 inches.
- Spray 5: 39 inches.
- Spray 6: 47 inches.
- Spray 7: 55 inches.
Use small pieces of removable tape to mark the spots temporarily.
This gives you 8 inches between neighboring spray centers, with 7 inches of cord before the first spray and another 7 inches after the last one.
The fourth spray belongs at the 31-inch mark, which is the exact middle of the usable cord.
Step 4. Check the Spacing Before Gluing
Place the seven sprays along the marked cord, berries facing forward, without attaching them yet.
Look at the spaces between the sprays. Their long outer leaves should reach toward one another and overlap slightly.
Because every leaf is approximately 4 3/4 inches long, the upper leaves have enough length to reach into the space between neighboring 8-inch spray centers when they're fanned outward.
If you see a large gap, turn one of the neighboring sprays slightly so an upper leaf points farther into it. Try that before changing the measurements.
The sprays don't have to sit at exactly the same angle. In fact, I'd rather see a little variation than seven perfectly matched clusters.
Step 5. Attach the Sprays with Their Hidden Felt Straps
Now we'll use the seven narrow felt strips you cut earlier. Each one goes across the back of a spray and captures the decorating cord between the strip and the oval backing.
Work on one spray at a time:
- Turn the first completed holly spray face down on your protected worktable.
- Locate the center of the oval backing.
- Place the decorating cord horizontally across that center, lining it up with the first 7-inch mark.
- Place one narrow felt strap vertically across the cord.
- Apply glue only to approximately the upper 3/8 inch and lower 3/8 inch of the strap, securing those ends to the oval backing.
- Leave the middle of the strap bridging the cord rather than flattening the strap underneath it.
- Add a very small dot of suitable adhesive where the cord touches the backing to keep the spray from sliding away from its marked position.
- Allow the adhesive to set before turning the spray face up.
Check the front. You shouldn't see the oval backing, the felt strap, or any glue.
Repeat the same attachment process at the other six marked positions.
Keep the leaf tips free. Only the hidden backs need to be attached to the cord.
Step 6. Check the Finished Garland
Once the glue has fully set, spread the garland flat and check all seven attachment points.
Make sure the berries are secure, the backing straps hold the cord, and none of the leaf tips has accidentally been glued to a neighboring spray.
Remove the temporary measuring tape.
Then lift the cord gently over the worktable to see how the leaves hang. If a leaf has folded behind another, bring it forward with your fingers.
Final assembly checkpoint: The finished garland should have seven berry clusters, 28 large felt leaves, and 8-inch spacing between spray centers. All backing pieces should be hidden behind the foliage.
Hang and Decorate with Your Felt Holly Garland
Now you can enjoy the part you made it for. Those red berries and overlapping green leaves can give a mantel or party display a classic Christmas look without needing much else.
I'd let the holly be the main decoration rather than adding bows, bells, ornaments, and everything else I could find. With this much color and texture, you don't need all of it.
Hang the Garland Across a Christmas Mantel
Choose two properly installed decorating hooks or other supports suited to the weight of your finished garland.
Place the hanging loops over the supports and let the cord dip into a gentle curve.
The center holly spray should hang near the lowest point, with three sprays on either side.
Stand back and look at the arrangement before making any adjustments. You may want to lift a lower leaf, turn one spray slightly, or spread two overlapping leaves apart so both colors show.
If you're decorating a fireplace mantel, use the garland only where it will remain away from heat and flames. Don't hang felt decorations where a working fireplace, candles, or hot lighting could reach them.
Use It for a Christmas Baby Shower
The traditional green and red colors are also lovely for a Christmas baby shower.
Try hanging the garland along the front of a dessert-table backdrop, above a holiday welcome display, or across a decorative shelf.
The red berry clusters are decorative enough that you won't need to cover the table with lots of additional Christmas pieces.
If you're planning the rest of the party, you'll find more ideas on my Christmas Baby Shower Ideas page.
Can You Make a Longer or Shorter Garland?
Yes. The seven-spray arrangement is the main pattern, but you can adjust the number of sprays for a different display.
For a shorter version, make five sprays using 20 leaves and 15 red felt balls. Cut a 54-inch cord, use 4 inches at each end for the hanging loops, and place the spray centers at 7, 15, 23, 31, and 39 inches from the left loop base.
For a longer version, make nine sprays using 36 leaves and 27 red felt balls. Cut an 86-inch cord and position the spray centers at 7, 15, 23, 31, 39, 47, 55, 63, and 71 inches.
Keep the sprays 8 inches apart in either version, and make sure you have suitable supports for the longer display.
I'd start with the seven-spray pattern unless you already know the exact space you're decorating. It's easier to decide whether you want more after you've seen the first garland hanging.
How to Store the Felt Holly Garland
One reason to make decorations like this is that you can use them again next Christmas.
After the holidays, take the garland down gently and check the felt berries and backing straps before putting it away.
I'd store it in a shallow box rather than folding it into a tight bundle.
- Lay the garland flat, following the curve of the cord if necessary.
- Arrange the holly sprays so the leaves aren't sharply folded.
- Place a little plain tissue paper between overlapping sections if needed.
- Avoid putting heavy ornaments or other decorations on top.
- Store the box in a dry place away from dampness and direct sunlight.
If the felt becomes dusty, use a gentle dry brush or carefully remove loose dust. Check the manufacturer's care instructions before using water or cleaners on the felt balls or glued parts.
Decoration note: This is a hanging decoration, not a baby toy. The cord and small felt berries must remain completely out of reach of babies and young children. Never attach the garland to a crib, bassinet, or other infant sleep space. The U.S. Consumer Product Safety Commission's infant sleep guidance is a useful reference when deciding where decorations belong in a home with a baby.
If you enjoy making Christmas decorations rather than buying them all ready-made, you can find more projects in my DIY Christmas Garland collection.
Frequently Asked Questions About Felt Holly Garlands
Can I use ordinary craft felt instead of wool-blend felt?
Yes. Ordinary craft felt will work with the printable template. Just be aware that very thin felt may hang more limply, especially with leaves this large. I'd choose felt with enough body to hold a clean, pointed outline without adding wire.
Do I have to embroider the holly leaf veins?
No. There are no embroidered veins in this pattern. The finished design gets its texture from the felt itself, the two shades of green, and the way the leaves overlap. You can stop there.
Can I use red pom-poms instead of wool felt balls?
Yes, provided they're approximately the same size and your adhesive bonds them securely. The finish will look a little different. I prefer wool felt balls for this project because their firm, rounded shape looks attractive beside the flat felt leaves.
Can I make the garland without any sewing?
Yes. The leaves, berry clusters, backing pieces, and attachment straps are glued. The two end loops are secured with tightly wrapped and knotted thread, not sewn stitches. You won't need a sewing machine, hand-sewing needle, or embroidery needle for the basic pattern.
What if my holly garland looks too sparse?
Before cutting more leaves, check the arrangement. Each spray should contain four leaves, with the upper pair spreading toward its neighbors. The seven spray centers are 8 inches apart. Try turning the sprays slightly so their outer leaves overlap. That's usually the adjustment I'd make first.
Can I use the holly leaf template for other Christmas decorations?
Yes. You can make one smaller holly decoration for a gift package, a holiday centerpiece, or another craft project. The full-size template is designed for this garland, but you can print a reduced copy for a separate project. Just remember that reducing the template changes the finished dimensions.
Can I hang this felt holly garland outside?
I'd keep this version indoors. The pattern uses ordinary wool-blend felt, felt balls, and glued attachments. Rain and damp weather may affect their appearance and how well the glued pieces hold. For an outdoor decoration, I'd choose materials intended for outdoor use instead.
When you click on links to various merchants on this site and make a purchase, this may result in this site earning a commission. This does not affect the price you pay.

UBGI Gold Standard 2026
Reviewed under the site's
editorial checklist.
Photos, decorating ideas, party setups and reader submissions are shared for inspiration unless a page is specifically presented as a pattern, tutorial, reference guide or step-by-step project. Follow the instructions, measurements, safety guidance and manufacturer directions provided for the particular project or product.
About Jan | Contact | Baby Nursery Ideas (Blog) | Site Map | Privacy Policy | Disclosure Policy | Disclaimer | Affiliate Disclosure | Earnings Disclosure | Facebook | Pinterest
I am a participant in the Amazon Services LLC Associates Program, an affiliate advertising program designed to provide a means for us to earn fees by linking to Amazon. As an Amazon Associate I earn from qualifying purchases.
Copyright © 2006-2026. All Rights Reserved.