Felt Peppermint Candy Cane Garland: Free Pattern
By Jan Bay
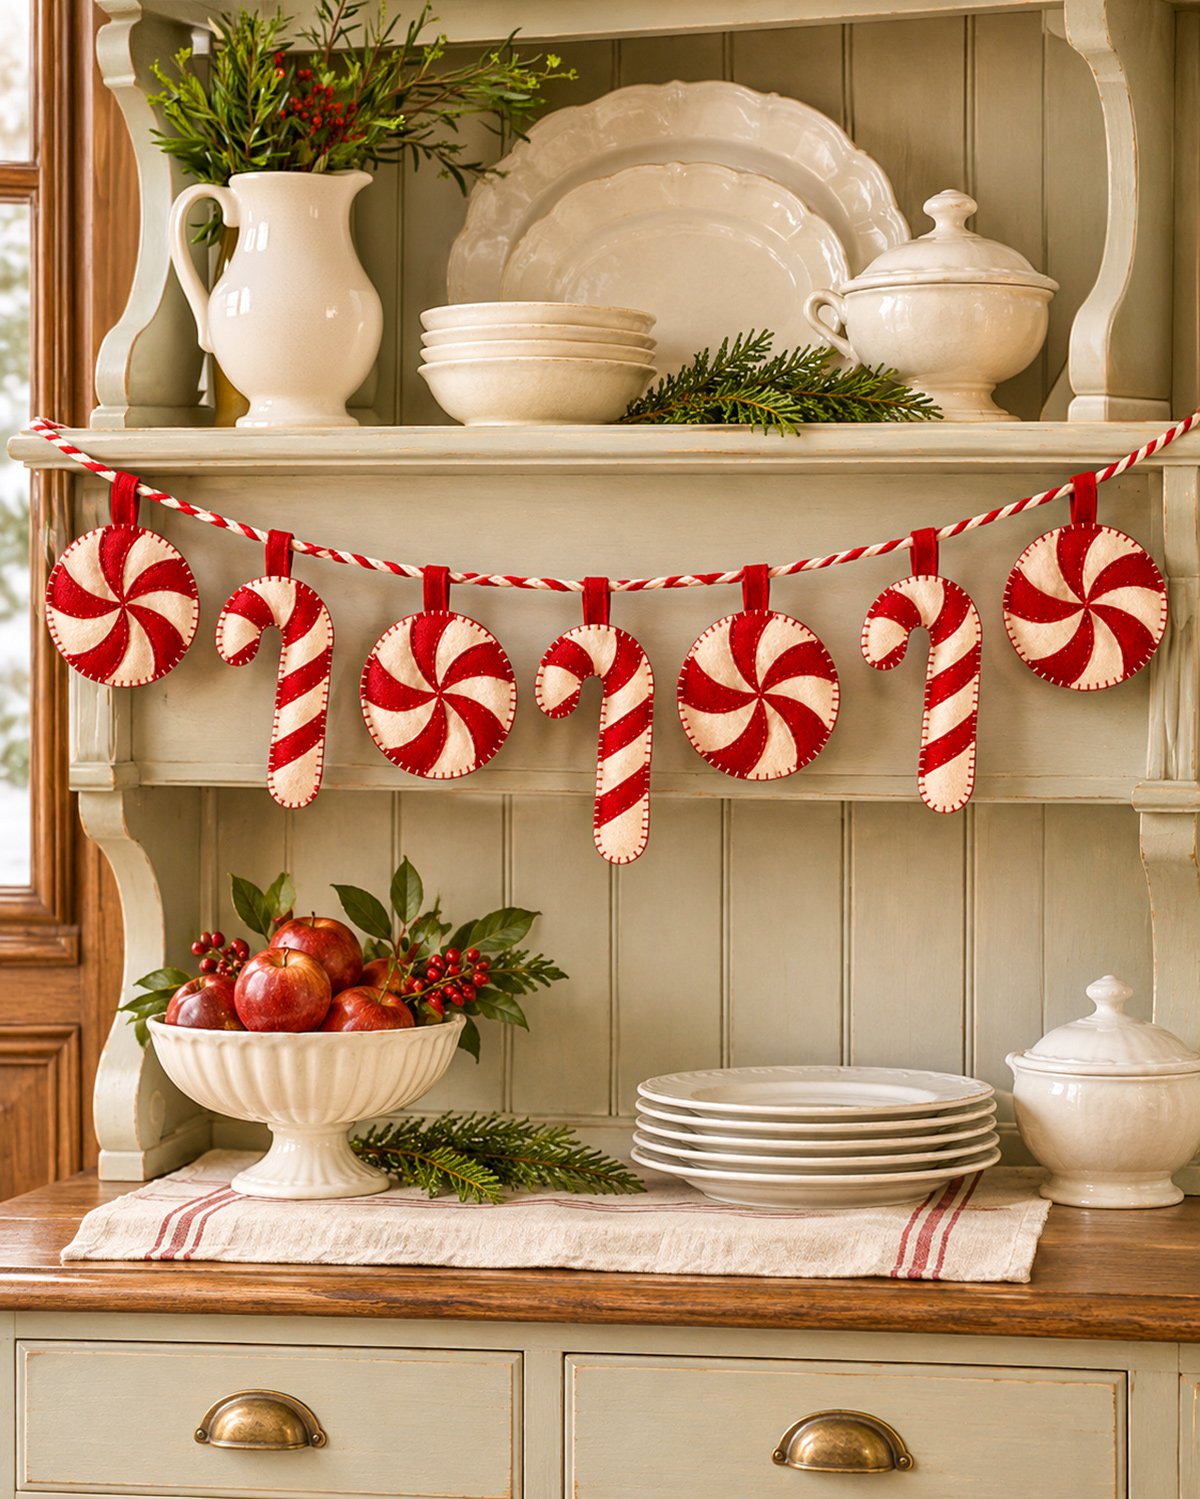
A felt peppermint candy cane garland has one big advantage over decorations made with real sweets: you can use it year after year. This handmade garland combines round peppermint candies with little striped candy canes, all made from felt and arranged along a hanging cord. Once finished, you can bring it out again and again for Christmas parties, baby showers, and family gatherings. I'll show you how to cut, stitch, and assemble each piece using free printable templates, then hang the finished garland across a mantel, behind a dessert table, or against a party backdrop. You can also use the individual pieces as Christmas ornaments.
Explore More Handmade Christmas Garlands and Felt Crafts
DIY Christmas Garland Ideas and Free Patterns
Free Felt Christmas Mitten Garland Pattern
Christmas Ribbon Bow Garland Tutorial
See Supplies for This Project Here.
Jump to a Section
Felt Peppermint Candy Cane Garland: Finished Size and Project Details
Before you start cutting felt, let's look at what we're making. There are seven decorations altogether: four round peppermint candies and three striped candy canes. They're joined by a red-and-ivory cord, with a little red felt hanging loop behind each piece.
I've kept the decorations flat, just as they appear in the finished example. There's no stuffing to buy, and you won't need a sewing machine. A few evenings of hand stitching will give you a garland you can bring out again whenever Christmas rolls around.
- Skill level: Beginner with basic hand-sewing experience.
- Construction: Flat felt appliqué with hand-stitched details.
- Number of decorations: Seven.
- Round peppermints: Four, each measuring 3 1/2 inches across.
- Striped candy canes: Three, each approximately 4 3/4 inches tall and 1 7/8 inches wide.
- Garland cord: 64 inches before making the hanging loops.
- Length between hanging-loop bases: Approximately 56 inches.
- Spacing: 6 1/2 inches between decoration centers.
- Colors: Christmas red and warm ivory.
- Special stitches: Small running stitches and blanket stitch.
- Stuffing: None.
- Printable pattern: Full-size PDF templates.
The peppermint candies have six curved red sections arranged over an ivory felt circle. The little spaces between the red pieces form the ivory part of the peppermint swirl. It's a nice way to get that familiar candy-shop look without having to sew a dozen tiny wedges together.
The candy canes are made a little differently. Each one has an ivory front and back, with red diagonal felt strips stitched onto the front. Red blanket stitching finishes the edges of both shapes.
Size checkpoint: The peppermint circles should measure 3 1/2 inches across after cutting. The candy canes should be approximately 4 3/4 inches tall. Those measurements come from the full-size templates, so check your printer settings before cutting anything.
If you'd rather make a shorter garland, you can use five decorations instead of seven. I'll explain how to adjust the spacing when we put everything together.
Materials and Supplies for Your Felt Peppermint Garland
You won't need much to make this garland. I'd choose a good-quality felt that holds its shape when you pick it up. Very thin felt can stretch while you're stitching, especially around the curved candy cane tops.
Felt and Thread
- Three 9 × 12-inch sheets of warm ivory felt, approximately 1 mm thick.
- Two 9 × 12-inch sheets of Christmas red felt, approximately 1 mm thick.
- Red sewing or embroidery thread for the peppermint swirls, candy cane stripes, and blanket-stitched edges.
- Ivory sewing thread for any small stitches you want to hide against the background felt.
- 64 inches of red-and-ivory twisted cotton decorating cord, preferably approximately 1/8 inch thick.
The felt quantities allow for the seven decorations and a little extra for cutting mistakes. If you're buying individual sheets, check their sizes before ordering. Smaller craft squares may not give you enough material for all eight peppermint circles and six candy cane pieces.
Tools
- Sharp fabric scissors.
- Small embroidery scissors for trimming felt details.
- Hand-sewing needle suitable for embroidery thread.
- Straight pins or small sewing clips.
- Fabric marking pencil or removable fabric pen.
- Ruler or measuring tape.
- Printer and US Letter paper for the templates.
- Optional tracing paper for transferring the stripe and swirl placement guides.
What I Would Skip
There's no need for stuffing, beads, buttons, glitter, or plastic candy decorations. The red-and-ivory felt is enough to give the pieces their Christmas look.
I'd also skip hot glue for the main construction. Hand stitches take longer, but they hold the felt layers together without leaving stiff spots along the edges.
Use matching thread for the red appliqué pieces. Save the more noticeable red blanket stitching for the outside edges. That way, the curved peppermint swirls stay easy to see without lots of extra stitching across their faces.
Before cutting: Wash or clean your hands and clear a flat work surface. Light-colored felt picks up lint and stray thread easily, and it's much easier to keep the pieces clean than to remove little fibers later.
Download the Free Printable Felt Peppermint and Candy Cane Patterns
I've put the cutting shapes and assembly measurements into one printable pattern. You won't have to draw your own peppermint swirls or try to guess the size of the candy cane hook.
Download the Free Felt Peppermint Candy Cane Garland Templates (PDF)
What's Included in the Printable Pattern?
- Page 1: Project measurements, cutting quantities, and printing instructions.
- Page 2: Full-size peppermint front and back circles with the six-part pinwheel placement guide.
- Page 3: Full-size red peppermint wedge and candy cane outline with the red stripe placement guide.
- Page 4: Full-size cutting templates for the five individually shaped red candy cane stripes.
- Page 5: Hanging tab template, decoration order, and exact garland spacing measurements.
Print the Templates at Actual Size
- Open the PDF and select Print.
- Choose US Letter paper.
- Set the print size to Actual Size or 100%.
- Turn off any setting that says Fit to Page, Scale to Fit, or Shrink Oversized Pages.
- Print the first page and measure the 1-inch test square.
- If the square measures exactly 1 inch, print the remaining pages.
- Cut out one paper copy of each template you need.
Don't skip that little square. A printer that reduces the page even slightly can give you smaller pieces than the pattern calls for, and that will change the finished garland.
Cutting Checklist
For all seven decorations, you'll cut:
- 8 ivory circles: Four peppermint fronts and four backs.
- 24 red peppermint wedges: Six for each of the four round candies.
- 6 ivory candy cane shapes: Three fronts and three backs.
- 15 shaped red candy cane stripes: Cut three copies of each of the five numbered stripe templates on page 4 of the PDF. Each candy cane uses five different red shapes.
- 7 red hanging tabs: Each measuring 1/2 inch wide and 1 3/4 inches long.
The candy cane stripes have their own cutting templates, so you won't have to guess their shapes. Three diagonal pieces fit along the straight shaft, and two shaped pieces fit around the curved hook. Cut three complete sets, keeping the pieces numbered until you're ready to sew them in place.
Cutting checkpoint: Before you begin sewing, lay out four ivory peppermint fronts, four matching backs, three candy cane fronts, three matching backs, and seven red tabs. Keep the small red appliqué pieces together so they don't get lost.
Now we're ready for the part that gives the garland its peppermint look.
How to Make the Round Felt Peppermint Candies
Let's start with the round peppermints. They're the largest pieces in the garland, and making them first will give you a chance to get comfortable with the stitching.
Each peppermint has an ivory felt front, an ivory felt back, and six curved red appliqué pieces. You'll make four identical candies.
Step 1: Cut the Ivory Peppermint Circles
- Take the 3 1/2-inch circle template from page 2 of the PDF.
- Pin it to your ivory felt.
- Cut around the outside edge, keeping the scissors close to the template.
- Repeat until you have eight ivory circles.
- Set four aside for the fronts and four for the backs.
Try to keep the circles as round as possible. A wavy edge will become more noticeable after you add the red blanket stitching.
Cutting checkpoint: You should have eight matching ivory circles, each 3 1/2 inches across.
Step 2: Cut the Curved Red Peppermint Pieces
The peppermint swirl is made from six identical red wedges. The curves are already drawn for you on page 3 of the printable pattern.
- Cut out the red wedge paper template.
- Pin the template to your red felt.
- Cut carefully along both curved sides and the rounded outside edge.
- Repeat until you have 24 red wedges.
- Divide the wedges into four groups of six.
Keep the narrow pointed ends intact while cutting. You'll adjust those little tips when you arrange the pieces on the ivory background.
You'll notice that the red pieces aren't ordinary pie-shaped triangles. They curve toward one side. That's what gives the finished candy its peppermint swirl.
Step 3: Arrange the Six Red Swirls
Place one ivory front circle on your worktable. Find its center and mark it lightly with a removable fabric pen.
- Lay the first red wedge on the ivory circle with its narrow tip pointing toward the center.
- Match its rounded outer edge to the edge of the ivory circle.
- Place the next red wedge beside it, turning it 60 degrees clockwise from the first one.
- Continue arranging the remaining four wedges in the same direction.
- Use the full-size pinwheel diagram on page 2 as your placement guide.
- Adjust the pieces until the six ivory spaces between the red wedges look even.
- Pin or lightly baste the red pieces in place.
The red shapes should curve around the center in the same direction. Don't flip every other wedge over. If you do, the peppermint won't have the pinwheel appearance shown in the finished example.
The pointed ends can stop approximately 1/16 inch before the center mark. That leaves a tiny ivory center and prevents the red tips from piling up on top of one another.
Arrangement checkpoint: Count six red curved sections and six ivory spaces. The outer red curves should meet the edge of the ivory circle, and the center should remain nearly flat.
Step 4: Stitch the Peppermint Swirls in Place
Use red sewing thread or a few strands of red embroidery floss. Keep the stitches small so the curved shapes remain the main feature.
- Thread your needle with red thread and knot the end on the back of the ivory front circle.
- Begin near the narrow point of the first red wedge.
- Make small running stitches approximately 1/16 inch from one curved edge.
- Continue stitching toward the rounded outer end.
- Stitch along the opposite curved edge, working back toward the center.
- Make two tiny securing stitches near the narrow tip.
- Fasten off on the back of the ivory circle.
- Repeat for the other five red wedges.
You don't need to make heavy stitches across the red felt. The pieces should lie flat against the ivory circle.
If one edge begins to lift, add an extra little stitch in that spot. It's easier to take care of it now than after the front and back have been joined.
Step 5: Add the Red Felt Hanging Tab
Each peppermint hangs from a small folded red felt tab. The tab is attached to the backing before the two circles are joined, so its cut ends are hidden inside.
- Take one red felt strip measuring 1/2 inch wide and 1 3/4 inches long.
- Fold it in half crosswise, bringing the two short ends together.
- Place an ivory backing circle on your worktable with the inside surface facing upward.
- Position the folded strip at the top center of the backing circle.
- Allow the folded loop to extend approximately 1/2 inch beyond the circle's edge.
- Lay the two cut ends against the inside of the backing, overlapping the felt circle by approximately 3/8 inch.
- Stitch both ends firmly to the backing circle.
Make sure your hanging cord will pass through the folded loop. It should be roomy enough to slide along the cord before you secure the final spacing.
Step 6: Join the Peppermint Front and Back
Now place the decorated front on top of its prepared backing circle. The red swirl faces outward, and the hanging-tab ends are enclosed between the layers.
- Match the edges of the two ivory circles.
- Pin the layers together in three or four places.
- Thread your needle with red thread.
- Begin near the hanging tab and work a blanket stitch around the outside edge.
- Make each stitch approximately 1/8 inch deep and about 1/4 inch apart.
- Keep the red thread visible along the outer edge, as shown in the finished example.
- Continue all the way around the circle without leaving an opening.
- Make an extra securing stitch on each side of the hanging tab.
- Fasten off and hide the thread end between the two layers.
There's no stuffing to add. The two flat felt layers give the peppermint enough body to hang without making it bulky.
At approximately 1/4-inch spacing, you'll make around 44 blanket stitches around a 3 1/2-inch circle. The exact count may vary a little around the hanging tab.
Step 7: Make the Other Three Peppermints
Repeat Steps 3 through 6 until all four peppermint candies are finished.
Lay them together and compare their sizes. The swirls should all turn in the same direction, the edges should be neat, and the hanging tabs should sit at the top.
Finished peppermint checkpoint: You should now have four round candies, each 3 1/2 inches across, with six red swirls, a red blanket-stitched edge, and a small red hanging loop. None should have stuffing or loose appliqué edges.
Set the four candies aside while we make the striped candy canes.
How to Make the Striped Felt Candy Canes
The candy canes give the garland a little variety. Their curved tops hang between the round peppermints, so you get two different shapes without introducing more colors.
You'll make three candy canes. Each one has two ivory felt pieces, red diagonal appliqué stripes, and a red blanket-stitched edge.
Step 1: Cut the Candy Cane Shapes
- Find the full-size candy cane outline on page 3 of the printable PDF.
- Cut out the paper template around its outer edge.
- Pin the template to your ivory felt.
- Cut one candy cane shape, including the curved hook and rounded lower end.
- Repeat until you have six identical ivory pieces.
- Divide them into three matching pairs, one front and one back for each candy cane.
Keep all three hooks facing the same direction, with the curved ends pointing left when you look at the fronts.
Cutting checkpoint: You should have six ivory candy cane pieces, each approximately 4 3/4 inches tall and 1 7/8 inches wide at its widest point.
Step 2: Cut the Five Red Candy Cane Stripes
Instead of cutting a handful of straight strips and trying to make them fit around the curved hook, we'll use the five shaped templates on page 4 of the PDF. That takes care of the tricky measuring.
- Print page 4 of the PDF at Actual Size or 100%.
- Cut out the five numbered stripe templates.
- Pin template 1 to your red felt and cut three copies.
- Repeat with templates 2, 3, 4, and 5, cutting three copies of each shape.
- Divide the 15 red pieces into three sets. Each set should contain one piece numbered 1 through 5.
- Keep the pieces numbered until you're ready to attach them.
The first three shapes are diagonal bands for the straight part of the candy cane. Numbers 4 and 5 are shaped for the curved hook.
Cutting checkpoint: You should have 15 red pieces altogether, divided into three matching groups of five.
Step 3: Arrange the Five Red Stripes on the First Candy Cane
Lay one ivory candy cane front on your worktable with its hook pointing left. Keep page 3 of the PDF beside you so you can follow the color placement guide.
- Place red stripe 1 across the lower part of the straight candy cane shaft, matching its position on the printed guide.
- Place stripe 2 above it, leaving the ivory space shown in the pattern.
- Add stripe 3 farther up the straight shaft.
- Position stripe 4 around the upper outer curve of the hook.
- Place stripe 5 on the short, rounded left end of the hook.
- Check that all five pieces lie flat and that the ivory spaces between them remain visible.
- Pin or lightly baste the red pieces in place.
- Trim away any tiny overhangs so the outside edges follow the ivory candy cane outline.
Don't stretch a red piece to make it fit. Each stripe has its own shape and position. If something looks wrong, check its number before you start trimming.
Stripe checkpoint: Your candy cane should have three diagonal red bands along the straight shaft and two shaped red sections around the hook. All three candy canes will use the same arrangement.
Once you're happy with the placement, continue with Step 4 to stitch the red pieces onto the ivory felt.
Step 4: Stitch the Red Stripes in Place
- Thread your needle with red sewing thread.
- Begin at one end of the lowest red stripe.
- Make small running stitches approximately 1/16 inch inside the stripe's edge.
- Continue around the strip, keeping it flat against the ivory felt.
- Fasten off on the back of the ivory front.
- Repeat for each red section, including the short pieces around the hook.
- Remove the temporary pins or basting stitches.
- Trim any red felt extending beyond the candy cane outline.
Use a few extra little stitches on the inside curve of the hook. That spot gets handled more while you're putting the garland together, so it's worth checking before you close the back.
The edges should now look like the finished candy cane in the example image, with red stripes sitting directly against the ivory felt.
Step 5: Attach the Candy Cane Hanging Tab
The candy cane needs its hanging tab near the top of the curved hook, slightly toward the straight shaft. That position helps the longer part of the cane hang downward.
- Take one red felt tab measuring 1/2 inch by 1 3/4 inches.
- Fold the tab in half crosswise.
- Place one undecorated ivory candy cane backing on your worktable, inside surface facing upward.
- Position the folded tab at the top of the hook, slightly toward the straight side.
- Allow approximately 1/2 inch of folded tab to extend above the felt.
- Lay its two cut ends against the inside of the backing, overlapping the edge by approximately 3/8 inch.
- Secure the ends with several small stitches.
Before sewing the front and back together, you can hold the piece by its tab to check that the cane hangs with its long shaft pointing downward. Move the tab slightly toward the shaft if the piece tilts too much.
Step 6: Sew the Candy Cane Front and Back Together
- Lay the decorated candy cane front over its prepared backing.
- Match the two outside edges carefully.
- Make sure the hanging-tab ends are enclosed between the felt layers.
- Pin the pieces together at the top, middle, and lower end.
- Thread your needle with red thread.
- Begin near the hanging tab and work a blanket stitch around the entire outer edge.
- Make the stitches approximately 1/8 inch deep and around 1/4 inch apart.
- Use slightly closer stitches around the tight inner curve of the hook.
- Continue around the rounded lower end and back up the other side.
- Secure the stitching near the tab and hide the thread end between the felt layers.
You won't need to turn this piece right side out. The stitching is supposed to show around the edge, so the raw felt edges stay on the outside.
A candy cane of this size has approximately 12 3/4 inches of perimeter. At roughly 1/4-inch spacing, expect around 52 blanket stitches, with a few extra near the hook if needed.
Step 7: Make the Other Two Candy Canes
Repeat the cutting, stripe placement, and stitching for the remaining two candy canes.
Keep the hooks facing the same direction and use the same red stripe layout on each one. You want them to look like a matching set, even if your hand stitches aren't perfectly identical.
Finished candy cane checkpoint: You should have three flat felt candy canes, approximately 4 3/4 inches tall, with diagonal red stripes, neat blanket-stitched edges, and red hanging tabs.
Now count your finished pieces. Four round peppermints plus three candy canes gives you seven decorations.
That's everything we need for the garland itself.
Assemble Your Felt Peppermint Candy Cane Garland
Now we get to put everything together. The important thing is to arrange the peppermint candies and candy canes before making the hanging loops at the ends of the cord.
That way, you can slide all seven pieces into place without trying to squeeze them over a finished knot.
Step 1: Prepare the Decorating Cord
- Cut one 64-inch length of red-and-ivory twisted cotton decorating cord.
- Lay the cord on a table without pulling it tight.
- Check that both cut ends are secure and not unraveling.
- If the ends begin to separate, wrap them with matching sewing thread and make a few securing stitches.
Keep the cord long enough for the hanging loops. Don't shorten it yet.
Step 2: Thread the Seven Decorations onto the Cord
Slide the cord through the red felt hanging tabs in this order:
- Peppermint candy.
- Candy cane.
- Peppermint candy.
- Candy cane.
- Peppermint candy.
- Candy cane.
- Peppermint candy.
Make sure the decorated fronts face you and all three candy cane hooks point in the same direction.
Move the seven decorations toward the middle of the cord for now. We'll measure their final positions after making the two hanging loops.
Step 3: Make the Hanging Loops at Both Ends
- Measure 4 inches inward from the left end of the cord.
- Fold the free end back toward the 4-inch mark to form a hanging loop.
- Secure the free end to the main cord with several firm hand stitches and a wrapping stitch.
- Repeat at the right end, using the last 4 inches of cord.
- Pull gently on both finished loops to check that the joins hold.
Because you've folded back 4 inches at each end, approximately 56 inches of cord remain between the two hanging-loop bases.
Cord checkpoint: You should have seven decorations threaded onto a 56-inch usable section, with a secure hanging loop at each end.
Step 4: Measure the Seven Decoration Positions
Lay the garland flat and measure along the cord, starting at the base of the left hanging loop.
Slide the decorations to these positions, measuring to the center of each red felt hanging tab:
- Peppermint 1: 8 1/2 inches.
- Candy cane 2: 15 inches.
- Peppermint 3: 21 1/2 inches.
- Candy cane 4: 28 inches.
- Peppermint 5: 34 1/2 inches.
- Candy cane 6: 41 inches.
- Peppermint 7: 47 1/2 inches.
That gives you six equal spaces of 6 1/2 inches between the decorations. You'll also have approximately 8 1/2 inches of undecorated cord at each end.
The middle candy cane should sit at the 28-inch mark, exactly halfway between the two hanging-loop bases.
Step 5: Keep the Decorations from Sliding
Once you have the spacing right, make a small stitch through the back of each red felt hanging tab and around the cord. Keep the stitch at the back where it won't show.
Repeat for all seven decorations. Then lift the garland by its two hanging loops and check the arrangement.
If a candy cane turns sideways, take out its positioning stitch and adjust the tab before securing it again.
Assembly checkpoint: You should have four round peppermints alternating with three candy canes, with the middle candy cane centered along the cord.
Step 6: Hang and Check the Finished Garland
Before hanging the garland, remove every remaining pin, clip, and temporary basting stitch. Check for loose thread ends and any removable fabric marks. Give each hanging tab a gentle pull to make sure it's firmly attached.
Hang the finished garland from two suitable decorating hooks in a place where the cord and decorations will remain out of reach of babies and young children.
Allow the middle to dip into a gentle curve. The exact drop will depend on how far apart you place the hooks.
Stand back and check that the peppermint candies face forward, the candy canes hang downward, and the two end candies look balanced.
If everything looks even, you're finished!
Want to Make a Shorter Garland?
You can make a five-piece version using three round peppermints and two candy canes.
Cut the cord to 51 inches. After folding back 4 inches at each end for the hanging loops, you'll have approximately 43 inches between the loop bases.
Arrange the five decorations at 8 1/2, 15, 21 1/2, 28, and 34 1/2 inches from the left hanging-loop base. That keeps the same 6 1/2-inch spacing and leaves 8 1/2 inches at each end.
The seven-piece version matches the finished example image, but it's nice to have the smaller option if you don't need the full length.
Christmas Decorating Ideas for Your Peppermint Garland
One of the things I like about this design is that you don't have to change much to use it for different celebrations. Red and ivory look right at home with traditional Christmas decorations, but the little candy shapes also work for a more playful party theme.
Decorate a Christmas Mantel
If you have a decorative fireplace that isn't used, you can hang the garland across the front of the mantel. The red felt stands out nicely against an ivory or cream-colored background.
Keep the arrangement simple. A few decorations above the mantel are plenty, since the peppermint swirls and striped candy canes already provide the color.
Important: Don't hang felt or cord decorations over a fireplace that will be used. Remove the garland before lighting a fire, and keep it away from hot surfaces, candles, and other heat sources.
Use It for a Christmas Baby Shower
For a Christmas baby shower, the garland would look pretty against a party backdrop or along the front of a dessert display, as long as it is securely hung and completely out of children's reach.
You could pair it with ivory table linens and a few red decorations. There's no need to cover every surface with peppermint candy shapes. Let the handmade garland be the decoration everyone notices.
If you're planning more handmade decorations, take a look at my DIY Christmas garland ideas for other projects you can make.
Make Individual Peppermint Christmas Ornaments
You don't have to turn every felt candy into a garland. The same round peppermints and striped candy canes can become individual hanging ornaments.
Just make one piece using the printable pattern and attach a short hanging cord through its red felt tab. The flat design makes it easy to store between Christmases.
A Note About Decorations Around Children
These peppermint shapes may look like sweets, but they're decorations, not food or toys. Keep them where babies and young children cannot reach or pull on them. Don't attach the garland to a crib, bassinet, stroller, or infant sleep space.
The U.S. Consumer Product Safety Commission's holiday safety guidance is a helpful reference when you're planning Christmas decorations, especially around young children and heat sources.
If you're decorating for Baby's First Christmas, I would use the garland as part of an adult-arranged display rather than anywhere a baby could touch it.
How to Store Your Felt Christmas Garland
The real advantage of making this garland from felt is that you can pack it away and bring it out again next Christmas. You don't have to make a fresh batch of candy decorations for every party.
A little care when you put it away will help keep the pieces looking neat.
Clean the Garland Before Storing It
- Take the garland down and lay it flat.
- Check each peppermint and candy cane for loose stitches.
- Repair any lifted appliqué edges or loose hanging tabs.
- Remove dust with a lint roller used gently or a clean, dry cloth.
- If a spot needs cleaning, follow the care directions for the felt you used.
- Allow every piece to dry completely before storing it.
Don't wring or twist the felt. You want the circles to stay round and the candy cane hooks to keep their shape.
Pack the Garland Without Creasing the Felt
- Lay a piece of clean tissue paper or smooth paper in the bottom of a storage box.
- Arrange the felt decorations in a loose row.
- Place a little tissue between pieces if needed to keep them from rubbing together.
- Coil the decorating cord loosely beside the felt shapes rather than winding it tightly around them.
- Cover the garland with another sheet of tissue paper.
- Store the box somewhere dry, away from direct sunlight and extreme heat.
If your storage box is too small, don't force the candy cane hooks to bend. Use a slightly larger box instead.
Before you hang the garland again, check the cord, tabs, and stitching. Make any little repairs before putting it back on display.
And that's your handmade felt peppermint candy cane garland. Four round peppermint candies, three striped candy canes, and a decoration you can use again instead of starting from scratch every Christmas.
When you click on links to various merchants on this site and make a purchase, this may result in this site earning a commission. This does not affect the price you pay.

UBGI Gold Standard 2026
Reviewed under the site's
editorial checklist.
Photos, decorating ideas, party setups and reader submissions are shared for inspiration unless a page is specifically presented as a pattern, tutorial, reference guide or step-by-step project. Follow the instructions, measurements, safety guidance and manufacturer directions provided for the particular project or product.
About Jan | Contact | Baby Nursery Ideas (Blog) | Site Map | Privacy Policy | Disclosure Policy | Disclaimer | Affiliate Disclosure | Earnings Disclosure | Facebook | Pinterest
I am a participant in the Amazon Services LLC Associates Program, an affiliate advertising program designed to provide a means for us to earn fees by linking to Amazon. As an Amazon Associate I earn from qualifying purchases.
Copyright © 2006-2026. All Rights Reserved.