Christmas Ribbon Bow Garland: How to Make Christmas Bows with Velvet Ribbon
By Jan Bay
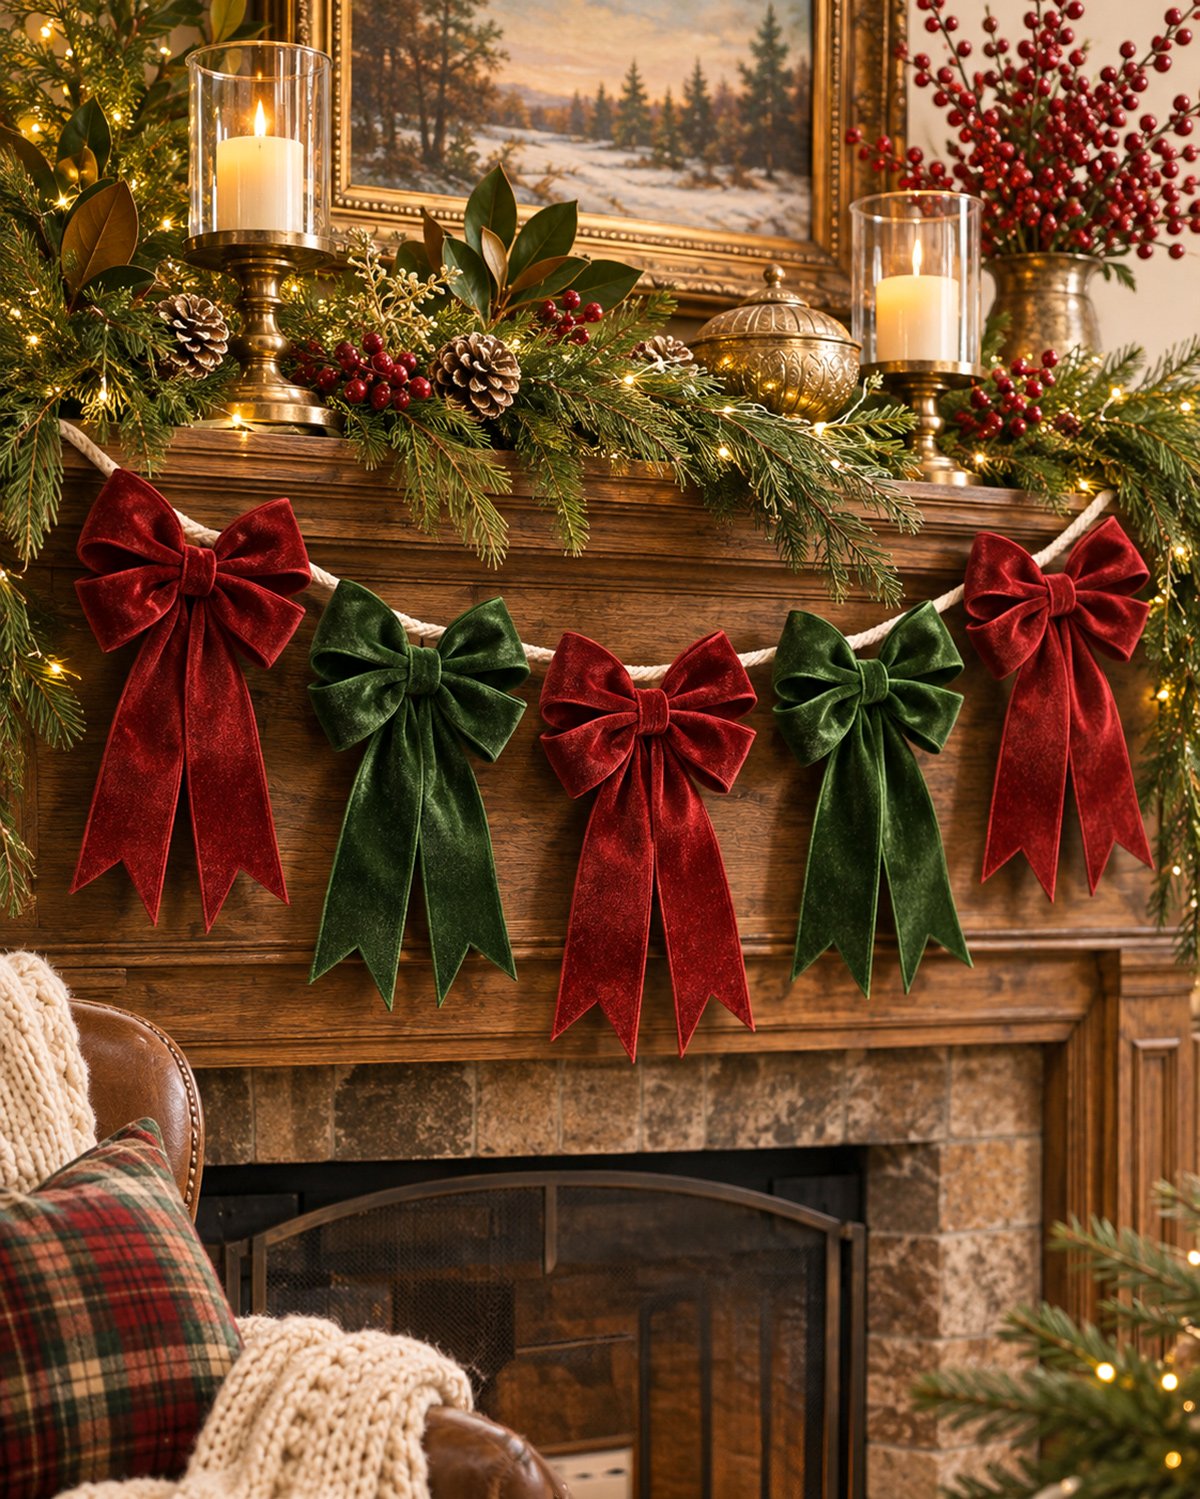
Make a Christmas Ribbon Bow Garland with five big, elegant bows made from wired velvet ribbon. I've chosen three deep red bows and two evergreen green ones, with full loops and long, pointed tails hanging from a cream-colored cord. I'll show you how to make Christmas bows that hold their shape, finish the centers neatly, and arrange all five into a garland for your mantel, Christmas baby shower, or holiday party. There's a free printable cutting and assembly guide, too. You won't need a sewing machine, and you can use the same bow-making method for other Christmas decorations.
Explore More Handmade Christmas Decorations
DIY Christmas Garland Ideas and Tutorials
Folded Paper Christmas Star Garland
See Supplies for This Project Here.
Jump to the Christmas Ribbon Bow Garland Tutorial
- Supplies and Finished Measurements
- Download the Free Cutting and Assembly Guide
- Cut the Ribbon Pieces for Five Bows
- How to Make Christmas Bows with Wired Velvet Ribbon
- Finish the Bow Centers and V-Cut Tails
- Attach and Space the Five Bows on the Garland
- Hang and Decorate with Your Christmas Bow Garland
- Frequently Asked Questions
Supplies for Your Christmas Ribbon Bow Garland
You'll make five velvet bows for this garland, three Christmas red and two evergreen green. Each one has two full loops, a narrow wrapped center, and two long tails with those pretty V-shaped ends. Once you've made the first bow, the others follow the same steps. Just change the ribbon color.
I'd choose wired velvet ribbon for this project. The wire along the edges lets you shape the loops with your fingers, and it helps them stay open when the bows are hanging. Regular velvet ribbon is pretty, too, but it may droop instead of holding those full, rounded loops.
Finished Measurements
- Finished garland: Five handmade velvet Christmas bows.
- Color arrangement: Red, green, red, green, red.
- Bow width: Approximately 6 to 7 inches across the shaped loops.
- Ribbon tails: Approximately 7 to 8 inches long, depending on the final trimming.
- Main ribbon width: 1 1/2 inches.
- Garland cord: 58 inches before finishing the hanging loops.
- Usable garland length: 50 inches between the two hanging-loop bases.
- Bow spacing: 8 inches between neighboring bow centers.
- Construction: Folded velvet ribbon loops, separate tails, a stitched center wrap, and a hidden hanging strap.
- Skill level: Beginner ribbon craft with a few simple hand stitches.
These are the planned finished measurements from the cutting guide. The exact width of each bow depends on how you shape its wired edges, and the length of the tails may change slightly when you trim them.
Materials and Tools
- 2 1/2 yards of deep Christmas red wired velvet ribbon, 1 1/2 inches wide. Three yards is better if you want a little extra for practice.
- 2 yards of evergreen green wired velvet ribbon, 1 1/2 inches wide.
- At least 15 inches of matching red ribbon, 5/8 inch wide, for three bow centers.
- At least 10 inches of matching green ribbon, 5/8 inch wide, for two bow centers.
- 6 inches of red cotton tape and 4 inches of green cotton tape, both 3/8 inch wide, for the hidden attachment straps.
- 58 inches of cream-colored cotton decorating cord.
- Matching red and green sewing thread.
- Hand-sewing needle.
- Sharp fabric scissors.
- Ruler or measuring tape.
- Sewing clips or pins.
- Optional fabric fray-prevention liquid for the ribbon tail ends.
- Printed Christmas Ribbon Bow Garland Cutting and Assembly Guide.
Here's something worth checking before you buy the ribbon: it needs to have a flexible wire running along both long edges. You'll also want the velvet on the front to look nice when the loops are bent into shape.
If you're comparing ribbon widths, Michaels' beginner bow-making class includes both 1 1/2-inch and 2 1/2-inch wired ribbon. For this garland, stick with the 1 1/2-inch width so the cutting measurements and finished bow proportions stay consistent.
You won't need a sewing machine, glue gun, bow-making tool, or expensive embellishments. A needle, thread, and a few clips will do the job.
How Much Ribbon Will You Actually Use?
Each finished bow uses 30 inches of the wide velvet ribbon: 14 inches for the loops and two 8-inch pieces for the tails.
For three red bows, that's exactly 90 inches, or 2 1/2 yards, of wide red ribbon. You'll use 60 inches, or 1 2/3 yards, of the wide green ribbon for the other two bows.
The narrower center wraps and hidden straps are separate materials. Don't forget those when you're gathering everything together.
I'd buy 3 yards of the red velvet ribbon if possible. The exact 2 1/2-yard amount doesn't leave any room for an uneven cut or a practice bow.
Download the Free Christmas Ribbon Bow Garland Cutting and Assembly Guide
You won't need a shaped paper pattern for these bows because every ribbon piece is cut to a measured length. I've included a printable guide so you can keep the cutting numbers and assembly steps beside you while you work.
The guide also shows the five-bow arrangement and exactly where to position each bow on the garland cord.
Download the Free Christmas Ribbon Bow Garland Cutting and Assembly Guide (PDF)
What's Included in the Printable?
- Page 1: Finished design, bow measurements, complete cutting list, and supplies.
- Page 2: Illustrated steps for making the two loops, attaching the tails, finishing the center, and adding the hidden strap.
- Page 3: Garland assembly, finished cord measurements, and exact positions for all five bows.
Print the guide on ordinary US Letter paper. You can choose your printer's normal page-fitting option because this is a measurement guide, not a full-size shape that needs to be traced.
Keep a ruler handy. It's the cut lengths that matter for this project.
Before You Start Cutting
Look at the finished bow in the guide. Notice that the tails are separate pieces rather than extensions of the ribbon used for the loops.
That's an important detail. It lets you make matching loops without having to leave a lot of extra ribbon dangling from each end.
The center wrap covers the stitching that joins those pieces together. And the little cotton-tape strap on the back lets you thread the finished bow onto the garland cord without adding a visible hanging loop.
That's the construction we'll use for all five bows.
Cut the Ribbon Pieces for Five Christmas Bows
Let's get all the cutting done first. It'll be much easier to make matching bows if you have the pieces measured and ready instead of stopping to cut more ribbon halfway through.
Keep the red and green pieces in separate groups. You can even put each bow's pieces into a little pile so you know everything is there before you start sewing.
One little velvet trick: Before cutting, look at a short piece of ribbon from both directions. Velvet has a pile, and the color may look darker when you turn it around. I'd keep the pile running in the same direction on all the hanging tails. Mark the direction on the back of your ribbon with a small piece of removable tape if you need a reminder. That way, your three red bows will look like they belong together instead of appearing to be made from slightly different shades of red.
Step 1. Cut the Wide Velvet Ribbon
Use your 1 1/2-inch-wide wired velvet ribbon for both the loops and the tails.
For each red bow, cut:
- One 14-inch strip for the two loops.
- Two separate 8-inch strips for the tails.
Repeat this for all three red bows. You'll have three 14-inch red strips and six 8-inch red strips.
For each green bow, cut:
- One 14-inch strip for the two loops.
- Two separate 8-inch strips for the tails.
Repeat for both green bows. You'll have two 14-inch green strips and four 8-inch green strips.
Use sharp scissors and cut straight across each piece for now. We'll make the decorative V-shaped cuts after the bows are assembled.
Step 2. Cut the Narrow Center Wraps
Each bow needs one short strip of matching ribbon to cover the stitching around its middle.
- Cut three 5-inch strips of red ribbon, 5/8 inch wide.
- Cut two 5-inch strips of green ribbon, 5/8 inch wide.
These narrow pieces are for the center bands only. They aren't used to make the loops or tails.
Step 3. Cut the Hidden Attachment Straps
You'll also need a short piece of cotton tape behind each finished bow. The decorating cord will slide through this little strap.
- Cut three 2-inch strips of red cotton tape, 3/8 inch wide.
- Cut two 2-inch strips of green cotton tape, 3/8 inch wide.
Keep the small pieces with their matching bow colors. You don't want to be looking for a tiny green strap after you've already finished the green bow.
Step 4. Count Everything Before Sewing
Here's the complete cutting checklist for the five-bow garland.
| Piece | Red | Green | Total |
|---|---|---|---|
| 14-inch loop strips | 3 | 2 | 5 |
| 8-inch tail strips | 6 | 4 | 10 |
| 5-inch center wraps | 3 | 2 | 5 |
| 2-inch attachment straps | 3 | 2 | 5 |
Cutting checkpoint: You should have 25 ribbon and tape pieces altogether. There are five complete bow sets, and each set contains five pieces.
Keep the 58-inch cream cord uncut until you're ready to assemble the garland. You won't need it while making the bows.
How to Make Christmas Bows with Wired Velvet Ribbon
Now for the fun part. You'll make the two velvet loops first, add the separate tails, and then gather everything together in the middle.
We're making a classic two-loop bow rather than one of those big, many-looped tree-topper bows. The simpler shape is just right for this garland because the long tails can hang down without getting lost in a big bunch of ribbon.
Step 1. Make the First Velvet Ribbon Loop
- Take one 14-inch strip of your wide red velvet ribbon.
- Lay it flat on your worktable with the velvet side facing down.
- Measure 7 inches from one end and mark the midpoint lightly on the back.
- Bring the left end inward toward the midpoint, curving the ribbon into a loop on the left.
- Let the left end cross approximately 1/2 inch beyond the midpoint.
- Hold that end in place with your fingers or a small sewing clip.
Don't crease the outside curve of the loop. You want it to stay rounded and full.
Step 2. Make the Matching Loop
- Bring the right end inward toward the same midpoint.
- Curve the ribbon to form a matching loop on the right.
- Let the right end cross approximately 1/2 inch beyond the midpoint in the opposite direction.
- Arrange the two ribbon ends so they overlap by approximately 1 inch at the back of the bow center.
- Check that the left and right loops are approximately the same size.
- Pin or clip the overlapping center to keep the loops in position.
You should now have two loops spreading outward from the middle. Each one should have its velvet side facing outward.
Loop checkpoint: Both loops should be approximately equal in width. The two short ribbon ends overlap at the back, and there are no long tails hanging from this piece.
If one loop looks bigger than the other, adjust the overlap before sewing. Don't try to fix a badly uneven bow after the center has been wrapped.
Step 3. Add the Two Separate Velvet Tails
Now take the two matching 8-inch red ribbon strips you cut earlier.
- Lay both tail strips vertically on the worktable with their velvet sides facing up.
- Bring their upper ends close together, allowing them to overlap slightly at the center.
- Arrange the lower ends so they hang downward, one toward the left and one toward the right.
- Take your folded bow loops and position them across the upper ends of the tails.
- Tuck approximately 1/2 inch of each tail behind the middle of the bow.
- Check that the loop piece covers the upper tail ends.
- Pin or clip the complete stack together at its center.
The two tails should come down from beneath the bow center, not from the outside ends of the loops.
Don't worry about their pointed ends yet. We'll trim those after the center is finished, when you can see how the tails actually hang.
Step 4. Check the Shape Before Stitching
Hold the bow up gently, keeping the center pinched between your fingers.
- There should be one loop on the left and one on the right.
- The two loops should look balanced.
- Both long tails should hang below the center.
- The velvet side of the loops and tails should face forward.
- The overlapping ends and rough upper tail ends should be hidden at the middle.
If a tail has twisted, straighten it now. If one loop looks flat, you can gently bend the wired edges into a rounded shape.
Keep this part simple. You're not trying to make every little curve perfectly identical. You just want the five bows to look like they belong together.
Finish the Velvet Bow Centers and V-Cut Tails
You've got the basic bow shape. Now we'll hold everything together with a few stitches, cover the middle with matching ribbon, and trim the tails into those pretty pointed ends.
I'd finish one complete bow before making the other four. That gives you a chance to see whether you like the loop size and tail length before you repeat the same cuts and folds.
Step 1. Gather and Stitch the Bow Center
- Keep the two loops and both tails together at the center.
- Remove any clip that's in the way while holding the layers firmly between your fingers.
- Pinch the middle of the ribbon into two or three small accordion folds.
- Keep the folds centered so the left and right loops remain balanced.
- Thread a hand-sewing needle with matching red thread and knot the end.
- Push the needle through the gathered ribbon layers at the center.
- Make several small stitches back and forth through the gathered middle to hold all the layers together.
- Secure the thread on the back of the bow.
- Remove any temporary pins or clips once the stitching holds.
Don't pull the thread so tightly that the ribbon bunches into a hard little knot. You want the center gathered, but the loops should still open nicely on both sides.
Center checkpoint: The bow should hold together when you lift it gently by the middle. Both tails should remain attached, and the loops should stay on opposite sides.
Step 2. Add the Narrow Center Wrap
The 5/8-inch-wide ribbon covers the stitching and gives the bow a neat, finished center.
- Take one 5-inch piece of matching red center ribbon.
- Lay its midpoint across the front of the gathered bow center.
- Bring both ends around to the back.
- Pull the ribbon snugly around the gathered layers without flattening the loops.
- Overlap the two narrow ribbon ends at the back of the center.
- Trim away only the excess needed to make a neat overlap.
- Use matching thread to stitch the overlapping ends together securely on the back.
- Check that the front of the center wrap is smooth and that no gathering stitches are showing.
If your velvet ribbon is unusually thick, check the center wrap before trimming it. The supplied 5-inch length is the pattern measurement, but the finished overlap can vary with the ribbon thickness.
Wrap checkpoint: Each bow has one narrow center band. The band covers the gathered stitching, and the two loops and tails remain free to be shaped.
Step 3. Cut the V-Shaped Ribbon Tails
These V-cut ends are sometimes called dovetail cuts. They're easy to make, but I would definitely use sharp scissors. Dull blades can catch the velvet and leave ragged edges.
- Lay the finished bow flat with its velvet side facing upward.
- Take one hanging tail and fold its bottom end in half lengthwise, bringing its two side edges together.
- At the folded center edge, measure approximately 3/8 inch upward from the bottom.
- Cut diagonally from that marked point down toward the outer corner at the bottom of the folded ribbon.
- Open the fold. You should have a shallow V-shaped notch cut into the bottom of the tail.
- Repeat on the second tail.
- Compare the two tails and trim only as much as necessary to make them look balanced.
The pointed ends should be on the outside edges, with the V notch rising into the middle of each ribbon tail.
There's no need to cut a very deep V. A shallow notch looks pretty and leaves more of the velvet showing.
Step 4. Finish the Cut Edges
If your ribbon starts to fray after cutting, apply a small amount of fabric fray-prevention liquid to the exposed cut edges.
Follow the product directions and let the treatment dry completely before handling or hanging the bows. Test it on a scrap first, especially if your velvet is dark or has a delicate finish.
Skip the liquid if the cut ends already look neat and stay together.
Step 5. Shape the Finished Loops
- Hold the bow gently at its wrapped center.
- Use your fingers to curve the wired edge along the left loop.
- Repeat on the right loop, opening it to approximately the same size.
- Spread the two loops outward so they sit on opposite sides of the center.
- Straighten the two hanging tails, keeping their velvet sides facing forward.
- Check the finished bow from the front and adjust the wired edges until the shape looks balanced.
Finished bow checkpoint: You should have two full loops, one narrow center wrap, and two separate V-cut tails. The bow should measure approximately 6 to 7 inches wide once shaped, with tails hanging approximately 7 to 8 inches below the center.
Step 6. Make the Remaining Four Bows
Use the same steps for the other two red bows and both green bows.
The cutting measurements don't change with the color. Each bow still needs one 14-inch loop strip, two 8-inch tail strips, and one 5-inch center wrap.
When you've finished, line all five bows up in this order:
RED - GREEN - RED - GREEN - RED
Look at them together before starting the garland. Adjust any loops that have become flattened and check that the V-cut tails are facing the same way.
That's all five bows made. Now we can give them a place to hang.
Attach and Space the Five Bows on the Christmas Ribbon Garland
The nice thing about this arrangement is that the bows sit right against the cream garland cord. There aren't any extra strings dangling above them. A little cotton-tape strap hidden behind each bow holds the cord in place.
We'll put those straps on first, thread all five bows onto the cord, and then finish the hanging loops at both ends.
Step 1. Sew the Hidden Attachment Straps
- Take one finished red bow and one 2-inch length of matching red cotton tape.
- Turn the bow over so its back faces you.
- Find the narrow center wrap on the back of the bow.
- Lay the cotton tape horizontally across the back of the center wrap.
- Fold the tape ends inward as needed so they can be secured to the back of the center wrap while leaving some slack in the middle.
- Stitch one tape end firmly to the center wrap, keeping your stitches on the back.
- Stitch the opposite end to the wrap in the same way.
- Leave the middle of the tape loose, forming a small tunnel between the tape and the center wrap.
- Check that the tunnel is wide enough for your cream decorating cord to slide through.
- Gently pull on the tape to check both stitched ends.
Don't sew the tape flat all the way across. The open middle is important because that's where the garland cord will go.
Repeat on the other four bows, using matching red or green cotton tape.
Attachment checkpoint: Each finished bow has one hidden horizontal strap behind its center. Both strap ends are stitched in place, and the middle remains open for the cord.
Step 2. Thread the Five Bows onto the Cord
Cut one 58-inch length of cream cotton decorating cord.
Before you tie or stitch the ends into hanging loops, slide the cord through the hidden straps on all five bows.
Thread the bows in this order, from left to right:
- Red velvet bow.
- Evergreen green velvet bow.
- Red velvet bow.
- Evergreen green velvet bow.
- Red velvet bow.
Keep the five bows together near the middle temporarily. You'll move them to their measured positions after the end loops are finished.
Make sure the decorated fronts are all facing the same direction and that the cord passes behind every bow center.
Step 3. Make the Hanging Loops at Both Ends
- Lay the cord straight on your worktable without stretching it.
- Measure 4 inches inward from the left end.
- Fold the loose end back to that mark to form a hanging loop.
- Secure the loose end to the main cord with firm hand stitches or an appropriate knot.
- Repeat at the right end, using the final 4 inches of cord.
- Check both loops to make sure they're securely attached.
You should now have approximately 50 inches of cord between the two hanging-loop bases. Small differences caused by the knots or stitches are fine.
Don't cut the cord shorter. The extra length at both ends is what gives you room to hang the garland.
Step 4. Measure the Five Bow Positions
Lay the garland cord flat and measure from the base of the left hanging loop.
Slide the bows into these positions:
- Red bow 1: 9 inches.
- Green bow 2: 17 inches.
- Red bow 3: 25 inches.
- Green bow 4: 33 inches.
- Red bow 5: 41 inches.
These positions put the bows 8 inches apart, measured from the middle of one bow to the middle of the next.
Why 8 inches apart? Each finished bow is approximately 6 to 7 inches wide. With the centers 8 inches apart, that leaves about 1 to 2 inches between neighboring bows when the cord is laid straight. The velvet loops have room to show off their shape, but the garland doesn't look skimpy. I'd check all five bows together before stitching them permanently to the cord. Adjust the loops rather than changing the measured spacing.
You'll also have approximately 9 inches of undecorated cord between the left hanging-loop base and the first bow, and another 9 inches between the last bow and the right hanging-loop base.
Spacing checkpoint: The middle red bow sits at 25 inches, with two bows to its left and two to its right. The red and green colors alternate evenly.
Step 5. Secure the Bows So They Won't Slide
- Check that the first bow is centered at its 9-inch mark.
- Thread a needle with matching thread.
- Make several small stitches through the hidden attachment strap and around the cream cord at that position.
- Keep the stitches behind the bow where they won't show from the front.
- Repeat at the other four positions.
- Remove any temporary pins, clips, or position markers.
- Gently lift a short section of cord over the worktable and check that the bows stay at their marked positions.
Don't rely on the straps being tight enough to hold the bows in place by themselves. The small securing stitches are what stop them from sliding toward the middle when the cord hangs in a curve.
Step 6. Check the Completed Garland
Lay the whole garland on your worktable and give it one last look.
- Five velvet bows are attached to the cream cord.
- Three bows are red and two are evergreen green.
- The bows alternate red, green, red, green, red.
- Every bow has two full loops, one wrapped center, and two V-cut tails.
- Each hidden attachment strap is firmly stitched.
- All five bows are secured at the measured positions.
- Both cord end loops are finished.
- All temporary pins, clips, and markers have been removed.
Once everything checks out, you're ready to hang your Christmas bow garland.
Hang and Decorate with Your Christmas Ribbon Bow Garland
Now you get to see how those velvet bows look together. The red and green colors are pretty enough on their own, so I wouldn't crowd the garland with lots of other decorations. Let those full loops and long tails do the work.
Hang Your Finished Garland
- Choose two secure decorating hooks or suitable supports for the ends of the garland.
- Place the left hanging loop over the first hook.
- Stretch the cord gently across to the second hook without pulling it tight.
- Attach the right hanging loop.
- Allow the middle of the cord to dip into a gentle curve.
- Check that the center red bow hangs at the lowest point, with two bows on either side.
- Use your fingers to open the wired velvet loops and give each bow its full shape.
- Straighten the tails so the velvet sides face forward and the V-cut ends hang freely.
If one of the bows seems a little flat, don't take the whole garland down. You can reshape the wired edges gently while it's hanging.
Make sure the two end bows face forward rather than turning toward the wall. A small adjustment to the loops can make a big difference.
Decorate a Christmas Mantel
A ribbon bow garland looks lovely across a mantel, especially if you're already decorating with traditional Christmas reds and greens.
You could put a few wrapped Christmas packages below it or use a matching ribbon on nearby decorations. I would keep the arrangement fairly simple. Five large velvet bows already make quite a statement.
If your mantel is above a working fireplace, choose a different display location. Velvet ribbon and decorating cord need to stay away from heat and flames.
Use the Garland for a Christmas Baby Shower
For a Christmas baby shower, hang the bows above the dessert table or across a decorative backdrop. The velvet ribbon dresses up the space without needing a lot of extra ornaments.
Red ribbon on favor boxes or gift bags would look pretty with the garland. You don't need to put bows on every single decoration, though. A few matching details are plenty.
You can find more holiday party decorating ideas on my Christmas Baby Shower Ideas page.
Try Different Christmas Ribbon Colors
The red-green-red-green-red arrangement is the main project, but you can make another garland with the same cutting measurements in different colors.
For a pink Christmas display, try dusty rose and ivory wired velvet ribbon. Burgundy and cream would be pretty for a more traditional Christmas room, too.
Keep the same 14-inch loop strips, 8-inch tails, and 5-inch center wraps. Just change the ribbon colors. You won't need another cutting pattern.
If you're decorating with pink this Christmas, take a look at my DIY Pink Christmas Decorations collection for more handmade projects that could go with your bows.
Store the Velvet Bows Between Christmases
When it's time to put the decorations away, remove the garland from its hooks and lay it in a wide, shallow box.
Arrange the bows without pressing their loops flat. You can tuck a little plain tissue paper inside the loops if you want to help them keep their shape.
Don't put heavy decorations on top of the velvet. Keep the garland in a dry storage area, away from anything that might snag the wired edges.
When you bring it out again, gently reshape the loops with your fingers. That's one of the nice things about using wired ribbon.
Decoration note: This ribbon garland is for decoration, not play. Keep the bows and hanging cord completely out of reach of babies and young children. Never attach a garland to a crib, bassinet, or other infant sleep space. Keep the ribbon away from fireplaces, candles, hot lights, and other sources of heat.
Frequently Asked Questions About Making Christmas Ribbon Bows
Can I use satin ribbon instead of velvet ribbon?
Yes. Wired satin ribbon can work with the same cutting measurements. Look for ribbon that's 1 1/2 inches wide with flexible wire along both edges. The finished bows will have a different texture and shine, but you can use the same two-loop construction, separate tails, and wrapped centers.
Why do my Christmas bow loops look uneven?
Check the overlap at the back of the center. If the two ends of your 14-inch loop strip aren't centered evenly, one loop may be larger than the other. Adjust the overlap before you make the center stitches. If the bow is already finished, try reshaping the wired edges first. That may be enough to balance the loops without taking the bow apart.
Can I make this Christmas bow garland without sewing?
You won't need a sewing machine, but this particular design does use a few hand stitches. They hold the gathered centers, finish the narrow wraps, secure the hidden attachment straps, and keep the bows from sliding on the cord. I wouldn't skip those stitches without changing the construction method.
Can I make a longer Christmas ribbon bow garland?
Yes. Keep the bow centers 8 inches apart and allow approximately 9 inches of undecorated cord at both ends. For seven bows, you would need approximately 66 inches between the hanging-loop bases, plus another 8 inches for the two end loops. Cut a 74-inch cord and make four red bows and three green bows for a matching alternating arrangement.
You'll also need extra ribbon. Each additional bow uses one 14-inch loop strip, two 8-inch tails, one 5-inch center wrap, and one 2-inch attachment strap.
Can I use the velvet bows on Christmas presents?
Yes. Make the bows using the same loop, tail, and center-wrap instructions. Skip the hidden cord strap if you're not making a garland. You can attach the finished bow to a package with a separate length of ribbon or another suitable gift-wrapping attachment.
Can I hang velvet Christmas bows outdoors?
I would keep this particular garland indoors. Ordinary wired velvet ribbon can become wet, collect dirt, or lose its appearance outdoors. If you're making an outdoor version, choose materials specifically labeled for outdoor decorating and follow the manufacturer's care instructions.
If you're looking for another handmade Christmas decoration to go with your ribbon bows, visit my DIY Christmas Garland collection page. You'll find more projects made with paper, felt, ribbon, and fabric.
When you click on links to various merchants on this site and make a purchase, this may result in this site earning a commission. This does not affect the price you pay.

UBGI Gold Standard 2026
Reviewed under the site's
editorial checklist.
Photos, decorating ideas, party setups and reader submissions are shared for inspiration unless a page is specifically presented as a pattern, tutorial, reference guide or step-by-step project. Follow the instructions, measurements, safety guidance and manufacturer directions provided for the particular project or product.
About Jan | Contact | Baby Nursery Ideas (Blog) | Site Map | Privacy Policy | Disclosure Policy | Disclaimer | Affiliate Disclosure | Earnings Disclosure | Facebook | Pinterest
I am a participant in the Amazon Services LLC Associates Program, an affiliate advertising program designed to provide a means for us to earn fees by linking to Amazon. As an Amazon Associate I earn from qualifying purchases.
Copyright © 2006-2026. All Rights Reserved.