Free Felt Mouse with Book Ornament Pattern
By Jan Bay
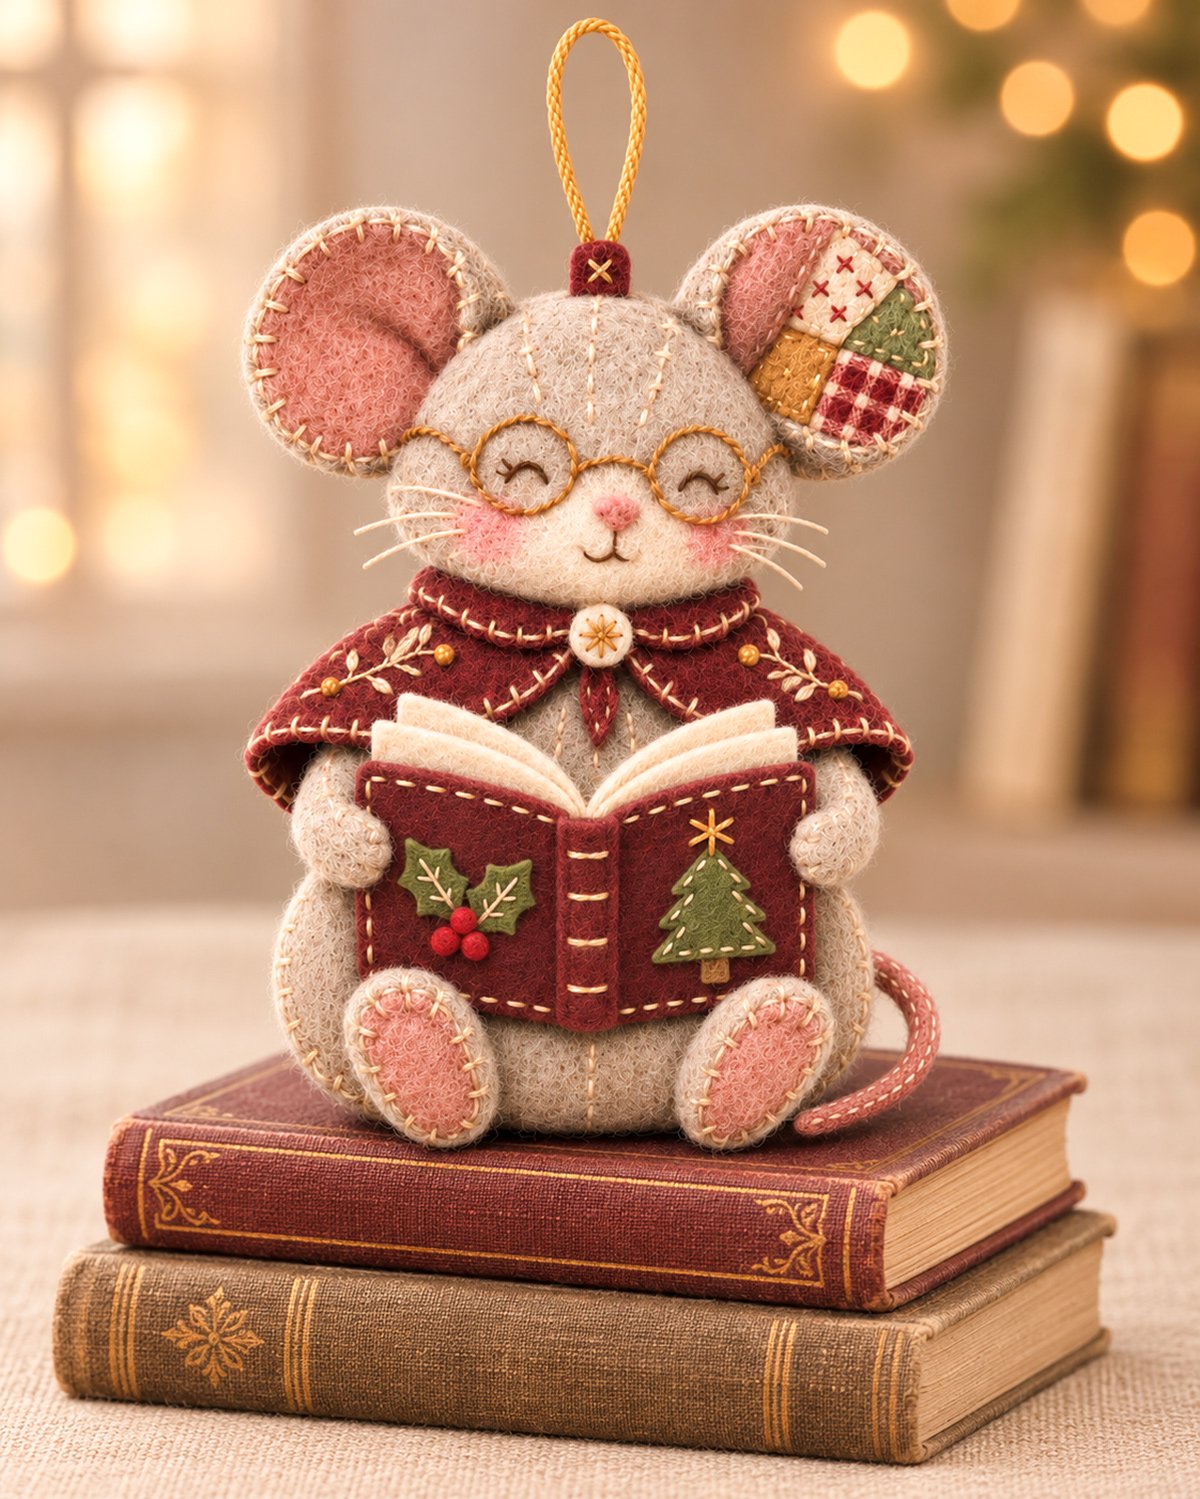
This free felt mouse with book ornament pattern features a little gray mouse wearing round glasses and a burgundy cape while reading a Christmas storybook. One ear has a colorful patchwork design, and the open book is decorated with simple felt holly leaves and a Christmas tree. I'll show you how to cut the pieces, sew the mouse together, make the little book and add the finishing details using the free printable templates.
Explore More Free Felt Crafts and Ornament Patterns
Free Felt Cardinal Ornament with Christmas Envelope
See Supplies for This Project Here.
On This Page
Supplies for the Felt Mouse Ornament
You'll need several colors of felt, embroidery floss, a little stuffing and a hanging cord. I'd choose wool-blend felt about 1 to 1.5 mm thick. It holds its shape well enough for the little ears, cape and open book without making the pieces too difficult to sew.
Materials
- Warm gray felt for the head, body, ears, arms and feet
- Dusty pink felt for the ear linings, cheeks, paw pads and tail
- Cream felt for the muzzle, book pages and cape clasp
- Burgundy felt for the cape, collar and book cover
- Olive green felt for the Christmas tree, holly leaves and ear patchwork
- Small scraps of mustard, cream, brown and burgundy felt for the patchwork ear and book details
- Embroidery floss in cream, gold, brown, burgundy, green, pink and red
- A small amount of polyester stuffing
- Approximately 9 inches of hanging cord or narrow ribbon
- A small scrap of felt to reinforce the hanging loop
Tools
- Sharp embroidery scissors
- Embroidery and hand-sewing needles
- Fabric clips or fine pins
- Washable fabric marker or tailor's chalk
- Ruler
- Printer and ordinary letter-size paper
A little pink fabric chalk is optional if you'd rather give the mouse rosy cheeks without sewing on separate pink pieces.
You won't need wire, plastic eyes, beads or special ornament hardware. The mouse's eyes and glasses are embroidered, and the cape clasp is made from felt.
Stitches Used
You'll use blanket stitch for most of the outside seams, backstitch for the glasses and facial features, running stitch for the decorative edges and French knots for the holly berries.
If any of those stitches are new to you, DMC's illustrated embroidery stitch guide shows how to make them.
Finished Size and Skill Level
The finished ornament is expected to measure approximately 6 inches tall and 4.6 inches wide across the ears, not counting the hanging loop or the little tail extending to the side.
I'd call this an intermediate felt sewing project. The main mouse is fairly straightforward, but the patchwork ear, embroidered glasses and layered book require a little patience.
The mouse is made in separate padded sections. You'll sew the body and head first, then add the ears, cape, paws and book. That keeps the pieces manageable and makes it easier to position everything before the final stitches go in.
Estimated finished size: 6 inches tall, excluding the hanging loop
Estimated width: 4.6 inches across the ears
Skill level: Intermediate hand sewing
Construction: Sewn felt with light stuffing and embroidered details
Printing: US letter paper at actual size, 100%
These are expected measurements based on the cutting templates. The finished size and balance still need to be checked against a sewn sample.
Download the Free Felt Mouse Ornament Pattern and Templates
The printable package includes the full-size cutting templates, cutting list, assembly placement guide and sewing instructions. Every pattern piece has a letter that matches the cutting guide below.
free felt mouse with book ornament pattern
download the complete printable pattern pdf
download the complete pattern zip package
Print at 100% or actual size. Do not select "fit to page." Check the 1-inch test square before cutting your felt.
The templates are intended to be cut on the printed outlines. You don't need to add a seam allowance because the pieces are joined along their edges with blanket stitch.
I'd print the templates once on ordinary paper and cut them out. If you prefer sturdier patterns, trace them onto lightweight cardstock before cutting your felt.
Felt Cutting Guide
Cut all the pieces before sewing. The letters below match the printable templates, and the measurements are based on the drafted pattern.
Mouse Body and Head
- A: Body front and back. Cut 2 warm gray pieces, approximately 3.44 x 3.45 inches.
- B: Head front and back. Cut 2 warm gray pieces, approximately 3.16 x 2.39 inches.
- C: Outer ears. Cut 4 warm gray pieces, making 2 front-and-back pairs. Each measures approximately 1.66 x 1.68 inches.
- D: Inner ear linings. Cut 2 dusty pink pieces, approximately 1.34 x 1.39 inches.
- E1-E4: Four patchwork sections. Cut 1 each in cream, olive green, mustard and burgundy.
- N: Cream muzzle. Cut 1 using the printable template.
- O: Pink cheek pieces. Cut 2 if using felt instead of fabric chalk.
Arms, Feet and Tail
- F: Oval foot shells. Cut 4 warm gray pieces, making 2 front-and-back pairs.
- G: Oval foot pads. Cut 2 dusty pink pieces.
- H: Arm shells. Cut 4 warm gray pieces, making 2 front-and-back pairs.
- I: Small front paw overlays. Cut 2 warm gray pieces.
- U: Curved tail. Cut 2 dusty pink pieces, approximately 1.22 x 1.30 inches.
- W: Hanging-loop reinforcement tabs. Cut 2 warm gray pieces.
Cape and Collar
- J1: Left burgundy cape wing. Cut 1.
- J2: Right burgundy cape wing. Cut 1.
- K1: Left burgundy collar flap. Cut 1.
- K2: Right burgundy collar flap. Cut 1.
- L: Small round cream felt clasp. Cut 1.
- M: Burgundy pointed tie. Cut 1.
Christmas Storybook
- P: Burgundy open book cover. Cut 1, approximately 3.07 x 1.76 inches.
- Q1: Largest cream page layer. Cut 1, approximately 3.10 x 2.12 inches.
- Q2: Middle cream page layer. Cut 1, approximately 2.96 x 2.02 inches.
- Q3: Smallest cream page layer. Cut 1, approximately 2.82 x 1.91 inches.
- R: Olive green Christmas tree. Cut 1.
- S: Small brown tree trunk. Cut 1.
- T: Green holly leaves. Cut 2.
- V: Raised burgundy book spine. Cut 1, approximately 1.65 inches tall.
The templates include the little curved tail and the larger felt decorations for the book. The holly berries, glasses, mouth, whiskers and smaller stitched decorations don't need separate cutting pieces.
Before you begin: Keep the patchwork ear on the mouse's right as you look at the finished ornament. The plain pink ear goes on the left. That detail matters because the two ears are intentionally different in our finished design.
Free Felt Mouse with Book Ornament Pattern: Sewing Instructions
We'll start with the ears and face, then sew the head and body. After that, we'll make the Christmas book and put everything together.
Use two strands of embroidery floss for ordinary seams and finer details. For the outside blanket stitching, three strands will give you a more noticeable handmade edge.
Keep the blanket stitches approximately 1/8 inch apart and 1/8 inch deep. Don't pull them so tightly that the felt puckers.
Step 1: Make the Patchwork Ear
- Cut four gray outer ear pieces using template C. You'll need two pieces for each ear.
- Cut two dusty pink inner ear linings using template D.
- Set one pink lining aside for the mouse's plain ear.
- Arrange E1 through E4 over the second pink lining using the patchwork placement guide. Leave the upper-left pink section visible. Baste mustard E3 and olive E2 first, then burgundy E4, and finish with cream E1. Overlap adjoining edges by no more than 1/16 inch.
- Use cream, mustard, olive and burgundy felt for the four patches.
- Sew the patches onto the pink lining with short running stitches. Add a few embroidered crosses to the cream patch and a simple plaid design to the burgundy patch.
- Attach the completed pink lining to the front of one gray ear. Leave approximately 1/8 inch of gray felt showing around its edge.
- Sew the plain pink lining to the front of the other gray ear.
Now put each decorated ear front against an undecorated gray ear back. Blanket stitch around the curved edges, leaving about 1/2 inch open at the bottom.
You can add a very small pinch of stuffing if you'd like the ears slightly padded. Don't overstuff them. They should remain fairly flat and hold their rounded shape.
Set both ears aside with their bottom openings unsewn. We'll catch those openings inside the head seam.
Step 2: Embroider the Mouse's Face
Take one gray head piece, template B. This will be the front of the mouse's face.
Lightly mark the center of the head from top to bottom. Use the printable face placement guide to position the glasses and other features.
- Transfer the face placement markings from page 8 of the printable PDF to the head front. Keep the glasses centered across the face, with their centers approximately 1.42 inches apart.
- Draw two circles approximately 0.70 inch across for the spectacles, following the full-size face guide.
- Embroider each circle with gold or tan floss using small backstitches. You can also couch a thicker strand of floss along the marked circles for a slightly raised look.
- Add a short embroidered bridge between the two circles.
- Inside each spectacle ring, embroider a small curved line in dark brown to make the mouse's closed, smiling eyes.
- Place cream muzzle N below the glasses and sew it down with small matching stitches.
- Position the two pink cheek pieces on either side of the muzzle. Sew them down with tiny stitches, or use a little pink fabric chalk instead.
- Embroider the nose with several pink satin stitches, making a small rounded triangle.
- Add a short line beneath the nose and two little curved stitches to form the mouth.
- Embroider three fine whiskers extending toward each side of the face.
Use a few pale cream running stitches along the center of the forehead to copy the gentle stitched detail in the finished example.
I'd keep the glasses embroidery fairly fine. The round frames are a big part of the mouse's character, but they shouldn't hide the little embroidered eyes.
Before sewing the head, turn the felt over and secure all your thread ends on the back.
Step 3: Sew the Head and Attach the Ears
Lay the decorated head front face up. Position the ears at the upper sides of the head, with their bases pointing inward.
The plain pink ear belongs on the mouse's left as you look at it. The patchwork ear belongs on the right.
- Slide approximately 1/4 inch of each ear base beneath the corresponding edge of the head front.
- Baste the ears in place with a few small stitches.
- Cut two reinforcement tabs using template W. Fold the 9-inch hanging cord in half and knot its two cut ends together.
- Place the knotted ends between the two W tabs. Sew a small box of closely spaced stitches through both felt tabs and the cord. Gently check that the cord cannot slip out.
- Position the reinforced tabs inside the center crown of the head, between the front and back head pieces. Keep the loop emerging above the head and stitch through the tabs and both head layers.
- Place the second gray head piece behind the decorated front, matching the edges carefully.
- Begin blanket stitching around the head, catching the ear bases and reinforcing the cord attachment as you go.
- Leave an opening of approximately 1 inch along the bottom of the head.
- Add small amounts of stuffing, working them toward the cheeks and upper head first.
- When the head is rounded but not tightly packed, close the opening with blanket stitch.
Check that the ears are secure and the hanging loop comes out at the center. The finished head should look plump without becoming a hard ball.
Step 4: Make the Curved Tail
Cut two tail pieces using template U.
Place the two tail pieces together and sew around their long curved edges with small stitches. Leave the tail unstuffed. Add a line of cream running stitches along the center to match the finished example.
The tail should curve toward the mouse's right side as you look at the front. Use the printable assembly diagram to check its direction before attaching it.
Position the thicker end approximately 1 1/4 inches above the bottom of the body, at the right rear edge as you look at the mouse from the front. The curved tip should extend out to the side.
Baste the thick end to the inside of the body piece. Keep the rest of the tail outside the body.
There shouldn't be anything hanging down between the feet. The tail belongs at the side, exactly as shown in the finished example.
Step 5: Sew and Stuff the Body
- Place the two gray body pieces, template A, together with their edges matching.
- Keep the basted tail in position at the right rear side.
- Blanket stitch around the body, leaving approximately 1 inch open near the upper side.
- Add polyester stuffing a little at a time.
- Shape the body into a rounded, slightly flattened oval.
- Close the opening with blanket stitch.
The body needs enough stuffing to hold its shape, but remember that the cape and book will be sewn over the front. A very firm body would make those pieces harder to position.
Step 6: Attach the Head to the Body
Place the finished head over the upper body, overlapping the pieces by approximately 1/2 inch.
Center the head so the body extends evenly on both sides below it.
Use four rows of small concealed stitches across approximately 1.1 inches of the neck join. Pass the needle through the felt layers of both stuffed sections, not just the stuffing. Add reinforcement stitches across the back of the neck so the head remains securely attached when the ornament hangs.
Check the ornament from the front and side. The face should look forward, and the head shouldn't tip sharply toward either side.
The cape collar will cover much of this join when we add the clothing.
Make the Felt Christmas Storybook
The little open book is one of my favorite details in this design. It's also the part I'd keep simple. We don't need tiny houses, windows or anything that requires cutting pieces smaller than we can reasonably sew.
Our book has a burgundy cover, three visible layers of cream pages, two holly leaves and a Christmas tree. The remaining decorations are embroidery.
Step 1: Decorate the Burgundy Cover
Lay book cover P flat on your work surface with the front facing up. The two sides of the book are already shaped into the open-book outline.
Find the vertical center. This will become the book's spine.
Left side: Position the two green holly leaves, template T, near the center of the left cover panel.
- Sew both leaves down with small green stitches.
- Add a few cream stitches for the leaf veins.
- Embroider three red French knots beneath the leaves to represent holly berries.
Those berries don't need separate felt pieces or stuffing. French knots will give you the same little spots of red without all the fiddly cutting.
Right side: Position Christmas tree R on the right cover panel, with trunk S beneath it.
- Sew the brown trunk in place first.
- Place the green tree over the top of the trunk and attach it with small green stitches.
- Use cream floss to make a simple line of short diagonal stitches across the tree for a garland.
- Embroider a small gold star at the top.
Keep the star embroidered rather than cutting a separate tiny felt shape.
Finish the cover with a line of cream running stitches around its outside edges. Stay approximately 1/8 inch inside the edge.
Step 2: Make the Cream Felt Pages
Cut page layers Q1, Q2 and Q3 from cream felt. The pieces are different sizes so the top edges will show in gentle steps.
- Lay Q1, the largest page layer, on the table.
- Center Q2 over it, matching the lower center point.
- Place Q3 on top, again matching the lower center point.
- Set the decorated burgundy cover P over the cream pages, matching the lower center points.
- Check that the cream page edges remain visible above the burgundy cover.
- Pin the layers together through their vertical centers.
Use four to six short stitches along the middle of the book to join the cover and all three cream page layers.
Cut the raised burgundy spine using template V. Place it vertically over the center joining seam on the front of the book. Sew its long edges to the cover with small matching stitches, then add four or five short horizontal cream stitches across the raised spine.
Secure each outer corner with a small holding stitch so the pages don't flop backward.
Gently bend the finished book along the center spine to make a shallow V shape.
The felt layers should suggest an open book without looking like a thick stack of pages. That's enough to get the effect we're after.
Step 3: Check the Finished Book
Lay the book against the mouse's belly before sewing it in place.
The burgundy book cover measures approximately 3.07 inches across and covers much of the front body. Its three cream page layers should fan upward in visible steps, while the decorated burgundy cover and raised center spine remain clearly visible.
Check that you can still see both lower feet when the book is held in position.
If the cream pages sit too low, check their layering and center alignment before stitching them again. Don't solve the problem by trimming the book cover smaller.
Set the completed book aside while you finish the cape, arms and feet.
Assemble the Felt Mouse Ornament
Now we're ready to put the remaining pieces together. Keep the finished example image nearby while you work. It's easier to check the position of the cape, feet and book before sewing everything down.
Step 1: Sew the Feet
- Cut four gray foot pieces using template F.
- Cut two pink foot pads using template G.
- Position one pink pad on the front of each foot, leaving a narrow gray border around it.
- Sew each pad down with small cream or pink stitches.
- Pair each decorated foot front with an undecorated gray foot back.
- Blanket stitch around each pair, leaving a small opening for stuffing.
- Add a little stuffing to round the feet, then close the openings.
Place the finished feet at the bottom of the mouse's body, one on either side. Let the lower edges extend slightly beyond the body.
Angle the feet outward a little so the pink pads face forward. Sew through the back layer of each foot and into the body, keeping your attachment stitches hidden.
Don't pull them flat against the body. A little padding gives the feet the rounded appearance shown in our example.
Step 2: Sew the Arms and Hands
- Cut four gray arm shells using template H and two small gray front paw overlays using template I.
- Pair the arm shells to make two front-and-back sets.
- Blanket stitch around each pair, leaving a small opening for stuffing.
- Add a small amount of stuffing and close the openings.
- Sew one gray paw overlay I over the free end of each finished arm, using small matching stitches.
Place the arms against the outer sides of the body, just below the shoulders. They should curve forward toward the book.
Sew the upper ends to the body with several small hidden stitches. Leave the lower ends free for now.
We'll attach the hands to the book after the cape is in place.
Step 3: Decorate the Burgundy Cape
The cape is made from two separate burgundy felt wings, J1 and J2. This gives the mouse the little shoulder covering shown in the finished example.
- Lay both cape pieces flat with their front sides facing up.
- Embroider a short curved gold stem on the outer portion of each cape wing.
- Add three or four pairs of small straight stitches along each stem to make leaves.
- Add two or three tiny gold French knots along each stem for decorative accents.
- Work a line of cream running stitches approximately 1/8 inch inside the curved outer edges.
- Secure the embroidery ends on the back of the felt.
Keep the embroidery simple. The two leaf sprigs and the visible edge stitching give the cape plenty of character without covering every inch.
Step 4: Attach the Cape and Collar
Place the left cape wing over the mouse's left shoulder and the right wing over its right shoulder. The upper inner corners should meet near the center of the neck.
Let the lower outside edges extend over the upper arms, creating the broad shoulder shape visible in the example image.
- Tuck the upper inside tips just beneath the lower edge of the head.
- Sew the upper cape edges to the body and head join with small hidden stitches.
- Secure the outer shoulder edges with two or three small stitches so the cape doesn't shift.
- Position burgundy collar flaps K1 and K2 across the neckline, meeting at the center front. Keep their curved lower edges visible above the cape wings.
- Tuck the outer ends of both collar flaps beneath the head and secure them with small hidden stitches.
- Position pointed tie M at the center of the collar, with its narrow end facing downward.
- Place cream clasp L over the upper end of the tie.
- Sew the clasp in place and embroider a small gold eight-point star on it.
The collar should sit just beneath the mouse's chin. The little pointed tie hangs down the middle, although part of it will be covered by the open book.
Check that the cape looks balanced before going any further. Both sides should fall at approximately the same height.
Step 5: Attach the Open Christmas Book
Hold the finished book across the mouse's lower belly, centered between the arms.
The lower book edge should rest just above the pink foot pads. The cream pages should point upward toward the mouse's face.
- Pin the book at the center front of the body.
- Check that the spine is centered beneath the mouse's nose.
- Use several small hidden stitches to attach the center back of the book to the body.
- Add a holding stitch near each lower book corner so the book doesn't swing away from the body.
- Bring the left arm forward until its gray paw rests against the outside edge of the left book cover.
- Secure the gray paw with three or four tiny hidden stitches through the paw and book edge.
- Repeat with the right arm and gray paw, keeping the holly leaves and Christmas tree visible.
Make sure the hands appear to be holding the book rather than covering the Christmas decorations.
Check the book from the side. It should sit slightly forward, but it shouldn't hang so far away from the body that the ornament becomes front-heavy.
Once the book and hands are secure, you can remove the pins.
Finishing Details and Hanging Loop
We're almost finished. Before hanging the ornament, check the little details that give our mouse its personality.
Check the Glasses and Face
Make sure the embroidered glasses form two even circles with a short connecting bridge. The smiling eyes should still show clearly inside them.
If a stitch has pulled the felt out of shape, loosen it carefully rather than adding more stitches over the top.
Straighten the Cape and Book
Gently arrange the cape wings so both sides spread over the shoulders. The collar should sit beneath the chin, with the cream clasp centered at the front.
Check that the book is open, the pages are visible and the tree and holly decorations can be seen clearly.
Check the Tail
The tail should extend from the mouse's right rear side and curl outward beside the body.
If it isn't holding its curve, you can add one small hidden stitch near the inside of the curl to keep it positioned. Don't attach the free tip to the front of the ornament.
Finish the Hanging Loop
The hanging cord should already be anchored inside the top of the head.
Gently pull on the loop to check that the reinforcement tab and seam are holding firmly. If the crown stitches move, add more stitches through the reinforced area before using the ornament.
The ornament should hang approximately upright. If it tips forward, check whether the book is attached too loosely or the stuffing is crowded toward the front.
Final Inspection
- Check the head-to-body connection.
- Check both ear attachments.
- Check the feet and arms.
- Check the cape and collar.
- Check that the book is firmly attached.
- Make sure the hanging loop is secure.
- Weave in or hide any remaining thread ends.
Don't add loose buttons, plastic eyes or other tiny decorations. Everything in this pattern can be made with felt and embroidery.
This mouse is intended as a decorative Christmas ornament, not as a toy for babies or young children. Hang it out of their reach.
Tips for Sewing Your Felt Mouse Ornament
There are a few things I'd pay particular attention to while making this mouse. None of them is difficult, but they're worth checking before you finish each section.
Don't Overstuff the Head
A small amount of stuffing is enough to round the cheeks and forehead. If you pack the head too firmly, the glasses may stretch out of shape and the muzzle can look flattened.
Add stuffing gradually and check the face as you go.
Keep the Patchwork Ear Flat
The patchwork ear has several layers of felt. Use small, flat stitches when attaching the colored pieces and avoid piling extra layers around the center.
I'd use felt no thicker than 1 mm for the tiny patchwork pieces if the main ornament is made with thicker felt.
Test the Book Before Attaching It
Hold the completed book against the body and check the finished example image.
You should be able to see the mouse's face, cape, arms and both feet. The book needs to be large enough to look like a proper storybook without covering the entire mouse.
If the book is too stiff to hold a shallow V shape, use thinner felt for the cream pages. Don't add stuffing to the book.
Use Embroidery for the Smallest Decorations
The Christmas tree and holly leaves are large enough to cut from felt. The berries, little star, tree garland and decorative cape details are better embroidered.
That's my choice for this pattern because it keeps the cutting manageable and makes the finished decorations easier to reproduce.
Check the Ornament's Balance
After attaching the book and paws, hold the ornament by its hanging loop to check how it hangs.
If it leans sharply forward, check the stuffing and the position of the book. A flatter body and a book stitched close to the front will help keep the ornament upright.
If the head tilts sideways, check that the two ears are attached evenly and that the head is centered over the body.
Keep the design just as it is. The embroidered glasses, patchwork ear, burgundy cape and Christmas storybook are enough to make this little mouse special without adding extra accessories.
If you'd like another hand-sewn project after finishing the mouse, you'll find more patterns and ideas on my free felt crafts page.
Frequently Asked Questions
Can I make the felt mouse without a sewing machine?
Yes. Every part of this pattern is designed for hand sewing. You'll use blanket stitch, running stitch, backstitch and a few simple embroidery stitches.
Do I need wool felt for the mouse?
No. Wool-blend felt is my first choice for the main pieces, but good-quality craft felt can also work. Choose felt that holds its shape without stretching too easily, especially for the ears and book cover.
Can I make the mouse larger?
Yes. You can enlarge all the cutting templates by the same percentage when printing. Just remember that the finished size, embroidery placement and amount of stuffing will change. The original instructions are calculated for the approximately 6-inch ornament.
What if my felt is too thick for the book pages?
Try a thinner cream felt for the three page layers. Keep the burgundy cover a little firmer so it supports the open shape. You don't need to add stuffing or cardboard between the pages.
Can I make a different Christmas book cover?
Of course. You could use a simple embroidered snowflake, a Christmas stocking or one larger holly sprig instead of the tree. Just keep the decorations flat so the mouse can still hold the book comfortably.
Can this felt mouse be used as a child's toy?
No. This pattern is intended for a hanging Christmas decoration. It includes small decorative pieces and a hanging cord, so it should be kept out of reach of babies and young children.
When you click on links to various merchants on this site and make a purchase, this may result in this site earning a commission. This does not affect the price you pay.

UBGI Gold Standard 2026
Reviewed under the site's
editorial checklist.
Photos, decorating ideas, party setups and reader submissions are shared for inspiration unless a page is specifically presented as a pattern, tutorial, reference guide or step-by-step project. Follow the instructions, measurements, safety guidance and manufacturer directions provided for the particular project or product.
About Jan | Contact | Baby Nursery Ideas (Blog) | Site Map | Privacy Policy | Disclosure Policy | Disclaimer | Affiliate Disclosure | Earnings Disclosure | Facebook | Pinterest
I am a participant in the Amazon Services LLC Associates Program, an affiliate advertising program designed to provide a means for us to earn fees by linking to Amazon. As an Amazon Associate I earn from qualifying purchases.
Copyright © 2006-2026. All Rights Reserved.