Free Felt Snowman Ornament Pattern
By Jan Bay
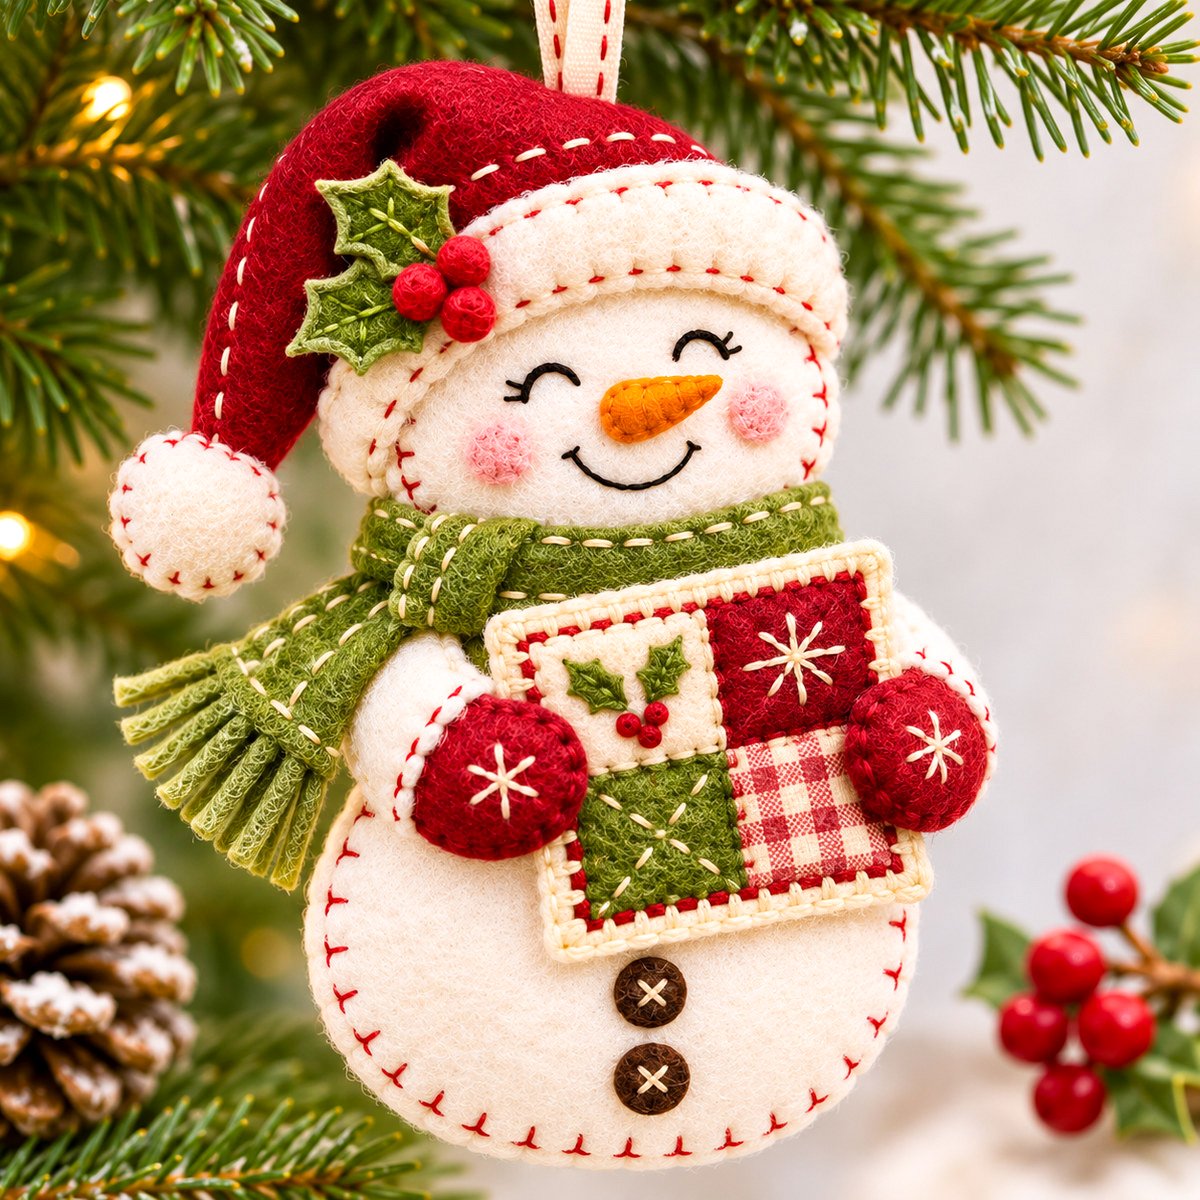
This free felt snowman ornament pattern comes with printable cutting templates and step-by-step sewing instructions because nobody needs a complicated project during the most wonderful time of the year. Our cheerful little snowman wears a red Christmas hat, a fringed green scarf, and matching mittens while holding a tiny patchwork quilt. You'll find full-size cutting templates, embroidery details, and instructions for putting together this handmade Christmas tree ornament.
Explore More Free Felt Crafts and Ornament Patterns
Free Felt Reindeer Ornament Pattern
See Supplies for This Project Here.
On This Page
Download the Free Felt Snowman Ornament Pattern
Cutting Guide and Pattern Pieces
Make the Christmas Hat and Scarf
Make the Miniature Patchwork Quilt
Assemble the Felt Snowman Ornament
Download the Free Felt Snowman Ornament Pattern
You can make the whole snowman with the free printable pattern package below. It includes the full-size felt cutting templates, the sewing guide, and a picture of the finished ornament so you can check the details as you go.
The snowman is made with two layers of ivory felt, a lightly padded Christmas hat, and a little four-patch quilt that sits between his red mittens. You won't need a sewing machine or any special quilt-making equipment.
Free Felt Snowman Ornament Pattern and Printable Templates
Get the complete sewing pattern, full-size cutting templates, and step-by-step instructions in one convenient ZIP download.
Download the Complete Felt Snowman Pattern Package (ZIP)
Prefer separate downloads?
Download the Complete Sewing Pattern (ZIP)
Download the Full-Size Cutting Templates (ZIP)
Save the ZIP file to your computer, extract its contents, and open the printable PDFs. Print the templates at 100% or Actual Size.
Before cutting your felt: Print the templates on US Letter paper at 100% or Actual Size. Don't select Fit to Page. Measure the 1-inch test square on the first template sheet to make sure your printer hasn't changed the size.
The pattern already includes the finished cutting outlines. You don't need to add a seam allowance because the felt pieces are joined with visible edge stitching.
The expected finished ornament measures approximately 6 3/4 inches tall and 4 inches wide, not counting the hanging loop or the scarf fringe that extends to the side.
Pattern note: This design and its printable templates have been drafted and checked against the finished example image, but the ornament has not yet been physically test-sewn. Check the paper pieces and their placement before cutting your felt.
Supplies for the Felt Snowman Ornament
You won't need much felt for this project. A few small sheets and some embroidery floss will take care of nearly everything. I'd use wool-blend felt around 1 to 1.5 mm thick. It's easy to stitch, holds its shape nicely, and won't make the tiny quilt too bulky.
Felt and fabric:
- Ivory or cream wool-blend felt, approximately 8 x 10 inches, for the snowman, hat brim, pompom, sleeve cuffs, and quilt details
- Cranberry-red felt, approximately 5 x 7 inches, for the hat, mittens, and quilt pieces
- Sage-green felt, approximately 5 x 7 inches, for the scarf and one quilt square
- Small scrap of brown felt for two buttons
- Small scrap of orange felt for the carrot nose
- Small scrap of pale pink felt for the cheeks
- Small scrap of holly-green felt for four decorative leaves
- One red-and-cream gingham cotton fabric scrap, at least 2 x 2 inches, for the lower-right quilt square
Sewing supplies:
- Embroidery floss in cream, cranberry red, black or dark brown, sage green, orange, and pale pink
- Embroidery needle or a fine hand-sewing needle with a large enough eye for embroidery floss
- Small amount of polyester fiberfill
- One 7-inch length of cream ribbon or twill tape, approximately 1/4 inch wide
- Lightweight paper-backed fusible web for the gingham fabric
- Sharp fabric scissors and small embroidery scissors
- Washable fabric marking pen
- Sewing pins or small clips
- Ruler, stuffing tool, and pressing cloth
Stitches used: Blanket stitch, backstitch, running stitch, straight stitch, and French knots. If one of those is unfamiliar, DMC's illustrated embroidery stitch guide shows how to work each one.
For the face and small decorations, two strands of embroidery floss are a reasonable starting point. Try three strands for the red blanket stitching around the snowman's body if you want those stitches to show clearly. Check the look on a scrap of felt first.
There's no need to buy miniature quilting tools. The little quilt is made by sewing four small pieces of fabric onto one felt backing. It looks pieced, but it's much simpler to put together.
One thing I'd skip: Loose beads and plastic eyes. The embroidered face, stitched button details, and little holly berries already give the snowman plenty of personality. This ornament does contain small pieces, so it's meant for hanging as a decoration rather than use as a child's toy.
Felt Snowman Ornament Pattern Cutting Guide
Before you start sewing, cut out all the pieces from the printable templates. Each piece has a letter, and those same letters appear in the instructions below.
There are 20 different pattern pieces, labeled A through T. You'll cut 30 individual pieces altogether, not counting the hanging ribbon or the embroidered decorations.
| Piece | Description and Color | Cut |
|---|---|---|
| A | Snowman body, ivory, front and back | 2 |
| B | Face overlay, ivory | 1 |
| C | Drooping Christmas hat, cranberry red | 2 |
| D | Christmas hat brim, cream | 2 |
| E | Hat pompom circles, cream | 2 |
| F | Scarf neckband, sage green | 1 |
| G | Fringed scarf tail, sage green | 1 |
| H | White sleeve cuffs, ivory | 2 |
| I | Mittens, cranberry red | 2 |
| J | Body buttons, brown | 2 |
| K | Carrot nose, orange | 1 |
| L | Cheek circles, pale pink | 2 |
| M | Hat holly leaves, green | 2 |
| N | Miniature quilt holly leaves, green | 2 |
| O | Quilt backing, ivory | 1 |
| P | Quilt underlay, cranberry red | 1 |
| Q | Upper-left quilt square, ivory | 1 |
| R | Upper-right quilt square, cranberry red | 1 |
| S | Lower-left quilt square, sage green | 1 |
| T | Lower-right quilt square, red-and-cream gingham | 1 |
Check these measurements after cutting:
- Piece F, scarf band: approximately 4 1/8 inches long and 1/2 inch wide.
- Piece G, scarf tail: approximately 2 7/16 inches long and 2/3 inch wide.
- Piece O, ivory quilt backing: 2.86 x 2.06 inches.
- Piece P, red quilt underlay: 2.60 x 1.80 inches.
- Pieces Q, R, S, and T: each approximately 1.18 x 0.78 inches.
The four small quilt squares need to fit inside the red underlay, with a narrow red line showing between them. The ivory backing will extend approximately 1/8 inch beyond the red underlay on every side.
Cutting tip: Use small scissors for the carrot nose, cheeks, holly leaves, and other tiny pieces. Cut the two snowman body pieces together, or trace them from the same template and compare their edges before sewing.
Don't cut the fringe into piece G yet. Mark the fringe stopping line shown on the template, but wait until you're ready to make the scarf.
Now lay out the pieces in their finished positions. The hat tips toward the snowman's left, the scarf fringe hangs to the left, and the quilt sits high enough to leave both brown buttons showing below it.
How to Embroider the Felt Snowman's Face
Start with the face while the felt is still flat. It's much easier to make neat embroidery stitches now than after you've stuffed the snowman.
You'll need the ivory face overlay B, orange carrot nose K, two pink cheek circles L, black embroidery floss, and the front snowman body piece A.
Step 1. Mark the Face
Place piece B on your work surface and find its center. Using the full-size placement sheet from the PDF, mark the eyes, nose, cheeks, and smile with a washable fabric pen.
The two eyes should be approximately 1 1/4 inches apart, measured between their centers. Each eye is a small upward curve, giving the snowman his cheerful, closed-eye expression.
Keep the face centered, but leave enough space at the top for the cream hat brim. The lower edge of the face will be covered by the scarf.
Step 2. Stitch the Eyes
Thread your needle with two strands of black embroidery floss.
- Begin at the inside corner of the first eye.
- Follow the curved marking with short backstitches, approximately 1/8 inch long or smaller where the curve changes.
- At the outer corner, add one or two short eyelash stitches.
- Repeat for the second eye, keeping both curves at approximately the same height.
Both eyes should look like little upside-down smiles. Don't make the curves too deep. The face in our finished example has a gentle, happy expression.
Step 3. Make the Smile
Mark a shallow U-shaped curve below the nose position. Stitch along the line with two strands of black floss and the same short backstitch used for the eyes.
Finish with the two ends of the smile turning slightly upward. Keep the smile fairly small so the pink cheeks and carrot nose have room around it.
Step 4. Attach the Carrot Nose
Position orange felt piece K across the center of the face, pointing toward the snowman's right.
Use tiny orange stitches to attach the nose around its edge. If you'd like a little more texture, make two or three short orange stitches on the surface, running across the carrot at a slight angle.
Keep the nose flat enough that it won't snag on the scarf or hat. The embroidered surface stitches will give it a raised look without needing a separate stuffed piece.
Step 5. Add the Rosy Cheeks
Place one pink circle L below the outer part of each eye. Check that the cheeks sit evenly on either side of the smile.
Stitch each circle in place with small pink stitches around its edge. A few short stitches in the center can add a little texture if you want the cheeks to look slightly fuzzy.
Step 6. Attach the Face to the Snowman
Center the finished face overlay B on the front body piece A, following the full-size placement sheet.
Stitch around the visible edges of B with ivory thread. The top of the overlay will disappear beneath the hat brim, and the bottom will be hidden by the scarf.
If you want the cheeks and forehead to appear slightly rounded, slip a very thin layer of fiberfill beneath B before closing its final edge. Don't add enough to make the face bulge.
Step 7. Add the Two Brown Buttons
Before closing the snowman's body, place the two brown felt button circles J along the center of the lower body.
Use the paper quilt template to check the placement. Both buttons need to remain fully visible below the quilt, with a little ivory felt showing between them.
Attach each felt circle with two cream diagonal stitches that cross in the center to form an X. These stitched buttons match the finished example without using separate plastic or wooden buttons.
Face checkpoint: You should now have two matching curved eyes, a small black smile, an orange carrot nose, two pink cheeks, and two buttons below the future quilt position. Check everything before closing the snowman's body.
Make the Felt Snowman's Christmas Hat and Scarf
The red hat and green scarf give this little snowman most of his Christmas personality. His hat leans toward the left, with a cream pompom hanging below the brim. The scarf has a long fringed tail that points in the same direction.
We'll prepare both accessories now and attach them after the snowman's body has been sewn and lightly stuffed.
Step 1. Sew the Red Christmas Hat
Take the two cranberry felt hat pieces C. Place them together with their edges matching. Because felt doesn't have a true right or wrong side, just make sure the decorated face of the front piece points outward.
Before joining them, embroider a line of short cream running stitches near the curved upper edge of the front hat piece. Keep the stitches evenly spaced and follow the shape of the cap.
Now blanket-stitch the two hat layers together along the side edges and around the drooping tip.
Leave the lower opening unfinished. Slip a very small amount of fiberfill between the layers to round the cap slightly.
Don't stuff the hat firmly. It needs to droop naturally toward the snowman's left, rather than standing upright like a cone.
Step 2. Make the Cream Pompom
Place the two cream pompom circles E together.
- Blanket-stitch around most of the circle using cream or red embroidery floss.
- Leave a small opening.
- Add a pinch of fiberfill to make the pompom rounded.
- Close the remaining opening.
- Stitch the pompom firmly to the drooping tip of the red hat.
The pompom should hang to the left of the snowman's face. You don't need to make it perfectly round, but keep it small enough that it doesn't pull the hat out of shape.
Step 3. Add the Cream Hat Brim
Take the two cream brim pieces D.
Position one across the front lower edge of the hat and the other across the back. The cream felt should cover the unfinished lower opening of the red cap while leaving the bottom edges available for attaching the hat to the snowman.
Use small cream stitches to attach the brim pieces. A few short cranberry stitches along the cream edge will match the decorative stitching in the finished example.
The brim has a slightly curved shape. Keep that curve instead of pulling it into a straight band. It should sit naturally across the snowman's forehead when the hat is attached.
Step 4. Add the Holly and Berries
Use the two green hat holly leaves M and red embroidery floss.
- Arrange the leaves on the left front side of the cream brim, with their pointed ends spreading outward.
- Attach them with tiny green stitches.
- Add a few green straight stitches down the centers for leaf veins.
- Embroider three red French knots where the leaf bases meet.
Make each berry with one or two wraps of red floss around the needle. Place the knots close together so they look like a small holly cluster.
You can use tiny stitched felt berry circles instead if you prefer, but I would keep them small. The holly should decorate the hat rather than cover the whole brim.
Step 5. Cut the Green Scarf Fringe
Take sage-green scarf tail G. The printable template includes a dashed line marking where the fringe should stop.
Using small scissors, cut five or six narrow slits into the left end of the tail. Stop each cut at the marked line, approximately 1/2 inch from the end.
Don't cut all the way through the felt. The fringe needs to remain attached to the solid part of the scarf.
Use your fingers to separate the fringes gently. They should spread out like a little fan when the scarf hangs at an angle.
Step 6. Embroider the Scarf
Take scarf band F and the prepared tail G.
With two strands of cream embroidery floss, work a row of short running stitches along the scarf band, approximately 1/8 inch from one long edge.
Add a matching line of running stitches along the solid part of the scarf tail. Stop before you reach the fringe.
Keep the stitches relaxed. Pulling them too tightly will make the felt gather or curl.
Placement checkpoint: The cap should droop toward the snowman's left, and the pompom should hang below the brim line. The scarf fringe also points down and left. Set these prepared accessories aside until the stuffed body is ready.
Make the Miniature Four-Patch Quilt
Now for the little patchwork quilt he's holding. This is the detail that sets our snowman apart from a plain felt ornament, and it doesn't require sewing a real miniature quilt.
We're going to arrange four small felt and fabric squares on a red felt background, then finish the whole thing with a cream border. The quilt stays flat, so it's easy to attach and won't make the front of the snowman bulky.
Step 1. Prepare the Quilt Backing
Gather these six pattern pieces:
- O: ivory felt quilt backing, 2.86 x 2.06 inches
- P: cranberry felt underlay, 2.60 x 1.80 inches
- Q: ivory upper-left patch, 1.18 x 0.78 inches
- R: cranberry upper-right patch, 1.18 x 0.78 inches
- S: sage-green lower-left patch, 1.18 x 0.78 inches
- T: red-and-cream gingham lower-right patch, 1.18 x 0.78 inches
Lay the ivory backing O on your work surface. Center the red felt underlay P over it.
You should have approximately 1/8 inch of ivory felt extending beyond the red felt on all four sides.
Pin the layers together temporarily. We'll stitch the underlay securely after adding the four squares.
Step 2. Arrange the Four Quilt Squares
Lay the four small pieces on the red underlay in this exact arrangement:
| Q Ivory Holly and berries |
R Cranberry Cream star |
| S Sage green Cream sprig |
T Red gingham No embroidery |
Arrange the four patches on the red underlay in two rows. Leave approximately 0.08 inch of red felt showing between the patches and around their outside edges. The two patches in each row, together with the three narrow red spaces, will fill the width of the underlay. The same spacing works from top to bottom.
Check the arrangement before you sew. The holly belongs at the upper left, the cream star at the upper right, the sprig at the lower left, and the gingham at the lower right.
Step 3. Attach the Four Squares
Begin with the two upper squares, Q and R. Use small running stitches or tiny whip stitches in matching thread to secure each square to the red underlay P.
Work close to the edges without pulling the felt out of shape.
Repeat with the lower-left green square S.
For gingham square T, apply lightweight paper-backed fusible web to the back of the cotton fabric, following the product's heat instructions. Allow it to cool before cutting the square with template T.
Position the gingham in the lower-right corner and fuse it to the underlay according to the fusible web instructions, using a pressing cloth if required. Test the heat setting on a scrap first, since some felt types can be damaged by a hot iron.
Finish by working tiny stitches around the gingham edges so the cotton won't fray as the ornament is handled.
Step 4. Make the Holly Quilt Square
Take the two smaller green holly leaves N.
Arrange them on ivory square Q with their pointed ends spreading outward. Stitch them in place with green embroidery floss, then add a small center vein to each leaf.
Work three red French knots where the leaves meet. Keep the berries grouped together near the center of the patch.
The holly decoration should fit comfortably inside the ivory square without hiding the red dividing lines around it.
Step 5. Embroider the Cream Star
On cranberry square R, mark a tiny center point.
Use cream embroidery floss to make an eight-point star with straight stitches.
- Make one vertical stitch through the center.
- Make one horizontal stitch crossing it.
- Add two diagonal stitches to complete the eight-point design.
Four straight stitches crossing at the center give you eight visible rays. Aim for a finished star approximately 1/2 inch across, or a little smaller if the felt is thick.
Don't pull the threads tightly. You want the star to stay flat against the red felt.
Step 6. Embroider the Green Sprig
On the lower-left sage square S, mark a short diagonal stem running from lower left toward upper right.
Stitch the stem with cream embroidery floss. Add three or four pairs of short diagonal stitches along it to suggest little leaves.
Keep the sprig simple. A tiny branch with a few leaves is all this square needs.
Step 7. Finish the Quilt Border
Remove the temporary pins and check that the red underlay P is still centered on the ivory backing O.
Secure P to O with small stitches around the outside edge of the red underlay. This step keeps the two backing layers together.
Next, work cream blanket stitches around the outer edge of the ivory backing O. Follow all four sides and turn the corners neatly.
Use approximately 1/8-inch spacing for the border stitches, adjusting slightly at the corners if needed. The edge should look evenly finished without drawing the backing inward.
Don't add stuffing between the quilt layers. The quilt in our finished example is a flat panel, with the four squares and embroidered decorations sitting on its front.
Quilt checkpoint: Your finished panel should measure approximately 2.86 x 2.06 inches. The four squares should be clearly visible, the ivory border should show all around, and the gingham square should sit at the lower right. If a tile is curling or lifting, correct it now before attaching the quilt to the snowman.
Assemble the Felt Snowman Ornament
Now that the face, hat, scarf, and quilt are ready, we can put everything together. Take your time with the placement before sewing the accessories down. A small adjustment to the scarf or quilt can make quite a difference to the finished snowman's expression.
Step 1. Prepare the Hanging Loop
Take your 7-inch length of cream ribbon or twill tape and fold it in half.
Place the two loose ends between the snowman body pieces A at the top center, with the folded loop extending upward.
Leave approximately 2 inches of the loop exposed. The remaining ribbon ends will be held inside the snowman's body.
Use a few small stitches to anchor the ribbon ends to the inside of the back body piece before joining the two layers.
The loop needs to be attached to the body, not just the Christmas hat. That way, the weight of the finished ornament won't pull against the hat's stitching.
Step 2. Sew the Snowman's Body
Place the two ivory body pieces A together, with the embroidered face and brown buttons facing outward on the front.
Match the edges and hold them with sewing clips or a few pins.
- Thread your needle with cranberry-red embroidery floss.
- Begin blanket stitching around the outer edge of the snowman.
- Keep the stitches approximately 1/8 inch apart and a similar distance from the cut edge.
- Continue around the head, shoulders, and body, checking that both layers remain aligned.
- Leave an opening approximately 2 inches long along the lower-right edge for adding stuffing.
- Fasten the thread temporarily without closing the opening.
Use the same red blanket stitching around the entire outside edge. It's a noticeable part of the design, especially against the ivory felt.
Step 3. Add the Stuffing
Take a small amount of polyester fiberfill and separate it into little pieces.
Begin filling the head, working the stuffing gently toward the upper curves. Add a little to the neck and then fill the rounded lower body.
Keep the body lightly padded rather than firmly stuffed. The snowman should have some dimension, but the front still needs to be flat enough to hold the miniature quilt.
Pay particular attention to the narrow neck. Too much stuffing in this area can make it difficult to wrap the scarf neatly.
Once the shape looks even, continue the red blanket stitching across the opening. Fasten the thread securely and hide the end between the two felt layers.
Body checkpoint: The snowman should have a rounded head, a narrow neck, and a wider lower body. The hanging loop should feel secure, and both brown buttons should remain centered on the front.
Step 4. Attach the Christmas Hat
Place the completed hat across the top of the snowman's forehead.
The cream brim should cover the upper edge of the face overlay B, but it shouldn't hide the embroidered eyes.
Arrange the drooping end of the hat so it hangs toward the snowman's left. The pompom should be clearly visible beside his face.
Use small cream stitches to attach the front brim D to the snowman's face and the second brim D to the back of the head.
Add two or three hidden stitches between the red hat and the head to keep the cap from shifting.
Check the hanging loop. It should come up behind the hat without pulling the hat backward.
Step 5. Wrap and Attach the Scarf
Take the two prepared sage-green scarf pieces F and G.
- Place the unfringed end of tail G against the left side of the snowman's neck.
- Angle the fringed end down and toward the left.
- Wrap the long scarf band F around the neck, covering the lower edge of the face overlay.
- Bring the left end of F over the attached end of G so the pieces look like one wrapped scarf.
- Tuck the remaining end of F around to the back.
- Secure the scarf with small sage-green stitches along the hidden overlaps.
Arrange the fringed tail so it hangs naturally beside the snowman's body. The cream running stitches should remain visible across the scarf band and tail.
Don't pull the scarf too tightly around the neck. It should follow the shape of the stuffed snowman without making a deep indentation.
If the scarf is hiding too much of the smile, move the neckband down approximately 1/8 inch before fastening it.
Step 6. Position the White Sleeve Cuffs
Take the two ivory sleeve cuff pieces H.
Position one on each side of the snowman's upper body, approximately level with the middle of the miniature quilt.
Each sleeve should extend slightly beyond the outer edge of the future quilt position. The red mittens will cover part of these ivory pieces.
Use small ivory stitches to fasten the sleeve cuffs to the front of the snowman's body. Keep their center areas available for attaching the mittens.
Check the symmetry before sewing the second cuff. The cuffs don't have to look perfectly identical, but they should sit at approximately the same height.
Step 7. Position the Miniature Quilt
Place the finished four-patch quilt against the snowman's upper body.
The upper edge should sit close to the bottom of the green scarf. Both brown buttons must remain completely visible beneath the quilt.
Turn the quilt very slightly so its right side sits higher than its left, approximately a 5-degree angle. Across this small quilt, that means the right upper corner will be roughly 1/4 inch higher than the left.
Don't tilt it so far that it looks as though the snowman is dropping it.
Secure the quilt with small hidden stitches through the ivory backing O and the front of the snowman's body. Work a few stitches near each corner and along the upper edge.
Keep the front of the quilt smooth. Avoid pulling the backing so tightly that the four squares bend or wrinkle.
Step 8. Embroider the Red Mittens
Take the two cranberry felt mitten pieces I.
Before attaching them, embroider a small cream star on the front of each mitten.
Use three or four straight stitches crossing through the center to create six to eight rays. Keep the stars small enough that they fit comfortably inside the mitten outlines.
Fasten the embroidery threads on the backs of the mittens.
Step 9. Attach the Mittens Over the Quilt
Place one red mitten over each ivory sleeve cuff H.
Arrange the mittens so their inner edges overlap the sides of the patchwork quilt, near the line between its upper and lower squares.
Stitch each mitten around its outside edge with cranberry embroidery floss, attaching it to the ivory sleeve beneath.
Use one or two small stitches along the inner edge to secure the mitten to the quilt backing.
The arrangement should look like the snowman is holding the quilt against his body, with the white sleeves behind his red mittens.
Check that both cream mitten stars are visible and that neither mitten covers too much of the patchwork design.
Assembly checkpoint: The snowman should now have his complete face, drooping hat, fringed scarf, two ivory sleeves, red star mittens, and miniature patchwork quilt. Both brown buttons should show below the quilt.
Add the Finishing Details and Hanging Loop
Before hanging your snowman, give everything one last check. Most of the work is finished, but a few small adjustments will help the ornament hang neatly and keep the accessories in place.
Check the Outside Stitching
Look around the snowman's body and make sure the red blanket stitches are evenly spaced. Check the curved head, narrow neck, and rounded bottom in particular.
If a stitch is loose, secure it with a small additional stitch in the same color. Don't pull the felt edges inward to make them perfectly tight.
Check the Hat and Pompom
Hold the ornament upright by its hanging loop.
The red hat should lean naturally toward the left, and the cream pompom should hang beside the face without pulling the hat down over the eyes.
If the hat stands too upright, gently redistribute or remove a little stuffing from the cap. If it moves around, add another hidden anchoring stitch at the back.
Arrange the Scarf Fringe
Separate the five or six scarf fringes with your fingers.
Arrange them so they point diagonally down and left. Check the scarf band and tail for loose stitching.
You can trim individual fringe ends if one is noticeably longer than the others, but don't make them so short that the scarf loses its fringed appearance.
Check the Quilt and Mittens
Look closely at the quilt. You should be able to see all four blocks:
- Ivory holly square at the upper left
- Red star square at the upper right
- Green embroidered sprig at the lower left
- Red-and-cream gingham square at the lower right
The cream border should be visible on all four sides. Both red mittens should overlap the quilt edges without covering the main decorations.
If one corner of the quilt sticks out too far, add a small hidden stitch through the backing to hold it closer to the snowman's body.
Test the Hanging Loop
Hold the finished ornament by its cream ribbon loop and allow it to hang freely.
Check that it hangs upright and doesn't lean too far forward. The ribbon should remain firmly anchored inside the top body seam.
If the quilt makes the ornament tip forward, check that the stuffing is evenly distributed and that the ribbon exits near the back of the top seam. You may need to reposition the hanger slightly toward the back.
Final Pattern Check
Before you're finished, compare your ornament with the completed example and check for these details:
- Ivory snowman with red blanket stitching
- Closed embroidered eyes, smile, carrot nose, and pink cheeks
- Drooping cranberry hat with cream brim and pompom
- Two green holly leaves and three red berries on the hat
- Sage-green scarf with cream stitching and a left-hanging fringed tail
- Two ivory sleeve cuffs
- Two cranberry mittens with cream embroidered stars
- Four-patch miniature quilt with an ivory border
- Two brown felt buttons with cream X stitches
- Secure cream hanging loop
If those details are in place and the ornament hangs neatly, you're finished.
The little patchwork quilt makes this snowman especially nice for someone who enjoys sewing or quilting. You could hang him on your Christmas tree, attach him to a wrapped gift, or make another one to give as a handmade Christmas decoration.
For more small hand-sewn Christmas projects, visit my free felt crafts and patterns collection.
Felt Snowman Ornament Pattern FAQs
Can I make this felt snowman ornament without a sewing machine?
Yes. The entire ornament is designed for hand sewing. You'll use blanket stitches around the body and smaller stitches for the appliqué pieces, face, and patchwork quilt. You don't need a sewing machine.
Do I need to know how to quilt?
No. The miniature quilt uses four small fabric and felt squares attached to one backing. There's no quilt batting, machine piecing, or traditional binding. The cream felt border gives the little panel its finished appearance.
Can I make all four quilt squares from felt?
Yes. You can replace the lower-right gingham square with a piece of felt if that's what you have available. It will change the look of that square, but the cutting size and construction remain the same. Use small decorative stitches to suggest a checked pattern if you want.
Should I add a seam allowance to the printable felt patterns?
No. The templates show the actual cutting outlines. The edges are joined with visible blanket stitching, so there's no extra seam allowance to add. Print the pattern at 100% and check the 1-inch test square before cutting.
Can I use regular craft felt instead of wool-blend felt?
Yes, although the finished appearance may be different. Choose craft felt that isn't too thick or stiff. Thicker felt can make the tiny quilt squares, hat brim, and mitten layers harder to stitch neatly.
Is this a needle-felted snowman pattern?
No. This pattern uses flat pieces of felt that are cut, embroidered, and sewn together. You won't need a felting needle or loose wool roving.
When you click on links to various merchants on this site and make a purchase, this may result in this site earning a commission. This does not affect the price you pay.

UBGI Gold Standard 2026
Reviewed under the site's
editorial checklist.
Photos, decorating ideas, party setups and reader submissions are shared for inspiration unless a page is specifically presented as a pattern, tutorial, reference guide or step-by-step project. Follow the instructions, measurements, safety guidance and manufacturer directions provided for the particular project or product.
About Jan | Contact | Baby Nursery Ideas (Blog) | Site Map | Privacy Policy | Disclosure Policy | Disclaimer | Affiliate Disclosure | Earnings Disclosure | Facebook | Pinterest
I am a participant in the Amazon Services LLC Associates Program, an affiliate advertising program designed to provide a means for us to earn fees by linking to Amazon. As an Amazon Associate I earn from qualifying purchases.
Copyright © 2006-2026. All Rights Reserved.