Free Felt Cardinal Ornament Pattern with Christmas Card Envelope
By Jan Bay
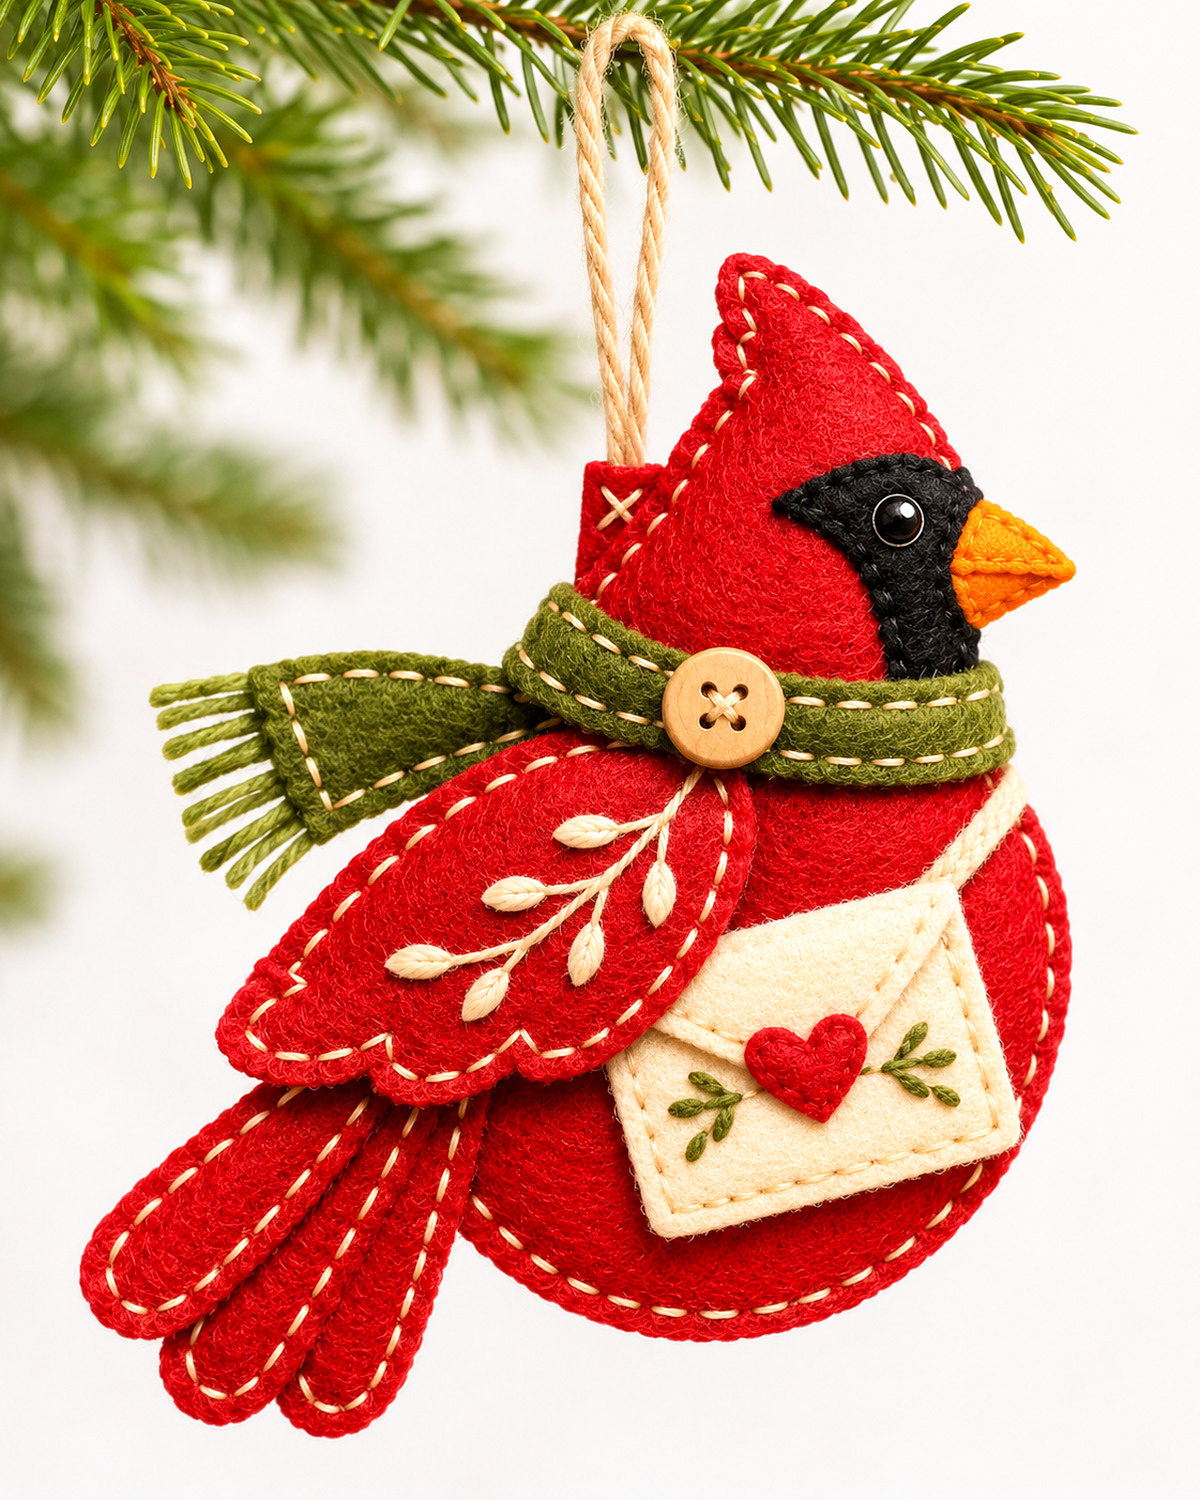
This free felt cardinal ornament pattern shows you how to make a cheerful red Christmas bird wearing a green scarf and carrying a tiny envelope sealed with a heart. The design uses layered felt, simple embroidery, and blanket stitching to create a handmade decoration with plenty of personality. I'll walk you through cutting the pieces, sewing the wings and tail, making the little envelope, and attaching the hanger so your finished cardinal is ready for the Christmas tree.
Explore More Handmade Christmas Crafts
Felt Mouse with Christmas Storybook Ornament
Free Felt Christmas Tree Ornament Patterns
Felt Crafts and Ornament Patterns
See Supplies for This Project Here.
Supplies for the Free Felt Cardinal Ornament Pattern
You won't need a large pile of supplies for this cardinal. The body and feathers use red felt, and the smaller details can come from scraps. I'd choose felt that holds its shape when you pick it up. Very thin felt may make the wings and tail droop.
- One 9 x 12-inch sheet of red felt, approximately 1 to 1.5 mm thick, for the body, two wing layers, three tail feathers, heart and hanger tab
- Small scraps of black felt for the face mask and orange felt for the beak
- Olive-green felt for the scarf band and its flying tail
- Ivory felt for the Christmas envelope and triangular flap
- Six-strand embroidery floss in cream, red or burgundy, olive green, black and warm gold or orange
- An embroidery needle, small sharp scissors, straight pins or sewing clips, and a disappearing fabric marker
- A small amount of polyester fiberfill for the body and tail feathers
- One wooden button, approximately 10 to 12 mm across
- One approximately 4 mm black sew-on bead for the eye, or black floss if you'd rather embroider it
- A 2.4-inch length of narrow cream cotton cord for the envelope strap
- A 6-inch length of natural twine for the hanger
- Printer paper for the full-size pattern templates
Use three strands from your six-strand floss for the visible cream stitching. Place most stitches about 1/8 inch from the cut edge and about 1/8 to 3/16 inch apart. The edges stay on the outside, so you won't be turning the bird inside out.
If blanket stitch is new to you, the Royal School of Needlework's blanket stitch guide shows how the loops are formed. A little practice on two scraps of felt is worth doing before you start the ornament.
Finished Size and Skill Level
The finished cardinal is expected to measure approximately 4.1 inches from the tail tip to the beak and 4.9 inches from the crest to the lowest feather, not counting the hanging loop. The main body template is approximately 4.3 inches tall. These measurements are calculated from the printable pattern, not taken from a sewn sample. The finished size may vary slightly with stuffing and the way you arrange the feathers.
I'd call this a confident-beginner to intermediate hand-sewing project. You'll use blanket stitch, running stitch, a few small embroidered leaves and simple appliqué. The envelope looks fancy, but it's made from just two little rectangles, a triangle and a heart.
The ornament is designed to look finished from the front, just like the example image. The back is plain red felt with a neatly stitched outline. It's a Christmas decoration, not a toy for a baby or young child.
Download the Free Felt Cardinal Ornament Pattern and Templates
The ten-page printable includes full-size cutting templates, a cutting inventory, front and back assembly diagrams, and complete sewing directions. Print it on US Letter paper at Actual Size or 100%. Don't choose Fit to Page.
free felt cardinal ornament printable pattern and templates
download the complete ten-page pdf pattern
Includes full-size felt shapes, a cutting list, an assembly map and the sewing guide.
Measure the one-inch square at the bottom of a printed sheet before cutting the felt. It needs to be exactly one inch on both sides. A printer that shrinks the page will also shrink every part of the cardinal.
This pattern was drafted to match the finished design shown above. The pieces and construction have been planned together, but the pattern has not been physically test-sewn. Check the fit with paper pieces before cutting your good felt, especially around the beak, scarf and envelope.
Felt Cutting Guide
Cut along each solid outline in the PDF. The cutting shapes already include the outside edge of the ornament, so don't add a seam allowance. Use the letter on the printable to find each piece.
- A: Main body. Cut two red pieces. Flip the paper template over for the second piece so the shapes line up with their outward-facing sides showing.
- B: Black face mask. Cut one.
- C: Orange beak. Cut two.
- D: Embroidered outer wing. Cut one red piece with the scalloped lower edge.
- E: Underwing. Cut one red piece.
- F, G and H: Tail feathers. Cut two of each red shape, six pieces total.
- I: Scarf neck band. Cut one olive-green piece.
- J: Scarf flying tail. Cut one olive-green piece.
- K: Envelope. Cut two ivory rectangles.
- L: Envelope flap. Cut one ivory triangle.
- M: Heart seal. Cut one small red heart.
- N: Hanger tab. Cut one small red rectangle.
That gives you 20 cut felt pieces in all. Keep the small black, orange and ivory pieces in a little dish so they don't get mixed in with the red scraps.
Before sewing, put the red body front on the table with the crest pointing up and the bird looking to the right. Arrange the black face, layered wing, envelope and scarf on top without stitching. This quick paper-and-felt layout lets you catch a misplaced piece before any thread goes through it.
Embroider the Cardinal's Wings and Tail Details
The cream stitches are an important part of this design. I'd keep them neat and fairly simple. The red felt should still do most of the work.
Embroider the front wing
Lay the scalloped wing D with its pointed end to the right and its rounded end to the left. Transfer the broken branch line from the printable onto the front of this piece.
Thread your needle with three strands of cream floss. Use small backstitches or stem stitches to make the branch, starting near the broad left end and working toward the pointed right end.
Stitch five little leaves at the marks on the template. Each leaf can be made from two or three short satin stitches meeting at a point. Keep them small enough that the branch is still visible.
Work a line of cream running stitches around the wing, approximately 1/8 inch inside the edge. Follow each scallop without pulling the felt into puckers.
Tie off on the back of the single wing piece and trim the floss. Set it aside with underwing E.
Prepare the three tail feathers
Choose one piece from each F, G and H pair for the visible front. Stitch a cream line down the middle of each one, beginning about 1/4 inch from the rounded tip and stopping before the narrow root end.
Place each embroidered feather against its matching plain back piece. Keep their outer edges even.
Blanket stitch around each pair with three strands of cream floss, taking the stitches about 1/8 inch from the edge. Leave a small opening at the narrow root end until you've added a tiny wisp of fiberfill.
Close the remaining opening. Don't pack stuffing into the last 1/2 inch of the root. Those flat ends need to fit between the body pieces later.
Set the longest feather on top, the middle length beneath it and the shortest at the bottom when you're ready to arrange the tail. Their rounded ends will fan down toward the left.
Make the Little Christmas Envelope
This is the detail that makes our cardinal different from a plain red bird ornament. The envelope is a flat sewn decoration, not a pocket that needs to open. Keeping it flat also stops it from pulling the lower part of the body out of shape.
Put one ivory envelope piece K right side up for the front. Save the second piece for its backing. Each should measure approximately 1.71 inches wide by 1.24 inches tall when printed and cut at full size. Use the printed outline rather than cutting a separate rectangle by measurement.
With two strands of olive floss, stitch a tiny branch on each side of the middle of the rectangle. Add three or four short leaf stitches to each branch. Leave the center clear for the red heart.
Place triangular flap L over the upper part of the rectangle, with its straight side along the top edge and its point facing down. Sew the straight edge and upper corners with tiny ivory stitches. Let the triangle lie flat against the rectangle.
Position red heart M at the pointed end of the flap. Sew around it with two strands of red or burgundy floss. Catch the flap underneath as you stitch so it stays shut.
Cut the cream cord to 2.4 inches. Put one end at each upper corner of the envelope, leaving a loose arch above it. Tack both ends to the wrong side of the envelope front with several firm stitches.
Place the second ivory rectangle behind the decorated front, keeping the cord ends between the layers. Blanket stitch around the outside with two strands of cream floss, catching both cord ends securely. Don't add filling.
You should now have one small envelope with a pointed flap, red heart, green embroidered sprigs and a cream cord strap. Keep the strap loose for the moment. We'll secure its upper part to the bird after the envelope is in position.
Make the Green Felt Scarf
The scarf has two pieces, not one long strip wrapped around a stuffed bird. That keeps the neckline tidy and lets the left end look as though it's blowing behind the cardinal.
Cut olive scarf band I and flying tail J from the printable. The curved neckband measures approximately 2.50 inches along its overall length, and the tapered flying tail is approximately 2.2 inches long. Follow the printed outlines rather than cutting straight strips. The neckband curves across the chest and overlaps the narrower end of the fringed tail.
With three strands of cream floss, run a line of small stitches about 1/8 inch inside each long edge of both pieces. Keep the ends of your floss on the underside.
Cut six or seven 1-inch lengths of olive floss. Loop or stitch them through the left short end of scarf tail J, then trim the loose fringe to about 3/8 inch. Give every strand a gentle tug to check that it is secure.
Lay the fringed end pointing left, away from the bird's face. The right end of J will sit beneath scarf band I on the bird's left shoulder.
Set aside the 10 to 12 mm wooden button. We'll sew it through the band and body front once we know exactly where the scarf meets at the neck.
Don't pull the scarf tight enough to make a dent in the head. It should sit around the neckline and leave the black face and orange beak easy to see.
Sew and Assemble the Felt Cardinal
Keep the back body piece aside for now. Most of the small decorations are much easier to sew while the front is still flat.
Step 1: Add the black face and orange beak
Position black mask B over the upper-right portion of the front body A, with the mask's lower tip reaching toward the scarf line. Stitch around its edges with two strands of black floss. The red crest must remain completely visible above it.
Sew the black bead near the front of the mask with four or five passes of doubled black thread. Knot on the wrong side of the body front. If you're skipping the bead, make a small black satin-stitched eye and add a single tiny cream highlight stitch instead.
Put the two orange beak pieces C together and whipstitch their upper and lower sides, leaving the straight root end open. A tiny amount of filling is enough if you want the beak to sit slightly forward. Slip about 1/4 inch of that open root over the body's right-facing edge, where the black mask ends, and tack it to the wrong side of the front. The pointed tip faces right. The body seam will catch the root again later.
Step 2: Arrange both wing layers
Lay underwing E on the upper-left part of the body. Angle its broad end back toward the tail and its narrower end toward the neck. Secure it with small red stitches along the upper edge.
Place embroidered wing D over E, leaving a narrow strip of the underwing visible near the top and rear. Keep the wing's pointed end by the shoulder and the scalloped edge facing down. Tack D at the shoulder and along its upper edge. Leave the lower scallops loose for now. They need to overlap the top-left corner of the envelope.
Step 3: Put the envelope in place
Set the envelope on the lower-right part of the body front, just beneath the wing. Angle it slightly so the right side sits higher than the left, as shown on the printable placement map. Keep every envelope edge at least 1/8 inch inside the red body outline. The red heart should face outward, and the envelope's upper-left corner should slip beneath the loose scallops of the wing.
Use small ivory stitches at the envelope's four corners and along the lower edge to secure it to the red body. Sew through the envelope backing, not through its triangular flap. Finish the loose wing scallop stitches over the envelope's upper-left corner, keeping the cream branch visible.
Guide the cream cord from the envelope's upper-right corner diagonally up and to the right, toward the green scarf near the bird's chest. Tuck its upper section beneath the scarf band and secure it with a few small stitches. Hide the other side of the cord beneath the wing. Only one diagonal strap should be clearly visible between the envelope and scarf, matching the placement diagram on page 5 of the printable pattern.
Step 4: Position and fasten the scarf
Lay the scarf tail J across the upper-left shoulder, with the fringe pointing left. Sew its right end to the body where it will be covered by the scarf band.
Place band I across the neck, just below the black face and above most of the wing. Follow the curve of the body without stretching the green felt. Tuck the ends slightly around the sides or beneath neighboring pieces and sew with small olive stitches.
Add the wooden button where the band meets the scarf tail near the left front of the neck. Sew through the scarf pieces and the red body front several times, then knot on the wrong side. The button is decorative, but its stitching should also help hold the scarf in place.
Step 5: Set the three feathers into the lower body
Put the plain red back body A on the table with its inside facing up. Arrange tail feathers F, G and H so their unstuffed root ends overlap the lower-left edge of the body by about 3/8 inch. The finished rounded ends fan down and left. Place the longest feather uppermost, then the middle one, then the shortest below.
Spread the outer ends slightly apart so all three feathers can be seen. Sew each root to the inside of the back with at least four firm stitches. Don't rely on the final blanket stitching alone to hold them. The tail pieces are now attached to the back, ready to be enclosed between the body layers.
Attach the Hanging Loop So It Doesn't Float Above the Bird
The twine must come from the bird itself, not from the bow or scarf. I'd use the small red tab in the printable to hide the connection behind the upper back of the crest.
Fold the 6-inch length of natural twine in half to make a loop. Bring both cut ends together and secure them with a tight knot or several strong stitches.
Fold red tab N in half crosswise to make a doubled piece approximately 0.37 inch wide and 0.54 inch tall. Enclose the joined ends of the twine between the red felt layers, with the loop coming out of the top.
Stitch an X through both layers of the tab and around the twine ends, then sew a short line across the tab just below them. The knot or wrapped ends must not slide free.
Place the lower 1/4 inch of the folded tab inside the upper back-of-neck edge, approximately 0.9 to 1.5 inches below the crest tip, as shown on the printable's back-view assembly diagram. Sew it to the inside of the back piece with four or five firm stitches. The final body seam will catch the tab again.
Check the loop with a gentle pull. It should remain attached without moving the felt tab out of position. The final body seam will catch the lower part of the tab once more.
Keep the loop directly above the upper body so the ornament hangs upright. If the paper layout tips too far forward or backward when suspended, move the tab slightly along the top seam before closing the body.
Close, Stuff and Finish the Ornament
Lay the decorated body front over the prepared back, with the good sides facing outward. Align the crest, chest, belly and back edges. Keep the tail feather roots and hanger tab tucked between the body pieces, with the feathers and twine extending outward.
Clip or pin the edges. With three strands of cream floss, start blanket stitching around the outside, roughly 1/8 inch from the cut edge. Space the stitches about 1/8 to 3/16 inch apart. Take extra stitches through the orange beak root, all three tail roots and the red hanger tab where the seam passes them.
Leave an opening about 1 1/4 inches long along the lower-right curve of the belly, away from the tail roots. Don't cut or remove the working thread yet.
Add small amounts of fiberfill through the opening. Use the blunt end of a pencil or a wooden turning tool to guide a little filling into the crest. Fill the chest and belly lightly, keeping the red felt gently rounded rather than stretched tight.
Close the opening with the same cream blanket stitching. Make a small anchoring stitch, pass the needle between the felt layers and bring it out a little farther away. Trim the floss close so the end disappears inside.
Straighten the scarf fringe, spread the tail feathers, and smooth the envelope flap and strap. Check that the wing scallops still rest partly over the envelope and that the embroidered vine remains easy to see.
Your cardinal should now have a defined crest, a rounded red body, two visible wing layers, three separate tail feathers and the little Christmas letter resting on its chest. The scarf and twine loop should both be firmly attached.
Helpful Tips Before You Hang Your Cardinal
If the tail looks too bulky: Remove a little filling from each feather or flatten the unstuffed root ends before sewing the body closed. The tail should fan out, not form a single thick bundle.
If the beak droops: Add two small stitches where the orange root meets the black mask and the red body. Keep those stitches tucked close to the seam so they don't show from the front.
If the wing wants to lift: Add one small matching stitch near the top of the scalloped edge. Don't sew down the entire wing so tightly that the two red layers disappear.
If the envelope strap is loose: Shorten the visible arch by taking a small hidden stitch under the green neck band. Keep a short diagonal section showing above the envelope, as in the example image.
If the printed pieces don't line up: Recheck the one-inch square before cutting anything else. All template sheets must be printed at exactly the same scale.
I'd keep the back plain rather than adding a second envelope or another embroidered wing. The front has plenty of detail already. If you're looking for more little projects to sew, the felt crafts collection is the place to browse next.
Because the ornament includes a small button, an eye bead and a hanging cord, keep it out of reach of babies, young children and pets. It's made for hanging on a tree or displaying, not for handling as a toy. Dust it gently rather than putting it through a washing machine.
Felt Cardinal Ornament Pattern FAQ
Does the little envelope actually open?
No. It's a flat felt decoration, with the triangular flap held down by the stitched red heart. Making it into a real pocket would add thickness and change the look of the finished bird.
Can I make the ornament without a bead for the eye?
Yes. Use dense black satin stitches for the eye, then add one tiny cream stitch as a highlight. That avoids a small separate bead while keeping the face expressive.
Will ordinary acrylic craft felt work?
It can, provided the felt is firm enough to hold the scalloped wing, tail feathers and beak. I'd avoid very thin felt that stretches out of shape when you pull the embroidery thread. A wool-blend felt around 1 to 1.5 mm thick is another option.
Can I make this ornament larger?
You can enlarge all the template sheets by the same percentage. If you print at 125%, for example, the body and every cut felt piece will become 25% larger. You'll also need a little more filling, a longer hanging loop and a longer envelope strap. Print every sheet at the same scale so the pieces still fit.
When you click on links to various merchants on this site and make a purchase, this may result in this site earning a commission. This does not affect the price you pay.

UBGI Gold Standard 2026
Reviewed under the site's
editorial checklist.
Photos, decorating ideas, party setups and reader submissions are shared for inspiration unless a page is specifically presented as a pattern, tutorial, reference guide or step-by-step project. Follow the instructions, measurements, safety guidance and manufacturer directions provided for the particular project or product.
About Jan | Contact | Baby Nursery Ideas (Blog) | Site Map | Privacy Policy | Disclosure Policy | Disclaimer | Affiliate Disclosure | Earnings Disclosure | Facebook | Pinterest
I am a participant in the Amazon Services LLC Associates Program, an affiliate advertising program designed to provide a means for us to earn fees by linking to Amazon. As an Amazon Associate I earn from qualifying purchases.
Copyright © 2006-2026. All Rights Reserved.