Easy Christmas Quilt Pattern with Chunky HO HO HO Letters and Christmas Trees
By Jan Bay
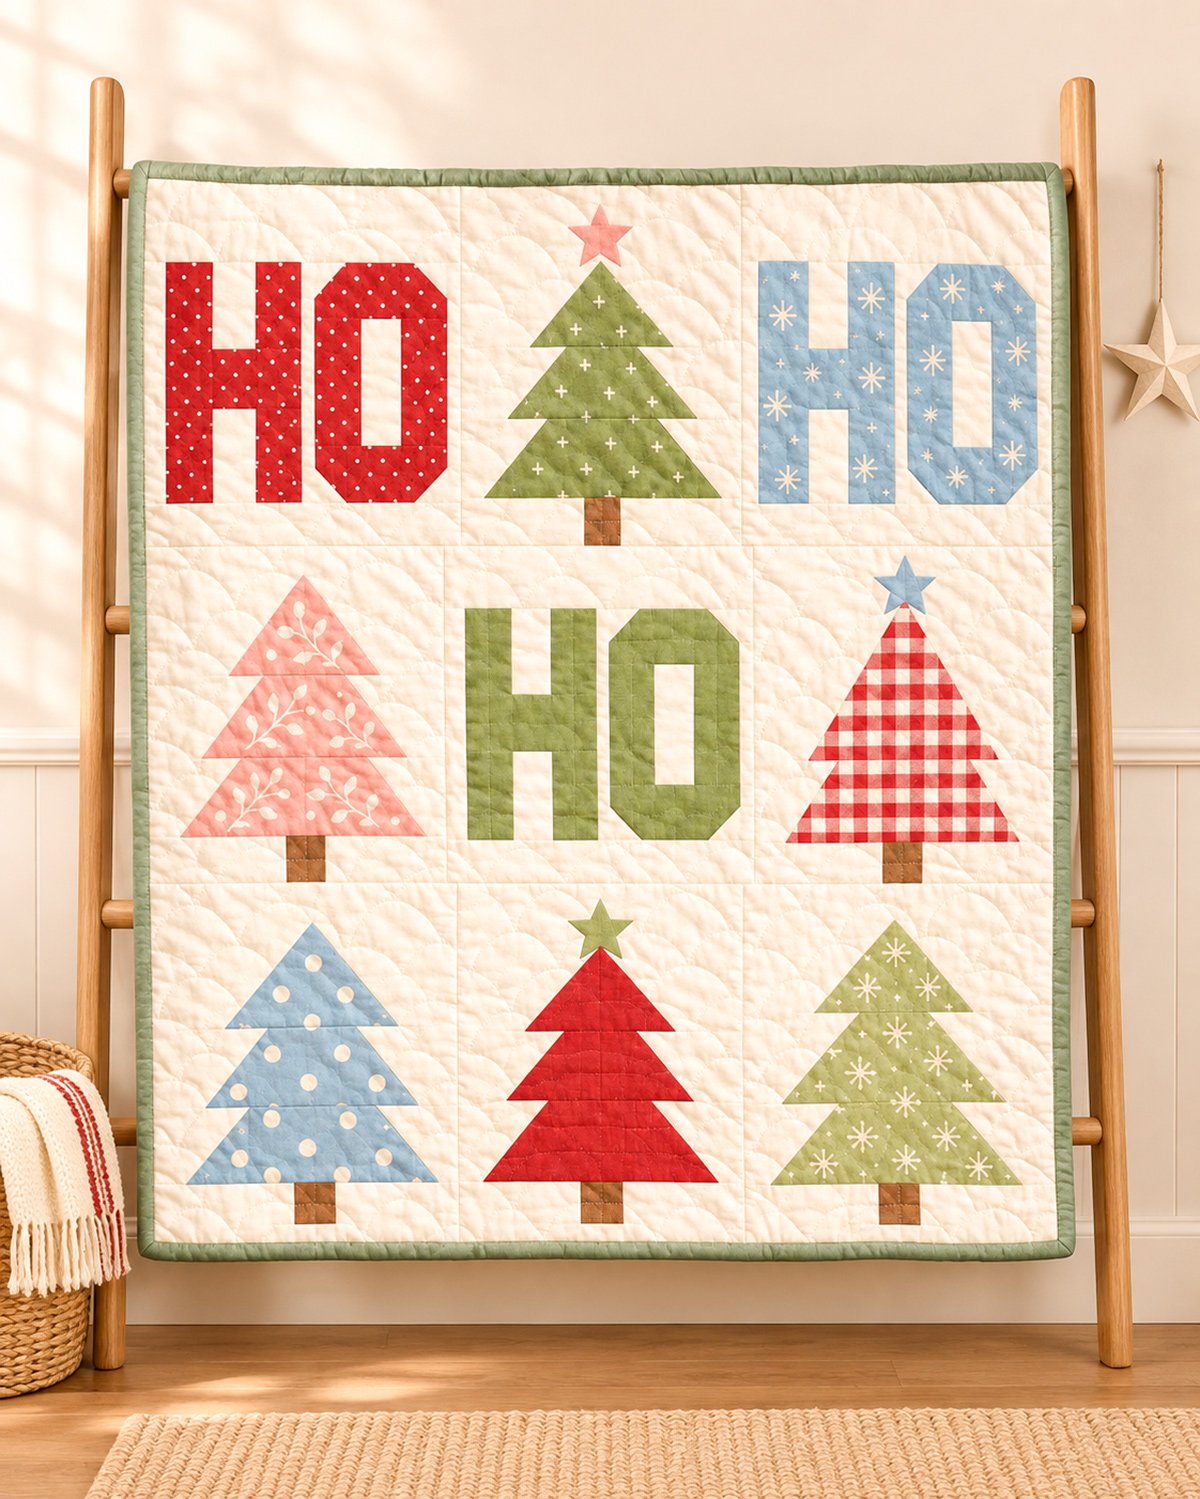
This easy Christmas quilt pattern features three oversized HO HO HO letter blocks and six colorful Christmas trees. The chunky shapes and simple nine-block layout give the quilt its cheerful holiday look without lots of tiny pieces. Soft red, sage green, blush pink, and powder blue fabrics stand out against a warm ivory background. It's a playful Christmas patchwork design with plenty of personality and a straightforward construction plan great for beginners.
Explore More Free Christmas Quilt Patterns
Christmas Tree Irish Chain Quilt Pattern
See Supplies for This Project Here.
Jump to the Free Easy Christmas Quilt Pattern
Finished Size and Supplies for This Easy Christmas Quilt Pattern
We're making a quilt with nine big blocks, arranged in three rows of three. Three blocks spell out HO in chunky patchwork letters. The other six have Christmas trees made from simple triangle shapes.
The finished quilt measures approximately 48 inches square. That's a nice size for a Christmas wall quilt, a throw for a favorite chair, or a handmade holiday decoration. There aren't any complicated borders to sew. The sage green binding finishes the outside edge, just like the example image.
Finished Quilt Measurements
- Calculated finished quilt size: 48 × 48 inches, before any changes from quilting, binding, or washing.
- Unfinished quilt top: 48 1/2 × 48 1/2 inches, measured across the raw edges.
- Each finished block: 16 × 16 inches.
- Each unfinished block: 16 1/2 × 16 1/2 inches.
- Letter blocks: Three, each containing one H and one O.
- Christmas tree blocks: Six.
- Piecing seam allowance: 1/4 inch throughout.
- Construction: Straight-seam machine piecing, diagonal corner flips, and three small appliqué stars.
- Skill level: Beginner, with basic rotary cutting and accurate quarter-inch seams.
Each H and O finishes 7 inches wide and 11 1/4 inches tall. They're deliberately wide and chunky, with just 1/2 inch of ivory between the letters. The background extends 3 inches above the letters and 1 3/4 inches below them, giving each HO block the same bold look as the finished quilt.
The trees are nearly as simple. Each one has three broad, pointed tiers and one little brown trunk. Three trees also have a star at the top. The dots, snowflakes, gingham checks, and little flowers come from printed quilting cotton rather than individually sewn decorations.
Fabric Requirements
I'd choose the fabrics before cutting anything. The quilt looks especially cheerful because the colors repeat without every block looking exactly alike. You don't have to buy a coordinated fabric collection, either.
- Warm ivory background: 3 yards of quilting cotton, assuming at least 40 inches of usable fabric width.
- Red polka-dot print: 1 fat quarter for the upper-left HO block.
- Powder blue snowflake print: 1 fat quarter for the upper-right HO block.
- Solid or nearly solid sage green: 1 fat quarter for the center HO block.
- Sage green with tiny white crosses: 1 fat quarter for the upper-center Christmas tree.
- Blush pink botanical print: 1 fat quarter for the middle-left tree.
- Red-and-cream gingham: 1 fat quarter for the middle-right tree.
- Powder blue polka dots: 1 fat quarter for the lower-left tree.
- Christmas red: 1 fat quarter for the lower-center tree.
- Light sage with white snowflakes: 1 fat quarter for the lower-right tree.
- Brown fabric: One scrap at least 3 × 16 inches for the six tree trunks.
- Blush pink, powder blue, and sage green scraps: One 4 × 4-inch piece of each for the three appliqué stars.
- Sage green binding: 1/2 yard for six 2 1/2-inch-wide binding strips.
- Backing: Approximately 3 1/4 yards of standard-width quilting cotton for a pieced backing, or 1 5/8 yards of 108-inch-wide backing fabric.
- Quilt batting: One piece at least 56 × 56 inches, or larger if required by your quilting setup.
- Lightweight fusible web: One 4 × 12-inch strip or three 4 × 4-inch pieces for the stars.
Those fabric amounts are calculated allowances for the pieces listed in this pattern, not measurements taken from a physically sewn quilt. The fat-quarter quantities assume approximately 18 × 21 inches of usable fabric. Large directional prints or carefully matched gingham checks may take extra yardage.
I'd keep the ivory background fairly quiet. A tiny cream-on-cream print would be pretty, but a large floral print could compete with the lettering.
Other Supplies
- Sewing machine and suitable machine needles
- Neutral piecing thread and coordinating appliqué thread
- Rotary cutter, cutting mat, and quilting ruler
- Fabric scissors
- Iron and pressing surface
- Fabric marking pencil or removable fabric marker
- Quilting pins or clips
- Basting supplies
- Quilting foot suitable for your chosen quilting method
- US Letter paper and a printer for the free templates
All the patchwork is cut from rectangles. The only little shaped pieces you'll cut from a paper template are the three stars. That's really enough decoration for this quilt.
Before cutting the full batch, check the quarter-inch seam setting on your machine. The block measurements below depend on that seam allowance. If the seams are too wide, the letters and trees will gradually become smaller than planned.
Easy Christmas Quilt Cutting Chart
Let's get the pieces organized. I'd cut the three HO blocks first, then move on to the Christmas trees. Keep each block's fabric in its own little pile so the red polka dots don't end up mixed with the red gingham.
Every measurement in these charts includes the 1/4-inch seam allowance. Read each measurement as width × height with the quilt upright.
Cutting Chart for Each Chunky HO Block
Cut one complete set from red polka dots, one from powder blue snowflakes, and one from sage green. All three blocks have ivory backgrounds.
| Piece | Quantity | Raw Cutting Size |
|---|---|---|
| Colored H uprights | 2 | 2 3/4 × 11 3/4 in. |
| Colored H crossbar | 1 | 3 × 3 1/4 in. |
| Ivory upper H opening | 1 | 3 × 4 1/2 in. |
| Ivory lower H opening | 1 | 3 × 5 in. |
| Colored O sides | 2 | 3 × 6 3/4 in. |
| Colored O top and bottom caps | 2 | 7 1/2 × 3 in. |
| Ivory O opening | 1 | 2 1/2 × 6 3/4 in. |
| Ivory O corner squares | 4 | 2 × 2 in. |
| Ivory gap between letters | 1 | 1 × 11 3/4 in. |
| Ivory outside side margins | 2 | 1 1/4 × 11 3/4 in. |
| Ivory upper margin | 1 | 16 1/2 × 3 1/2 in. |
| Ivory lower margin | 1 | 16 1/2 × 2 1/4 in. |
You'll make three identical letter blocks. Only the fabric colors change. Each complete HO block must measure 16 1/2 inches square before joining.
Cutting Chart for the Six Christmas Tree Blocks
The trees share the same simple piecing method, but their heights vary a little. The pink tree also has a narrower top, and the red gingham tree has one continuous triangular outline instead of three separate branch ledges.
In the chart below, the numbers are the raw heights of the pieces, in inches. Cut one ivory header, three colored tree tiers, one brown trunk, and the corresponding ivory pieces for each block.
| Tree Fabric | Header | Upper | Middle | Lower | Foot |
|---|---|---|---|---|---|
| B: Sage crosses | 4 | 4 1/4 | 3 3/4 | 4 | None |
| D: Blush botanical | 2 | 5 1/4 | 4 1/2 | 4 1/4 | None |
| F: Red gingham | 3 1/2 | 4 3/4 | 3 3/4 | 4 | None |
| G: Blue polka dots | 2 1/4 | 5 1/4 | 4 | 4 | 1 |
| H: Solid red | 3 1/4 | 4 1/4 | 3 3/4 | 4 | 1 1/4 |
| J: Light sage snowflakes | 2 | 4 3/4 | 4 1/2 | 4 1/4 | 1 |
Every header and foot strip is 16 1/2 inches wide. A foot strip is only needed for the three trees in the bottom row.
Tree Tier Widths
These are the raw widths of the colored rectangles and the matching ivory side strips. Use the heights in the chart above for each piece.
| Tree Blocks | Colored Tier Widths: Upper / Middle / Lower | Ivory Side Strip Widths: Upper / Middle / Lower |
|---|---|---|
| B, G, H, J | 8 1/2 / 11 / 13 1/2 in. | 4 1/2 / 3 1/4 / 2 in. |
| D: Blush | 6 1/2 / 11 / 13 1/2 in. | 5 1/2 / 3 1/4 / 2 in. |
| F: Gingham | 5 1/2 / 9 1/2 / 13 1/2 in. | 6 / 4 / 2 in. |
Cut two ivory side strips for each tier. For example, the blush tree's upper colored rectangle is 6 1/2 × 5 1/4 inches, and its two upper side strips are each 5 1/2 × 5 1/4 inches.
Common Pieces for Every Christmas Tree
- Ivory flip patches: Six rectangles, each 8 × 5 inches. Two for every tier.
- Brown trunk: One 2 1/2 × 2 1/2-inch square.
- Ivory trunk sides: Two 7 1/2 × 2 1/2-inch rectangles.
- Ivory header: One 16 1/2-inch-wide strip, using the height assigned to that tree.
- Ivory foot: One 16 1/2-inch-wide strip only where a foot height appears in the chart.
There are 36 ivory flip patches altogether, six brown trunks, and twelve ivory trunk-side pieces.
Star and Finishing Cuts
- One blush star, approximately 3 1/4 inches wide.
- One powder blue star, the same size.
- One sage green star, the same size.
- Six sage binding strips, each 2 1/2 inches wide across the usable fabric width.
- Backing and batting at least 56 × 56 inches.
The star template is a raw-edge appliqué outline. Don't add a seam allowance. The H and O paper outlines are finished-shape references; their individual fabric pieces come from the cutting chart.
The red gingham cutting sizes are different for a reason. Its three sections meet along one continuous triangular outline, just like the approved quilt. Keep its pieces separate from the other trees.
Make the Three Chunky HO Letter Blocks
Let's make the letters first. The H has two straight uprights and a bar across the middle. The O has a tall rectangular opening and four clipped outside corners. You'll get those angled corners with ordinary straight seams, so there's no curved piecing involved.
Make the red polka-dot HO first, then repeat the same construction in powder blue and sage green. Each letter finishes 7 inches wide and 11 1/4 inches tall.
Step 1. Piece the Letter H
- Place the ivory 3 × 4 1/2-inch upper opening above the colored 3 × 3 1/4-inch crossbar.
- Place the ivory 3 × 5-inch lower opening below the crossbar.
- Sew the three pieces together along their 3-inch edges, right sides facing, using 1/4-inch seams.
- Press the seams toward the colored crossbar.
- Measure the completed center strip. It must be 3 × 11 3/4 inches.
- Place one colored 2 3/4 × 11 3/4-inch upright along each long side of the center strip.
- Sew the uprights in place, right sides together, and press the seams toward the colored fabric.
Checkpoint: The unfinished H measures 7 1/2 × 11 3/4 inches.
The finished H has two 2 1/4-inch-wide uprights, a 2 1/2-inch-wide opening, and a crossbar 2 3/4 inches high. The ivory opening above the crossbar is 4 inches tall, and the opening below is 4 1/2 inches tall.
Step 2. Make the Clipped Corners of the O
The O has a slightly angled shape at each outside corner. The four ivory squares give it those angles without making the sewing complicated.
- Take the two colored 7 1/2 × 3-inch caps and four ivory 2-inch squares.
- Draw a diagonal from corner to corner on the wrong side of each ivory square.
- Lay the upper colored cap horizontally, right side up.
- Place one ivory square right sides together over its upper-left corner, aligning the raw edges. The diagonal runs from the square's lower-left corner to its upper-right corner.
- Sew directly on the marked diagonal.
- Fold the ivory outward and check that it covers the clipped corner completely.
- Open the fold again. Trim the excess corner fabric 1/4 inch beyond the stitching on the discarded side, then fold and press the ivory into place.
- Repeat at the upper-right corner, with the diagonal running from the square's upper-left corner to its lower-right corner.
- Repeat on the lower cap, placing the ivory squares at its two lower outside corners and mirroring the upper-cap diagonals.
Only the four outside corners are clipped. The corners next to the O's center opening stay square.
Checkpoint: Both finished cap units still measure 7 1/2 × 3 inches across their raw edges.
Step 3. Finish the Letter O
- Place the ivory 2 1/2 × 6 3/4-inch opening between the two colored 3 × 6 3/4-inch side pieces.
- Sew the long edges together using 1/4-inch seams.
- Press toward the colored sides.
- Measure the completed center unit. It must be 7 1/2 × 6 3/4 inches.
- Place the clipped upper cap above the center unit, with its angled corners facing outward at the top.
- Place the clipped lower cap beneath it, with its angled corners facing outward at the bottom.
- Sew both caps to the center using 1/4-inch seams.
- Press toward the colored caps.
Checkpoint: The unfinished O measures 7 1/2 × 11 3/4 inches, matching the H.
The finished opening inside the O is 2 inches wide and 6 1/4 inches tall. The outside corners have the same chunky angled look as the example quilt.
Step 4. Join H and O into One Block
- Arrange the H on the left and O on the right, with both letters upright.
- Place the ivory 1 × 11 3/4-inch strip between the letters.
- Sew H to one long edge of the strip and O to the other.
- Press and measure the joined panel. It must be 15 × 11 3/4 inches.
- Sew one ivory 1 1/4 × 11 3/4-inch strip to each outside edge.
- Press the seams. The framed letter band now measures 16 1/2 × 11 3/4 inches.
- Sew the ivory 16 1/2 × 3 1/2-inch strip across the top.
- Sew the ivory 16 1/2 × 2 1/4-inch strip across the bottom.
- Press carefully and measure the complete block.
Final checkpoint: The unfinished HO block measures exactly 16 1/2 × 16 1/2 inches.
There's 1/2 inch of finished ivory space between the letters, 3/4 inch at each outside edge, 3 inches above the letters, and 1 3/4 inches below them.
Step 5. Make the Other Two Letter Blocks
Repeat these steps with the remaining letter fabrics.
- Block A: Red polka-dot HO.
- Block C: Powder blue snowflake HO.
- Block E: Sage green HO.
Check that all three completed blocks measure 16 1/2 inches square. The polka dots and snowflakes are part of the printed fabric, not extra appliqué pieces.
That's all the lettering finished. The trees come next.
Make the Six Easy Christmas Tree Quilt Blocks
Now for the Christmas trees. Each one has three fabric tiers and a brown trunk. Most have little branch ledges where one tier meets the next. The pink tree has a smaller top, and the red gingham tree has one continuous triangle shape instead.
We'll make the sloping sides with oversized ivory corner-flip patches. That means the original colored fabric stays rectangular while you're marking and sewing it. You'll trim the excess only after the ivory has been stitched and checked.
Keep the cutting chart beside you. The six blocks use the same construction method, but their measurements aren't all identical.
Step 1. Mark the Tree Tier Shapes
Lay one colored tier rectangle right side up. Lightly mark a line 1/4 inch inside all four raw edges. That's your seam frame.
The lower corners of this frame mark the lower endpoints of the sloping sides. The upper marks are measured from the left side of the finished area, just inside that frame.
Use the following measurements to mark the top of each tier:
| Tree and Tier | Upper Marks From Finished Left Edge | Finished Base Width |
|---|---|---|
| Upper: B, G, H, J | 4 and 4 in. (one tip) | 8 in. |
| Upper: D, blush | 3 and 3 in. (one tip) | 6 in. |
| Upper: F, gingham | 2 1/2 and 2 1/2 in. (one tip) | 5 in. |
| Middle: B, D, G, H, J | 2 1/2 and 8 in. | 10 1/2 in. |
| Middle: F, gingham | 2 and 7 in. | 9 in. |
| Lower: B, D, G, H, J | 3 and 10 in. | 13 in. |
| Lower: F, gingham | 2 and 11 in. | 13 in. |
On each side, connect the upper mark to its corresponding lower corner of the seam frame. Extend the line to the raw edges of the rectangle.
The upper tier has one pointed top. The middle and lower tiers have flat tops. Those different outlines create the tree's branches.
Step 2. Sew the Ivory Corner-Flip Patches
Each colored tier takes two ivory 8 × 5-inch patches. These are intentionally oversized so the corners can be folded out and trimmed back to the original rectangle.
- Place the colored tier right side up, with the two diagonal lines marked.
- Take one ivory 8 × 5-inch rectangle and place it right sides together over the colored fabric.
- Arrange its long edge parallel to the first marked diagonal, about 1/4 inch beyond the line toward the outside corner. The body of the ivory patch lies across the colored center before folding.
- Pin along the marked seam line. Fold the ivory outward temporarily and check that it will cover the entire outside corner.
- If any part of the corner remains uncovered, reposition the patch and check again before sewing.
- Unfold the patch and sew directly on the marked diagonal, from raw edge to raw edge. If the patch hides the line, transfer the mark to the wrong side of the colored fabric and sew from that side.
- Trim the original colored corner and the corresponding excess layers on the discarded side, leaving a 1/4-inch seam allowance.
- Flip the ivory outward and press. Trim only the excess ivory beyond the original rectangular raw edges.
- Repeat for the opposite corner, using the second ivory patch.
Checkpoint: The completed colored-and-ivory unit must retain the same outside width and height as the original colored rectangle.
Don't cut the colored triangle shape out before sewing. Keep the original rectangle intact until the diagonal seams are complete and you've checked the folds.
Step 3. Add the Ivory Side Strips
- Take the two ivory side strips assigned to that tier in the cutting chart.
- Match each strip's height to the height of the completed colored tier.
- Sew one strip to each end of the tier using 1/4-inch seams.
- Press the seams toward the ivory strips where the fabric lies flat.
- Measure the completed row.
Checkpoint: Every completed tier row measures 16 1/2 inches wide. Its raw height remains the height listed for that tree in the cutting chart.
Repeat Steps 1 through 3 for all three tiers of your first tree.
Step 4. Keep the Pink and Gingham Trees Distinct
The blush pink tree has a narrower upper triangle. Its upper colored piece is only 6 1/2 inches wide before sewing, rather than the 8 1/2-inch width used in four of the other trees.
The red gingham tree is different again. Its finished upper tier widens from a single point to a 5-inch base. The middle tier widens from 5 inches at the top to 9 inches at the bottom. The lower tier widens from 9 inches to 13 inches.
That makes the three gingham sections line up into one continuous triangle with no branch ledges. It's a little detail, but it matters to the appearance of the finished quilt.
All the measurements for these two trees are included in the cutting chart. The sewing method stays the same.
Step 5. Make the Brown Tree Trunk
- Take one brown 2 1/2 × 2 1/2-inch square.
- Place an ivory 7 1/2 × 2 1/2-inch rectangle on either side.
- Sew the pieces together with 1/4-inch seams.
- Press toward the brown trunk.
- Measure the row. It must be 16 1/2 inches wide and 2 1/2 inches tall.
The trunk finishes 2 inches wide and 2 inches tall. Center it beneath the three tree tiers.
Step 6. Assemble the Christmas Tree Block
Lay out the block in this order, from top to bottom:
- Ivory header strip, using the assigned height.
- Completed upper tree tier.
- Completed middle tree tier.
- Completed lower tree tier.
- Brown trunk row.
- Ivory foot strip, only for trees G, H, and J in the bottom quilt row.
Fold each row briefly to find its center and mark that position. Match the centers before sewing so the trunk sits beneath the tree tip.
- Sew the header to the upper tier with right sides together.
- Use the marked upper point as a checkpoint. The seam should pass through the point at the 1/4-inch seam line.
- Sew the middle tier beneath the upper tier.
- Add the lower tier.
- Sew the trunk row beneath the lower tier.
- For G, H, and J, sew the assigned ivory foot strip beneath the trunk.
- Press the seams carefully, directing the allowances toward the less bulky side.
- Measure the completed block.
Final checkpoint: Every unfinished Christmas tree block measures exactly 16 1/2 × 16 1/2 inches.
If a tree block measures small, check its seams before trimming. The tier heights were calculated to finish at the same block size even though the trees are different.
Step 7. Add the Three Appliqué Stars
Only three trees have stars. The blush pink botanical tree, the blue polka-dot tree, and the light sage snowflake tree stay plain.
- Print the star template at 100% or Actual Size and check the one-inch calibration square.
- Trace the star outline three times onto the paper side of lightweight fusible web.
- Fuse one outline to the wrong side of blush pink fabric, one to powder blue, and one to sage green.
- Cut each star along its outer outline. Don't add a seam allowance.
- Center the blush star above tree B, the upper-center sage tree.
- Center the blue star above tree F, the red gingham tree.
- Center the sage star above tree H, the solid red tree.
- For each star, keep one point facing straight up and place the lower inward notch between its two lower points at the tree tip.
- Fuse according to the fusible web manufacturer's instructions.
- Secure the edges with a small blanket stitch or narrow zigzag, pivoting at each point and inner corner.
The stars are approximately 3 1/4 inches wide. No buttons, beads, or extra ornaments are needed.
Step 8. Make All Six Tree Blocks
- Block B: Sage green with tiny white crosses and a blush star.
- Block D: Blush pink botanical tree with a narrow upper tier, no star.
- Block F: Red-and-cream gingham continuous triangle with a powder blue star.
- Block G: Powder blue polka-dot tree, no star.
- Block H: Solid Christmas red tree with a sage green star.
- Block J: Light sage green snowflake tree, no star.
All six blocks finish at the same size, but their tier measurements keep the shapes close to the approved quilt design.
The printed fabric takes care of the little dots, snowflakes, gingham checks, and botanical details. That's plenty of decoration without making the sewing more complicated.
Arrange the Nine Christmas Quilt Blocks
Here's where all those red, blue, pink, and green pieces come together. Before sewing the rows, spread the nine blocks out on a clean surface and compare them with the layout below.
Keep the HO blocks in the exact positions shown. The three words aren't arranged in three straight rows. Instead, the letters are mixed among the trees, giving the quilt its playful look.
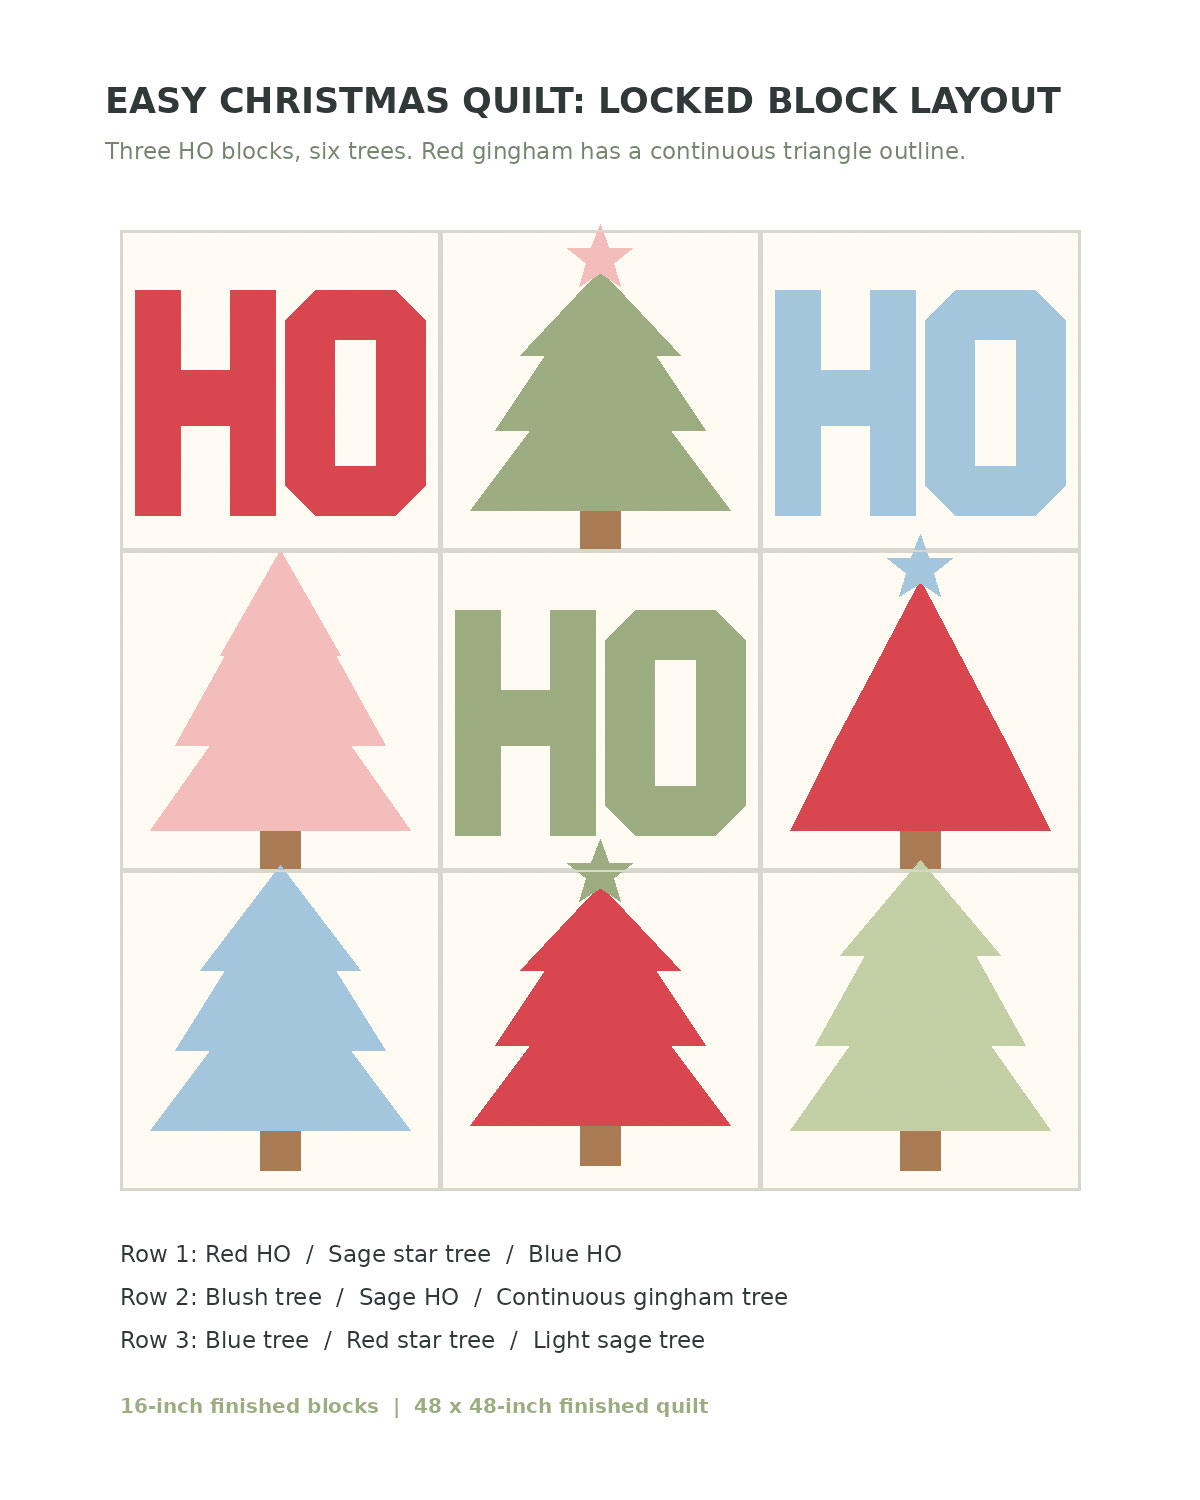
Top Row: Red HO, Sage Tree, Blue HO
- Left: Red polka-dot HO block.
- Center: Sage green Christmas tree with a blush pink star.
- Right: Powder blue snowflake HO block.
The red and blue letters balance each other across the top. I'd leave that arrangement exactly as it is.
Middle Row: Pink Tree, Green HO, Red Gingham Tree
- Left: Blush pink botanical Christmas tree.
- Center: Sage green HO block.
- Right: Red-and-cream gingham Christmas tree with a powder blue star.
The sage green HO belongs in the center of the quilt. The pink tree and red gingham tree add color on either side without competing with those big letters.
Bottom Row: Blue Tree, Red Tree, Sage Tree
- Left: Powder blue tree with ivory polka dots.
- Center: Solid red Christmas tree with a sage green star.
- Right: Light sage green snowflake tree.
All three bottom blocks are Christmas trees. Together, they give the quilt a cheerful finish without squeezing in another row of lettering.
Look at the complete layout before joining anything. The trees must all point upward, and the three HO blocks must read from left to right. Make any fabric-position corrections while the blocks are still separate.
Sew the Easy Christmas Quilt Top Together
Now for the easiest part. All nine blocks are the same size, so you can sew the quilt together in three straight rows. There are no extra sashing strips or patchwork borders to work around.
Step 1. Sew the Top Row
- Place the red HO block and the sage green tree block right sides together.
- Match the upper and lower raw edges, then pin or clip along the shared side.
- Sew the blocks together using a 1/4-inch seam.
- Open the pair and place the blue HO block right sides together against the tree's other edge.
- Sew along the shared side with another 1/4-inch seam.
- Press both joining seams toward the center tree block, or press them open if the seam intersections lie flatter that way.
The top row now contains red HO, sage tree, and blue HO in that order.
Measurement checkpoint: The unfinished row measures 48 1/2 inches wide and 16 1/2 inches tall.
Step 2. Sew the Middle Row
- Place the blush pink tree to the left of the sage green HO block.
- Place the red gingham tree to the right.
- Sew the three blocks together using 1/4-inch seams.
- Press the joining seams in the opposite direction from the top row where practical.
- Check that the row measures 48 1/2 × 16 1/2 inches.
Keeping the green letters in the middle makes it easy to see whether the row is arranged correctly.
Step 3. Sew the Bottom Row
- Arrange the blue polka-dot tree on the left.
- Place the solid red tree in the center.
- Place the light sage snowflake tree on the right.
- Sew the three blocks together with 1/4-inch seams.
- Press and check that the completed row measures 48 1/2 × 16 1/2 inches.
Step 4. Join the Three Rows
- Lay the top and middle rows right sides together, keeping the printed quilt layout beside you.
- Match the vertical seams where the three columns meet. Pin those intersections first.
- Match the remaining raw edges and secure the seam with additional pins or clips.
- Sew across the full row with a 1/4-inch seam.
- Open the joined rows and check that the lettering and tree blocks remain in their correct positions.
- Lay the bottom row right sides together against the lower edge of the middle row.
- Match the two vertical seam intersections and pin them.
- Sew the final horizontal seam using the same allowance.
- Press both long joining seams carefully. Press them open where that gives the flattest result.
Your complete unfinished quilt top should measure 48 1/2 × 48 1/2 inches across the raw edges. Once the outer seam allowances are enclosed by the binding, the nominal finished patchwork area is 48 × 48 inches.
Check the Quilt Before Layering
Spread the quilt top out and compare it with the example image. There should be exactly three HO blocks and six tree blocks, with no extra sashing or decorative border.
- The red HO is in the upper-left corner.
- The blue HO is in the upper-right corner.
- The sage HO is in the exact middle.
- The pink tree is left of the center HO.
- The red gingham tree is right of the center HO.
- The lower row contains the blue, red, and light sage trees in that order.
- All three stars are attached to their assigned trees.
- The tree trunks are centered and all six trees point upward.
Check the outside edges, too. If you find a seam that has pulled or gathered, correct it before adding batting. Don't stretch the finished top into a 48 1/2-inch square to disguise a measurement problem.
There isn't anything else to piece around the quilt. The sage green binding will give it the narrow green outline shown in the picture.
Quilting and Binding Your Christmas Quilt
The approved quilt has soft, rounded quilting lines running across the ivory backgrounds, letters, and trees. I'd keep that gentle scalloped look rather than adding a bold geometric design that might compete with the patchwork.
You're not sewing the quilting lines into each individual block before assembly. Finish the quilt top first, then quilt through the top, batting, and backing together.
Step 1. Prepare the Quilt Backing
Give yourself a little extra backing around the quilt top. We're preparing a 56-inch square, which leaves approximately 3 3/4 inches beyond each side of the 48 1/2-inch unfinished quilt top.
If you've chosen 108-inch-wide backing fabric, cut one piece at least 56 × 56 inches.
For standard-width backing, use approximately 3 1/4 yards of fabric with at least 40 inches of usable width. That amount assumes you have at least 114 inches of usable fabric length after any preshrinking. Buy extra if washing or squaring the fabric will reduce the available length.
- Cut two 57-inch lengths from the backing fabric.
- Remove the selvages.
- Trim each panel to 29 × 57 inches.
- Place the panels right sides together along their 57-inch edges.
- Sew the long edges together using a 1/2-inch seam allowance.
- Press the backing seam open.
- The joined backing now measures 57 inches square.
- Trim it to 56 × 56 inches.
Prepare the batting at least 56 × 56 inches as well. If your quilting machine or quilting service requires a larger backing or batting allowance, use those measurements instead.
Step 2. Layer the Quilt
- Press the quilt top and backing.
- Spread the backing right side down on a clean, flat surface.
- Place the batting over the backing, smoothing it from the middle outward.
- Center the quilt top right side up over the batting.
- Check that backing and batting extend beyond all four edges of the top.
- Baste the three layers using your preferred quilting pins, basting stitches, or another appropriate quilting method.
Don't pull the quilt top tight. Smooth it gently so the letters and trees stay square.
Step 3. Quilt the Soft Scalloped Lines
The example image has a broad, overlapping scallop pattern. You can reproduce that rounded texture with gently curved quilting lines repeated across the whole surface.
- Use a removable fabric marker and a flexible ruler or curved drawing template to mark a row of shallow arches.
- Make each arch approximately 3 inches wide and 1 inch high, with its two ends resting on the same horizontal guide line.
- Repeat the arches across the quilt, connecting their ends into a continuous scalloped row.
- Mark additional rows approximately 2 inches apart vertically. Offset alternate rows horizontally by about 1 1/2 inches to create the overlapping scallop rhythm.
- Continue the marked pattern over the tree fabrics and letter blocks, rather than stopping at every colored patchwork seam.
- Quilt the marked curves using a quilting method suitable for your machine and batting. Work from the center outward, keeping the quilt layers smooth.
- Remove the temporary markings according to the marker manufacturer's directions.
The scallop spacing is an estimated construction specification based on the example image, not a measured tracing of its quilting stitches. The important visual detail is the soft, repeating arc pattern covering the quilt.
I'd choose an ivory or light neutral quilting thread. Heavy dark stitching would draw attention away from the red letters and colorful Christmas trees.
Step 4. Trim the Quilted Layers
- Lay the quilt flat and check that the quilted edges are reasonably square.
- Trim the batting and backing even with the outside edge of the quilt top.
- Keep all four corners square and avoid cutting into the outer quarter-inch seam allowance.
- Check that the three quilt rows remain aligned at the edges.
The trimmed quilt is now ready for its sage green binding.
Step 5. Prepare the Sage Green Binding
- Cut six sage green strips, each 2 1/2 inches wide across the usable fabric width.
- Place two strip ends right sides together at a 90-degree angle.
- Sew diagonally across the overlapping square, from one outer corner to the opposite outer corner.
- Trim the excess fabric to a 1/4-inch seam allowance and press the seam open.
- Repeat until all six strips form one long binding strip.
- Fold the completed strip in half lengthwise, wrong sides together.
- Press along the full length to make double-fold binding.
Six strips provide extra length for the quilt's approximately 192-inch perimeter, diagonal joins, corners, and final binding connection.
Step 6. Attach the Binding
- Begin along one side of the quilt, away from a corner. Leave an unsewn binding tail approximately 8 to 10 inches long.
- Place the binding's raw edges even with the raw edge of the quilt front.
- Sew using a 1/4-inch seam allowance, stopping 1/4 inch before the first corner.
- Secure the stitching and remove the quilt from the machine.
- Fold the binding upward at a 45-degree angle, then fold it back down along the next edge. Align the folded edge with the previous quilt edge to form a neat miter.
- Begin sewing the next side 1/4 inch from the corner.
- Repeat the same process at the remaining corners.
- Stop before reaching the starting point, leaving enough space to join the binding ends.
- Lay the two loose tails flat and trim them so their overlap equals the 2 1/2-inch binding width.
- Open the tails and join them with a diagonal seam, making certain the binding isn't twisted.
- Trim and press that seam, refold the binding, and sew the remaining gap.
- Fold the binding around to the quilt back and secure the folded edge by hand or machine, covering the first stitching line.
Give the binding corners a final look. The sage green edge should be narrow and even, with no bulky folds sticking out.
The quilt is finished when all four edges are bound, the quilting is secure, and any temporary marks are removed.
Download the Free Easy Christmas Quilt Pattern and Templates
I've separated the printable instructions from the full-size templates so you don't have to print everything unless you want to. The complete pattern has all the cutting measurements and sewing instructions. The second PDF has the letter outlines, star template, and cutting references.
Download the Complete Christmas Quilt Pattern
Download the Free Easy Christmas Quilt Pattern (10-Page PDF)
This printable includes the finished quilt design, materials, fabric cutting charts, instructions for piecing the chunky H and O letters, construction of all six trees, quilt assembly, quilting, binding, and measurement checkpoints.
Download the Full-Size Templates
Download the Free Christmas Quilt Templates (8-Page PDF)
The separate template package includes:
- Complete nine-block quilt layout.
- Corrected HO letter cutting chart.
- Christmas tree cutting measurements.
- Full-size tiled H letter outline.
- Full-size tiled O letter outline with clipped corners.
- Actual-size five-point star template.
- One-inch printer calibration square.
- Tree-tier measurements, including the special pink and gingham shapes.
Printing the Quilt Templates
Print on US Letter paper at 100% or Actual Size. Turn off Fit to Page, Shrink to Fit, or any other automatic scaling option.
Measure the one-inch calibration square before cutting the star. It must measure exactly 1 inch on both sides.
The H and O outlines are finished-shape references. Join their tiled pages at the marked registration line, but cut the actual fabric rectangles from the chart. The chart already includes the quarter-inch seam allowances.
The star outline is an actual raw-edge fabric cutting template. Use it for the blush, blue, and sage stars without adding a seam allowance.
Keep the complete pattern nearby while sewing. The diagrams and cutting measurements are designed to work together, especially for the narrower pink tree and the continuous red gingham triangle.
Easy Christmas Quilt Tips for Beginners
You don't have to tackle every Christmas tree and every letter at once. I'd get one HO block finished first, then make one tree. Once those two blocks measure correctly, the remaining pieces repeat the same construction.
There are a few measurements worth checking along the way. They take very little time and can prevent the finished rows from coming out different lengths.
Keep the Quarter-Inch Seams Consistent
The pieces in this quilt are fairly large, but accurate seams still matter. A little extra width in every seam can make the finished letters look narrower than intended.
If your machine has a quarter-inch piecing foot, that's convenient. Otherwise, mark an accurate seam guide beside the needle.
For more information about basic patchwork units, the American Quilter's Society quilt-block tutorials cover common piecing techniques, including flying geese construction.
Don't Stretch the Christmas Tree Points
The diagonal seams are the only places where this project gets a little delicate. Press them gently instead of sliding the iron back and forth.
If one triangle looks crooked after pressing, check the diagonal stitching line and the original rectangular measurement. The pointed unit must remain the same outside size as the rectangle you cut.
Don't trim a whole tree tier smaller just to make the point look even.
Keep the Fabric Prints in the Right Places
The approved quilt uses several different prints, but the shapes stay simple. The colors and printed designs make the blocks interesting.
I'd keep the red polka dots in the first HO, the blue snowflakes in the second, and the fairly solid sage green in the middle. The blue polka-dot tree and red gingham tree are especially cheerful beside those letters.
There's no reason to cut and piece every little printed dot or snowflake. Those details are already part of the chosen fabric.
Check Your Measurements as You Go
| Construction Stage | Expected Unfinished Size |
|---|---|
| Individual H letter | 7 1/2 × 11 3/4 in. |
| Individual O letter | 7 1/2 × 11 3/4 in. |
| H and O with center gap | 15 × 11 3/4 in. |
| Complete HO block | 16 1/2 × 16 1/2 in. |
| Completed upper tree tier row | 16 1/2 in. wide; height varies by tree |
| Completed middle tree tier row | 16 1/2 in. wide; height varies by tree |
| Completed lower tree tier row | 16 1/2 in. wide; height varies by tree |
| Tree trunk row | 16 1/2 × 2 1/2 in. |
| Complete Christmas tree block | 16 1/2 × 16 1/2 in. |
| One assembled three-block row | 48 1/2 × 16 1/2 in. |
| Complete unquilted quilt top | 48 1/2 × 48 1/2 in. |
These are calculated measurements based on the cutting chart and quarter-inch seam allowances. The pattern has been digitally checked, but the complete quilt has not been physically sewn or washed from these instructions. Your actual finished dimensions may vary slightly with seam accuracy, quilting, and laundering.
Keep the Finishing Simple
I'd keep the sage green binding narrow and let the three big HO blocks do the talking. An extra patchwork border might be pretty on a different quilt, but it would change the simple look of this one.
If you're making the quilt as a Christmas wall hanging, the square shape and big lettering make a cheerful display. It would also look lovely folded over a quilt ladder or the back of a chair.
And if you've enjoyed making these easy Christmas tree blocks, you might like the different piecing approach in my free Christmas star quilt pattern.
Once the binding is finished, you'll have three chunky HO blocks, six colorful Christmas trees, and a Christmas quilt that looks much more involved than the individual pieces really are.
Big shapes. Cheerful fabrics. That's the charm of this one.
When you click on links to various merchants on this site and make a purchase, this may result in this site earning a commission. This does not affect the price you pay.

UBGI Gold Standard 2026
Reviewed under the site's
editorial checklist.
Photos, decorating ideas, party setups and reader submissions are shared for inspiration unless a page is specifically presented as a pattern, tutorial, reference guide or step-by-step project. Follow the instructions, measurements, safety guidance and manufacturer directions provided for the particular project or product.
About Jan | Contact | Baby Nursery Ideas (Blog) | Site Map | Privacy Policy | Disclosure Policy | Disclaimer | Affiliate Disclosure | Earnings Disclosure | Facebook | Pinterest
I am a participant in the Amazon Services LLC Associates Program, an affiliate advertising program designed to provide a means for us to earn fees by linking to Amazon. As an Amazon Associate I earn from qualifying purchases.
Copyright © 2006-2026. All Rights Reserved.