DIY Pink Christmas Ornaments: Mini Felt Baby Bib Favors
By Jan Bay
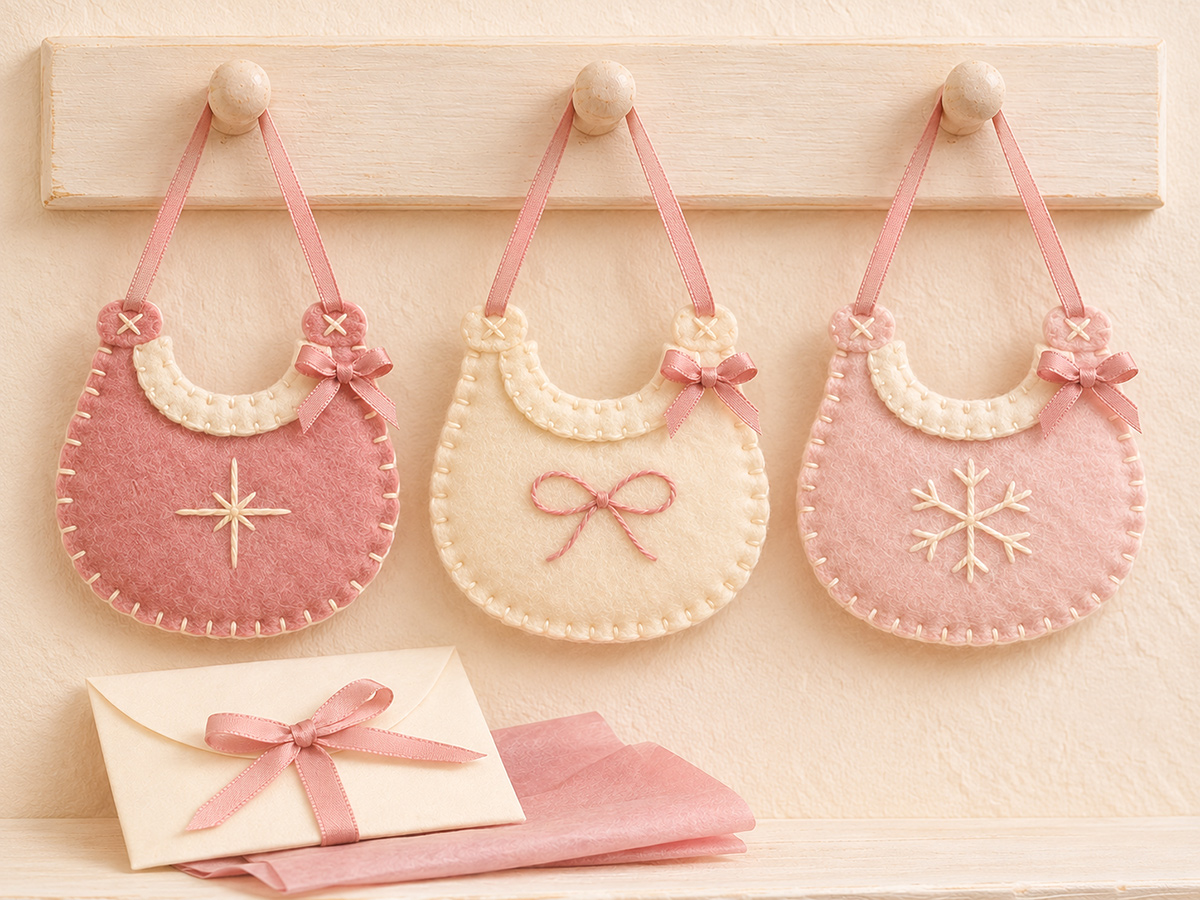
These DIY pink Christmas ornaments are little felt baby bibs that you can make as favors for a Christmas baby shower for a baby girl or as decorations for your own tree. The set includes three miniature bibs in dusty rose, ivory, and blush pink, each finished with ivory stitching, a little satin bow, and pretty embroidered details. I like that you can make them in matching colors without every ornament looking exactly alike. And you don't need a sewing machine! This is a No Sew Christmas craft project. Everything is stitched by hand. The free printable pattern will show you how to cut the felt pieces, add the embroidery, sew the layers together, and attach the hanging ribbons. They're a sweet little keepsake that guests can take home after the party.
Explore More Christmas Crafts and Baby Shower Favors
DIY Pink Christmas Decorations
Free Felt Crafts and Christmas Ornament Patterns
Three Easy Felt Christmas Tree Ornaments
See Supplies for This Project Here.
Jump to a Section
- Free DIY Pink Christmas Ornaments Pattern
- Materials and Embroidery Supplies
- Finished Measurements and Cutting Guide
- Cut the Felt Bibs and Ivory Neckline Pieces
- Embroider the Star, Bow, and Snowflake Motifs
- Attach the Ivory Felt Necklines
- Attach the Hanging Ribbons to Both Bib Shoulders
- Sew the Front and Back Felt Bib Layers Together
- Make and Attach the Small Satin Bows
- Finishing and Ornament Quality Check
- Christmas Baby Shower Favor and Tree Display Ideas
We'll make three little bib ornaments using the same pattern, then change the felt colors and embroidery so each one looks a little different. The important detail is the neckline. It has a genuine bib shape, with two rounded shoulders and a curved opening between them. The hanging ribbon attaches to both shoulders, not the middle of the neckline.
You'll be cutting two felt layers for each bib, plus a separate ivory neckline trim. Everything is sewn by hand, and there's no stuffing. Once you've made the first ornament, the others follow the same steps.
Free DIY Pink Christmas Ornaments Pattern
I've included a three-page printable pattern with the actual-size bib outline, the ivory neckline piece, three embroidery designs, and a drawing showing exactly where the hanging ribbon attaches.
Free printable pattern: Download the Mini Felt Baby Bib Christmas Ornament Pattern and Templates.
Print the PDF on US Letter paper at Actual Size or 100%. Turn off Fit to Page, Shrink to Fit, and any other scaling options. There's a 1-inch test square on the pattern. Measure it with a ruler before cutting your felt.
The three printable pages include:
- Page 1: Full-size miniature baby bib outline and separate U-shaped ivory neckline trim.
- Page 2: Actual-size embroidered star, thread bow, and snowflake designs, plus the two-shoulder ribbon placement diagram.
- Page 3: Cutting quantities, assembly order, and finished-project checkpoints.
Use the complete bib outline for both the front and back of every ornament. The ivory neckline is a separate piece that goes on the front only.
I'd make one ornament before cutting a large batch for shower favors. That gives you a chance to check the ribbon length and stitching with the felt you've chosen.
Materials and Embroidery Supplies
You won't need much felt for these little ornaments. I'd choose wool-blend or good-quality craft felt that holds its shape when you pick it up. Very thin, stretchy felt can make the shoulder tabs curl, and that isn't the look we're after.
For a matching set of three ornaments:
- Dusty-rose felt, enough for two full bib shapes
- Ivory felt, enough for two full bib shapes
- Blush-pink felt, enough for two full bib shapes
- Additional ivory felt for three U-shaped neckline trims
- Dusty-rose satin ribbon, approximately 1/4 inch wide, for three hanging loops
- Narrow dusty-rose satin ribbon, approximately 1/8 to 3/16 inch wide, for three small neckline bows
- Ivory embroidery floss for the outer edges, neckline stitching, shoulder crosses, star, and snowflake
- Dusty-rose embroidery floss for the bow embroidered on the ivory bib
- Matching sewing thread for attaching the satin bows
- Embroidery needle and hand-sewing needle
- Sharp fabric scissors
- Small pointed embroidery scissors
- Ruler or measuring tape
- Washable fabric-marking pencil or tailor's chalk
- Straight pins or small sewing clips
- The three-page printed pattern
For the hanging loops, cut three 7-inch pieces of 1/4-inch satin ribbon. For the little bows at the necklines, cut three separate 6-inch pieces of narrow satin ribbon. You can trim those bow tails after tying them.
Two strands of embroidery floss work well for the small decorative stitches shown in the pattern. If your felt is especially thick, choose a needle that passes through it without pulling or leaving an oversized hole.
What I'd skip: Buttons, plastic eyes, sequins, bells, and beads. The embroidery already gives each bib its own design, and there's no need to add loose little pieces to something being given out at a baby shower.
These ornaments are decorative keepsakes, not wearable bibs or toys.
Finished Measurements and Cutting Guide
Each finished felt bib is designed to measure approximately 4 inches wide and 3 1/2 inches tall, not counting its hanging ribbon. The actual height of the hanging loop depends on how the ribbon drapes when the ornament is displayed.
Those measurements come from the full-size pattern. Felt thickness and hand stitching can change the finished size slightly.
| Piece | Size | Cut |
|---|---|---|
| Dusty-rose bib | Full-size template A | 2 |
| Ivory bib | Full-size template A | 2 |
| Blush-pink bib | Full-size template A | 2 |
| Ivory neckline trim | U-shaped template B | 3 |
| Hanging ribbon | 7 inches long, about 1/4 inch wide | 3 |
| Small satin bow ribbon | 6 inches long, 1/8 to 3/16 inch wide | 3 |
You should have nine felt pieces altogether: six full bib shapes and three separate neckline trims.
Each hanging loop is made from one 7-inch ribbon. When 1/2 inch at each end is hidden between the felt layers, approximately 6 inches of ribbon remains outside the ornament.
That's one loop connecting the two shoulders. You don't need a separate ribbon running from the center of the bib.
Cut the Felt Bibs and Ivory Neckline Pieces
Start with the full bib pattern on page 1. Notice how the two rounded shoulders are separated by a deep U-shaped neckline. Keep those shoulder tabs intact when cutting. They're where the ribbon will attach later.
Cut the Six Bib Shapes
- Print page 1 at 100% and check the 1-inch test square.
- Cut out template A along its solid outline, including the curved neckline between the shoulders.
- Lay the template on the dusty-rose felt.
- Trace carefully around the entire shape.
- Cut along the traced outline, following the rounded bottom and shoulder tabs.
- Repeat to cut a second dusty-rose bib.
- Use the same template to cut two ivory bibs.
- Cut two more bibs from blush-pink felt.
- Lay each matching pair together and check that the edges line up.
- Trim any uneven spots without changing the neckline shape.
Cutting checkpoint: Six full bib shapes, with two in each color. All six have the same curved neckline and rounded shoulder tabs.
Don't cut the shoulder tabs off to make the top straight. The separate shoulders are what make these look like miniature baby bibs rather than an ordinary rounded ornament.
Cut the Three Ivory Neckline Trims
- Find template B on page 1 of the PDF.
- Cut it out along both its inner and outer curved edges.
- Place the paper template on your ivory felt.
- Trace the U-shaped outline and cut one piece.
- Repeat until you have three matching neckline trims.
- Place one trim on the front of the dusty-rose bib.
- Position its inner edge along the bib's curved neckline opening.
- Check that its wider curved edge lies flat on the front of the bib.
- Repeat the placement check on the blush and ivory bib fronts.
The ivory ornament also gets an ivory neckline. You can choose a slightly lighter shade of ivory for that trim so the two layers remain visible.
Neckline checkpoint: Three separate U-shaped trims, each following the neckline cutout without covering the open center.
Choose the Front and Back of Each Ornament
Lay the six bib pieces in three matching pairs. Choose the smoothest side of each pair for the decorated front. Put the other piece aside as its back.
We'll embroider the fronts and attach the neckline trims before joining each pair. That keeps the knots and thread ends hidden between the layers.
Embroider the Star, Bow, and Snowflake Motifs
Each bib has its own little embroidery design. The dusty-rose bib gets an ivory star, the ivory bib gets a pink thread bow, and the blush bib gets an ivory snowflake.
All three designs are on page 2 of the printable pattern. They're small enough to fit below the neckline without covering the whole front of the bib.
You can use two strands of embroidery floss for these designs. I'd keep the stitches fairly flat against the felt. You want to see the star, bow, or snowflake clearly, but you don't need thick raised embroidery.
Mark the Embroidery Placement
- Place the dusty-rose bib front on your work surface, right side up.
- Find the center of the bib from left to right.
- Measure 2 1/4 inches straight down from the height of the highest shoulder point.
- Mark the embroidery center lightly where that measurement meets the bib's vertical centerline.
- Repeat on the ivory and blush bib fronts.
- Use the embroidery drawings on page 2 to transfer the appropriate design onto each bib.
- Check that the designs sit below the neckline trim and leave room around the outer edges.
Use marks that can be removed from your chosen felt. If you're unsure how a marker will behave, try it on a small scrap first.
Embroider the Ivory Star on the Dusty-Rose Bib
The first bib has a simple eight-point star. Four longer stitches make a cross, and four shorter diagonal stitches fill the spaces between them.
- Thread your embroidery needle with two strands of ivory floss.
- Secure the starting thread on the back of the dusty-rose bib front.
- Bring the needle up at the lower point of the marked vertical line.
- Take it down at the center to make the first half of the long vertical stitch.
- Bring the needle up at the center and take it down at the upper point to complete the vertical line.
- Repeat from the left point to the center and from the center to the right point, making the horizontal line.
- Check that the vertical and horizontal stitches cross neatly at the center.
- Mark four shorter diagonal rays between the longer points.
- Make one straight stitch from the center toward the upper-left diagonal point.
- Repeat toward the upper-right, lower-right, and lower-left points.
- Secure the floss on the back of the felt.
The full star should measure approximately 1 inch from top to bottom. Its four diagonal rays are shorter than the vertical and horizontal ones.
Star checkpoint: One ivory eight-point star centered on the dusty-rose bib, with four longer rays and four shorter diagonal rays.
Embroider the Pink Thread Bow on the Ivory Bib
The middle ornament has a little bow embroidered directly onto the felt. It isn't a separate satin bow. We'll save the satin ribbon for the neckline decoration.
The embroidered bow has two loops, a small center knot, and two short tails.
- Place the ivory bib front right side up.
- Transfer the pink bow design from page 2, centering it below the neckline.
- Thread an embroidery needle with two strands of dusty-rose floss.
- Secure the thread on the back of the felt.
- Start at the center of the bow.
- Follow the outline of the left loop using small back stitches.
- Bring the stitching back to the center.
- Continue around the right loop with the same small stitches.
- Keep the loops rounded and approximately the same size.
- Make two or three short stitches at the center to suggest the knot.
- Stitch one short tail angling downward toward the left.
- Stitch the second tail angling downward toward the right.
- Secure the thread on the back of the felt.
The finished thread bow should be approximately 1 inch wide. Keep the center knot small enough that you can still see both loops.
Bow embroidery checkpoint: One dusty-rose bow with two stitched loops, a small central knot, and two short tails. No loose ribbon is attached to the middle of the ivory bib.
Embroider the Ivory Snowflake on the Blush Bib
The blush-pink bib has a six-arm snowflake with little branches along the arms. We'll start with the six main lines, then add the shorter stitches.
- Place the blush-pink bib front right side up.
- Transfer the snowflake drawing from page 2.
- Thread your needle with two strands of ivory embroidery floss.
- Secure the starting thread on the back of the felt.
- Bring the needle up at the center of the snowflake.
- Make the first straight stitch upward to the top point.
- Return to the center and make another straight stitch down to the bottom point.
- Make two diagonal arms extending toward the upper-left and upper-right.
- Make two more diagonal arms extending toward the lower-left and lower-right.
- Check that the six arms are spaced approximately 60 degrees apart.
- Near the outer end of the top arm, add two short angled branch stitches.
- Repeat with two short branches on each of the other five arms.
- Keep the branches angled outward from the center.
- Secure the thread on the back of the felt.
The finished snowflake should measure approximately 1 inch across. The main arms are longer than the little side branches.
Snowflake checkpoint: One ivory snowflake with six main arms and twelve short branch stitches, centered on the blush-pink bib.
Check All Three Embroidered Fronts
Lay the decorated bib fronts next to one another. You should have one ivory star on dusty rose, one pink thread bow on ivory, and one ivory snowflake on blush pink.
Check that the designs are centered and that none will be covered by the neckline trim. Secure any loose thread ends on the backs.
If you're unfamiliar with back stitch or straight stitch, DMC's illustrated embroidery stitch guide shows both techniques, along with the blanket stitch we'll use for the felt edges.
Attach the Ivory Felt Necklines
The ivory neckline trim gives the bibs their finished look. It's a separate curved piece that follows the U-shaped opening and sits on the front of the felt.
We'll attach the trim before joining the front and back layers. That way, all the little stitches around the neckline can be worked without trying to sew through the entire finished ornament.
Position the First Ivory Neckline
- Place the embroidered dusty-rose bib front right side up.
- Take one ivory U-shaped neckline piece from template B.
- Position it around the curved opening, with its inner cut edge following the bib's neckline cutout.
- Keep the wider curved part of the trim lying on the front of the bib.
- Align the two ends of the trim beneath the rounded shoulder tabs.
- Check that the neckline opening remains completely clear.
- Pin the trim lightly in place.
Neckline placement checkpoint: The ivory trim follows the U-shaped opening without bridging the gap between the shoulders or covering the embroidered star.
Sew the Neckline Trim to the Bib Front
- Thread a needle with two strands of ivory embroidery floss.
- Secure the thread on the back of the dusty-rose felt front.
- Begin near one end of the U-shaped trim.
- Use small, evenly spaced stitches to attach the outer curved edge of the trim to the bib front.
- Work slowly around the bottom of the U so the felt doesn't wrinkle.
- Continue up the opposite side to the other trim end.
- Work another row of small stitches along the inner curved edge, catching the trim and bib front together.
- Keep these inner stitches close to the cut edge without pulling the neckline out of shape.
- Secure the thread on the back of the felt.
- Remove the temporary pin.
Keep the stitches small and light. The ivory edge stitching should be visible, but the neckline shouldn't look bulky.
We'll work the final blanket stitching around the complete bib outline, including the neckline cutout, after the back layer is added.
Attach the Other Two Necklines
- Place a second ivory trim on the embroidered ivory bib front.
- Align the trim with the curved neckline opening.
- Sew along both curved trim edges using ivory thread.
- Repeat with the final trim on the blush-pink bib front.
- Lay all three decorated fronts together.
- Check that the neckline openings are similarly shaped.
Three-neckline checkpoint: All three fronts have their ivory U-shaped trims attached. The bib shoulders remain separate, the openings are clear, and each embroidered motif is visible below the neckline.
Don't add the satin bows yet. They're easier to position after the bib layers and hanging ribbons have been sewn together.
Attach the Hanging Ribbons to Both Bib Shoulders
Now we can add the hanging ribbons. This is what makes the finished ornaments look like miniature baby bibs, so we'll attach the ribbon at both shoulders rather than running it up from the middle of the neckline.
Each ornament uses one continuous length of dusty-rose satin ribbon. One end goes into the left shoulder, and the other goes into the right shoulder. The ribbon forms a loop above the bib when it's hanging.
Prepare the Three Hanging Ribbons
- Cut three lengths of dusty-rose satin ribbon, each measuring 7 inches.
- Use ribbon approximately 1/4 inch wide.
- Lay one piece in a U shape on your work surface.
- Check that the ribbon isn't twisted.
- Keep both ends facing the same direction, ready to attach to the shoulders.
- Repeat with the other two ribbon lengths.
Ribbon cutting checkpoint: Three continuous 7-inch satin ribbons. Each will connect the two shoulders of one felt bib.
Position the Ribbon on the Dusty-Rose Bib
- Turn the decorated dusty-rose bib front wrong side up.
- Find the rounded left shoulder tab.
- Take one 7-inch ribbon and place one end on the wrong side of that shoulder.
- Position approximately 1/2 inch of the ribbon inside the felt outline.
- Point the free length of ribbon upward beyond the shoulder.
- Pin or clip that ribbon end in place.
- Take the other end of the same ribbon to the right shoulder.
- Position approximately 1/2 inch of this end on the wrong side of the right shoulder tab.
- Make sure the free ribbon arches above the neckline opening.
- Check that the ribbon is lying flat and isn't twisted.
- Temporarily secure the second end with a pin or clip.
Turn the bib front right side up for a moment and check the shape. You should see the ribbon rising from both shoulder tabs, leaving the U-shaped neckline completely open.
Shoulder placement checkpoint: One ribbon end is attached at the left shoulder and the other is attached at the right shoulder. No ribbon is attached at the center of the neckline.
Baste the Ribbon Ends in Place
- Turn the bib wrong side up again.
- Thread a needle with matching sewing thread.
- Make two or three small temporary holding stitches through the left ribbon end and the felt shoulder.
- Keep the stitches within the 1/2-inch overlap area.
- Repeat at the right shoulder.
- Remove the temporary pins.
- Gently lift the ornament by the ribbon to check that both ends stay positioned.
- Lay the ornament flat again.
These basting stitches hold the ribbon in place while we sew the back on. We'll add the little ivory X stitches through the completed shoulders for the final attachment.
Add the Hanging Ribbons to the Other Two Bibs
- Turn the decorated ivory bib front wrong side up.
- Position the two ends of its 7-inch ribbon at the left and right shoulders.
- Insert approximately 1/2 inch of each ribbon end behind the felt.
- Baste both ends in place.
- Repeat on the blush-pink bib front.
- Check all three ornaments to make sure their ribbons are attached at the same shoulder positions.
Three-ribbon checkpoint: Each decorated bib front now has one continuous satin hanging ribbon attached separately at the two shoulders.
Sew the Front and Back Felt Bib Layers Together
Now we'll sew each decorated bib front to its matching back. I want these ornaments to stay fairly flat, like the ones in the example, so we're not adding stuffing or batting between the felt layers.
The ivory blanket stitches go all the way around the outside edge and around the curved neckline opening. They'll also help hold the shoulder tabs in shape.
Match the Front and Back Layers
- Place the decorated dusty-rose bib front right side up.
- Take the plain dusty-rose bib back.
- Place the back directly underneath the front, matching the cut edges.
- Make sure the satin ribbon ends remain between the two felt layers at the shoulders.
- Check that the free ribbon loop extends upward beyond the shoulders.
- Align the curved bottom edge.
- Align both outer sides.
- Align the two shoulder tabs and the curved neckline opening.
- Clip the felt layers together at the sides and lower edge.
Layer checkpoint: Two matching dusty-rose felt layers, one embroidered front and one plain back, with the hanging ribbon ends enclosed at the shoulders.
Blanket Stitch the Outside Edge
- Thread an embroidery needle with two strands of ivory floss.
- Secure the starting thread between the felt layers near the lower side of the bib.
- Bring the needle up approximately 1/8 inch inward from the cut edge.
- Begin a small blanket stitch, passing through both felt layers.
- Keep the working thread beneath the needle as you draw it through, forming a neat loop along the edge.
- Move approximately 1/8 inch along the outline and make the next stitch.
- Continue around the lower rounded edge.
- Keep the stitches evenly spaced as the edge curves upward.
- Work up the outer side of the bib toward the first shoulder.
- Follow the rounded shoulder outline carefully, using shorter spacing where the curve is tight.
- Continue around the opposite shoulder and outer side as you work around the complete silhouette.
- Join the final stitch neatly to the starting stitch.
- Secure the thread between the felt layers and trim the loose end.
You can begin anywhere along the lower edge. Just keep working in one direction until the entire outside edge is joined.
Outer-edge checkpoint: The two felt layers are joined around the outside, with ivory blanket stitches visible along the rounded bottom, sides, and shoulder tabs.
Blanket Stitch Around the Neckline Opening
The neckline is a separate inner edge, so it needs its own stitching path. This is what keeps the U-shaped opening neat and holds the front and back layers together around the cutout.
- Thread the needle with another length of ivory floss.
- Begin at the inside edge of the left shoulder.
- Hide the starting knot between the felt layers.
- Make a small blanket stitch through the front and back felt, catching the ivory neckline trim where it meets the cutout.
- Follow the inner curve downward toward the lowest part of the U.
- Keep the stitches approximately 1/8 inch apart.
- Shorten the spacing slightly if the curve requires it.
- Continue around the bottom of the U without crossing the open space.
- Work upward along the opposite side of the neckline.
- Finish at the inside edge of the right shoulder.
- Secure the thread between the felt layers.
- Trim the loose thread end.
Neckline stitching checkpoint: The neckline remains open, both felt layers are joined along its complete curve, and the ivory trim lies flat against the decorated front.
If the neckline starts to bunch, loosen the last few stitches and work them again without pulling the floss so tightly. The opening should keep its rounded bib shape.
Add the Two Ivory Shoulder Crosses
The little ivory X stitches aren't just decoration. They'll give each ribbon attachment another set of holding stitches and match the revised ornament photograph.
- Place the assembled dusty-rose bib with its front facing you.
- Find the left shoulder tab where the satin ribbon emerges.
- Thread a needle with ivory embroidery floss.
- Bring the needle up near the upper-left part of the ribbon attachment area.
- Make one short diagonal stitch down toward the lower-right, passing through the front felt, ribbon, and back felt.
- Bring the needle up near the upper-right part of the same area.
- Make a second diagonal stitch down toward the lower-left, crossing the first to form an X.
- Repeat the crossing stitches once more if needed to hold the ribbon firmly.
- Secure the thread on the back with a small knot worked into the felt, or bury the thread between the layers.
- Repeat the same X-shaped attachment stitches at the right shoulder.
- Gently lift the ornament by its ribbon to check that both shoulder attachments remain secure.
Shoulder checkpoint: Two small ivory X stitches, one on each shoulder, holding the ribbon ends between the felt layers.
Don't add another ribbon or a central hanging loop. The one ribbon connecting the shoulders is all the ornament needs.
Assemble the Ivory and Blush Bibs
- Match the decorated ivory bib front with its plain ivory back.
- Check that the hanging ribbon ends are enclosed at the two shoulders.
- Blanket stitch the outside edge with ivory floss.
- Blanket stitch the curved neckline opening.
- Add the two ivory X stitches at the shoulders, passing through the ribbon ends.
- Repeat the complete assembly with the blush-pink bib.
- Lay all three ornaments together with their decorated fronts facing up.
- Check that the shoulder tabs, necklines, and hanging loops match the intended design.
Assembly checkpoint: Three flat, two-layer felt bib ornaments with stitched ivory necklines, separate shoulder ribbon attachments, and securely joined outer edges.
Make and Attach the Small Satin Bows
Each bib gets one small dusty-rose satin bow at the right side of its ivory neckline. The bow sits near the shoulder, not in the middle of the bib.
Keep the bows fairly small. I think the ornaments look prettier when the satin bow is a little finishing touch rather than the largest thing on the bib.
Tie the First Satin Bow
- Cut one 6-inch length of narrow dusty-rose satin ribbon.
- Lay the ribbon on a flat surface.
- Make one small loop with the left side.
- Make a second loop with the right side.
- Cross the loops and tie them into a bow.
- Gently tighten the center knot.
- Adjust the loops until the bow measures approximately 3/4 to 1 inch across.
- Arrange the two tails so they point downward.
- Trim the tails if they're too long.
There's no need to make enormous loops. A small knot and two short tails are enough.
Sew the Bow to the Right Neckline
- Place the dusty-rose bib ornament front facing up.
- Find the right end of the ivory U-shaped neckline trim.
- Position the satin bow just below the right shoulder tab.
- Center its knot over the junction between the trim and bib front.
- Turn the ribbon tails downward along the right side of the neckline.
- Thread a hand-sewing needle with dusty-rose sewing thread.
- Make two or three small stitches through the back of the bow knot and the felt underneath.
- Keep the stitches hidden beneath the knot.
- Secure the thread on the back, hiding the end between the felt layers where possible.
- Check that the bow doesn't slide out of position.
Bow placement checkpoint: One dusty-rose satin bow near the right neckline, with its tails pointing down and the embroidered star still completely visible.
Add the Other Two Satin Bows
- Cut two more 6-inch lengths of narrow dusty-rose satin ribbon.
- Tie each length into a small bow.
- Position one at the right neckline of the ivory bib.
- Sew it through the knot into the felt.
- Repeat with the blush-pink bib.
- Check that all three bows sit in approximately the same position.
Three-bow checkpoint: One small dusty-rose satin bow on the right neckline of each bib, with no bow covering the embroidered designs.
Finishing and Ornament Quality Check
Before you hang the bibs on a tree or package them as favors, I'd check each one carefully. They're small projects, and it's much easier to fix a loose stitch now than after you've wrapped them.
Check the Shape and Stitching
- Place the three finished bibs on a flat surface with their fronts facing up.
- Check that each ornament measures approximately 4 inches wide and 3 1/2 inches tall.
- Compare the rounded bottom edges and outer sides.
- Make sure each neckline has a distinct U shape with two rounded shoulder tabs.
- Inspect the blanket stitching along the outside edge of every bib.
- Inspect the inner neckline stitching, making sure the full curve is joined.
- Check that the ivory neckline trims lie flat.
- Look for loose knots or thread ends.
- Trim any remaining loose threads without cutting into the finished stitches.
Shape checkpoint: Three miniature bibs that lie flat, with smooth rounded bottoms and open necklines. The shoulder tabs shouldn't curl inward or pull toward each other.
Check the Hanging Ribbons
- Hold the dusty-rose bib by its hanging ribbon.
- Check that the ribbon rises from the left and right shoulders.
- Make sure both ribbon ends are secured between the felt layers.
- Inspect the two ivory X stitches at the shoulder attachments.
- Check that the ribbon isn't twisted.
- Gently pull upward on the loop to check that neither end slips out.
- Repeat the same inspection on the ivory and blush bibs.
If a ribbon end moves, don't rely on the outer blanket stitching alone. Add another secure set of stitches through the ribbon and both felt layers at that shoulder.
All three ornaments should hang with their bib fronts facing forward and the neckline openings remaining visible.
Check the Embroidered Designs and Satin Bows
- Check that the dusty-rose bib has one ivory eight-point star.
- Check that the ivory bib has one embroidered dusty-rose thread bow.
- Check that the blush bib has one ivory six-arm snowflake.
- Inspect the embroidery for loose stitches.
- Check that each ornament has one small satin bow at the right neckline.
- Make sure the satin bows are sewn through their knots and cannot slide off.
- Arrange the satin tails so they point downward.
- Remove any remaining pins, clips, or temporary marking threads.
- Check the front and back of each ornament for exposed sharp points or loose thread ends.
Finished set checkpoint: Three flat felt baby bib ornaments, three ivory neckline trims, three embroidered motifs, three satin neckline bows, and three hanging ribbons with six separate shoulder attachments.
There's no stuffing, no removable hardware, and no separate hanging loop at the middle of the neckline.
Care and Storage
I'd keep these in a small box between Christmas seasons, with a piece of tissue paper between them if the satin bows are getting pressed flat.
If the felt needs cleaning, gently spot-clean it with a barely damp cloth and let it air-dry. Avoid soaking the ornaments or putting them through the washing machine. The hand embroidery and satin ribbons are best handled gently.
These are decorative Christmas ornaments, not wearable baby bibs or children's toys. Keep the hanging ribbons and small decorative pieces out of a baby's reach.
Christmas Baby Shower Favor and Tree Display Ideas
These little bibs were designed to work as both Christmas decorations and baby shower favors. Guests can hang them on their own trees later, which is a nice way to give them something useful beyond the party.
Use Them as Christmas Baby Shower Favors
For a pink Christmas baby shower, you can make several sets using the same three colors. I'd repeat the star, embroidered bow, and snowflake designs rather than trying to invent a different motif for every guest.
Place each ornament in a small paper envelope or a simple gift bag with tissue paper. The satin hanging loop can be folded gently behind the bib without creasing the neckline.
You'll want to choose packaging large enough for the 4-inch-wide ornament. Don't fold the felt bib in half to make it fit.
If you're using plain ivory envelopes, a dusty-rose satin ribbon around each one would be enough decoration. There's no need to add glitter or little plastic embellishments.
Hang Them on a Small Christmas Tree
You could also hang the three finished ornaments together on a small Christmas tree at the shower. The two pink bibs look pretty on either side of the ivory one, and the matching satin ribbons keep the set looking coordinated.
Use the hanging loops to place the ornaments on secure branches, with the embroidered fronts facing outward.
Keep the tree and hanging decorations out of the baby's reach.
Make a Larger Matching Set
Once you've made the first three ornaments, you can use the same templates to cut more. For six favors, double the cutting quantities. For twelve, multiply them by four.
I'd cut all the felt pieces first, then embroider the fronts in batches. After that, you can attach the necklines, add the ribbons, and sew each ornament together.
If you're making enough for a whole shower, finish one complete sample first. That way, you can check the ribbon length, felt thickness, and stitch spacing before repeating the work.
Change the Colors Without Changing the Pattern
You can use this same bib outline for other Christmas colors. Red felt with an ivory neckline would be pretty, and a pale blue version could work for a winter baby shower.
I'd keep the separate shoulder attachments and curved neckline exactly as they are. Those details are what make the ornament recognizable as a baby bib.
If you're looking for more projects using felt, you can find additional ornaments and appliques on my free felt crafts and patterns page.
You can also see how these little bib ornaments fit with the other projects in our DIY pink Christmas decorations collection.
That's the finished set. Three little felt bibs, three embroidered designs, and a few pieces of satin ribbon. They're small enough to make as party favors, but pretty enough to keep for your own Christmas tree.
When you click on links to various merchants on this site and make a purchase, this may result in this site earning a commission. This does not affect the price you pay.

UBGI Gold Standard 2026
Reviewed under the site's
editorial checklist.
Photos, decorating ideas, party setups and reader submissions are shared for inspiration unless a page is specifically presented as a pattern, tutorial, reference guide or step-by-step project. Follow the instructions, measurements, safety guidance and manufacturer directions provided for the particular project or product.
About Jan | Contact | Baby Nursery Ideas (Blog) | Site Map | Privacy Policy | Disclosure Policy | Disclaimer | Affiliate Disclosure | Earnings Disclosure | Facebook | Pinterest
I am a participant in the Amazon Services LLC Associates Program, an affiliate advertising program designed to provide a means for us to earn fees by linking to Amazon. As an Amazon Associate I earn from qualifying purchases.
Copyright © 2006-2026. All Rights Reserved.