DIY Baby's First Christmas Tree Skirt with Yearly Handprints
By Jan Bay
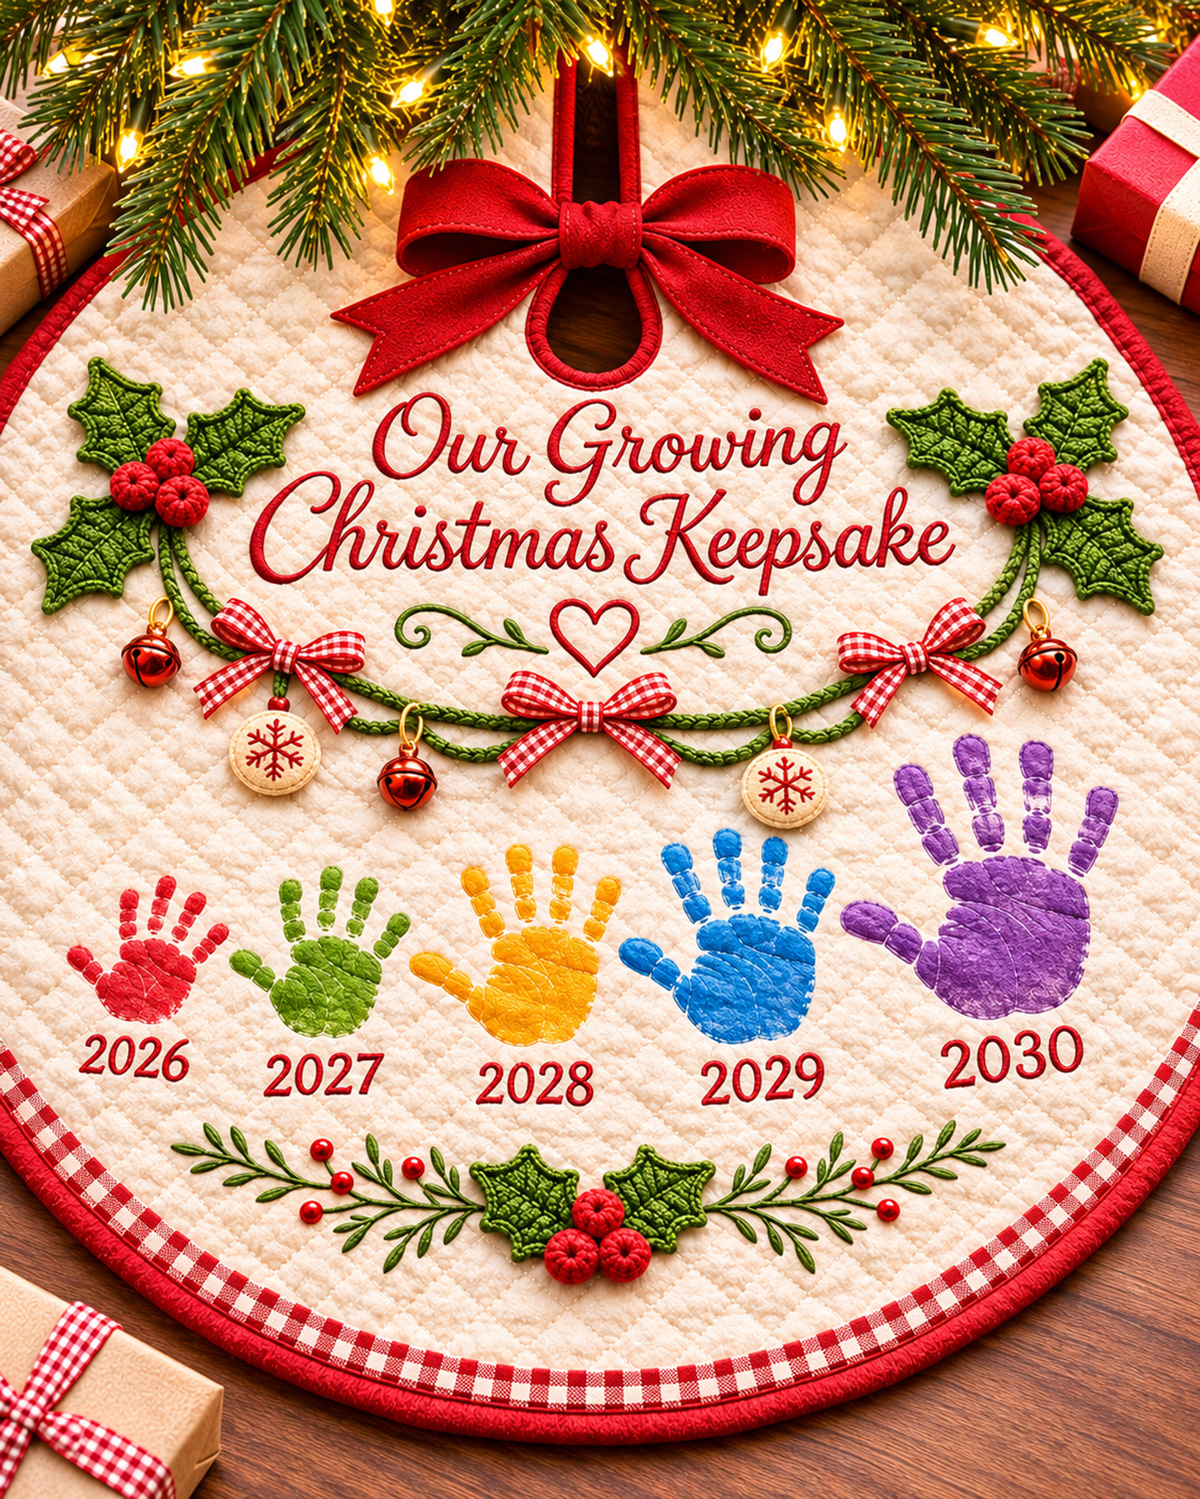
Make a DIY Baby's First Christmas Tree Skirt that grows more meaningful every year! Start with one tiny handprint and the year of baby's first Christmas, then add another print and date each Christmas to watch how your child's hands grow. This keepsake features a quilted ivory tree skirt, a festive holly garland, and optional crocheted decorations. You can paint the dates directly onto the fabric for an easier project or embroider them for a traditional handmade finish. No complicated handprint appliqué pieces are needed.
More Baby Christmas Keepsakes and Crafts
Baby Christmas Crafts and Keepsakes
Free Crochet Holly Leaf and Berry Pattern
See Supplies for This Project Here.
Jump to the DIY Tree Skirt Instructions
Materials and Supplies for Your DIY Baby's First Christmas Tree Skirt
Before you start, I'd gather the tree skirt fabric, paint, and trim first. You can add the fancy Christmas decorations afterward. The handprints are the reason we're making this keepsake, so I wouldn't let the holly, bows, or embroidery turn it into a project that's harder than it needs to be.
For the tree skirt itself, you'll need:
- 1 1/2 yards of ivory or cream pre-quilted fabric, at least 50 inches wide after any preparation or shrinkage. A 54-inch-wide fabric gives you more cutting room.
- 6 1/2 yards of red double-fold bias binding, approximately 3/4 inch wide when finished, suitable for the thickness of your quilted fabric.
- 1/2 yard of red-and-white gingham cotton fabric for the curved border, plus 1 yard of narrow red-and-white gingham ribbon for the three small bows.
- Approximately 3 yards of green cotton decorative cord, about 1/8 inch thick, for the double-strand garland.
- One 30 to 36-inch length of wide red ribbon for the bow at the tree opening.
- Approximately 2 yards of narrow red twill tape for the tree skirt's closure ties.
- Small pieces of red and ivory felt or cotton fabric for the five flat Christmas baubles.
- Red, green, and cream sewing thread.
- Embroidery floss in evergreen, cranberry red, and a little gold.
- Embroidery needle, regular sewing needle, and sewing machine.
- Fabric scissors or rotary cutter, cutting mat, ruler, flexible tape measure, and marking pencil.
- Large paper, pencil, string, and chalk for drawing the circular cutting line.
- Small amount of lightweight fusible embroidery stabilizer or a suitable removable stabilizer for lettering, if needed.
For the yearly handprints, gather:
- A baby handprint kit or inkless print pad labeled for the intended age and use.
- Plain white paper to preserve the original handprint.
- Permanent textile paint in red, green, golden yellow, blue, and purple.
- A small foam applicator or stencil brush.
- Reusable stencil film or another stencil material suitable for fabric.
- A fine-tip fabric paint pen for the dates, if you prefer painting instead of embroidery.
- Scrap quilted fabric for checking the print and paint finish.
- A washable fabric-marking pencil.
Important: Ordinary permanent fabric paint is intended for fabric, not automatically for a baby's skin. Capture the original handprint with an appropriate baby handprint product, then use that print to make a stencil for the tree skirt. That way, you can keep the baby's actual hand shape without putting textile paint directly on the skin.
If you want to read more about choosing and handling art products, Poison Control's guide to the safe use of art products explains why product labels and intended uses matter.
Optional Crochet Holly Supplies
The crocheted holly is a lovely finishing touch, but you don't need to make it to complete the keepsake. I'd treat it as an upgrade you can add after the tree skirt and first handprint are finished.
- Smooth worsted-weight cotton yarn in evergreen green, approximately 90 yards to allow for all three clusters and adjustments.
- Red worsted-weight cotton yarn, approximately 30 yards.
- 4.0 mm crochet hook.
- Yarn needle.
- Small amount of fiberfill for the optional dimensional berries.
- Blocking pins and mat, if needed.
If you already have leftover red and green yarn from Christmas projects, use it here. There's no need to buy large skeins for a few holly leaves.
Finished Tree Skirt Dimensions and Handprint Layout
The finished tree skirt is designed to measure approximately 48 inches across. That's a useful size for a household Christmas tree, and it gives you room for several years of handprints without crowding them together. The example image illustrates the proposed finished design, and the measurements below are calculated construction targets rather than measurements from a sewn sample.
Here's the planned size of each part:
- Tree skirt: Approximately 48 inches in diameter.
- Center trunk opening: 5 inches across.
- Back opening: One straight slit from the outer edge to the center opening, approximately 21 1/2 inches long.
- Outer gingham border: Approximately 1 inch wide.
- Finished red binding: Approximately 3/4 inch wide.
- Embroidered centerpiece: About 19 to 20 inches wide overall, arranged on two lines.
- Decorative garland: Approximately 36 inches between the two upper holly clusters, with a gentle downward curve.
- Handprints: Five reserved positions, beginning with 2026 and continuing through 2030.
- Upper crochet holly: Two large three-leaf clusters.
- Lower crochet holly: One smaller two-leaf cluster with berries.
Plan the Five Handprints Before Painting Anything
The example image shows five handprints so you can see what the keepsake could look like after several Christmases. But if you're starting this project in 2026, you'll only add the first handprint now.
Leave the other four spaces empty. Those belong to Christmases that haven't happened yet!
The arrangement follows a shallow curve across the lower half of the skirt:
- 2026: Small red handprint toward the lower left.
- 2027: Green handprint a little lower and closer to the center.
- 2028: Golden yellow handprint near the middle.
- 2029: Blue handprint toward the lower right.
- 2030: Purple handprint at the far right.
Each future print should be a little larger as your child grows, but don't try to force the prints into exact sizes. These are real hands, not manufactured decorations.
For planning, allow roughly 3 to 3 1/2 inches of height for the first print and up to 6 inches for the last one. Those are layout allowances, not promises about how large your child's hand will be.
A Simple Placement Map
Lay the tree skirt flat with the trunk opening at the top. Imagine a vertical line running from the center opening to the bottom edge.
Use the original center of the full circle as your measuring point. Measure down toward the bottom edge for the vertical positions and left or right for the horizontal positions.
- 2026: 15 inches left of center, about 12 inches down.
- 2027: 7 1/2 inches left of center, about 14 inches down.
- 2028: Centered horizontally, about 16 inches down.
- 2029: 7 1/2 inches right of center, about 14 inches down.
- 2030: 15 inches right of center, about 12 inches down.
Those points mark the approximate centers of the handprints, not the fingertips or the dates. Keep about an inch between the planned handprint areas and the nearby decorations. Place each year directly below its matching print.
I'd make a little paper handprint template for every reserved position before permanently decorating the skirt. You can move the templates around until the whole arrangement looks right.
The future positions are guides. If your child's hand grows faster than expected, shift a later print slightly toward the open space. There's no reason to crowd two handprints together just to follow a measurement.
And keep the thumbs! Each print needs a clearly recognizable palm, four fingers, and a thumb. That's the whole point of preserving the shape of your child's hand.
How to Make the Quilted Christmas Tree Skirt
I'd start with pre-quilted fabric for this one. You still get the pretty diamond-stitched background shown in the example image, but you don't have to spend hours quilting a large circle before you can begin the keepsake.
Choose fabric with a fairly flat surface and small, evenly spaced quilting. Very puffy fabric can make painted handprints look broken where the paint skips over the stitched valleys.
Step 1: Prepare and Check the Fabric
Check the care instructions before washing or pressing the quilted fabric. If it's washable, prepare it according to the manufacturer's directions so you aren't surprised by shrinkage later.
Make sure the prepared fabric still gives you at least a 48-inch circle with room to cut. If it has shrunk below that size, you'll need a larger piece or a smaller finished skirt.
Spread the quilted fabric on a large, clean surface. Smooth it without pulling or stretching the quilting.
Choose the side with the nicest appearance as the right side. Mark the wrong side with a little piece of removable tape so you don't get the two faces mixed up.
Step 2: Cut the 48-Inch Circle
Cut a square measuring 48 inches by 48 inches from the quilted fabric.
Mark the exact center, 24 inches from each edge.
Tie a pencil or fabric marker to a string so the distance from the pencil tip to the center point is 24 inches. Hold the string at the center and draw a full circle.
You can also use a flexible tape measure. Measure 24 inches from the center at several points around the fabric, mark those points, and connect them with a smooth curve.
Cut carefully along the outer circle. You'll have one circular quilted panel approximately 48 inches across.
I'd cut through one layer at a time if the pre-quilted fabric is thick. Trying to cut several folded layers at once can leave the edges uneven.
Step 3: Make the Center Opening
Mark a smaller circle exactly in the middle of the tree skirt. It should measure 5 inches across, which means the cutting line is 2 1/2 inches from the center point all the way around.
Carefully cut out this smaller circle.
Now mark a straight line from the top outside edge of the skirt to the nearest edge of the center opening. Keep the line aligned with the original center mark.
Cut along that line. The slit should measure approximately 21 1/2 inches from the outer edge to the center opening.
This is the opening that lets you wrap the finished skirt around the Christmas tree without lifting the tree.
Step 4: Mark the Decorations Before Sewing
Lay the skirt flat again with the slit pointing straight up.
Use removable fabric marks to reserve these areas:
- The main wording in the upper center, starting below the trunk opening.
- Two large holly clusters, one to the left and one to the right of the wording.
- The curved garland running beneath the wording.
- Five growing handprint positions in the lower half.
- A small decorative greenery spray near the lower edge.
Don't sew on the garland or crochet pieces yet. We want the permanent handprint paint and lettering finished first, especially if your fabric paint needs heat setting.
Step 5: Embroider the Christmas Keepsake Message
The wording in the finished example is:
Our Growing
Christmas Keepsake
Place the wording in two centered lines, leaving the handprint area below it open. Aim for a complete lettering block about 19 to 20 inches wide and approximately 5 inches tall, beginning roughly 4 inches below the original center point of the skirt.
Choose a flowing script font in a word-processing program, enlarge the lettering to fit, and print the words across several sheets of paper if necessary. Tape the pages together, then transfer the outlines to the quilted fabric with removable fabric-transfer paper.
If your fabric is too thick to trace through, use a washable marking pencil and transfer the lettering one small section at a time.
Use cranberry-red embroidery floss and work the letters with a stem stitch or small backstitches. The curved lettering looks particularly nice with a stem stitch, but use whichever one you're comfortable making.
For a fuller appearance, work two closely spaced rows of stitching on the wider parts of the letters. Keep the lettering even rather than trying to make every stroke very thick.
I'd embroider a small red heart centered just below the wording. Outline it with backstitch and leave the inside unfilled, as shown in the example. Add a short green leafy sprig on each side of the heart with stem stitches for the stems and lazy-daisy or straight stitches for the leaves.
Before removing the stabilizer, check the back of the lettering. Secure the floss ends without pulling the quilted fabric into puckers. Remove or trim the stabilizer according to its directions.
If you want to make the title with a fabric paint pen instead, that's an easier optional finish. Keep the same lettering position and let the paint dry and cure according to its label before going farther.
Step 6: Add the Red Binding and Gingham Border
For the decorative border, the gingham needs to follow a circle. Straight woven ribbon can wrinkle along a curved edge, so I'd use bias-cut gingham fabric instead.
Cut 1 1/2-inch-wide bias strips from the gingham fabric. Join the ends with diagonal seams until you have approximately 4 1/2 yards of continuous strip. Press the seam allowances open.
Press each long raw edge of the strip 1/4 inch toward the wrong side. The finished strip should be about 1 inch wide.
Starting near the back slit, arrange the gingham strip just inside the outer edge of the skirt. Keep the outer folded edge about 3/4 inch in from the cut edge, so the red binding will sit outside it.
Pin or clip the gingham band around the full circle. Ease it gently along the curve without stretching the quilted fabric.
Join the ends at the back slit. Stitch along both folded edges with matching thread, keeping the strip flat.
Next, bind the raw edge of the entire tree skirt with red double-fold bias binding. This includes the large outside circle, both sides of the back slit, and the small center circle.
Open one fold of the binding and stitch it to the raw edge, following the manufacturer's instructions for the binding you're using. Fold it around to the other side and secure it with a second row of stitching, catching the folded edge completely.
Work slowly around the center circle. A flexible bias binding will follow that tighter curve more neatly than straight-grain fabric. At the two junctions where the slit meets the center opening, turn the binding carefully and secure the corners without leaving loose raw edges.
Once you're finished, the skirt should have a continuous red edge with a narrow gingham band immediately inside it.
Step 7: Add the Back Closure Ties
Cut six pieces of narrow red twill tape, each approximately 12 inches long. Turn under and stitch one end of each piece. This will be the free end used for tying. The opposite end will be sewn to the tree skirt. Tuck that raw end under at its attachment point so no cut edge remains exposed.
Place three ties along one side of the back slit and three matching ties directly opposite them.
Position one pair near the center opening, one pair around the middle of the slit, and the final pair toward the outside edge. Keep each tie's attached end about 3/4 inch inside the bound edge.
Sew each tie down securely with a small rectangle of stitching and an X through the center. Make sure your stitches catch the underlying quilted fabric, not just the binding.
The ties should close the slit neatly without pulling the skirt into folds.
Finally, add the wide red ribbon bow at the center opening. Cut your 30 to 36-inch ribbon into two equal lengths. Finish one end of each piece by folding the cut edge under and stitching it neatly. On the other end of each piece, fold under about 1/2 inch and stitch it securely to the quilted fabric, placing one ribbon on each side of the back slit about 1 inch from the center opening. Use a small rectangle of stitching with an X through the middle, just as you did for the smaller closure ties.
Bring the two free ribbon ends together across the slit and tie them into the large decorative bow shown in the example image. Adjust the loops and tails until they lie neatly against the quilt. Leave the bow untacked so you can untie it when removing the skirt from the tree.
The large bow is decorative. The smaller closure ties are what hold the skirt around the tree.
Checkpoint: Lay the finished base flat. The outside edge should form a circle, the center opening should lie flat, and the slit should close without bunching. The skirt should still measure close to 48 inches across.
How to Add Baby's First Handprint to the Christmas Tree Skirt
Now for the part that makes this tree skirt worth saving. Your baby's first little handprint goes on the lower left, with plenty of room beside it for the next four Christmases.
I'd do the handprint on paper first. You get to keep the original, you don't have to bring the baby anywhere near permanent fabric paint, and you can take your time getting the shape onto the quilt.
Step 1: Capture the Original Handprint
Use an inkless baby handprint kit or another product specifically labeled for the baby's age and the way you intend to use it.
Read the kit directions before beginning. Have a clean sheet of paper ready, and ask another adult to help if you need someone to support the baby while you position the hand.
Gently spread the fingers enough to get a recognizable print, including the thumb. Don't force the hand open if your baby wants to curl those little fingers.
Make the impression according to the kit directions. Lift the hand without dragging it sideways across the paper.
If the print comes out a little uneven, that's fine. I'd rather save a recognizable little hand than try to make it look as perfect as a rubber stamp.
Label the paper with your baby's name, the date, and the year 2026. Keep that original paper print with your other keepsakes.
Step 2: Make a Handprint Stencil
Let the original paper print dry completely if the product requires drying.
Place transparent stencil film over the print. Trace carefully around the outside of the palm, thumb, and all four fingers.
Don't straighten the fingers or change their proportions. The little differences in shape are part of what makes the print personal.
Cut out the traced hand shape with a craft knife on a cutting mat. Keep the outside stencil piece, which has a hand-shaped opening in it.
An adult should handle the craft knife and all cutting. Keep needles, pins, small decorations, paint, stencil adhesive, and other craft supplies out of your baby's reach. Follow the product labels, work in a well-ventilated area when the materials call for it, and clean your work surface after finishing.
Check that the thumb is separated from the fingers and that the spaces between the fingers are open all the way down to the natural webbing.
This stencil preserves the size and outline of the original handprint. It won't reproduce every tiny palm crease from the paper print, but you can give the painted shape a more natural stamped appearance by applying the fabric paint lightly rather than filling it with a heavy, perfectly smooth coat.
If you want to save the original paper print and still make matching handprint crafts, my baby handprint crafts page has more ideas for using those little prints.
Step 3: Practice on Scrap Quilted Fabric
Before touching the actual tree skirt, put the stencil on a leftover piece of the same quilted fabric.
Secure the stencil with a removable tape or stencil adhesive that is suitable for fabric. Follow the adhesive's directions and test for residue on the scrap first.
Apply a small amount of red textile paint to a foam applicator. Dab the paint into the opening, working from the middle of the palm outward toward the fingers.
Use light pressure. Too much paint can creep underneath the stencil and close the little spaces between the fingers.
Lift the stencil straight up. Check whether the fingertips, thumb, and palm are recognizable.
If the paint skipped over the quilting lines, try a second light application on another scrap. If it spread beyond the fingers, use less paint or a firmer stencil seal.
I'd practice until you get a result you're happy with. It's much easier to adjust the paint on a scrap than on the finished skirt.
Step 4: Paint the 2026 Handprint
Lay the tree skirt flat with the outside facing up. Smooth the fabric and check that the area reserved for 2026 is clean and dry.
Position the stencil approximately 15 inches to the left of the original center point and about 12 inches down from it. Adjust the placement so the entire handprint fits comfortably inside the border, leaving room for the year underneath.
Secure the stencil, making sure every fingertip and the thumb are lying flat against the quilted fabric.
Apply the red fabric paint in light layers using the same technique that worked on your practice piece.
Pay particular attention to the thumb. It should have its own clear outline instead of disappearing into the palm.
Remove the stencil carefully while following your paint manufacturer's removal directions. Don't smear the wet edges as you lift it.
Leave the painted handprint alone until it is dry.
I'd choose permanent fabric paint that cures without ironing for this project. You'll be adding another handprint every Christmas, and you won't want to heat-set paint around the finished ribbons, crochet decorations, and baubles. Check that the paint is compatible with your quilted fabric, practice on a leftover piece, and follow the manufacturer's drying and curing directions. If you're painting the dates too, choose a fabric paint pen that doesn't require heat setting.
Don't add the crochet decorations, garland cords, or felt baubles until the paint has received any required curing or heat treatment.
Handprint checkpoint: Before adding the date, check that you can clearly see the palm, four separate fingers, and the thumb. The print should stay inside the planned space without touching the gingham border.
Paint or Embroider the Christmas Dates
You don't have to embroider every year onto this skirt. A fabric paint pen is perfectly fine, and it's the option I'd suggest if you want to keep this project simple.
With one small handprint to add every December, the date shouldn't turn into a major sewing job.
Option 1: Write the Year with Fabric Paint
Wait until the handprint paint is dry enough for the next step according to the product instructions.
Use a washable marking pencil to draw a light guideline beneath the handprint. Leave roughly 1/2 to 3/4 inch between the bottom of the palm and the top of the numbers.
Write 2026 in simple, readable numbers with a fine-tip red fabric paint pen.
Aim for numbers approximately 3/4 inch tall. If the handprint is particularly small, make the numbers a little smaller so the date doesn't look larger than the hand.
Keep the numbers close together and centered beneath the print.
Let the lettering dry completely and follow the paint manufacturer's instructions for curing and laundering.
That's all you need.
Option 2: Embroider the Year
If you like a traditional stitched finish, write the year lightly with a washable fabric-marking pencil.
Thread an embroidery needle with two or three strands of red embroidery floss.
Starting at the first number, use small backstitches to follow the marked lines. Keep the stitches short enough to make the curves smooth.
Work each number separately. Secure the thread on the back before moving to the next number if there's a long gap between them.
Don't pull the embroidery tight. The quilting should stay flat around the numbers.
Repeat until all four numbers are complete. Weave the thread ends securely into the stitching on the back.
Should All Five Years Match?
I'd keep the date lettering the same style each Christmas, even if the handprints are different colors.
You can paint every date in red, as shown in the example image, or embroider every date in the same red floss.
The handprints will change as your child grows. Keeping the lettering consistent gives the finished skirt a more finished appearance.
If you prefer to mix methods, that's fine too. Just try to keep the number size and spacing similar.
Add the Holly and Bauble Garland
Now we can bring back the pretty Christmas garland from the finished example. I wouldn't skip it if you're making the full decorated version. It gives the tree skirt a little Christmas sparkle without competing with the handprints.
The garland hangs in a gentle curve beneath the embroidered wording. There are two strands of green cord, three little gingham bows, and five small Christmas baubles. A large crocheted holly cluster finishes each end.
Because this is a keepsake that may be displayed near a baby or small child, I'd make the baubles as flat, sewn-on fabric decorations instead of attaching real bells or breakable ornaments. You get the same festive look without hanging loose hardware from the skirt.
Step 1: Mark the Garland's Curve
Lay the skirt flat with the top opening at twelve o'clock.
Mark two garland attachment points approximately 18 inches left and right of the original center, about 7 1/2 inches below it.
Mark the lowest point of the garland roughly 11 1/2 to 12 inches below the original center.
Connect the three points with a smooth, shallow curve using a flexible ruler or a piece of string.
Check that the curve sits below the embroidered words and above the handprint spaces. Move it slightly upward if a future handprint would otherwise touch it.
I'd rather adjust the garland now than have the 2030 handprint squeezing into the gingham border later.
Step 2: Attach the Green Garland Cords
Cut two pieces of green cotton decorative cord, each approximately 45 inches long. Lay them along the marked curve and trim only after checking the fit.
Arrange the first cord along the main line, starting at the left attachment point and ending at the right.
Place the second cord just above the first, allowing the two strands to come together at several points. The finished garland should look like two gently intertwined evergreen ropes, not two widely separated lines.
Use matching green sewing thread to couch the cords onto the quilted fabric. Make a small stitch over each cord approximately every inch, adding extra stitches near the curved sections and ends.
Take the stitches through the quilted layers so the cords stay securely attached.
At both ends, tuck the cord tails beneath the planned crochet holly clusters and stitch them down. Don't leave loose, dangling cord ends.
Checkpoint: Lift the skirt gently. The cords should stay against the fabric rather than swinging freely beneath it.
Step 3: Make Five Fabric Christmas Baubles
Cut three circles from red felt or cotton fabric, each about 1 1/4 inches across.
Cut two circles from cream felt, each about 1 1/2 inches across.
Arrange them along the garland in this order:
- One red bauble near the left end.
- One cream bauble left of center.
- One red bauble near the middle.
- One cream bauble right of center.
- One red bauble near the right end.
For the three red baubles, I'd use red satin-finish fabric if you have it. Embroider two short curved gold lines across each one, then add a narrow dark-red horizontal slit near the bottom to suggest the jingle-bell ornaments in the example image. Keep these decorations flat and sew them securely around their edges rather than attaching small metal bells. They'll have the same festive colors and placement, although they won't have the raised metallic finish shown in the picture.
For each cream bauble, embroider a small red snowflake. Start with three straight lines crossing at the center, then add two tiny branch stitches near the ends of each line.
Position each fabric circle just below the garland, leaving enough room between decorations for the gingham bows.
Sew each circle directly onto the quilted fabric with small stitches all the way around its edge. Use matching thread and keep the shapes flat.
Embroider a short gold hanging loop between the top of each bauble and the garland. The loop is decorative stitching, not a separate piece of hardware.
You'll end up with five ornaments that appear to hang from the garland but are actually secured against the skirt.
Step 4: Add the Three Gingham Bows
Cut three lengths of narrow gingham ribbon, each about 9 to 10 inches long.
Tie each length into a small bow with loops approximately 1 to 1 1/2 inches wide. Trim the tails so they don't cover the handprints below.
Position one bow toward the left third of the garland, one in the center, and one toward the right third.
Adjust the bows until the spacing looks balanced with the five baubles.
Use matching sewing thread to secure each knot directly through the quilted fabric. Add one small stitch through each loop so the bow doesn't rotate or come loose.
The bows should lie against the quilt rather than hang down.
Step 5: Add the Lower Greenery and Berry Decoration
The smaller greenery spray along the bottom of the example image is worth including. It gives the lower edge a finished look without enclosing the handprints inside a heavy border.
Mark a shallow curved stem below the three middle handprints, roughly 2 to 3 inches inside the lower edge of the skirt. Let the ends rise slightly toward the outer handprints without crossing the dates.
Keep this decoration mainly across the lower middle of the skirt. The two outside prints need enough room for their years.
Embroider the stem in evergreen floss using stem stitch or small backstitches.
Add pairs of leaves along the stem with lazy-daisy stitches, alternating them from one side to the other. Make each leaf approximately 1/2 to 3/4 inch long.
Add three small red berry groups along the greenery. Each group can have two or three berries made with small satin-stitched circles approximately 1/4 inch across.
Leave the center of the lower garland open for the small crocheted holly cluster.
If you're skipping the crocheted holly, you can embroider a simple holly spray in the center instead. Use three pointed green leaves with red satin-stitched berries.
There's no need to cover the entire bottom edge with greenery. The gingham border already does that job.
Optional Crochet Holly Leaves and Berries
If you crochet, this is a nice place to use a little leftover Christmas yarn. The finished example has two large holly clusters near the upper ends of the garland and one smaller cluster centered near the bottom.
You can make them now, or save them for another Christmas. The tree skirt will still work perfectly well without them.
The holly is based on my free crochet holly leaf pattern with berries, which also includes a smaller version for other holiday projects.
Finished Crochet Holly Pieces
To decorate this particular tree skirt as shown, make:
- 6 large green holly leaves, 3 for each upper cluster.
- 6 large red crocheted berries, 3 for each upper cluster.
- 2 small green holly leaves for the lower cluster.
- 3 small flat red crocheted berries for the lower cluster.
Expected finished measurements:
- Large leaf: approximately 4 1/4 to 4 1/2 inches long.
- Large three-leaf cluster: approximately 7 to 7 1/2 inches across.
- Large berry: approximately 3/4 to 7/8 inch across.
- Small leaf: approximately 2 1/4 to 2 1/2 inches long.
- Lower two-leaf cluster: approximately 3 1/2 to 4 inches across, depending on the angle of the leaves.
These are expected measurements based on the yarn, hook, and stitch construction. The tree skirt arrangement and these specific crochet assemblies have not been physically test-made together.
Crochet Abbreviations
This pattern uses standard U.S. crochet terms.
- ch = chain
- sc = single crochet
- hdc = half double crochet
- dc = double crochet
- tr = treble crochet
- sl st = slip stitch
- sc2tog = single crochet two stitches together
- st/sts = stitch or stitches
- rnd = round
Beginning chains and decorative point chains do not count as stitches unless the instructions say otherwise.
Large Crochet Holly Leaf
Make 6 leaves in evergreen green.
Use worsted-weight cotton yarn and a 4.0 mm crochet hook.
Target gauge: Approximately 17 single crochet stitches and 18 rows = 4 inches with the 4.0 mm hook. The large 17-chain foundation should measure close to 4 inches relaxed, and the small 10-chain foundation should measure about 2 1/4 inches. If yours is noticeably different, adjust your hook size before making all the leaves. These are calculated size targets, not measurements from a physically tested sample.
Foundation: Ch 17.
Round 1: Sc in the second ch from the hook and in each of the next 14 chains. You now have 15 sc.
Work 3 sc in the final chain.
Turn the work so you can crochet along the unused loops on the opposite side of the foundation chain.
Work 1 sc in each of those 15 loops. Do not join. (33 sc)
Checkpoint: You should have 15 sc down one side, 3 sc around the far end, and 15 sc along the opposite side.
Round 2, first side: Work the following sequence:
*Sl st in next st, sc in next st, work (hdc, dc, ch 2, sl st in second ch from hook, dc, hdc) all in next st, sc in next st, sl st in next st.*
Repeat from * to * two more times. You have used 15 stitches from Round 1 and formed 3 pointed holly lobes along the first side.
Round 2, leaf tip: Sc in the next st.
In the next st, work (hdc, dc, tr, ch 3, sl st in second ch from hook and next ch, tr, dc, hdc).
Sc in the next st.
This uses the 3 stitches at the end of the leaf and forms one longer center point.
Round 2, second side: Work the following sequence:
*Sl st in next st, sc in next st, work (hdc, dc, ch 2, sl st in second ch from hook, dc, hdc) all in next st, sc in next st, sl st in next st.*
Repeat from * to * two more times.
Join with a sl st to the first sl st of Round 2.
Fasten off, leaving a long yarn tail if you'll use it to sew the leaf to the tree skirt.
You should have 3 side points on each side and one longer point at the tip, for 7 points altogether.
Add the center vein: Place the leaf with its chosen right side facing up. Join green yarn at the base and work loose surface slip stitches along the foundation chain toward the pointed tip.
Stop just below the tip, fasten off, and weave the ends into the wrong side.
Repeat until you have 6 large leaves.
Large leaf checkpoint: Each finished leaf should measure close to 4 1/4 to 4 1/2 inches long. If your first leaf is much larger or smaller, adjust the hook size before making the other five.
Keep the slip stitches and center vein loose enough that the leaves lie mostly flat. If a leaf curls sharply, check your tension before continuing.
Large Crochet Holly Berries
Make 6 in cranberry-red yarn.
These small dimensional berries are the rounded decorations used in the two upper holly clusters.
Work in continuous rounds. Use a stitch marker to mark the beginning of each round.
Round 1: Make a magic ring and work 6 sc into the ring. Pull the ring closed. (6 sc)
Round 2: Work 2 sc in each st around. (12 sc)
Round 3: Sc in each st around. (12 sc)
Round 4: Sc2tog 6 times. (6 sc)
Remove the stitch marker. Secure the magic-ring starting tail on the inside of the berry.
Add a very small amount of fiberfill, just enough to round the berry.
Cut the yarn, leaving a long sewing tail. Thread the tail through the front loops of the remaining 6 stitches and pull the opening closed.
Shape the berry with your fingers. It should measure approximately 3/4 to 7/8 inch across.
Make the other five berries the same way.
These dimensional berries are for the decorative tree skirt, not for a baby blanket, lovey, bib, or other item a baby may handle or mouth.
Small Crochet Holly Leaves
Make 2 in evergreen green.
Use the same worsted-weight yarn and 4.0 mm hook.
Foundation: Ch 10.
Round 1: Sc in the second ch from hook and in each of the next 7 chains. You have 8 sc.
Work 3 sc in the final chain.
Rotate the work and crochet along the opposite side of the foundation chain. Work 1 sc in each of the 8 unused loops. Do not join. (19 sc)
Round 2, first side: Work the following sequence:
*Sl st in next st, sc in next st, work (hdc, dc, ch 2, sl st in second ch from hook, dc, hdc) all in next st, sl st in next st.*
Repeat from * to * once more. You have used the first 8 stitches and formed 2 side points.
Round 2, leaf tip: Sc in next st.
In the next st, work (hdc, dc, tr, ch 3, sl st in second ch from hook and next ch, tr, dc, hdc).
Sc in next st.
Round 2, second side: Work the following sequence:
*Sl st in next st, sc in next st, work (hdc, dc, ch 2, sl st in second ch from hook, dc, hdc) all in next st, sl st in next st.*
Repeat from * to * once more.
Join with a sl st to the first sl st of Round 2.
Fasten off, leaving a sewing tail.
You should have 2 points along each side and one tip point, for 5 points altogether.
Center vein: Join green yarn at the leaf's base on the right side. Work loose surface slip stitches along the foundation chain, stopping just below the tip.
Fasten off and weave in the ends on the wrong side.
Make the second leaf the same way.
Small leaf checkpoint: Each leaf should measure approximately 2 1/4 to 2 1/2 inches long. The two leaves should be close in size before you arrange them on the skirt.
Small Flat Crochet Berries
Make 3 in red yarn.
These lie flat against the quilted fabric, making them a good choice for the smaller holly decoration along the bottom.
Round 1: Make a magic ring and work 5 sc into the ring. Pull the ring firmly closed. Join with a sl st to the first sc. (5 sc)
Round 2: Ch 1, which does not count as a stitch. Work 2 sc in each stitch around. Join with a sl st to the first sc. (10 sc)
Fasten off, leaving a long tail for sewing.
Weave the starting tail securely through several stitches on the wrong side. Leave the long finishing tail for attaching the berry.
Make 2 more berries.
They should be approximately 5/8 to 3/4 inch across and lie flat without stuffing.
Assemble the Upper Holly Clusters
Make two matching clusters, one for each end of the upper garland.
For the first cluster, lay one large holly leaf with its point facing up and slightly outward.
Angle the second leaf toward the left and the third toward the right. Overlap the stem ends by approximately 1/2 to 3/4 inch.
Arrange the leaves so their pointed edges spread outward rather than lying directly on top of each other.
Use matching green yarn to stitch the overlapping leaf bases together.
Position the cluster over the left garland attachment point, covering the ends of the green cords.
Sew through the quilted skirt and around the outer edges of all three leaves. Follow their pointed shapes with small stitches rather than attaching only the center.
Place three dimensional berries in a little triangle over the joined leaf bases, with one berry above the other two.
Use each berry's long tail to stitch repeatedly through the berry and into the underlying quilted fabric. Secure the yarn on the wrong side and weave in the ends.
Repeat the assembly for the upper right cluster, reversing the leaf angles so the points face outward toward the right edge.
The finished clusters should sit against the quilted fabric without loose leaf points or dangling berries.
Assemble the Small Lower Holly Cluster
Take the 2 small leaves and arrange them with their bases overlapping at the center and their pointed ends spreading outward, one toward the left and one toward the right.
Place the cluster in the middle of the embroidered greenery near the bottom edge of the tree skirt.
Use green yarn to stitch the leaves to the quilted fabric all the way around their outer edges.
Position the 3 flat red berries over the overlapping leaf bases in a compact triangle.
Sew around the full edge of each berry, then make one additional anchoring stitch through its center.
Secure all yarn ends on the wrong side. Check that nothing pulls away easily.
Finish the Crochet Decorations
Turn the tree skirt over and inspect the back of each attached motif.
Weave in any remaining yarn tails. Don't leave long loose strands between the individual decorations.
Check the dimensional berries carefully. If you cannot secure them firmly to the skirt, replace them with flat berry discs made using the small berry pattern.
Keep the finished tree skirt and its decorative pieces out of a baby's reach. It's a Christmas decoration, not a play mat or baby blanket.
And remember, the crocheted motifs are optional. If you'd rather keep the decorations completely flat, you can embroider the holly leaves and berries instead.
The little growing handprints will still be the main attraction.
Add a New Handprint Every Christmas
Once the 2026 handprint is finished, the tree skirt is ready for its first Christmas. The next four spaces can stay empty until it's time to add another little hand.
That's what makes this project different from an ordinary Christmas decoration. You aren't making everything at once. You're adding to it as your child grows.
Christmas 2027: The Second Handprint
When Christmas comes around again, take the tree skirt out before setting up the Christmas tree.
Lay it flat and find the space reserved for 2027, just to the right of the first handprint and slightly lower toward the bottom edge.
Capture another handprint on paper using an age-appropriate product. Label it with the child's name and the year.
Make a new stencil using the actual 2027 handprint. Don't enlarge the first year's stencil. We want to see how much the little hand has really grown.
Use green fabric paint for the new handprint, keeping the thumb and fingers clearly separated.
Allow the paint to dry and cure according to the product directions. Add 2027 beneath the print with red fabric paint or embroidery.
Now you have two little hands showing two different Christmases.
Christmas 2028 Through 2030
Repeat the same process each year with the next reserved position.
- 2028: Add a golden yellow handprint near the lower middle of the skirt.
- 2029: Add a blue handprint toward the lower right.
- 2030: Finish the planned five-print arrangement with a purple handprint at the right end.
Use the actual handprint from that Christmas, not a resized version of an earlier print.
Before painting, lay the new stencil in its planned space and check the distance from the garland, lettering, and border.
Leave enough room below the palm for the year. If the new handprint is larger than expected, adjust its position slightly.
You'll notice that the planned handprint positions form a gentle curve, but the finished prints don't have to follow that curve perfectly. A little variation is part of the charm.
What If a Handprint Doesn't Turn Out Perfectly?
If one fingertip is lighter than the others, I wouldn't automatically paint over it. The natural texture can give the print a more handmade appearance.
But if the thumb disappears completely or two fingers run together, I'd try another practice impression before putting more paint on the quilt.
With a stencil, you can make corrections before the permanent paint touches the skirt. That's a big advantage over trying to place a painted hand directly on a large quilted surface.
If a finished print has a tiny gap, you can touch it up with a suitable fabric paint pen after the original paint has dried enough. Keep the repair small so the natural shape stays recognizable.
Could You Continue Beyond 2030?
Yes, provided there is enough room for the new prints.
The example design reserves five positions because they fit comfortably across the lower half of a 48-inch skirt. A sixth or seventh print would need to go somewhere else.
If you want to continue the tradition, you could add a second curved row higher up, but check the space before committing. The garland and lettering already occupy much of the upper half.
Another idea is to stop at five prints and embroider the child's name and the years covered on the back of the skirt.
Five little hands showing five Christmases are plenty for a lovely keepsake.
How to Care for and Store Your Christmas Tree Skirt
Because this skirt will hold handprints from several different years, I'd be careful about washing it unnecessarily. Each new print is a little piece of the keepsake you can't go back and recreate at exactly the same age.
Before Using It Under the Tree
Check that all permanent textile paint has completed the drying and curing process required by its manufacturer.
Inspect the back ties, crocheted holly, berries, gingham bows, and sewn-on ornaments. Remove all sewing pins, blocking pins, temporary tape, stencils, and removable marking tools. Check both sides of the skirt for loose threads or anything that could come loose.
If anything feels loose, stitch it down again before displaying the skirt.
Keep the tree skirt and its decorations out of your baby's reach. If your little one is crawling or walking, use a suitable barrier around the tree rather than relying on the decorations being securely stitched. Don't let electrical cords, plugs, or light connections sit underneath the fabric, and keep the tree stand accessible for watering. Place the Christmas tree at least 3 feet from fireplaces, heaters, candles, and other heat sources. Keep the tree from blocking an exit, use properly tested Christmas lights, and turn them off before leaving home or going to bed. You can find additional guidance in the National Fire Protection Association's Christmas tree fire information.
Cleaning the Tree Skirt
Start with the care label for the quilted fabric and the instructions for the paint.
If the finished materials permit it, gently spot-clean small marks with a soft cloth and a little water. Test an inconspicuous area first.
Avoid rubbing across the painted prints or pulling on the embroidered details.
For a washable version, make sure every paint and trim product is compatible with the same washing method before laundering the complete skirt.
I'd be especially cautious with red fabric beside ivory. Check the red binding, gingham, and thread for color bleeding before washing the finished keepsake.
Do not machine-wash a decorated skirt if its crocheted attachments, ribbons, fabric paint, or quilted fabric aren't suitable for that treatment.
Storing It After Christmas
Make sure the skirt is completely dry before putting it away.
Fold it loosely with clean, unprinted cotton fabric or acid-free tissue between areas where painted surfaces might press against each other.
Don't pack it tightly beneath heavy decorations. The crocheted holly and embroidered lettering will keep their shape better if they aren't crushed.
Store the skirt in a clean, dry place away from direct sunlight and excessive heat.
Keep the original paper handprints in a separate labeled folder. I'd put a copy of each one in the same storage box as the skirt, just in case you ever want to make a matching keepsake.
Then next December, you'll have everything ready for the next little handprint.
DIY Baby's First Christmas Tree Skirt FAQ
Can I make this Christmas tree skirt without knowing how to quilt?
Yes. Using pre-quilted fabric means the diamond quilting is already finished. You'll still need to cut the circle, finish its edges, and add the closure ties, but you won't have to quilt the fabric yourself.
If you're new to sewing curves, practice with a small scrap of quilted fabric and bias binding before working on the full skirt.
Do I have to embroider the handprint dates?
No. You can write the dates with a permanent fabric paint pen instead. I'd choose that option for a simpler project. Just make sure the paint is suitable for your fabric and follow the manufacturer's curing directions.
Can I put fabric paint directly on my baby's hand?
Not unless the manufacturer specifically says the product is appropriate for that kind of skin contact and your baby's age. A non-toxic label alone doesn't mean a product is intended for skin painting.
For this project, I'd use an appropriate baby handprint kit to capture the original print on paper, then transfer that outline to the quilted skirt with a stencil. It gives you the child's actual hand shape without needing permanent textile paint on the skin.
Can I add the crochet holly later?
Absolutely. You can finish the skirt and add the first handprint now, then crochet the holly whenever you have time. The upper garland ends and lower embroidered greenery give you planned spaces for the motifs.
Just attach each crochet piece securely with stitching through the quilted layers. Don't rely on fabric glue or a single stitch at the center.
What if my child's handprint is larger than the planned space?
Move the stencil before painting. The five positions are guides, not rigid boxes. Keep enough open space around the fingers, thumb, year, and nearby decorations.
The original design is meant to show how your child's hands actually grow, so I wouldn't shrink the handprint just to make it fit a predetermined size.
How many Christmases will fit on this tree skirt?
The 48-inch example is planned for five handprints, beginning in 2026 and ending in 2030. You may be able to add more if there's enough open fabric, but the five-print arrangement is the one shown in the finished example.
If you want to preserve every handprint from baby's first Christmas through the preschool years, this gives you a lovely start.
Can I use a ready-made tree skirt instead?
Yes, and that's a good shortcut if you don't want to sew the base.
Choose a plain, light-colored quilted tree skirt with enough smooth fabric for the handprints. I'd look for one around 48 inches across, with minimal decorations in the lower half.
Check its fabric content before using permanent textile paint. Some ready-made skirts have finishes or synthetic fabrics that affect paint adhesion and heat-setting options.
You can still add the holly garland, painted dates, and crocheted decorations to make it your own.
Is this tree skirt suitable for a baby's play area?
No. It's designed as a Christmas tree decoration and family keepsake, not a baby play mat. Keep the ribbons, crocheted berries, and other decorations out of a baby's reach, and inspect the attachments before displaying it each Christmas.
What makes the finished skirt special?
It's the five little handprints, really. Everything else makes the skirt pretty, but those prints record something you can't save in quite the same way once your child grows.
Start with that first tiny hand in 2026. Add the next one at Christmas, then another the year after.
Someday, you'll have a Christmas tree skirt that shows just how much those little hands have grown.
When you click on links to various merchants on this site and make a purchase, this may result in this site earning a commission. This does not affect the price you pay.

UBGI Gold Standard 2026
Reviewed under the site's
editorial checklist.
Photos, decorating ideas, party setups and reader submissions are shared for inspiration unless a page is specifically presented as a pattern, tutorial, reference guide or step-by-step project. Follow the instructions, measurements, safety guidance and manufacturer directions provided for the particular project or product.
About Jan | Contact | Baby Nursery Ideas (Blog) | Site Map | Privacy Policy | Disclosure Policy | Disclaimer | Affiliate Disclosure | Earnings Disclosure | Facebook | Pinterest
I am a participant in the Amazon Services LLC Associates Program, an affiliate advertising program designed to provide a means for us to earn fees by linking to Amazon. As an Amazon Associate I earn from qualifying purchases.
Copyright © 2006-2026. All Rights Reserved.