Free Crochet Star Rug Pattern & Baby Play Mat
By Jan Bay
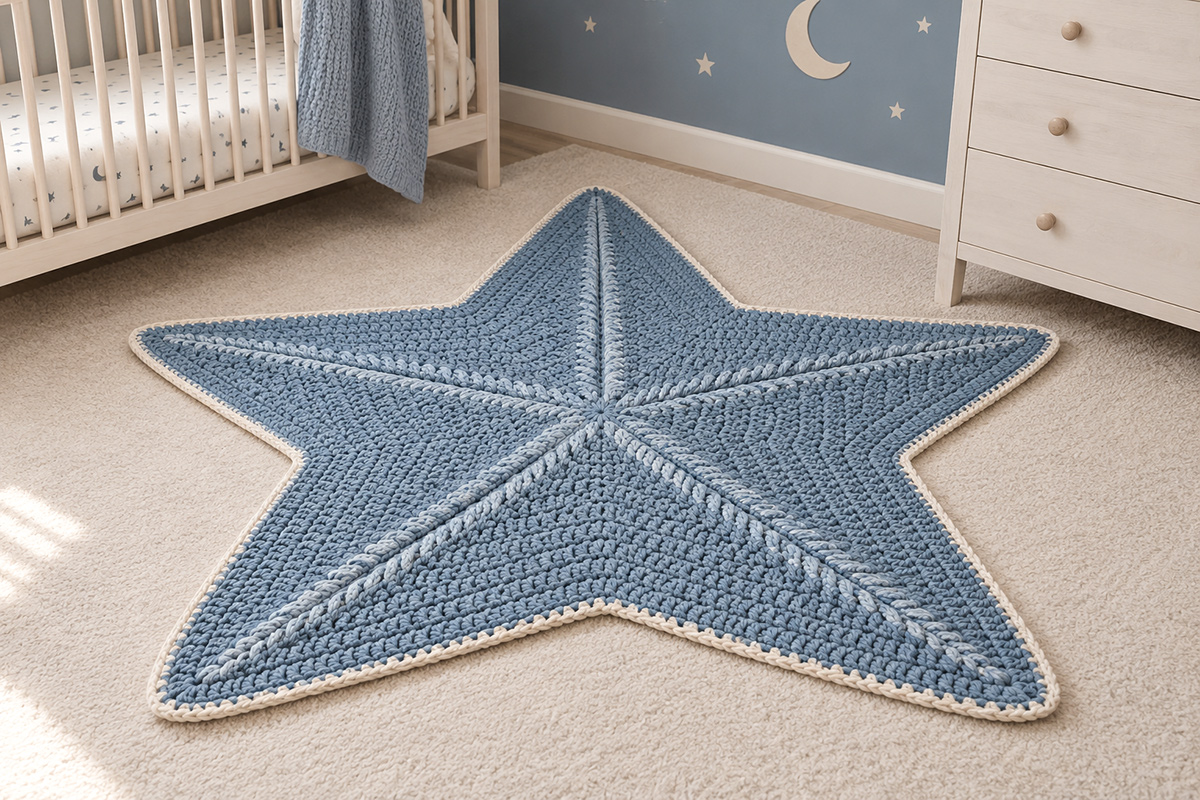
This free crochet star rug pattern makes a large five-point star that can be used as a nursery floor rug or soft play mat for supervised baby play. The bold star shape fits naturally into moon and stars, celestial and space themed nurseries while giving you a handmade rug that can remain an attractive part of the room’s decor long after the baby play mat stage has passed.
Explore More Crochet Patterns and Star Nursery Ideas
Giant Flower Baby Play Mat Pattern
See Yarn and Supplies for This Project
Jump to:
Supplies – yarn, hook and materials Finished Size – star rug and play mat measurements Gauge – check the size before you begin Star Rug – crochet the five-point star Optional Starburst Rays – add the raised lines or leave the star plain Outer Border – finish the star with a clean contrasting edge Finishing – weave in ends and shape the rug Nursery Ideas – use it as a rug or supervised baby play matSupplies
For this rug, I would use a smooth bulky yarn rather than a fuzzy chenille. A smoother yarn should help the five points hold their definition and give the finished piece more of a rug look instead of making it resemble a plush blanket. It should also make the optional raised starburst lines easier to see if you decide to add them.
Yarn: Size 5 bulky yarn. A smooth tubular cotton blend, cotton and nylon blend or other firm bulky yarn that holds its shape well is a good choice.
Color A, main star: Allow about 1,350 to 1,500 yards in dusty blue or your main color.
Color B, optional starburst rays: Allow about 35 yards in a tone-on-tone or contrasting shade. Skip Color B completely if you want the plain star version.
Color C, outer edge: Allow about 75 to 100 yards in ivory, soft white or another light contrast.
Hook: 8 mm crochet hook, or the size needed to reach the gauge below.
Also needed: Yarn needle, scissors, tape measure and one locking stitch marker.
Pattern development note: The stitch counts and round totals for this pattern have been calculated and cross-checked for internal consistency. The finished size and yarn amounts are expected estimates for the stated gauge and yarn weight, not measurements from a physically test-crocheted sample. Check your gauge, allow extra yarn if your yarn or tension differs, and make sure the star continues to lie flat as it grows.
If you're planning to use the finished piece as a floor rug on wood, tile or another smooth surface, you may also want a separate nonslip rug pad underneath it. I prefer a removable pad rather than adding a permanent coating to the crochet itself. You can remove the pad when you want to use the star as a play mat or wash the rug.
Finished Size
At the gauge below, the 24-round star is expected to measure about 37 to 39 inches across its widest span before any stretching during blocking. The narrow outer border adds only a small amount to that measurement.
That gives you a substantial nursery rug without making the star so large that the points become difficult to keep flat. It is also large enough to work as a soft floor mat for supervised baby play.
If you want a larger rug later, you do not have to redesign the pattern. The star follows a repeatable increase system, so you can continue adding rounds after Round 24. I explain that below.
Gauge
About 9 double crochet stitches and 5 rows = 4 inches.
Gauge matters more here than it does on a small applique. If your stitches are much tighter, you'll end up with a noticeably smaller star. If they are much looser, the points can become floppy and the finished rug may not lie as neatly.
There is also an easy checkpoint built into the pattern. After Round 6, measure from the center of the star to the tip of one point. It should be close to 5 inches at the stated gauge. If yours is substantially different, change hook size before you crochet another eighteen rounds.
Pattern terms: This pattern uses US crochet terminology.
ch = chain
dc = double crochet
sc = single crochet
sc2tog = single crochet 2 stitches together
sl st = slip stitch
st or sts = stitch or stitches
Peak shell: Work 2 dc, ch 2, 2 dc in the indicated stitch or ch-2 space.
The peak shells make the five outward points. The two skipped stitches between adjoining points make the five inward valleys. You need both. If you forget a valley skip, that section starts rounding out instead of keeping the sharp star shape.
Free Crochet Star Rug Pattern
The main star is worked as one piece from the center outward. There are no separate points to sew on later. Each new round adds length to both sides of all five points while the two-stitch skips keep the valleys tucked inward.
Round 1: Ch 4 and join with a sl st to form a ring. Ch 3, which counts as the first dc. Work 9 dc into the ring. Join with a sl st to the top of the beginning ch 3. You should have 10 dc.
Round 2: Ch 1, which does not count as a stitch. Work a peak shell in the same st as the join. Skip the next st. Repeat around, working a peak shell in the next st and skipping the following st. Join with a sl st to the first dc of the first peak shell. You should have five peak shells, 20 dc total and five ch-2 peak spaces.
Round 3: Sl st into the next dc of the first peak shell. Ch 2, which does not count as a stitch. Dc in the same st. Work a peak shell in the next ch-2 space. Dc in the next dc. Skip the next 2 sts. Repeat around the remaining four points: dc in the next st, peak shell in the next ch-2 space, dc in the next st, skip the next 2 sts. Join with a sl st to the first dc. You should have 30 dc total.
Stop for a minute and look at those five valleys before going farther. Each valley skip should sit directly between two adjoining points. If one point looks wider than the others now, recount Round 3. It is much easier to fix here than after another fifteen rounds.
Beginning with Round 4, move the start of each new round one stitch forward before beginning the first side. The dc worked immediately after the beginning ch 2 is the first dc of that side. It is included in the stated side count, not added to it. The beginning ch 2 does not count as a stitch. Place a locking stitch marker in that first dc so you can find the join again easily.
Round 4: Sl st into the next dc. Ch 2 and dc in that same dc. Mark this dc. It counts as the first of the 2 dc on the first side. Dc in the next dc. Work a peak shell in the next ch-2 space. Dc in the next 2 dc. Skip the next 2 dc. *Dc in the next 2 dc, work a peak shell in the next ch-2 space, dc in the next 2 dc, skip the next 2 dc.* Repeat from * to * 3 more times. Join with a sl st to the marked first dc. 40 dc.
Round 5: Sl st into the next dc. Ch 2 and dc in that same dc. Mark this dc. It counts as the first of the 3 dc on the first side. Dc in the next 2 dc. Work a peak shell in the next ch-2 space. Dc in the next 3 dc. Skip the next 2 dc. *Dc in the next 3 dc, work a peak shell in the next ch-2 space, dc in the next 3 dc, skip the next 2 dc.* Repeat from * to * 3 more times. Join with a sl st to the marked first dc. 50 dc.
Round 6: Sl st into the next dc. Ch 2 and dc in that same dc. Mark this dc. It counts as the first of the 4 dc on the first side. Dc in the next 3 dc. Work a peak shell in the next ch-2 space. Dc in the next 4 dc. Skip the next 2 dc. *Dc in the next 4 dc, work a peak shell in the next ch-2 space, dc in the next 4 dc, skip the next 2 dc.* Repeat from * to * 3 more times. Join with a sl st to the marked first dc. 60 dc.
Measure from the center to one point now. At the stated gauge, you are looking for approximately 5 inches.
Rounds 7 through 24: Continue the same increase pattern. For each new round, first sl st into the next dc. Ch 2 and dc in that same dc, then mark that dc. It is the first dc of the first side.
For each round, the number of dc on each side of every point equals the round number minus 2. Because you have already made the marked first dc, work one fewer additional dc before the first peak shell. Then work a peak shell in the ch-2 space, the full side count in dc down the other side, and skip the next 2 dc at the valley.
For the remaining four points, work the full side count in dc, a peak shell in the next ch-2 space, the full side count in dc, and skip the next 2 dc. Repeat until all five points are complete, then join with a sl st to the marked first dc.
So on Round 7, each side has 5 dc. After making the marked first dc, work 4 more dc before the first peak shell. On Round 8, each side has 6 dc, so work 5 more after the marked first dc. On Round 9, each side has 7 dc, so work 6 more after the marked first dc. Continue the same way through Round 24.
These checkpoints will help you catch a counting mistake before it travels around the whole rug:
Round 7: 5 dc, peak shell, 5 dc, skip 2. 70 dc total.
Round 8: 6 dc, peak shell, 6 dc, skip 2. 80 dc total.
Round 9: 7 dc, peak shell, 7 dc, skip 2. 90 dc total.
Round 10: 8 dc, peak shell, 8 dc, skip 2. 100 dc total.
Round 12: 10 dc, peak shell, 10 dc, skip 2. 120 dc total.
Round 15: 13 dc, peak shell, 13 dc, skip 2. 150 dc total.
Round 18: 16 dc, peak shell, 16 dc, skip 2. 180 dc total.
Round 20: 18 dc, peak shell, 18 dc, skip 2. 200 dc total.
Round 22: 20 dc, peak shell, 20 dc, skip 2. 220 dc total.
Round 24: 22 dc, peak shell, 22 dc, skip 2. 240 dc total.
Fasten off Color A after Round 24. If you want the plain star version, skip the starburst section and go straight to the outer border. If you want the five raised rays, add them now before crocheting the border.
If you want to enlarge the rug, continue the same formula. Round 25 would use 23 dc on each side of every point and have 250 dc total. Round 26 would use 24 dc on each side and have 260 dc total. Every additional round adds 10 dc to the total stitch count.
I would not make the points longer by adding rows to the five points separately. Continuing the established rounds keeps the proportions of the center, points and valleys together.
Optional Starburst Rays
You don't have to add the rays at all. The plain five-point star already makes a finished nursery rug, and I actually like how clean it looks with nothing more than the narrow contrasting border. The photo below shows that simpler version.
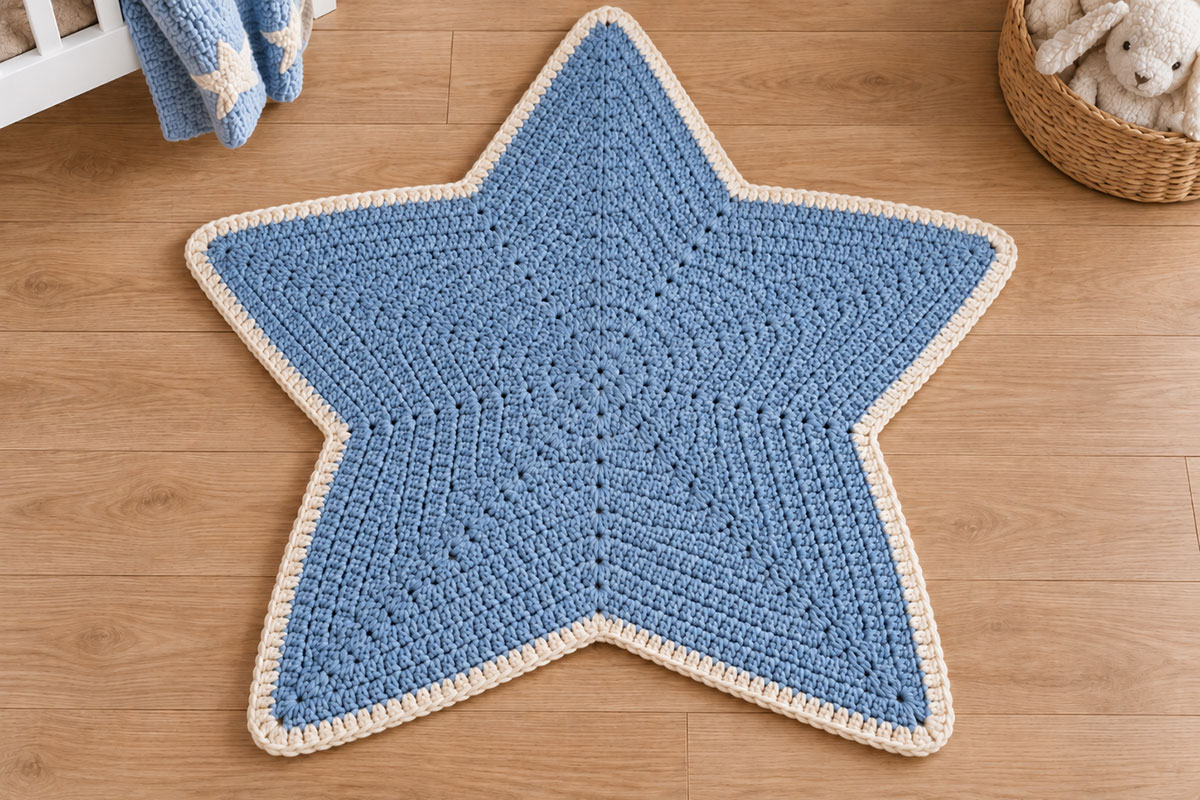
If you do want the extra detail, the five rays are made with surface crochet after the main star is complete. There is no embroidery required, and the rays do not change any of the shaping or stitch counts in the rug itself.
For the raised version, I would use soft ivory or cream for Color B so the rays relate to the outer border without dividing the blue star into five hard sections.
Lay the star flat with the right side facing you. Find the center of the ring and the ch-2 space at the tip of each point.
Before you crochet a ray, lay a straight scrap of yarn from the center toward the tip of the first point. Use it as a temporary guide. The ray should divide that point in half visually. It should not wander toward either sloping side.
With Color B held behind the rug, insert the hook from front to back just outside Round 1 along that guide line. Pull up a loop.
Work one relaxed surface sl st through the fabric at approximately each successive round along the center line of the point. Continue outward through Round 23, stopping one round below the final peak shell. You should have about 22 small surface slip stitches forming one continuous raised line.
Do not pull these stitches tight. A tight surface chain can draw the point inward and make the rug pucker. The line should sit on top of the fabric without changing the shape underneath it.
Fasten off on the back and weave the two ends securely through the back of the star.
Repeat for the remaining four points. Start every ray at the same distance from the center and stop every ray at the same distance below its peak.
When all five lines begin and end evenly, they read as one deliberate starburst. Then stop. I wouldn't add little moons, extra stars, tassels or fringe on top of them. The rug has enough going on already.
Crochet the Contrasting Outer Border
Use Color C for one narrow round around the entire star. I would keep this border whether you add the optional rays or leave the center plain. It gives the five points a clean finished outline.
Join Color C with a sl st in any ch-2 peak space. Ch 1, which does not count as a stitch. Work 3 sc into that same ch-2 space.
Sc in each dc down the side of the point until only the final dc immediately before the valley remains unworked. On the standard 24-round star, that means 23 sc before the valley.
At the valley, work an sc2tog using the final dc of the first side and the first dc of the next side. The sc2tog pulls those two edge stitches together and keeps the inward point of the star defined.
Sc in each remaining dc up the next side. On the standard 24-round star, that gives you another 23 sc before the next peak. Work 3 sc in the next ch-2 peak space.
Continue around in the same way, working 3 sc at every peak and one sc2tog across every valley. Join with a sl st to the first sc of the beginning 3-sc peak.
For the standard 24-round star, you should have 250 sc around the finished border, counting each sc2tog as one stitch. If you added extra main rounds to make a larger rug, your border count will be higher.
Fasten off Color C.
If the border starts ruffling, check the peaks first. There should be only 3 sc in each peak space. If a valley starts rounding out, check that you worked the sc2tog across it instead of putting separate stitches into both sides.
Finishing and Shaping the Star
Remove the locking stitch marker and weave every yarn end securely into the back of the rug. If you added the optional rays, remember that each ray has two yarn ends on the back that also need to be woven in securely.
Lay the finished star on a flat surface and spread all five points into position. Measure from the center to each tip. They should be very close to the same length.
Wet block the rug if the care instructions for your yarn allow it. Shape the valleys inward and pull each point gently into place, then let the star dry completely while lying flat. Avoid high heat on synthetic yarn.
If one point is only slightly out of line, fix it during blocking rather than pulling the border stitches tighter. The edge should stay relaxed.
For a rug used on a hard floor, cut a nonslip rug pad slightly smaller than the star so it remains hidden behind the crochet. About an inch inside the outside edge is plenty. Keep the pad separate rather than sewing it permanently to the rug.
Using the Star as a Nursery Rug or Baby Play Mat
Dusty blue with a narrow ivory edge is the combination I would use for a moon and stars room. The plain star already gives you an obvious celestial shape without covering the rug with extra motifs. If you add the optional rays, soft ivory keeps them connected visually to the border.
If you're building the rest of the room around it, my moon and stars nursery ideas page gives you more ways to carry the theme onto the walls and around the crib without repeating stars on every single surface.
You could also take the rug farther into a galaxy or astronaut room with the ideas on my space themed nursery page.
The star works differently from the giant flower crochet baby play mat. The flower is playful and obviously baby centered. This one can stay on the floor as ordinary nursery decor after you no longer need a baby play mat. That's one reason I like keeping the design simple.
If you want the same shape on a much smaller project, you can also make my free crochet star pattern.
Baby use: Use the star on the floor for awake, supervised play only. It is not an infant sleep surface. The American Academy of Pediatrics recommends that babies sleep on an appropriate firm, flat sleep surface rather than soft bedding or play surfaces. You can read the AAP safe sleep guidance for current recommendations.
Questions About the Crochet Star Rug Pattern
Can I make the star rug larger?
Yes. Continue the established round sequence after Round 24. Add one dc to each side of every point on each new round, keep the same peak shell and skip 2 sts at every valley. Each additional round adds 10 dc to the total. If you want the optional rays, add them only after the main star reaches its final size.
Can I make a smaller baby play mat?
Yes. Stop the main star several rounds earlier, as long as the five points and valleys are lying flat. Add the outer border at that size. If you also want the optional rays, shorten them so each one still begins just outside the center and stops one round below its point. I would size the mat by actual measurement rather than trying to assign it to a particular baby age.
Can I use blanket or chenille yarn?
You can, but it would not be my first choice for this design. Very fuzzy yarn softens the definition of the five points and can make the optional surface-crochet rays harder to see. A smoother bulky yarn gives the star a cleaner rug shape.
Do I have to add the starburst rays?
No. Leave them off for the plain version shown above. If you do add them, use the main star color for texture only or choose a soft ivory or another closely related shade. I would avoid a hard contrast that divides the star into five separate sections.
Do I need the ivory border?
No, but I would keep it on the featured version. That narrow outline makes the five-point shape easier to see against the floor and ties in nicely with light nursery furniture without complicating the pattern.
When you click on links to various merchants on this site and make a purchase, this may result in this site earning a commission. This does not affect the price you pay.

UBGI Gold Standard 2026
Reviewed under the site's
editorial checklist.
Photos, decorating ideas, party setups and reader submissions are shared for inspiration unless a page is specifically presented as a pattern, tutorial, reference guide or step-by-step project. Follow the instructions, measurements, safety guidance and manufacturer directions provided for the particular project or product.
About Jan | Contact | Baby Nursery Ideas (Blog) | Site Map | Privacy Policy | Disclosure Policy | Disclaimer | Affiliate Disclosure | Earnings Disclosure | Facebook | Pinterest
I am a participant in the Amazon Services LLC Associates Program, an affiliate advertising program designed to provide a means for us to earn fees by linking to Amazon. As an Amazon Associate I earn from qualifying purchases.
Copyright © 2006-2026. All Rights Reserved.