Free Crochet Snowman Lovey Snuggler Pattern
By Jan Bay
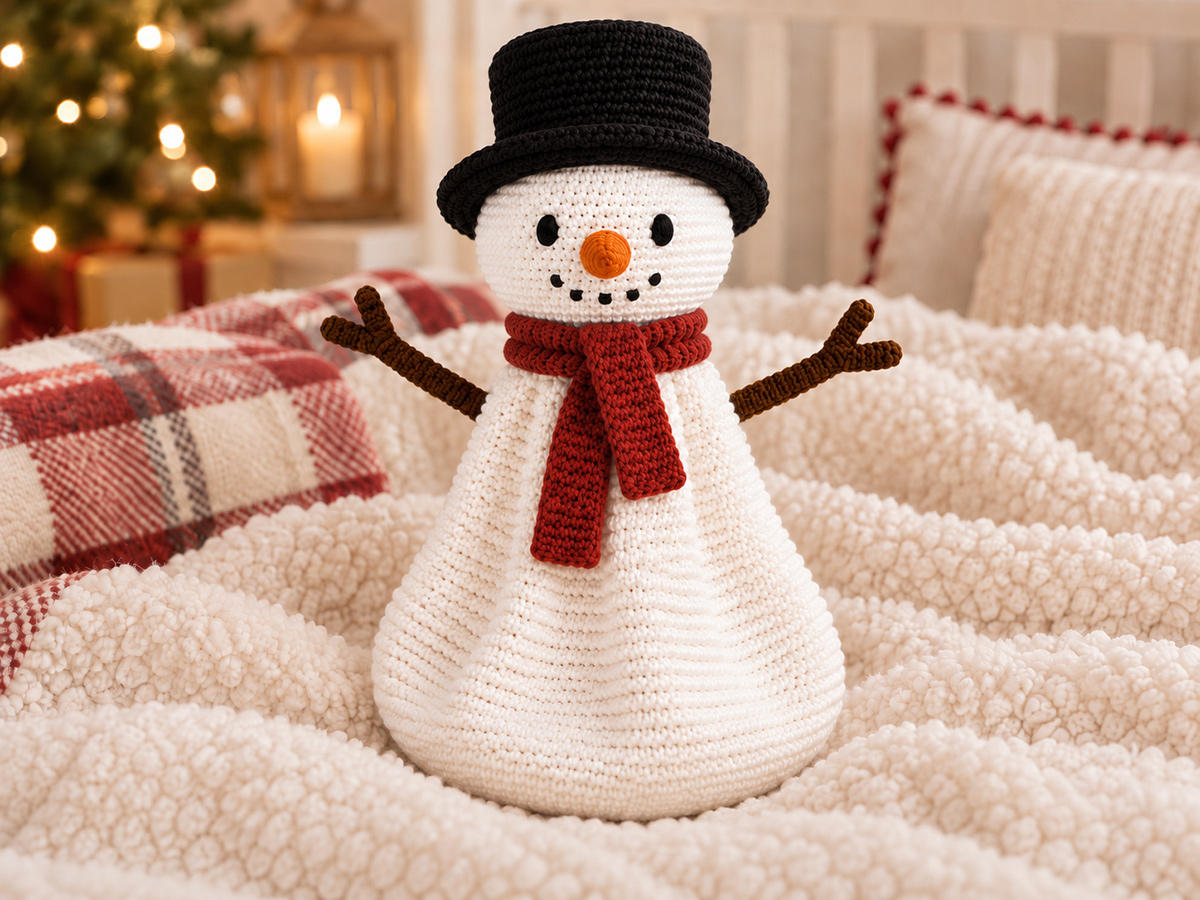
This free crochet snowman lovey snuggler pattern shows you how to make a large soft snowman with a round stuffed head, black top hat, red scarf, carrot nose, brown twig arms and one long floppy white body. No legs. Snowmen don't usually have legs, do they? Mine don't. The body is only lightly stuffed, so it bends and drapes instead of standing upright like a traditional stuffed snowman.
Explore More Free Crochet Patterns
Helpful Supplies for This Crochet Snowman Snuggler
Jump to the Crochet Snowman Lovey Snuggler Pattern
Pattern Notes and Abbreviations
Crochet the Soft Floppy Lovey Body
Free Crochet Snowman Lovey Snuggler Pattern: Materials and Supplies
Use a smooth worsted weight yarn for this snowman. I would skip chenille here. The black top hat, narrow twig arms and little carrot nose all show up better when you can see the stitches clearly.
Yarn: Worsted weight #4 yarn in approximately:
- White: 275 to 325 yards for the head and long soft body
- Black: 80 to 100 yards for the top hat
- Rust red or Christmas red: 60 to 75 yards for the scarf
- Medium brown: 40 to 50 yards for the twig arms
- Carrot orange: about 5 yards for the nose
- Small amount of black embroidery floss for the eyes and smile
Hook: 3.5 mm (E/4) crochet hook, or the hook size needed to make a firm fabric without obvious gaps.
You'll also need:
- Polyester fiberfill, about 4 to 5 ounces
- Yarn needle
- Removable stitch markers
- Straight pins for positioning the pieces
- Scissors
- Tape measure
The yarn amounts are approximate. A different yarn, hook or gauge will change both the finished size and the amount you use.
The eyes and smile are embroidered. There are no plastic safety eyes, buttons or other hard facial pieces.
Finished Size and Gauge
At the gauge below, the finished snowman is expected to measure about 12 inches from the rounded bottom of the body to the top of the black top hat.
The head is expected to measure about 4 inches across. The soft body is about 8 1/2 inches along the crocheted surface from the neck opening to the rounded bottom and close to 6 inches across at its widest point when lightly rounded with stuffing rather than pressed flat. Each main twig arm is expected to measure about 3 1/2 inches from the shoulder end to the tip, with the short side twig extending about 3/4 inch from the branch point.
The top hat brim is expected to measure about 5 to 5 1/2 inches across.
Gauge: About 18 single crochet stitches and 20 rounds = 4 inches.
Those measurements are calculated from the stated gauge rather than taken from a physically completed sample. The most important thing is the proportion. The head should stay round and firm while the long body remains soft enough to bend and slump when you pick the snowman up.
Pattern Notes and Abbreviations
This pattern uses U.S. crochet terms.
MR: magic ring
ch: chain
sl st: slip stitch
sc: single crochet
st: stitch
sts: stitches
inc: work 2 sc in the same stitch
inv dec: invisible single crochet decrease over the next 2 stitches
The head, arms, hat and carrot nose are worked in continuous rounds unless the instructions say otherwise. Move your stitch marker to the first stitch of each new round.
The body begins at the neck with an open 36 stitch ring and is worked downward. The lower body is closed completely, which gives us the long rounded-cone shape in the example instead of an open skirt or separate legs.
The scarf is worked back and forth in rows.
The snowman has nine crocheted pieces: one head, one body, two main twig arms, two small side twigs, one top hat, one scarf and one carrot nose. The two side twigs are crocheted separately and sewn securely to the main arms before the arms are attached to the body.
Stuff the head firmly enough to hold its round shape. Stuff the body much more lightly. The upper body needs enough filling to support the head, but the middle and lower body should stay loose and flexible.
The body starts with 36 stitches. Round 18 of the head also has 36 stitches. Those matching counts give you a broad head-to-body attachment without adding a skinny neck.
Crochet the Snowman Head
With white yarn, begin at the top of the head.
Round 1: Work 6 sc in a MR. (6 sts)
Round 2: Inc in each stitch around. (12 sts)
Round 3: *Sc in next st, inc in next st.* Repeat around. (18 sts)
Round 4: *Sc in next 2 sts, inc in next st.* Repeat around. (24 sts)
Round 5: *Sc in next 3 sts, inc in next st.* Repeat around. (30 sts)
Round 6: *Sc in next 4 sts, inc in next st.* Repeat around. (36 sts)
Round 7: *Sc in next 5 sts, inc in next st.* Repeat around. (42 sts)
Round 8: *Sc in next 6 sts, inc in next st.* Repeat around. (48 sts)
Round 9: *Sc in next 7 sts, inc in next st.* Repeat around. (54 sts)
Rounds 10 through 15: Sc in each stitch around. (54 sts for 6 rounds)
Round 16: *Sc in next 7 sts, inv dec.* Repeat around. (48 sts)
Round 17: *Sc in next 6 sts, inv dec.* Repeat around. (42 sts)
Round 18: *Sc in next 5 sts, inv dec.* Repeat around. (36 sts)
Place a removable marker through one stitch of Round 18. You'll use this 36 stitch round later when the body is attached.
Round 19: *Sc in next 4 sts, inv dec.* Repeat around. (30 sts)
Round 20: *Sc in next 3 sts, inv dec.* Repeat around. (24 sts)
Begin stuffing the head. Add small amounts and spread the fiberfill evenly around the inside.
Round 21: *Sc in next 2 sts, inv dec.* Repeat around. (18 sts)
Round 22: *Sc in next st, inv dec.* Repeat around. (12 sts)
Add the rest of the stuffing. The head should be firm and round, but don't pack it until the stitches spread apart.
Round 23: Inv dec around. (6 sts)
Fasten off, leaving a tail. Thread the tail through the front loops of the remaining 6 stitches, pull the opening closed and secure the yarn inside the head.
Add the Face and Carrot Nose
Use removable stitch markers or straight pins to mark the eye, nose and smile positions before you embroider the face. Keep the features simple. The black top hat and twig arms already give this snowman plenty of personality.
Place the eye centers around Rounds 11 through 13, approximately 8 stitches apart. Make each eye with several short vertical satin stitches using black embroidery floss.
Center the carrot nose below the eyes, around Rounds 14 and 15.
Make five small black embroidered smile dots in a shallow curve below the nose, around Rounds 16 and 17.
Secure the embroidery floss after each feature. Bury the knots and loose ends inside the stuffed head so no floss ends remain loose on the surface.
Carrot Nose
With orange yarn:
Round 1: Work 4 sc in a MR. (4 sts)
Round 2: Sc in each stitch around. (4 sts)
Round 3: *Sc in next st, inc in next st.* Repeat twice. (6 sts)
Round 4: Sc in each stitch around. (6 sts)
Round 5: *Sc in next 2 sts, inc in next st.* Repeat twice. (8 sts)
Fasten off, leaving a long sewing tail.
Put only a tiny amount of fiberfill inside the wider end of the nose. Pin the 8 stitch opening to the center of the face and sew around the base securely. Keep the pointed end aimed forward rather than downward.
Crochet the Soft Floppy Lovey Body
This long body is what makes the snowman a lovey snuggler instead of another firmly stuffed snowman doll. It starts narrow at the neck, widens slowly for most of its length and then closes into a soft rounded bottom. There are no separate legs.
With white yarn, ch 36. Being careful not to twist the chain, join with a sl st to the first chain to form a ring. Ch 1. This chain does not count as a stitch.
Round 1: Sc in the same chain as the joining sl st and in each of the remaining 35 chains around. (36 sts)
Do not join at the end of Round 1. Place your stitch marker in the first sc and continue working in continuous rounds.
Rounds 2 through 4: Sc in each stitch around. (36 sts)
Round 5: *Sc in next 5 sts, inc in next st.* Repeat around. (42 sts)
Rounds 6 through 8: Sc in each stitch around. (42 sts)
Round 9: *Sc in next 6 sts, inc in next st.* Repeat around. (48 sts)
Rounds 10 through 12: Sc in each stitch around. (48 sts)
Round 13: *Sc in next 7 sts, inc in next st.* Repeat around. (54 sts)
Rounds 14 through 16: Sc in each stitch around. (54 sts)
Round 17: *Sc in next 8 sts, inc in next st.* Repeat around. (60 sts)
Rounds 18 through 20: Sc in each stitch around. (60 sts)
Round 21: *Sc in next 9 sts, inc in next st.* Repeat around. (66 sts)
Rounds 22 through 24: Sc in each stitch around. (66 sts)
Round 25: *Sc in next 10 sts, inc in next st.* Repeat around. (72 sts)
Rounds 26 through 28: Sc in each stitch around. (72 sts)
Round 29: *Sc in next 11 sts, inc in next st.* Repeat around. (78 sts)
Rounds 30 through 32: Sc in each stitch around. (78 sts)
Round 33: *Sc in next 12 sts, inc in next st.* Repeat around. (84 sts)
Rounds 34 through 36: Sc in each stitch around. (84 sts)
Now round off the bottom rather than leaving a wide flat hem.
Round 37: *Sc in next 5 sts, inv dec.* Repeat 12 times. (72 sts)
Round 38: *Sc in next 4 sts, inv dec.* Repeat 12 times. (60 sts)
Round 39: *Sc in next 3 sts, inv dec.* Repeat 12 times. (48 sts)
Round 40: *Sc in next 2 sts, inv dec.* Repeat 12 times. (36 sts)
Round 41: *Sc in next st, inv dec.* Repeat 12 times. (24 sts)
Round 42: Inv dec around. (12 sts)
Round 43: Inv dec around. (6 sts)
Fasten off, leaving a tail. Thread the tail through the front loops of the final 6 stitches, pull the opening closed and secure it inside the body.
Leave the 36 stitch neck opening at the top open. You'll add the stuffing through that opening before attaching the head.
Crochet the Twig Arms
Make two main arms and two small side twigs with brown yarn.
The finished arms are meant to look like simple Y-shaped snowman branches, with one main tip and one short side twig. Keep all four pieces unstuffed.
Main Arm, Make 2
Before making the magic ring, leave an 18 to 20 inch beginning tail. You'll use this tail later to sew the shoulder end to the body.
Round 1: Work 6 sc in a MR. (6 sts)
Rounds 2 through 12: Sc in each stitch around. (6 sts for 11 rounds)
Round 13: *Sc in next st, inv dec.* Repeat twice. (4 sts)
Rounds 14 through 16: Sc in each stitch around. (4 sts)
Round 17: Inv dec twice. (2 sts)
Fasten off, leaving a short tail. Thread the tail through the remaining 2 stitches, pull the end closed and secure it inside the arm.
Side Twig, Make 2
Round 1: Work 4 sc in a MR. (4 sts)
Rounds 2 through 4: Sc in each stitch around. (4 sts)
Fasten off, leaving a long tail for sewing. Do not stuff.
Pin one side twig against each main arm around Rounds 13 and 14, angling it away from the narrow main tip to form a Y. Sew all the way around the 4 stitch opening of the side twig and into the main arm. Secure the join well and hide the tail inside the arm.
The two twig ends should sit at different angles rather than looking like fingers. At the stated gauge, each finished main arm is expected to measure about 3 1/2 inches from the shoulder end to the tip, with the short side twig extending about 3/4 inch from the branch point.
Before attaching the arms to the body, lay them beside each other and turn the side twigs in opposite directions so the finished arms mirror each other.
Crochet the Black Top Hat
Use black yarn. Keep the crown tall and the brim easy to see so the finished hat reads clearly as a classic top hat rather than a short cap.
Begin at the center of the top of the hat.
Round 1: Work 6 sc in a MR. (6 sts)
Round 2: Inc in each stitch around. (12 sts)
Round 3: *Sc in next st, inc in next st.* Repeat around. (18 sts)
Round 4: *Sc in next 2 sts, inc in next st.* Repeat around. (24 sts)
Round 5: *Sc in next 3 sts, inc in next st.* Repeat around. (30 sts)
Round 6: *Sc in next 4 sts, inc in next st.* Repeat around. (36 sts)
Round 7: *Sc in next 5 sts, inc in next st.* Repeat around. (42 sts)
Round 8: *Sc in next 6 sts, inc in next st.* Repeat around. (48 sts)
Round 9: Working in the back loops only, sc in each stitch around. (48 sts)
Rounds 10 through 18: Sc in each stitch around. (48 sts)
The back-loop round gives the top of the crown a cleaner corner instead of letting it melt into a rounded beanie shape.
Now make the brim.
Round 19: Working in the front loops only, *sc in next 7 sts, inc in next st.* Repeat around. (54 sts)
Round 20: *Sc in next 8 sts, inc in next st.* Repeat around. (60 sts)
Round 21: *Sc in next 9 sts, inc in next st.* Repeat around. (66 sts)
Round 22: *Sc in next 10 sts, inc in next st.* Repeat around. (72 sts)
Round 23: Sc in each stitch around. (72 sts)
Fasten off and weave in the tail.
Flatten the brim gently with your fingers. Don't stuff the crown. It should hold its cylindrical shape from the firm crochet fabric rather than from fiberfill.
Crochet the Snowman Scarf
Use rust red or Christmas red yarn.
Ch 69.
Row 1: Sc in the second chain from the hook and in each chain across. (68 sts)
Rows 2 through 4: Ch 1 and turn. The ch 1 does not count as a stitch. Sc in each of the 68 stitches across. (68 sts)
Fasten off, leaving a long tail for securing the scarf to the snowman.
At the stated gauge, the scarf is expected to measure about 15 inches long and just under 1 inch wide. That gives you enough length for one wrap around the neck and two short front tails without the very long scarf ends you sometimes see on decorative snowmen.
Do not add fringe.
Assemble the Snowman Lovey Snuggler
Finish the body first, then choose which side you want to use as the front. Put a removable marker at the center front near the neck opening.
1. Attach the twig arms.
Pin the shoulder end of each brown arm high on the side of the body, centered around Body Rounds 6 through 8.
At that point the body has 42 stitches around. Starting from the center-front marker, each side is about 10 to 11 stitches away.
Check both arms from the front before sewing. They should come out from the upper sides of the snowman and the little branches should remain completely visible.
Using the long beginning tail on each arm, sew securely around the first round of the arm and into the body. Go around the attachment twice if needed, then bury the tail inside the body.
2. Lightly stuff the body.
Add fiberfill through the 36 stitch neck opening.
Put the most filling in the upper third of the body. Use less through the middle and very little near the rounded bottom.
Pick the body up before you add more. It should bend and sag instead of holding itself upright like a firmly stuffed doll. If the lower body feels hard, take some filling back out.
3. Attach the head.
Find the marker at Head Round 18. That round contains 36 stitches, matching the 36 stitch opening at the top of the body.
Center the face over the center-front body marker.
Pin the body opening evenly around Head Round 18, matching one body stitch to one head stitch all the way around.
Check the snowman from the front and side. The head should sit directly over the narrow upper body with almost no visible neck.
Once the body opening is pinned evenly around Head Round 18, remove the Round 18 marker. Using white yarn, sew the body opening securely around that round. Continue all the way around to the starting point, then go around the join a second time before securing and hiding the tail inside.
4. Attach the black top hat.
Center the top hat on the head. Pin Hat Round 19 evenly around Head Round 9, keeping the crown upright and the brim clearly visible above the eyes. Both rounds have 54 stitches, so match one Hat Round 19 stitch to one Head Round 9 stitch all the way around.
Thread about 36 inches of black yarn onto your yarn needle. Starting at the back of the hat, sew the inner edge of Hat Round 19 securely to Head Round 9, taking small stitches underneath the brim. Continue all the way around until you return to the starting point. Secure the yarn and hide both ends inside the hat.
5. Attach the scarf.
Wrap the scarf once around the head-to-body join and cross the ends at the front.
Keep both front tails fairly short. Use the long tail left on the scarf to sew it securely at the back of the neck. Then use short lengths of matching red yarn to tack the front crossing and the lower end of each scarf tail to the body. Secure and bury all yarn ends. It should be part of the snowman rather than a removable accessory.
Finishing and Safety Check
Shape the head gently with your hands, straighten the top hat and position the two twig ends on each arm so the Y shape is easy to see.
Then pick the snowman up around the middle. The head should keep its round shape, but the long white body should bend and slump underneath it. That's the look we're after.
Check the carrot nose, embroidered face, both arm joins, both side-twig joins, the top hat and every place where the scarf is sewn down. Make sure every straight pin and removable stitch marker used during construction has been removed. Repair any loose yarn end or seam before using the snowman as a toy.
Because this design includes a scarf, I would not leave it removable on a toy for a young child. The U.S. Consumer Product Safety Commission warns that strings and straps on toys can present a strangulation hazard to young children. You can read its guidance about strings and straps on toys. If you're making the snowman for a very young child, another option is to omit the scarf altogether.
If you're making this snowman for a baby, keep it out of the crib, bassinet, play yard and other infant sleep spaces. The CPSC's Safe Sleep guidance recommends keeping a baby's sleep space bare except for a fitted sheet.
The finished shape should now match the example: a round traditional snowman head under a black top hat, a red scarf, two brown twig arms and one long soft white body with a rounded closed bottom. No separate legs.
For more floppy character projects, visit my crochet baby snuggler patterns. You can also find more seasonal projects in the Christmas crochet patterns collection.
When you click on links to various merchants on this site and make a purchase, this may result in this site earning a commission. This does not affect the price you pay.

UBGI Gold Standard 2026
Reviewed under the site's
editorial checklist.
Photos, decorating ideas, party setups and reader submissions are shared for inspiration unless a page is specifically presented as a pattern, tutorial, reference guide or step-by-step project. Follow the instructions, measurements, safety guidance and manufacturer directions provided for the particular project or product.
About Jan | Contact | Baby Nursery Ideas (Blog) | Site Map | Privacy Policy | Disclosure Policy | Disclaimer | Affiliate Disclosure | Earnings Disclosure | Facebook | Pinterest
I am a participant in the Amazon Services LLC Associates Program, an affiliate advertising program designed to provide a means for us to earn fees by linking to Amazon. As an Amazon Associate I earn from qualifying purchases.
Copyright © 2006-2026. All Rights Reserved.