Free Crochet Gingerbread Man Snuggler Lovey Pattern
By Jan Bay
This free crochet gingerbread man snuggler lovey pattern makes a soft Christmas character that looks almost good enough to eat. The classic gingerbread shape gives it plenty of Christmas personality without hard buttons, plastic eyes or loose embellishments, making it perfect for holiday cuddles.
Explore More Free Crochet Baby Patterns
Free Crochet Baby Snuggler Lovey Patterns
Crochet Snowman Snuggler Lovey Pattern
Jump to the Gingerbread Man Snuggler Lovey Pattern
Crochet the Gingerbread Man Head
Crochet Gingerbread Man Snuggler Lovey Pattern Details
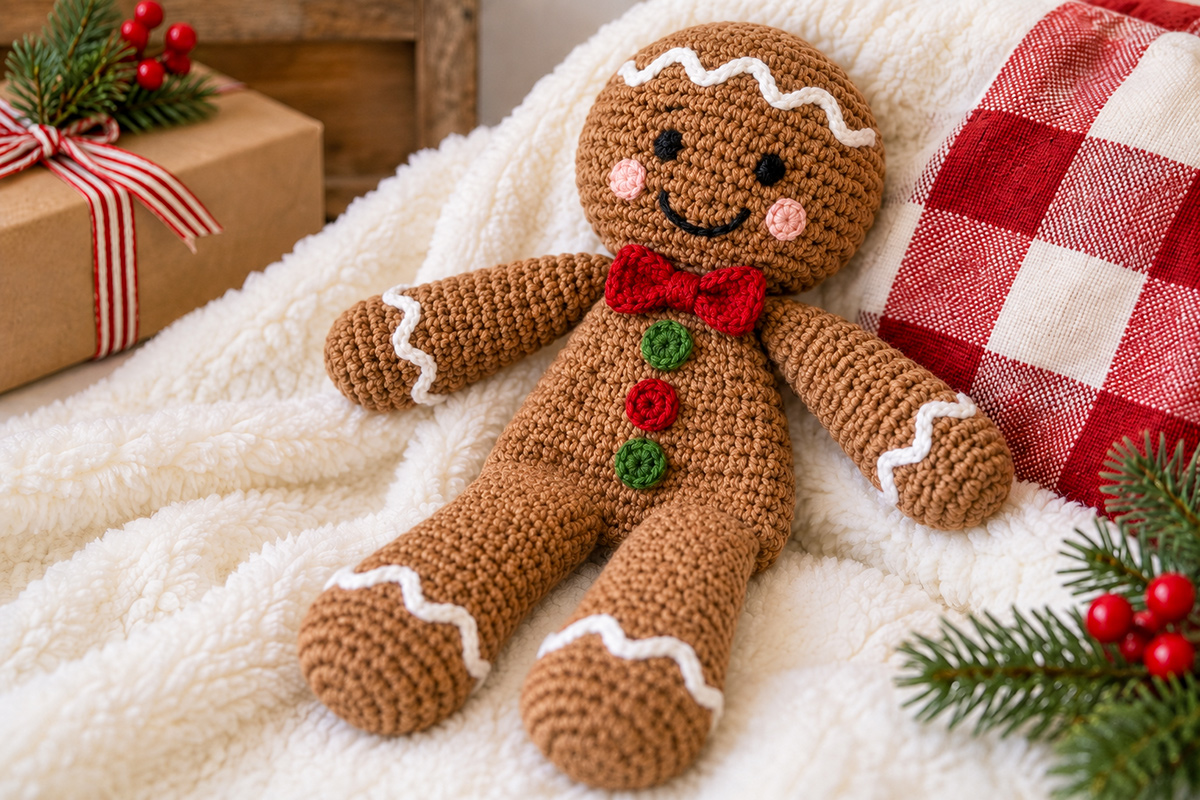
This gingerbread man is meant to have the proportions you see in the main page image: a round stuffed head, a longer soft body, long floppy arms and legs, a red bow tie, three crocheted candy-style circles and white icing details. I would keep the body and limbs much softer than a standard amigurumi doll. That's what gives him the relaxed snuggler shape instead of making him look like a firmly stuffed gingerbread toy.
I'd also use a smooth worsted weight yarn for this one rather than fuzzy chenille. The embroidered eyes, white icing and small chest decorations are important parts of the design, and they'll show up much more clearly against a smooth crocheted surface.
Expected finished size: About 18 to 19 inches from the top of the head to the bottom of the feet, with an arm span of approximately 15 to 16 inches when laid flat.
Skill level: Advanced beginner. You'll need to work single crochet in continuous rounds, increase, decrease, sew crocheted pieces together and add simple embroidery.
Construction: The head, body, two arms and two legs are crocheted separately. The head is firmly stuffed. The body and limbs get much less stuffing so they stay floppy. The head and body both finish with 18 stitches at the neck so they can be joined evenly without gathering one piece to fit the other.
Pattern note: This pattern has not been physically test-crocheted. The main page image shows the intended finished design. The finished measurements are calculated from the gauge and construction below, so a different gauge will change the finished size.
Yarn, Hook and Materials
Yarn:
Approximately 300 yards worsted weight #4 yarn in gingerbread brown
Approximately 20 yards white for the icing
Approximately 15 yards red for the bow tie and center chest circle
Approximately 10 yards green for the two green chest circles
Small amount of pale pink for the cheeks
Black embroidery floss or black yarn for the eyes and smile
You will also need:
3.75 mm crochet hook, or the size needed to meet gauge
Approximately 3 to 4 ounces polyester fiberfill
Yarn needle
Embroidery needle if using floss
Several removable stitch markers or short pieces of scrap yarn
Scissors
No plastic safety eyes or hard buttons are used in this pattern. The black eyes are embroidered with satin stitches, and the red and green decorations on the body are small crocheted circles sewn securely around their entire edges.
Gauge: Approximately 14 sc = 4 inches across and 16 rounds = 4 inches high in firm single crochet worked in the round. Measure without stretching the fabric.
You want a dense fabric without obvious holes between stitches. If stuffing shows through your work, go down a hook size rather than stuffing more tightly.
Abbreviations and Pattern Notes
US crochet terms are used.
ch = chain
sc = single crochet
inc = work 2 sc in the same stitch
inv dec = invisible single crochet decrease
sl st = slip stitch
st = stitch
sts = stitches
rnd = round
Unless I say otherwise, work in continuous rounds without joining. Put a marker in the first stitch of each round and move it up as you work.
For an invisible decrease, insert the hook through the front loop of each of the next 2 stitches, yarn over and pull through both front loops, then yarn over and pull through the remaining 2 loops on the hook.
Crochet the Gingerbread Man Head
Use gingerbread brown. The head is worked from the top down. It reaches 54 stitches at its widest point and finishes with an 18-stitch neck opening.
Rnd 1: Work 6 sc in a magic ring. (6)
Rnd 2: Inc in each st around. (12)
Rnd 3: *Sc in next st, inc in next st.* Repeat around. (18)
Rnd 4: *Sc in next 2 sts, inc in next st.* Repeat around. (24)
Rnd 5: *Sc in next 3 sts, inc in next st.* Repeat around. (30)
Rnd 6: *Sc in next 4 sts, inc in next st.* Repeat around. (36)
Rnd 7: *Sc in next 5 sts, inc in next st.* Repeat around. (42)
Rnd 8: *Sc in next 6 sts, inc in next st.* Repeat around. (48)
Rnd 9: *Sc in next 7 sts, inc in next st.* Repeat around. (54)
Rnds 10 through 16: Sc in each st around. (54)
Rnd 17: *Sc in next 7 sts, inv dec.* Repeat around. (48)
Rnd 18: *Sc in next 6 sts, inv dec.* Repeat around. (42)
Rnd 19: *Sc in next 5 sts, inv dec.* Repeat around. (36)
Rnd 20: *Sc in next 4 sts, inv dec.* Repeat around. (30)
Rnd 21: *Sc in next 3 sts, inv dec.* Repeat around. (24)
Rnd 22: *Sc in next 2 sts, inv dec.* Repeat around. (18)
Fasten off with a long tail for joining, but don't close the opening.
Add the Gingerbread Face
Decide which side of the head will be the front before you add the face. With the neck opening pointing down, place the eye centers approximately 9 to 10 stitches apart. Each eye should span roughly Rnds 11 through 13.
Use black embroidery floss or black yarn to make several short vertical satin stitches for each eye. Build the stitches beside one another until each eye forms a small solid oval. Don't use plastic safety eyes. The embroidered eyes are part of the finished design.
Add the smile below the eyes, spanning approximately 9 stitches across Rnds 14 through 16. Use small backstitches for the curve, then go back over any thin areas until the line has the same visual weight as the eyes.
Make 2 pink cheek circles: With pale pink yarn, work 6 sc in a magic ring. Pull the ring closed, sl st to the first sc and fasten off with a long sewing tail. Each cheek should be approximately 1/2 inch across.
Position one cheek just outside each end of the smile, centered around Rnds 14 and 15. Sew completely around the outside edge of each circle so it lies flat and secure against the head.
Add the White Forehead Icing
Use white yarn and a yarn needle to embroider the raised icing line directly onto the head. Chain-stitch embroidery gives the line the slightly rounded, piped look shown in the main page image.
To make an embroidered chain stitch, bring the yarn to the front, insert the needle back into or immediately beside the same opening, then bring the needle up one stitch ahead with the working yarn held in a loop under the needle. Pull the yarn through gently to form the chain. Repeat the same movement for each stitch in the line.
Find the center front of the head between the eyes. Beginning around Rnd 7 approximately 10 stitches to the left of center, work the white chain-stitch line across the forehead to approximately 10 stitches to the right of center. Let the line rise into Rnd 6 and dip into Rnd 8 as you work so it forms three broad waves.
Keep the embroidery relaxed so it sits on top of the crochet without pulling the head out of shape. Fasten both ends securely inside the head.
Stuff the head firmly and evenly now. Add small amounts at a time so the head stays round instead of becoming lumpy or stretched.
Crochet the Long Soft Body
The body is worked from the bottom toward the neck. It widens to 42 stitches, stays fairly straight through the middle and then narrows gradually to the same 18-stitch opening as the head.
Use gingerbread brown.
Rnd 1: Work 6 sc in a magic ring. (6)
Rnd 2: Inc in each st around. (12)
Rnd 3: *Sc in next st, inc in next st.* Repeat around. (18)
Rnd 4: *Sc in next 2 sts, inc in next st.* Repeat around. (24)
Rnd 5: *Sc in next 3 sts, inc in next st.* Repeat around. (30)
Rnd 6: *Sc in next 4 sts, inc in next st.* Repeat around. (36)
Rnd 7: *Sc in next 5 sts, inc in next st.* Repeat around. (42)
Rnds 8 through 18: Sc in each st around. (42)
Rnd 19: *Sc in next 5 sts, inv dec.* Repeat around. (36)
Rnds 20 and 21: Sc in each st around. (36)
Rnd 22: *Sc in next 4 sts, inv dec.* Repeat around. (30)
Rnds 23 and 24: Sc in each st around. (30)
Rnd 25: *Sc in next 3 sts, inv dec.* Repeat around. (24)
Rnd 26: Sc in each st around. (24)
Rnd 27: *Sc in next 2 sts, inv dec.* Repeat around. (18)
Fasten off, leaving a long tail.
Add only a light layer of fiberfill to the body. I would fill the lower and middle body enough to keep its general shape, then use less as you move toward the neck. You should still be able to fold or squeeze the torso easily in your hand. Don't pack it until it feels like an amigurumi body.
Crochet the Arms
Make 2 in gingerbread brown. Work each arm from the hand toward the shoulder. The hand has a little extra fullness, then the arm narrows and continues as a long soft tube.
Rnd 1: Work 6 sc in a magic ring. (6)
Rnd 2: Inc in each st around. (12)
Rnd 3: *Sc in next st, inc in next st.* Repeat around. (18)
Rnds 4 through 6: Sc in each st around. (18)
Rnd 7: *Sc in next 7 sts, inv dec.* Repeat twice. (16)
Rnds 8 through 27: Sc in each st around. (16)
Fasten off with a long sewing tail. Don't close the top.
At the stated gauge, each arm is expected to measure approximately 6 3/4 inches from the hand end to the open shoulder. Stuff the hand and lower arm lightly. Continue with just a small amount of stuffing through the middle of the arm, then leave roughly the final 2 inches at the shoulder almost unstuffed. That soft upper section lets the arms fall naturally beside the body.
Crochet the Legs
Make 2 in gingerbread brown. The feet are only slightly wider than the legs. I wouldn't add separate oversized feet because that would change the proportions of the finished gingerbread man.
Rnd 1: Work 6 sc in a magic ring. (6)
Rnd 2: Inc in each st around. (12)
Rnd 3: *Sc in next st, inc in next st.* Repeat around. (18)
Rnd 4: *Sc in next 5 sts, inc in next st.* Repeat 3 times. (21)
Rnds 5 through 7: Sc in each st around. (21)
Rnd 8: *Sc in next 5 sts, inv dec.* Repeat 3 times. (18)
Rnds 9 through 29: Sc in each st around. (18)
Fasten off with a long sewing tail and leave the top open.
Stuff each foot enough to round it. Add a little less stuffing as you work up the leg, then leave approximately the final 2 1/2 inches at the top almost unstuffed. The legs should bend and drape instead of sticking straight out from the body.
Embroider the Icing on the Wrists and Ankles
Use the same white yarn and chain-stitch embroidery used on the forehead. Add these lines before attaching the arms and legs so you can turn each limb easily while you work.
For each wrist: Work one continuous white chain-stitch line around the arm through Rnds 6 through 8. Let the line rise and fall in three shallow waves around the circumference.
For each ankle: Work one continuous white chain-stitch line around the leg through Rnds 7 through 9, again forming three shallow waves around the circumference.
Keep the embroidery loose enough to sit on the surface without puckering the limb. Fasten the yarn securely inside each arm or leg when the line is complete.
Crochet the Red Bow Tie
Use red yarn.
Ch 15.
Row 1: Sc in 2nd ch from hook and in each ch across. (14)
Rows 2 through 6: Ch 1, turn, sc in each st across. (14)
Fasten off and weave in the short tail.
Pinch the rectangle firmly in the center so the two sides fan outward. Wrap a separate length of red yarn around the middle 8 to 10 times. Tie the wrapping yarn securely on the back, leaving its ends long enough to sew the bow to the neck later.
Crochet the Three Candy-Style Chest Circles
Make 2 green circles and 1 red circle. These are crocheted decorations, not buttons.
Rnd 1: Work 6 sc in a magic ring. (6)
Rnd 2: Inc in each st around. (12)
Sl st to the next st and fasten off with a long sewing tail.
Each circle should be close to 1 inch across at the stated gauge. If yours are noticeably larger, use a smaller hook for these three pieces rather than letting the decorations take over the front of the body.
Assemble the Gingerbread Snuggler Lovey
Before you sew anything closed, count the crocheted pieces. You should have 12: 1 head, 1 body, 2 arms, 2 legs, 1 bow tie, 3 chest circles and 2 pink cheek circles. By this point, the two cheek circles should already be sewn to the head and all five white icing lines should be embroidered and securely fastened.
Choose the front of the body and mark it with a removable stitch marker. Check the stuffing now. The body should hold its shape but still fold easily, and the upper arms and legs should remain very soft. Add or remove stuffing before sewing the openings closed. You won't have access to them afterward.
1. Join the head to the body. Match the 18-stitch opening at the bottom of the head to the 18-stitch opening at the top of the body. Align the face with the marked front of the body. Using the long brown yarn tail, whipstitch the openings together one stitch to one stitch all the way around. Knot securely and bury the yarn tail inside the body.
Because both openings contain 18 stitches, you shouldn't have to gather, stretch or skip stitches to make the pieces fit.
2. Attach the legs. Flatten each 18-stitch leg opening so 9 stitches on one side lie against 9 stitches on the other, giving you 9 paired attachment positions.
On Rnd 7 of the body, mark 3 consecutive stitches centered on the front. These 3 stitches form the gap between the legs. Immediately to the left of that gap, mark 9 consecutive body stitches for one leg. Immediately to the right, mark 9 consecutive body stitches for the other leg.
Place each flattened leg top against its marked 9-stitch section. Sew through both layers of the leg top and the corresponding body stitch at all 9 positions. Sew back across the seam once more for reinforcement. The two legs should hang from the lower front of the body with the 3-stitch gap between them.
3. Attach the arms. Flatten each 16-stitch arm opening into 8 paired attachment positions. Rnd 23 of the body has 30 stitches. Using the marked front of the body as your guide, identify 7 consecutive stitches centered on the front: 3 stitches on each side of the center-front stitch plus the center stitch itself. Moving around Rnd 23 from one edge of that 7-stitch front section, the next 8 stitches form the first arm attachment, the next 7 stitches form the center-back section, and the final 8 stitches form the second arm attachment.
Place one flattened arm opening against each 8-stitch side section. Sew through both layers of the arm top and the corresponding body stitch at all 8 positions, then sew back across each seam once more for reinforcement.
The nearly unstuffed tops of the arms and legs are intentional. Those soft sections act like flexible hinges and let the limbs fall into the relaxed pose shown in the finished example.
4. Add the chest circles. Center the green, red and green circles vertically down the front of the body. Place the upper green circle around Rnds 20 and 21, the red circle around Rnds 15 and 16, and the lower green circle around Rnds 10 and 11.
Sew completely around the outside edge of every circle instead of catching it with only two or three stitches. I would also take one small anchoring stitch through the center before burying the tail inside the body. They should lie flat against the crochet and stay soft.
5. Add the bow tie. Center the red bow directly over the neck seam and sew it securely to the front of the body. Keep the ends of the bow free so it still has that slightly dimensional shape.
Final Shaping
Lay the finished gingerbread man flat and check the proportions before you bury the last yarn tails. The head should be round and full. The body should be longer and narrower than the head. The arms and legs should fall loosely rather than holding a stiff pose.
At this stage, don't reopen a seam just to change the stuffing. Gently redistribute the existing filling with your fingers so the torso and upper limbs stay flexible and the head remains round. Remove every stitch marker or scrap-yarn marker, check each sewn seam and decorative piece, and bury any remaining yarn tails before the snuggler is used.
Check the face from straight on, too. The embroidered eyes should be even, the smile should sit below them without touching the cheeks, and the forehead icing should follow a loose wave rather than forming a straight stripe.
A Note About the Embroidery and Baby Use
The eyes, smile and white icing are embroidered, while the cheeks and chest circles are crocheted from yarn rather than made from plastic eyes or hard buttons. If you're making this for a baby or young child, sew every decorative piece securely and check the stitching regularly for loose yarn or damage.
A snuggler lovey is not an infant sleep item. The U.S. Consumer Product Safety Commission recommends keeping an infant's crib, bassinet or play yard bare except for a fitted sheet. Keep this gingerbread man out of an infant sleep space and use it as a supervised cuddle or play item instead. You can read the CPSC safe sleep guidance here.
Can I Make This Gingerbread Lovey With Chenille Yarn?
You can, but I wouldn't substitute chenille and expect the same finished gingerbread man from these stitch counts. A thicker yarn changes the head size, limb thickness, finished height and the amount of stuffing you'll need.
There's another reason I'd stay with smooth worsted yarn for the pictured version. The white icing lines and embroidered face are easier to see against defined single crochet stitches. Chenille gives you a softer, fuzzier surface, but some of those gingerbread details disappear into it.
If you do change yarn weight, make a small gauge sample first and choose a hook that produces a firm fabric without gaps. Treat the finished size as a new version rather than trying to force it back to the 18 to 19 inch measurement above.
More Christmas Crochet Snuggler Lovey Patterns
If you want another floppy Christmas character to go with this one, my crochet snowman snuggler lovey pattern keeps the same soft holiday idea but gives you a completely different character.
You can also make the crochet reindeer snuggler lovey pattern or browse the full crochet baby snuggler lovey pattern collection.
For ornaments, dolls and other seasonal projects beyond snugglers, see my free Christmas crochet patterns.
Gingerbread Man Snuggler Lovey FAQ
Why isn't the body stuffed as firmly as the head?
The head needs enough stuffing to stay round and hold the embroidered face in shape. The body is deliberately softer so it can fold, drape and cuddle like the snuggler in the finished example.
Can I use plastic safety eyes instead of embroidery?
The pictured design and this pattern use black satin-stitch embroidery. I would keep it that way rather than changing the face to hard plastic eyes.
Are the red and green circles buttons?
No. All three are small crocheted circles made from yarn. Sew each one around its full outside edge and add the center anchoring stitch described in the assembly instructions.
Can I leave off the bow tie or candy circles?
Yes, but the finished gingerbread man won't match the example image. The red bow, green-red-green chest circles and white icing are all part of this particular design.
How large should the finished gingerbread man be?
At the stated gauge, expect approximately 18 to 19 inches from the top of the head to the bottom of the feet. That measurement is calculated from the pattern gauge and round counts, so a tighter or looser gauge will change it.
When you click on links to various merchants on this site and make a purchase, this may result in this site earning a commission. This does not affect the price you pay.

UBGI Gold Standard 2026
Reviewed under the site's
editorial checklist.
Photos, decorating ideas, party setups and reader submissions are shared for inspiration unless a page is specifically presented as a pattern, tutorial, reference guide or step-by-step project. Follow the instructions, measurements, safety guidance and manufacturer directions provided for the particular project or product.
About Jan | Contact | Baby Nursery Ideas (Blog) | Site Map | Privacy Policy | Disclosure Policy | Disclaimer | Affiliate Disclosure | Earnings Disclosure | Facebook | Pinterest
I am a participant in the Amazon Services LLC Associates Program, an affiliate advertising program designed to provide a means for us to earn fees by linking to Amazon. As an Amazon Associate I earn from qualifying purchases.
Copyright © 2006-2026. All Rights Reserved.