Free Crochet Nutcracker Lovey and Snuggler Pattern
By Jan Bay
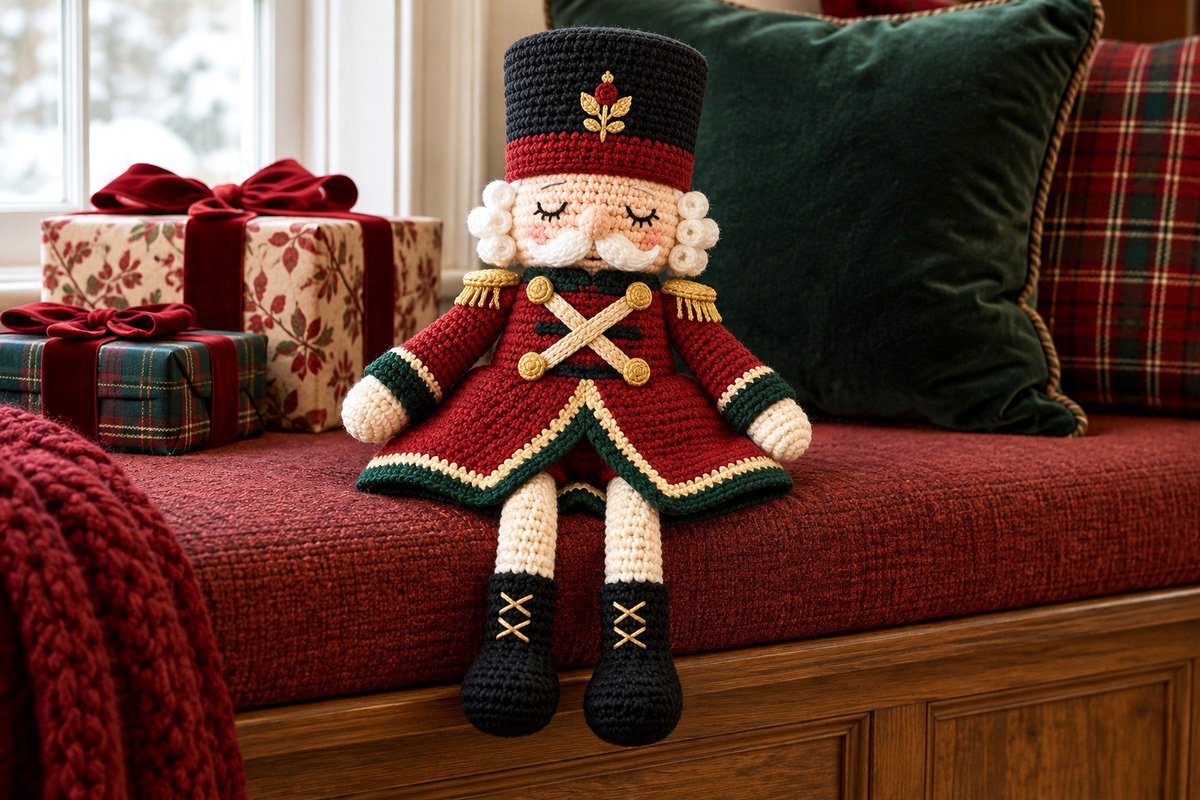
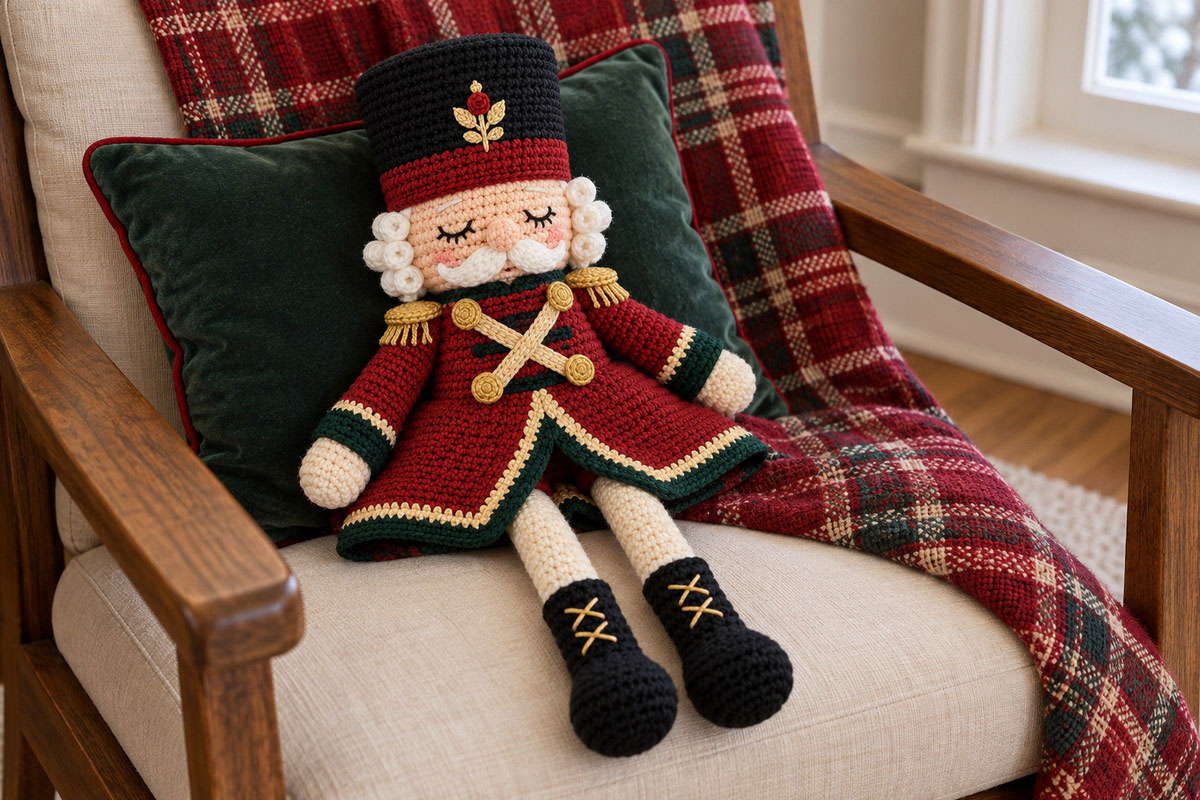
This free crochet nutcracker lovey pattern shows the softer side of the familiar Christmas toy soldier. This snuggler has a tall black hat, sleepy little face, curled white mustache, and a cranberry-red coat that forms his soft, floppy body. His long dangling legs, miniature boots, and gold-trimmed uniform give him plenty of holiday character and dignity, but I designed him to look relaxed and a little sleepy, not stiff like a traditional nutcracker doll.
Explore More Free Christmas Crochet Patterns
Free Christmas Crochet Patterns
Free Crochet Baby Snuggler Patterns
Jump to the Nutcracker Lovey Pattern
Pattern Details and Finished Size
Materials, Gauge and Abbreviations
Crochet the Floppy Body and Soldier Coat
Make the Head, Sleepy Face and Mustache
Crochet the Soldier Hat and White Curls
Make the Arms, Legs and Little Boots
What Makes This Crochet Nutcracker Lovey Pattern Different?
When you picture a Christmas nutcracker, you probably think of those wooden soldiers lined up on a mantel, standing straight as little fence posts with their stern faces and fancy uniforms. Mine still has the uniform, but he looks as though he's a little worn out after standing guard all day.
I wanted to keep the traditional details that make a nutcracker instantly recognizable. He needed a tall soldier hat, curled white mustache, gold decorations and those wonderful little black boots. But I didn't want the stiff body or serious expression. His embroidered eyes are closed, his cheeks have a touch of pink, and his arms and legs are made to hang loosely at his sides.
A Christmas Soldier with a Sleepy Little Face
His expression is my favorite part of the design. Those closed eyes, tiny lashes, rounded peach nose and upward-curling mustache make him look rather pleased with himself. He's dressed for a grand Christmas celebration, but he looks ready for an afternoon nap.
The white side curls help frame his face, too. You'll make six little spirals and arrange three on either side, just beneath the hat. They're small details, but they give his face that old-fashioned nutcracker appearance without making him look stern.
I wouldn't substitute plastic eyes or add a long beard. The embroidered expression and short, curled mustache are part of what gives this particular nutcracker his character.
His Flared Coat Is Part of the Snuggler Body
The biggest difference is his coat. Instead of making a round, stuffed soldier's torso, we're crocheting a broad, flattened body with two red coat fronts that separate toward the bottom. A little evergreen shows through the opening, and the gold edging follows the pointed edges of the coat.
The front begins as one continuous chest section. Below that, the stitches divide into two independently shaped flaps. The green section is worked directly into the back panel, so it shows between the coat fronts without adding another heavy layer of crochet.
It's a little more involved than making a plain stuffed cylinder, but there's a reason for it. The finished coat should spread out naturally when he's sitting down, with those long ivory legs and black boots dangling beneath it.
And don't worry about making him stand upright. He isn't supposed to. That's a job for the wooden nutcrackers.
Nutcracker Lovey Pattern Details and Finished Size
We're making a Christmas nutcracker with a stuffed head, a lightly supported tall hat and a soft, flat body. His little hands and boots get a small amount of filling, but the coat and most of his arms and legs stay unstuffed.
That's what gives him the relaxed look in the finished example. He can sit with his legs dangling or lie flat with his coat spread around him, but he isn't designed to stand by himself.
Free Crochet Nutcracker Lovey Pattern at a Glance
Skill level: Intermediate. You'll use single crochet, shaping, color changes, surface embroidery, continuous rounds and sewn assembly.
Expected finished length: Approximately 15 to 17 inches from the top of the hat to the bottom of the boots.
Expected coat width: Approximately 8 inches across the lower edge before decorative edging.
Expected coat height: Approximately 5 1/2 inches from shoulder to hem.
Expected head width: Approximately 3 1/2 inches at the widest point, excluding the side curls.
Main hook: 4.0 mm (G/6), or the size needed to obtain gauge.
Construction: Flat crocheted coat panels, stuffed head, separate hat, arms, legs and embroidered decorations.
The measurements are calculated from the stitch counts and reference gauge. They haven't been confirmed against a physically completed sample.
What You'll Make
There are 21 crocheted pieces altogether: a back panel, a split-front panel, a head, a hat, two arms, two legs, two mustache halves, six white curls, two shoulder epaulettes, two crossed gold strips and one small evergreen chest diamond. The hat insignia, gold rosettes, facial features and boot laces are embroidered.
We'll begin with the coat, then make the head and hat, followed by the limbs and uniform decorations. Assembly comes last, after you can lay everything out and check the proportions.
The coat is the part I'd pay particular attention to. Its pointed front opening, broad lower edge and contrasting green lining give him a shape that a plain stuffed doll wouldn't have.
Materials, Gauge and Crochet Abbreviations
I'd choose a smooth, washable worsted-weight yarn for this project. His face and uniform have quite a few small details, and a fuzzy yarn would make those details harder to see. You don't need specialty Christmas yarn. Ordinary yarn in the right colors will do nicely.
Yarn Colors and Estimated Yardage
Use medium-weight #4 worsted yarn. The following amounts are planning estimates, not measured consumption from a completed sample.
Cranberry red: Approximately 100–150 yards for the coat, sleeves and hatband.
Deep evergreen: Approximately 40–65 yards for the coat inset, cuffs, collar and edging.
Charcoal black: Approximately 60–90 yards for the tall hat and boots.
Warm peach: Approximately 40–60 yards for the head and hands.
Soft ivory: Approximately 40–65 yards for the side curls, mustache and legs.
Muted gold: Approximately 10–20 yards for the uniform decorations, insignia and boot laces.
You'll also need small amounts of black embroidery floss or thin black yarn for the eyes, plus muted pink yarn for his rosy cheeks.
Other Supplies
Have a 4.0 mm crochet hook, an optional 3.5 mm hook for smaller details, polyester fiberfill, a tapestry needle, scissors, stitch markers and a measuring tape ready. A few rustproof pins will help you position the mustache, hair and uniform decorations before sewing.
You won't need plastic eyes, loose beads, buttons, wire or a stiff insert for the hat. All the visible decorations can be made with yarn.
Gauge and Size Check
Reference gauge: 20 single crochet stitches and 22 rows = 4 inches (10 cm) in a relaxed, unstuffed swatch.
The back panel ends with 40 stitches across its lower edge, which should measure approximately 8 inches at this gauge. Its 30 rows should measure about 5 1/2 inches from shoulder to hem.
Check the gauge before starting the coat. If your fabric is considerably wider, you'll have an oversized body that may make the head look too small. If it's narrower, the coat may lose some of its broad, flared shape.
The stuffed head needs firm stitches so the filling doesn't show through. If your yarn leaves noticeable gaps at the reference hook size, try the smaller hook for the stuffed pieces. Keep the flat coat at the stated gauge.
U.S. Crochet Abbreviations
ch: Chain
sc: Single crochet
hdc: Half double crochet
dc: Double crochet
sl st: Slip stitch
st / sts: Stitch / stitches
inc: Work 2 sc in one stitch
sc2tog: Single crochet 2 stitches together
dec: Decrease using sc2tog
MR: Magic ring
BLO: Back loop only
RS / WS: Right side / wrong side
FO: Fasten off
Working Notes
All instructions use U.S. crochet terminology. Beginning turning chains don't count as stitches. Work the coat panels in rows and the head, hat and limbs in continuous rounds unless a section says otherwise.
Move your stitch marker up at the beginning of each new round. For color changes, begin the last stitch in the old color and finish its final yarn-over with the new one.
When you're making the coat, remember that the outside edge of each red flap eventually joins the body side seam. Its inside edge faces the pointed opening. Those edges have different shaping, so keep a marker at the outside edge of each flap.
Don't stuff the coat. Its flexibility comes from the flat crochet fabric, not from loose filling.
A Few Things I'd Keep in Mind Before Starting
It's tempting to make his little face first, especially since that's the fun part. But I'd start with the coat. Its width determines how large the head should look, where the arms belong and how far apart to place those dangling legs.
Pay Attention When the Coat Front Divides
The first 17 rows of the front are worked as one continuous piece. Beginning with Row 18, you'll make the two lower coat flaps separately, shaping the outside and inside edges as you go.
One flap is the mirror of the other, and it's easy to get turned around when you're increasing at one edge and decreasing at the other. That's why I suggest marking each outside edge before beginning the shaping.
You'll know the shaping is headed in the right direction when the opening gradually widens below the chest. By the last row, the evergreen section of the back should show between the two red fronts.
Don't try to sew that opening closed. It's supposed to be there.
Keep the Head Firm and the Limbs Soft
Not every part of this nutcracker needs the same amount of stuffing. The head should stay rounded, but the arms and ivory legs need some flexibility. Add just enough filling to the hands and boots to help them hold their shape.
The hat also needs a little support. Start with a small amount of fiberfill in its upper crown and check how it sits on the head before sewing it down. Packing it too firmly could make it heavy enough to tip backward.
Take Your Time with His Face
You'll embroider the eyes while the head is still open, which makes hiding the yarn ends much easier. Mark the center of the face before stitching either eye so you can keep the two little curves balanced.
Position the nose and eyes first. Then pin the mustache halves beneath the nose and check that both ends curl upward evenly. Arrange the six white hair curls before the hat is sewn on.
A couple of minutes spent checking his expression is time well spent. His face is too sweet to rush.
Crochet the Floppy Body and Nutcracker Soldier Coat
We're starting with the coat because it sets the proportions for everything else. The red fronts are supposed to spread apart near the bottom, with evergreen showing between them. That little V is worth getting right. It's what gives him the sweeping soldier coat in the finished picture.
The back is one flat panel with a green center worked into its lower rows. The front starts as a solid red chest and divides into two separate coat flaps. Once they're joined, the entire body stays unstuffed.
Cranberry Back Panel
With cranberry yarn, ch 21. Work from the narrow shoulder edge toward the wider lower hem.
Row 1: Sc in second ch from hook and each remaining ch. (20)
Row 2: Ch 1, turn, sc across. (20)
Row 3: Ch 1, turn, inc in first st, sc to last st, inc in last st. (22)
Rows 4–5: Ch 1, turn, sc across. (22)
Row 6: Ch 1, turn, inc at both ends. (24)
Rows 7–8: Ch 1, turn, sc across. (24)
Row 9: Ch 1, turn, inc at both ends. (26)
Rows 10–11: Ch 1, turn, sc across. (26)
Row 12: Ch 1, turn, inc at both ends. (28)
Rows 13–14: Ch 1, turn, sc across. (28)
Row 15: Ch 1, turn, inc at both ends. (30)
Rows 16–17: Ch 1, turn, sc across. (30)
Row 18: Ch 1, turn, inc at both ends. (32)
Row 19: Ch 1, turn, sc across. (32)
On increase rows, work 2 sc in the first stitch and 2 sc in the last stitch, with ordinary sc across all the stitches between them.
Evergreen Center of the Back Panel
Starting with Row 20, you'll work a narrow evergreen section directly into the center of the cranberry back. It begins with just two green stitches and grows gradually wider toward the hem.
Use two small balls or bobbins of cranberry yarn, one for either side of the green section, and one of evergreen. This is a simple intarsia color change. At each boundary, complete the final yarn-over of the previous stitch using the new color and twist the two strands together once on the wrong side to prevent a gap.
Work each row as one continuous row across all three color sections. Ch 1 and turn at the beginning of every row.
Row 20: 15 cranberry sc, 2 evergreen sc, 15 cranberry sc. (32)
Row 21: Increase in the first and last stitches while keeping the 2 center stitches evergreen. The completed row has 16 cranberry, 2 evergreen, 16 cranberry. (34)
Row 22: 15 cranberry sc, 4 evergreen sc, 15 cranberry sc. (34)
Row 23: 15 cranberry sc, 4 evergreen sc, 15 cranberry sc. (34)
Row 24: Increase at both outside edges. Work the completed row as 15 cranberry, 6 evergreen, 15 cranberry. (36)
Row 25: 15 cranberry sc, 6 evergreen sc, 15 cranberry sc. (36)
Row 26: 14 cranberry sc, 8 evergreen sc, 14 cranberry sc. (36)
Row 27: Increase at both outside edges. Work the completed row as 15 cranberry, 8 evergreen, 15 cranberry. (38)
Row 28: 14 cranberry sc, 10 evergreen sc, 14 cranberry sc. (38)
Row 29: 14 cranberry sc, 10 evergreen sc, 14 cranberry sc. (38)
Row 30: Increase at both outside edges. Work the completed row as 14 cranberry, 12 evergreen, 14 cranberry. (40)
On rows where the green section widens, the next stitch at each color boundary is simply worked in evergreen instead of cranberry. Those color changes don't add stitches. Only the increases at the two outside edges change the row's total width.
FO each color separately. Weave the yarn tails securely into stitches of their matching colors, keeping the evergreen section smooth on both sides. Do not carry cranberry yarn across the exposed green section.
Before assembly, hold the back panel behind the split coat front. Choose the orientation that shows the neatest green surface through the V opening, and keep that orientation when joining the panels. No loose tails or color-change strands should be visible between the red coat flaps.
Checkpoint: Your back has 30 rows and finishes with 40 stitches across the hem. The evergreen section should be centered and 12 stitches wide at the bottom. At the reference gauge, the panel should measure approximately 8 inches across the hem and 5 1/2 inches tall.
Cranberry Front Chest
Now make the solid upper chest. This follows the same shaping as the first 17 rows of the back, but the whole piece stays cranberry. We'll divide it into two coat fronts afterward.
With cranberry yarn, ch 21.
Row 1: Sc in second ch from hook and each remaining ch. (20)
Row 2: Ch 1, turn, sc across. (20)
Row 3: Ch 1, turn, inc at both ends. (22)
Rows 4–5: Ch 1, turn, sc across. (22)
Row 6: Ch 1, turn, inc at both ends. (24)
Rows 7–8: Ch 1, turn, sc across. (24)
Row 9: Ch 1, turn, inc at both ends. (26)
Rows 10–11: Ch 1, turn, sc across. (26)
Row 12: Ch 1, turn, inc at both ends. (28)
Rows 13–14: Ch 1, turn, sc across. (28)
Row 15: Ch 1, turn, inc at both ends. (30)
Rows 16–17: Ch 1, turn, sc across. (30)
FO and weave in the end. Place the completed chest flat with the side you want facing outward uppermost, and the narrow shoulder edge at the top.
Count the 30 stitches along Row 17 from left to right as you look at the panel. Stitches 1–15 belong to the left coat flap. Stitches 16–30 belong to the right coat flap.
Mark the dividing point between stitches 15 and 16. You'll work the lower coat fronts separately, without joining them together at the center.
Left Coat Flap
With the right side facing, join cranberry yarn at stitch 15 of Row 17. Work toward the outside left edge.
Row 18: Sc in stitches 15 through 2, then work 2 sc in stitch 1. (16)
The outside edge of this flap is the left edge when viewed from the front. The inside edge faces the center opening.
Row 19: Ch 1, turn, sc across. (16)
Row 20: Ch 1, turn, sc2tog at inside edge, sc across remaining stitches. (15)
Row 21: Ch 1, turn, inc at outside edge, sc across remaining stitches. (16)
Row 22: Ch 1, turn, sc2tog at inside edge, sc across remaining stitches. (15)
Row 23: Ch 1, turn, sc across. (15)
Row 24: Ch 1, turn, inc at outside edge and sc2tog at inside edge, sc in all remaining stitches. (15)
Row 25: Ch 1, turn, sc across. (15)
Row 26: Ch 1, turn, sc2tog at inside edge, sc across remaining stitches. (14)
Row 27: Ch 1, turn, inc at outside edge, sc across remaining stitches. (15)
Row 28: Ch 1, turn, sc2tog at inside edge, sc across remaining stitches. (14)
Row 29: Ch 1, turn, sc across. (14)
Row 30: Ch 1, turn, inc at outside edge and sc2tog at inside edge, sc in all remaining stitches. (14)
FO, leaving a tail for securing the lower edge during assembly.
Right Coat Flap
With the right side facing, join cranberry yarn at stitch 30 of Row 17. This time begin at the outside right edge and work toward the center.
Row 18: Work 2 sc in stitch 30, then sc in stitches 29 through 16. (16)
The outside edge of this flap is now on the right when viewed from the front. Its inside edge faces the center opening.
Rows 19–30: Repeat the shaping sequence used for the left flap, always working the increase at this flap's outside edge and the decrease at its inside edge.
For clarity, the stitch totals at the ends of Rows 19 through 30 are: 16, 15, 16, 15, 15, 15, 15, 14, 15, 14, 14 and 14.
If an increase falls at the beginning of a row, work 2 sc in the first stitch. If it falls at the end, work 2 sc in the last stitch. For an inside-edge decrease, work sc2tog over the two stitches nearest the center opening.
FO, leaving a sewing tail.
Check the Split-Coat Shape
Lay the finished front over the back with the shoulder edges and outside edges aligned. The two red flaps should meet beneath the chest and then gradually separate, revealing the evergreen section of the back.
At Row 18, the red fronts occupy the full 32-stitch width. By Row 20, the opening is two stitches wide. At Row 24, it's six stitches wide. At the bottom of Row 30, the two red fronts have 14 stitches each and the green opening is 12 stitches wide.
Those are useful checkpoints. If the opening isn't centered or one flap is longer than the other, check the shaping before sewing.
Don't stitch the two red fronts together. The open V is deliberate, and closing it would spoil the shape of his soldier coat.
Evergreen and Gold Coat Edging
Before joining the body, use evergreen yarn to work a surface chain-stitch line along the inner edge of each red coat flap, beginning where the two fronts separate. Follow the shaped edge downward, anchoring a surface stitch at each successive row end from Rows 18–30. Turn the lower corner and continue across the 14 stitches of the flap's bottom edge.
Work a second parallel evergreen surface chain-stitch line immediately beside the first, toward the red fabric. Keep both lines close enough to form a noticeable green border approximately two embroidered stitches wide.
Repeat on the other coat flap, following the same row ends and 14-stitch lower edge. These are surface-embroidered stitches, so they do not change the foundation stitch counts or the 14-stitch hem attachments used during assembly.
Using muted gold yarn, embroider a narrow line of closely spaced surface chain stitches or backstitches immediately inside each evergreen border, toward the red fabric. Keep the gold line even along the sloping inner edges and both lower hems.
Don't pull the embroidered lines tight. Both coat fronts should still lie flat and separate naturally over the evergreen center. Secure the embroidery ends on the wrong side without stitching the two flaps together.
The gold and green outlines should follow the actual edges of the two red coat fronts, leaving the green inset visible beneath them. That's the detail that gives the finished coat its pointed ceremonial appearance.
Set the front and back panels aside without joining them yet. We'll complete the uniform decoration before closing the body.
Crochet the Nutcracker Head, Sleepy Face and Mustache
Now we get to his face, and I think this is the most enjoyable part. Those little closed eyes and the mustache curling up at the ends make him look as though he's perfectly content to let somebody else take care of Christmas.
We'll keep the face simple and soft. You won't need plastic eyes, wire or anything hard inside his head.
Crochet the Rounded Head
Using peach yarn, begin at the top of the head. Work in continuous rounds, moving your stitch marker up after each round.
Round 1: 6 sc in MR. (6)
Round 2: Inc in each st. (12)
Round 3: (Sc in next st, inc) 6 times. (18)
Round 4: (Sc in next 2 sts, inc) 6 times. (24)
Round 5: (Sc in next 3 sts, inc) 6 times. (30)
Round 6: (Sc in next 4 sts, inc) 6 times. (36)
Round 7: (Sc in next 5 sts, inc) 6 times. (42)
Round 8: (Sc in next 6 sts, inc) 6 times. (48)
Round 9: (Sc in next 7 sts, inc) 6 times. (54)
Rounds 10–19: Sc in each st around. (54)
Stop here to embroider the facial features while the head is still open. You'll be able to secure the embroidery tails neatly on the inside.
Embroider the Sleepy Eyes
Find the center front of the head, directly opposite the beginning-of-round marker. Around the 54-stitch circumference, this will be approximately halfway around, between stitches 27 and 28 if the marker is treated as the back.
Using black embroidery floss or thin black yarn, embroider two gently curved closed eyes around Rounds 14–15.
Position the center of each eye approximately five stitches to either side of the face center. Each eye should span about four stitches horizontally.
Curve the ends slightly downward and add two or three tiny lash stitches at each outer corner. Keep those lashes short. We're giving him a peaceful, sleepy expression, not great big cartoon eyelashes.
Step back and compare the eyes before securing the embroidery. They should be level and have matching curves.
Add the Nose and Rosy Cheeks
With peach yarn, mark a small oval centered over approximately two stitches at Round 17. Work a foundation of closely packed satin stitches across the oval, then build two or three additional layers of short satin stitches over the foundation to create a softly rounded, raised nose. Keep the edges smooth and the center fuller, forming the little bulb-shaped nose visible in the finished example. Anchor every layer securely through the head fabric and fasten the yarn ends inside the still-open head.
For the cheeks, use muted pink yarn to make two or three short satin stitches beneath the outer portion of each eye, around Rounds 16–17.
Keep the pink subtle. His peach face and ivory mustache provide plenty of contrast already.
If you want the faint eyebrows visible in the finished example, add one short ivory embroidered curve above each eye. They should be lighter and less noticeable than the black eyelashes.
Secure all embroidery ends inside the head before continuing.
Finish Shaping and Stuffing the Head
Return to the peach working yarn.
Round 20: (Sc in next 7 sts, sc2tog) 6 times. (48)
Round 21: (Sc in next 6 sts, sc2tog) 6 times. (42)
Round 22: (Sc in next 5 sts, sc2tog) 6 times. (36)
Round 23: (Sc in next 4 sts, sc2tog) 6 times. (30)
Round 24: (Sc in next 3 sts, sc2tog) 6 times. (24)
Begin stuffing the head with small amounts of polyester fiberfill. Spread the filling evenly toward the cheeks, forehead and back of the head. Shape it as you go so the face stays rounded rather than stretching into an oval.
Round 25: (Sc in next 4 sts, sc2tog) 4 times. (20)
Change to evergreen yarn.
Rounds 26–27: Sc in each st around. (20)
FO, leaving a long yarn tail for closing the neck and attaching the head. Leave the 20-stitch collar opening accessible while you finish the mustache, white curls and hat. You'll close it securely during final assembly, before joining the head to the body.
Checkpoint: The head has 54 stitches at its widest point and finishes with a 20-stitch green collar. The face should be centered above the collar, with the sleepy eyes, nose and cheeks clearly visible.
Crochet the White Mustache, Make 2 Halves
Each half has a rounded inner end and a narrower outer tip. You'll sew the fuller ends together beneath the nose and turn the tips upward toward the cheeks.
Using ivory yarn, ch 9.
Beginning in the second ch from hook, work 1 sl st in the first ch, 1 sc in each of the next 2 chs, 1 hdc in each of the next 2 chs, 1 dc in each of the next 2 chs, and 3 dc in the final ch.
Rotate the work to crochet along the unused underside loops of the foundation chain.
Work 1 dc in each of the next 2 chs, 1 hdc in each of the next 2 chs, 1 sc in each of the next 2 chs, and 1 sl st in the final ch.
FO, leaving a long sewing tail. Make the second mustache half the same way.
Position and Sew the Mustache
Place the two fuller ends together just below the nose. Curve the narrow ends outward and slightly upward so they frame the lower cheeks.
Pin both pieces before sewing. Make sure the two halves are balanced and don't cover the rosy cheeks.
Using ivory yarn, sew each mustache half against the face along its foundation-chain edge. Add small anchoring stitches along the body of each piece and at its outer tip.
The mustache can look slightly raised, but it shouldn't have a loose edge that can be pulled away from the head.
Leave the peach chin visible beneath the mustache. A long beard would change the sweet little expression we're trying to keep.
Crochet the Soldier Hat and White Side Curls
A nutcracker without his tall soldier hat would look a little unfinished, wouldn't he? This one has a charcoal-black crown, a cranberry band, a slightly wider black brim and a tiny gold embroidered insignia.
We'll also give him three white curls on each side of his head. Make those first so you can tuck their upper ends neatly beneath the hat.
White Side Curls, Make 6
Using ivory yarn, ch 9.
Work 2 sc in the second ch from hook and 2 sc in each remaining ch. (16 sc)
FO, leaving a long sewing tail. The strip should curl naturally into a little spiral.
Make six curls. Arrange three on each side of the head, beginning near the temples and working downward toward the cheeks.
The upper curls should sit close to the hat line. The lowest curls should frame the sides of the face without covering the mustache.
Pin them first and compare the arrangement on both sides. Sew the base and center of each curl against the head, then add small anchoring stitches along the outer turns. Don't leave loose loops that can be pulled away.
Bury the sewing tails securely inside the head.
Tall Black Nutcracker Soldier Hat
With charcoal yarn, begin at the flat top of the hat and work downward in continuous rounds.
Round 1: 6 sc in MR. (6)
Round 2: Inc around. (12)
Round 3: (Sc in next st, inc) 6 times. (18)
Round 4: (Sc in next 2 sts, inc) 6 times. (24)
Round 5: (Sc in next 3 sts, inc) 6 times. (30)
Round 6: (Sc in next 4 sts, inc) 6 times. (36)
Round 7: (Sc in next 5 sts, inc) 6 times. (42)
Round 8: (Sc in next 6 sts, inc) 6 times. (48)
Round 9: (Sc in next 7 sts, inc) 6 times. (54)
Round 10: Sc in BLO around. (54)
Rounds 11–20: Sc around. (54)
Change to cranberry yarn.
Rounds 21–23: Sc around. (54)
Change back to charcoal.
Round 24: (Sc in next 8 sts, inc) 6 times. (60)
Round 25: Sc around. (60)
Join with a sl st and FO, leaving a long sewing tail.
The BLO round creates a distinct corner between the top and sides of the hat. Rounds 24 and 25 give the lower edge a slight outward flare.
Keep the sides fairly straight. His hat should be a tall cylinder, not a pointed Christmas cap.
Shape and Attach the Hat
Try the hat over the head before adding any filling. Center the black brim above the eyes, with the cranberry band resting across the upper forehead. The six white side curls should remain visible below the hat.
Add a small amount of polyester fiberfill inside the upper crown, enough to help the tall shape stay upright. Leave the lower section hollow so it can sit over the rounded top of the head.
Adjust the filling until the hat has a reasonably straight cylindrical shape without feeling heavily packed. If it tips backward, remove a little filling and try the fit again.
Pin the hat in position, checking that the front brim doesn't cover the embroidered eyes.
Sew the lower hat wall securely to the head around its circumference, placing the stitches beneath the brim where they'll be less visible. Make a second pass to reinforce the attachment.
Secure and bury the yarn tail.
Embroider the Gold Hat Insignia
Using muted gold yarn, embroider a short vertical stem centered on the black hat above the cranberry band. Make it approximately four stitches tall.
Add two small leaves on either side with close satin stitches. Use cranberry yarn to embroider a tiny round rosette at the top of the stem.
Keep the insignia small and completely attached to the hat. No separate button or brooch is needed.
That's his hat finished. With the white curls peeking out beneath it, he's beginning to look like a proper little nutcracker soldier.
Crochet the Arms, Dangling Legs and Little Boots
His arms and legs are intentionally soft. The sleeves should rest against the sides of his coat, and the legs should hang freely beneath the hem. We want him to look comfortable sitting down, not like a wooden soldier with stiff arms and legs.
Hands and Sleeves, Make 2
Begin with peach yarn at the closed end of the hand. Work in continuous rounds.
Round 1: 6 sc in MR. (6)
Round 2: Inc around. (12)
Rounds 3–5: Sc around. (12)
Change to evergreen.
Rounds 6–7: Sc around. (12)
Change to muted gold.
Round 8: Sc around. (12)
Change to cranberry.
Rounds 9–20: Sc around. (12)
Add a small amount of fiberfill to the peach hand. Leave the cranberry sleeve mostly unstuffed so it bends naturally.
Flatten the open upper end so the 12 stitches form six pairs. Working through both layers, make 6 sl sts across to close the opening.
FO, leaving a long tail for attaching the arm to the body. Make the second arm the same way.
Checkpoint: Each arm has 20 rounds, a 12-stitch upper circumference and a flattened six-stitch attachment edge.
Black Boots and Ivory Legs, Make 2
Each leg begins at the rounded black boot toe and continues upward into the ivory leg. Making them in one piece keeps the color change neat and saves an extra seam.
Using charcoal yarn:
Round 1: 6 sc in MR. (6)
Round 2: Inc around. (12)
Round 3: (Sc in next st, inc) 6 times. (18)
Rounds 4–6: Sc around. (18)
Round 7: (Sc in next 4 sts, sc2tog) 3 times. (15)
Round 8: (Sc in next 3 sts, sc2tog) 3 times. (12)
Rounds 9–13: Sc around. (12)
Add a little fiberfill to the black toe and foot. Work it toward the rounded end and leave the narrow upper boot fairly soft.
Change to ivory.
Rounds 14–31: Sc around. (12)
Leave the ivory leg unstuffed so it can hang freely. Flatten the open top into six pairs of stitches and work 6 sl sts through both layers to close it.
FO, leaving a long sewing tail. Make the second leg the same way.
Checkpoint: Each leg has 31 rounds, including 13 charcoal rounds and 18 ivory rounds. Both should have the same length and a flattened six-stitch upper attachment edge.
Embroider the Gold Boot Laces
Using muted gold yarn, embroider three small X-shaped stitches down the front of each boot, approximately across Rounds 9–12.
Keep the crosses centered and evenly spaced. Anchor each one into the boot fabric and bury the yarn ends inside.
Don't add actual loose shoelaces. The embroidered crosses give him the little lace-up boots in the finished example without adding dangling strings.
Add the Gold Nutcracker Uniform Details
Now we get to dress him up a little. The crossed gold decoration gives his uniform that grand, old-fashioned look, and I particularly like it against the cranberry red and deep evergreen.
Keep the decoration firmly attached to the coat. It should look like part of the uniform rather than ribbons or cords hanging from his chest.
Evergreen Chest Diamond
The lower green lining isn't the only evergreen detail. There's also a small dark green area behind the crossed gold decoration on his upper chest.
We'll make that as a thin, flat diamond-shaped appliqué so it shows between the gold strips without adding much bulk.
With evergreen yarn, ch 3.
Row 1: Sc in second ch from hook and next ch. (2)
Row 2: Ch 1, turn, inc in each st. (4)
Row 3: Ch 1, turn, inc in first st, sc in next 2 sts, inc in last st. (6)
Row 4: Ch 1, turn, inc in first st, sc in next 4 sts, inc in last st. (8)
Row 5: Ch 1, turn, sc across. (8)
Row 6: Ch 1, turn, sc2tog, sc in next 4 sts, sc2tog. (6)
Row 7: Ch 1, turn, sc2tog, sc in next 2 sts, sc2tog. (4)
Row 8: Ch 1, turn, sc2tog twice. (2)
FO, leaving a sewing tail.
Lay the diamond over the center of the cranberry chest, approximately spanning Body Rows 4–11. Its narrower ends should point toward the neckline and lower coat.
Pin it in place, then sew all four edges flat against the chest using small evergreen stitches. The middle of the diamond should sit beneath the crossing point of the gold strips.
Crossed Gold Chest Strips, Make 2
With muted gold yarn, ch 3.
Row 1: Sc in second ch from hook and next ch. (2)
Rows 2–14: Ch 1, turn, sc across. (2)
FO, leaving a long sewing tail. Make a second matching strip.
Each strip should be approximately 2 1/2 inches long at the reference row gauge. Before sewing, check that it reaches comfortably between the marked chest positions without being stretched.
Arrange the Gold Cross
Lay the coat front flat with the narrow shoulder edge at the top. Count stitches across the complete chest rows from left to right as you look at the front.
Mark four approximate positions:
Upper left: Row 4, stitch 6.
Upper right: Row 4, stitch 17.
Lower left: Row 11, stitch 8.
Lower right: Row 11, stitch 19.
Lay the first gold strip diagonally from upper left to lower right. Lay the second from upper right to lower left so the strips form an X over the evergreen diamond.
Pin both strips before sewing. Their upper and lower ends should be evenly spaced, with the green diamond showing through the spaces around the crossed strips.
Sew each strip down along both long edges and across its ends. At the crossing point, stitch through both strips and the fabric underneath. Nothing should hang loose.
Four Gold Uniform Rosettes
At each of the four strip endpoints, embroider a small circular gold rosette approximately 3/8 inch across.
Begin with a small ring of backstitches, then fill it with closely packed satin stitches. Add a few short curved stitches around the outside if you want a slightly raised appearance.
Make all four rosettes the same size and secure the embroidery ends on the wrong side.
These embroidered ornaments replace separate gold buttons. They give the nutcracker the rounded military decorations shown in the example without introducing small detachable pieces.
Gold Shoulder Epaulettes, Make 2
With muted gold yarn, ch 7.
Row 1: Sc in second ch from hook and across. (6)
Row 2: Ch 1, turn, sc across. (6)
Row 3: Ch 1, turn, sc across. (6)
FO, leaving a long sewing tail. Make a second epaulette.
Place one across the upper outside end of each cranberry sleeve, where the arm will meet the shoulder of the body.
Sew the epaulette down flat around all four sides. Add several short vertical gold embroidery stitches along its lower edge to suggest traditional military fringe. Anchor both ends of every stitch into the sleeve fabric.
Don't make separate hanging tassels. The embroidered fringe gives the right appearance without introducing loose yarn pieces.
And that's enough gold. Between the crossed chest decoration, shoulder trim, little hat insignia and embroidered boot laces, he's dressed for Christmas without needing another ornament.
Assemble and Finish Your Christmas Nutcracker Lovey
We've got all the pieces now. Before sewing anything permanently, spread them out and check the proportions. The head should look comfortably oversized above the coat, the hat should stand tall, and those long legs should extend well below the hem.
Don't rush the positioning. A head that's slightly crooked or legs that are sewn too far apart can change his whole expression and posture.
Attach the Legs to the Back Panel
We'll attach the legs before closing the body. That gives us room to reinforce the stitching without sewing across the open V in the front of the coat.
Lay the back panel flat with its wrong side facing you, its narrow shoulder edge at the top and its 40-stitch hem at the bottom.
Position the flattened six-stitch top of the first ivory leg across stitches 13–18 of Back Row 27. Position the second leg across stitches 21–26 of the same row.
The legs should point downward toward the hem, and the black boots should extend well below it. Position the embroidered boot laces so they'll face the front of the finished nutcracker.
Pin both legs temporarily. Turn the back panel over and check the spacing. They should sit evenly on either side of the center, with enough room between them to dangle naturally.
Using each leg's long sewing tail, stitch through its flattened six-stitch top and the corresponding section of Back Row 27. Make a second pass through the attachment to reinforce it.
Add several short anchoring stitches through the adjacent back-panel fabric at Row 28, catching the leg fabric without gathering the surrounding stitches.
Secure both yarn tails on the wrong side of the back panel and remove the temporary pins.
Join the Front and Back Coat Panels
Place the decorated front and shaped back together with wrong sides facing inward. The right side of the uniform should face outward.
Match the narrow shoulder edges and the outside side edges. The two red coat fronts should lie over the matching red portions of the back, leaving the evergreen section visible between them.
At the shoulder edge, sew the first five stitches of the front to the corresponding first five stitches of the back. Repeat with the last five stitches of each panel.
This leaves ten unjoined stitches on the front and ten on the back, forming a 20-stitch neckline opening.
Using cranberry yarn, sew each outside side seam with mattress stitch. Match Row 1 to Row 1 and continue through Row 30, catching the corresponding row ends from both layers.
At the hem, sew the 14 stitches of the left red coat flap to the first 14 stitches of the back hem. Repeat on the right, sewing its 14 stitches to the last 14 stitches of the back hem.
Leave the center 12 evergreen stitches uncovered. These form the exposed lower edge of the green lining between the two red coat fronts.
Neaten that exposed green edge with a row of small surface slip stitches if needed, taking care not to pull the fabric tight. Secure the yarn ends inside the body.
Don't sew the two red coat flaps together across the center. Their separated, gold-edged fronts are part of the design.
Checkpoint: Both outside side seams should be closed, the neckline should have 20 exposed stitches, and the green V should remain visible between the red coat fronts. The long ivory legs should hang below the body with their attachment stitching concealed inside.
Leave the body completely unstuffed.
Attach the Arms at the Shoulders
Position the flattened top of each cranberry sleeve against the outside edge of the coat, approximately across Body Rows 3–9.
The arms should angle slightly downward and outward, with the ivory hands visible below the green cuffs. The gold epaulettes belong at the top of the shoulders.
Pin both arms in place and look at the nutcracker from the front. One arm shouldn't sit noticeably higher than the other.
Using the long sewing tail, stitch the flattened six-stitch end of each sleeve firmly against the corresponding body side seam. Catch both layers of the coat where possible.
Work a second row of attachment stitches in the opposite direction to reinforce the join.
Secure and weave in both yarn tails.
Attach the Head to the Neckline
Before attaching the head, close its lower opening so the fiberfill cannot work its way into the unstuffed coat.
Check that the head is evenly stuffed, then gently flatten the 20-stitch evergreen collar opening, with the center front of the face aligned over the center of one flattened edge. The opening should form two layers of ten stitches each.
Using the long evergreen sewing tail, whipstitch the ten pairs of collar stitches together across the opening. Catch both layers securely at every stitch and make a second pass to close any gaps. Keep the collar flat without pulling it into a tight gather.
The stuffing should now be completely enclosed inside the head. You'll still have ten collar stitches along the front of the flattened edge and ten along the back for attaching it to the body.
Position the head above the center of the crossed gold decoration, keeping the sleepy face toward the decorated front of the coat.
Align the ten front collar stitches with the ten exposed neckline stitches on the front body panel. Align the ten back collar stitches with the ten exposed neckline stitches on the back panel.
Pin the head temporarily and check the position. The mustache should remain well above the gold chest decoration, and the face should look straight ahead rather than tipping toward one shoulder.
Using the remaining evergreen sewing tail, sew each front collar stitch to its corresponding front neckline stitch. Continue around the attachment, matching the ten back collar stitches to the ten back neckline stitches. Work small, close stitches without pulling the neckline into tight gathers.
Make a second reinforcing pass around the attachment. Secure the yarn firmly and weave the tail into the body or head fabric.
Check the attachment by gently moving the head from side to side. It should have a little natural softness, but the seam should remain firmly closed without exposing the stuffing.
Check His Face and Hat
Set the nutcracker upright against a cushion or let him sit with his legs dangling over the edge of a chair. He isn't designed to stand independently.
Look at his face first. The sleepy eyes should sit at the same level, the peach nose should be centered, and both halves of the white mustache should curl upward evenly.
Check the white side curls next. Three belong on each side, and they should frame his cheeks without hiding the eyes.
His tall black hat should remain upright, with the little gold insignia centered above his face.
If something looks slightly uneven, make any adjustment that can be done without disturbing a secure attachment. Don't pull firmly sewn pieces apart simply to achieve a tiny cosmetic difference.
Smooth the Flared Coat
Spread the two red coat fronts gently with your hands. They should separate beneath the chest, with the evergreen lining showing between them.
The gold and green edging should follow the actual shaped edges of the coat, and the crossed gold decoration should sit centered on his chest.
If the lower coat edges curl slightly, lightly dampen the fabric, smooth it onto a clean towel and let it dry flat. Follow the yarn manufacturer's care instructions.
Don't press a hot iron directly onto the yarn or flatten the raised decorations.
Weave In the Ends and Inspect the Finished Lovey
Weave remaining yarn tails through several stitches, reverse direction and weave through another short section before trimming. Avoid cutting a tail immediately beside a seam knot.
Check the head attachment, hat, mustache, curls, arms, legs and uniform decorations. Every embellishment should be secured firmly against the crocheted fabric.
Remove all temporary pins and stitch markers. Look for loose yarn ends, exposed fiberfill, openings along the seams or decorations that can be pulled away.
Give the arm and leg attachments a gentle check, and repeat the inspection after laundering or regular handling.
And there he is. Tall hat, dignified uniform, sleepy little face and those wonderfully floppy legs. He may look like a proper Christmas soldier, but I don't think he's planning to march anywhere.
A Little Christmas Keepsake with Plenty of Personality
One of the things I like about this nutcracker is that he doesn't need anything extra to look festive. His cranberry coat, white curls and tall black hat already tell you exactly who he is. Add the gold uniform decorations and those little lace-up boots, and he's dressed for Christmas.
He would make a lovely handmade keepsake for a baby's first Christmas, especially tucked into a gift basket with a soft blanket or a little holiday outfit. Just remember that a crocheted lovey belongs outside an infant's sleep space and should only be handled during supervised awake time.
The U.S. Consumer Product Safety Commission's safe sleep guidance advises keeping soft objects out of a baby's crib, bassinet and other sleep spaces. When he isn't being used during supervised play, display the nutcracker securely out of reach.
For an older child, he'd be a charming character to bring out with the Christmas decorations each year. I can also picture him sitting on a bookshelf, with his legs dangling over the edge and that grand soldier hat standing above everything else.
If you're making him as a gift, I'd choose a pretty fabric gift bag rather than tying ribbons directly around the doll. His gold decorations and white curls are enough without adding anything that might catch on the yarn.
Could You Change His Uniform Colors?
You could change the cranberry to a brighter Christmas red or use a slightly deeper evergreen for the lining. A warmer ivory would also look lovely for the white curls and mustache.
I'd keep the coat shape, crossed gold decoration and sleepy embroidered expression just as they are. They're the details that give him his particular character.
If you'd like another soft Christmas character to go with him, my free crochet Santa lovey pattern would make a nice companion. You can also browse my free Christmas crochet patterns for more handmade holiday projects.
And really, I think he's rather dignified for someone who looks ready to fall asleep in the middle of his Christmas duties.
Pattern development note: The stitch counts have been reviewed mathematically, but the pattern has not been physically test-crocheted. Finished dimensions and yarn quantities are estimates.
When you click on links to various merchants on this site and make a purchase, this may result in this site earning a commission. This does not affect the price you pay.

UBGI Gold Standard 2026
Reviewed under the site's
editorial checklist.
Photos, decorating ideas, party setups and reader submissions are shared for inspiration unless a page is specifically presented as a pattern, tutorial, reference guide or step-by-step project. Follow the instructions, measurements, safety guidance and manufacturer directions provided for the particular project or product.
About Jan | Contact | Baby Nursery Ideas (Blog) | Site Map | Privacy Policy | Disclosure Policy | Disclaimer | Affiliate Disclosure | Earnings Disclosure | Facebook | Pinterest
I am a participant in the Amazon Services LLC Associates Program, an affiliate advertising program designed to provide a means for us to earn fees by linking to Amazon. As an Amazon Associate I earn from qualifying purchases.
Copyright © 2006-2026. All Rights Reserved.