Free Crochet Gingerbread Girl Lovey Snuggler Pattern
By Jan Bay
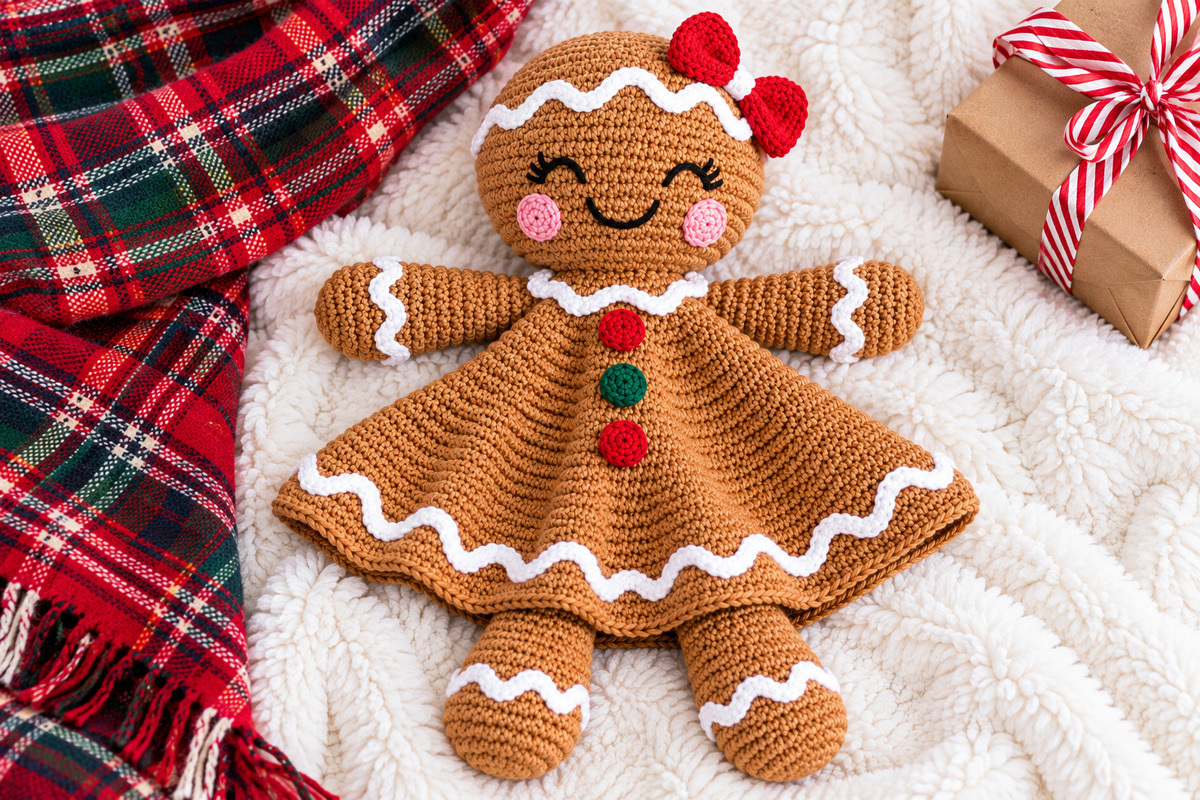
This free crochet gingerbread girl lovey snuggler pattern is the sweetheart of my gingerbread man lovey. He needed a companion so here she is with her big smile, rosy pink cheeks and a bright red bow ready for Christmas. She has a bit of snow white icing on her forehead, neckline, wrists, skirt and feet, and a few festive red-and-green decorations to brighten the skirt of her dress. Her long, soft legs peek out from beneath the skirt, giving her all the charm of a gingerbread cookie dressed up for the holiday season.
Explore More Free Christmas Crochet Patterns
Gingerbread Man Snuggler Lovey Pattern
Gingerbread Man, Woman and House Appliqué Patterns
Free Christmas Crochet Patterns
See supplies for this project.
Jump to the Gingerbread Girl Lovey Pattern
Materials, Gauge and Abbreviations
Crochet the Head and Smiling Face
Crochet the Flared Dress and Icing
Meet the Gingerbread Girl Lovey
Our little gingerbread girl is dressed for Christmas, right down to the white icing around her skirt! Her big smile, pink cheeks and bright red hair bow make her a sweet companion to the gingerbread man, but she has a personality all her own.
What I especially like about this design is her dress. It isn't a separate skirt pulled over a stuffed doll. The whole brown dress is one soft crochet piece that widens from the neckline into a lovely, rippled hem. Two long, floppy legs peek out underneath.
Her head is lightly stuffed, along with the rounded ends of her hands and feet. The dress, upper arms and upper legs stay soft and hollow. That's what gives her the relaxed shape of a lovey snuggler instead of a firmly stuffed amigurumi doll.
You'll work the head, dress, arms and legs separately, then assemble everything after the icing and little Christmas decorations are in place. There are a few details to pay attention to, especially where the legs attach beneath the skirt, but we'll cover those as we go.
One thing I'd leave alone is the color combination. The gingerbread brown, bright Christmas red, deep green, pink cheeks and white icing give her plenty of personality. She doesn't need extra ornaments or accessories.
Crochet Gingerbread Girl Lovey Snuggler Pattern: Materials and Gauge
Skill level: Intermediate, or confident beginner with experience working continuous rounds, increasing, decreasing, embroidering faces and sewing crochet pieces together.
Estimated finished size: Approximately 16 to 17 inches tall, including the head and visible legs, at the stated gauge. The dress is designed to spread approximately 13 to 14 1/2 inches across its lower edge when arranged flat. These are calculated estimates, not measurements from a finished sample.
Those measurements are estimates calculated from the stitch counts and proposed gauge. The amount of flare, stuffing and finished drape will affect the actual size.
Yarn and Supplies
Main yarn: Worsted-weight (size 4) yarn in warm gingerbread brown, approximately 500 to 650 yards.
Additional yarn: Bright Christmas red for the bow and two chest decorations, deep green for the center decoration, white for the icing and bow center, and pink for the cheeks.
Face: A small amount of black embroidery floss or fine black yarn for the closed smiling eyes, eyelashes and mouth.
Hook: 4.0 mm (G/6), or the size needed to make a closely stitched fabric without large gaps.
Other supplies: Polyester fiberfill, blunt yarn needle, embroidery needle if using floss, scissors, stitch markers, measuring tape and removable markers or pins for positioning the pieces.
The yarn amount is a planning estimate, not a measured amount from a completed sample. The wide dress uses much more yarn than a small gingerbread amigurumi, so allow extra brown yarn rather than buying only enough for an ordinary stuffed doll.
Gauge
Approximately 20 single crochet stitches and 22 rounds equal 4 inches in a firm crochet fabric using the 4.0 mm hook.
Check your gauge with a small swatch worked in the round. Measure it without stretching.
The head stitches need to be close enough to contain the stuffing. The hollow dress can relax and drape, but it should still have an even, tidy stitch texture.
If you're changing yarn brands, check the gauge before making the head. A substantial difference will change both the head size and the way the skirt spreads.
Abbreviations (US Crochet Terms)
MR: Magic ring
ch: Chain
sc: Single crochet
sl st: Slip stitch
st or sts: Stitch or stitches
inc: Work 2 single crochet stitches in the same stitch
dec: Invisible single crochet decrease over 2 stitches
BLO: Back loop only
rnd: Round
FO: Fasten off
Instructions followed by a multiplication sign, such as (sc in next st, inc) x 6, mean repeat the entire sequence six times.
Before You Begin
Unless a section says otherwise, work in continuous spiral rounds. Use a stitch marker in the first stitch of each round and move it upward as you work.
Don't join continuous rounds with a slip stitch, and don't add a turning chain unless the instructions specifically call for one.
The head will have a separate crocheted bottom closure. That keeps its fiberfill inside the head rather than allowing it to move down into the hollow dress.
The legs attach behind the front of the skirt, not along the hem. You'll still see the two rounded feet and part of each leg, but the dress keeps its continuous scalloped edge.
Leave sewing tails where instructed. For the icing and other decorations, hide and secure the yarn ends on the wrong side of the crochet.
One important point: Don't stuff the dress. Its soft, flexible shape is the whole reason for making this as a snuggler.
Crochet the Gingerbread Girl's Round Head
We'll start at the top of her head and work downward. The wide middle rounds give her the big, cheerful face shown in the finished example.
Use gingerbread-brown yarn and work in continuous spiral rounds.
Head Increases
Rnd 1: Work 6 sc in a magic ring. (6 sts)
Rnd 2: Inc in every stitch around. (12 sts)
Rnd 3: (Sc in next st, inc) x 6. (18 sts)
Rnd 4: (Sc in next 2 sts, inc) x 6. (24 sts)
Rnd 5: (Sc in next 3 sts, inc) x 6. (30 sts)
Rnd 6: (Sc in next 4 sts, inc) x 6. (36 sts)
Rnd 7: (Sc in next 5 sts, inc) x 6. (42 sts)
Rnd 8: (Sc in next 6 sts, inc) x 6. (48 sts)
Rnd 9: (Sc in next 7 sts, inc) x 6. (54 sts)
Rnd 10: (Sc in next 8 sts, inc) x 6. (60 sts)
Rnd 11: (Sc in next 9 sts, inc) x 6. (66 sts)
Rnd 12: (Sc in next 10 sts, inc) x 6. (72 sts)
Shape the Sides of the Head
Rnds 13 through 23: Sc in each stitch around. (72 sts in each round)
These eleven even rounds give the head its full, rounded shape.
Decrease the Underside
Rnd 24: (Sc in next 10 sts, dec) x 6. (66 sts)
Rnd 25: (Sc in next 9 sts, dec) x 6. (60 sts)
Rnd 26: (Sc in next 8 sts, dec) x 6. (54 sts)
Rnd 27: (Sc in next 7 sts, dec) x 6. (48 sts)
Pause here. Add the facial embroidery, pink cheeks and white forehead icing while the opening is still large enough to reach inside.
Embroider Her Smiling Eyes
Choose the front of the head and mark its center. The finished girl has two closed, upward-curving eyes, with short eyelashes at their outer corners.
Using black embroidery floss or fine black yarn, make the first gently curved eye across approximately Head Rounds 17 through 19. Center it about seven stitches to one side of the face center, and let the curve span approximately five stitches.
Repeat on the other side, keeping the two eyes level and evenly spaced.
Add two or three short eyelashes at each outer corner. Work the lashes with small stitches close against the crochet fabric.
Secure all the black yarn ends inside the head. Don't leave long strands floating across the back of the stitches.
Add the Curved Smile
Use black yarn to embroider a broad U-shaped smile across approximately Head Rounds 21 through 23.
Center it beneath the eyes, with the corners slightly higher than the middle.
Make the curve from several short, anchored stitches rather than one long loose strand.
Make the Pink Cheeks (Make 2)
Use pink yarn.
Rnd 1: Work 6 sc in a magic ring. (6 sts)
Rnd 2: Inc around. (12 sts)
Sl st into the next stitch and fasten off, leaving a sewing tail.
Flatten each circle without stuffing.
Position one cheek beneath and slightly outside each eye, approximately across Head Rounds 20 through 22.
Sew completely around the outer edge of each cheek. Add one small anchoring stitch through its center to keep it flat against the head.
Both cheeks should be the same size and sit at the same height.
Embroider the White Forehead Icing
Thread a yarn needle with white yarn.
Beginning near one upper side of the face, stitch a gentle wavy line across approximately Head Rounds 10 through 12.
Make four or five shallow, rounded waves across approximately 18 to 22 stitches in total. Space the waves evenly from one upper side of the forehead to the other, following the curve of the head. Keep the entire icing line above both eyes.
Use small, closely spaced stitches to make the icing look like a continuous piped line. Anchor the yarn at each bend.
Secure the white yarn ends inside the head.
Finish Shaping the Head
Return to the brown working yarn.
Rnd 28: (Sc in next 6 sts, dec) x 6. (42 sts)
Rnd 29: (Sc in next 5 sts, dec) x 6. (36 sts)
Rnd 30: (Sc in next 4 sts, dec) x 6. (30 sts)
Fasten off, leaving a long tail for assembly. Keep the 30-stitch lower opening accessible.
Lightly stuff the head, shaping the rounded forehead and cheeks as you go. Use enough fiberfill to hold the smile and rounded outline, but don't pack it so tightly that the stitches stretch.
Crochet the Head Closure
Use gingerbread-brown yarn. This small circular piece closes the bottom of the head and keeps the stuffing separate from the hollow dress.
Rnd 1: Work 6 sc in a magic ring. (6 sts)
Rnd 2: Inc around. (12 sts)
Rnd 3: (Sc in next st, inc) x 6. (18 sts)
Rnd 4: (Sc in next 2 sts, inc) x 6. (24 sts)
Rnd 5: (Sc in next 3 sts, inc) x 6. (30 sts)
Fasten off, leaving a long sewing tail.
Place the circular closure across the 30-stitch opening at the bottom of the stuffed head.
Match all 30 edge stitches of the closure to the 30 remaining stitches of the head opening.
Using the sewing tail, stitch the edges together all the way around, working through both loops of each matching stitch. Keep the seam even and avoid catching large amounts of stuffing.
Before closing the final few stitches, adjust the filling if needed. Then finish the seam and secure the tail inside the head.
You should now have a completely enclosed, softly rounded head with a 30-stitch circular seam around its underside.
Set the head aside until the dress is ready.
Crochet the Gingerbread Girl's Wide, Flared Dress
Now for the dress that gives this little gingerbread girl her shape. We're making it from the neckline downward, gradually adding stitches until it spreads into a broad, soft skirt.
Keep the whole dress hollow. There won't be a separate stuffed body hiding underneath it.
Use gingerbread-brown yarn.
Begin at the Neckline
Chain 30 loosely. Check that the chain isn't twisted, then join with a slip stitch in the first chain to form a ring.
Rnd 1: Ch 1, work 1 sc in each of the 30 foundation chains. Do not count the joining slip stitch or beginning chain as a stitch. (30 sts)
Place a marker in the first sc. Continue in uninterrupted spiral rounds from here onward.
Rnds 2 through 5: Sc around. (30 sts per round)
The upper portion of the dress should form a short, narrow tube. We'll add the white neckline icing after the dress is finished.
Widen the Dress
Rnd 6: (Sc in next 4 sts, inc) x 6. (36 sts)
Rnds 7 and 8: Sc around. (36 sts)
Rnd 9: (Sc in next 5 sts, inc) x 6. (42 sts)
Rnds 10 and 11: Sc around. (42 sts)
Rnd 12: (Sc in next 6 sts, inc) x 6. (48 sts)
Rnds 13 and 14: Sc around. (48 sts)
Rnd 15: (Sc in next 7 sts, inc) x 6. (54 sts)
Rnds 16 and 17: Sc around. (54 sts)
Rnd 18: (Sc in next 8 sts, inc) x 6. (60 sts)
Rnds 19 and 20: Sc around. (60 sts)
Rnd 21: (Sc in next 9 sts, inc) x 6. (66 sts)
Rnds 22 and 23: Sc around. (66 sts)
Rnd 24: (Sc in next 10 sts, inc) x 6. (72 sts)
Rnds 25 and 26: Sc around. (72 sts)
Rnd 27: (Sc in next 11 sts, inc) x 6. (78 sts)
Rnds 28 and 29: Sc around. (78 sts)
Rnd 30: (Sc in next 12 sts, inc) x 6. (84 sts)
Rnds 31 and 32: Sc around. (84 sts)
Rnd 33: (Sc in next 13 sts, inc) x 6. (90 sts)
Rnds 34 and 35: Sc around. (90 sts)
Rnd 36: (Sc in next 14 sts, inc) x 6. (96 sts)
Rnds 37 and 38: Sc around. (96 sts)
Rnd 39: (Sc in next 15 sts, inc) x 6. (102 sts)
Rnds 40 and 41: Sc around. (102 sts)
Rnd 42: (Sc in next 16 sts, inc) x 6. (108 sts)
Rnds 43 and 44: Sc around. (108 sts)
At the end of Round 44, you'll have 108 stitches. The dress should now be quite broad, but we're going to give the lower edge a little more fullness.
Create the Softly Rippled Skirt Hem
The last few rounds add extra stitches near the hem. That's deliberate. A plain cone would hang more smoothly, while this fuller lower edge has room to form the little ripples in our gingerbread girl's dress.
Rnd 45: (Sc in next 8 sts, inc) x 12. (120 sts)
Rnd 46: Sc around. (120 sts)
Rnd 47: (Sc in next 4 sts, inc) x 24. (144 sts)
Rnd 48: Sc around. (144 sts)
Rnd 49: Working in BLO, sc around. (144 sts)
Fasten off and weave the end securely into the wrong side of the dress.
Finished dress count: 144 stitches around the lower edge.
Spread the dress out on a flat surface. You should have a narrow neckline, a steadily widening body and a noticeably fuller lower edge.
At the stated gauge, the 144-stitch circumference represents approximately 28 3/4 inches of crochet fabric around the edge. That's about 14 1/2 inches when folded flat without accounting for the ripples.
The extra hem stitches are intended to create soft waves rather than a stiff, flat skirt. Their exact depth will depend on your yarn and tension.
Don't try to force every ripple into a perfectly even pleat. The finished image has a relaxed, flowing shape, and that's what we're aiming for.
Add the White Icing Along the Skirt Hem
Lay the dress out with the lower edge accessible.
Thread a yarn needle with white yarn. Work the icing just above the final edge, moving between approximately Dress Rounds 46 through 48.
The line should make shallow, rounded waves that follow the full circumference of the skirt.
Divide the 144-stitch edge into twelve groups of twelve stitches. Place temporary markers at those intervals if you want help keeping the waves reasonably even.
Within each twelve-stitch group, let the white icing rise gently toward Round 46, then dip toward Round 48 before rising again.
Work the line with closely spaced embroidery stitches, anchoring the yarn every one or two crochet stitches. Avoid long white strands stretched across the surface.
Continue all the way around the dress, making approximately twelve complete waves.
Don't pull the white yarn tight. If the brown skirt begins to gather beneath the icing, loosen the embroidery before securing it.
Once you've gone all the way around, secure the yarn ends on the wrong side.
You'll have a continuous white icing border, with the brown edge remaining visible beneath it.
Add the White Icing at the Neckline
Before attaching the head, embroider the smaller white scalloped neckline.
Use white yarn and work around approximately Dress Rounds 2 through 4.
Make five small waves around the 30-stitch neckline. Each wave will span about six stitches.
Keep the icing close to the upper edge so it reads as a little white collar beneath the head.
Use short, anchored stitches and secure the yarn ends inside the dress.
Leave the neckline opening clear. The head will be sewn to it during final assembly.
Make the Three Christmas-Colored Decorations
Our gingerbread girl has three little decorations down the front of her dress. The top and bottom ones are red, with a green one in the middle.
They're flat crocheted circles, not actual buttons. There's no need to add anything hard underneath them.
Make 2 red circles and 1 green circle.
Rnd 1: Work 6 sc in a magic ring. (6 sts)
Rnd 2: Inc in each stitch around. (12 sts)
Sl st in the next stitch and fasten off, leaving a long sewing tail.
Make all three circles the same size. Don't stuff them.
Lay the dress flat and mark the center front. The upper neckline should line up with the middle of the flared lower edge.
Position the first red circle approximately at Dress Round 8, the green circle at Round 16, and the second red circle at Round 24.
Adjust them slightly if needed so they form a straight, evenly spaced vertical row. Remember that the circles cover several rounds, so use the round numbers as their approximate centers.
Sew completely around the edge of each circle using the matching yarn tail. Add one small anchoring stitch through the middle of each decoration.
Secure the ends inside the hollow dress.
That's enough decoration for the front. The wide skirt, white icing and three colored circles already give her the Christmas-cookie look we're after.
Crochet the Floppy Arms, Legs and Christmas Bow
With the big dress finished, we're ready for the smaller pieces. Both arms and both legs use the same basic idea: a softly rounded end with a longer, hollow section that can bend and drape.
Make the matching pieces the same way, and check their lengths before sewing anything to the dress.
Crochet the Arms (Make 2)
Use gingerbread-brown yarn. Begin at the rounded hand and work toward the shoulder.
Rnd 1: Work 6 sc in a magic ring. (6 sts)
Rnd 2: Inc in each stitch around. (12 sts)
Rnd 3: (Sc in next st, inc) x 6. (18 sts)
Rnd 4: (Sc in next 2 sts, inc) x 6. (24 sts)
Rnds 5 through 8: Sc around. (24 sts)
Rnd 9: (Sc in next 4 sts, dec) x 4. (20 sts)
Rnds 10 through 26: Sc around. (20 sts)
Fasten off, leaving a long brown sewing tail.
Before closing the shoulder opening, add the white wrist icing and secure the white yarn ends inside the arm.
Embroider the White Wrist Icing
With white yarn, make a small wavy band around approximately Arm Rounds 7 through 9.
Work four shallow waves around the circumference, using short embroidery stitches and anchoring the yarn at each change of direction.
Keep the icing close to the rounded hand.
Secure the white yarn inside the arm through its still-open shoulder end.
Add a small amount of fiberfill to the rounded hand, approximately Rounds 1 through 8. Leave the long upper arm unstuffed.
Flatten the 20-stitch shoulder opening without closing it. It should form an opening ten stitches wide when flattened.
Repeat the complete arm and icing instructions for the second arm.
Lay the two arms side by side. They should match in length, hand size and icing placement.
Crochet the Gingerbread Girl's Legs (Make 2)
The legs will hang beneath the dress, with the upper ends concealed inside the skirt. We'll make them separately so the dress can keep its full, uninterrupted hem.
Use gingerbread-brown yarn and begin at the rounded toe.
Rnd 1: Work 6 sc in a magic ring. (6 sts)
Rnd 2: Inc around. (12 sts)
Rnd 3: (Sc in next st, inc) x 6. (18 sts)
Rnd 4: (Sc in next 2 sts, inc) x 6. (24 sts)
Rnd 5: (Sc in next 3 sts, inc) x 6. (30 sts)
Rnds 6 through 8: Sc around. (30 sts)
Rnd 9: (Sc in next 3 sts, dec) x 6. (24 sts)
Rnds 10 through 27: Sc around. (24 sts)
Fasten off, leaving a long sewing tail.
Add the White Ankle Icing
Use white yarn to embroider a gently wavy line around approximately Leg Rounds 7 through 10.
Make four rounded waves around the leg, using short, firmly anchored stitches.
Repeat at the same height on the second leg.
Secure the white yarn ends inside the legs before adding the stuffing.
Add a little fiberfill to the rounded foot, approximately Rounds 1 through 9.
Leave the upper leg hollow.
Flatten the 24-stitch upper opening so the front twelve stitches lie directly against the back twelve stitches.
Using the brown sewing tail and a yarn needle, whipstitch the opening closed. Match each stitch on the front layer with its corresponding stitch on the back layer. You'll have twelve paired stitches across the closed upper edge.
Keep the long remaining tail for attaching the leg beneath the dress.
Repeat for the second leg.
Check the two completed legs before assembly. Each should have a rounded foot, a narrow floppy upper section and a closed twelve-stitch-wide attachment edge.
Crochet the Red Hair Bow
Our gingerbread girl wears her bow on the upper right side of her head, just above the white forehead icing. It's a small detail, but it gives her quite a bit of personality.
Use bright Christmas-red yarn.
Ch 13.
Row 1: Sc in the second chain from the hook and in each remaining chain. (12 sts)
Rows 2 through 6: Ch 1, turn, sc across. (12 sts per row)
Fasten off and weave in the working end.
Lay the rectangle horizontally and pinch it firmly at the center, gathering the middle into a bow shape.
Thread a length of white yarn through a yarn needle. Wrap the white yarn around the pinched center several times to make the narrow white band shown in the finished design.
Secure the wrapping on the back of the bow with several stitches through the red crochet fabric.
Shape the two red loops so they look fairly even. Don't add loose ribbon tails, tassels or anything that can dangle.
We'll attach the entire bow to the head after the larger pieces are assembled.
Assemble the Gingerbread Girl Lovey Snuggler
Now we get to put her together. Lay everything out before sewing, with the decorated side of the dress facing upward.
You'll have one stuffed and closed head, one hollow dress, two floppy arms, two legs with closed upper ends, and the red hair bow.
Check the direction of the smile, the three colored decorations and the white icing before attaching the head. It's much easier to correct a crooked piece now than after you've sewn it in place.
Step 1. Attach the Head to the Dress
Center the finished head above the 30-stitch neckline opening.
The 30-stitch seam around the underside of the head should line up with the 30 stitches around the upper opening of the dress.
Make sure the embroidered face points toward the three colored decorations.
Using gingerbread-brown yarn, sew the head to the dress around the entire neckline. Match each of the 30 neckline stitches to its corresponding position around the 30-stitch head-base seam.
Catch the head securely just above its closure seam and the dress at its upper edge. Work evenly all the way around without pulling the neckline into a tight puckered ring.
Make a second reinforcing pass around the neck attachment.
Secure the yarn ends inside the body.
The head should now be firmly attached, with its stuffing contained behind the circular closure.
The white icing collar should remain visible directly beneath the head.
Because this is a soft snuggler, the head isn't intended to hold itself upright when the toy is standing. It should remain securely attached and sit naturally when the lovey is laid out.
Step 2. Position and Sew the Arms
Lay the dress flat, with the neckline at the top and the three colored decorations centered.
Place one arm on each side of the upper dress.
Position the flattened shoulder openings along the outer sides of the dress, extending approximately from Dress Round 5 through Round 15. The rounded hands should point outward, with the arms at the same height.
Check both sides before sewing. You want the arms to look balanced, not one reaching upward while the other points toward the floor.
Using the long brown sewing tail, begin at Dress Round 5 along the outer side edge. Match the upper end of the flattened shoulder to this point and the lower end to approximately Dress Round 15.
Sew through both layers of the flattened shoulder opening and catch the corresponding front and back side-edge stitches of the dress. Distribute the ten paired shoulder stitches evenly along the attachment span, working from top to bottom. Keep the seam flat without gathering the dress.
Reinforce the attachment with a second pass of sewing stitches.
Repeat on the opposite side.
Don't pull the shoulder seams so tightly that they gather the fabric around the neckline.
The finished arms should extend outward but still bend and drape softly.
Step 3. Attach the Legs Inside the Dress
We're keeping the entire dress hem free, so the legs are sewn behind the front of the skirt rather than through the lower edging.
Turn the dress wrong-side out through its open lower hem, taking care not to pull hard on the neckline or arms.
Locate Dress Round 37. This round contains 96 stitches.
Flatten the dress carefully, with the three chest decorations marking the center front. The opposite layer is the back of the dress.
At Round 37, there should be 48 stitches across the back layer when the dress is flattened.
Beginning at the left side edge of this back layer, count the stitches across and mark two attachment areas:
First leg: Back-layer stitches 9 through 20. (12 stitches)
Second leg: Back-layer stitches 29 through 40. (12 stitches)
That leaves eight stitches between the two attachment areas and eight stitches outside each attachment area.
Keep the marked areas on the back layer only. Do not sew the front of the dress to the back.
Place the closed twelve-stitch-wide upper edge of the first leg against its marked attachment area on the wrong side of the dress.
The body of the leg should point toward the dress hem.
Using the long brown sewing tail, sew the closed upper leg edge to the twelve marked dress stitches along Round 37.
Catch the full closed seam of the leg and the inner surface of the dress fabric. Work from one end to the other, keeping the seam flat.
Reinforce the attachment with a second pass.
Repeat with the second leg in the other marked area.
Don't join the two legs to each other, and don't catch the front layer of the dress while sewing.
Turn the dress right-side out and let the legs hang down beneath the skirt.
The upper portions should remain hidden behind the front of the dress, while the lower legs and rounded feet extend below the hem.
Lay the lovey flat and check that both legs are the same length and hang at matching angles.
At the stated gauge, approximately 2 1/2 to 3 inches of each leg should remain visible below the dress, although the exact exposure will depend on how the flared hem falls.
The skirt should still spread freely. If either attachment has pulled the front of the dress into a fold, check that no front stitches were accidentally caught in the seam.
Step 4. Attach the Red Hair Bow
Place the bow near the upper right side of the head as viewed from the front.
Its lower edge should sit close to the white forehead icing, but it shouldn't cover an eye or interfere with the embroidered lashes.
Using red yarn, stitch the white-wrapped center securely to the head.
Then sew the underside of both red bow loops against the head with small concealed stitches.
Don't rely on the white center wrap alone to hold the bow in place. The loops themselves need to be attached.
Secure all the ends inside the head.
Step 5. Give Her the Final Shape
Lay the completed gingerbread girl faceup on a flat surface.
Gently smooth the dress outward from the neckline. Arrange the lower edge so its extra fullness forms a few soft ripples.
Keep the white icing waves visible above the brown hem.
Straighten the three colored decorations down the center of the dress, arrange the arms outward, and let the legs hang naturally beneath the skirt.
Check the red hair bow one final time. It should sit firmly against the head without either loop lifting away.
Remove every temporary stitch marker and positioning pin. Check for loose yarn ends, exposed fiberfill and any gaps around the head, arm or leg seams. Follow the care instructions for your chosen yarn, and inspect the attachments again after cleaning.
She's finished when the rounded head, wide dress, icing details and floppy legs look balanced together.
Don't add extra stuffing to make the dress stand up. She isn't meant to stand on her own.
A Few Finishing Checks Worth Making
Before putting the gingerbread girl into a Christmas gift box, give her a careful once-over.
If the head feels too loose: Check the neckline attachment. You may need another reinforcing pass around the existing seam. Keep those stitches evenly tensioned so the head stays secure without making the neckline hard.
If the skirt doesn't form noticeable ripples: First confirm that you worked all 144 stitches in the final rounds. The extra width near the hem is what allows the fabric to wave. Different yarns will produce different amounts of fullness, so don't force the edge into stiff pleats.
If the legs look uneven: Compare their round counts and the placement of the concealed upper seams. Both legs should have 27 rounds and attach at matching locations along Dress Round 37.
If the white icing gathers the crochet: The embroidery is probably too tight. Ease the white yarn before securing the ends. It should follow the brown fabric, not pull it into a smaller shape.
If a decoration lifts away: Add small stitches around the edge and through the center until the piece lies flat. This includes the cheeks, colored circles and both loops of the hair bow.
That's really enough. The dress, bow and icing already give this little girl plenty of Christmas character.
A Gingerbread Girl for a Handmade Christmas Gift
Our gingerbread girl would look particularly sweet tucked into a Christmas gift basket with a soft blanket, a little holiday storybook and a keepsake ornament.
She also makes a natural companion to the free crochet gingerbread man snuggler lovey pattern. Make the two in matching gingerbread-brown yarn and you'll have a cheerful Christmas pair.
If you'd rather make something smaller first, the free gingerbread crochet appliqué patterns include a gingerbread man, gingerbread woman and little gingerbread house. They're a fun way to carry the same Christmas-cookie theme onto other handmade projects.
For gift wrapping, I'd keep things simple. A shallow box lined with tissue paper gives you enough room to spread out her dress and arrange her floppy legs without squashing the head or bow.
The wide flouncy skirt of her dress is worth showing off.
A Note About Handmade Lovey Safety
This gingerbread girl is intended as a handmade keepsake or soft toy for supervised awake play, not as a sleep accessory.
Her embroidered eyes eliminate the need for plastic safety eyes, and the chest decorations are crocheted rather than made from actual buttons. Even so, all seams, decorations and the bow need careful attachment and regular inspection.
Check the head seam, arms, legs, cheeks and hair bow before use. If anything loosens or the filling becomes exposed, stop using the toy until the problem is corrected.
Keep this lovey out of an infant's crib, bassinet and other sleep spaces. The U.S. Consumer Product Safety Commission's safe sleep guidance explains why infant sleep areas should remain free of soft objects and loose items.
More Free Christmas Crochet Patterns
If you're building a little collection of handmade Christmas characters, take a look at the free crochet snowman lovey snuggler pattern next. He makes a different kind of floppy Christmas companion.
You can also browse the free Christmas crochet patterns collection for more holiday gifts, ornaments and crochet decorations.
Pattern Development Note
Pattern development note: The stitch counts and construction have been reviewed mathematically for internal consistency. The finished dimensions and yarn quantities are estimates, and the pattern has not been physically test-crocheted. The final drape of the flared dress, concealed leg attachments, head support and stability of the sewn decorations require verification with a completed sample.
When you click on links to various merchants on this site and make a purchase, this may result in this site earning a commission. This does not affect the price you pay.

UBGI Gold Standard 2026
Reviewed under the site's
editorial checklist.
Photos, decorating ideas, party setups and reader submissions are shared for inspiration unless a page is specifically presented as a pattern, tutorial, reference guide or step-by-step project. Follow the instructions, measurements, safety guidance and manufacturer directions provided for the particular project or product.
About Jan | Contact | Baby Nursery Ideas (Blog) | Site Map | Privacy Policy | Disclosure Policy | Disclaimer | Affiliate Disclosure | Earnings Disclosure | Facebook | Pinterest
I am a participant in the Amazon Services LLC Associates Program, an affiliate advertising program designed to provide a means for us to earn fees by linking to Amazon. As an Amazon Associate I earn from qualifying purchases.
Copyright © 2006-2026. All Rights Reserved.