Free Crochet Reindeer Face Ornament Pattern with Red Nose
By Jan Bay
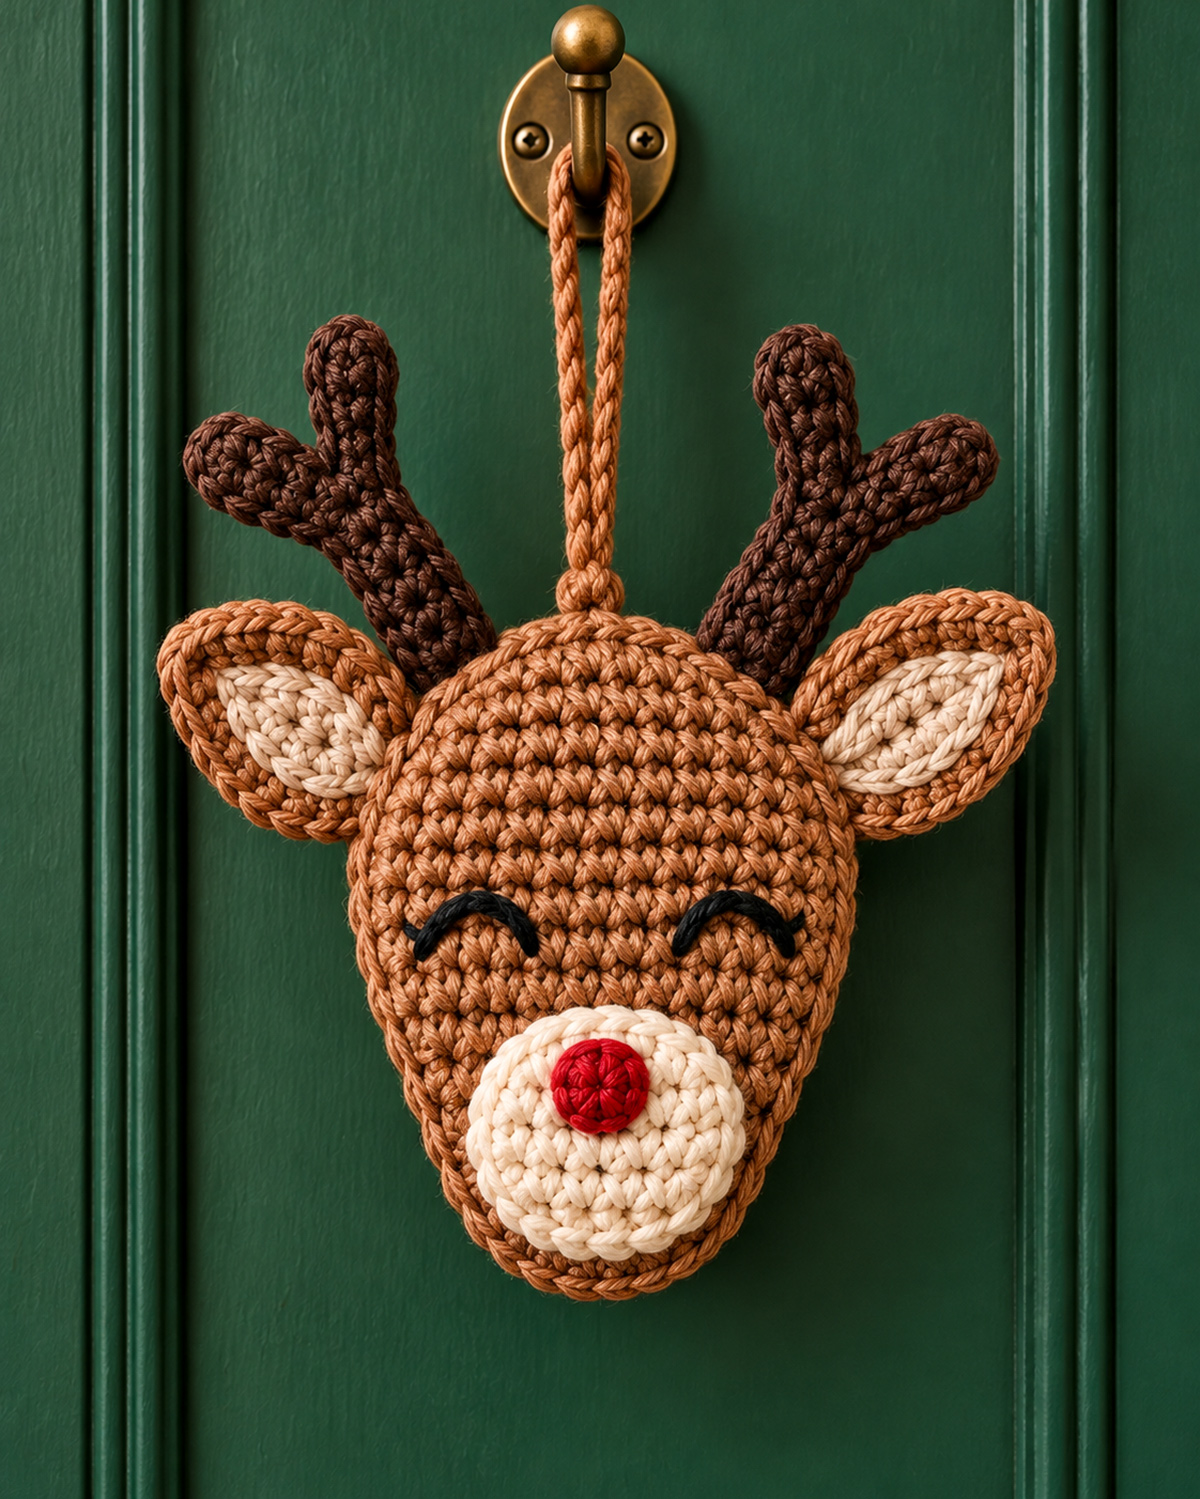
This free crochet reindeer face ornament pattern makes a little red-nosed reindeer with a longer, tapered face instead of the usual round one. He's got branching brown antlers, pointed ears and two embroidered closed eyes that give him a peaceful, sleepy expression. Add a lightly padded backing and a yarn loop, and you've got a handmade keepsake Christmas tree ornament you will treasure for many years. No bow or bell required.
Explore More Free Christmas Crochet Patterns
Free Christmas Crochet Patterns
Flying Crochet Reindeer Ornament
See Supplies for This Project Here.
Jump to the Free Crochet Reindeer Face Ornament Pattern
Stitches, Abbreviations and Pattern Notes
Crochet the Tapered Reindeer Face
Crochet the Cream Muzzle and Red Nose
Crochet the Pointed Reindeer Ears
Crochet the Branching Brown Antlers
Join, Stuff and Finish the Ornament
Yarn, Materials and Supplies
You won't need a lot of different supplies to make this little reindeer, but I'd pay attention to the yarn you choose for the antlers. Those narrow branches need firm stitches or they'll lean instead of standing up above his forehead.
I'd use DK-weight cotton or a cotton-blend yarn. It gives the face a nice, clear stitch texture, and you can make the muzzle and ears without changing yarn weights.
Yarn
- Medium caramel brown: Approximately 75–100 yards available for the face, backing, outer ears and hanging loop.
- Dark chocolate brown: Approximately 10–15 yards for both branching antlers.
- Ivory or warm cream: Approximately 10–15 yards for the muzzle and inner ears.
- Christmas red: Approximately 2 yards for the little crochet nose.
- Black embroidery floss: A short length for the two closed eyes.
These amounts are estimates, not yardages measured from a completed sample. I'd keep a little extra brown yarn available for sewing the panels together and for remaking an antler if the first one turns out too loose.
Tools and Other Supplies
- 3.25 mm (D/3) crochet hook, or the size needed to match gauge
- Optional 3 mm hook for firmer antler stitches
- Blunt tapestry needle
- Embroidery needle for the black eyes
- Scissors
- Stitch marker
- Measuring tape
- A small amount of polyester fiberfill
- Several removable stitch markers or sewing pins for positioning the pieces
- Blocking mat and pins, optional
Skill level: Intermediate. The main face uses ordinary single crochet, increases and decreases. The narrow antler tubes and their attachment take a little more patience.
Everything decorative is made with yarn or embroidery floss. There's no need for plastic eyes, beads, buttons, bells or wire.
Decorating note: This is a hanging Christmas ornament, not a toy. Keep the hanging loop and attached pieces out of a baby's reach and away from cribs and infant sleep areas.
Finished Size and Gauge
The face is meant to be longer than it is wide. Don't try to round out the lower cheeks. That narrower chin is what makes this reindeer look like the example instead of another round Rudolph ornament.
Target gauge: 22 single crochet stitches and 26 rows = 4 inches (10 cm), worked flat in single crochet with DK-weight yarn and a 3.25 mm hook.
Expected finished measurements:
- Main face before edging: approximately 3 5/8 inches wide and 4 5/8 inches tall
- Main face after edging: approximately 4 inches wide and 5 inches tall
- Complete ornament across the ears: approximately 6–7 inches
- Complete ornament from the antler tips to the chin: approximately 6–6 1/2 inches
- Folded hanging loop: approximately 3–3 1/2 inches above the face
These measurements are calculated from the gauge, stitch counts and planned assembly. The example image shows the intended finished appearance, not a physically crocheted sample made from these instructions. The actual finished size and details will depend on your yarn, tension and assembly.
Make a Gauge Swatch
With medium brown yarn, ch 27.
Row 1: Sc in the second ch from the hook and in each remaining ch. Ch 1, turn. (26 sc)
Rows 2–28: Sc in each of the 26 sts across. Ch 1 and turn after each row, except the last. (26 sc per row)
Measure a 4-inch section in the center, away from the edges. You're aiming for 22 stitches across and 26 rows vertically.
If you have more than 22 stitches across 4 inches, try a larger hook. If you have fewer, try a smaller hook.
Checkpoint: At the stated gauge, the widest 20-stitch row of the reindeer's face should measure about 3 5/8 inches before the edging is added.
Keep the same yarn and hook for both brown face panels. If the backing is worked more loosely than the front, their edges won't line up properly when you join them.
Stitches, Abbreviations and Pattern Notes
This free crochet reindeer face ornament pattern uses U.S. crochet terms. The face and ears are worked in turned rows, while the antlers and nose are worked in rounds.
- ch: Chain
- sc: Single crochet
- sl st: Slip stitch
- inc: Work 2 sc in the same stitch
- sc2tog: Single crochet 2 stitches together
- MR: Magic ring or adjustable ring
- st/sts: Stitch/stitches
- rnd: Round
- RS: Right side, the side that faces outward
- WS: Wrong side, the back of the crocheted piece
- FO: Fasten off
Turning chains: Chain 1 at the end of a row unless told otherwise. The turning chain does not count as a stitch. Work the first sc into the first stitch of the new row.
Increases: An increase adds one stitch by working 2 sc into one stitch.
Decreases: To make sc2tog, insert the hook into the next stitch, yarn over and pull up a loop. Repeat in the following stitch. Yarn over and pull through all three loops on the hook. Two stitches have become one.
Joined rounds: When a section says to join, slip stitch into the first sc of the round. That joining slip stitch does not count as an additional stitch.
Continuous rounds: The antlers are worked in spirals without joining. Mark the first stitch of each round, moving the marker into the first stitch of the new round as you work. Remove the marker when the piece is finished, before sewing the antler onto the face.
Color changes: No color changes are needed inside a row or round. The brown face, cream muzzle, red nose and dark antlers are crocheted separately and sewn together later.
Front and back: Work both brown panels using the same instructions. Pick the neater-looking side of the first panel as the front. The backing will be turned so its neat side faces outward when the panels are joined.
If you need to check a stitch, the Craft Yarn Council crochet abbreviations guide gives the U.S. terminology used in this pattern.
You'll make the face first, followed by the muzzle, nose, ears and antlers. After embroidering the eyes and arranging the front, crochet the backing, add the hanging loop and close the ornament with a little stuffing.
Piece count: You'll crochet 12 separate pieces in total: 2 brown face panels, 2 brown outer ears, 2 cream inner ears, 1 cream muzzle, 1 red nose, 2 main antler stems and 2 shorter antler branches. The hanging loop is chained directly onto the backing, so it isn't counted as another piece.
Crochet the Tapered Reindeer Face
Start at the top of the forehead and work down toward the chin. We'll widen the upper face, keep the forehead fairly broad and then decrease along both sides to form the longer, narrow face shown in the picture.
Don't add extra stitches near the bottom to round out the chin. The finished shape should taper naturally underneath the cream muzzle.
Make 1 in medium caramel brown.
Hook: 3.25 mm
Construction: Turned rows, from forehead to chin
Part 1. Crochet the Forehead
Foundation: Ch 13.
Row 1: Sc in second ch from hook and in each remaining ch. Ch 1, turn. (12 sc)
Row 2: Inc in first st, sc in next 10 sts, inc in last st. Ch 1, turn. (14 sc)
Row 3: Inc in first st, sc in next 12 sts, inc in last st. Ch 1, turn. (16 sc)
Row 4: Inc in first st, sc in next 14 sts, inc in last st. Ch 1, turn. (18 sc)
Row 5: Inc in first st, sc in next 16 sts, inc in last st. Ch 1, turn. (20 sc)
Rows 6–14: Sc in each of the 20 sts across. Ch 1 and turn after each row. (20 sc per row)
Checkpoint: You should have 14 completed rows. The widest section is 20 stitches across, with nine straight rows after the increases.
At the stated gauge, this upper section should measure approximately 3 5/8 inches wide. The short foundation row gives the forehead a slightly rounded top rather than a perfectly straight square edge.
Part 2. Shape the Long, Tapered Face
Row 15: Sc2tog, sc in next 16 sts, sc2tog. Ch 1, turn. (18 sc)
Rows 16–17: Sc in each of the 18 sts across. Ch 1, turn after each row. (18 sc)
Row 18: Sc2tog, sc in next 14 sts, sc2tog. Ch 1, turn. (16 sc)
Rows 19–20: Sc in each of the 16 sts across. Ch 1, turn after each row. (16 sc)
Row 21: Sc2tog, sc in next 12 sts, sc2tog. Ch 1, turn. (14 sc)
Rows 22–23: Sc in each of the 14 sts across. Ch 1, turn after each row. (14 sc)
Row 24: Sc2tog, sc in next 10 sts, sc2tog. Ch 1, turn. (12 sc)
Row 25: Sc in each of the 12 sts across. Ch 1, turn. (12 sc)
Row 26: Sc2tog, sc in next 8 sts, sc2tog. Ch 1, turn. (10 sc)
Row 27: Sc in each of the 10 sts across. Ch 1, turn. (10 sc)
Row 28: Sc2tog, sc in next 6 sts, sc2tog. Ch 1, turn. (8 sc)
Row 29: Sc in each of the 8 sts across. Ch 1, turn. (8 sc)
Row 30: Sc2tog, sc in next 4 sts, sc2tog. (6 sc)
Do not fasten off. You'll use the attached brown yarn to work the edging.
Face checkpoint: You should have 30 rows altogether. The forehead is 20 stitches wide, the lower cheeks narrow gradually, and the final chin row has 6 stitches.
Lay the piece flat with Row 1 at the top and Row 30 at the bottom. Both sides should taper evenly. If one side has a noticeably different angle, check the decrease rows before adding the edging.
Part 3. Crochet the Brown Face Edging
The edging tidies up the stepped decreases and gives you a finished border for sewing the ornament together.
After Row 30, ch 1. Do not turn the piece. You'll work around the outer edge in one continuous edging round.
- Starting at the end of Row 30, crochet upward along the nearest side edge toward Row 1. Work 1 sc into each row-end space except Rows 6, 12, 19 and 26, which you skip. This gives you 26 sc along the first side.
- Across the upper foundation edge, work 2 sc into the unused loop of the first foundation stitch, 1 sc into each of the next 10 foundation-stitch loops and 2 sc into the last foundation-stitch loop. (14 sc across the top)
- Work down the opposite side edge toward Row 30. Again work 1 sc into each row-end space except Rows 6, 12, 19 and 26. (26 sc)
- Across the 6 stitches of the bottom Row 30, work 2 sc in the first st, 1 sc in each of the next 4 sts and 2 sc in the last st. (8 sc)
- Join with a sl st to the first edging sc.
Total edging: 26 + 14 + 26 + 8 = 74 sc. The joining slip stitch does not count.
Fasten off and weave the remaining brown yarn tail securely into the wrong side of the face. Keep it clear of the edging stitches so the front and backing can be joined without catching a loose end.
Final shape checkpoint: The brown face should be approximately 4 inches across at its widest point and about 5 inches tall after edging, at the stated gauge.
The chin will be narrow, with the edging gently rounding its lower corners. Don't pull the border tight enough to curl the face, and don't add extra stitches around the chin just to make it wider.
Choose the neater-looking side as the right side. Keep Row 1 at the top whenever you position the eyes, muzzle, ears or antlers.
Crochet the Cream Muzzle and Red Nose
The cream muzzle is a rounded ivory oval that sits low on the brown face. It's nearly round, but a little taller than it is wide. That shape matters because it gives the reindeer his longer nose without hiding the tapered brown chin.
We'll make the muzzle first and then crochet the small red nose. Sew them together later, after you've checked their placement on the face.
Part 4. Crochet the Cream Oval Muzzle
Make 1 in ivory or warm cream.
Hook: 3.25 mm
We'll use a short foundation chain and crochet around both sides of it. The extra rounds make a fuller muzzle that's nearly round, with a little more length from top to bottom.
Foundation: Ch 4.
Round 1: Sc in the second ch from the hook, sc in the next ch, then work 3 sc in the last ch. Rotate the work to crochet along the unused loops on the opposite side of the foundation chain. Sc in the unused loop of the middle ch, then work 2 sc in the same foundation chain that holds your first sc. Join with a sl st to the first sc. (8 sc)
Round 2: Ch 1. Inc in first st, sc in next st, inc in each of the next 3 sts, sc in next st, inc in each of the last 2 sts. Join with a sl st to the first sc. (14 sc)
Round 3: Ch 1. Inc in first st, sc in next 2 sts, repeat [inc in next st, sc in next st] 3 times, sc in next st, then repeat [inc in next st, sc in next st] 2 times. Join with a sl st to the first sc. (20 sc)
Round 4: Ch 1. Repeat [sc in next 2 sts, inc in next st] 6 times, then sc in the last 2 sts. Join with a sl st to the first sc. (26 sc)
Round 5: Ch 1. Repeat [sc in next 3 sts, inc in next st] 6 times, then sc in the last 2 sts. Join with a sl st to the first sc. (32 sc)
Round 6: Ch 1. Repeat [sc in next 4 sts, inc in next st] 6 times, then sc in the last 2 sts. Join with a sl st to the first sc. (38 sc)
Fasten off, leaving an 18-inch tail for sewing.
Muzzle checkpoint: You should have 8, 14, 20, 26, 32 and 38 stitches across the six rounds. At the stated gauge, expect a rounded oval approximately 1 3/4–2 inches wide and 2–2 1/4 inches tall when the foundation chain runs vertically. These dimensions are estimates, not measurements from a completed sample.
Lay the piece flat with the short foundation chain running from top to bottom. It should be nearly round, with a little extra length vertically.
If the outer edge ripples, check the increase counts before trying to stretch the piece flat. You can lightly block the finished muzzle if needed, but don't force it into a wide horizontal oval.
Part 5. Crochet the Little Red Nose
Make 1 in Christmas red.
Hook: 3.25 mm
Work from the rounded front of the nose toward the open back. Use joined rounds. Chain 1 after joining the first two rounds; the chain does not count as a stitch.
Round 1: Make an MR and work 6 sc into the ring. Pull the ring closed and join with a sl st to the first sc. Ch 1. (6 sc)
Round 2: Repeat [sc in next st, inc in next st] 3 times. Join with a sl st to the first sc. Ch 1. (9 sc)
Round 3: Sc in each of the 9 sts around. Join with a sl st to the first sc. (9 sc)
Fasten off, leaving a 12-inch tail for sewing. Keep the nine-stitch opening at the back unclosed.
The finished nose should form a small rounded dome, approximately 1/2–5/8 inch across at the stated gauge. The magic-ring center is the front, and the nine-stitch opening goes against the ivory muzzle.
Don't stuff the nose. Its three crocheted rounds should give it a little fullness without adding a separate piece of filling.
Nose checkpoint: You should have completed 6, 9 and 9 stitches in the three rounds. Place the nose temporarily near the upper center of the cream muzzle. Leave plenty of ivory showing around it.
Set the nose and muzzle aside for assembly.
Crochet the Pointed Reindeer Ears
Each ear has a brown outer piece and a smaller cream center. The finished ears extend outward from the sides of the upper face, with a pointed tip and a narrow base tucked behind the brown forehead.
We'll make the outside first, then sew the cream insert onto it. Keep both ears flat. There's no stuffing in this part.
Part 6. Brown Outer Ears — Make 2
Yarn: Medium caramel brown
Hook: 3.25 mm
Foundation: Ch 3.
Row 1: Sc in second ch from hook and next ch. Ch 1, turn. (2 sc)
Row 2: Inc in each st. Ch 1, turn. (4 sc)
Row 3: Inc in first st, sc in next 2 sts, inc in last st. Ch 1, turn. (6 sc)
Rows 4–7: Sc in each of the 6 sts across. Ch 1 and turn after each row. (6 sc per row)
Row 8: Sc2tog, sc in next 2 sts, sc2tog. Ch 1, turn. (4 sc)
Rows 9–10: Sc in each of the 4 sts across. Ch 1 and turn after each row. (4 sc)
Row 11: Sc2tog twice. (2 sc)
Fasten off, leaving a 12-inch tail at Row 11 for attaching the ear to the face.
Make the second brown ear exactly the same way.
Outer ear checkpoint: Each brown ear has 11 rows. The widest rows contain 6 sc, and both ends are narrower. At the stated gauge, the ear is expected to be approximately 1 3/4 inches long and a little over 1 inch wide.
Row 1 forms the outer tip of the ear. Row 11 becomes the base that attaches behind the head.
Part 7. Cream Inner Ears — Make 2
Yarn: Ivory or warm cream
Foundation: Ch 3.
Row 1: Sc in second ch from hook and next ch. Ch 1, turn. (2 sc)
Row 2: Inc in each st. Ch 1, turn. (4 sc)
Rows 3–5: Sc in each of the 4 sts across. Ch 1 and turn after each row. (4 sc per row)
Row 6: Sc2tog twice. Ch 1, turn. (2 sc)
Row 7: Sc in each of the 2 sts. (2 sc)
Fasten off, leaving a 10-inch tail for sewing.
Make the second cream insert.
Inner ear checkpoint: Each cream piece has 7 rows and is narrower and shorter than its brown outer ear.
Part 8. Sew the Inner and Outer Ear Pieces Together
- Lay one brown outer ear flat with Row 1 pointing away from you and Row 11 nearest you.
- Place one cream insert over the center, with its Row 1 pointing in the same direction as the brown ear's Row 1.
- Position the cream insert so its narrow upper tip sits approximately over brown Rows 2–3 and its lower end finishes around brown Row 9.
- Leave a visible brown border around the cream piece. Adjust it so both sides of the border look even.
- Thread the cream sewing tail into a tapestry needle.
- Sew around the edge of the cream insert, taking small stitches through both layers. Keep the cream piece flat without pulling the brown ear inward.
- Weave the cream tail into the wrong side of the brown ear.
- Leave the brown tail from Row 11 available for attaching the completed ear to the reindeer.
Repeat with the second ear.
Finished ear checkpoint: You now have two matching pointed brown ears with cream centers. Their bases are narrow enough to tuck behind the upper sides of the face.
If the tips curl, lightly dampen the ears and lay them flat until dry. Don't stretch them longer. The finished example has fairly broad ears with pointed ends, not narrow dangling strips.
Crochet the Branching Brown Antlers
The antlers are the only narrow tubular pieces in this ornament. Each one has a taller main stem and a shorter branch pointing outward. You'll make two matching antlers, with the branches facing opposite directions.
The finished example has dark brown antlers with rounded tips. We aren't making flat chains or adding wire inside them.
Part 9. Crochet the Main Antler Stems — Make 2
Yarn: Dark chocolate brown
Hook: 3.25 mm, or 3 mm if needed for firmer stitches
Construction: Continuous spiral rounds
Begin at the rounded top of the antler and work downward toward its attachment base.
Round 1: Make an MR and work 6 sc into the ring. Pull the ring closed. (6 sc)
Rounds 2–11: Sc in each st around. (6 sc per round)
Fasten off, leaving a 16-inch tail for sewing. Leave the final 6-stitch opening unclosed.
Make the second main stem exactly the same way.
Main stem checkpoint: Each stem has 11 rounds and a circumference of 6 stitches. The magic-ring end forms the closed upper tip, while the 6-stitch opening is the base.
The stems should be narrow, slightly rounded tubes. Don't stuff them with polyester fiberfill. The stitches need to be close enough to hold their shape without making the antlers bulky.
Part 10. Crochet the Outward Antler Branches — Make 2
These shorter tubes form the sideways branches of the antlers.
Yarn: Dark chocolate brown
Round 1: Make an MR and work 5 sc into the ring. Pull the ring closed. (5 sc)
Rounds 2–7: Sc in each st around. (5 sc per round)
Fasten off, leaving a 12-inch tail for sewing. Leave the final 5-stitch opening unclosed.
Make a second branch the same way.
Branch checkpoint: Each branch has 7 rounds. The closed magic-ring end forms the rounded outer tip, while the final 5-stitch opening is the end that attaches to the main stem.
Part 11. Assemble the Two-Point Antlers
Lay the first main stem with its closed tip at the top and open base at the bottom.
- Place one shorter branch against the outer side of the main stem, around main-stem Rounds 5–7, counting from the closed tip. This places the branch near the middle of the stem, as shown in the example image.
- Point the closed tip of the branch outward and upward at roughly a 45-degree angle.
- Thread the branch's sewing tail into a tapestry needle.
- Sew all five stitches around the branch's open end to the side of the main stem, taking several additional securing stitches where the two pieces meet.
- Keep the joined area compact so the branch doesn't cover the tall upper portion of the stem.
- Carry the sewing tail down through the main stem and out near its open base. Secure the yarn on the inside of the attachment area.
Repeat for the second antler, reversing the branch direction.
Important: The first antler's branch points left when viewed from the front. The second antler's branch points right. Their longer main stems remain nearly upright.
Each finished antler should have exactly two rounded tips: one at the top of the main stem and one at the end of the outward branch.
Check the Finished Antler Pair
Lay both antlers next to one another before attaching them to the face.
- Each main stem has 11 rounds.
- Each outward branch has 7 rounds.
- Both branch tips point away from the center.
- The two taller tips remain separate.
- Both 6-stitch main-stem bases remain open for attachment.
If a stem feels floppy, try making a replacement with the smaller 3 mm hook before changing the round counts. You can also carry an extra doubled strand of matching brown yarn through the center to add a little support, but don't use wire.
These are small yarn structures, so their firmness depends on your actual tension and yarn. The expected shape needs to be checked on the finished sample.
Set both antlers aside until assembly.
Embroider the Reindeer's Closed Eyes
The little curved eyes give this reindeer his sleepy expression. Keep them simple. You don't need plastic eyes, extra eyelashes or eyebrows.
Use black embroidery floss and work each curve with several short stitches. That way the embroidery follows the surface of the crochet instead of leaving one long strand stretched across the face.
Part 12. Mark the Eye Positions
Lay the completed brown face with its right side facing up. Row 1 is the top of the forehead, and Row 30 is the bottom of the chin.
The eyes curve across Rows 12–14 in the upper half of the face. This leaves a visible band of caramel-brown crochet above the cream muzzle, just as shown in the example. The muzzle will begin lower, around Rows 16–17, without touching the black embroidery.
- Find Row 13, which contains 20 stitches.
- Mark the left eye area across approximately stitches 3–7.
- Mark the right eye area across approximately stitches 14–18.
- Check that the two marked areas are balanced on opposite sides of the center line.
Each completed eye should be approximately 3/4 inch wide at the target gauge, with a shallow upward curve.
Part 13. Embroider the First Eye
- Thread a short length of black embroidery floss into an embroidery needle.
- Bring the needle from the wrong side to the front near stitch 3 of Row 14.
- Make a short backstitch diagonally upward toward stitch 4 of Row 13.
- Continue toward the highest point of the curve near stitch 5 of Row 12.
- Work down through the corresponding stitches toward stitch 7 of Row 14, using short backstitches to complete the arch.
- Take the needle through to the wrong side and secure the floss by weaving it beneath several existing brown stitches.
Don't pull the thread too tightly. The eye should rest against the crochet without puckering the forehead.
Part 14. Embroider the Second Eye
Repeat the curved shape on the opposite side, using stitches 14–18 of Row 13 as your horizontal guide.
Begin near stitch 14 of Row 14, rise toward the highest point near stitch 16 of Row 12 and finish near stitch 18 of Row 14.
Keep the height and width close to the first eye. If one arch looks taller, adjust the embroidery before securing its tail.
Eye checkpoint: Both eyes should form shallow black arches, with their highest points at roughly the same height. Leave a clear space between them and enough brown below for the cream muzzle.
Don't embroider a mouth. The finished ornament has only the closed eyes and the little red nose on the cream muzzle.
Assemble the Crochet Reindeer Face
Now you can see how all the pieces fit together. Lay the face on a table and arrange the muzzle, nose, ears and antlers before sewing anything permanently.
The spacing matters. The ears need to sit out to the sides, the antlers rise above the forehead and the muzzle belongs low on the tapered face.
Part 15. Position and Sew the Cream Muzzle
- Lay the brown face right side up, with Row 1 at the top.
- Place the cream muzzle on the lower face, with its short foundation chain running vertically from top to bottom.
- Center the muzzle on the lower face, with its narrow upper end around Rows 16–17, directly beneath the space between the embroidered eyes. Leave a visible band of brown crochet above the cream so the muzzle does not touch either eye.
- Bring the lower edge toward the chin, keeping the entire cream oval inside the brown face edging. Check the bottom and both sides before sewing. If the cream extends beyond the brown outline, adjust its position and check the gauge and muzzle measurements. Don't gather the oval or stretch the brown face to make it fit.
- Check that the ivory oval covers the center of the lower face without extending beyond either brown cheek.
- Use pins or removable stitch markers to hold the muzzle in position.
- Thread the saved cream sewing tail into a tapestry needle.
- Sew around all 38 stitches of the outer muzzle edge, catching the brown face underneath with small, even stitches.
- Keep the ivory oval flat as you sew. Don't gather its edges or pull the brown face inward.
- Secure the cream tail on the wrong side of the face and remove the temporary markers.
Muzzle checkpoint: The oval should sit directly beneath the embroidered eyes and remain centered on the narrow lower portion of the face. It should not cover the eyes or hang beyond the chin.
Part 16. Sew on the Red Nose
- Place the red crochet nose near the upper middle of the cream oval.
- Center it horizontally, leaving more cream visible below the nose than above it.
- Thread the saved red tail into a tapestry needle.
- Place the nine-stitch open base against the cream muzzle, with the closed magic-ring end facing outward.
- Sew each of the 9 stitches around the open base to the cream muzzle, keeping the rounded front of the nose raised.
- Secure the tail on the wrong side of the face.
The little red nose is enough. Don't make it so large that it covers most of the cream muzzle.
Part 17. Attach the Two Antlers
Keep the reindeer face right side up with Row 1 at the top. Number the 14 stitches of the top edging from left to right. Mark stitches 4–6 for the left antler and stitches 9–11 for the right antler. Then turn the face wrong side up, keeping the markers in place so you won't accidentally swap the left and right positions.
- Lay the antlers behind the marked positions on the upper forehead. Their rounded main tips point upward, and their shorter branches must point outward when you look at the right side of the face.
- Position the left antler base behind the markers for top-edge stitches 4–6.
- Position the right antler base behind the markers for top-edge stitches 9–11.
- Keep the central space between the antlers open for the hanging loop.
- Angle the main stems slightly outward, but keep them nearly upright.
- Thread the long tail from the first main stem into a tapestry needle.
- Flatten its six-stitch open base slightly against the wrong side of the forehead. Sew through all six base stitches and the underlying brown head stitches, going around the base and adding several reinforcing passes.
- Repeat for the second antler.
- Secure the tails on the wrong side without pulling the forehead out of shape. Remove the placement markers.
Turn the face right side up and check the antlers. Each one should have a tall rounded tip and a shorter branch projecting outward.
Antler placement checkpoint: You should see four rounded antler tips altogether, two on each side. The dark brown stems should not overlap each other or cover the embroidered eyes.
Part 18. Attach the Two Ears
With the face right side up, position one completed ear on each upper side of the forehead.
- Place the left ear base behind the side edge around Rows 5–9.
- Point the outer tip sideways and slightly upward, away from the face.
- Overlap approximately 1/4–3/8 inch of the narrow ear base behind the brown face edge.
- Use the saved brown tail from Row 11 of the ear to sew the base securely to the wrong side of the face.
- Repeat with the right ear, reversing its direction.
- Check that the cream inserts both face forward and that the two ears have matching angles.
- Weave the sewing tails into the wrong side, keeping the ear bases flat.
The ears should look wider than the antler stems and sit beneath them, not directly alongside their tallest tips.
Check the Complete Reindeer Front
Lay the finished face flat and compare all the parts before making the backing.
- The brown forehead is broad, with a longer tapered lower face.
- The ivory muzzle is centered near the chin.
- The red nose sits near the upper center of the ivory.
- Both black embroidered eyes curve upward at matching heights.
- The ears point outward, with their ivory inserts visible.
- The dark brown antlers rise above the forehead, with their branches facing away from the center.
If you need to shift an ear or antler, do it now. Once the backing is sewn on, those attachment stitches will be hidden between the two panels.
Crochet the Ornament Backing
The backing is a second brown face made without eyes, ears, antlers or a muzzle. It gives the ornament a finished back and leaves a little room for stuffing.
Don't make the backing circular. It needs to match the same tapered outline as the decorated front.
Part 19. Make the Matching Brown Back Panel
Yarn: Medium caramel brown
Hook: 3.25 mm
Follow the complete 30-row brown face instructions in the Crochet the Tapered Reindeer Face section.
Begin with ch 13 and work the same increases, straight rows and decreases.
Check these row counts as you go:
- Row 1: 12 sc
- Row 5: 20 sc
- Row 14: 20 sc
- Row 15: 18 sc
- Row 18: 16 sc
- Row 21: 14 sc
- Row 24: 12 sc
- Row 26: 10 sc
- Row 28: 8 sc
- Row 30: 6 sc
After Row 30, work the identical edging:
- 26 sc along the first side, skipping the row-end spaces of Rows 6, 12, 19 and 26
- 14 sc across the upper foundation edge, including the two corner increases
- 26 sc along the opposite side, skipping the same four row-end spaces
- 8 sc across the six bottom stitches, increasing in the first and last stitches
Join with a sl st to the first edging sc. (74 sc)
Fasten off and weave in the tail.
Part 20. Check the Two Panels Together
Lay the decorated front and plain backing on top of one another, with their wrong sides touching and right sides facing outward.
Align Row 1 with Row 1 and Row 30 with Row 30. Match the top, sides and chin.
Backing checkpoint: Both pieces must have 30 rows and 74 edging stitches. Their outlines should match, with no obvious difference in width or length.
If the backing is noticeably larger, compare your gauge and row counts. Don't try to force a larger panel onto the front by gathering the seam.
Set the panels apart again so you can make the hanging loop before sewing the ornament closed.
Make the Reindeer's Yarn Hanging Loop
Use the same caramel brown yarn as the face for the hanging loop. It should rise from the middle of the forehead, between the two antlers.
I'd make the loop from a crochet chain instead of adding a separate piece of ribbon. It matches the rest of the ornament, and you can anchor both ends inside the backing before closing everything up.
Part 21. Crochet the Hanging Loop
Yarn: Medium caramel brown
Hook: 3.25 mm
- Lay the plain backing panel with its wrong side facing you and the wider forehead edge at the top.
- Find the 14 stitches across the upper edging. Mark stitches 7 and 8, the two center stitches.
- Leave a 12-inch starting tail. Join the brown yarn with a sl st to edging stitch 7.
- Ch 44.
- Bring the free end of the chain around to form a loop, without twisting the chain.
- Sl st into edging stitch 8 to anchor the other end.
- Fasten off, leaving a second 12-inch tail.
- Thread each tail through a tapestry needle. Sew the loop's attachment ends to several nearby brown edging stitches, taking three or four small securing passes at each end.
- Weave the remaining tails across the wrong side of the backing. They'll be hidden when the front and back are joined.
Loop checkpoint: The chain should form a loop approximately 3–3 1/2 inches high when folded, depending on your chain tension. Hold it above the face before securing the second end. It should look long and narrow, like the hanging loop in the example image.
Hold the backing by the loop. The forehead should hang beneath it without turning sideways.
If the loop pulls noticeably toward one antler position, move the attachment before sewing the panels together. Keep it centered. You don't need a longer loop just to make it look decorative.
Join, Stuff and Finish the Crochet Reindeer Ornament
You're almost finished. The decorated face goes in front, the plain brown backing goes behind it, and a little stuffing adds just enough fullness to keep the ornament from looking completely flat.
Go lightly with the filling. Too much stuffing will push the cheeks outward and make the tapered face look round.
Part 22. Align the Front and Back
- Lay the decorated face right side down, so its wrong side faces upward.
- Check that the ear and antler bases are sewn securely to the wrong side of the front panel. Remove any remaining stitch markers or pins from the individual crocheted pieces before closing them between the two panels.
- Place the backing over the front with the wrong sides touching. Both right sides should face outward when the ornament is assembled.
- Align the 14-stitch forehead edges, the 26-stitch side edges and the 8-stitch chin edges.
- Check that the hanging loop projects from the top center between the antlers.
- Pin or temporarily clip the panels together at the forehead, both cheeks and the chin.
Alignment checkpoint: The front and back have 74 edging stitches each. Every stitch on the front should have a matching stitch on the back.
Part 23. Sew the Panels Together
Cut two 30-inch lengths of medium-brown yarn. Thread the first length through a tapestry needle and keep the second nearby. You'll use them to sew the matching edging stitches around both panels, securing the yarn between lengths rather than trying to complete the entire seam with one strand.
- Begin near the lower left side of the chin, working through the corresponding edging stitches of both panels.
- Use small whipstitches to sew the two layers together. Pass the needle through both loops of one front edging stitch and both loops of its matching backing stitch.
- Continue around the edge, making one joining stitch for each matching pair of edging stitches.
- When approximately 6 inches of the first sewing strand remain, secure it with two small stitches on the wrong side of the seam and weave its end between the panels.
- Thread the second 30-inch length through the tapestry needle. Begin at the next unjoined pair of edging stitches, anchoring the new yarn with two small stitches inside the seam before continuing.
- If the second length becomes short, secure it in the same way and use another length of brown yarn. Don't stretch the seam to make the yarn reach.
- Keep the seam snug but don't pull so tightly that the brown edging curls.
- At the ear and antler attachment areas, sew through the matched panel edging stitches. Where an attached base overlaps the seam, catch that base with a few additional securing stitches.
- Keep the free portions of the antlers and ears outside the seam. Don't stitch across their tips.
- Continue joining the panels until approximately 12 matched stitch pairs remain unsewn.
- Leave that opening available for adding the fiberfill.
The whipstitch seam should sit close to the brown edging. If you're using the same yarn color for sewing, the join will be much less noticeable.
Part 24. Add a Little Stuffing
Put a small pinch of polyester fiberfill inside the ornament through the remaining opening.
Start with approximately 1–2 grams of filling. That's an estimated starting amount, not a required weight. Add or remove it according to how the actual crocheted panels behave.
- Spread the stuffing gently beneath the forehead and upper cheeks.
- Use your fingers to smooth the filling into a thin, even layer.
- Keep the lower chin lightly filled so it doesn't bulge outward.
- Turn the ornament right side up and check the face before closing the opening.
- If the cheeks look too round, remove some stuffing.
- If the upper forehead collapses inward, add a very small amount beneath that area.
The face should have a little fullness, but you should still be able to see the narrow chin beneath the cream muzzle.
Part 25. Close the Final Opening
- Match the 12 remaining front and backing stitch pairs.
- Continue the whipstitch seam through all 12 pairs, closing the opening completely.
- Secure the sewing yarn with two small stitches inside the seam.
- Carry the remaining tail through the interior of the ornament and bring it out between two brown stitches a short distance away.
- Pull the tail gently, trim it close to the surface and let the cut end settle back inside.
Seam checkpoint: All 74 edging stitches on the front are matched to the 74 backing stitches. No filling should show through the join.
Part 26. Finish the Face and Antlers
Hold the ornament upright by its hanging loop.
- Check that the chin points downward and the loop rises from the center of the forehead.
- Gently straighten the two ears so their cream centers face forward.
- Separate the branching antlers so all four rounded tips remain visible.
- Check the cream muzzle and red nose for any loose sewing stitches.
- Make sure neither embroidered eye has been pulled out of shape by the stuffing.
- Remove every remaining temporary pin or clip, including those used to align the front and backing. Weave in any remaining loose yarn ends before trimming them.
If the antlers need a little shaping, lightly dampen them and let them dry in the desired position. Don't press a hot iron against the crochet.
Final ornament checkpoint: The completed reindeer should have a broad forehead, long tapered brown face, two pointed ears, dark branching antlers, embroidered closed eyes and a cream muzzle with a little red nose.
That's your finished Christmas tree ornament. No bow or bell needed.
Measurements and Troubleshooting
If something looks a little off, check the shape and stitch counts before pulling everything apart. With a small ornament, one missed decrease can make a noticeable difference.
Finished Component Checkpoints
- Brown front: 30 rows, 20 sc at the widest point, 6 sc across the final chin row and 74 sc around the edging
- Brown backing: Identical to the front, with 30 rows and 74 edging stitches
- Cream muzzle: 6 oval rounds with counts of 8, 14, 20, 26, 32 and 38 sc
- Red nose: 3 rounds with counts of 6, 9 and 9 sc, ending with a nine-stitch sewing edge
- Brown ears: 2 pieces, 11 rows each, with a maximum width of 6 sc
- Cream ear inserts: 2 pieces, 7 rows each, with a maximum width of 4 sc
- Main antler stems: 2 pieces, 11 rounds each, 6 sc around
- Antler branches: 2 pieces, 7 rounds each, 5 sc around
- Hanging loop: 44 chains, anchored at the top center of the backing
Why Does My Reindeer Face Look Too Round?
First, check the lower shaping rows. You should decrease to 14 stitches in Row 21, 12 in Row 24, 10 in Row 26, 8 in Row 28 and 6 in Row 30.
If the finished face is wide all the way to the chin, a decrease may have been missed or replaced with a regular single crochet.
Also check the stuffing. Too much fiberfill can push the lower cheeks outward and hide the taper even when the stitch counts are correct.
Remove some stuffing before changing the pattern itself.
What if the Front and Back Don't Match?
Both panels should have exactly 30 rows and 74 edging stitches. Check the last row of each panel and the four skipped row-end spaces along each side before joining.
If the stitch counts match but the panels are different sizes, the gauge probably changed between pieces. Compare the widest 20-stitch rows and the full 30-row heights before sewing.
Don't gather one panel to make it fit the other. Remake the panel that doesn't match, using the same hook and tension as the first.
What if the Cream Muzzle Looks Uneven?
Check the six rounds. The stitch counts should be 8, 14, 20, 26, 32 and 38. A missed increase can pull one side inward, while an extra increase may make the outer edge ripple.
Lay the oval flat with its foundation chain running vertically. If the muzzle looks crooked after sewing, remove the affected sewing stitches and reposition it before fastening the tail. Keep the cream centered beneath the eyes, with a little brown showing at the chin.
What if the Antlers Lean Forward?
Check the bases first. Each main stem has a six-stitch opening that should be sewn firmly to the forehead and reinforced at the seam.
If the antler tubes themselves are too flexible, try a smaller hook and make the stitches firmer. A short length of doubled brown yarn carried through the stem may add some support, but it won't behave like rigid wire.
Don't add pipe cleaners or wire to this ornament. If your yarn won't hold the upright shape, change the hook size or yarn before trying to force the branches into position.
What if the Ornament Hangs Crooked?
Check the chain loop. Its two ends should be anchored at the center of the top edging, between the antlers.
If the loop is centered but the ornament still tilts, check whether one ear or antler has much more weight than the other. You may be able to improve the balance by adjusting their positions or by spreading the stuffing more evenly.
Should I Block the Finished Ornament?
Light blocking can help shape the ears and antlers, especially when using cotton yarn. Follow the care instructions for your chosen fiber.
Dampen only as much as needed, shape the pieces gently and let them dry completely before hanging the ornament. Don't flatten the lightly padded face with heavy pressure.
The pattern's measurements and construction counts are calculated. A physically crocheted sample is still needed to verify the final dimensions, firmness and exact match to the finished example image.
Frequently Asked Questions About the Crochet Reindeer Face Ornament Pattern
Can I use worsted-weight yarn instead of DK yarn?
Yes, but expect a larger ornament. Keep the same stitch counts and use a hook that makes firm, even stitches. I'd make one antler first because thicker yarn can change the proportions of those little branches quite a bit.
Can I make this reindeer ornament without stuffing?
Yes. Crochet both brown panels and sew them together without fiberfill. You'll have a flatter hanging ornament, although it won't have quite the same fullness as the finished example.
Can I make the red nose smaller?
Yes. For a smaller, flatter nose, make only the first round of 6 single crochet stitches, close the ring and sew that little circle onto the muzzle. The finished example uses the rounded three-round nose.
Can I make a flat reindeer applique instead?
If you want a reindeer to sew onto a Christmas stocking or fabric project, use the separate free Christmas crochet reindeer applique pattern. That design is made entirely flat and doesn't need an ornament backing or hanging loop.
Can I hang this ornament above a baby's crib?
No. This reindeer is intended as a Christmas tree ornament or another decoration kept out of a baby's reach. Don't attach it to a crib or place it within an infant's sleep area. The hanging loop and small attached pieces aren't intended for infant handling.
Can I change the antler color?
Yes. A dark chocolate brown makes the branches stand out against the caramel face, as shown in the example. You can use a lighter brown for a quieter woodland color combination, but keep both antlers the same color.
Has this crochet reindeer ornament pattern been physically tested?
No. The written instructions, stitch counts, shaping and assembly were developed for the finished design shown in the example. The measurements are estimates based on the stated gauge and construction, not measurements taken from a completed crochet sample.
If you're making several ornaments, I'd finish one completely before cutting yarn for the rest. That gives you a chance to check the final size, antler firmness and hanging balance with your own yarn and tension.
If you'd like another handmade reindeer for your Christmas collection, the flying crochet reindeer ornament with holly and berries is a completely different project, with a full crocheted body, legs and festive harness.
When you click on links to various merchants on this site and make a purchase, this may result in this site earning a commission. This does not affect the price you pay.

UBGI Gold Standard 2026
Reviewed under the site's
editorial checklist.
Photos, decorating ideas, party setups and reader submissions are shared for inspiration unless a page is specifically presented as a pattern, tutorial, reference guide or step-by-step project. Follow the instructions, measurements, safety guidance and manufacturer directions provided for the particular project or product.
About Jan | Contact | Baby Nursery Ideas (Blog) | Site Map | Privacy Policy | Disclosure Policy | Disclaimer | Affiliate Disclosure | Earnings Disclosure | Facebook | Pinterest
I am a participant in the Amazon Services LLC Associates Program, an affiliate advertising program designed to provide a means for us to earn fees by linking to Amazon. As an Amazon Associate I earn from qualifying purchases.
Copyright © 2006-2026. All Rights Reserved.