Free Crochet Elf Applique Pattern for Boy and Girl Christmas Elves
By Jan Bay
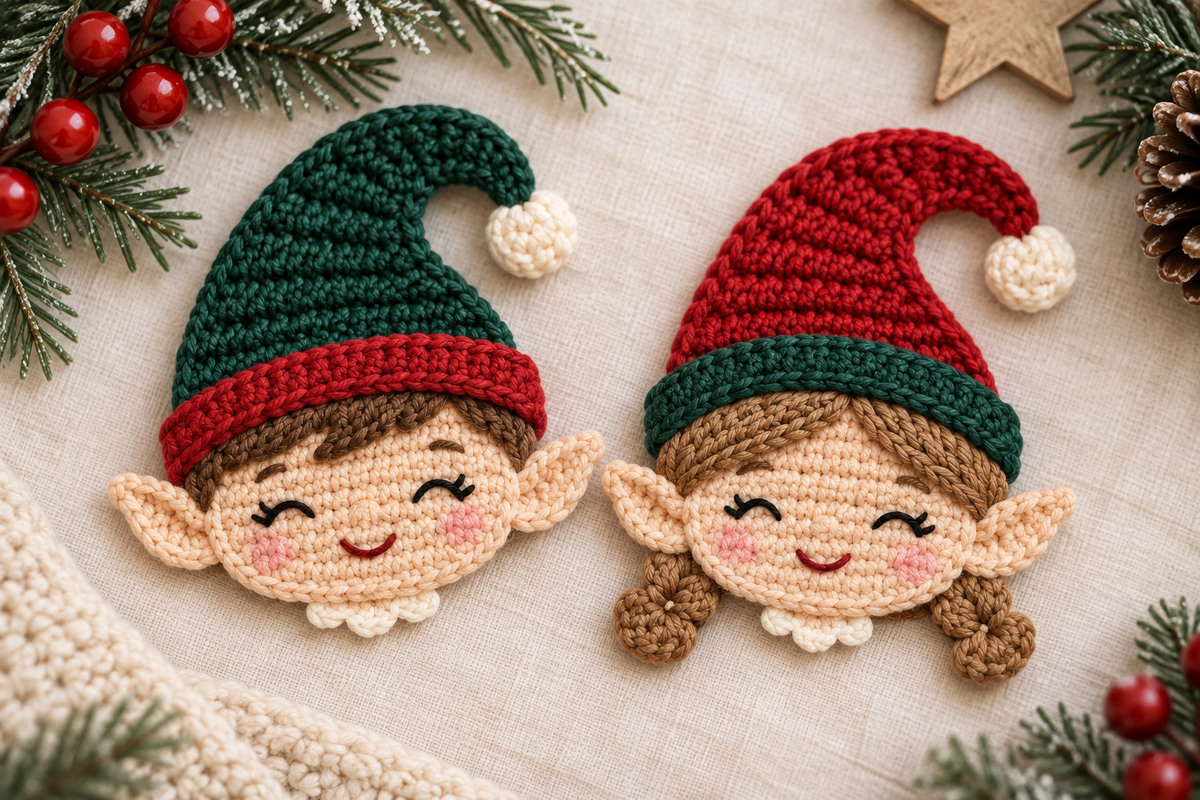
This free crochet elf applique pattern creates two little Christmas elves that look as though they've just slipped away from Santa's workshop for a little holiday fun! I didn't want one lonely little elf. I wanted a matching set, a boy and girl with pointed ears, cheerful Christmas colors and enough personality to stand out on a handmade stocking or blanket. Tell me, did I achieve my goal? I think I did! They're quite the pair and will be cute as can be on Christmas sweaters, gift bags and other handmade holiday decorations.
Explore More Free Christmas Crochet Patterns
Christmas Crochet Applique Patterns
Gingerbread Man, Woman and House Appliques
Crochet Snowman Family Appliques
See supplies for this project here.
Jump to the Crochet Elf Applique Pattern
- Meet the Boy and Girl Elves
- Materials, Finished Size and Gauge
- Stitches and Pattern Notes
- Crochet the Elf Faces
- Make the Pointed Ears
- Make the Boy's Hair and Girl's Braids
- Crochet the Curled Elf Hats
- Make the Pom-Poms and Collars
- Embroider and Assemble the Elves
- Christmas Project Ideas
- Pattern Development Note
Meet the Boy and Girl Christmas Elves
Our little elves have quite a bit in common, but they aren't identical twins! Both have those wonderfully pointed ears, rosy cheeks, embroidered smiling eyes and long Christmas hats with curled tips. The differences are in their hair and the colors of their hats.
The boy wears an evergreen hat with a cranberry-red brim. His short brown fringe peeks out across his forehead. The girl wears the opposite colors, with a cranberry hat, evergreen brim and two little brown braids. Both have ivory pom-poms and a tiny scalloped collar beneath their chins.
We're making just their heads and hats, not the entire little elf dolls. That keeps the finished pieces relatively flat so you can sew them onto other crochet projects or use them as decorations.
You'll make both faces from the same oval pattern, and both hats from the same instructions. Just change the colors and hair details. That's much easier than working through two entirely different patterns, and you still end up with a proper matching pair.
Materials, Finished Size and Gauge
You won't need an enormous collection of yarn for these two. If you already have some Christmas crochet projects underway, you may have most of the colors on hand.
Yarn and Supplies
- #4 worsted weight yarn in a peach or light skin tone for both faces and four ears
- Evergreen worsted weight yarn for the boy's hat and girl's hat brim
- Cranberry-red worsted weight yarn for the girl's hat and boy's hat brim
- Medium brown worsted weight yarn for the hair and braids
- Small amount of ivory worsted weight yarn for the pom-poms and collars
- Black embroidery floss for the closed eyes and eyelashes
- Dark cranberry embroidery floss for the smiling mouths
- Soft pink embroidery floss for the cheeks
- 3.5 mm crochet hook, or size needed to obtain gauge
- Yarn needle and embroidery needle
- Scissors
- Stitch markers
- Straight pins or locking stitch markers for positioning the pieces
I'd choose a smooth yarn that gives the faces and hats clearly defined stitches without making them stiff. Use the same yarn weight for all the crocheted pieces so the proportions stay close to those in the finished example.
Expected Finished Size
Each completed appliqué is expected to measure approximately 6 to 7 1/2 inches high, including the curled hat, and about 6 to 7 inches across at the widest point of the ears. The face itself should measure roughly 4 1/4 to 4 3/4 inches across.
These measurements are estimates based on the construction and working gauge, not dimensions taken from a finished sample.
Working Gauge
22 single crochet stitches and 24 rows over 4 inches, using a 3.5 mm hook.
Make a small single crochet swatch if finished size matters for the project you're decorating. A looser gauge will produce larger faces and hats. A tighter gauge will make everything smaller, including the pointed ears.
Skill level: Intermediate beginner to intermediate. You'll need single crochet increases and decreases, basic shaping, simple embroidery and some sewing to assemble the pieces.
Crochet Stitches and Pattern Notes
We're using standard US crochet terminology throughout the pattern. If you need a refresher on reading the instructions, the Craft Yarn Council's guide to reading crochet patterns explains the basic abbreviations.
- ch: chain
- sc: single crochet
- hdc: half double crochet
- dc: double crochet
- sl st: slip stitch
- sc2tog: single crochet decrease over the next two stitches
- inc: work 2 single crochet stitches in the same stitch
- MR: magic ring
- st/sts: stitch/stitches
- RS: right side of the work
Pattern notes: The oval faces are worked in joined rounds. At the end of each round, join with a slip stitch to the first single crochet. Begin the following round with the chain one already written in that round's instructions. Do not make an additional chain. The joining slip stitch and beginning chain do not count as stitches.
The small pom-poms are worked in continuous rounds rather than joined rounds. Place a stitch marker in the first stitch of each round and move it up as you work. Do not join or chain one between pom-pom rounds. Remove the marker before closing each pom-pom.
The hats, hat extensions, brims and hair strips are worked in turned rows. Each row's instructions already include the chain one and turn where needed. Work them only once. The turning chain does not count as a stitch.
Stitch counts appear in parentheses at the end of the instructions. Count the completed stitches rather than including the turning chain or joining slip stitch.
Keep the faces, ears and hats flat as you work. Only the ivory hat pom-poms and the girl's small braid-end caps are rounded.
Crochet Elf Applique Pattern: Make the Boy and Girl Faces
Let's start with those smiling little faces. Both elves use exactly the same oval, which is worked around a short foundation chain rather than beginning with a round circle.
That gives us a wider face with room for the eyes, cheeks and those pointed ears. I prefer this shape for the elves because a perfectly round face wouldn't look quite like the pair we're making.
Face Oval: Make Two
Using peach yarn, ch 13.
Round 1: Work 3 sc in the second ch from the hook. Sc in each of the next 10 chains. Work 3 sc in the last chain. Rotate the work and crochet along the unused loops on the opposite side of the foundation chain. Sc in the next 10 loops. Join with a sl st to the first sc. (26 sts)
Round 2: Ch 1. Work 2 sc in each of the next 3 sts, sc in next 10 sts, 2 sc in each of the next 3 sts, sc in next 10 sts. Join. (32 sts)
Round 3: Ch 1. *Work 2 sc in next st, sc in next st.* Repeat from * twice more. Sc in next 10 sts. Repeat the sequence of 2 sc in next st and sc in next st three times. Sc in next 10 sts. Join. (38 sts)
Round 4: Ch 1. *Sc in next 2 sts, work 2 sc in next st.* Repeat from * twice more. Sc in next 10 sts. Repeat the increase sequence three times. Sc in next 10 sts. Join. (44 sts)
Round 5: Ch 1. *Work 2 sc in next st, sc in next 3 sts.* Repeat from * twice more. Sc in next 10 sts. Repeat the increase sequence three times. Sc in next 10 sts. Join. (50 sts)
Round 6: Ch 1. *Sc in next 4 sts, work 2 sc in next st.* Repeat from * twice more. Sc in next 10 sts. Repeat the increase sequence three times. Sc in next 10 sts. Join. (56 sts)
Round 7: Ch 1. *Work 2 sc in next st, sc in next 5 sts.* Repeat from * twice more. Sc in next 10 sts. Repeat the increase sequence three times. Sc in next 10 sts. Join. (62 sts)
Fasten off, leaving a length of yarn for sewing.
Make the second face in exactly the same way.
Check the Face Shape
Lay each oval flat with the foundation chain running horizontally. The face should be wider than it is tall, with softly rounded cheeks and a smooth lower chin.
If the outside edge ripples, check the increase counts before continuing. Each new round adds six stitches, and the final round contains 62 stitches.
Don't embroider the faces just yet. It's easier to position the eyes and smiles after you know exactly where the hat brims will sit.
Make the Pointed Crochet Elf Ears
Those ears are much too important to leave out! They're one of the details that make the faces recognizable as elves, even before we add the hats.
Each ear is a small, flat, tapered crochet piece. We'll sew the wider end behind the face and leave the pointed tip extending outward.
Pointed Ears: Make Four
Using peach yarn, ch 8.
First side: Beginning in the second ch from the hook, work 1 sl st, 1 sc, 1 hdc, 1 hdc, 1 dc, 1 dc and 1 dc, working one stitch into each successive chain. (7 sts)
Opposite side: Rotate around the wide end. Work another dc into the same last chain. Continue along the unused loops on the opposite side of the foundation chain, working 1 dc in each of the next 2 loops, 1 hdc in each of the next 2 loops, 1 sc in the next loop and 1 sl st in the final loop. (7 additional sts)
Fasten off with a sewing tail. Each ear has 14 worked stitches around its foundation chain.
Make four ears altogether.
Gently shape each one so the slip-stitch end forms the pointed outer tip and the taller stitches form the wider base. You should have two ears pointing left and two pointing right when you lay them beside the finished faces.
Position the Ears
Lay the ears behind the faces at approximately the widest part of each oval. Their tips should extend outward, with the bases partially hidden beneath the face edges.
Pin them in place, checking that the left and right ears extend a similar distance. Sew the wide bases securely to the back of each face, catching several stitches along the attachment edge.
There's no need to sew down the entire ear. The outer pointed sections should remain visible.
Make the Boy's Hair and Girl's Braids
Now we're giving the two elves their own personalities. The boy gets his little swept fringe, while the girl gets a side-swept fringe and two short braids that peek out beneath her hat.
Use medium brown yarn for both. The difference comes from the placement and the girl's extra braids, not from changing the main face pattern.
Crochet the Hair Fringe: Make Two
Using brown yarn, ch 22.
Row 1: Sc in the second ch from the hook and in each remaining chain. (21 sts)
Row 2: Ch 1, turn. Sl st in next 3 sts, sc in next 5 sts, hdc in next 5 sts, sc in next 5 sts and sl st in last 3 sts. (21 worked sts)
Fasten off, leaving a sewing tail.
Make a second fringe in the same way.
Position the Boy's Hair
Lay one fringe across the upper portion of the boy's face. The lower edge should curve gently across his forehead, with the hair extending from one side toward the other.
Position it high enough to leave room for the embroidered eyes. The cranberry hat brim will cover the upper edge of the hair when you assemble the appliqué.
For the short swept look in the example, you can embroider two or three small diagonal brown stitches along the lower edge of the fringe. Keep them short and slightly uneven so they resemble little locks of hair.
Position the Girl's Hair
Use the second fringe for the girl. Position the middle of the strip just beneath the center of her evergreen hat brim. Gently angle the two halves downward and outward toward her ears, creating a shallow center part with the brown hair sweeping across both sides of her forehead. Pin the strip in place without folding or overlapping its stitches. The ends should taper toward her temples, leaving the center of her forehead visible.
Keep the lower edge above the position of her embroidered eyes. Her evergreen hat brim will hide the upper edge of the hairpiece.
Make the Girl's Two Braids
For each braid, cut three strands of brown yarn approximately 5 inches long.
Thread each strand through a stitch along the side of the face, beneath the hairline. Pull the strand through until its two ends are approximately equal in length. Repeat with the other two strands, placing them through nearby stitches. You will have six loose ends.
Divide the six ends into three groups of two strands each. Braid the groups together for approximately 3/4 to 1 inch.
Tie the braid near its end with a separate short piece of brown yarn. Trim the loose ends to about 1/8 inch.
Repeat on the opposite side of the girl's face.
Rounded Braid Ends: Make Two
Using brown yarn, make a magic ring. Work in continuous rounds, marking the first stitch of each round.
Round 1: Work 6 sc into the magic ring. (6 sts)
Round 2: Work 2 sc in each st around. (12 sts)
Round 3: Sc in each st around. (12 sts)
Round 4: Sc2tog six times. (6 sts)
Remove the marker and fasten off, leaving a long sewing tail. Do not close the opening yet.
Make a second rounded cap in the same way.
Insert the tied and trimmed end of one braid into the six-stitch opening of a cap. Tuck the trimmed yarn ends inside. If needed, add a very small scrap of matching brown yarn inside the cap to help it hold its rounded shape.
Using the sewing tail, pass through the front loops of the six remaining stitches and draw the opening snugly around the braid. Sew through the cap and braid end several times to secure them together. Weave in the remaining tail.
Repeat with the second braid. The finished ends should form two small rounded knobs rather than flat circles or loose tassels.
Pin the braids so they rest alongside the girl's lower cheeks, then tack them to the face near their lower ends. They should stay in position when the finished appliqué is picked up.
Crochet the Curled Christmas Elf Hats
Here come those wonderful hats! They're the biggest feature on both appliqués, so we're keeping their tall, tapered shape and the distinctive curl at the top.
The boy's hat is evergreen with a cranberry brim. The girl's hat is cranberry with an evergreen brim. Both curl toward the right when viewed from the front.
Each hat has a wide, flat lower section that narrows toward the top. A small shaped extension is sewn onto the narrow end and curved over to form the hooked tip.
Main Elf Hat: Make Two
Using evergreen yarn for the boy or cranberry yarn for the girl, ch 29.
Row 1: Sc in the second ch from the hook and in each remaining chain. (28 sts)
Row 2: Ch 1, turn. Sc in each st across. (28 sts)
Row 3: Ch 1, turn. Sc in each st across. (28 sts)
Row 4: Ch 1, turn. Sc2tog, sc in next 24 sts, sc2tog. (26 sts)
Row 5: Ch 1, turn. Sc in each st across. (26 sts)
Row 6: Ch 1, turn. Sc2tog, sc in next 22 sts, sc2tog. (24 sts)
Row 7: Ch 1, turn. Sc2tog, sc in next 20 sts, sc2tog. (22 sts)
Row 8: Ch 1, turn. Sc in each st across. (22 sts)
Row 9: Ch 1, turn. Sc2tog, sc in next 18 sts, sc2tog. (20 sts)
Row 10: Ch 1, turn. Sc2tog, sc in next 16 sts, sc2tog. (18 sts)
Row 11: Ch 1, turn. Sc in each st across. (18 sts)
Row 12: Ch 1, turn. Sc2tog, sc in next 14 sts, sc2tog. (16 sts)
Row 13: Ch 1, turn. Sc2tog, sc in next 12 sts, sc2tog. (14 sts)
Row 14: Ch 1, turn. Sc in each st across. (14 sts)
Row 15: Ch 1, turn. Sc2tog, sc in next 10 sts, sc2tog. (12 sts)
Row 16: Ch 1, turn. Sc2tog, sc in next 8 sts, sc2tog. (10 sts)
Row 17: Ch 1, turn. Sc in each st across. (10 sts)
Row 18: Ch 1, turn. Sc2tog, sc in next 6 sts, sc2tog. (8 sts)
Row 19: Ch 1, turn. Sc in each st across. (8 sts)
Row 20: Ch 1, turn. Sc2tog, sc in next 4 sts, sc2tog. (6 sts)
Row 21: Ch 1, turn. Sc in each st across. (6 sts)
Row 22: Ch 1, turn. Sc2tog, sc in next 2 sts, sc2tog. (4 sts)
Row 23: Ch 1, turn. Sc in each st across. (4 sts)
Fasten off, leaving a sewing tail.
Make a second hat using the opposite main color.
Count the final four stitches before moving on. Both hats should taper gradually from the 28-stitch base to a narrow upper end.
Crochet the Curved Hat Extensions: Make Two
Using the same color as the main hat, ch 5.
Row 1: Sc in the second ch from the hook and in each remaining chain. (4 sts)
Row 2: Ch 1, turn. Sc in each st across. (4 sts)
Row 3: Ch 1, turn. Sc in each st across. (4 sts)
Row 4: Ch 1, turn. Sc2tog, sc in next 2 sts. (3 sts)
Row 5: Ch 1, turn. Sc in each st across. (3 sts)
Row 6: Ch 1, turn. Sc2tog, sc in next st. (2 sts)
Row 7: Ch 1, turn. Sc in each st across. (2 sts)
Row 8: Ch 1, turn. Sc2tog. (1 st)
Fasten off with a long sewing tail.
Make a second extension in the other hat color.
Shape the Curled Hat Tips
Place the wide four-stitch end of an extension against the four-stitch top edge of its matching hat. With the right side facing upward, angle the extension toward the right.
Sew the four-stitch base firmly to the top edge of the main hat. Use matching yarn so the join blends into the crocheted fabric.
Lay the hat flat with the right side facing up and the wide brim edge at the bottom. Bend the narrow extension gently toward the right until the tip points downward. Aim for a rounded hook shape rather than a sharp fold.
Bring the inner edge of the extension toward the upper right side of the main hat, near Rows 20 to 22. Pin the curve temporarily and check that there is a visible opening beneath the hooked tip. Adjust the position until the curl resembles the finished example.
Using matching yarn, make two or three small securing stitches where the inside of the curved extension meets the main hat. Keep the stitches on the back whenever possible. Do not sew the entire extension flat against the hat. The outer curved edge and the pointed tip should remain visible.
Repeat with the other hat, making both tips curl in the same direction.
The curve should look soft and floppy rather than like a sharply folded corner. Pin the hats to a flat surface while positioning the bends. Their final shape is controlled by the sewing, so this placement should be checked against the finished example before fastening everything permanently.
Contrasting Hat Brims: Make Two
Using cranberry yarn for the boy's brim or evergreen yarn for the girl's brim, ch 29.
Row 1: Sc in the second ch from the hook and in each remaining chain. (28 sts)
Rows 2 and 3: Ch 1, turn. Sc in each st across. (28 sts per row)
Fasten off, leaving a long sewing tail.
Make the second brim in the opposite color.
The brim is a three-row band that sits across the bottom of the main hat, covering the join between the hat and the upper forehead.
Don't attach it yet. We'll position it after the hair and faces are ready.
Make the Ivory Pom-Poms and Little Collars
Both elves get the same ivory finishing details. The pom-poms are small crocheted rounds rather than loose yarn pom-poms, and the scalloped collars are just little accents that peek out beneath their chins.
Crocheted Pom-Poms: Make Two
Using ivory yarn, make a magic ring.
Round 1: Work 6 sc into the magic ring. (6 sts)
Round 2: Work 2 sc in each st around. (12 sts)
Round 3: Sc in each st around. (12 sts)
Round 4: Sc2tog six times. (6 sts)
Fasten off, leaving a long sewing tail.
Before closing the opening, tuck the short starting yarn tail inside the little ball to help it hold its rounded shape. Thread the remaining tail through the front loops of the six final stitches and pull the opening closed.
Make the second pom-pom the same way.
These should be small, softly rounded pom-poms. You don't need additional stuffing or a large fluffy ball on such a small appliqué.
Tiny Scalloped Collars: Make Two
Using ivory yarn, ch 7.
Row 1: Sc in the second ch from the hook and in each remaining chain. (6 sts)
Row 2: Ch 1, turn. *Sl st in next st, work 3 hdc in next st.* Repeat from * two more times. (3 scallops)
Fasten off, leaving a sewing tail.
Make a second collar.
You'll attach each collar behind the lower center of a face, with the scalloped edge just visible beneath the chin. Only a small amount needs to show.
Embroider the Faces and Assemble the Christmas Elves
We've got all the pieces ready, and now our little elves are finally going to look like themselves!
Before sewing everything down, lay the pieces in position and compare the two faces side by side. The expressions should be similar, but the hair and opposite hat colors will give each elf a different appearance.
Embroider the Closed Eyes
Lay the first face flat and position the hair and hat brim temporarily along its upper edge.
Mark the eye positions with two small pins or temporary yarn markers. Place the eyes on either side of the center, beneath the hairline, leaving enough room between them for the little smile.
Using black embroidery floss, make each eye as a shallow upward-curving arch approximately 1/2 to 5/8 inch wide. Use several small backstitches rather than one long loose stitch.
Add one or two tiny outward-pointing eyelashes at the outer corner of each eye.
Repeat on the second face, keeping the closed-eye expressions similar.
Using medium brown yarn or matching embroidery thread, stitch a small eyebrow above each eye. Make two or three short backstitches in a gentle arch, approximately 1/4 to 3/8 inch wide. Repeat for both elves. Keep the eyebrows above the closed eyes but below the hair fringe so they remain visible after assembly.
Add the Rosy Cheeks and Smiles
Using soft pink embroidery floss, work several short satin stitches beneath the outer half of each eye. Keep the cheek patches approximately 1/4 to 3/8 inch wide.
Use only enough stitches to give the cheeks a little blush. There should still be plenty of the peach face showing around them.
For the mouth, use dark cranberry embroidery floss to stitch a small upward-curving smile centered below the eyes.
I'd keep these smiles fairly small. Those closed eyes and rosy cheeks are already doing most of the work.
Secure all embroidery ends on the back of the face, weaving them through several stitches so the expressions remain firmly attached.
Attach the Hair
Pin each brown hair fringe across the upper portion of its matching face.
For the boy, keep the lower hairline fairly level, with a few little swept strands extending toward the center of the forehead.
For the girl, keep the center of the fringe close to the hat brim and let the two sides sweep outward toward her temples. Sew the strip in this position so the shallow center part remains visible, as shown in the finished example.
Sew the hair securely along its lower edge, leaving the upper edge positioned beneath the future hat brim.
Check that the girl's two braids sit beside the lower cheeks and that the rounded braid ends are securely attached.
Attach the Hats and Brims
Position each hat above its matching face, with the widest edge overlapping the upper part of the hair.
Center the 28-stitch hat base over the upper face edge. The finished face has 62 stitches around its perimeter, so you can position the hat across approximately 28 of the uppermost edge stitches, leaving the sides of the face visible beneath the ears.
Pin the hat in place and stitch its lower edge securely to the face. Keep the hat flat, catching the back of the crocheted stitches rather than pulling the front surface out of shape.
Now lay the contrasting three-row brim across the bottom of the hat. Let it cover the upper edge of the brown hair so the hair appears to be peeking out beneath the brim.
Sew the brim along its upper and lower edges. Follow the gentle curve of the face instead of pulling the band into a perfectly rigid straight line.
Repeat with the second elf, remembering that the girl's brim is evergreen and the boy's is cranberry.
Attach the Pom-Poms
Sew each ivory pom-pom onto the narrow curled end of its matching hat.
Pass the sewing yarn through the pom-pom and hat tip several times, then secure it on the back. The pom-pom should sit at the end of the curl without pulling the tip out of position.
Add the Little Collars
Turn each face over and position one ivory collar behind the lower center of the chin.
Allow the three scallops to extend slightly below the peach face. Sew the straight upper edge of the collar to the back of the oval.
Turn the appliqué right side up and adjust the scallops so they're visible without looking like a large ruffle.
Attaching an Elf Applique to Your Project
Lay the finished elf on the stocking, blanket, sweater or fabric piece you're decorating. Pin it in position, spreading the pointed ears and curled hat so the entire shape lies the way you want it.
Using a yarn needle and matching yarn or suitable sewing thread, sew around the outside edges of the face and hat with small, even stitches. Secure both pointed ears, the ivory collar and the hat tip separately. For the girl, make sure both braids and their rounded ends are attached firmly rather than left dangling.
Catch the outer stitches of the appliqué and the fabric underneath without pulling so tightly that either one puckers. If you're sewing onto stretchy crochet or knit fabric, check the background frequently as you work.
Weave in the sewing ends on the back. The finished appliqué should stay in place when the decorated item is handled, without the ears, braids or curled hat catching on loose edges.
Final Shape Check
Lay the finished elves beside one another and compare them with the example image.
- Both faces should be wide, softly rounded ovals with pointed ears.
- The boy should have a green hat, red brim and short brown fringe.
- The girl should have a red hat, green brim and two brown braids.
- Both hats should curl toward the right, ending in small ivory pom-poms.
- The expressions should have closed embroidered eyes, rosy cheeks and little smiles.
- The collars should show only a few ivory scallops beneath the chins.
Check the backs for loose yarn ends and secure any that need another stitch. Remove every positioning pin and stitch marker. The faces and hats should lie relatively flat, with only the ivory hat pom-poms and the girl's rounded braid ends adding small raised details.
Christmas Project Ideas for Your Crochet Elf Appliques
Now, where should our two little elves go? I'd be tempted to keep them together on the same project, especially if you're making a Christmas stocking or holiday pillow. The opposite hat colors make them look like a pair without having to match every detail.
Here are a few places they would look especially cute:
- Christmas stockings: Sew one elf near the upper front of each stocking, or use both on a larger family stocking.
- Crochet blankets: Place the two faces on a decorative Christmas blanket, perhaps near opposite corners or together in a central panel.
- Holiday sweaters: Use one elf on the front of a sweater or attach the pair to a larger Christmas motif.
- Christmas pillows: Arrange both elves near the center of a plain pillow front, leaving enough space around the hats and ears.
- Gift bags: Stitch an elf onto the front of a reusable fabric gift bag for a little Christmas personality.
- Wall decorations: Attach the completed faces to a fabric hanging or other display that will be brought out each Christmas.
Because the girl has braids and both elves have projecting ears and rounded pom-poms, attach them securely and use them on decorative items rather than leaving any parts loose. Keep appliquéd decorations and other soft items out of an infant's sleep space.
If you're making a whole collection of Christmas decorations, you can find more ideas in my free Christmas crochet applique patterns. Or visit my Christmas crochet patterns page for larger projects.
And if you decide to make only one elf instead of the pair? Well, I'll forgive you. But I still think these two belong together!
Crochet Elf Applique Pattern Development Note
Pattern development note: The stitch counts and construction have been reviewed mathematically for internal consistency. Finished dimensions are estimates, and actual yarn requirements will vary with gauge and yarn choice. This pattern has not been physically test-crocheted. The curved hat extensions, ear proportions and final assembly placement require verification with a completed sample.
When you click on links to various merchants on this site and make a purchase, this may result in this site earning a commission. This does not affect the price you pay.

UBGI Gold Standard 2026
Reviewed under the site's
editorial checklist.
Photos, decorating ideas, party setups and reader submissions are shared for inspiration unless a page is specifically presented as a pattern, tutorial, reference guide or step-by-step project. Follow the instructions, measurements, safety guidance and manufacturer directions provided for the particular project or product.
About Jan | Contact | Baby Nursery Ideas (Blog) | Site Map | Privacy Policy | Disclosure Policy | Disclaimer | Affiliate Disclosure | Earnings Disclosure | Facebook | Pinterest
I am a participant in the Amazon Services LLC Associates Program, an affiliate advertising program designed to provide a means for us to earn fees by linking to Amazon. As an Amazon Associate I earn from qualifying purchases.
Copyright © 2006-2026. All Rights Reserved.