Butterfly Crochet Blanket Pattern with 3D Butterfly Appliqués
This free butterfly crochet blanket pattern combines solid, framed crochet squares with 3D butterfly appliqués for a baby blanket that feels special without looking overly fussy. The raised butterfly wings add texture to selected squares, while the simpler squares give the design room to breathe. The result is an heirloom-style crochet baby blanket suited to a nursery, handmade baby gift or baby shower gift.
By Jan Bay
Explore More Free Crochet Baby Patterns
Baby Blanket Patterns and Ideas
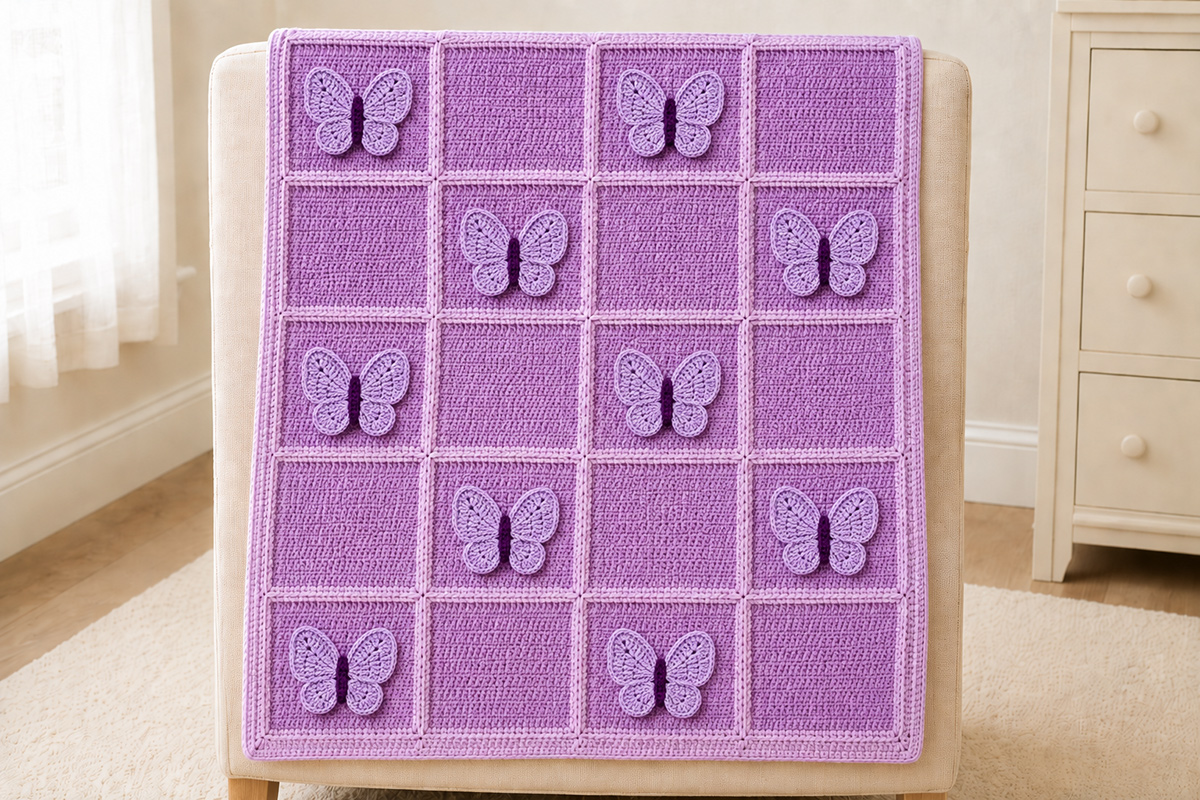
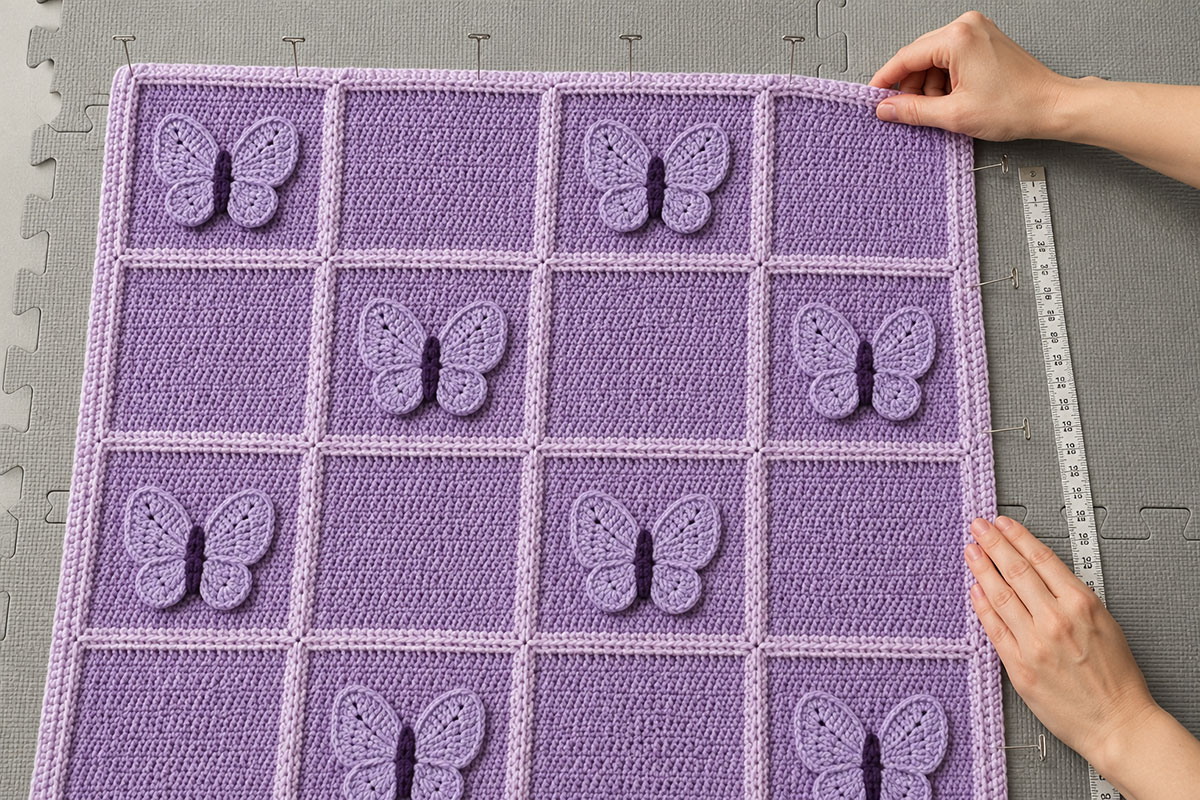
The example image shows the intended finished shape and layout. The pattern and stitch counts have been mathematically reviewed, but the complete blanket has not yet been physically sample-tested. Finished measurements and stitch appearance can vary with yarn, hook size and individual crochet tension.
Yarn for This Project
Butterfly Crochet Blanket Pattern Overview
This butterfly baby blanket is built from 20 solid crochet squares arranged in a 4-by-5 grid. Ten squares receive a 3D butterfly appliqué and ten remain plain. The butterfly and plain squares alternate across the blanket in a simple checkerboard arrangement.
I prefer to let the butterflies do the decorative work and keep the square itself quiet. Each square has a subtle framed edge that gives the finished blanket structure and helps the appliqués look intentional rather than simply added on top.
- Construction: 20 individually crocheted squares joined into one blanket
- Layout: 4 squares across by 5 squares long
- Butterflies: 10 securely attached 3D crochet butterfly appliqués
- Plain squares: 10 framed crochet squares
- Approximate finished size: 35 × 43 inches after joining and border
- Skill level: Advanced beginner
- Main techniques: Half double crochet, single crochet, double crochet, increases, joining squares, appliqué assembly and border rounds
The butterfly wings are shaped separately from the blanket square so they have visible depth and a clear four-wing silhouette. The center body is stitched firmly over the wing join. The appliqué is then attached securely to the square at several points so the motif keeps its shape during normal handling and washing.
Alternating the butterfly and plain squares gives the finished blanket a more deliberate rhythm. Each new row shifts the sequence by one square, so every butterfly is bordered horizontally and vertically by plain crochet rather than sitting beside another appliqué.
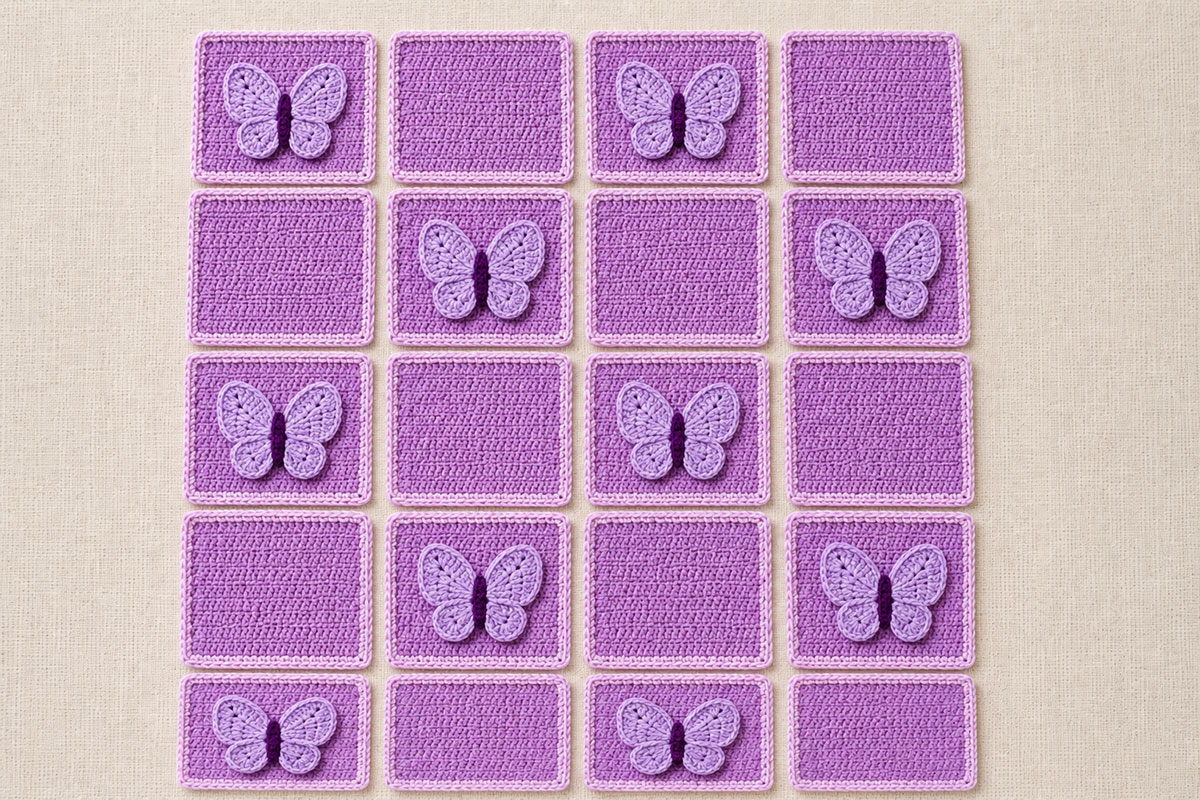
Because this is a square-by-square project, you can check the size and shape as you go instead of discovering a measurement problem after the entire blanket is finished. The pattern below gives a target measurement for each blocked square before joining.
Finished Size and Gauge
The finished blanket measures approximately 35 inches wide by 43 inches long after the squares are joined, the outer border is added and the blanket is lightly blocked.
Each completed square should measure approximately 8 × 8 inches before joining. Check several squares as you work. Small differences can multiply across a four-by-five layout, so it is worth correcting the size early.
- Finished blanket: approximately 35 × 43 inches
- Completed square: approximately 8 × 8 inches
- Square layout: 4 across × 5 down
- Main fabric gauge: approximately 13 half double crochet stitches × 10 rows = 4 inches
- Gauge swatch: work at least a 5-inch square, then measure the center 4 inches
Gauge does not need to be exact to the fraction of a stitch, but all 20 squares need to finish at nearly the same size. If your squares are consistently larger than 8 inches, try a smaller hook. If they are smaller, move up one hook size.
Do not stretch a noticeably undersized square into shape during blocking. A square that needs heavy stretching can pull against the neighboring squares after the blanket is joined.
The dimensional butterflies are sized to fit comfortably inside an 8-inch square with open space around the wings. The finished butterfly should measure about 5 to 5 1/2 inches across at its widest point and approximately 4 inches from the top wings to the lower wings.
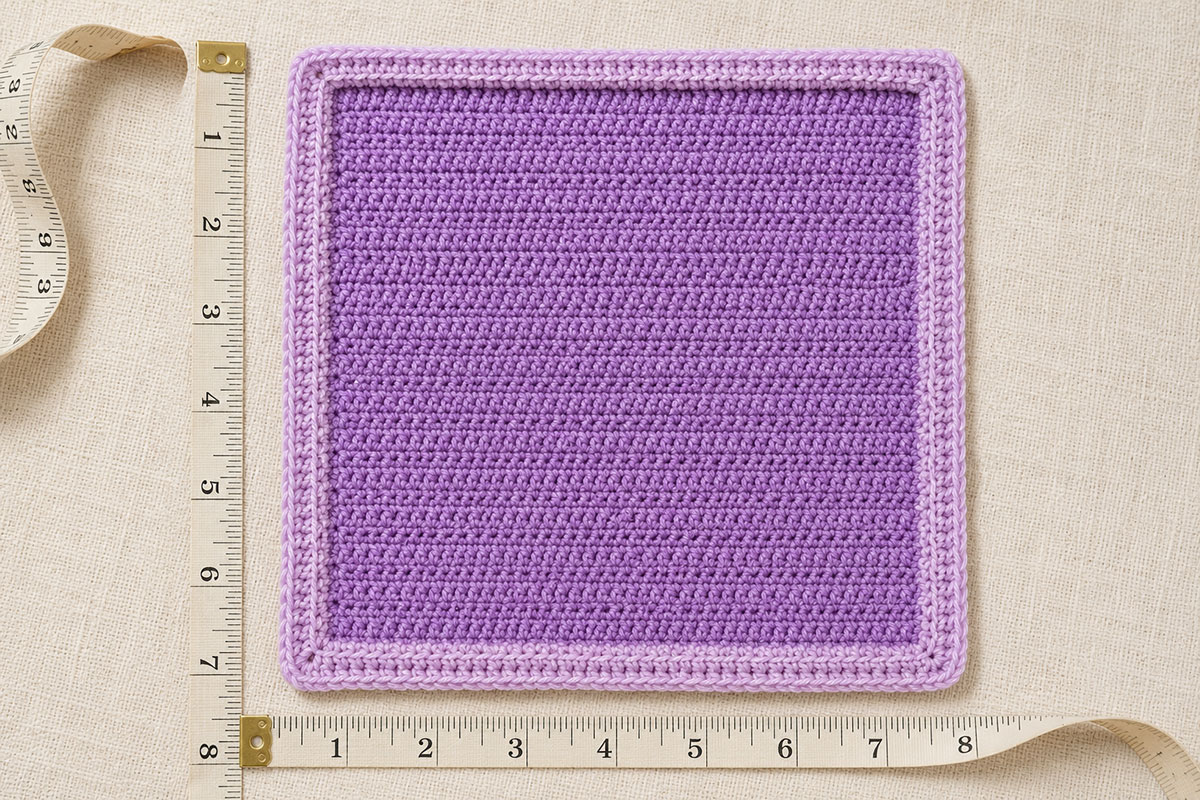
If you want a different finished blanket size later, use the handmade baby blanket size guide before changing the number of squares. Keeping the individual squares at 8 inches makes it much easier to enlarge the blanket without changing the butterfly pattern.
Yarn, Hook and Materials
Use a smooth, washable worsted-weight yarn for this blanket. The butterfly shaping is easier to see when the yarn has good stitch definition, so I would skip fuzzy, chenille and heavily textured yarns for this particular design.
The example blanket uses dusty lavender for all 20 square centers, light lavender for the frames, border and butterfly wings, and deep plum for the narrow butterfly bodies. Keeping the wings in one color gives the checkerboard a quieter look and lets the raised crochet texture provide the detail. The Color and Layout Variations section later in the pattern shows how to substitute plum, mauve, orchid and berry wings if you want more color.
Yarn
- Yarn weight: #4 worsted weight
- Fiber: washable acrylic, cotton/acrylic blend or another soft baby-blanket yarn with clear stitch definition
- Color A, dusty lavender: approximately 1,150 yards for the main square fabric
- Color B, light lavender: approximately 700 yards for the framed edges, joining, outer border and all 10 butterfly wing sets
- Color C, deep plum: approximately 40 yards for the 10 butterfly bodies and finishing
The estimated total is about 1,890 yards. Yarn usage can change with fiber, tension and joining method, so buy a little extra of Colors A and B when practical. If you substitute yarn, compare yardage rather than relying only on the number of skeins.
Hook and Notions
- 5.0 mm (H-8) crochet hook, or the hook size needed to match gauge
- Tapestry needle with a blunt tip
- Sharp scissors
- Locking stitch markers
- Flexible measuring tape
- Blocking mats or another clean, flat blocking surface
- Rust-resistant blocking pins
You do not need beads, buttons, wire or separate decorations for the butterflies. Their shape comes entirely from crochet stitches and careful placement of the wings. Keeping the appliqués yarn-only also makes the finished blanket easier to wash and eliminates unnecessary hard embellishments.
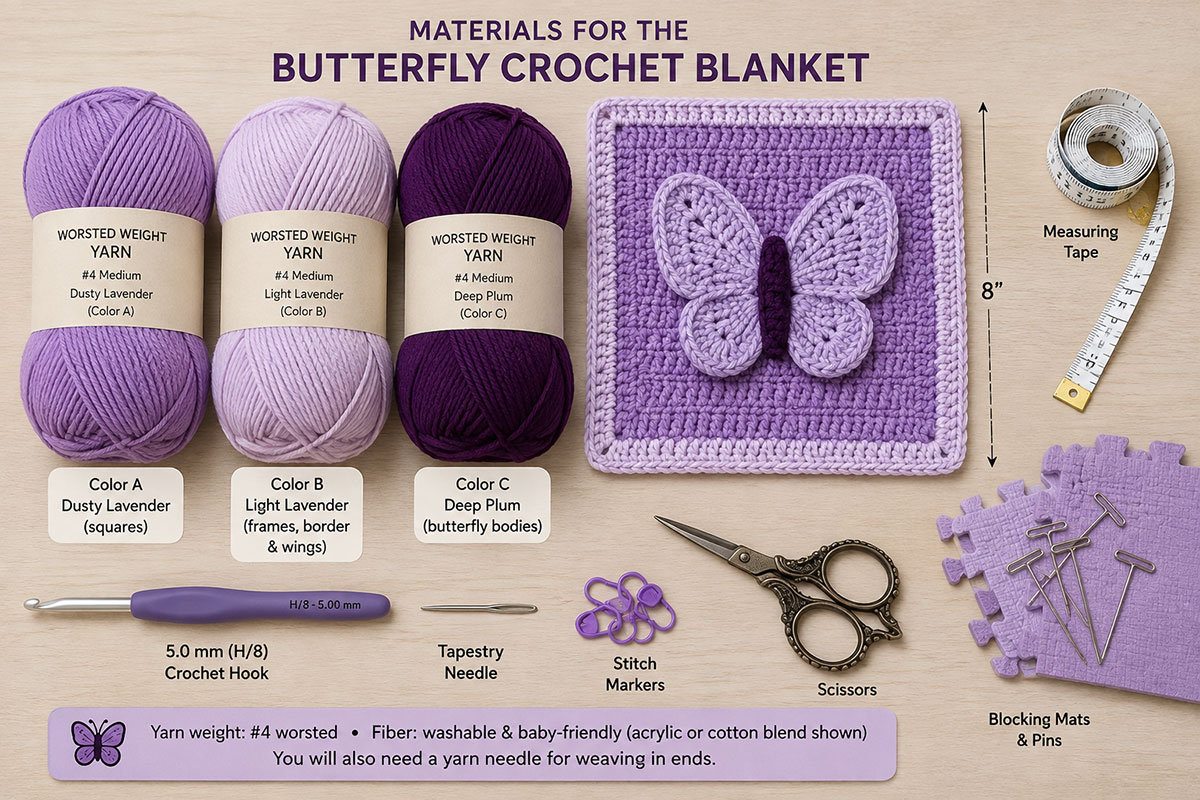
Before cutting any yarn for the butterflies, crochet and measure one complete blanket square. That square becomes your reference for the remaining 19 and confirms that the appliqués will have enough open space around their wings.
Crochet the Solid Framed Blanket Squares
Make 20 squares in the same size and construction. The center is worked back and forth in half double crochet, then two rounds of single crochet create the frame. The second frame round is worked through the back loop only, leaving a quiet ridge around the square.
The turning chain does not count as a stitch anywhere in this pattern. Stitch counts are given at the end of rows and rounds so you can catch a missed stitch before it changes the size of the square.
Abbreviations
This pattern uses US crochet terminology.
- ch = chain
- sc = single crochet
- hdc = half double crochet
- dc = double crochet
- tr = treble crochet
- sl st = slip stitch
- BLO = back loop only
- st/sts = stitch/stitches
Square Center
With Color A, dusty lavender, ch 24.
Row 1: Hdc in the second ch from the hook and in each ch across. Turn. (23 hdc)
Rows 2–18: Ch 1, hdc in each st across. Turn. (23 hdc)
After Row 18, the center should measure approximately 7 to 7 1/4 inches square. Do not fasten off because of a small difference within this range. The two frame rounds bring the square to its final measurement.
Fasten off Color A and weave in the end.
Add the Framed Edge
Place the square with Row 18 at the top and the side you want as the right side facing you. Join Color B, light lavender in the first hdc of Row 18 at the upper-right corner.
Frame Round 1: Ch 1. Work 3 sc in the same corner st. Sc in each of the next 21 hdc across Row 18. Work 3 sc in the final hdc at the upper-left corner.
Work down the first side across the 17 exposed row ends as follows: *sc in each of the next 3 row ends, 2 sc in the next row end; repeat from * 3 more times, then sc in the final row end. (21 side sc between corners)
Work 3 sc in the foundation-chain loop at the bottom-left corner. Sc in each of the 21 foundation-chain loops between the bottom corners. Work 3 sc in the bottom-right corner.
Work up the final side across the 17 exposed row ends as follows: *sc in each of the next 3 row ends, 2 sc in the next row end; repeat from * 3 more times, then sc in the final row end. Join with a sl st to the first sc. (96 sc)
Frame Round 2: Ch 1. Working in the BLO, sc in each st around. At each corner, work 3 sc in the center sc of the 3-sc corner from the previous round instead of the single sc normally worked in that stitch. Join with a sl st to the first sc. (104 sc)
Fasten off and weave in the ends securely. Lay the square flat without stretching it. The completed framed square should measure approximately 8 × 8 inches after light blocking.
Make the Remaining Squares
Repeat the instructions until you have 20 matching squares. Count the stitches and measure the first few rather than assuming they will all come out the same. A small tension change can be easy to miss in your hands but very easy to see when several squares are placed side by side.
Before moving on, arrange all 20 squares on a flat surface in a 4-across by 5-down grid. Replace or rework any square that is noticeably larger, smaller or more rectangular than the others.
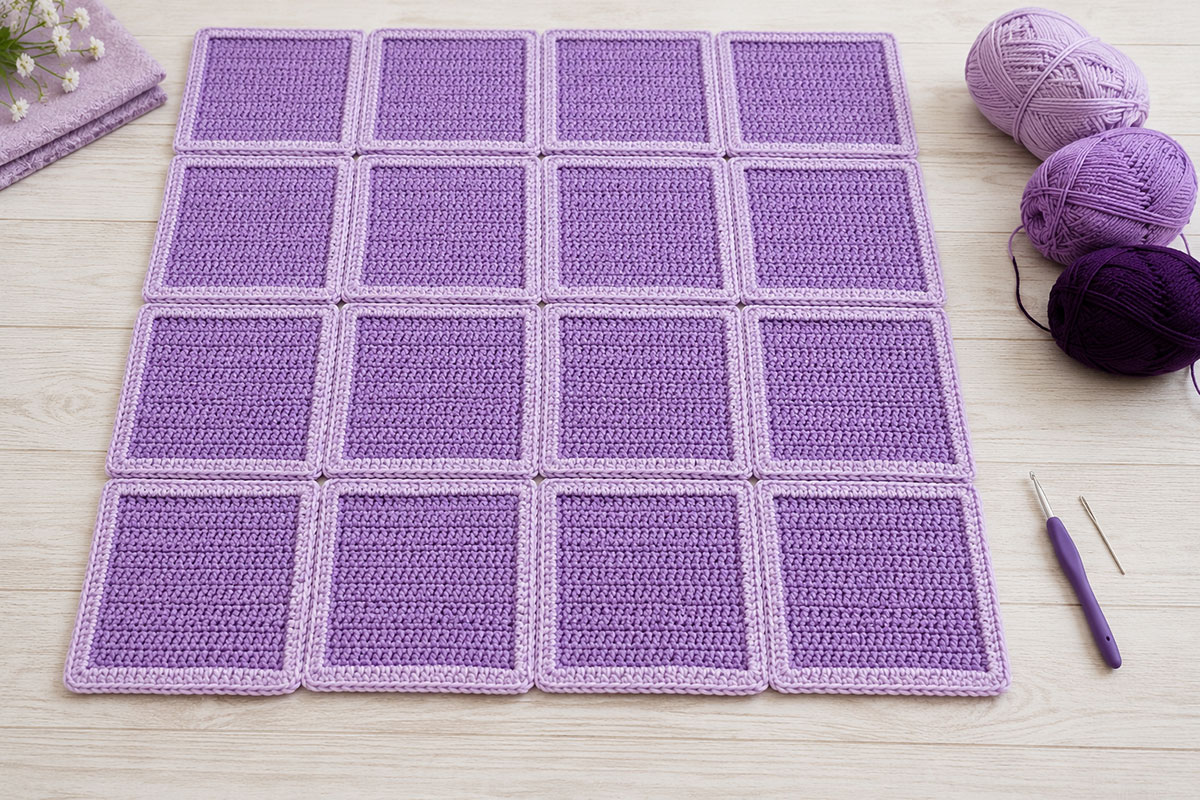
Lightly block the squares to the same 8-inch measurement before adding the butterflies. Let them dry completely. Do not sew on the appliqués yet. Keep the squares in the 4-by-5 arrangement so you can check the every-other-square placement and butterfly direction before attaching the motifs.
Crochet the 3D Butterfly Appliqués
Make 10 butterflies for the blanket. Each butterfly has two broad rounded upper wings, two smaller rounded lower wings and one narrow center body. The five pieces are crocheted separately and joined only at the center, which gives the finished appliqué the raised four-wing shape shown in the example images.
Use Color B, light lavender, for all 40 wings and Color C, deep plum, for all 10 bodies.
An assembled butterfly should measure approximately 5 to 5 1/2 inches across and about 4 inches from the top of the upper wings to the bottom of the lower wings. The upper pair should look visibly larger and broader than the lower pair.
Large Rounded Upper Wing
Make 2 upper wings for each butterfly, or 20 upper wings total.
With Color B, light lavender, ch 4.
Round 1: Sc in the second ch from the hook, hdc in the next ch, work 5 dc in the last ch. Turn the foundation chain so you can work along the unused loops on the opposite side. Hdc in the next ch, sc in the final ch. Join with a sl st to the first sc. (9 sts)
Round 2: Ch 1. Sc in the first sc, hdc in the next st, 2 dc in the next st, 2 tr in the next st, 3 tr in the next st, 2 tr in the next st, 2 dc in the next st, hdc in the next st and sc in the final st. Join with a sl st to the first sc. (15 sts)
Round 3: Ch 1. Sc in each st around. Join with a sl st to the first sc. (15 sc)
Fasten off, leaving an 8-inch tail for assembly.
The narrow end where the first and last sc meet is the inner edge that sits beneath the body. The opposite end, shaped by the taller stitches in Round 2, should spread into a broad rounded fan rather than a long pointed leaf.
Small Rounded Lower Wing
Make 2 lower wings for each butterfly, or 20 lower wings total.
With Color B, light lavender, ch 3.
Round 1: Sc in the second ch from the hook, work 5 hdc in the last ch, then work along the unused loop on the opposite side of the foundation chain and sc in the remaining ch. Join with a sl st to the first sc. (7 sts)
Round 2: Ch 1. Sc in the first sc, 2 hdc in the next st, 2 dc in the next st, 3 dc in the next st, 2 dc in the next st, 2 hdc in the next st and sc in the final sc. Join with a sl st to the first sc. (13 sts)
Round 3: Ch 1. Sc in each st around. Join with a sl st to the first sc. (13 sc)
Fasten off, leaving an 8-inch tail.
The lower wing should be shorter and rounder than the upper wing. Do not stretch it into an oval during blocking.
Crochet the Butterfly Body
Make 10 bodies.
With Color C, deep plum, ch 11.
Round 1: Sc in the second ch from the hook and in each of the next 8 ch. Work 3 sc in the last ch.
Continue along the unused loops on the opposite side of the foundation chain. Sc in each of the next 8 ch. Work 2 sc in the remaining side of the first ch used at the beginning of the round. Join with a sl st to the first sc. (22 sc)
Fasten off, leaving a tail at least 18 inches long for assembly.
The finished body should be slim, flat and approximately 3 to 3 1/4 inches long. There is no stuffing inside it.
Assemble Each Butterfly
Lay all five pieces on a flat surface before sewing. Place the two broad upper wings at the upper left and upper right. Position the two smaller rounded wings directly below them.
Angle the upper wings slightly upward and outward. Angle the lower wings slightly downward and outward. The narrow ends of all four wings should meet in a tight center so the finished shape has a visible waist.
Overlap only the narrow inner edges of the upper and lower wings by about 1/4 inch. Keep the rounded outer portions separate.
Use the wing tails to stitch the four inner ends together. Keep these assembly stitches close to the center because the body will cover them.
Lay the deep-plum body vertically over the joined wing ends. Center it so a small portion extends above the wing junction and a small portion extends below it.
Use the long body tail to sew down both long sides of the body through the inner edges of all four wings. The body should hold the center firmly without flattening the rounded portions of the wings.
Do not add antennae. The broad upper wings, smaller lower wings and narrow contrasting body are enough to make the butterfly recognizable without adding loose cords.
Make one complete butterfly and place it on an 8-inch framed square before crocheting the remaining nine. The finished appliqué should fit comfortably inside the frame with visible dusty-lavender fabric around all four wings. Once that first butterfly matches the intended proportions, use it as the reference for the remaining pieces.
Butterfly Placement and Blanket Layout
Arrange the 20 blocked squares in 5 horizontal rows with 4 squares in each row. Do this on a floor, bed or large table where you can see the full blanket at once.
The butterfly squares alternate with plain squares in a checkerboard arrangement. Ten squares receive a butterfly appliqué and ten remain plain. Shifting the pattern by one square on each new row gives the blanket an even visual rhythm while preserving plenty of open crochet around the raised wings.
Place the Ten Butterflies
Number the rows from top to bottom and the squares from left to right. Use the following arrangement as the pattern layout:
| Row | Square 1 | Square 2 | Square 3 | Square 4 |
|---|---|---|---|---|
| 1 | Butterfly | Plain | Butterfly | Plain |
| 2 | Plain | Butterfly | Plain | Butterfly |
| 3 | Butterfly | Plain | Butterfly | Plain |
| 4 | Plain | Butterfly | Plain | Butterfly |
| 5 | Butterfly | Plain | Butterfly | Plain |
All ten butterfly squares use the same light-lavender wings and deep-plum bodies shown in the main example. The alternating placement provides the pattern, so the blanket does not need a different butterfly color in every position.
Position Each Butterfly on Its Square
Center each butterfly on an 8-inch square with the body running generally from top to bottom. Leave roughly the same amount of open crochet fabric around the widest part of the wings.
Keep most of the butterflies vertical. If you want a little movement, turn only two or three by about 5 to 10 degrees. The alternating square placement already gives the blanket a clear pattern, so the butterflies do not need large changes in angle.
Use locking stitch markers to hold each butterfly in place before sewing. Check that no wing extends onto the framed edge of the square.
Sew the Butterfly Appliqués Securely to the Squares
Thread a tapestry needle with Color C, deep plum.
1. Sew down the full length of the butterfly body, passing through the appliqué and the crochet square beneath it. Keep the stitches small and place them between the crochet stitches when practical. Secure and weave in the deep-plum yarn on the wrong side.
Thread the needle with Color B, light lavender before securing the wings so the attachment stitches blend into the appliqué.
2. Secure the narrow inner portion of each of the four wings to the square. Stitch approximately 3/4 to 1 inch outward from the body along each wing.
3. Add one small anchoring stitch near the middle of each wing. Do not pull the stitch tightly enough to flatten the wing.
4. Leave the rounded outer portion of each wing slightly raised. The wing should have visible dimension, but it should not form a large loose flap that can easily fold back on itself.
5. Turn the square over. Weave the yarn through several stitches on the wrong side, change direction once, weave through several more stitches and trim the end.
Repeat for all ten butterflies. Run your fingers around every appliqué when you finish. The bodies and inner wings should feel firmly attached, with only the outer portion of the wings lifting slightly from the blanket surface.
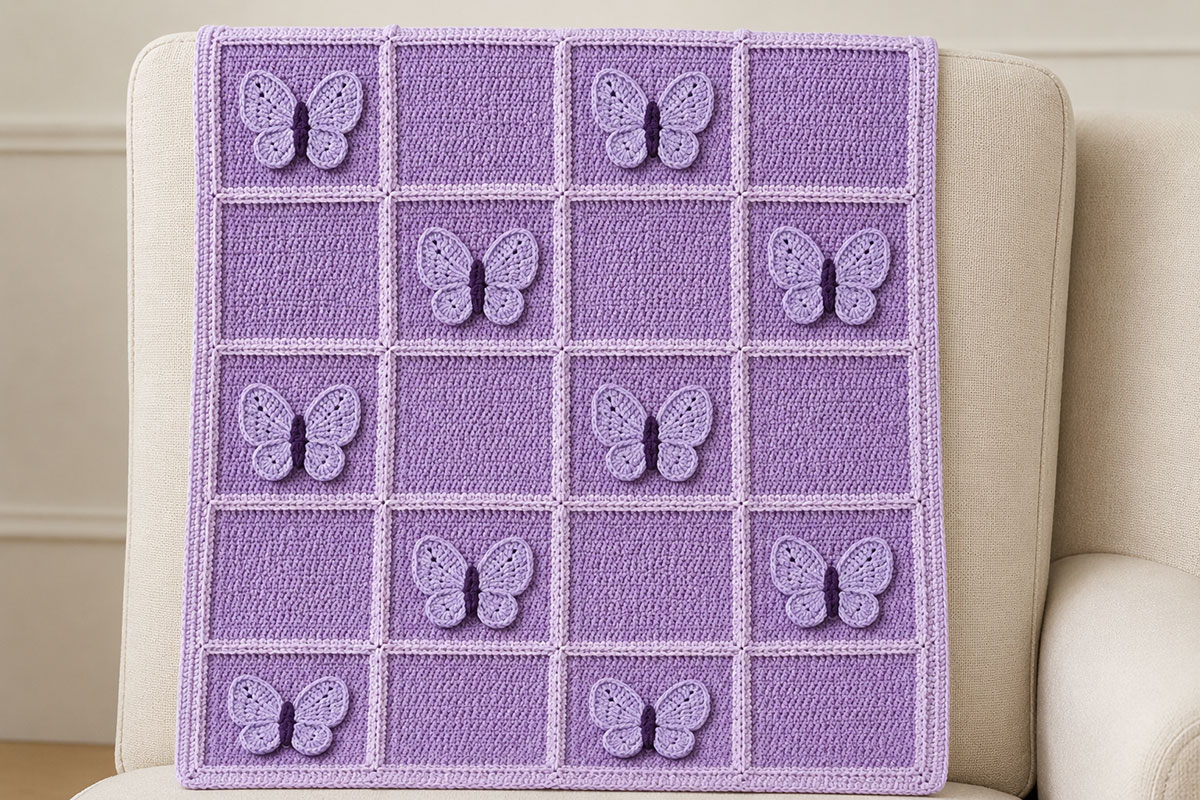
Once all ten appliqués are attached, return the squares to the checkerboard layout above and keep the rows together. A quick photo of the arrangement can also be useful before you begin joining, especially if you need to move the project between work sessions.
Join the Crochet Squares
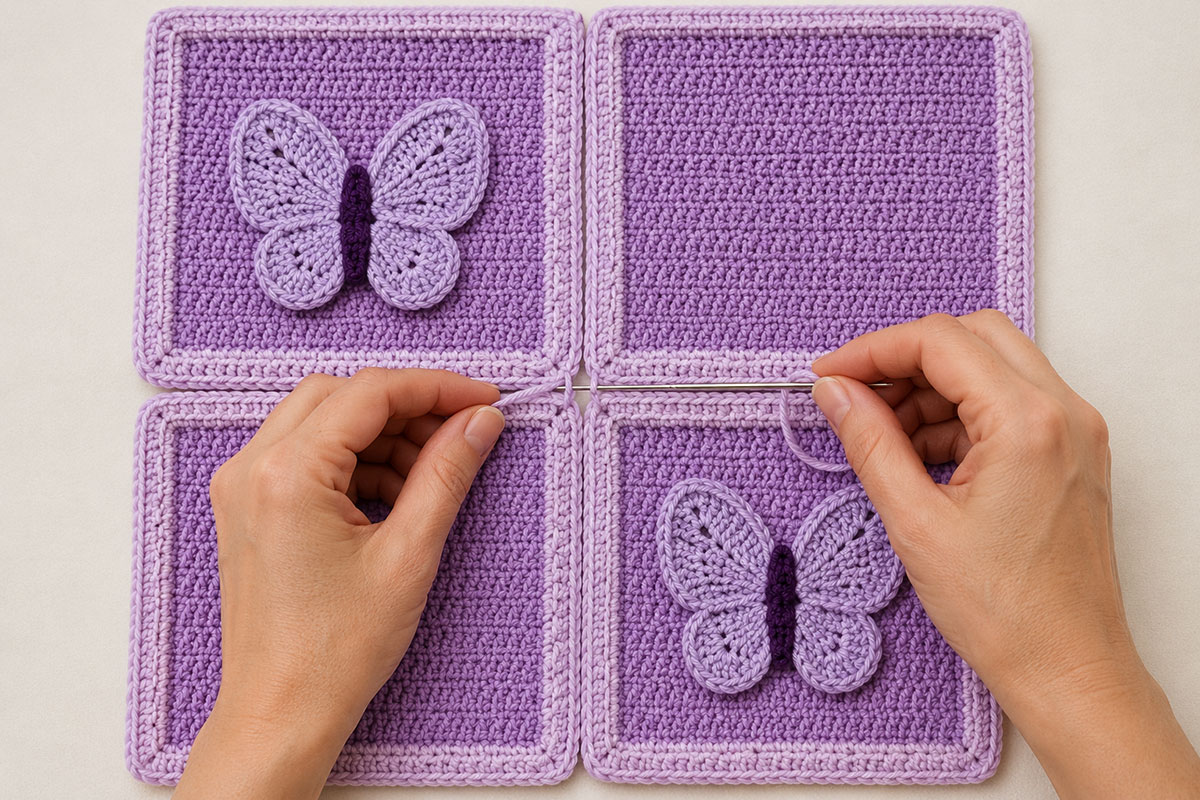
Once the ten butterflies are attached, join the 20 squares in the same 4-by-5 checkerboard arrangement shown above. I use a sewn mattress-style join here because it keeps the front of the blanket flat and lets the framed edges remain visible without adding another heavy ridge between the squares.
Use Color B, light lavender for all joins. Keep the squares right side up while you work.
Join the Squares into Five Rows
Start with the four squares in Row 1. Place Square 1 and Square 2 side by side with their framed edges touching.
Cut a length of Color B about three times the length of one square edge and thread it onto a tapestry needle.
1. Insert the needle through the edge stitch at the bottom corner of Square 1, then through the matching edge stitch of Square 2.
2. Bring the needle through the next edge stitch of Square 1 and then through the matching stitch of Square 2.
3. Continue from bottom to top, matching one stitch on Square 1 with one stitch on Square 2.
4. Pull the yarn snug enough to close the space between the squares, but do not pull so tightly that the edges pucker.
5. Secure the yarn at the upper corner and weave in the end on the wrong side.
Join Square 3 to Square 2 in the same way, then join Square 4 to Square 3.
Repeat until all five horizontal rows contain four joined squares.
Join the Five Rows Together
Lay Row 1 above Row 2 with the right sides facing up. Match the three vertical square seams before you begin sewing. The vertical joins in one row should line up with the vertical joins in the next row.
Starting at one outside corner, mattress stitch the entire long edge of Row 1 to Row 2. Work through one matching edge stitch on each row at a time.
When you reach an intersection between four squares, pass the needle securely through the corner stitches on both rows. Do not skip across the intersection. A loose join at this point can leave a visible hole in the center of the four squares.
Continue across the remaining squares to the opposite edge.
Join Row 3 to Row 2, Row 4 to Row 3 and Row 5 to Row 4 in the same way.
Check the Joined Blanket Before Adding the Border
Spread the joined blanket on a flat surface with the right side facing up. The center should measure approximately 32 inches wide by 40 inches long before the outer border is added.
Check every intersection where four squares meet. The corners should sit together without a large opening, and the joining yarn should not pull the surrounding squares inward.
Also check the outer perimeter. If one square edge is noticeably looser than the others, correct the join before starting the border. The border can smooth a small difference, but it should not be used to hide a puckered or stretched seam.
Turn the blanket over once more before moving on. Weave in every joining end now. It is much easier to find and secure them before the outer border covers the perimeter stitches.
Crochet the Outer Blanket Border
The border finishes the grid and gives the blanket enough visual weight to balance the raised butterflies. Keep it simple. A heavily scalloped edge would compete with the appliqués, so this border uses clean rounds of single and half double crochet with one raised ridge near the outside edge.
Use Color B, light lavender throughout the border. Keep the right side of the blanket facing you.
Border Round 1
Join Color B with a sl st in the center sc of any outer 3-sc corner.
Ch 1. Work 3 sc in the same corner stitch. Work 1 sc in every remaining outer-edge stitch around the blanket. Where two squares meet along an outer edge, work one sc in the outer-edge stitch of each square but do not add a stitch into the sewn seam itself. Work 3 sc in the center stitch of each of the remaining three outer corners. Join with a sl st to the first sc. (490 sc)
Lay the blanket flat before continuing. If the count is correct but the edge does not lie flat, check for an accidentally skipped or doubled edge stitch and check your border tension before changing the stitch count.
Border Round 2
Ch 1. Hdc in each stitch around. Work 3 hdc in the center stitch of each corner instead of 1 hdc in that stitch. Join with a sl st to the first hdc. (498 hdc)
Border Round 3
Ch 1. Working in the BLO, sc in each stitch around. Work 3 sc in the center stitch of each corner instead of 1 sc in that stitch. Join with a sl st to the first sc. (506 sc)
This back-loop round creates a narrow raised line that echoes the framed edge around each individual square.
Border Round 4
Ch 1. Hdc in each stitch around. Work 3 hdc in the center stitch of each corner instead of 1 hdc in that stitch. Join with a sl st to the first hdc. (514 hdc)
Border Round 5
Ch 1. Sc in each stitch around. Work 3 sc in the center stitch of each corner instead of 1 sc in that stitch. Join with a sl st to the first sc. (522 sc)
Fasten off and weave the yarn securely into the wrong side of the border.
The finished border should measure approximately 1 1/2 inches deep. The completed blanket should be close to 35 × 43 inches, although a small difference is normal when yarn and individual tension vary.
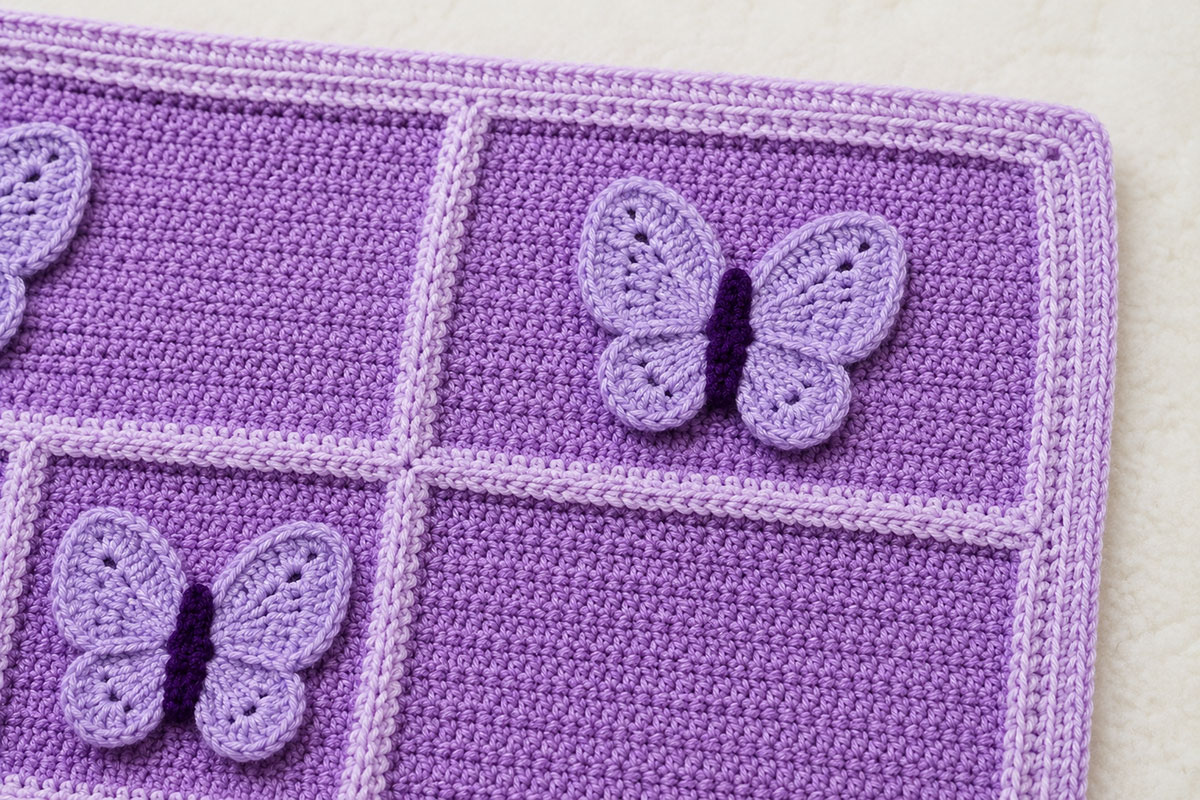
Take a moment to look at all four corners before you block the blanket. Each corner should lie flat without curling upward or spreading into a fan shape. It is much easier to redo one border round now than to try to force an uneven edge into shape during blocking.
Assembly and Finishing
With the border complete, the blanket is fully assembled. The final steps are about checking every join, securing every yarn end and shaping the blanket without flattening the raised butterfly wings.
Weave In and Check Every Yarn End
Turn the blanket to the wrong side and inspect it square by square.
Use a tapestry needle to weave each remaining yarn tail through several stitches. Change direction and weave through several more stitches before trimming the yarn. Do not rely on a knot alone to hold an appliqué, seam or border end.
Pay extra attention to three areas:
- The center and inner edges of every butterfly appliqué
- The intersections where four blanket squares meet
- The beginning and end of each border round
Gently tug each butterfly body and each attached portion of the wings. Nothing should shift away from the square underneath it.
Lightly Block the Finished Blanket
Check the care instructions for your yarn before choosing a blocking method.
Lay the blanket right side up on clean blocking mats or another flat surface. Shape it to approximately 35 × 43 inches without stretching the square joins.
Smooth each framed square so the grid lines remain straight. Pin the outside edge only where needed to keep the blanket square and the corners even.
Do not pin the butterfly wings flat. Arrange each wing with your fingers so the inner portion remains attached to the square and the rounded outer portion keeps its slight lift.
If your yarn can be wet blocked, dampen the blanket according to the yarn manufacturer's care directions and allow it to dry completely while lying flat. If the yarn calls for another care method, follow the label instead.
Final Measurement Check
After the blanket is completely dry, remove the pins and let the fabric rest for a short time before measuring it again.
- Target width: approximately 35 inches
- Target length: approximately 43 inches
- Target individual square: approximately 8 inches before joining
- Target butterfly width: approximately 5 to 5 1/2 inches
- Target butterfly height: approximately 4 inches
A small difference in the finished blanket measurement is not a problem. What matters more is that the blanket lies flat, the square grid remains even and the border does not pull or flare.
Before You Call the Blanket Finished
Run both hands over the front and back of the blanket. Check for loose yarn ends, open seams, missed border stitches and any appliqué edge that feels less secure than the others.
Then hold each butterfly square by the edges and give it a gentle shake. The appliqué should move with the square rather than independently from it.
I would rather add two small securing stitches to a wing now than leave an edge that seems questionable simply because the blanket looks finished. Those extra stitches can be nearly invisible when they are worked between the crochet stitches.
Care and Baby Safety
A handmade blanket can be part of everyday family life, but the raised butterfly appliqués deserve the same careful check you would give any crocheted item made for a baby. Before the blanket is used, inspect every butterfly, seam and yarn end again.
Check the Butterfly Appliqués Regularly
The butterfly bodies and inner wing sections should remain firmly attached to the blanket squares. The rounded wing edges are intentionally raised, but they should not become long, loose flaps.
Check the blanket after washing and from time to time during use. Stop using it until repaired if you find a loose appliqué, broken strand, open seam or yarn end that a small hand could pull.
Do not add buttons, beads, bells, wire antennae, ribbons or other small decorations to this pattern. They are not needed to make the butterfly recognizable, and the yarn-only design is much easier to inspect.
Keep Baby Blankets Out of an Infant Sleep Space
This crochet blanket is not intended as infant sleep bedding. The U.S. Consumer Product Safety Commission advises keeping blankets and other soft items out of a baby's crib, bassinet or play yard during sleep. A fitted sheet should be the only bedding in the infant sleep space.
You can read the current CPSC safe sleep guidance for more information.
Use the butterfly blanket for appropriate awake-time uses, such as a supervised cuddle blanket or a decorative handmade keepsake. If a baby falls asleep, move the blanket out of the sleep space.
Washing the Finished Blanket
Follow the care directions on the yarn label because fiber content determines the safest washing and drying method.
For a machine-washable yarn, place the blanket in a large mesh laundry bag if practical and use a gentle cycle. Avoid washing it with garments that have open hooks, zippers or other hardware that can catch the raised wings.
Reshape the butterflies while the blanket is damp. Smooth the square grid and arrange the wings with your fingers rather than pressing them flat.
Allow the blanket to dry according to the yarn manufacturer's instructions. Once dry, check the appliqués again before returning the blanket to use.
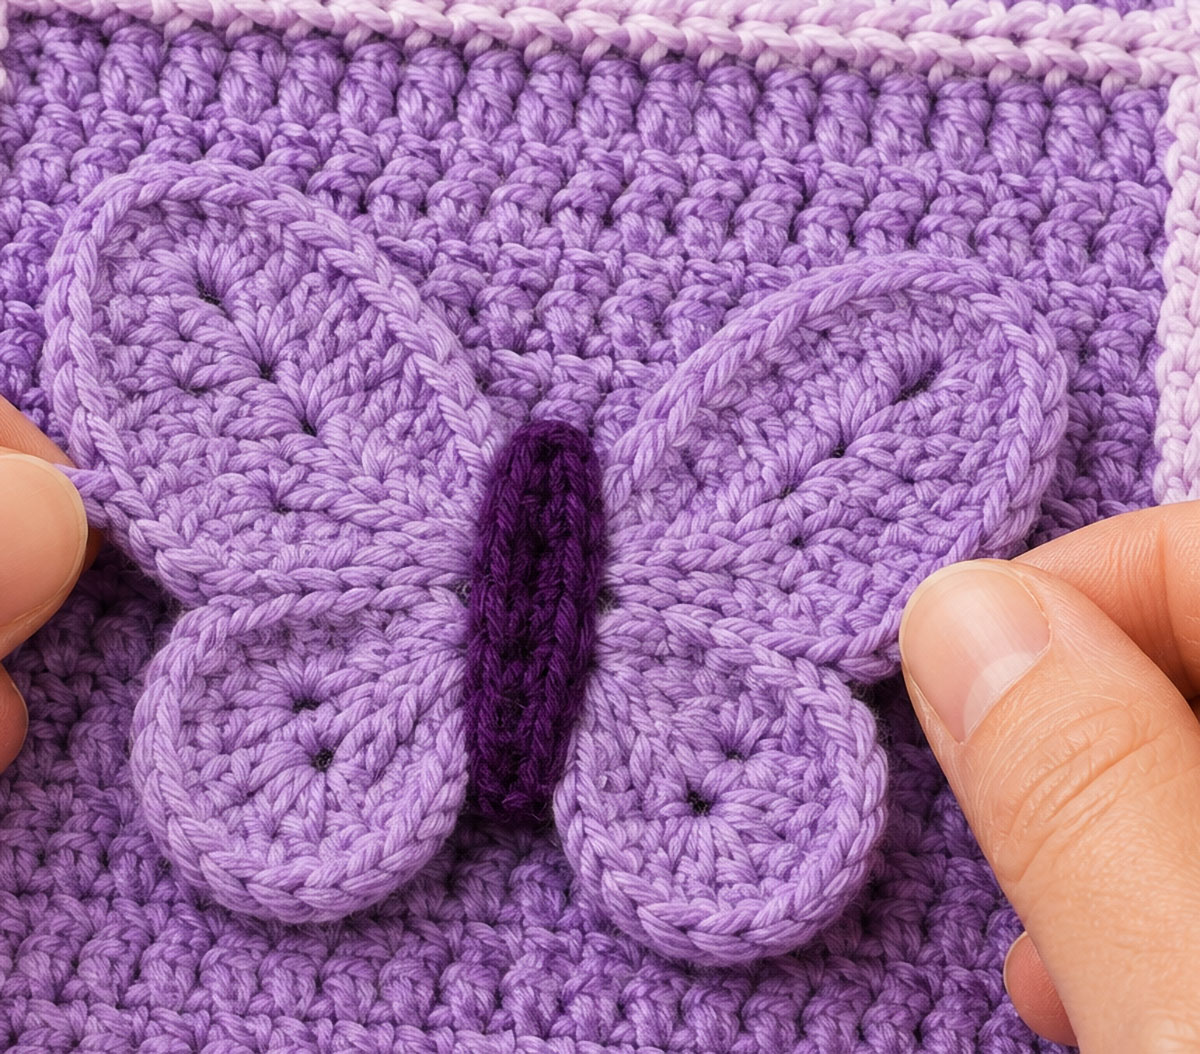
A pretty butterfly is not worth leaving a questionable stitch in place. If one wing starts to loosen, a few discreet yarn stitches through the inner edge can secure it again without flattening the shape that gives the appliqué its dimension.
Butterfly Crochet Blanket FAQ
Is this butterfly crochet blanket pattern suitable for beginners?
The pattern is best for an advanced beginner who is comfortable with single crochet, half double crochet, double crochet, basic increases and sewing crochet pieces together. The blanket squares themselves are straightforward. The butterfly assembly and keeping all 20 squares the same size require a little more attention.
How many butterfly appliqués are on the blanket?
The pattern uses 10 butterfly appliqués across 20 squares. Ten squares remain plain. The butterfly and plain squares alternate in a checkerboard arrangement.
Can I put a butterfly on every square?
You can, but I would not recommend it for this design. The raised wings have much more presence than a flat color motif. Ten alternating butterflies give the blanket texture while the ten plain squares keep the individual appliqués easy to see.
Can I make the butterfly appliqués in different colors?
Yes. The example blanket uses light-lavender wings with deep-plum bodies so the raised butterfly shape, rather than a color change, carries the checkerboard design. For a more colorful version, substitute plum, mauve, orchid, muted berry or another coordinated wing color while keeping the every-other-square placement unchanged.
Can I use the butterfly pattern on another crochet project?
Yes. The same butterfly can be sewn securely to another blanket, a decorative crochet panel or a similar handmade project. Check the finished size first because these butterflies are approximately 5 to 5 1/2 inches wide and were designed specifically to fit an 8-inch square.
Can I make a larger butterfly crochet blanket?
Yes. Keep the individual squares at approximately 8 inches and add complete rows or columns. For example, a 5-by-6 layout uses 30 squares before the border is added. Use the baby blanket size chart to choose a target size before deciding how many squares to crochet.
Do I need to block every square before joining?
Light blocking is helpful because the squares need to meet evenly at the seams. Check the yarn label before blocking and shape each square to approximately 8 × 8 inches without stretching it aggressively.
Why are the butterfly wings only partly sewn down?
The inner portions of the wings are secured to the square while the rounded outer edges remain slightly raised. That gives the appliqué its 3D appearance. The lifted section should remain modest rather than forming a large loose flap.
Can I use a different yarn weight?
You can, but changing the yarn weight also changes the square size, butterfly size and finished blanket dimensions. If you want to keep the measurements given here, use #4 worsted-weight yarn and adjust the hook only as needed to match gauge.
Where can I find more crochet baby blanket patterns?
Browse the baby blanket ideas and patterns for more blanket projects, or visit the free baby crochet patterns collection for loveys, blankets and other handmade baby projects.
Color and Layout Variations
You can change the personality of this butterfly blanket quite a bit without changing a single stitch. Keep the square construction, butterfly size and joining method the same, then change only the color placement.
For a Softer Lavender Blanket
Use one dusty lavender for all 20 square centers, a pale orchid for the framed edges and border, and keep the butterflies within plum, mauve, berry and deeper violet shades. This keeps the blanket coordinated while still giving each butterfly enough contrast to show its wing shape.
For a Lighter Butterfly Blanket
Use a crisp soft white or very pale lavender for the squares, then make the butterflies in deeper colors. A light background shows the individual crochet stitches clearly and gives the raised wings more definition.
For a More Colorful Version
Keep the blanket squares in one color and expand the butterfly palette instead of changing every square. Six or eight butterfly colors can work well when they share a similar depth and saturation. The plain squares keep the additional color from becoming busy.
Keep the Every-Other-Square Layout
The alternating butterfly placement is part of this version of the design. If you change the butterfly colors, keep the butterfly and plain square positions the same so the checkerboard remains intact.
If you enlarge or reduce the blanket, continue the alternating pattern across each new row. Begin one row with a butterfly square, begin the next with a plain square, and continue switching from row to row.
The framed squares give the plain spaces enough structure to hold their own beside the appliqués. That is why an equal balance of butterfly and plain squares works without making the unfinished-looking gaps that can happen with a more random arrangement.
How to Fix Common Problems Before You Finish the Blanket
A square blanket gives you plenty of checkpoints, which is useful because small differences are much easier to correct before the border is added. If something looks uneven, compare the affected area with the measurements in the pattern instead of trying to block every problem away at the end.
The Squares Are Not All the Same Size
Measure the squares without stretching them. A difference of about 1/4 inch can often be corrected with light blocking, but a square that is noticeably larger or smaller should be reworked.
If several squares are too large, check your gauge and hook size before making more. If only one square is different, tension is the more likely cause.
The Square Edges Are Wavy
A wavy framed edge usually means too many stitches were worked along one or more sides. Check the stitch count before blocking. Removing the extra stitches will give a cleaner result than trying to press the ripple flat.
The Joined Grid Is Pulling at the Intersections
Check the places where four squares meet. The joining yarn should hold those corners together without drawing them into a tight point.
If an intersection puckers, loosen or redo that small section of the seam. The four corners should meet neatly while still lying flat.
The Butterfly Looks Too Narrow or Leaf-Shaped
Check Round 2 of the upper wings before changing the assembly. The taller stitches and increases in that round are what spread each upper wing into the broad rounded fan shape shown in the example image.
The two upper wings should be noticeably broader than the lower pair. If all four pieces look almost the same size, check the upper-wing stitch placement and confirm that the 3-tr center increase was worked correctly.
When assembling the butterfly, keep the four narrow wing ends together beneath the body and let the rounded portions spread away from the center. That small waist is what keeps the finished appliqué from reading as a bow.
The Butterfly Wings Are Too Flat
Check where you placed the anchoring stitches. The body and inner section of each wing should be secure, but the rounded outer portion should remain slightly raised.
If you accidentally stitched around the entire perimeter of a wing, carefully remove the unnecessary outer stitches and leave only the attachment points described in the pattern.
The Butterfly Wings Lift Too Far from the Blanket
Add one discreet anchoring stitch farther toward the outer half of the affected wing. Place it between crochet stitches and pull only until the wing sits closer to the square. Do not cinch it completely flat.
The Outer Border Is Rippling
Stop after the round where the ripple first appears. Lay the blanket flat and check the stitch placement around the square joins and corners.
Too many stitches along a side cause the border to flare. Too few make it pull inward. Correct that round before continuing so later rounds do not magnify the problem.
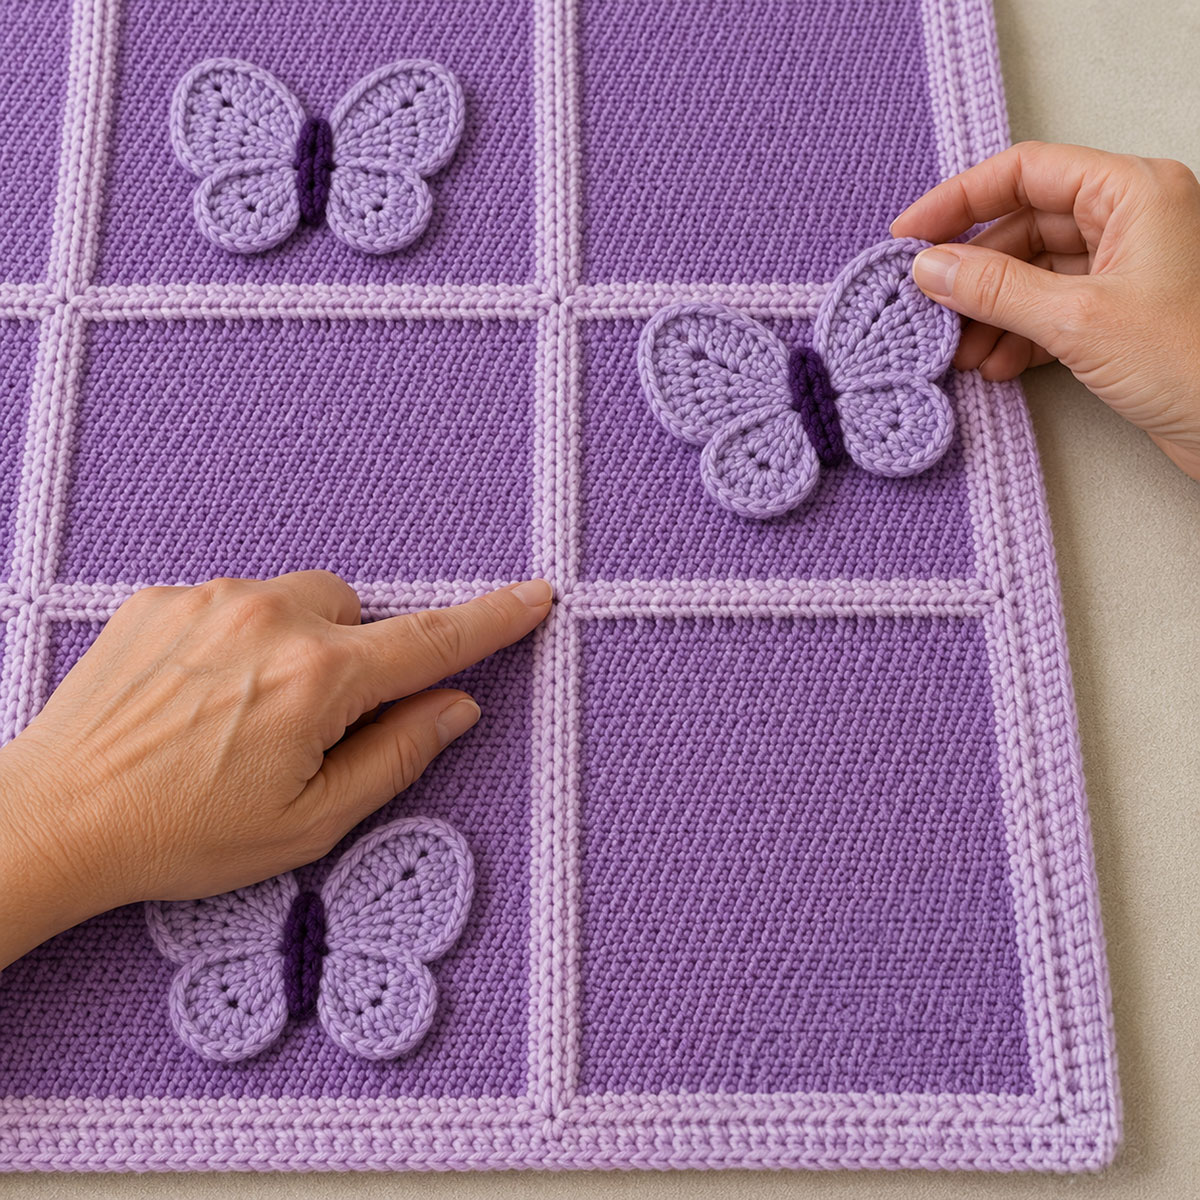
The easiest time to correct this blanket is while the pieces are still separate. Check the squares before joining, check the butterflies before sewing them down, and check the joined grid before starting the border. Those three pauses can save a surprising amount of unpicking later.
How to Make the Butterfly Blanket Larger or Smaller
The easiest way to resize this pattern is to keep the 8-inch squares unchanged and alter only the number of squares in the grid. Continue the every-other-square butterfly arrangement so the resized blanket keeps the same checkerboard look.
Smaller Blanket
For a compact blanket, make 12 squares and arrange them 3 across by 4 down. Alternate butterfly and plain squares for a total of 6 butterfly appliqués and 6 plain squares.
Before the border, the joined center will measure approximately 24 × 32 inches. The finished size will depend on the depth of the border.
Original Baby Blanket
The pattern as written uses 20 squares arranged 4 across by 5 down, with 10 butterfly appliqués and 10 plain squares.
The joined center measures approximately 32 × 40 inches, and the finished blanket is approximately 35 × 43 inches.
Larger Blanket
For a roomier version, make 30 squares and arrange them 5 across by 6 down. Continuing the checkerboard produces 15 butterfly squares and 15 plain squares.
The joined center will measure approximately 40 × 48 inches before the border.
| Layout | Squares | Butterflies | Approximate Center Size |
|---|---|---|---|
| 3 × 4 | 12 | 6 | 24 × 32 inches |
| 4 × 5 | 20 | 10 | 32 × 40 inches |
| 5 × 6 | 30 | 15 | 40 × 48 inches |
When you change the size, start the first row with a butterfly square and alternate butterfly, plain, butterfly, plain across the row. Start the next row with a plain square and reverse the sequence. Continue switching the starting square from row to row.
Yarn requirements will increase with every added square. Buy extra yarn from the same dye lot when possible, especially for the main square color and the lighter yarn used for framing, joining and the border.
Border counts change when you resize the grid. The 490, 498, 506, 514 and 522 stitch counts in the main border instructions apply only to the original 4-by-5 blanket.
For the 3-by-4 version, the five border rounds contain 382 sc, 390 hdc, 398 sc, 406 hdc and 414 sc.
For the 5-by-6 version, the five border rounds contain 598 sc, 606 hdc, 614 sc, 622 hdc and 630 sc.
Work the corner increases exactly as written in the original border instructions. Only the total stitch count changes with the size of the grid.
Pattern Notes for a Neat, Even Finish
A few small habits make this square-built blanket much easier to assemble. They do not change the pattern, but they help the framed edges, butterflies and joins line up the way they should.
Keep the Right Side Easy to Identify
After completing the framed edge, place a locking stitch marker on the right side of each square. The raised ridge from the BLO frame round should be visible on this side.
Keep that marker in place until the butterfly has been attached or the plain square has been joined into the blanket. It prevents an occasional square from being turned over when you assemble the grid.
Make the Full Set of Squares Before Joining
Finish, measure and lightly block the complete set for your chosen layout before sewing any rows together. For the original 4-by-5 blanket, that means all 20 squares. This gives you a chance to compare the entire group instead of judging one square at a time.
Stack squares of the same size together. If one piece stands out when the stack is viewed from the side, measure it again before moving forward.
Keep the Frame Ridge Facing Outward
The BLO round creates the narrow ridge that frames each square. When the blanket is laid right side up, that ridge should appear consistently around every square in the chosen layout.
If one framed edge looks noticeably different, check that the second frame round was worked through the back loop only and that the square is facing the same direction as its neighbors.
Mark the Butterfly Squares Before Sewing
Once the checkerboard for your chosen layout is arranged, place a stitch marker on every square that will receive an appliqué. In the original 4-by-5 blanket, mark 10 butterfly squares. You can also mark the row number with a small removable yarn tie if you plan to put the project away between work sessions.
Keep the remaining squares plain. Every butterfly square should touch plain squares above, below and beside it wherever another square is present.
Check the Butterfly Direction from a Distance
Before sewing an appliqué permanently, pin or mark its position and look at the entire layout rather than only the individual square. A slight tilt can look graceful on one square but distracting once several butterflies are viewed together.
Keep most of the bodies close to vertical and limit the angled butterflies to the small 5-to-10-degree turns given in the layout instructions.
Do Not Carry Yarn Between Separate Pieces
Fasten off each square, wing and butterfly body as directed. Do not carry unused colors across the wrong side of the project. Separate pieces are easier to shape, assemble and repair when each color change has its own securely woven end.
Use the First Finished Square and Butterfly as References
Set aside one correctly sized square and one correctly assembled butterfly. Compare later pieces with those references as you work.
That simple check is especially helpful near the end of a repeated project, when a small change in tension can otherwise creep into the final pieces without being obvious.
Stitch Count Checkpoints for the Original 4-by-5 Blanket
Keep this count list nearby while you crochet the original 4-by-5 version. It gives you a quick way to check each component before you fasten off or move to the next step. The totals below are for the 20-square blanket with 10 butterfly appliqués. If you are making one of the resized versions, use the square, butterfly and border totals given in the resizing section above. If a count is wrong, correct it at that stage rather than carrying the difference into the joining or assembly.
Blanket Square Counts
- Starting chain: 24 ch
- Rows 1 through 18: 23 hdc in every row
- Frame Round 1: 96 sc total
- Frame Round 2: 104 sc total
- Completed squares needed: 20
- Target square measurement: approximately 8 × 8 inches
For Frame Round 1, each corner contains 3 sc. There are 21 sc between the corner groups on every side of the square. Frame Round 1 has 96 sc total, and Frame Round 2 has 104 sc total.
Outer Border Counts
- Border Round 1: 490 sc
- Border Round 2: 498 hdc
- Border Round 3: 506 sc
- Border Round 4: 514 hdc
- Border Round 5: 522 sc
Large Upper Butterfly Wing Counts
- Starting chain: 4 ch
- Round 1: 9 sts
- Round 2: 15 sts
- Round 3: 15 sc
- Upper wings per butterfly: 2
- Upper wings for 10 butterflies: 20
Small Lower Butterfly Wing Counts
- Starting chain: 3 ch
- Round 1: 7 sts
- Round 2: 13 sts
- Round 3: 13 sc
- Lower wings per butterfly: 2
- Lower wings for 10 butterflies: 20
Butterfly Body Counts
- Starting chain: 11 ch
- Completed body round: 22 sc
- Bodies needed: 10
Finished Piece Check
Before assembly, you should have:
- 20 framed crochet squares
- 20 large upper wings
- 20 small lower wings
- 10 butterfly bodies
After assembling the appliqués, you should have 10 complete butterflies and 20 squares. Attach butterflies to 10 squares and leave 10 squares plain.
Blanket Layout Check
- Squares across: 4
- Squares down: 5
- Total squares: 20
- Butterfly squares: 10
- Plain squares: 10
- Approximate joined center: 32 × 40 inches
- Approximate finished blanket: 35 × 43 inches
If all of these counts and measurements agree before you begin the outer border, the blanket should finish with an even grid and the intended proportions.
How to Fold and Store a Blanket with Raised Butterfly Wings
The raised wings give this blanket much of its character, so it is worth folding it in a way that does not press every butterfly flat.
Fold Along the Square Seams
Lay the blanket right side up and use the joined square lines as natural folding points. Avoid making a hard fold directly through the center of a butterfly.
For the 4-by-5 layout, fold the blanket loosely in thirds or quarters rather than compressing it into a very small bundle. If a butterfly lands close to a fold, gently arrange its wings so they lie in their natural direction instead of being bent backward.
Do Not Store Heavy Items on Top
Keep the folded blanket on top of heavier linens rather than beneath them. Long periods under a heavy stack can flatten the raised wings and leave sharp creases in the appliqués.
Reshape the Wings After Washing or Storage
If the butterflies look flat after washing or storage, place the blanket on a flat surface and shape the wings with your fingers. Lift only the rounded outer portions while keeping the securely sewn inner sections against the square.
You should not need starch or another stiffening product. The butterfly shape comes from the crochet construction and the way the wings are attached.
For Giving the Blanket as a Handmade Gift
Fold it so at least one butterfly remains visible on top. A loose fold shows the raised detail much better than tightly rolling the blanket.
Include the yarn care instructions with the gift if you still have the label. That gives the recipient the washing information for the exact fiber used rather than relying on general crochet-care advice.
The dimensional butterflies are meant to keep a gentle lift, not stand rigidly above the blanket. A little reshaping after washing or folding is all they should need.
How to Substitute Yarn Without Losing the Butterfly Proportions
You can use a different worsted-weight yarn for this blanket, but make the square and one complete butterfly before buying or cutting yarn for the whole project. The label may say #4 worsted weight while the actual thickness and finished fabric still differ noticeably from another #4 yarn.
Check the Square First
Work one framed square with the hook you expect to use. After light blocking, it should measure close to 8 × 8 inches.
If the square is too large or too small, adjust the hook size before changing the stitch count. Changing the number of stitches would also change the frame instructions, joining points and finished blanket measurements.
Then Check One Complete Butterfly
Use the same yarn line for the butterfly if possible. Assemble one full appliqué and place it on the finished test square.
The butterfly should measure about 5 to 5 1/2 inches across and approximately 4 inches high. More importantly, all four wings should fit well inside the framed area with visible background around them.
If the butterfly nearly fills the square, try a slightly smaller hook for the appliqué only. If it looks too small, a slightly larger hook for the butterfly can help. Keep the blanket hook unchanged once the square gauge is correct.
Compare Texture as Well as Size
A very soft yarn can still be a poor choice if the stitches collapse into each other and hide the wing shaping. Look for enough definition that you can easily see the rounded upper and lower wings when the butterfly is viewed from several feet away.
Also avoid making the appliqués from a yarn that is much heavier or denser than the square yarn. The butterfly should add texture without pulling the square forward or making it sag when the blanket is held upright.
Buy by Yardage, Not Just by Skein Count
Two worsted-weight yarns can have very different yardage per skein. Use the approximate yardage in the materials list when planning a substitution, then add a little extra for gauge differences, joining and weaving in ends.
For Colors A and B in particular, I would rather have part of a skein left at the end than discover near the final border that the replacement yarn contained fewer yards than expected.
Wash the Test Pieces if the Yarn Is New to You
If you are unsure how the substitute yarn behaves, wash the test square and butterfly according to the yarn label before making the remaining pieces. Check for stretching, shrinking, excessive fuzzing or a butterfly wing that no longer holds its shape.
Once the square still measures correctly and the butterfly keeps its four-wing silhouette after washing, you can continue with much more confidence that the finished blanket will behave the same way.
More Free Crochet Baby Projects
If you like a baby blanket with one clear decorative idea rather than a mix of competing motifs, this butterfly pattern is a useful starting point. The square construction also makes it easy to stop between sections, check your measurements and return to the project without losing your place.
For another blanket with simpler construction, see the simple chunky crochet baby blanket pattern. If you would rather make a smaller gift next, the crochet baby booties pattern is a practical companion project.
You can also browse the crochet animal lovey patterns when you want a handmade project with more character, or return to free baby crochet patterns for the full collection.
The butterflies are the detail worth lingering over here. Keep the square grid neat, give the wings enough lift to show their shape, and let the alternating plain squares provide the space that makes those ten appliqués stand out.
When you click on links to various merchants on this site and make a purchase, this may result in this site earning a commission. This does not affect the price you pay.

UBGI Gold Standard 2026
Reviewed under the site's
editorial checklist.
Photos, decorating ideas, party setups and reader submissions are shared for inspiration unless a page is specifically presented as a pattern, tutorial, reference guide or step-by-step project. Follow the instructions, measurements, safety guidance and manufacturer directions provided for the particular project or product.
About Jan | Contact | Baby Nursery Ideas (Blog) | Site Map | Privacy Policy | Disclosure Policy | Disclaimer | Affiliate Disclosure | Earnings Disclosure | Facebook | Pinterest
I am a participant in the Amazon Services LLC Associates Program, an affiliate advertising program designed to provide a means for us to earn fees by linking to Amazon. As an Amazon Associate I earn from qualifying purchases.
Copyright © 2006-2026. All Rights Reserved.