Free Christmas Goose Quilt Pattern – Miss Sissy's Irish Chain Quilt
By Jan Bay
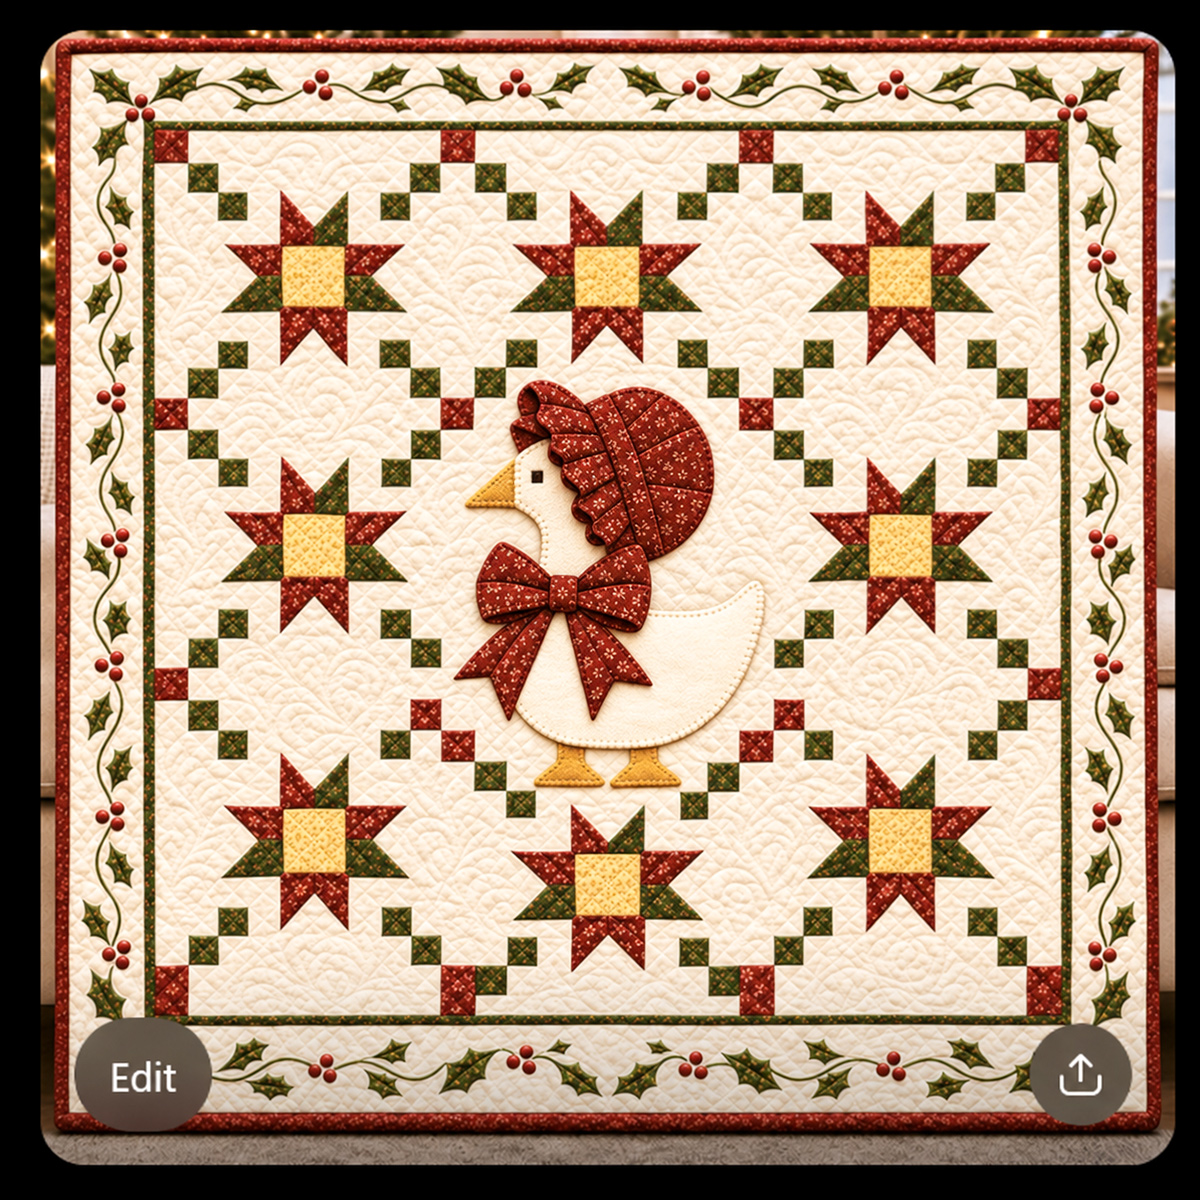
My free Christmas Goose Quilt Pattern features Miss Sissy the Prissy Goose dressed for the holidays in her old-fashioned red bonnet and a small pieced Christmas bow at her neck. Eight traditional patchwork red-and-green stars surround her, with Irish Chain checkerboards connecting the design and a pretty holly border finishing the quilt. Her body is one ivory appliqué shape, while the bonnet and bow are made from patchwork fabric pieces. The finished design is a generous 72-inch square Christmas quilt with downloadable full-size templates and detailed piecing maps.
Explore More Free Christmas and Goose Quilt Patterns
Miss Sissy the Prissy Goose Crib Quilt
Christmas Tree Irish Chain Quilt Pattern
See Supplies for This Project Here.
Jump to the Christmas Goose Quilt Instructions
- Quilt Size and Pattern Overview
- Fabric and Supplies
- Fabric Cutting Chart
- Piece the Eight Christmas Star Blocks
- Make the Irish Chain Patchwork
- Make Miss Sissy's Goose Appliqué
- Piece the Christmas Bonnet and Bow
- Assemble the Quilt Top
- Make the Holly Border
- Quilting, Binding and Finishing
- Download the Free Quilt Pattern and Templates
- Frequently Asked Questions
Christmas Goose Quilt Pattern: Size and Construction Overview
Miss Sissy's Christmas quilt finishes at a calculated 72 × 72 inches. Eight red-and-green pieced stars surround her ivory appliqué silhouette, with traditional Irish Chain checkerboards connecting the design.
The quilt center is made from nine setting units. Unlike a regular nine-block quilt, the units have different widths and heights so the chain and star positions match our original design. The bottom-center star sits 3 1/2 inches lower than the neighboring bottom stars.
Miss Sissy is appliquéd over the completed patchwork field. Her bonnet and bow contain genuine fabric seams, but her ivory body and neck remain one continuous piece.
The goose stays simple.
Version B construction facts:
- Calculated finished quilt: 72 × 72 inches
- Pieced center field: 60 × 60 inches finished
- Eight matching 12-inch Christmas star motifs
- Nine unequal setting units arranged in three rows
- 16 Irish Chain checkerboard groupings
- Four elongated red checkerboard pieces at the lower edge
- One continuous ivory goose appliqué
- Pieced red bonnet with scalloped brim and matching red band
- Smaller 76%-scale pieced red bow
- 3/4-inch finished dark green inner frame
- 4 1/2-inch visible cream holly border
- 3/4-inch visible red binding
Pattern note: The printable pattern features a slightly smaller pieced bow and a red bonnet band in place of the green one pictured.
The full pattern is divided into four coordinated PDFs, including the cutting instructions, numbered piecing maps, full-size templates, and construction reference. The diagrams give the measurements and seam positions used to reproduce the quilt.
The construction and measurements were checked digitally. The finished dimensions are calculated rather than measured from a physically sewn quilt.
Fabric and Supplies for Miss Sissy's Christmas Quilt
I would keep the fabric choices close to the original Christmas collection: warm cream, ivory, small-print cranberry red, evergreen green, and a little golden yellow.
The same red print appears in the star points, Irish Chain squares, bonnet, and bow. Using one print for these details keeps everything coordinated without introducing another competing pattern.
Fabric requirements for Version B:
- 3 1/4 yards cream quilting cotton for the field, checkerboard backgrounds, star corners, and setting fillers
- 1 1/4 yards small-print Christmas red quilting cotton for the star points, chain squares, bonnet, and bow
- 1 yard green print for the checkerboard squares, star points, and holly leaves
- 1/2 yard golden-yellow cotton for the star centers, beak, and feet
- 3/4 yard ivory cotton for Miss Sissy's body and neck
- 3/8 yard dark green cotton for the narrow inner frame
- 1 1/2 yards cream cotton for the holly border
- One 12 × 18-inch piece of red fabric for the holly berries
- 1 3/8 yards red cotton for the binding
- 2 3/8 yards of 108-inch-wide backing fabric, sufficient for one 82-inch square
- One 82 × 82-inch batting piece
These yardages assume at least 40 inches of usable fabric width for standard quilting cotton and nondirectional prints. Additional fabric may be required when matching directional prints or cutting around large motifs.
Other supplies:
- Sewing machine and quilting needle
- Rotary cutter, cutting mat, and quilting rulers
- Fabric scissors and appliqué scissors
- Matching cream, ivory, red, green, and gold thread
- Dark olive embroidery thread or floss for the holly vines
- Black embroidery floss for Miss Sissy's eye
- Lightweight fusible web
- Removable fabric-marking pencil
- Transparent tracing material
- Iron and pressing cloth
- Printed Version B cutting, layout, and appliqué templates
The quilt combines traditional patchwork and raw-edge appliqué. Use a 1/4-inch seam allowance for joined patchwork pieces. Single-piece raw-edge appliqué shapes do not receive an additional seam allowance.
Complete Version B Fabric Cutting Chart
Before cutting, print the Version B pattern and piecing maps. Keep the labeled checkerboard pieces and cream setting fillers organized by unit number.
Irish Chain checkerboard pieces
- 14 small-print red squares measuring 2 1/2 × 2 1/2 inches
- 4 small-print red terminal rectangles measuring 2 1/2 × 4 inches, with the longer edge vertical
- 62 green squares measuring 2 1/2 × 2 1/2 inches
- 108 cream checkerboard squares measuring 2 1/2 × 2 1/2 inches
These 188 pieces form the 16 checkerboard groupings. Use the A1–D4 color maps on pages 3–4 of PDF 3 to identify their positions. Each square has a unique group, row, and column address.
Pieces for all eight Christmas stars
- 8 gold center squares measuring 4 1/2 × 4 1/2 inches
- 40 red rectangles measuring 2 1/2 × 4 1/2 inches
- 24 green rectangles measuring 2 1/2 × 4 1/2 inches
- 64 cream squares measuring 2 1/2 × 2 1/2 inches for the stitch-and-flip corners
Each star uses one gold center, five red rectangles, three green rectangles, and eight cream corner squares. Do not substitute the older half-square triangle cutting chart.
Additional cream setting pieces
The quilt requires 123 cream filler rectangles, in addition to the 108 cream checkerboard squares and 64 cream star-corner squares.
The following is the complete filler cutting schedule. Dimensions are raw cutting measurements, width first and height second, in inches.
| Quantity and size | Quantity and size | Quantity and size |
|---|---|---|
| 3 at 4 1/2 × 1 1/2 | 2 at 15 1/2 × 2 1/2 | 2 at 3 1/2 × 5 1/2 |
| 2 at 17 1/2 × 2 | 2 at 18 1/2 × 2 1/2 | 2 at 3 × 6 1/2 |
| 1 at 18 1/2 × 2 | 4 at 4 1/2 × 3 | 2 at 3 1/2 × 6 1/2 |
| 17 at 4 1/2 × 2 1/2 | 8 at 7 × 3 | 2 at 3 1/2 × 7 1/2 |
| 2 at 7 × 2 1/2 | 3 at 4 1/2 × 3 1/2 | 2 at 2 1/2 × 10 1/2 |
| 4 at 9 1/2 × 2 1/2 | 2 at 4 1/2 × 4 | 4 at 2 1/2 × 12 1/2 |
| 1 at 10 1/2 × 2 1/2 | 4 at 7 × 4 | 2 at 2 1/2 × 13 |
| 6 at 13 1/2 × 2 1/2 | 34 at 3 × 4 1/2 | 2 at 2 1/2 × 14 1/2 |
| 3 at 14 1/2 × 2 1/2 | 6 at 3 1/2 × 4 1/2 | 1 at 22 1/2 × 17 |
Cutting checkpoint: The quantities above total 123 cream fillers. The F labels and their exact positions appear in the nine setting-unit diagrams on pages 8–16 of PDF 3. Labels restart within each setting unit.
Miss Sissy's appliqué pieces
Cut these shapes from the full-size masters in PDF 2:
- Ivory: one complete body and neck, labeled I
- Gold: one beak B and two feet F1 and F2
- Red bonnet crown: four joined sections C1–C4
- Red scalloped bonnet brim: seven joined sections H1–H7
- Red bow loops: L11–L13 and L21–L23
- Red bow tails: T11–T12 and T21–T22
- Red bonnet band N and center bow knot K
- Black embroidered eye, marked E on the placement guide
The bonnet and bow contain 21 numbered red patchwork sections, plus the red band and bow knot. Each numbered section includes the required 1/4-inch internal piecing allowances.
Holly border appliqué
- 63 green serrated holly leaves: 4 small, 7 medium, and 52 large
- 72 red berry circles, each approximately 0.920 inch in diameter
Use the actual-size holly templates rather than estimating the leaf outlines. The leaves vary in size and direction around the border.
Border and binding cuts
- Dark green: four strips measuring 1 1/4 × 30 1/2 inches
- Dark green: four strips measuring 1 1/4 × 31 1/4 inches
- Cream border: four strips measuring 5 1/2 × 31 1/4 inches
- Cream border: four strips measuring 5 1/2 × 36 1/4 inches
- Red binding: nine strips measuring 4 3/4 inches × usable width of fabric
Use the 4 3/4-inch-wide binding strips listed here. This wider binding creates the intended 3/4-inch visible red edging around the finished quilt. Ordinary 2 1/2-inch binding strips would produce a narrower finish.
Piece the Eight Red and Green Christmas Star Blocks
All eight stars share the same traditional piecing geometry. Each star has a 4-inch finished golden center and four directional point units. The completed visible star motif measures 12 inches from tip to tip.
The stars are assembled into the larger quilt setting, rather than into eight separate 12 1/2-inch square background blocks.
Step 1: Prepare a star kit
For one star, gather one 4 1/2-inch gold square, five red 2 1/2 × 4 1/2-inch rectangles, three green rectangles of the same size, and eight cream 2 1/2-inch squares.
Step 2: Sew the north star arm
- Place one red rectangle vertically on the left and one green rectangle vertically on the right.
- Place a cream square right sides together over the top end of each colored rectangle.
- Mark the diagonal sewing line across each cream square, from the outside top corner toward the opposite corner, following the north-arm diagram on page 6 of PDF 3.
- Sew directly on each marked diagonal.
- Fold the cream corner open to confirm that it covers the intended corner of the colored rectangle.
- Trim the concealed fabric layers 1/4 inch beyond the sewn line, toward the discarded corner.
- Press the cream triangles outward and join the two colored halves along their long edges with a 1/4-inch seam.
The north arm measures 4 1/2 inches square unfinished.
Step 3: Make the remaining three arms
For the west and east arms, arrange the colored rectangles horizontally, with red above green. The cream stitch-and-flip corners face the left outside end for the west arm and the right outside end for the east arm.
For the south arm, use two red rectangles. Turn the north-arm construction upside down so its points face downward.
Match each diagonal direction to the directional arm diagrams in PDF 3. The corner orientations determine the shape of the finished star points.
Step 4: Label the components
Each star kit contains five components: north arm N, west arm W, east arm E, south arm S, and golden center A.
Label these with their star number, such as 1N, 1W, 1E, 1S, and 1A.
Keep the five components separate until the corresponding numbered setting-unit instructions call for them. Do not sew them into a conventional nine-patch star block.
Repeat for all eight stars. Each star receives the same color arrangement: red and green at the top, red above green at the sides, and two red lower points.
Make the Irish Chain Patchwork Setting
The Irish Chain gives Miss Sissy's quilt its distinctive arrangement of red and green squares. The pattern includes 16 checkerboard groups, labeled A1 through D4, with cream pieces surrounding the colored squares.
The complete patchwork field contains nine setting units. They are not identical squares.
The nine-unit layout
| Unit 11 19 × 18 inches | Unit 12 22 × 18 inches | Unit 13 19 × 18 inches |
| Unit 21 19 × 20 1/2 inches | Unit 22 22 × 20 1/2 inches | Unit 23 19 × 20 1/2 inches |
| Unit 31 19 × 21 1/2 inches | Unit 32 22 × 21 1/2 inches | Unit 33 19 × 21 1/2 inches |
These are finished unit measurements. Add 1/2 inch to each width and height for the unfinished measurements before the units are joined.
Step 1: Organize the checkerboards
- Open PDF 3, pages 3–4, showing the 16 checkerboard maps and cell address register.
- Arrange the red, green, and cream squares by their printed addresses.
- Keep the four longer red terminal rectangles separate. They belong at the bottom of the quilt.
- Place the cream F filler pieces into nine groups, using the setting-unit diagrams on pages 8–16.
- Keep the five components of each star labeled with its number and direction.
The checkerboard maps identify every colored patch and its cream partner. Do not replace the illustrated arrangements with a generic diagonal Irish Chain.
Step 2: Read the numbered seam maps
Each setting unit has a complete numbered sewing sequence in PDF 3.
The labels work as follows:
- A vertical bar, as in A | B, means place A on the left and B on the right, then sew their adjoining vertical edges.
- A slash, as in A / B, means place A above B and sew their adjoining horizontal edges.
- A J number identifies a completed seam operation. The J numbering begins again for each setting unit.
- An F number identifies a cream filler piece. Its exact raw cutting dimensions appear beside that unit's diagram.
Read the numbered joins down each printed column before moving to the next column. Use a 1/4-inch seam throughout.
Step 3: Complete the nine setting units
- Begin with Unit 11 on page 8 of PDF 3.
- Lay out every labeled checkerboard patch, cream filler, and star component shown in the unit diagram.
- Sew each numbered J operation in the printed order.
- Press the seam after each join, checking that the next edges are aligned.
- Measure the completed unit against its stated unfinished dimensions.
- Continue with Units 12 and 13, then Units 21–23 and 31–33.
The center setting unit contains cream background and portions of the surrounding Irish Chain. The goose appliqué is placed over this area after the entire field has been sewn.
Construction checkpoint: The nine setting-unit recipes contain 342 internal joins. The completed units are assembled with eight additional joins to form the quilt field.
Every checkerboard group is already accounted for in the numbered layout. There is no extra checkerboard arrangement to invent or fill in afterward.
Prepare Miss Sissy's Christmas Goose Appliqué
Miss Sissy's body and neck are cut from one continuous piece of ivory cotton. The golden beak and feet are separate appliqué pieces.
This construction keeps the goose smooth against the cream background. The decorative patchwork belongs in her bonnet and bow, not across her belly.
Step 1: Print the full-size placement guide
- Open PDF 2, the full-size appliqué and fabric templates.
- Print on US Letter paper at 100% or Actual Size, never Fit to Page.
- Measure the one-inch calibration square in both directions.
- Assemble the sheets for the placement guide labeled P, matching the row and column references and registration marks.
- Check that the completed placement window measures 26 × 30 inches.
The upper-left corner of placement window P is positioned 17 inches right and 16 inches down from the upper-left finished corner of the 60-inch patchwork field.
The dashed registration lines align with the setting-unit seams at x = 19 and 41 inches and y = 18 and 38 1/2 inches.
Step 2: Cut the body, beak, and feet
- Trace ivory body-and-neck template I, reversing the front-view shape when tracing onto the paper side of fusible web.
- Fuse the web to the wrong side of the ivory cotton, following the product directions.
- Cut the complete body-and-neck silhouette along its finished outline.
- Repeat for the golden beak B and the two feet F1 and F2.
- Keep the backing paper in place until the quilt field is ready for appliqué placement.
The beak and feet are separate shapes, but the body and neck remain one piece. No additional patchwork seams are drawn across the goose.
Step 3: Prepare the eye marking
Transfer the eye position E from the placement guide. The finished eye is made with black satin stitches rather than a button.
The individual pieces are prepared now, but the appliqué will be positioned and secured after the nine-unit quilt field is fully assembled.
Piece Miss Sissy's Christmas Bonnet and Patchwork Bow
The bonnet and bow are made from the same small-print red fabric used in the Christmas stars. The seams are real joined fabric sections, not decorative lines drawn over a single red piece.
Both pieces lie flat against the goose as appliqué after their individual fabric sections are sewn.
Step 1: Piece the bonnet crown
Use the four numbered bonnet-crown templates C1–C4 from PDF 2.
- Cut each red fabric section using its numbered template, including the indicated 1/4-inch sewing allowances.
- Arrange the four sections right side up over the complete bonnet-crown master.
- Join Section 4 to Section 3, then add Section 2 and Section 1 in that order.
- Match the marked seam endpoints and press the joined seams open.
- Check the completed crown against the master outline before trimming.
Step 2: Piece the scalloped bonnet brim
The old-fashioned ruffled appearance comes from the seven separately pieced red sections H1–H7.
- Cut and label the seven red sections from PDF 2.
- Arrange them over the complete scalloped-brim master.
- Join Section 7 to Section 6, then add Sections 5, 4, 3, 2, and 1 in descending order.
- Press the joining seams carefully.
- Check the complete brim against its master and trim to the outer scalloped shape after applying fusible web.
The finished brim follows the approved vintage bonnet shape. It does not require gathers or bulky stuffed folds.
Step 3: Prepare the red bonnet band
Cut band N from the same small-print Christmas red fabric. Fuse lightweight web to the wrong side and trim to its full-size outline.
The band is red, not green. It lies across the joining area between the bonnet crown and brim in the position marked on the placement guide.
Step 4: Piece the smaller Christmas bow
Version B uses the approved smaller bow, with the same angular loops and pointed tails as the original design.
- Cut and label the left loop sections L11–L13 and right loop sections L21–L23.
- For each loop, join Section 3 to Section 2, then add Section 1.
- Cut and label the two sections of each bow tail: T11–T12 and T21–T22.
- Join the two sections of each tail along their marked seam.
- Press the seams open, keeping the left and right pieces in their correct mirrored orientations.
- Cut the small center knot K from the same red print.
- Fuse web to the wrong side of the completed loop and tail units, then trim each against its whole-unit master.
The finished bow measures approximately 9.99 inches wide and 9.14 inches high. Its knot center is at field coordinate (27.15, 32.66), measured from the upper-left finished corner of the patchwork field.
The reduced bow leaves approximately 0.718 inch of calculated clearance between its nearest upper loop and the lower edge of the bonnet brim.
No checkerboard fabric, contrasting patches, or artificial shadow lines are added to the bow.
Step 5: Check the finished fabric units
Before placing the bonnet and bow on the quilt, compare each completed unit against the full-size templates and the placement guide.
The bonnet keeps its original orientation. The smaller bow keeps its knot at Miss Sissy's neck, with a visible gap beneath the bonnet.
Assemble the Christmas Goose Quilt Top
With the nine patchwork setting units complete, arrange them in three rows as shown in PDF 3.
Step 1: Sew the three patchwork rows
- Join Units 11, 12, and 13 for the top row.
- Join Units 21, 22, and 23 for the middle row.
- Join Units 31, 32, and 33 for the bottom row.
- Use 1/4-inch seams and match the checkerboard connections at each join.
Each completed row measures 60 1/2 inches wide unfinished.
The top row measures 18 1/2 inches high unfinished, the middle row measures 21 inches, and the bottom row measures 22 inches.
Step 2: Join the rows
- Place the top and middle rows right sides together.
- Match their vertical unit seams and checkerboard intersections.
- Sew the rows together with a 1/4-inch seam.
- Press and attach the bottom row in the same way.
- Check the complete patchwork field before adding the appliqué.
Field measurement: The assembled patchwork measures 60 1/2 × 60 1/2 inches unfinished and finishes at 60 × 60 inches inside its border seams.
The lower-center star is Star 7. Its golden center is at field coordinate (30, 51 1/2), which places it 3 1/2 inches below the centers of Stars 6 and 8.
That arrangement provides approximately 1.18 inches of calculated clearance between Miss Sissy's feet and the upper point of the bottom-center star.
Step 3: Position the goose appliqué
- Press the completed patchwork field.
- Position placement guide P using the marked coordinates and setting seams.
- Place the golden feet F1 and F2 and the beak B first.
- Place the ivory body I over the tops of the feet and the root of the beak.
- Position the pieced bonnet crown C over the head.
- Add the scalloped bonnet brim H, followed by the red bonnet band N.
- Place the two bow tails, both bow loops, and center knot K, in that order.
- Check the bow-to-bonnet clearance against the guide before fusing.
- Fuse the pieces in place according to the fusible-web directions.
Step 4: Secure the appliqué edges
Stitch around the exposed appliqué edges with matching fine thread. A narrow blanket stitch or short straight stitch about 1/16 inch inside the raw edge is specified in the Version B instructions.
Add the inset running stitch around the ivory goose body. Finish the eye with closely worked black satin stitches at position E.
Do not add a patchwork grid across the ivory goose. The body remains a continuous appliqué silhouette.
Make the Christmas Holly Border
The holly border frames Miss Sissy and the Irish Chain without adding another patchwork pattern. The cream fabric continues the quilt's background, with evergreen leaves, red berries, and gently curving embroidered vines.
Version B uses a narrow dark green frame beneath the holly border and a wider red binding at the outside edge.
Step 1: Sew the dark green inner frame
Cut the dark green strips as listed in the cutting chart:
- Four strips measuring 1 1/4 × 30 1/2 inches
- Four strips measuring 1 1/4 × 31 1/4 inches
- Join the four shorter strips in matching pairs using 1/4-inch straight seams to make two strips measuring 60 1/2 inches long.
- Sew these strips to the left and right sides of the patchwork field.
- Press the seams toward the border.
- Join the four longer strips in matching pairs to make two strips measuring 62 inches long.
- Sew these strips to the top and bottom of the quilt.
- Press the completed frame flat.
Measurement checkpoint: The framed field measures 62 × 62 inches unfinished. The dark green frame finishes at 3/4 inch wide.
Step 2: Add the cream border strips
Cut the cream border strips:
- Four strips measuring 5 1/2 × 31 1/4 inches
- Four strips measuring 5 1/2 × 36 1/4 inches
- Join the shorter strips in matching pairs to make two 62-inch lengths.
- Sew these to the left and right sides.
- Join the longer strips in matching pairs to make two 72-inch lengths.
- Sew these across the top and bottom.
- Press and check the dimensions.
The quilt top measures 72 × 72 inches at this stage. After the wide red binding is attached, approximately 4 1/2 inches of cream border remains visible.
Step 3: Prepare the holly placement guides
Use the four full-size border placement guides V1 through V4 in PDF 2.
- V1 begins at the upper-left corner and runs across the top.
- V2 begins at the upper-right corner and runs down the right side.
- V3 begins at the lower-right corner and runs across the bottom toward the left.
- V4 begins at the lower-left corner and runs up the left side.
Align the outside guide edge with the quilt's raw outside edge. The opposite guide edge corresponds to the seam at the inner side of the cream border.
The four guides meet at the corners. Transfer each corner arrangement once rather than duplicating leaves and berries where the guides overlap.
Step 4: Attach the leaves and berries
- Trace and cut the 63 holly leaves from their full-size templates.
- Transfer the vine centerlines and leaf positions from the placement guides.
- Embroider the vines in dark olive thread using stem stitch or backstitch.
- Position each green leaf with its stem end and tip matching the guide.
- Fuse the leaves and stitch around their edges.
- Add a central vein to each leaf.
- Place the 72 red berries in their marked positions, arranged in groups of three.
- Fuse and edge-stitch the berries with matching red thread.
Keep the leaf sizes and angles shown in the printable guides. The border has a flowing holly-vine design rather than evenly spaced identical holly clusters.
The lower-corner holly arrangements in the templates are inferred continuations of the approved border design because those areas were partly hidden in the original reference image.
Quilting, Binding and Finishing
When the holly appliqué and border embroidery are complete, check that the fabric edges and thread ends are secured.
Make the quilt sandwich
- Press the 82 × 82-inch backing fabric.
- Lay the backing flat with its wrong side facing the batting.
- Center the 82 × 82-inch batting over the backing.
- Place the completed quilt top right side up over the batting.
- Smooth and baste the three layers.
The backing and batting extend beyond the 72-inch quilt top during quilting. That extra fabric is trimmed away after the layers are stitched.
Quilt the layers
Stitch in the ditch around the pieced star and checkerboard units, then add quilting around Miss Sissy's appliqué outline.
The open cream areas can be quilted with feather patterns or a gentle meander, similar to the texture visible in the original design.
Keep the quilt stitching distinct from the patchwork construction seams. Miss Sissy's body is not supposed to resemble a pieced grid.
Observe the batting manufacturer's maximum recommended spacing between quilting lines.
After quilting, trim the excess batting and backing even with the quilt top.
Prepare the red binding
The Version B binding is wider than ordinary narrow double-fold binding because the approved quilt has approximately 3/4 inch of visible red binding around the outside.
- Cut nine red strips, each 4 3/4 inches wide across the usable fabric width.
- Join the strips end to end using diagonal seams.
- Trim the joining allowances to 1/4 inch and press the seams open.
- Fold the binding in half lengthwise with wrong sides together.
- Press the full length.
Attach the binding
- Place the binding against the quilt front with the raw edges aligned.
- Leave a loose starting tail.
- Sew the binding with a 3/4-inch seam allowance.
- Stop 3/4 inch before each corner and form the miter with a 45-degree fold.
- Continue around the quilt, repeating the corner treatment.
- Leave an opening on the starting side for joining the binding ends.
- Overlap the loose ends by 4 3/4 inches, trim, and join them diagonally.
- Check that the joined binding lies flat before trimming the seam allowances.
- Complete the attachment seam.
- Fold the binding to the back, cover the attachment seam, miter the corners, and slipstitch the folded edge.
The calculated finished quilt is 72 × 72 inches, before any dimensional changes from quilting take-up or laundering.
Miss Sissy's red bonnet and smaller pieced bow remain the focal point, with the Christmas stars and Irish Chain creating the surrounding patchwork.
Download the Free Christmas Goose Quilt Pattern and Templates
The complete Miss Sissy Christmas Goose Quilt Pattern is provided as a ZIP package containing four coordinated PDFs.
Download the Complete Miss Sissy Christmas Goose Quilt Pattern Package (ZIP)
The package contains:
- Complete Quilt Pattern (8 pages): Fabric requirements, cutting quantities, star construction, assembly, bonnet, bow, appliqué, borders, and finishing.
- Full-Size Appliqué and Fabric Templates (112 pages): Actual-size goose, bonnet, bow, and holly templates, including tiled placement guides.
- Complete Quilt Layout and Piecing Maps (17 pages): All 16 checkerboard groupings, eight star positions, cream filler dimensions, and the numbered sewing sequences for the nine setting units.
- Construction and Fidelity Reference (11 pages): The approved design comparison, construction verification, and documentation of Version B's intentional adjustments.
For PDF 2, print on US Letter at 100% or Actual Size. Measure the one-inch calibration square before joining the numbered sheets. Do not select Fit to Page.
Use the registration marks and row-and-column references when taping the template sheets together.
The layout diagrams and numbered seam maps form part of the complete pattern. Keep PDF 3 available while sewing the setting units, since it identifies the cutting dimensions and joining order of each individual filler and checkerboard piece.
Pattern verification: The complete Version B package was checked digitally for piece usage, seam arithmetic, template dimensions, layout, and file integrity. Physical sewing and fabric shrinkage were not tested.
Frequently Asked Questions About the Christmas Goose Quilt Pattern
Is Miss Sissy made with appliqué or traditional patchwork?
Both. Her ivory body and neck are one appliqué shape, while her bonnet and bow are assembled from joined red fabric pieces before being appliquéd. The stars and Irish Chain are traditionally pieced.
What size is the finished Christmas goose quilt?
The calculated finished size is 72 × 72 inches. The center patchwork field finishes at 60 × 60 inches, surrounded by a dark green frame, cream holly border, and red binding.
Why is the bottom-center star lower than the other stars?
It's an intentional feature of Version B. The bottom-center star sits 3 1/2 inches below its two neighbors, giving Miss Sissy's feet more breathing room. The calculated clearance is approximately 1.18 inches.
Why does the bow in the pattern look smaller than the photograph?
The featured design image shows the original larger bow. Version B reduces it to 76% of that size, keeping the original shape and real fabric seams while leaving a visible gap between the bow and bonnet.
Are the bonnet and bow actually pieced?
Yes. The crown, scalloped brim, bow loops, and tails are assembled from separately cut and joined red fabric pieces. The narrow bonnet band and bow knot are single pieces. The full-size templates show the actual seam boundaries.
Can I make the quilt without the holly appliqué?
Yes. The cream border dimensions stay the same. You can leave the border plain while retaining the completed quilt size and patchwork field.
Can I change the Christmas fabric colors?
Yes. The cutting geometry remains the same when substituting comparable quilting cottons. I would retain one consistent print for the stars, bonnet, and bow, with enough contrast between the colored squares and cream background to preserve the Irish Chain design.
Is the PDF pattern physically test-sewn?
No. The cutting measurements, sewing sequences, and finished dimensions were checked digitally. They have not been confirmed by physical test sewing, laundering, or measurements of a finished quilt.
The traditional patchwork techniques in this design are part of a much broader quilting tradition. The Quilt Alliance's Quilt Index project documents quilts from collections across the United States. Miss Sissy's particular Christmas Goose composition is an original design for Unique Baby Gear Ideas.
When you click on links to various merchants on this site and make a purchase, this may result in this site earning a commission. This does not affect the price you pay.

UBGI Gold Standard 2026
Reviewed under the site's
editorial checklist.
Photos, decorating ideas, party setups and reader submissions are shared for inspiration unless a page is specifically presented as a pattern, tutorial, reference guide or step-by-step project. Follow the instructions, measurements, safety guidance and manufacturer directions provided for the particular project or product.
About Jan | Contact | Baby Nursery Ideas (Blog) | Site Map | Privacy Policy | Disclosure Policy | Disclaimer | Affiliate Disclosure | Earnings Disclosure | Facebook | Pinterest
I am a participant in the Amazon Services LLC Associates Program, an affiliate advertising program designed to provide a means for us to earn fees by linking to Amazon. As an Amazon Associate I earn from qualifying purchases.
Copyright © 2006-2026. All Rights Reserved.