DIY Baby Shower Welcome Sign for a Pink Christmas Shower
By Jan Bay
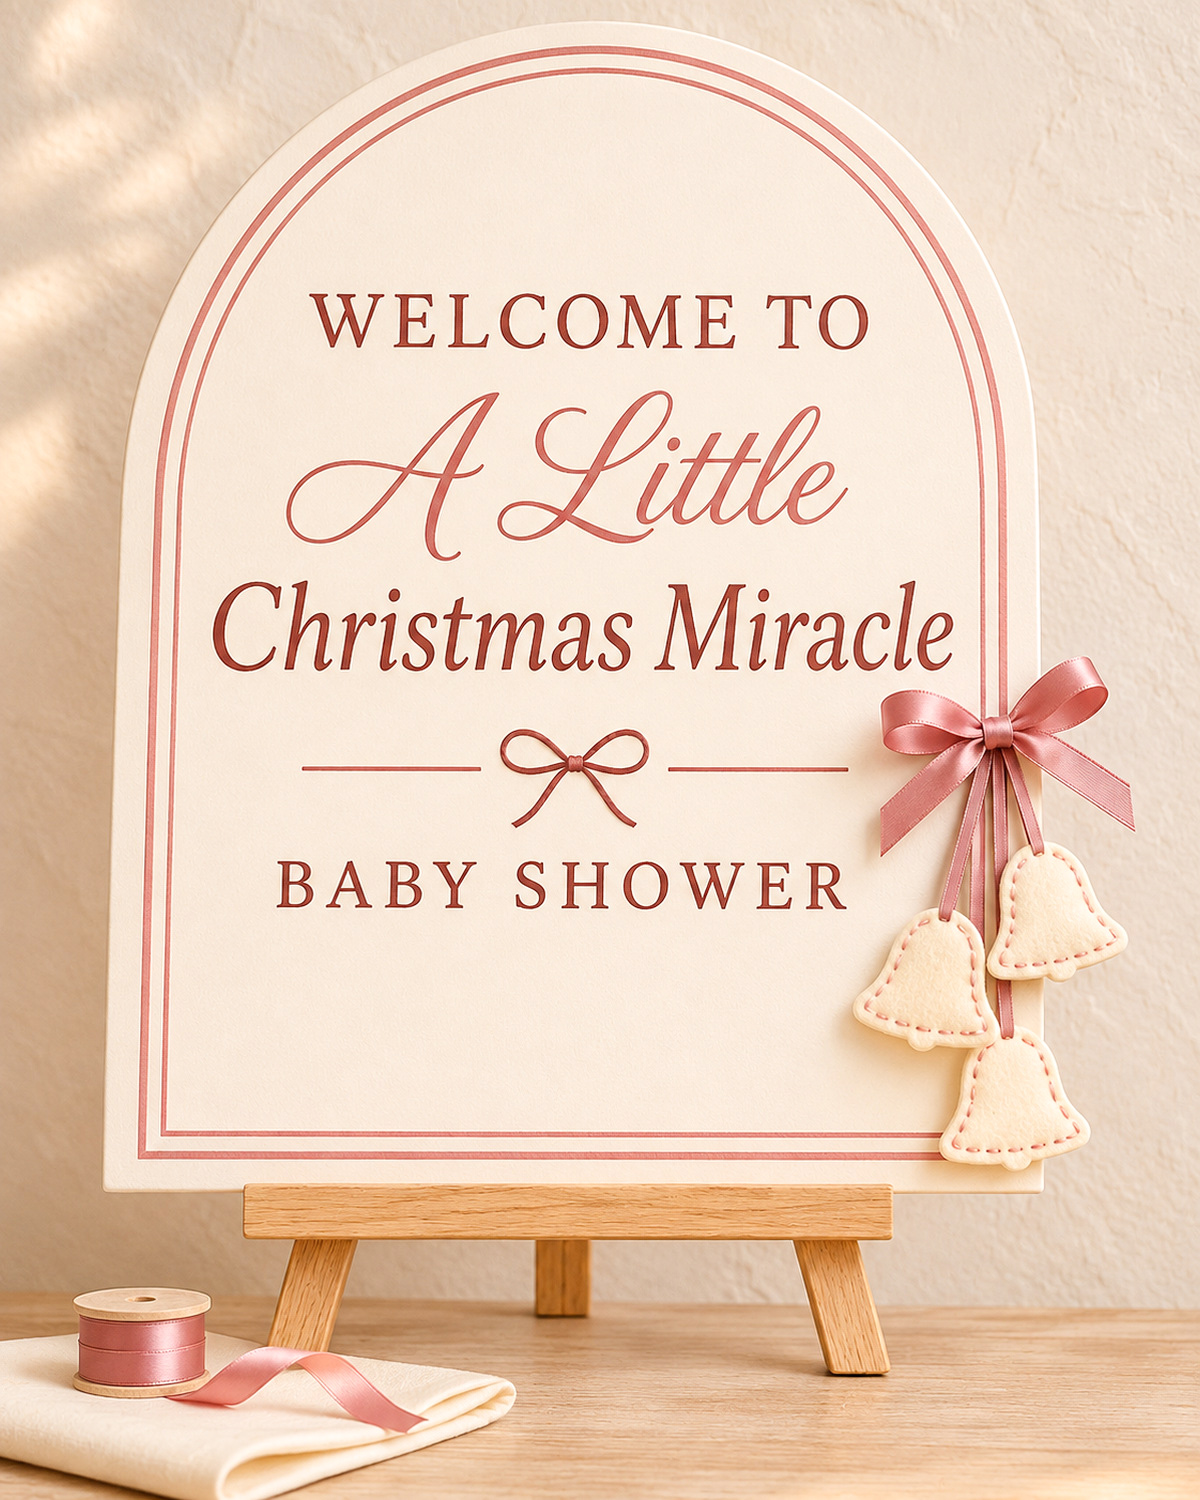
This Baby Shower Welcome Sign will greet your guests at the entrance to your pink Christmas baby shower and you won't have to spend a fortune on a custom-made sign. I've chosen an ivory arched design with dusty-rose lettering that says "Welcome to A Little Christmas Miracle," along with a pink satin bow and three little felt Christmas bells hanging down one side. I like that the sign has enough Christmas detail to feel festive without losing sight of what we're celebrating. It's very understated proving that you don't need a big entrance display for the event to look special! I'll show you how to make the arched sign, add the lettering and decorations, and set it up on an easel. The free printable templates will help you recreate the design, whether you're decorating a baby shower at home or in a larger party space.
Explore More Pink Christmas Crafts and Baby Shower Decorations
DIY Pink Christmas Decorations
DIY Pink Christmas Ornaments and Baby Shower Favors
See Supplies for This Project Here.
Jump to a Section
- Free Baby Shower Welcome Sign Printable and Templates
- Materials and Supplies
- Finished Measurements and Cutting Guide
- Make the Ivory Arched Welcome Sign
- Print and Add the Welcome Sign Lettering
- Add the Double Dusty-Rose Border
- Make the Three Ivory Felt Christmas Bells
- Attach the Hanging Bell Ribbons and Satin Bow
- Assemble and Finish the Welcome Sign
- Set Up the Baby Shower Entrance Display
- Personalization and Other Baby Shower Themes
We're going to make this baby shower welcome sign with a lightweight arched board, a little paint, pink satin ribbon, and three handmade felt Christmas bells. You can print the lettering at home, so you don't need a lettering machine or expensive equipment to get the design onto the sign.
The sign measures 16 inches wide and 20 inches tall. That's large enough for guests to read when they come into the room, but small enough to set on a sturdy tabletop easel. And once the shower is over, you can keep the sign as a decoration or remove the ribbon and felt bells to use somewhere else.
Free Baby Shower Welcome Sign Printable and Templates
I've put the printable pieces together in one PDF. It includes the full-size arched sign outline, the wording shown in the example image, the double pink border, the felt Christmas bell pattern, and a placement guide for the ribbons.
Free printable: Download the Baby Shower Welcome Sign Pattern and Templates.
The PDF has nine pages:
- Page 1: Printing directions, a 1-inch test square, and the layout for joining the sign artwork.
- Pages 2–7: Six full-size lettering and sign-outline sheets, labeled A1, A2, A3, B1, B2, and B3.
- Page 8: Actual-size felt Christmas bell template, inset running-stitch guide, and sewing instructions.
- Page 9: Ribbon measurements, decorative placement points, and final checks.
How to Print the Welcome Sign at Home
Don't shrink the PDF to make the sign fit on one sheet of paper. The lettering and border need to stay at their actual size or they won't line up with the 16 × 20-inch board.
- Open the PDF in a PDF reader.
- Select US Letter paper, measuring 8 1/2 × 11 inches.
- Choose Actual Size or 100% in the print settings. Turn off Fit to Page and Shrink to Fit.
- Print page 1 first.
- Measure the test square with a ruler. It must be exactly 1 inch on each side.
- If the square measures correctly, print pages 2 through 9 using the same settings.
- Lay the six sign-artwork sheets in two rows. A1, A2, and A3 go across the top. B1, B2, and B3 go underneath.
- Match the repeated lettering, arch, and border lines where the sheets overlap.
- Trim away one layer of paper in each overlap wherever needed, keeping the matching printed lines aligned.
- Tape the sheets together on the back to form one full-size pattern.
The artwork sheets overlap by approximately 0.55 inch from left to right and 0.60 inch from top to bottom. That extra paper is intentional. It gives you a little room to match the lines before taping everything together.
If you need help finding the right print setting, Adobe explains how to print a PDF at its actual size.
Printing checkpoint: You should have one assembled paper pattern measuring 16 × 20 inches, with the arched outline, lettering, and two border lines all aligned. Page 8 remains separate for cutting the felt bells.
Materials and Supplies
I'd keep the sign itself fairly simple and spend a little more attention on the lettering and satin ribbon. Those are the details that make the finished project look like something made especially for the shower.
For the arched welcome sign:
- One 16 × 20-inch sheet of lightweight foam board, approximately 3/16 inch thick, preferably ivory
- Ivory paper or thin ivory cardstock if your foam board needs covering
- One printed copy of the nine-page sign and bell pattern
- Dusty-rose acrylic paint pen or fine paintbrush and craft paint
- Graphite transfer paper suitable for a light-colored surface
- Ruler and measuring tape
- Pencil and eraser
- Low-tack painter's tape
- Craft knife with a sharp blade
- Self-healing cutting mat or other suitable cutting surface
- White craft glue or paper adhesive, if covering the board
- A sturdy tabletop or floor easel that can hold the completed sign
For the pink ribbon decorations:
- One 20-inch length of 5/8-inch-wide dusty-rose satin ribbon for the large bow
- One 7-inch length of 1/8-inch-wide dusty-rose ribbon for the small center bow
- One 6-inch length of narrow satin ribbon for the left hanging bell
- One 5-inch length of narrow satin ribbon for the right hanging bell
- One 8-inch length of narrow satin ribbon for the lower hanging bell
- Matching sewing thread
- Small sewing needle
- Craft glue suitable for attaching ribbon to the sign
For the three felt Christmas bells:
- Ivory wool-blend felt or good-quality craft felt, enough for six bell-shaped pieces
- Dusty-rose embroidery floss
- Embroidery needle
- Sharp fabric scissors
- A small amount of polyester filling, enough to lightly pad all three felt bells
- Washable fabric marker or tailor's chalk
- Small sewing clips or pins
You don't need a cutting machine, electric sign lights, glitter, artificial greenery, or battery-operated ornaments. The sign already has plenty going on with the lettering, the pink border, and those three little bells.
Finished Measurements and Cutting Guide
The finished arched board is designed to measure 16 inches wide by 20 inches high. Its upper curve is a semicircle with an 8-inch radius. The straight sides begin 8 inches below the top of the original board.
That makes the arch easy to measure. You don't have to guess how much to round the corners or try to draw a different curve on each side.
| Component | Measurement | Quantity |
|---|---|---|
| Main sign board | 16 × 20 inches before and after arch shaping | 1 |
| Arch radius | 8 inches | 1 upper arch |
| Double border | Approximately 0.42 and 0.66 inch inside outer edge | 2 lines |
| Ivory felt bell | Approximately 1.9 × 1.9 inches | 6 felt pieces for 3 bells |
| Large satin bow | 20-inch ribbon length; finished bow about 2.5 inches wide | 1 |
| Small center bow | 7-inch narrow ribbon length | 1 |
| Hanging bell ribbons | 6, 5, and 8 inches before trimming | 3 |
The felt bell template includes its complete cutting outline. Don't add a sewing allowance. We'll join the two layers with a single line of dusty-rose running stitches approximately 1/8 inch inside the edges, just as they're shown in the example image.
Cutting checkpoint: One arched sign board, six ivory felt bell pieces, three separate hanging ribbons, one large satin bow ribbon, and one small center bow ribbon.
These dimensions are calculated from the printable design. Before cutting your expensive materials, I'd make the full-size paper sign and one sample felt bell so you can check the proportions.
Make the Ivory Arched Welcome Sign
Let's start with the board. I like the rounded top for this design because it looks a little more like a special party sign than a plain rectangle. The curved shape also gives us a nice place to follow with the double pink border.
Use lightweight foam board for the sign rather than heavy wood. Foam board is easier to cut at home and puts less weight on the easel. You can choose an ivory-colored board or cover a white one with ivory paper before adding the lettering.
Mark the 16 × 20-Inch Arch
- Lay the 16 × 20-inch board on your work surface with the 16-inch side across the top.
- Find the center of the top edge and make a light pencil mark 8 inches from either side.
- Measure 8 inches down from the top along the board's vertical centerline. Mark this point as the center of your arch.
- Measure 8 inches down from the top along the left edge and make a mark.
- Make a matching mark 8 inches down along the right edge.
- Check that the three marks form the center and two ends of an 8-inch-radius semicircle.
- Place the assembled paper pattern over the board. The outer black outline shows the exact arch.
- Secure the paper lightly with painter's tape.
- Trace the outer curve onto the foam board with a pencil. You can use transfer paper beneath the pattern or prick a few tiny reference marks along the curve and join them with a pencil.
- Remove the paper and check that the curve meets both straight side edges smoothly, 8 inches below the top.
Arch checkpoint: The upper curve has an 8-inch radius. The top center is still 20 inches above the bottom edge, and the full sign is still 16 inches wide.
You can check your pencil outline by measuring from the center point you marked 8 inches below the top. The distance from that center point to several places along the curve should be approximately 8 inches.
Cut the Curved Top
- Place the board flat on a cutting mat.
- Hold the board steady, keeping your free hand away from the cutting path.
- Use a sharp craft knife to follow the marked curve.
- Make a light first pass instead of trying to cut through the foam board all at once.
- Follow the same line with additional shallow passes until the cut is complete.
- Remove the two upper corner pieces.
- Check the edge for rough spots or loose paper facing.
- Trim only the rough areas. Don't cut away extra material from the arch.
- Set the board upright briefly to check the finished silhouette.
If you prefer not to use a craft knife, a craft store or sign shop may be able to cut an arched board to your measurements. Just give them the completed paper outline.
The sign should have a rounded top, straight sides, and a flat bottom. Keep the bottom square so it sits neatly on the easel.
Finish the Ivory Surface
If your board is already a nice shade of ivory, you can leave it alone. If it's bright white and you'd rather have the warmer look in the example, cover the front with thin ivory paper.
- Lay the finished arched board face up.
- Choose a piece of ivory paper large enough to cover its front.
- Apply a thin, even layer of suitable paper adhesive to the board.
- Place the ivory paper over the surface, starting at the top and smoothing toward the bottom.
- Press gently to remove air bubbles.
- Let the adhesive dry fully.
- Turn the board over on a clean cutting mat.
- Trim the paper flush with the arched edges.
Use very little moisture when covering foam board. Too much wet glue can make the paper wrinkle or the board warp.
Board checkpoint: One smooth ivory sign, 16 × 20 inches, with a clean arched top and a flat bottom.
Print and Add the Welcome Sign Lettering
Now for the lettering. The printable pattern includes the wording from the example, so you can transfer it onto the board rather than trying to draw every letter freehand.
The sign reads:
WELCOME TO
A Little
Christmas Miracle
BABY SHOWER
That keeps the message focused on the baby shower while giving it a Christmas theme. There's no need to add the date, the parents' names, or extra wording unless you want to personalize it.
Position the Printed Lettering
- Lay the finished ivory board flat on your work surface.
- Place the assembled six-sheet paper pattern over the board.
- Match the paper's outer arch outline with the cut edge of the board.
- Check that the bottom of the pattern lines up with the bottom of the sign.
- Secure the paper at the top and sides using small pieces of low-tack tape.
- Lift one edge of the paper gently and slide graphite transfer paper underneath, with its transfer side facing the board.
- Use a pencil to trace the outline of the first line, WELCOME TO.
- Move the transfer paper as necessary and trace A Little.
- Transfer the words Christmas Miracle.
- Transfer BABY SHOWER below the decorative divider.
- Trace the two straight lines on either side of the small center bow placement.
- Lift the paper carefully to check that every letter transferred.
Don't press so hard that the pencil dents the surface of the foam board. A light outline is enough. You can fill the letters after you've checked their positions.
Lettering checkpoint: Four lines of centered wording, with WELCOME TO at the top, A Little and Christmas Miracle in the middle, and BABY SHOWER below the narrow divider.
Fill the Lettering with Dusty-Rose Color
- Test your paint pen or craft paint on a scrap of the same board or ivory paper.
- Let the test dry to check for bleeding.
- Start with WELCOME TO.
- Follow each transferred letter outline with a fine paint pen or small brush.
- Fill the letters carefully, keeping their edges clean.
- Let the first line dry before placing your hand over that area.
- Continue with A Little.
- Paint the words Christmas Miracle.
- Finish with BABY SHOWER.
- Fill the two narrow divider lines using a ruler as a guide.
- Let the lettering dry completely.
I'd use the same dusty-rose shade for the lettering and the border, with a slightly darker rose if you want the words Christmas Miracle to stand out more. That's close to the look in the example, and you won't need to buy several different paints.
If you're using a paint pen, work slowly around the curves of A Little. It's better to make two light passes than leave a heavy line that spreads outside the letter.
Add the Little Center Ribbon Bow
There's a very small bow between the two horizontal divider lines. It's easy to overlook in the photograph, but I think it gives the lettering a nice finishing touch.
- Cut a 7-inch length of 1/8-inch dusty-rose satin ribbon.
- Make two small loops and tie them into a bow.
- Adjust the loops until the bow measures approximately 3/4 inch across.
- Trim the ribbon tails to approximately 1/2 inch each.
- Measure approximately 7.20 inches from the left edge to place the small bow, matching the dotted placement guide on the printable.
- Position the bow between the two divider lines, approximately 12.52 inches down from the top edge of the original board.
- Check that the bow doesn't cover the ends of the divider lines.
- Apply a tiny amount of suitable craft glue beneath the knot.
- Hold the bow in position until the adhesive grips.
- Leave the ribbon undisturbed until the glue has dried.
Center-bow checkpoint: One small dusty-rose ribbon bow centered between the two straight lines, below Christmas Miracle and above BABY SHOWER.
Add the Double Dusty-Rose Border
The double border is one of my favorite details on this sign. It follows the arch and frames the lettering without adding any more decorations to the middle.
I'd use the printed lines rather than trying to draw the border by eye. Both curves need to follow the same shape, and a little difference is easy to see once the sign is standing upright.
Transfer the Two Border Lines
- Check that the lettering is completely dry.
- Place the assembled paper pattern over the sign again.
- Align the outer arch with the cut edge of the board.
- Secure the paper with low-tack tape.
- Place graphite transfer paper beneath the section you're working on.
- Trace the outer dusty-rose border line, which sits approximately 0.42 inch inside the sign's outside edge.
- Follow that line from the lower-left side, around the curved top, down the right side, and across the lower edge.
- Trace the second border line approximately 0.66 inch inside the outer edge.
- Keep the two lines separate and evenly spaced.
- Remove the pattern and check the entire border before painting.
These are two complete lines, not two separate pieces of ribbon. They can be painted or drawn directly onto the sign.
Paint the Double Border
- Use a fine dusty-rose acrylic paint pen or a small paintbrush.
- Begin at the lower-left corner of the outer border.
- Draw the straight section upward toward the arch.
- Follow the transferred curve across the top.
- Continue down the opposite side.
- Finish along the straight bottom edge.
- Allow the first border line to dry.
- Repeat the same process for the inner line.
- Check both lines for missed areas.
- Touch up only where needed.
- Let the sign dry before attaching ribbon or felt decorations.
Keep the lines narrow. The two dusty-rose borders should frame the sign, not compete with the words.
Border checkpoint: Two continuous dusty-rose outlines following the arch, both straight sides, and the bottom edge. The lettering is centered inside them, with no paint smudges.
And that's the main sign finished. If you wanted a simpler decoration without the hanging bells, you could stop with the lettering and the double border. For our Christmas baby shower version, though, we're going to add the three little felt bells from the example.
Make the Three Ivory Felt Christmas Bells
Now we'll make the little felt bells that hang down the right side of the sign. There are three of them, each made from two pieces of ivory felt with dusty-rose stitching around the edges.
I like the bells because they give the sign a handmade Christmas detail without making it look like an ordinary Christmas decoration. They also work nicely with the pink ribbon and the ivory background.
We're using the same bell pattern for all three. The different ribbon lengths will make them hang at different heights, just like the ones in the example image.
Cut the Six Felt Bell Pieces
- Find the felt bell template on page 8 of the PDF.
- Print that page at 100% if you haven't already.
- Measure its 1-inch test square to check the scale.
- Cut out template C along the complete outside edge.
- Place the template on your ivory felt.
- Trace around it using a removable fabric marker.
- Cut the first bell shape carefully.
- Repeat until you have six matching felt bell pieces.
- Pair the pieces together to make three sets.
- Check that the curves and small rounded bump at the bottom of each pair line up.
The small rounded bump at the bottom is part of the bell outline. It represents the little clapper beneath the bell. You don't need to cut a separate clapper and sew it on.
Cutting checkpoint: Six ivory felt bell shapes, each approximately 1.9 inches wide and 1.9 inches tall. You'll use two pieces for each of the three completed bells.
Mark the Inset Running-Stitch Line
The little felt bells have just one line of dusty-rose stitching around their shapes. It sits slightly inside the cut edge, following the rounded top, both sides, and the little clapper at the bottom.
We won't add a separate curved embroidery line. The same running stitches that you see on the finished bell will also hold its two felt layers together.
- Choose one felt piece from each of the three matching pairs to use as the front.
- Place the first front piece right side up.
- Find the dashed running-stitch line inside template C on page 8 of the PDF.
- Transfer that line lightly onto the felt front, approximately 1/8 inch inside the complete cut edge.
- Follow the curve around the rounded top, down both sides, and around the small clapper shape at the bottom.
- Repeat on the other two bell fronts.
- Check that the marked lines follow the same path on all three bells.
Don't sew the marked lines yet. We'll attach the hanging ribbons, match the fronts and backs, and then sew through both felt layers along those lines.
Stitch-line checkpoint: Three marked bell fronts and three plain backs. Each marked front has one continuous inset stitching guide, with no separate curved line across its lower half.
Attach the Hanging Ribbon to the First Bell
Each bell gets its own piece of satin ribbon. We'll sew the ribbon between the front and back felt pieces before closing the bell.
Start with the left hanging bell and its 6-inch ribbon.
- Take one marked bell front and one plain bell back.
- Place the pieces together with their wrong sides facing inward.
- Cut a 6-inch length of narrow dusty-rose satin ribbon.
- Position one ribbon end between the two felt layers at the very top center of the bell.
- Insert approximately 1/2 inch of ribbon between the layers.
- Make sure the free ribbon extends upward from the bell.
- Thread a sewing needle with matching thread.
- Make two or three small stitches through the front felt, ribbon, and back felt.
- Keep the holding stitches within the top attachment area.
- Secure the thread and check that the ribbon remains centered.
The ribbon should come out of the top of the bell without pulling its rounded shape to one side.
Sew the Inset Running-Stitch Seam Around the Felt Bell
Now we'll sew the two felt layers together. The dusty-rose stitches sit approximately 1/8 inch inside the cut edge, so the ivory felt remains visible around the outside.
Keep the stitches small and even. You don't need to blanket stitch the edge or add any other embroidery.
- Check that the marked front and plain back are aligned with their wrong sides together.
- Make sure the hanging ribbon is secured between the layers at the top center.
- Thread your embroidery needle with two strands of dusty-rose floss.
- Hide the starting knot between the felt layers near one upper side of the bell.
- Bring the needle through both layers at the marked running-stitch line, approximately 1/8 inch inside the cut edge.
- Make a running stitch approximately 1/8 inch long, passing the needle down through both layers.
- Move approximately 1/8 inch forward along the marked line and bring the needle up through both layers again.
- Continue around the rounded top of the bell.
- Follow the stitching guide down the opposite side, keeping the stitches close to the marked line.
- Use slightly shorter stitches as you sew around the small clapper shape at the bottom.
- Continue around the lower edge and up the other side.
- Stop before reaching your starting point, leaving an opening approximately 3/4 inch long.
- Insert a very small pinch of polyester filling through the opening.
- Spread the filling gently so the bell is lightly padded without becoming bulky.
- Continue along the same inset line with running stitches until the opening is completely closed.
- Overlap the beginning of the stitching by one or two stitches to secure the seam.
- Hide the thread end between the felt layers and trim it.
Leave the outside cut edge of the felt unstitched. The one line of pink running stitches should be visible just inside the ivory edge all the way around the bell.
First-bell checkpoint: One lightly padded ivory felt bell with a single inset line of dusty-rose running stitches, a rounded clapper shape, and a hanging ribbon secured at the top.
Make the Other Two Felt Bells
- Take the second marked bell front and its matching back.
- Cut a 5-inch length of narrow dusty-rose satin ribbon.
- Insert 1/2 inch of ribbon between the felt layers at the top center.
- Secure the ribbon with two or three small holding stitches.
- Sew the inset running-stitch seam through both felt layers, leaving a 3/4-inch opening. Add a small pinch of filling, then close the opening with the same running stitches.
- Secure the thread ends.
- Take the final two bell pieces.
- Cut an 8-inch length of narrow dusty-rose satin ribbon.
- Attach that ribbon at the top center between the felt layers.
- Use running stitches through both felt layers along the inset line, leaving a 3/4-inch opening. Add a small pinch of filling.
- Close the final opening with running stitches and secure the thread.
Three-bell checkpoint: Three finished ivory felt Christmas bells with dusty-rose stitching and separate hanging ribbons measuring 6, 5, and 8 inches before final trimming.
The bells should match in shape and general size. Their different hanging heights will come from the ribbons, not from cutting three different bell patterns.
Attach the Hanging Bell Ribbons and Satin Bow
Now we're ready to put the ribbon decoration together. The three bells hang at different heights beneath a larger dusty-rose satin bow on the right side of the sign.
I'd arrange everything with temporary tape before making the final attachment. It's much easier to adjust a hanging bell while the ribbons are still loose.
Mark the Main Bow Position
Page 9 of the PDF has the placement measurements. Use the top-left corner of the original 16 × 20-inch board as your measuring reference.
- Lay the decorated sign flat with its front facing up.
- Measure 14.75 inches from the left side of the original board.
- Measure 12.35 inches downward from the original top edge.
- Make a small, removable mark at that point.
- Check that the mark is near the upper-right portion of the lettering, along the right-side border.
- Set the large bow ribbon beside the sign so it is ready for tying.
This mark is where the main satin bow knot will sit. We'll hide the upper ends of all three bell ribbons underneath it.
Arrange the Three Hanging Bells
Before attaching anything, place the bells in their intended positions. The first bell sits toward the left, the second hangs higher on the right, and the third hangs lowest.
- Place the bell with the 6-inch ribbon toward the left of the group.
- Position its top approximately 13.90 inches from the board's left edge and 15.05 inches down from the original top edge.
- Place the bell with the 5-inch ribbon toward the right.
- Position its top approximately 15.60 inches from the left edge and 14.25 inches down from the top.
- Place the bell with the 8-inch ribbon below the other two.
- Position its top approximately 15.30 inches from the left edge and 17.35 inches down from the top.
- Bring the loose upper ends of the three ribbons together at the main bow position.
- Check that the ribbons lie flat and aren't twisted.
- Use small pieces of painter's tape to hold the upper ribbon ends temporarily.
- Lift the board carefully to check how the bells hang.
- Adjust the ribbon lengths if needed, keeping the three different hanging heights.
It's fine if the right bell overlaps the outer edge of the sign just a little, as it does in the example image. The other bells should remain clearly visible in front of the ivory board.
Bell placement checkpoint: One bell hangs toward the left, one slightly higher on the right, and one hangs below them near the lower-right side of the sign.
Secure the Three Ribbon Ends
The bell ribbons need a proper attachment, not just a loose bow holding them together.
- Keep the bells in their approved positions using temporary tape.
- Bring the three upper ribbon ends together at the marked main bow position.
- Allow approximately 1/2 inch or more of each ribbon end to extend beneath the place where the satin bow knot will sit.
- Trim away any excess ribbon beyond that attachment area, leaving enough material to secure each ribbon.
- Apply a small amount of craft glue suitable for ribbon and the board surface beneath the three ribbon ends.
- Press the ribbon ends into place.
- For a more permanent attachment, make two small needle holes through the board beneath the future bow knot and sew through the ribbon ends and board several times with matching thread.
- Knot the securing thread on the back of the board and cover it with a small piece of paper tape.
- Allow the adhesive to dry completely.
- Remove the temporary tape holding the bells.
- Hold the board upright and check that all three ribbons remain secured.
Those attachment stitches will be hidden behind the large satin bow. The bells should hang from their own secured ribbons rather than depending on the decorative bow knot alone.
Make the Large Dusty-Rose Satin Bow
- Cut a 20-inch length of 5/8-inch-wide dusty-rose satin ribbon.
- Make a loop with one side of the ribbon.
- Make a matching loop with the other side.
- Cross the loops and tie them together.
- Pull the knot snug without twisting the satin.
- Adjust the loops until the bow measures approximately 2 1/2 inches wide.
- Arrange the tails so they fall downward and outward.
- Trim the tails to approximately 1 to 1 1/2 inches if necessary.
- Check that the bow lies reasonably flat against the sign.
Keep the loops rounded and the knot neat. I'd rather have a smaller, tidy bow than one that's so large it covers the words Christmas Miracle.
Attach the Large Bow
- Place the finished satin bow over the secured upper ends of the three bell ribbons.
- Center its knot at the placement mark approximately 14.75 inches from the left and 12.35 inches from the top.
- Arrange the loops so they extend toward the right edge of the sign.
- Turn the bow tails downward.
- Check that the bow hides the ribbon attachment area completely.
- Apply a small amount of suitable craft glue behind the bow knot.
- Press the knot into position without flattening the loops.
- Let the adhesive dry.
- Stand the sign upright to check the complete ribbon arrangement.
Ribbon checkpoint: One large satin bow at the right side of the sign, with three separate ribbons hanging below it. Each ribbon ends in one embroidered ivory felt bell.
Assemble and Finish the Welcome Sign
We're almost finished. The lettering, double border, and felt bell decorations are all in place. Before putting the sign on an easel, give everything one final check.
You don't want to discover a loose ribbon or crooked bow after the welcome table is decorated.
Check the Finished Sign Against the Pattern
- Lay the sign flat with its decorated side facing up.
- Check that the finished board measures 16 inches across and 20 inches from the top of the arch to the bottom.
- Look at the outer arch and make sure both sides have an even curve.
- Check that the ivory surface is smooth and free of loose paper edges.
- Inspect the words WELCOME TO.
- Check that A Little and Christmas Miracle are centered beneath them.
- Check the BABY SHOWER lettering.
- Inspect the two dusty-rose border lines from the lower-left corner, around the arch, down the right side, and along the bottom.
- Make sure the little center bow is attached between the horizontal divider lines.
- Check the larger satin bow near the right side.
- Count the hanging bells. There should be exactly three.
- Inspect the single inset line of dusty-rose running stitches around each felt bell.
- Check that the bell ribbons are secured beneath the large bow.
- Remove any remaining pins, temporary tape, and unwanted pencil marks.
Finished sign checkpoint: One ivory arched welcome sign with four lines of dusty-rose lettering, a double border, one small center bow, one large side bow, and three embroidered ivory felt bells hanging at different heights.
Check the Sign from a Distance
Set the sign against a wall or on its easel and look at it from several feet away.
Can you read the words without moving closer? Are the felt bells hanging neatly? Does the larger bow stay in place without pulling the ribbons to one side?
The lettering should still be the first thing guests notice. The bells are there to add a Christmas detail, not hide the message.
If a bell is hanging too close to the lettering, adjust the ribbon before the final glue has fully set, or carefully reposition its attachment and secure it again.
Make Any Final Repairs
- Touch up small gaps in the painted letters with a fine brush.
- Correct uneven areas in the double border only where needed.
- Secure any loose embroidery stitches on the felt bells.
- Add extra holding stitches to a ribbon attachment if a bell begins to slip.
- Check that the large satin bow remains attached when the board is raised.
- Allow all glue and paint to dry completely before placing the sign near party decorations.
The finished sign is a decoration, not a toy. Keep the loose ribbons and felt pieces out of a baby's reach, and don't put the sign where someone could bump into its easel.
Set Up the Baby Shower Entrance Display
Once your sign is finished, you can put together the welcome display. I wouldn't add a lot more decorations around it. The arched shape and hanging felt bells already give the table plenty of detail.
You really don't need to fill every inch.
Choose a Place for the Welcome Sign
I'd choose the location before adding anything else to the table. You'll want guests to see the sign when they arrive, but it shouldn't block a doorway or get in the way of the gift table.
Three places make sense:
- At the entrance: Set the sign on a sturdy floor easel where guests can read it as they enter.
- On a welcome table: Use a wide-based tabletop easel and leave enough room for a guest book or small basket beside it.
- Near the gift table: Place the sign toward one end of the table so it doesn't block gifts or cards.
For the 16 × 20-inch board, choose an easel with a stable base and a support ledge that holds the bottom of the sign securely. A tiny decorative easel may look pretty, but it isn't much use if the sign tips forward.
Set Up the Easel and Sign
- Place the easel on a level surface.
- Open its legs or supports completely.
- Check that the support ledge is wide enough to hold the bottom of the board.
- Set the finished welcome sign onto the ledge.
- Center the sign so its weight is evenly balanced.
- Make sure the back of the board rests against the easel support.
- Check that the felt bells hang freely along the right side.
- Keep the satin ribbons clear of the easel's joints and support ledge.
- Gently test the stability of the display.
- Move the easel away from walkways or the edges of tables where it could be knocked over.
Display checkpoint: The full welcome message is visible, the three felt bells hang freely, and the sign stays upright without needing someone to hold it.
Decorate Around the Sign
If you're setting up a welcome table, I'd keep the other decorations in the same colors as the sign.
An ivory tablecloth, a folded linen napkin, and a small length of dusty-rose ribbon would look pretty without competing with the lettering. That's close to the simple styling in the example image.
You could also place a small dish for guest cards beside the sign or leave room for a guest book. I'd skip tall centerpieces that hide the sign or make the table look crowded.
If you're decorating a larger shower, you can carry the same pink and ivory colors through the room with the handmade projects in my DIY pink Christmas decorations collection.
The welcome sign should introduce the theme, not try to hold every Christmas decoration on one table.
Personalization and Other Baby Shower Themes
The printable sign uses the wording "A Little Christmas Miracle," but you can change the message if you want something more personal. Keep the arch, border, and decorative layout the same, and change only the lettering that needs to be different.
Add a Name to the Welcome Sign
If you want to include the baby's name or the guest of honor's name, I'd put it beneath the main lettering or use it in place of BABY SHOWER.
You can make that change without redrawing the whole sign.
- Assemble the full-size paper template.
- Decide which printed line you want to replace.
- Leave that line untransferred when tracing the pattern onto your board.
- Write your replacement wording on a separate sheet of paper.
- Choose lettering that's easy to read and fits within the double border.
- Center the new wording on the sign before transferring it.
- Trace the new lettering using the same transfer-paper method.
- Fill it with the same dusty-rose paint used for the rest of the sign.
- Let it dry before attaching the ribbon decorations.
I'd keep the wording short. A long name, a date, several lines of explanation, and a shower message can make the sign harder to read.
If you want to keep the original design exactly as shown, leave the lettering unchanged. The printable already includes the complete message.
Make a Winter Baby Shower Version
You can use the same arched board and double border for a winter baby shower without making the sign quite so Christmas-specific.
I'd keep the ivory and dusty-rose colors, then change the main wording to something like "A Little Winter Wonder" or "Welcome Baby." The felt bells could be replaced with handmade snowflakes or left off completely.
That would be a separate variation using the same construction method. The included printable contains the original Christmas wording, so new wording would need to be made separately.
Use the Sign for a Different Baby Shower Color Scheme
The same layout would also work in other colors. You might try sage green and ivory, pink and white, or a simple neutral design.
The important thing is to keep enough contrast between the lettering and the background. If the lettering is too pale, guests may have trouble reading it from across the room.
I'd choose the sign colors first and then match the ribbon and felt decorations. That way, you don't end up with several shades that almost match but don't quite belong together.
Keep the Sign After the Shower
If you've made the sign for someone special, you could save it with the other baby shower keepsakes. The felt bells are separate decorations, so they can also be used on a Christmas tree if you decide to remove them from the board.
Store the sign flat or upright in a dry place, with tissue paper over the satin bow so the loops don't get crushed. Avoid setting heavy objects against the front of the board.
For other ways to carry the same theme through the party, visit my Christmas baby shower ideas page.
I like that this project doesn't need a whole room full of decorations to look finished. One pretty sign, a ribbon bow, and three little felt bells are enough to give your guests a special welcome.
When you click on links to various merchants on this site and make a purchase, this may result in this site earning a commission. This does not affect the price you pay.

UBGI Gold Standard 2026
Reviewed under the site's
editorial checklist.
Photos, decorating ideas, party setups and reader submissions are shared for inspiration unless a page is specifically presented as a pattern, tutorial, reference guide or step-by-step project. Follow the instructions, measurements, safety guidance and manufacturer directions provided for the particular project or product.
About Jan | Contact | Baby Nursery Ideas (Blog) | Site Map | Privacy Policy | Disclosure Policy | Disclaimer | Affiliate Disclosure | Earnings Disclosure | Facebook | Pinterest
I am a participant in the Amazon Services LLC Associates Program, an affiliate advertising program designed to provide a means for us to earn fees by linking to Amazon. As an Amazon Associate I earn from qualifying purchases.
Copyright © 2006-2026. All Rights Reserved.