DIY Christmas Table Centerpiece with Pink Fabric Candy and Free Pattern Templates
By Jan Bay
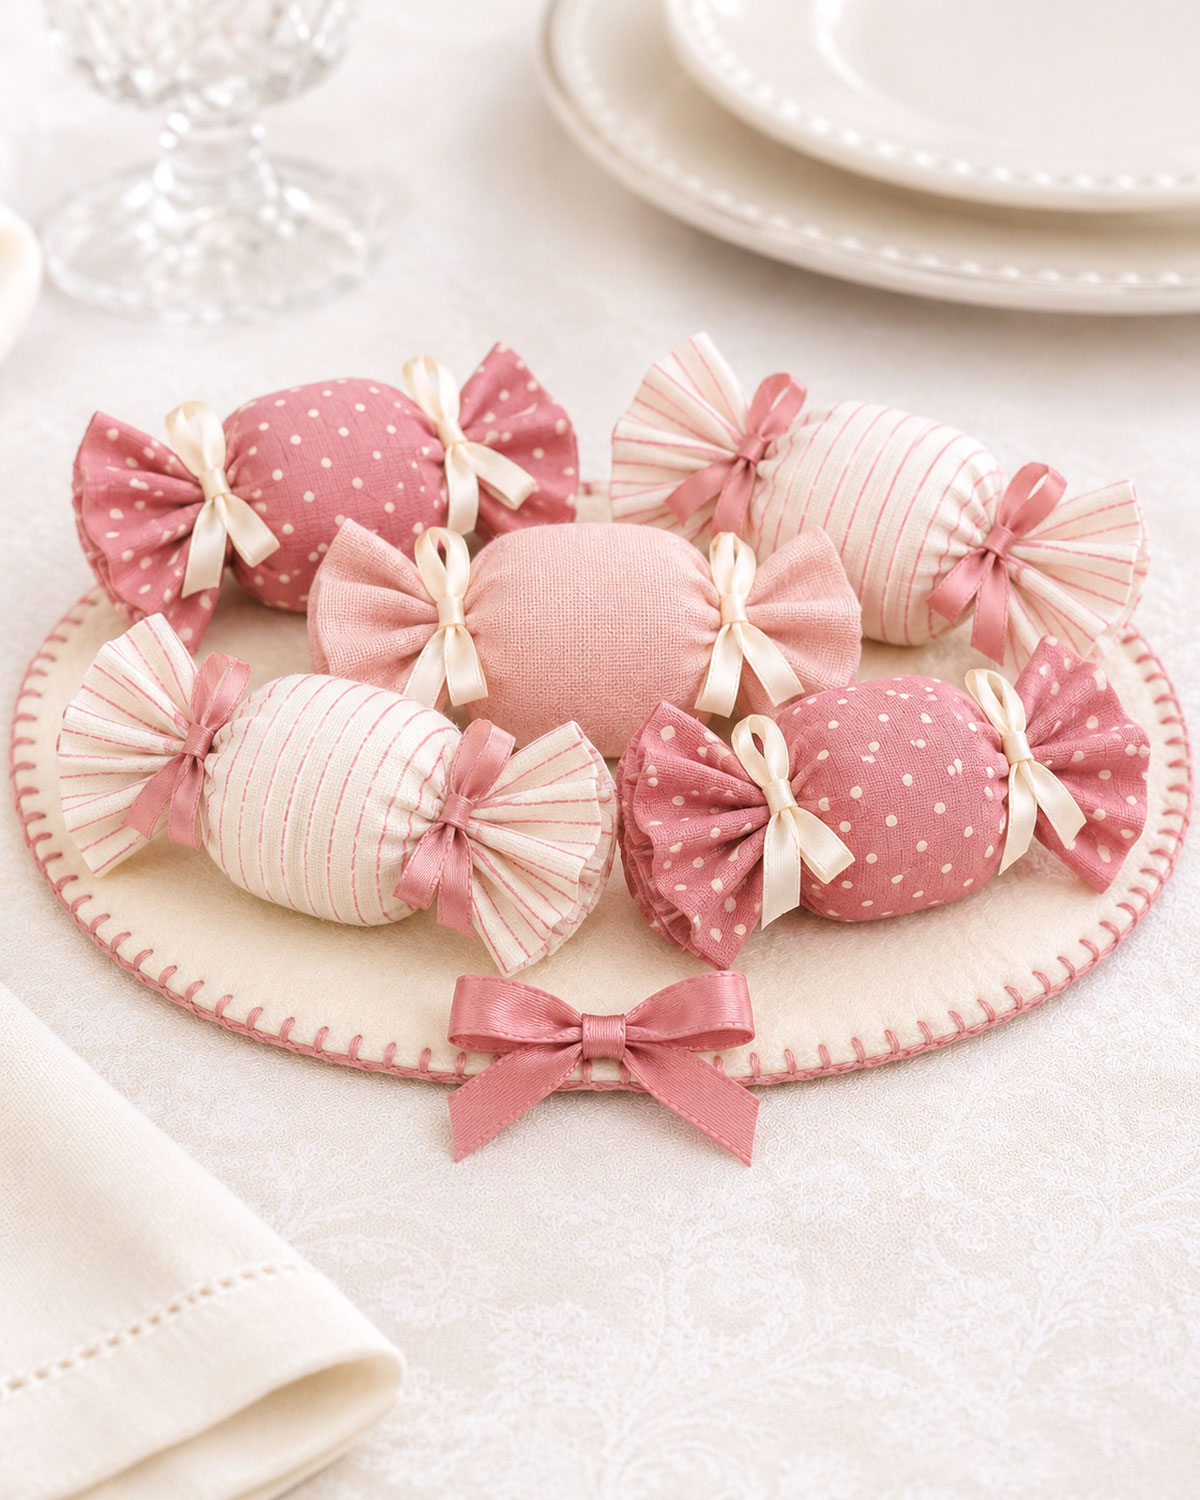
This DIY Christmas table centerpiece is made with five oversized fabric pieces of candy in dusty rose, blush pink, and ivory. They're arranged on an oval felt mat with pink blanket stitching around the edge and a satin bow at the front. I like that the candies aren't attached to the mat, so you can move them around until the arrangement looks just right or even repurpose them in other projects. And unlike a centerpiece made with real candy, you can bring this one out again next Christmas! I've included a free printable pattern with templates and instructions for sewing the candy wrappers, gathering the ends, tying the little bows, and making the felt base. It's a pretty addition to a Christmas dinner table, party or a pink Christmas baby shower.
Explore More Christmas Crafts and Table Decorations
DIY Pink Christmas Decorations
DIY Christmas Napkin Rings with Felt Bells
DIY Christmas Place Cards and Gift Boxes
See Supplies for This Project Here.
Jump to a Section
- Free DIY Christmas Table Centerpiece Templates
- Materials and Sewing Supplies
- Finished Measurements and Cutting Guide
- Make the Oval Felt Centerpiece Base
- Cut and Prepare the Five Fabric Candy Wrappers
- Sew and Fill the Fabric Candies
- Gather and Shape the Candy Wrapper Ends
- Tie the Small Candy Bows
- Arrange the Five Candies on the Felt Base
- Finishing and Final Project Check
- Christmas Table and Baby Shower Display Ideas
We'll start with the oval felt base, then make the five fabric candies. Each candy is sewn from one rectangle, gathered at both ends, and filled through the middle before the second end is closed. The little ribbon bows cover the gathered necks and give the wrappers their finished shape.
There's no need to sew the candies to the base. Once they're finished, you can arrange them in two rows with the blush candy between them, just as they're shown in the example.
Free DIY Christmas Table Centerpiece Templates
I've put the printable patterns and assembly guide together in one four-page PDF. You'll find the oval felt mat, the hidden chipboard insert, the fabric candy wrapper, and a placement guide for arranging all five candies.
Free printable templates: Download the Pink Christmas Candy Centerpiece Templates and Assembly Guide.
Print the pages on US Letter paper at 100% or Actual Size. Don't select Fit to Page or Shrink to Fit. Page 1 has a 1-inch check square. Measure it with a ruler before cutting the pieces.
Here's what's included:
- Page 1: Full-size 10 x 7-inch felt oval and a smaller 9 1/4 x 6 1/4-inch chipboard oval.
- Page 2: Full-size 6 x 5 1/2-inch fabric candy wrapper, with hem lines and gathering marks.
- Page 3: Placement diagram showing the five candies, their fabric colors, and the bow colors.
- Page 4: Finished project reference and assembly checkpoints.
The outer oval is the solid line on page 1. Cut two felt pieces from that outline. The smaller dashed oval is for the chipboard, and you'll need only one.
One useful printing tip: Page 1 shows the long oval running vertically so it fits on letter-size paper. Once it's cut out, turn the oval sideways to make the horizontal centerpiece shown in the photograph.
I'd make one complete fabric candy before cutting all five if you're using fabric that's much thicker or thinner than ordinary cotton. You'll be able to check the gathers and see how much filling gives the candy a nice rounded middle.
Materials and Sewing Supplies
The centerpiece doesn't need expensive materials. I'd put the money toward pretty cotton fabrics and ribbon. The construction is simple, and those are the things you'll see when it's sitting on the table.
For the oval centerpiece base:
- Ivory felt, enough to cut two 10 x 7-inch ovals
- Thin chipboard, enough to cut one 9 1/4 x 6 1/4-inch oval
- Dusty-rose embroidery floss or pearl cotton for the blanket-stitched edge
- Dusty-rose satin ribbon for one larger bow at the front of the mat
- A small amount of craft adhesive suitable for attaching chipboard to felt
- Matching sewing thread for the large bow
For the five fabric candies:
- Dusty-rose cotton with ivory polka dots, enough for two 6 x 5 1/2-inch rectangles
- Ivory cotton with narrow pink stripes, enough for two 6 x 5 1/2-inch rectangles
- Plain blush-pink cotton, enough for one 6 x 5 1/2-inch rectangle
- Polyester fiberfill for the five candy centers
- Ivory satin ribbon, approximately 1/4 to 3/8 inch wide, for six small bows
- Dusty-rose satin ribbon of the same width for four small bows
- Matching sewing thread
You'll also need:
- The printed four-page pattern
- Fabric scissors and scissors for the chipboard
- Ruler or measuring tape
- Fabric marker or tailor's chalk
- Straight pins or sewing clips
- Hand-sewing needles and an embroidery needle
- Sewing machine, optional
- Iron and pressing surface
- Small pointed tool or blunt pencil for turning the fabric tubes
Allow roughly 9 inches of narrow satin ribbon for each candy-neck bow to begin with, or 90 inches for all ten. You can trim the tails after tying them. For the larger bow on the felt mat, start with a separate piece of dusty-rose ribbon about 14 inches long and 5/8 to 3/4 inch wide.
For the stuffing, use small amounts of ordinary polyester fiberfill. You want rounded candy centers, not tightly packed balls. I'd skip loose beads, hard fillers, and anything heavy enough to distort the fabric.
Don't use real candy inside the fabric wrappers. These are reusable stuffed decorations, not food containers.
Finished Measurements and Cutting Guide
The finished centerpiece has an oval base measuring 10 inches long and 7 inches wide. The candies are approximately 5 inches long from one fan-shaped end to the other, with a padded middle section about 3 inches long.
Those are the intended dimensions from the printable pattern. The exact fullness of each candy will depend on how firmly you gather and fill the fabric.
| Piece | Cutting Size | Quantity |
|---|---|---|
| Ivory felt base | 10 x 7-inch oval | 2 |
| Chipboard insert | 9 1/4 x 6 1/4-inch oval | 1 |
| Dusty-rose polka-dot wrapper | 6 x 5 1/2 inches | 2 |
| Ivory striped wrapper | 6 x 5 1/2 inches | 2 |
| Solid blush wrapper | 6 x 5 1/2 inches | 1 |
| Small neck bows | Narrow satin ribbon | 10 |
| Large mat bow | Dusty-rose satin ribbon | 1 |
How the Candy Wrapper Measurements Work
Each fabric rectangle begins at 6 inches along the candy's length and 5 1/2 inches around the candy.
The two short ends are each folded inward twice by 1/4 inch. That uses 1/2 inch at each end and leaves a finished wrapper length of 5 inches.
Next, the two long raw edges are sewn together with a 1/4-inch seam allowance. That creates a tube with a fabric circumference of approximately 5 inches. Before stuffing, its calculated diameter is about 1.6 inches.
The gathering marks are 1 inch inside each finished hemmed end. That leaves three sections along the candy's length:
- One fan-shaped wrapper end, approximately 1 inch long
- One padded candy center, approximately 3 inches long
- One more fan-shaped wrapper end, approximately 1 inch long
That adds up to 5 inches. You won't be shortening the center or cutting away the wrapper ends after gathering.
Cutting Checklist
Before sewing, count everything. You should have two felt ovals, one chipboard oval, two polka-dot fabric rectangles, two striped rectangles, and one solid blush rectangle.
Set the narrow ribbon aside until all five candies are filled. The large bow for the felt mat is a separate decoration, so don't accidentally use its ribbon for the candy ends.
Make the Oval Felt Centerpiece Base
The ivory felt oval is what keeps the little candy arrangement together visually. It has a hidden chipboard insert to help it lie flat and a dusty-rose blanket-stitched edge that matches the ribbon bows.
We'll sandwich the chipboard between two felt ovals. There's no need to wrap the felt around the chipboard or cut extra seam allowances.
Cut the Two Felt Ovals
- Find page 1 of the printable pattern.
- Check that the 1-inch test square printed at the correct size.
- Cut around the solid outer oval to make your paper pattern.
- Place the pattern on the ivory felt and trace its outline.
- Cut the first felt oval along the traced line.
- Use the same pattern to cut a second matching oval.
- Lay the two felt pieces together and check that their edges line up.
- Trim any small uneven spots without changing the oval's overall size.
Felt cutting checkpoint: Two identical ivory felt ovals, each 10 inches long and 7 inches wide.
Cut the Hidden Chipboard Oval
- Return to page 1 of the PDF.
- Find the smaller dashed oval inside the solid outline.
- Trace that dashed shape onto a separate sheet of paper, or print page 1 again and cut around the dashed line.
- Place the smaller pattern on thin chipboard.
- Trace and cut one oval measuring 9 1/4 inches long by 6 1/4 inches wide.
- Check that the chipboard lies flat without curling or bent corners.
- Place the chipboard on top of one ivory felt oval, centering it from end to end and side to side.
Because the chipboard is 3/4 inch shorter and 3/4 inch narrower than the felt, it should leave a border of approximately 3/8 inch around the entire shape.
That's enough room to join the felt edges without sewing through the chipboard. I'd use fairly thin material here. Heavy, stiff cardboard could make the finished mat look raised in the middle.
Sandwich the Felt and Chipboard
- Place the first ivory felt oval flat on your work surface.
- Apply a small amount of suitable adhesive to one face of the chipboard, keeping the glue away from its outer edge.
- Center the chipboard on the felt, leaving an even 3/8-inch border.
- Press gently so the chipboard stays in place.
- Apply a little adhesive to the exposed upper face of the chipboard.
- Place the second ivory felt oval directly over the first, covering the chipboard completely.
- Align the two felt edges.
- Press the layers gently together without creating lumps of adhesive.
- Leave the felt border free of glue where you'll be sewing.
- Allow the adhesive to set according to its instructions.
Layering checkpoint: The chipboard is hidden between the two felt layers. The felt extends approximately 3/8 inch beyond the chipboard all around, and the outer edges of the two felt pieces are aligned.
If the chipboard has shifted toward an edge, adjust it before the glue dries. You don't want to meet a hard chipboard edge when you begin the blanket stitching.
Blanket Stitch Around the Oval
Now we'll add the dusty-rose stitching you can see around the outside of the mat. The stitches join the felt layers and make a decorative pink border.
- Thread an embroidery needle with dusty-rose embroidery floss or pearl cotton.
- Start at the back of the oval, hiding your starting knot between the felt layers near the edge.
- Bring the needle up approximately 1/8 to 3/16 inch inward from the felt edge.
- Pass the needle through both felt layers, staying outside the chipboard insert.
- Hold the working thread beneath the needle as you draw it through to form a blanket-stitch loop along the edge.
- Move approximately 1/4 inch along the oval and make the next stitch.
- Continue around the curved edge, keeping each stitch approximately the same depth and distance from its neighbors.
- Shorten the spacing slightly on the tight curves if needed so the stitches follow the oval neatly.
- Keep the thread snug against the felt without pulling the edges inward.
- Continue until you've worked around the entire perimeter.
- Join the final stitch neatly to the first.
- Pass the thread between the felt layers, secure it, and trim the end so it doesn't show.
If you haven't worked blanket stitch before, DMC's embroidery stitch guide includes a useful blanket-stitch diagram. The same stitch works along a curved felt edge.
Border checkpoint: Both felt layers are joined all around the oval. The stitches form an even dusty-rose border, the chipboard remains hidden, and the mat lies flat.
Don't try to make the stitches reach all the way through the middle of the mat. Their job is to hold the felt edges together and add that little pink outline.
Make the Larger Satin Bow for the Mat
The larger satin bow sits at the center of the front edge of the oval. It's separate from the ten small bows we'll use on the candies.
- Cut a piece of dusty-rose satin ribbon approximately 14 inches long and 5/8 to 3/4 inch wide.
- Make one loop on the left side of the ribbon.
- Make a matching loop on the right.
- Cross the loops and tie them into a bow.
- Adjust the loops until the bow is approximately 2 1/2 inches across.
- Arrange the tails so they hang below the knot.
- Trim the tails to the length you like, making the ends even or cutting them into small angled points.
- Check that the knot is firm and the loops lie flat.
Sew the Bow to the Front Felt Edge
- Turn the oval horizontally so its 10-inch length runs from left to right.
- Choose the lower long curved edge as the front of the centerpiece.
- Find the midpoint along that front edge.
- Place the bow at the midpoint, with its knot resting over the blanket stitching.
- Arrange the loops across the front edge and the tails pointing outward toward the table.
- Thread a needle with matching dusty-rose sewing thread.
- Sew through the back of the bow's knot and the felt border beneath it.
- Make several small anchoring stitches, staying outside the chipboard insert.
- Secure the thread between the felt layers.
- Gently check that the bow stays in place when the mat is lifted.
Completed base checkpoint: One 10 x 7-inch ivory felt oval with a hidden 9 1/4 x 6 1/4-inch chipboard insert, pink blanket stitching all around, and one large dusty-rose satin bow at the center of the front edge.
Set the base aside somewhere flat. There's no reason to bend or roll it while we make the candies.
Cut and Prepare the Five Fabric Candy Wrappers
We're making five candies in three fabrics. Two will be dusty rose with ivory dots, two will be ivory with pink stripes, and one will be plain blush pink.
I wouldn't add a fourth fabric to this particular design. The two repeating prints and one plain candy give you enough variety without making the small arrangement look busy.
Cut the Fabric Rectangles
- Press the fabric before cutting so the measurements won't be affected by wrinkles.
- Find the 6 x 5 1/2-inch wrapper template on page 2.
- Place the pattern on the wrong side of the dusty-rose polka-dot fabric.
- Trace and cut one rectangle.
- Repeat to cut a second dusty-rose polka-dot rectangle.
- Use the same pattern to cut two ivory rectangles with narrow pink stripes.
- Cut one final rectangle from plain blush-pink fabric.
- Check the length and width of each piece with a ruler.
Fabric cutting checkpoint: Five 6 x 5 1/2-inch rectangles, made up of two dotted rose pieces, two ivory striped pieces, and one solid blush piece.
For the striped fabric, lay out both rectangles so the stripes run in the same direction. That way, your two finished striped candies will look like a matching pair.
Mark the Hem and Gathering Lines
The short ends of each rectangle will become the two flared ends of the candy wrapper. They need small hems so the raw edges won't show.
- Place the first rectangle wrong side up with its 6-inch length running horizontally.
- Measure 1/4 inch inward from the left short edge and mark a folding line.
- Measure another 1/4 inch inward and mark the second folding line.
- Repeat at the right short edge.
- Measure 1 1/2 inches inward from the original left cut edge and mark the first gathering line.
- Measure 1 1/2 inches inward from the original right cut edge and mark the second gathering line.
- Check that the space between the gathering marks measures 3 inches.
- Repeat these marks on the other four rectangles.
Marking checkpoint: Each wrapper has two fold lines at each short end and two gathering lines, one on either side of the 3-inch middle section.
Hem the Two Short Ends
- Keep the first wrapper wrong side up.
- Fold the left short raw edge inward by 1/4 inch.
- Press the fold.
- Fold it inward another 1/4 inch, hiding the raw edge.
- Press again.
- Repeat the double fold at the right short end.
- Sew each folded hem close to its inner folded edge, using a straight stitch by machine or small hand stitches.
- Keep the stitching straight without stretching the fabric.
- Repeat the two hems on all remaining wrappers.
Each wrapper should now measure approximately 5 inches from one finished end to the other. The gathering lines remain 1 inch inward from those finished ends.
Hem checkpoint: Five flat fabric pieces, each with two neatly hemmed short ends and no exposed raw fabric along those ends.
Don't hem the long edges. We'll sew those together to make each wrapper into a tube.
Sew and Fill the Fabric Candies
Now we'll turn each rectangle into a little fabric tube. After that, one end gets gathered, the middle is filled, and the second end is gathered closed.
Sew the First Candy Tube
- Take one hemmed dusty-rose polka-dot rectangle.
- Fold it lengthwise, bringing its two long raw edges together.
- Keep the right sides of the fabric facing each other.
- Align the long edges and the two finished short ends.
- Pin or clip the long raw edges together.
- Sew along the long edge using a 1/4-inch seam allowance.
- Begin and end the seam at the finished hemmed edges.
- Backstitch at both ends if you're using a sewing machine.
- Remove the pins or clips.
- Check that the seam is complete and that both short ends remain open.
You'll have a tube approximately 5 inches long with a sewn circumference of about 5 inches. The long seam will be hidden inside after turning.
Turn the Tube Right Side Out
- Reach inside one open end of the sewn tube.
- Pull the opposite end through the opening to turn the tube right side out.
- Use your fingers or the blunt end of a pencil to gently straighten the fabric.
- Don't push a sharp tool through the fabric.
- Smooth the long seam with your fingers.
- Turn the tube until the seam lies along the underside.
- Check that both hemmed ends still open freely.
The tube should lie fairly flat when empty. It will take on its rounded candy shape after we gather the necks and add the filling.
Sew the Other Four Tubes
- Sew the second polka-dot wrapper with a 1/4-inch long-edge seam.
- Turn it right side out.
- Sew and turn the two ivory striped wrappers in the same way.
- Sew and turn the solid blush wrapper.
- Check that all five tubes have their seams hidden inside.
- Lay the tubes together and compare their finished lengths.
Tube checkpoint: Five fabric tubes approximately 5 inches long, with open hemmed ends and one hidden lengthwise seam each.
Don't fill all five yet. We'll shape one complete candy first, then repeat the same method for the others.
Gather and Shape the Candy Wrapper Ends
Here's how we'll give the fabric tubes their wrapped-candy shape. Each one has a rounded, stuffed center and two little fan-shaped ends. The gathers go at the marked lines, not at the very ends of the fabric.
That leaves an inch of fabric beyond each neck. We'll spread those ends into little fans after the candy is filled.
Gather the First Candy Neck
- Take the first polka-dot fabric tube and place it on your work surface.
- Find the gathering line 1 inch inward from one finished end.
- Thread a hand-sewing needle with doubled sewing thread, leaving a generous working length.
- Tie a knot in the thread ends.
- Bring the needle through the fabric at the gathering line, close to the underside seam.
- Make small running stitches around the entire circumference of the tube, following the marked line.
- Keep the stitches approximately 1/8 inch long.
- Return to the starting point, leaving the thread attached.
- Pull the thread gradually to draw the fabric into a narrow gathered neck.
- Arrange the gathers around the neck so they don't bunch entirely on one side.
- Pull the opening nearly closed, leaving no large gap for the stuffing to escape.
- Wrap the working thread around the gathered neck once or twice to help hold it.
- Secure the thread with several small stitches and a firm knot.
- Trim the loose thread end.
First-neck checkpoint: One end of the fabric tube is gathered into a narrow neck. About 1 inch of empty, hemmed fabric extends beyond the gathering line.
Leave that extra fabric alone for now. We'll shape it into a fan after the second neck is gathered.
Fill the Three-Inch Candy Center
- Hold the tube with the gathered neck pointing downward and the open end pointing upward.
- Take a small pinch of polyester fiberfill.
- Push the filling through the open end toward the gathered neck.
- Add another small pinch of filling.
- Work the filling into the middle section with your fingertips.
- Continue until the 3-inch area between the gathering marks looks gently rounded.
- Keep the stuffing away from the last 1-inch section at the open end.
- Shape the filling into a plump oval rather than a tightly packed cylinder.
- Check that the center doesn't have hard lumps or large empty spots.
I'd stop filling as soon as the middle looks nicely rounded. Too much stuffing can pull the fabric tight, make the seam stand out, and leave the candy looking more like a ball than a wrapped sweet.
Stuffing checkpoint: The middle 3 inches of the tube should look full and rounded, while the remaining open end is still empty and ready for gathering.
Gather the Second Candy Neck
- Find the remaining gathering line, 1 inch inward from the second finished hem.
- Push any loose filling back toward the middle so it stays clear of the gathering line.
- Thread the needle with another doubled length of sewing thread.
- Work small running stitches around the entire tube at the marked line.
- Return to the starting point.
- Pull the thread slowly to gather the second neck.
- Arrange the fabric evenly around the gathering.
- Before closing it completely, check that the center has the fullness you want.
- Add or remove a small amount of fiberfill if needed.
- Pull the gathered neck nearly closed.
- Wrap the thread around the neck and secure it with several small stitches and a knot.
- Trim the loose thread.
Two-neck checkpoint: The candy has a rounded middle approximately 3 inches long, with a gathered neck at each end and approximately 1 inch of unstuffed fabric beyond each neck.
Both gathered closures should be firm enough that the fiberfill can't work its way out when the candy is handled.
Shape the Two Fan Ends
Now we can make those little ends look more like the twisted ends of a candy wrapper.
- Hold the first candy with its length running from left to right.
- Take the loose fabric beyond the left gathered neck.
- Spread the hemmed outer edge into a small fan.
- Use your fingertips to arrange several shallow accordion pleats between the neck and the outer edge.
- Keep the pleats fairly even without flattening the whole fan.
- Repeat at the right end.
- Turn the candy over and check that the underside seam is still underneath.
- Adjust the two fans until they look reasonably balanced.
- Check that both hemmed edges are visible and tidy.
You don't need to press sharp creases into the fans. A little fullness makes them look like fabric candy wrappers instead of folded paper.
Make the Remaining Four Candies
- Take the second polka-dot fabric tube and gather its first neck.
- Add fiberfill to the 3-inch middle section.
- Gather its second neck closed.
- Spread both ends into fans.
- Repeat with the first ivory striped tube.
- Repeat with the second ivory striped tube.
- Finish the solid blush fabric tube in the same way.
- Arrange all five stuffed candies on your work surface.
- Check that their centers are similarly filled and that each candy has two complete fan ends.
Five-candy checkpoint: Two dotted dusty-rose candies, two ivory striped candies, and one plain blush candy. Every candy has one padded center, two gathered necks, and two fan-shaped ends.
Tie the Small Candy Bows
There are ten little bows altogether, one around each gathered neck. The polka-dot and plain blush candies have ivory bows. The striped candies have dusty-rose bows.
I like keeping those colors reversed. The ivory bows stand out on the pink fabrics, while the rose bows bring a little pink onto the striped candies.
Prepare the Ribbon Pieces
- Cut six lengths of narrow ivory satin ribbon, approximately 9 inches each.
- Cut four matching lengths of dusty-rose satin ribbon.
- Lay the ivory ribbons beside the two polka-dot candies and the plain blush candy.
- Lay the dusty-rose ribbons beside the two striped candies.
- Check that you have ten ribbon pieces before beginning.
Ribbon count: Four ivory bows for the two dotted candies, two ivory bows for the blush candy, and four dusty-rose bows for the striped candies.
Tie the First Ivory Bow
- Take one completed polka-dot candy.
- Hold the candy with its decorated side facing you and the long fabric seam underneath.
- Wrap one ivory ribbon around the gathered neck at the left end.
- Bring the ribbon ends together on the visible front of the neck.
- Tie a small firm knot, keeping the ribbon directly over the gathered stitching.
- Make two small loops and tie them into a bow.
- Adjust the loops to approximately 3/4 to 1 inch across.
- Let the short ribbon tails hang beside the gathered neck.
- Trim the tails neatly.
- Check that the bow is centered and the gathering thread is hidden underneath.
If the bow tends to rotate around the neck, add one small matching hand stitch through the back of its knot and a little of the gathered fabric. Keep that stitch hidden.
Tie the Remaining Nine Bows
- Tie another ivory bow around the right neck of the first polka-dot candy.
- Add two ivory bows to the second polka-dot candy.
- Add two ivory bows to the solid blush candy.
- Take the first ivory striped candy.
- Tie a dusty-rose bow around each of its gathered necks.
- Repeat with the second ivory striped candy.
- Arrange all the loops and tails so they face the front of the candies.
- Check that none of the bows covers the fan ends completely.
Bow checkpoint: Ten small satin bows, with six ivory and four dusty rose. Every gathered neck is covered by one bow, and all ten fan ends remain visible.
That's the candy sewing finished. You don't need to add beads, bells, or extra decorations to the wrappers. The three fabrics and their little bows are plenty.
Arrange the Five Candies on the Felt Base
Now we'll put the centerpiece together. The candies should rest on the felt oval without being sewn or glued to it. That makes it easy to change their positions if you want to move the arrangement or store it after Christmas.
The placement guide on page 3 of the printable pattern shows how the five colors fit together.
Position the Back Two Candies
- Place the finished felt oval horizontally on your table.
- Turn the large dusty-rose satin bow toward the front.
- Take one polka-dot candy with ivory bows.
- Place it toward the back-left area of the felt mat.
- Angle it slightly, with its rounded center resting on the felt.
- Take one ivory striped candy with dusty-rose bows.
- Place it toward the back-right area.
- Angle this second candy so the two wrappers look naturally arranged rather than lined up in a straight row.
Back-row checkpoint: One dotted rose candy at the back left and one ivory striped candy at the back right. Their fan ends can sit close together, but neither candy is permanently attached.
Add the Plain Blush Candy in the Middle
- Take the solid blush candy with its two ivory bows.
- Place it near the center of the oval, a little in front of the back two candies.
- Turn its length roughly from left to right.
- Let its fan ends overlap the neighboring wrappers slightly if needed.
- Adjust the middle candy so its padded center remains visible.
- Check that the ivory bows are facing upward.
The plain blush candy helps separate the two repeating prints. I'd keep it close to the middle rather than moving it to the far edge of the mat.
Position the Front Two Candies
- Take the remaining ivory striped candy.
- Place it in the front-left area of the felt oval.
- Turn its dusty-rose bows toward the front where they'll be easy to see.
- Take the remaining polka-dot candy.
- Place it in the front-right area.
- Adjust its ivory bows and flared fabric ends.
- Let the candies overlap one another slightly where the wrapper ends meet.
- Leave enough of the front felt border visible to show the pink blanket stitching and large satin bow.
Full arrangement checkpoint: Two candies at the back, one blush candy in the middle, and two candies at the front. The colors alternate between dotted rose, ivory stripes, and solid blush.
Adjust the Arrangement Without Attaching It
Take a look at the centerpiece from the side of the table where your guests will sit. You should see all three fabric colors, most of the small ribbon bows, and the larger bow at the front of the felt mat.
If one wrapper is hiding another, turn it a little. If the felt border has disappeared under the candies, move the front pieces inward. You don't have to make every candy perfectly straight.
Leave the candies loose. Don't glue them to the felt, run a string through them, or sew them together. Their movable arrangement is part of the original project design.
Finishing and Final Project Check
Before putting the centerpiece on the table, there are a few things I'd check. Most of them are easier to fix now, before the decorations are packed away or carried to another room.
Check the Felt Base
- Lift the felt mat with both hands and place it back on a flat surface.
- Check that the 10 x 7-inch oval lies flat.
- Make sure the chipboard insert remains centered between the two felt layers.
- Check that the chipboard doesn't show at the edges.
- Inspect the blanket stitching around the complete oval.
- Secure any loose thread ends.
- Gently check that the large satin bow is attached at the front-center edge.
- Remove any remaining sewing pins or clips.
If the mat curls, don't try to fix it by pressing it with a very hot iron. Heat and moisture may affect the adhesive or chipboard. Check the layers and allow any remaining glue to cure while the mat lies flat.
Check All Five Fabric Candies
- Count the finished candies. There should be five.
- Check that two are dusty rose with ivory dots.
- Check that two are ivory with narrow pink stripes.
- Check that one is plain blush pink.
- Feel each padded center gently to check for large lumps or gaps in the filling.
- Inspect the gathered necks for loose stitches.
- Check all ten satin bows.
- Make sure the fan ends are spread neatly and their hemmed edges are intact.
- Trim loose sewing threads.
- Remove any temporary pins, clips, or fabric-marking tools.
Finished candy checkpoint: Each candy is about 5 inches long, with a rounded center about 3 inches long and a fan-shaped wrapper end at either side.
The exact outside width will vary with the fullness of your stuffing, but the five candies should look like a matching set.
Check the Complete Centerpiece
Put the candies back on the finished oval and check the arrangement one last time. You should have the embroidered ivory base, the larger dusty-rose bow, five candy centers, ten gathered wrapper ends, and ten small neck bows.
All five candies should lift away individually. Nothing needs to hold them permanently to the mat.
Cleaning and Storage
I'd store the candies and mat separately after Christmas. The padded candies can go in a roomy container where their fan ends won't be flattened. Keep the felt oval flat so the chipboard doesn't bend.
Spot-clean the fabric and felt gently if necessary. Don't machine-wash the completed centerpiece or soak the chipboard base.
These candies are decorations only. They're not edible, and the small ribbons and stuffing make them unsuitable as toys for babies or young children. Keep the centerpiece out of their reach.
Christmas Table and Baby Shower Display Ideas
I think this centerpiece looks prettiest on a light tablecloth, especially ivory or white. The pink blanket stitching is easy to see, and the three fabric colors stand out without needing more decorations scattered around them.
Use It for Christmas Dinner
Place the oval in the middle of the dining table, with the large satin bow facing the most visible side. The finished base is only 10 inches long, so it's a smaller decoration rather than a tall arrangement that blocks conversation across the table.
You could pair it with ivory napkins and simple dishes. I'd leave the table fairly uncluttered around it so the little fabric wrappers can be seen.
For a coordinating handmade detail at each setting, take a look at the pink Christmas napkin rings with felt bells. They use the same dusty-rose and ivory colors.
Display It at a Pink Christmas Baby Shower
For a Christmas baby shower, you could put the centerpiece on a small guest table, near the dessert display, or beside the favors. It doesn't have to sit on the main dining table.
If you're making our mini Christmas gift box place cards, use those for the individual place settings and let the candy centerpiece be the main decoration. I'd keep the two projects separate instead of putting the boxes on top of the felt mat.
The finished candy wrappers are stuffed with fiberfill, so there's no need to fill them with actual sweets. If you're serving candy, put the real treats in a separate food-safe dish.
Change the Colors for Another Christmas Theme
You can make the same centerpiece in red and ivory, cream and green, or whatever colors suit your Christmas table. Just keep the five-candy layout and the same wrapper measurements.
I would still choose two coordinating prints and one plain fabric. That gives the arrangement a little variety without having five unrelated patterns competing for attention.
There's no need to make a new felt template for a different color combination. You can reuse the 10 x 7-inch oval and the same candy wrapper pattern.
Make a Longer Table Display
If you have a long dining table, I'd make a second complete centerpiece rather than trying to squeeze extra candies onto the original oval. Two matching arrangements can sit farther apart on the table, leaving room for plates and serving dishes between them.
Each centerpiece should still have its own five candies, felt base, and front bow. That keeps the proportions consistent with the original pattern.
You'll find more projects that use these same Christmas colors on my DIY pink Christmas decorations page.
And that's the finished candy centerpiece. Five little fabric sweets, one stitched felt mat, and a handful of satin bows make a Christmas decoration you can arrange again whenever you bring it out.
When you click on links to various merchants on this site and make a purchase, this may result in this site earning a commission. This does not affect the price you pay.

UBGI Gold Standard 2026
Reviewed under the site's
editorial checklist.
Photos, decorating ideas, party setups and reader submissions are shared for inspiration unless a page is specifically presented as a pattern, tutorial, reference guide or step-by-step project. Follow the instructions, measurements, safety guidance and manufacturer directions provided for the particular project or product.
About Jan | Contact | Baby Nursery Ideas (Blog) | Site Map | Privacy Policy | Disclosure Policy | Disclaimer | Affiliate Disclosure | Earnings Disclosure | Facebook | Pinterest
I am a participant in the Amazon Services LLC Associates Program, an affiliate advertising program designed to provide a means for us to earn fees by linking to Amazon. As an Amazon Associate I earn from qualifying purchases.
Copyright © 2006-2026. All Rights Reserved.