DIY Christmas Place Cards: Pink Gift Box Holders with Free Templates
By Jan Bay
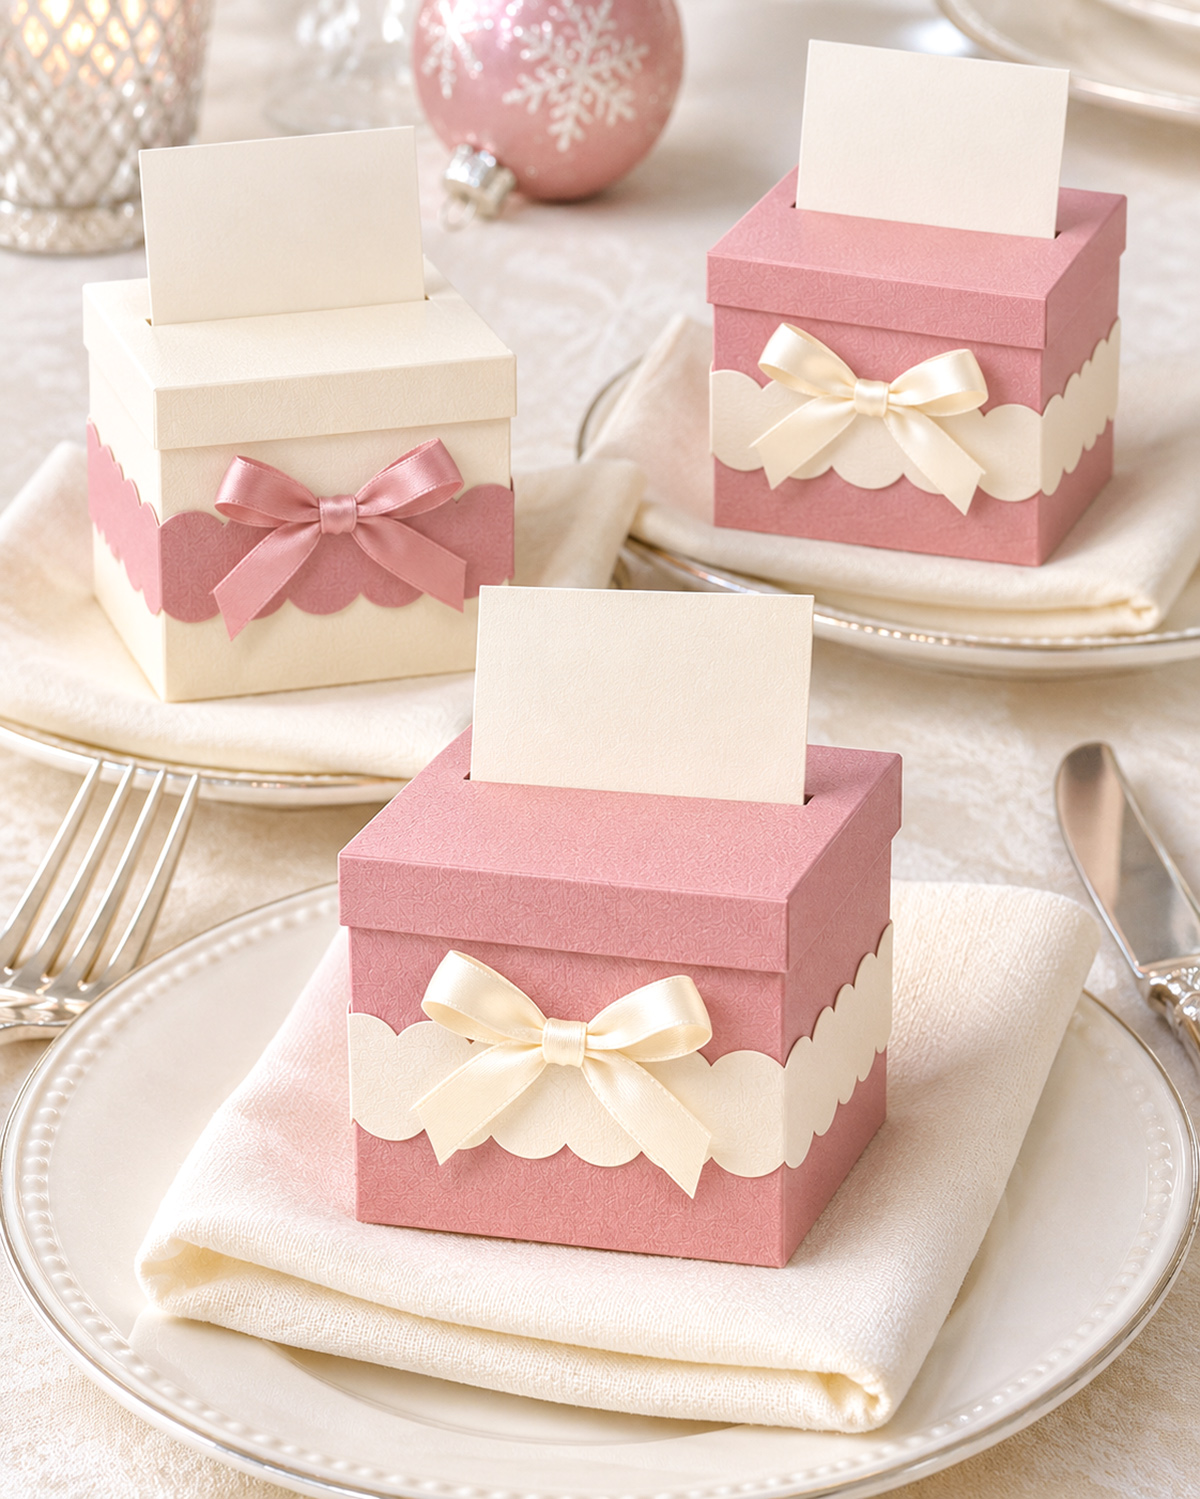
These DIY Christmas place cards are a little different from the usual folded name cards seen on party and holiday tables. Each one sits in the lid of a miniature gift box, with a pretty scalloped band and satin bow around the middle. I've made the design in dusty rose and ivory, with the colors reversed so you can mix the colors up around your Christmas table. You can even tuck a small wrapped favor inside each box. The free printable templates show you how to make the boxes, removable lids, and upright name cards for your holiday dinner or a baby girl Christmas shower.
Explore More Christmas Crafts and Table Decorations
DIY Pink Christmas Decorations
See Supplies for This Project Here.
Jump to a Section
- Free DIY Christmas Place Cards Templates
- Materials and Papercraft Supplies
- Cut the Pink and Ivory Gift Box Pieces
- Assemble the Three Mini Gift Boxes
- Make the Removable Gift Box Lids
- Make the Place Card Slots
- Add the Contrasting Scalloped Bands
- Make and Attach the Satin Bows
- Make the Removable Christmas Name Cards
- Finish and Check the Gift Box Place Card Holders
- Christmas Table and Baby Shower Place Setting Ideas
I like the idea of giving each guest a tiny present right at her place setting. These little boxes do that without taking up much room on the table. The name card slips into the top, and the lid lifts off if you want to tuck a wrapped favor inside. You can also leave the boxes empty and use them just for decoration.
We'll make three boxes to match the example image, two dusty rose and one ivory. Each box has a 2 1/4-inch-square base and stands about 1.85 inches high before you add its lid and name card. The contrasting scalloped bands and satin bows give them their finished look.
I'd make one complete box before cutting enough pieces for a whole Christmas dinner guest list. That gives you a chance to check how your cardstock folds, how the lid fits, and whether the name card stands up in its slot.
Free DIY Christmas Place Cards Templates
I've included the box, lid, scalloped band, and place card patterns in one four-page PDF. You can use the same patterns for every place setting and simply switch the cardstock colors.
Free printable templates: Download the Mini Christmas Gift Box Place Card Templates and Assembly Guide.
Print on US Letter paper at 100% or Actual Size. Turn off Fit to Page and Shrink to Fit. Each template page has a 1-inch test square. Measure that square with a ruler before you begin cutting.
The download includes:
- Page 1: Full-size gift-box body with a 2 1/4-inch-square floor, four walls, and corner glue tabs.
- Page 2: Separate lift-off lid with a reinforced 1.08-inch place card slot and a matching reinforcement piece.
- Page 3: Scalloped band strips, removable place card with an insertion tongue, and bow measurements.
- Page 4: Finished example reference, assembly order, and construction checkpoints.
The solid lines are for cutting. The dashed lines show where to fold, except for the short marked slot on the lid, which must be cut open. Don't cut away the little glue tabs. You'll need those to close the box corners.
Before batch cutting: Make one sample box and lid from your chosen cardstock. The measurements are provided in the templates, but the final fit will depend partly on the thickness of the paper you're using.
Materials and Papercraft Supplies
You won't need a cutting machine for these. I'd choose cardstock that's firm enough to hold a square box shape but still easy to fold neatly. The finish matters more than using expensive paper.
For three gift-box place settings, gather:
- Dusty-rose cardstock, approximately 65 to 80 lb cover weight, for two complete box bodies and two lids
- Ivory cardstock of a similar weight for one complete box body and lid
- Extra ivory cardstock for four scalloped band strips and three blank place cards
- Extra dusty-rose cardstock for two scalloped band strips
- Matching cardstock for three under-lid reinforcement pieces
- Ivory satin ribbon, 3/8 inch wide, approximately 16 to 18 inches total for two bows
- Dusty-rose satin ribbon, 3/8 inch wide, approximately 8 to 9 inches for one bow
- Clear-drying craft glue or paper-craft adhesive
- Strong double-sided craft tape, optional
- Sharp scissors
- Craft knife and cutting mat for the lid slots
- Metal ruler and pencil
- Scoring tool and bone folder
- Small paper clips or craft clips for holding glued corners
- Fine-tip pen for writing guest names
- Optional small, individually wrapped favors
- The printed four-page template set
You'll also need extra copies of the templates if you're making several boxes. Print one working set for each box or trace the pieces from a reusable paper pattern.
Cardstock tip: Score each dashed fold line before bending the paper. A scored line gives the paper a cleaner fold and helps prevent cracking. Cricut's cardstock scoring guide explains why this is worth doing, especially with heavier paper.
Keep the ribbon fairly narrow. A wide bow would cover too much of the little scalloped band, and that's one of the nicest details on these boxes.
Cut the Pink and Ivory Gift Box Pieces
Let's get everything cut before we start folding. There are several pieces for each box, so keeping the pink and ivory parts in separate piles will save a lot of sorting later.
Cut the Three Box Bodies
- Cut out the full-size box-body pattern from page 1 of the PDF.
- Lay it on the wrong side of your dusty-rose cardstock.
- Trace the complete outside outline, including the small corner tabs.
- Cut along the solid outside lines.
- Keep the four wall panels attached to the square bottom.
- Repeat to make a second dusty-rose box-body net.
- Trace and cut one more body net from ivory cardstock.
- Check that all three nets have the same floor, walls, and corner tabs.
Each box body has a 2.25 x 2.25-inch square floor and four walls measuring approximately 1.85 inches high.
Body cutting checkpoint: Three complete box-body nets, two dusty rose and one ivory. Each has one square floor, four attached walls, and four corner glue tabs.
Cut the Three Separate Lids
- Find the lift-off lid pattern on page 2.
- Trace the complete outline onto dusty-rose cardstock, including the four shallow side panels and corner tabs.
- Cut around the solid outside edges, leaving the printed slit uncut for now.
- Repeat to make a second dusty-rose lid.
- Cut one matching lid from ivory cardstock.
- Check that each lid has a 2.38-inch-square top and four 0.42-inch-deep sides.
- Keep the three lid nets flat until the reinforcement pieces have been attached.
Lid cutting checkpoint: Two dusty-rose lid nets and one ivory lid net, all with their shallow drop sides and joining tabs intact.
Cut the Lid Reinforcements
- Find the under-lid reinforcement rectangle on page 2.
- Trace it onto matching cardstock.
- Cut one rectangle measuring 1.60 x 0.92 inches for the first pink lid.
- Cut a second matching rectangle for the other pink lid.
- Cut a third rectangle for the ivory lid.
- Keep these pieces flat. They'll be glued beneath the lid tops before the card slots are cut.
Reinforcement checkpoint: Three rectangles, each 1.60 inches long by 0.92 inch wide.
Cut the Contrasting Scalloped Bands
Each finished box uses two joined scalloped strips. The pink boxes get ivory bands, while the ivory box gets a dusty-rose band.
- Find the scalloped band pattern on page 3.
- Trace the complete outline onto ivory cardstock, including the narrow joining tab.
- Cut carefully around the rounded scallops.
- Repeat until you have four ivory scalloped strips.
- Use the same pattern to cut two dusty-rose scalloped strips.
- Check that every strip measures 4 7/8 inches long, including its joining tab.
- Keep the straight upper edges intact. These edges will sit toward the top of the boxes.
- Arrange the strips in three pairs: two ivory pairs and one dusty-rose pair.
Band cutting checkpoint: Six strips altogether, four ivory and two dusty rose. Each pair will make one complete scalloped band.
Don't trim off the joining tabs. The corrected pattern includes a little fitting allowance so the band can wrap around the box without being stretched too tightly.
Cut the Three Blank Place Cards
- Find the blank removable place card pattern on page 3.
- Trace the complete outline onto ivory cardstock.
- Keep the narrow rectangular insertion tongue attached beneath the card face.
- Cut around the outer edges without separating the tongue from the card.
- Repeat until you have three matching place cards.
- Check that each visible card face measures 1.70 inches wide by 1.12 inches high.
- Check that each insertion tongue measures 0.94 inch wide by 0.46 inch deep.
- Set the cards aside until the lids and their slots are finished.
Place card cutting checkpoint: Three ivory cards, each with a wide rectangular face and one narrower tongue extending from the bottom center.
Check Your Complete Cutting List
Before you reach for the glue, you should have:
- Three box-body nets
- Three lift-off lid nets
- Three under-lid reinforcement rectangles
- Six scalloped band strips
- Three removable place cards
That's 18 cardstock pieces before you add the satin bows.
I'd keep the pieces for each box together. Once the three boxes are assembled, the pink and ivory parts will be much easier to match correctly.
Assemble the Three Mini Gift Boxes
Let's put the boxes together. They're all made the same way, so once you've finished the first one, the next two should be easier.
The pattern is one piece, with a square floor and four attached walls. The short tabs on the front and back panels fold inside the side walls to hold the corners together.
Score the First Box Body
- Choose one dusty-rose box-body net and place it on your work surface with its intended outside facing down.
- Find the four dashed lines around the square floor.
- Use a ruler and scoring tool to score each line without cutting through the cardstock.
- Find the four short dashed lines where the corner tabs join the front and back walls.
- Score those four tab lines as well.
- Check that all the outer cut edges are clean and the tabs are still attached.
- Fold the left and right side walls upward along their scored base lines.
- Fold the front and back walls upward in the same way.
- Open the walls again so you can reach the tabs while gluing.
Scoring checkpoint: You should have four wall folds and four shorter tab folds. The 2 1/4-inch-square floor stays flat.
Glue the Four Box Corners
- Fold the front wall upward to a right angle with the floor.
- Fold its two short corner tabs inward toward the inside of the box.
- Raise the left side wall so its inside face meets the first front tab.
- Apply a thin layer of glue to the side of the tab that will touch the inside of that wall.
- Press the tab against the inside of the side wall.
- Hold it until the adhesive begins to grip.
- Repeat with the second front tab and the right side wall.
- Raise the back wall and fold its two tabs inward.
- Glue those tabs inside the neighboring left and right side walls.
- Check that the four walls stand upright and the corners meet neatly.
- Place the box on a flat surface and check that its bottom remains square.
- Use small clips at the corners if the adhesive needs extra time to set.
- Allow the joins to dry before handling the box.
First box checkpoint: You should have an open-top dusty-rose gift box measuring approximately 2 1/4 inches across each side and 1.85 inches high.
Don't fold any of the walls inward to make a top. These boxes have completely separate lids, and the openings need to remain clear.
Make the Other Two Boxes
- Take the second dusty-rose box-body net.
- Score the four base lines and four corner-tab lines.
- Fold the walls upward and the tabs inward.
- Glue the four tabs inside the two side walls.
- Check that the bottom stays square and the sides stand upright.
- Repeat the same steps with the ivory box-body net.
- Allow all three boxes to dry completely.
- Place them side by side and compare their height and shape.
Three-box checkpoint: Two dusty-rose boxes and one ivory box, all with open tops, square floors, and four neatly joined corners.
Check the Box Measurements
Before making the lids, check the first box with a ruler. The floor should measure about 2.25 inches across and the walls should be about 1.85 inches high.
Run a fingertip lightly along the upper edges. They should be level, without one corner sticking up above the others.
If a box leans or twists, check whether one corner tab was glued crooked. Correct it before the adhesive sets. A square box is much easier to fit with a separate lid.
Make the Removable Gift Box Lids
I wouldn't glue the lids onto these little boxes. Being able to lift them off is what makes them useful as favor boxes as well as place card holders.
Each lid has a 2.38-inch-square top and four shallow sides that fold down approximately 0.42 inch. The top is slightly larger than the box beneath it, giving the lid room to slip over the box walls.
We'll reinforce and cut the place card slots before folding the lids. It's much easier to do that while the cardstock is lying flat.
Score the Three Lid Nets
- Place the first dusty-rose lid net on your work surface, finished side down.
- Find the four dashed lines surrounding the 2.38-inch-square lid top.
- Score each line carefully with a ruler and scoring tool.
- Score the four shorter lines where the corner glue tabs join the front and back lid walls.
- Do not cut the horizontal place card slot yet.
- Repeat the scoring on the second dusty-rose lid.
- Score the ivory lid in the same way.
- Keep all three nets flat for the reinforcement step.
Lid scoring checkpoint: Three flat lid nets with scored side walls and corner tabs. The slot lines are still uncut.
Make the Place Card Slots
The name card stands in a short slit near the back of each lid. There's no wire clip or separate holder. A small extra piece of cardstock beneath the slot helps keep that area from bending when the card is inserted.
I'd do this carefully on the first lid and test it with one place card before repeating it on the other two.
Reinforce the First Lid
- Place the first scored lid net flat with its finished side facing down.
- Find the printed 1.08-inch slot line on the lid top. It's closer to the BACK edge than the FRONT edge.
- Take one 1.60 x 0.92-inch reinforcement rectangle.
- Place it on the underside of the lid top, centered directly beneath the printed slot line.
- Check that the rectangle extends beyond both ends of the intended slot.
- Apply a thin, even layer of craft glue to the reinforcement piece.
- Press it against the underside of the lid top, keeping it centered over the slot.
- Allow the adhesive to dry completely while the lid remains flat.
Reinforcement checkpoint: One small rectangular patch should be attached beneath the intended slot, with no part of it extending beyond the outer edges of the lid top.
Cut the Reinforced Slot
- Place the reinforced lid on a cutting mat with its finished side facing up.
- Position a metal ruler along the printed 1.08-inch slot line.
- Use a sharp craft knife to cut along the line, passing through the lid top and the reinforcement beneath it.
- Make several light cutting passes if needed rather than forcing the blade through both layers at once.
- Keep the cut straight and stop at the marked ends.
- Lift the lid from the cutting mat and check that the slit passes completely through both cardstock layers.
- Do not widen the slit into a rectangular opening.
- Do not cut past either endpoint.
Slot checkpoint: One straight, 1.08-inch slit near the back of the lid, reinforced underneath.
Leave the slit narrow. A wide opening won't hold a place card as neatly, and it can weaken the lid top.
Test the Place Card Fit
- Take one of the ivory place cards cut from page 3.
- Find the dashed fold line between its rectangular face and narrow insertion tongue.
- Gently bend the tongue a little toward the back of the card.
- Hold the card upright, with its wide face above the lid.
- Slide the 0.94-inch-wide tongue into the 1.08-inch slot.
- Check that the tongue passes through without tearing the lid.
- Release the card carefully and see whether it remains upright.
- Remove the card and insert it again to check that the slit hasn't stretched.
Card-fit checkpoint: The place card should be removable and should stand reasonably upright without glue. Its tongue is narrower than the slot, so a slight backward bend helps it rest against the slit edges.
If the card leans too far, try a slightly firmer piece of ivory cardstock or adjust the bend in the tongue. Don't enlarge the slot just to make the card easier to insert. Test a sample before cutting all three lids.
Reinforce and Cut the Other Two Slots
- Take the second dusty-rose lid net.
- Glue one reinforcement rectangle beneath its marked slot.
- Allow the glue to dry.
- Cut the 1.08-inch slit through both layers.
- Repeat with the ivory lid and its matching reinforcement piece.
- Test each lid with one of the place cards.
- Check that all three cards can be inserted and removed without damaging the cardstock.
Three-slot checkpoint: All three lids should have matching reinforced slits near their back edges.
Fold and Glue the Lid Corners
- Return to the first dusty-rose lid, keeping the finished side outward.
- Fold its left and right side panels downward along their scored lines.
- Fold the front and back panels downward as well.
- Turn the four small corner tabs inward.
- Apply a little craft glue to the first front tab.
- Press it against the inside of the neighboring side wall.
- Glue the second front tab inside the opposite side wall.
- Repeat at the two back corners.
- Check that the lid top remains flat and the four shallow sides form an even square.
- Hold the corners until the glue grips.
- Repeat with the second dusty-rose lid and the ivory lid.
- Allow all three lids to dry before fitting them onto the boxes.
Completed lid checkpoint: Three shallow lift-off lids, two dusty rose and one ivory, each with a reinforced slot near the back.
Test Each Lid on Its Box
- Place the first dusty-rose box upright on your work surface.
- Hold a matching dusty-rose lid above it.
- Lower the lid gently over the box's four upper edges.
- Check that the shallow lid walls slip down around the outside of the box.
- Lift the lid off again without pulling the box walls inward.
- Repeat with the other dusty-rose box and lid.
- Test the ivory lid on the ivory box.
- Make sure the reinforced card slots remain toward the back of all three boxes.
Lid-fit checkpoint: Each lid should sit level, with its 0.42-inch sides covering the upper edges of the box. It should lift off without tearing, crushing, or badly distorting the box.
If a lid feels too tight, first check that all its corner tabs are glued flat and the box walls are square. If it still doesn't fit, recut the lid using the printed pattern with thinner cardstock or make a carefully measured adjustment to a new lid. Don't force a tight lid onto the finished box.
Add the Contrasting Scalloped Bands
Now for the part that makes these look like little Christmas presents. Each box gets a band of rounded scallops wrapped around its middle. The pink boxes have ivory bands, while the ivory box has a dusty-rose band.
I'd keep the bands at the same height on all three boxes. That way, the color changes give you variety without making the place settings look mismatched.
Join the Two Strips for the First Pink Box
- Take two of the ivory scalloped strips.
- Lay them on your work surface with the scallops pointing downward and the finished sides facing up.
- Find the 1/4-inch joining tab at the end of each strip.
- Bring the tab of the first strip behind the plain end of the second strip.
- Overlap the two pieces by exactly 1/4 inch.
- Check that their straight upper edges line up.
- Apply a thin amount of glue to the overlap and press the pieces together.
- Allow the first join to dry.
- Bring the two remaining ends around to form a continuous loop, keeping the scallops facing downward.
- Overlap the remaining tab behind the opposite plain end by 1/4 inch.
- Glue the second join.
- Check that the band isn't twisted before the glue dries.
Band measurement checkpoint: Each original strip measures 4 7/8 inches, including its joining tab. Two strips give you 9 3/4 inches before joining. The two 1/4-inch overlaps reduce the finished circumference to 9 1/4 inches.
The box itself has a nominal outside perimeter of 9 inches. That extra 1/4 inch gives the band a little room to fit around the cardstock rather than pulling tightly against the corners.
Fit the Ivory Band Around the First Pink Box
- Place the first dusty-rose box upright with its lid in place.
- Hold the completed ivory band around the box, keeping its scallops pointing down.
- Slide the band into position around the exposed walls.
- Position its straight top edge approximately 0.30 inch below the lower edge of the lid.
- Check that the rounded scallops hang down over the pink box walls.
- Arrange the joined sections toward the sides or back, leaving the front as neat as possible.
- Remove the lid carefully if you need better access while adjusting the band.
- Check that the band sits level around all four sides.
- Apply a few small dots of paper-craft glue beneath the straight upper portion of the band.
- Press the band gently against the box walls to hold it in place.
- Make sure the scalloped lower edge remains free and isn't flattened by the glue.
- Allow the adhesive to dry.
First band checkpoint: The pink box should have an ivory band circling its four sides, with the scallops hanging below a straight, level upper edge.
Don't glue the band to the lid. The lid must remain removable, and the scallops belong on the box body.
Decorate the Second Pink Box
- Take the remaining two ivory scalloped strips.
- Join their ends with two 1/4-inch overlaps to make another continuous band.
- Check that its finished circumference is approximately 9 1/4 inches.
- Slip it around the second dusty-rose box.
- Position the band at the same height as the band on the first box.
- Keep the scalloped edge pointing downward.
- Glue the band to the box walls with small, evenly spaced adhesive dots.
- Allow the band to dry.
Decorate the Ivory Box
- Take the two dusty-rose scalloped strips.
- Join them into a continuous band, overlapping 1/4 inch at both seams.
- Check that the scallops all face the same direction.
- Place the completed band around the ivory box.
- Position its straight upper edge approximately 0.30 inch below the lid's lower edge.
- Adjust the band until it sits at the same height as those on the two pink boxes.
- Glue the band to the ivory box walls.
- Let the adhesive dry fully.
Three-band checkpoint: You should now have two dusty-rose boxes with ivory scalloped bands and one ivory box with a dusty-rose scalloped band.
The bands should fit neatly without pulling the box corners inward. If one feels loose, use a small hidden glue dot to hold it against the box rather than stretching or crushing the cardstock.
Make and Attach the Satin Bows
The satin bows go at the center front of the scalloped bands. They'll cover a little of the paper decoration, but I'd leave plenty of the rounded edges showing on both sides.
We're using ivory ribbon on the pink boxes and dusty-rose ribbon on the ivory box, just as shown in the finished example.
Make the First Ivory Bow
- Cut an 8 to 9-inch length of ivory satin ribbon, 3/8 inch wide.
- Lay the ribbon on your work surface with its finished side facing up.
- Bring one end toward the center to make the first loop.
- Bring the other end toward the center to make a matching loop.
- Arrange the two loops so the finished bow will measure approximately 1 1/4 inches across.
- Leave two short ribbon tails hanging below the loops.
- Pinch the ribbon at the middle.
- Tie a small knot with matching sewing thread around the pinched center, or secure it with a tiny stitch.
- Adjust the loops until they're fairly even.
- Trim the tails into neat angled or V-shaped ends.
- Use a narrow fold of matching ribbon or a small wrapped center to cover the thread if needed.
Bow checkpoint: One ivory satin bow approximately 1 1/4 inches across, with two loops and two short tails.
Make the Other Two Bows
- Use another 8 to 9-inch length of ivory satin ribbon to make the second bow for the other pink box.
- Match the loop width and tail length to the first ivory bow.
- Cut an 8 to 9-inch length of dusty-rose satin ribbon for the ivory box.
- Make a third bow using the same method.
- Check that all three bows are approximately the same size.
Bow cutting checkpoint: Two ivory satin bows and one dusty-rose satin bow.
Attach the Bows to the Scalloped Bands
- Turn the first pink box so its cleanest band section faces front.
- Find the center of the front wall.
- Position an ivory bow over the scalloped band, with its loops spreading left and right.
- Check that the ribbon tails point downward and the band remains visible on both sides.
- Apply a tiny dot of suitable craft glue to the back of the bow's center.
- Press the bow gently onto the paper band.
- Hold it in place until the glue grips.
- Repeat on the second pink box with the other ivory bow.
- Attach the dusty-rose bow to the center front of the ivory box's pink scalloped band.
- Check that all three bows face forward and sit at approximately the same height.
- Allow the adhesive to dry.
Bow placement checkpoint: Both pink boxes should have ivory bows centered on their ivory scalloped bands. The ivory box should have a dusty-rose bow centered on its pink band.
That's enough ribbon. You don't need another bow on the lid or extra ribbon wrapped around the whole box. The scalloped band is already doing that job.
Make the Removable Christmas Name Cards
The name cards are the last paper pieces to finish. In the example, they're left plain ivory, which looks nice with the pink and scalloped decorations. You can write a guest's name on each one or leave them blank until you're ready to set the table.
Each card has a wide rectangular face and a smaller tongue at the bottom. The tongue goes into the reinforced slit in the lid, while the wider face stays above it.
Prepare the Three Card Faces
- Take the three ivory place cards you cut earlier.
- Check that their visible faces measure 1.70 inches wide by 1.12 inches high.
- Check that each lower insertion tongue measures 0.94 inch wide by 0.46 inch deep.
- Lay the first card on your work surface with its intended front facing upward.
- Find the dashed fold line between the wide face and the narrow tongue.
- Use a ruler and scoring tool to make a gentle crease along that line.
- Fold the tongue slightly toward the back of the card.
- Repeat with the other two cards.
- Keep the wide faces flat and free of creases.
Card checkpoint: Three ivory name cards with flat rectangular faces and small tongues bent slightly toward the back.
Add the Guest Names
- Decide which side of each card will face the guest.
- Write a name across the center of that side using a fine-tip pen.
- Keep the lettering within the 1.70 x 1.12-inch rectangular face.
- Leave the insertion tongue blank.
- Allow the ink to dry completely before handling the cards.
I'd use simple lettering in dusty rose or dark gray. There's already plenty of decoration on the boxes, so the names don't need an elaborate frame or extra snowflakes.
If you're making these for a baby shower and the guest list isn't final, leave the cards blank until closer to the party.
Insert the Cards into the Lids
- Place the first completed gift box on your work surface with its bow facing you.
- Set the matching lid on top, keeping the card slot closer to the back of the box.
- Hold the first place card with its name facing forward.
- Insert the narrow tongue into the reinforced slot.
- Lower the tongue until the wider card face meets the top of the lid.
- Gently adjust the backward bend in the tongue so the card stands as upright as possible.
- Check that the card can still slide out without damaging the lid.
- Repeat with the other two boxes and cards.
- Turn all three boxes so the bows and name cards face the same direction.
Place card checkpoint: You should have three small gift boxes with upright ivory name cards. Each card should slide out of its lid without glue.
If a card won't stand upright, don't keep pushing it farther into the slit. Try a slightly firmer card or adjust the tongue's backward bend first. The narrow cut should remain the same size.
Finish and Check the Gift Box Place Card Holders
Before making a dozen more, check your three finished boxes. The lids need to come off, the scalloped bands need to stay put, and the cards should stand up without making the tops buckle.
Check the Box Bodies and Lids
- Place all three boxes upright on a flat surface.
- Check that their bottoms are square and the walls stand straight.
- Inspect the four corner joins on each box.
- Make sure the glue tabs remain attached inside the side walls.
- Lift each lid off and replace it.
- Check that the lids sit level without crushing the box sides.
- Look underneath each lid and check that its reinforcement rectangle remains firmly attached.
- Inspect the card slots for tearing or stretching.
- Make sure no adhesive has accidentally joined a lid to its box.
Check the Scallops and Bows
- Check that each box has one complete scalloped band made from two joined strips.
- Make sure the bands sit below the removable lids.
- Check that the scallops hang downward and follow the box walls evenly.
- Inspect the two joining seams on each band.
- Secure any loose seam before handling the box again.
- Check that each bow is attached at the front center of its band.
- Confirm that the pink boxes have ivory bands and bows.
- Confirm that the ivory box has a dusty-rose band and bow.
- Trim any loose ribbon threads.
Check the Removable Place Cards
- Insert each card into its matching lid.
- Check that the card face remains visible above the lid.
- Make sure the tongue passes through both reinforced cardstock layers.
- Gently remove each card.
- Check that the slots haven't widened or torn.
- Reinsert the cards and adjust their angles if necessary.
- Make sure the cards face forward over the bows.
Finished project checkpoint: You should now have three gift-box place card holders, each with a 2.25-inch-square body, 1.85-inch-high walls, a separate 2.38-inch-square lift-off lid, a contrasting scalloped band, a small satin bow, and an upright removable ivory place card.
The box and card dimensions are taken from the printable patterns. The design hasn't been physically test-assembled from these instructions, so the precise lid clearance, band fit, and card-slot grip still need to be checked with a sample made from your chosen cardstock.
Remove all temporary clips and paper scraps before putting the boxes on the table. If you add favors, choose small, lightweight items in their own wrapping. Don't place unwrapped food directly against craft cardstock, adhesive, or ink.
Christmas Table and Baby Shower Place Setting Ideas
I'd set one little gift box on each dinner plate or folded napkin. The name card should face the guest, with the bow pointing toward the front of the place setting.
Use Them for Christmas Dinner
If you're decorating the table in pink and ivory, alternate the two box colors as you go around the table. The lighter box breaks up the dusty rose without looking like an entirely different decoration.
You don't need a separate favor bag or another name card. Each little box can handle both jobs.
For a larger table, make one finished sample first, then cut the remaining body pieces together, followed by the lids, bands, and cards. Working in batches will help keep the finished boxes looking alike.
Add a Small Wrapped Favor
These boxes are best for something light. A small wrapped chocolate or another individually packaged favor would be plenty, provided the package fits without pushing against the lid.
Put the favor inside before adding the lid and name card. Since the scalloped band stays attached to the body, guests can lift the top without disturbing the decoration.
I'd skip heavy gifts, oversized treats, and anything that needs refrigeration. These are little cardstock boxes, not sturdy gift containers.
Make Them for a Christmas Baby Shower
For a baby girl Christmas shower, you can use the same dusty-rose and ivory combination shown in the example. The boxes can mark places at a seated meal, or you can arrange them on a favor table with the guest names facing outward.
They'd look especially nice near the handmade sleigh from my Christmas sleigh centerpiece tutorial. The two projects use coordinating pink and ivory colors, but each can be displayed on its own.
Make Different Color Combinations
You can keep the templates exactly as they are and switch the colors for another Christmas theme. Red boxes with ivory scallops would look more traditional. Cream boxes with dusty-green bands would be pretty, too.
Keep the box sizes, lid construction, slot measurements, and scalloped-band lengths unchanged. Only the paper and ribbon colors need to be different.
Store the Place Card Boxes After Christmas
Remove the name cards and lift off the lids before storing the boxes. Place a small piece of tissue paper around the bows so they don't get flattened.
I'd store the finished boxes upright in a dry, sturdy container rather than trying to flatten them again. The glued corners and scalloped bands are meant to keep their shape.
And that's your set of Christmas place cards. Three little gift boxes, three upright names, and a few satin bows give you a pretty table decoration that can double as a small favor for each guest.
When you click on links to various merchants on this site and make a purchase, this may result in this site earning a commission. This does not affect the price you pay.

UBGI Gold Standard 2026
Reviewed under the site's
editorial checklist.
Photos, decorating ideas, party setups and reader submissions are shared for inspiration unless a page is specifically presented as a pattern, tutorial, reference guide or step-by-step project. Follow the instructions, measurements, safety guidance and manufacturer directions provided for the particular project or product.
About Jan | Contact | Baby Nursery Ideas (Blog) | Site Map | Privacy Policy | Disclosure Policy | Disclaimer | Affiliate Disclosure | Earnings Disclosure | Facebook | Pinterest
I am a participant in the Amazon Services LLC Associates Program, an affiliate advertising program designed to provide a means for us to earn fees by linking to Amazon. As an Amazon Associate I earn from qualifying purchases.
Copyright © 2006-2026. All Rights Reserved.