Free Baby Cross Stitch Patterns for Modern Nursery Keepsakes
By Jan Bay
These free baby cross stitch patterns are made for keepsakes you can actually finish and frame. Each design includes a counted chart, stitch key, finished size and clear instructions, starting with a baby footprint birth keepsake that can be personalized with a name, date, weight and length.
Explore More Baby Crafts and Keepsakes
Baby Crafts and Keepsake Ideas
Personalized Baby Gifts You Can Make
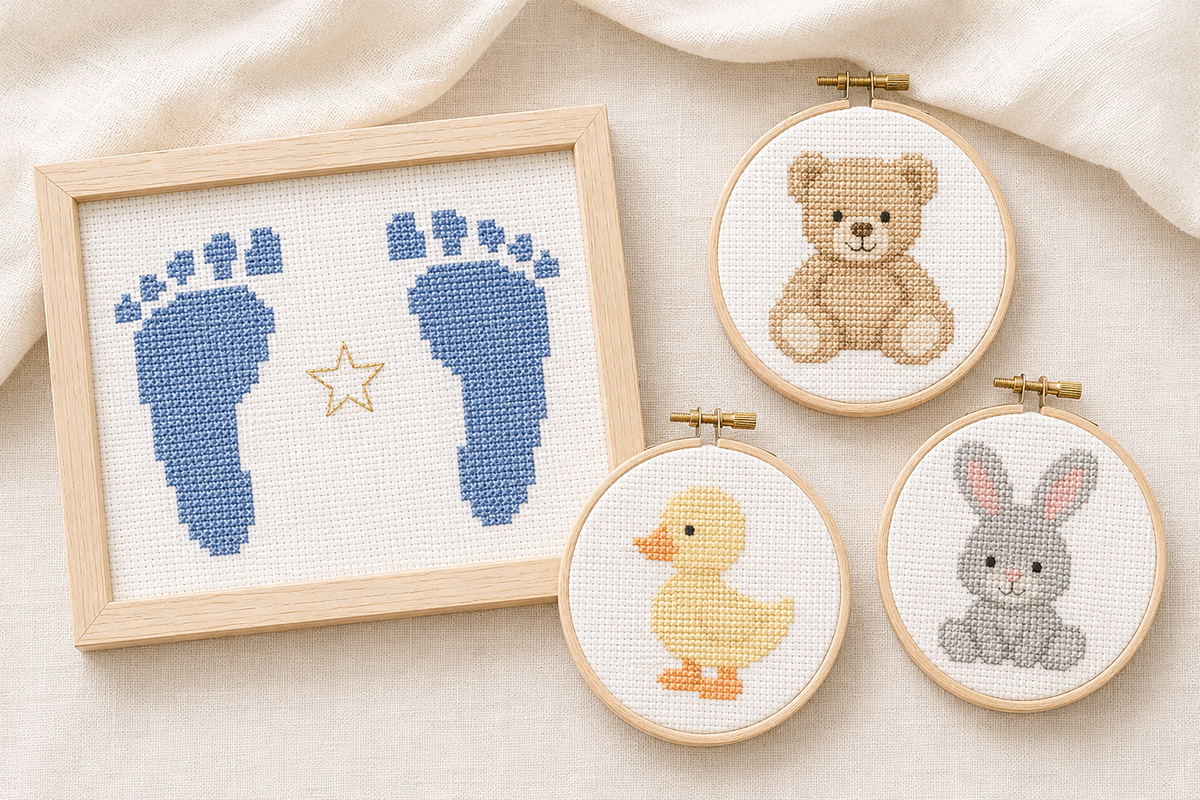
Use the charts below for exact stitch placement. The main page image is a visual preview of the four motifs, while the charts control the stitch counts, spacing and proportions.
14-Count Aida Cloth for This Cross Stitch Project
Jump to a Pattern or Section
Baby Footprint Cross Stitch Pattern
Teddy Bear Cross Stitch Pattern
Baby Duck Cross Stitch Pattern
How to Use Each Baby Cross Stitch Pattern on This Page
Each baby cross stitch pattern on this page is a counted design. The charts are the pattern. Every symbol represents one stitch on the fabric, and every blank square stays unstitched.
I am keeping these designs small enough to finish without turning a baby keepsake into a six-month project. The patterns are also simple enough to personalize. You can change the floss colors, add a baby's name or birth details, or frame the finished stitching without changing the basic chart.
The first pattern is a pair of mirrored baby footprints with a small five-point star between them. It works well as a birth keepsake because the stitched feet remain the focal point. There is room underneath for a name, date, weight and length if you want to add them.
Count twice before you stitch once. A mistake near the edge of a small motif can shift an entire foot or animal by one square, so use the row and column guides rather than judging placement by eye.
How to Read the Cross Stitch Charts
Start with the center of the fabric and the center of the chart. Fold the fabric gently in half from side to side and then from top to bottom. Press the folds lightly with your fingers. The place where the folds cross is the center of the fabric.
Each chart has numbered rows and a repeating column guide. The numbers are only counting aids. Do not stitch them.
- One chart square equals one square of Aida cloth.
- One symbol equals one full cross stitch unless the stitch key says otherwise.
- A period marks an empty square.
- Work all full cross stitches in the same direction. Make the lower diagonal of every stitch the same way, then cross it with the upper diagonal.
- Use two strands of six-strand embroidery floss for the full cross stitches unless the individual pattern says otherwise.
- Use one strand for optional backstitched names, dates or fine details.
You do not have to begin with the first row of a chart. Starting near the center makes it easier to keep the design centered on the fabric. Work outward while counting from stitches you have already completed.
If you lose your place, stop and count from a known row before adding another stitch. Removing three misplaced stitches is much easier than removing thirty.
Cross Stitch Supplies
The same basic supplies work for all four patterns on this page.
- 14-count white or off-white Aida cloth
- Size 24 tapestry needle with a blunt tip
- Six-strand cotton embroidery floss in the colors listed with each pattern
- 5-inch or 6-inch embroidery hoop for stitching
- Embroidery scissors
- Washable fabric marker or removable marking thread, optional for marking the center
- Printed or on-screen chart
- Finishing hoop or picture frame, if you plan to display the completed design
For the small motifs on this page, one standard skein of each listed floss color is more than enough. If you substitute colors, keep enough contrast between the stitched design and the fabric that the shape remains easy to see from across the room.
Cut the fabric several inches larger than the stitched area. For a design you plan to finish in a 6-inch hoop, a piece about 9 inches square gives you useful handling room around the edges.
Separate the embroidery floss before threading the needle. Standard stranded cotton has six strands. Cut a manageable length, separate two strands, bring those two strands back together and thread the needle. Very long floss tangles more easily and becomes fuzzy as it passes repeatedly through the fabric.
Free Baby Footprint Cross Stitch Pattern
This little footprint design is meant to look like a stitched baby keepsake, not an exact copy of an inked hospital footprint. Counted cross stitch is built on a square grid, so the curves are deliberately simplified. Five distinct toes, a rounded heel and a narrower middle keep each foot recognizable without making the chart unnecessarily complicated.
If you have an original hospital footprint that you want to preserve exactly as it was made, keep that original separate. You can find additional ways to display and protect it in these baby footprint frame ideas. Use the cross stitch design as a companion keepsake rather than trying to copy every smudge and crease in the original print.
Baby Footprint Pattern Details
| Chart size | 49 stitches wide × 34 stitches high |
| Fabric | 14-count Aida |
| Finished footprint pair | About 3.50 inches wide × 2.43 inches high on 14-count Aida |
| Total full cross stitches | 666, with 333 full cross stitches in each footprint |
| Additional stitch | Five-point star worked in backstitch |
| Suggested finish | 6-inch hoop for the motif; 7 or 8 inches if adding several lines of birth details |
| Difficulty | Beginner |
The 49 × 34 stitch size covers the complete footprint pair. The star is worked separately in backstitch and is not included in the 666 full-cross-stitch total. A baby's name and birth details are optional additions below the chart.
Suggested Floss Colors
- Footprints = DMC 3760 Medium Wedgwood, two strands
- Star = DMC 729 Medium Old Gold, one strand for backstitch
- Optional lettering = DMC 3799 Very Dark Pewter Gray, one strand for backstitch
The colors are suggestions, not requirements. Soft green, dusty rose, muted lavender, warm brown or one single color can all work. Keeping both footprints the same color gives the design a cleaner keepsake look.
Baby Footprint Cross Stitch Chart
Use the numbered grid below as the pattern. Each blue X represents one full cross stitch. The two footprints are exact mirrored versions of the same design, with five separate toes on each foot. The five-point star between the footprints is worked separately in backstitch.
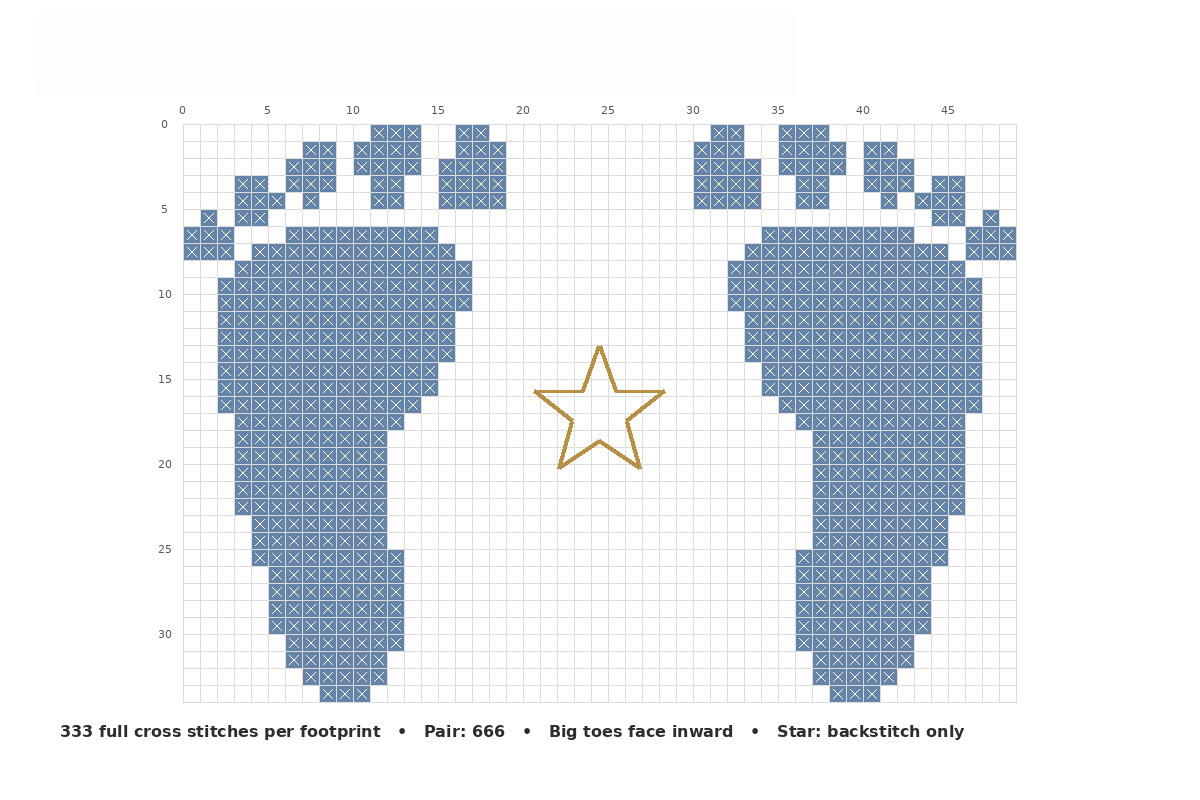
Click the chart to open the full-size pattern.
Finished Size on Different Fabric Counts
If you use a different Aida count, the number of stitches does not change. Only the physical size changes. These measurements use the full 49 × 34 stitched footprint pair and do not include optional lettering.
| Fabric | Approximate Footprint Pair Size |
|---|---|
| 14-count Aida | 3.50 × 2.43 inches |
| 16-count Aida | 3.06 × 2.12 inches |
| 18-count Aida | 2.72 × 1.89 inches |
How to Stitch the Baby Footprints
- Cut and prepare the fabric. Cut the Aida several inches larger than the stitched area and lightly mark the center of the fabric.
- Place the fabric in the working hoop. Keep it taut enough that the holes remain easy to see without stretching the weave out of shape.
- Use the center of the chart as your reference. The center falls in the blank space between the two feet. From the center mark on the fabric, count outward to the first blue stitch instead of estimating placement by eye.
- Thread the needle with two strands of footprint floss. Work every blue X as one full cross stitch. Keep the top diagonal of every stitch running in the same direction.
- Complete the first footprint from the chart. Follow the blue stitches exactly around the five separate toes, wider ball of the foot, narrower middle and heel.
- Stitch the second footprint from the chart. Do not estimate the spacing or reverse the first foot by eye. The chart already places the exact mirrored footprint so both big toes face inward.
- Check the full-cross-stitch count. Each footprint contains 333 full cross stitches, for 666 full cross stitches in the pair.
- Add the five-point star. Use one strand of DMC 729 and follow the gold star outline shown between the feet. The star is backstitch only and is not included in the 666 full-cross-stitch total.
- Inspect the finished pair before adding lettering. Confirm five separate toes on each foot, inward-facing big toes and matching heel height before beginning the name or birth details.
The toes do not need to look perfectly round. On a counted grid, a little squareness is part of the character of cross stitch. Trying to smooth every edge with extra stitches can quickly change the footprint into a much larger shape.
How to Add the Baby's Name and Birth Details
Leave at least four blank rows below the heel before adding a name. That small strip of open fabric keeps the footprints from looking crowded.
A simple layout is:
BABY'S NAME
Birth date
Weight · Length
Use one strand of dark floss and simple backstitch for small lettering. Before you begin, count the width of the complete name on graph paper or a cross stitch alphabet chart and center it beneath the footprint motif. Do not start with the first letter and hope the name lands in the middle.
If the full name is too wide, use the first name only. The footprints should still have room around them. A keepsake can hold quite a bit of information without needing to fill every open square.
For additional keepsake ideas using handprints and footprints, see baby hand and footprint ideas. The stitched version works especially well when you want something made to keep while leaving the original hospital prints untouched.
Finish the Footprint Keepsake
- Remove the fabric from the working hoop after all stitching is complete.
- Follow the care instructions for the fabric and floss if the piece needs cleaning.
- Allow the fabric to dry completely and press it from the reverse side if needed.
- Center the stitching in the finishing hoop or frame.
- Check that the fabric grain runs straight before tightening the hoop or closing the frame.
- Trim or secure the excess fabric on the back only after you are satisfied with the final position.
A little open fabric around the design is useful. The finished piece should look like a keepsake with room to breathe, not a chart squeezed into the smallest hoop that will hold it.
Free Teddy Bear Cross Stitch Pattern
The teddy bear is a seated design with rounded ears, a cream muzzle and paw centers, darker brown shaping and simple stitched facial details. The darker shading helps define the ears, face, arms and legs without surrounding the whole bear with a heavy outline.
Keep the blank fabric around the outside of the bear exactly as charted. Those open squares preserve the rounded ears, separate the feet and keep the seated silhouette easy to read.
Teddy Bear Pattern Details
| Chart size | 60 stitches wide × 60 stitches high |
| Fabric | 14-count Aida |
| Finished motif | About 4.29 inches wide × 4.29 inches high on 14-count Aida |
| Stitches used | Full cross stitch plus simple black backstitch for the mouth |
| Difficulty | Beginner |
Teddy Bear Floss Key
- DMC 738 = light tan, two strands
- DMC 842 = darker beige brown, two strands
- DMC 712 = cream, two strands
- DMC 435 = medium brown for the nose, two strands
- DMC 310 = black for the eyes, two strands, and mouth backstitch, one strand
If you prefer a different nursery palette, the main tan can be changed to taupe, soft gray or muted honey. Keep enough contrast between the main body, darker shaping and cream muzzle so the face, arms and feet remain easy to see.
Teddy Bear Cross Stitch Chart
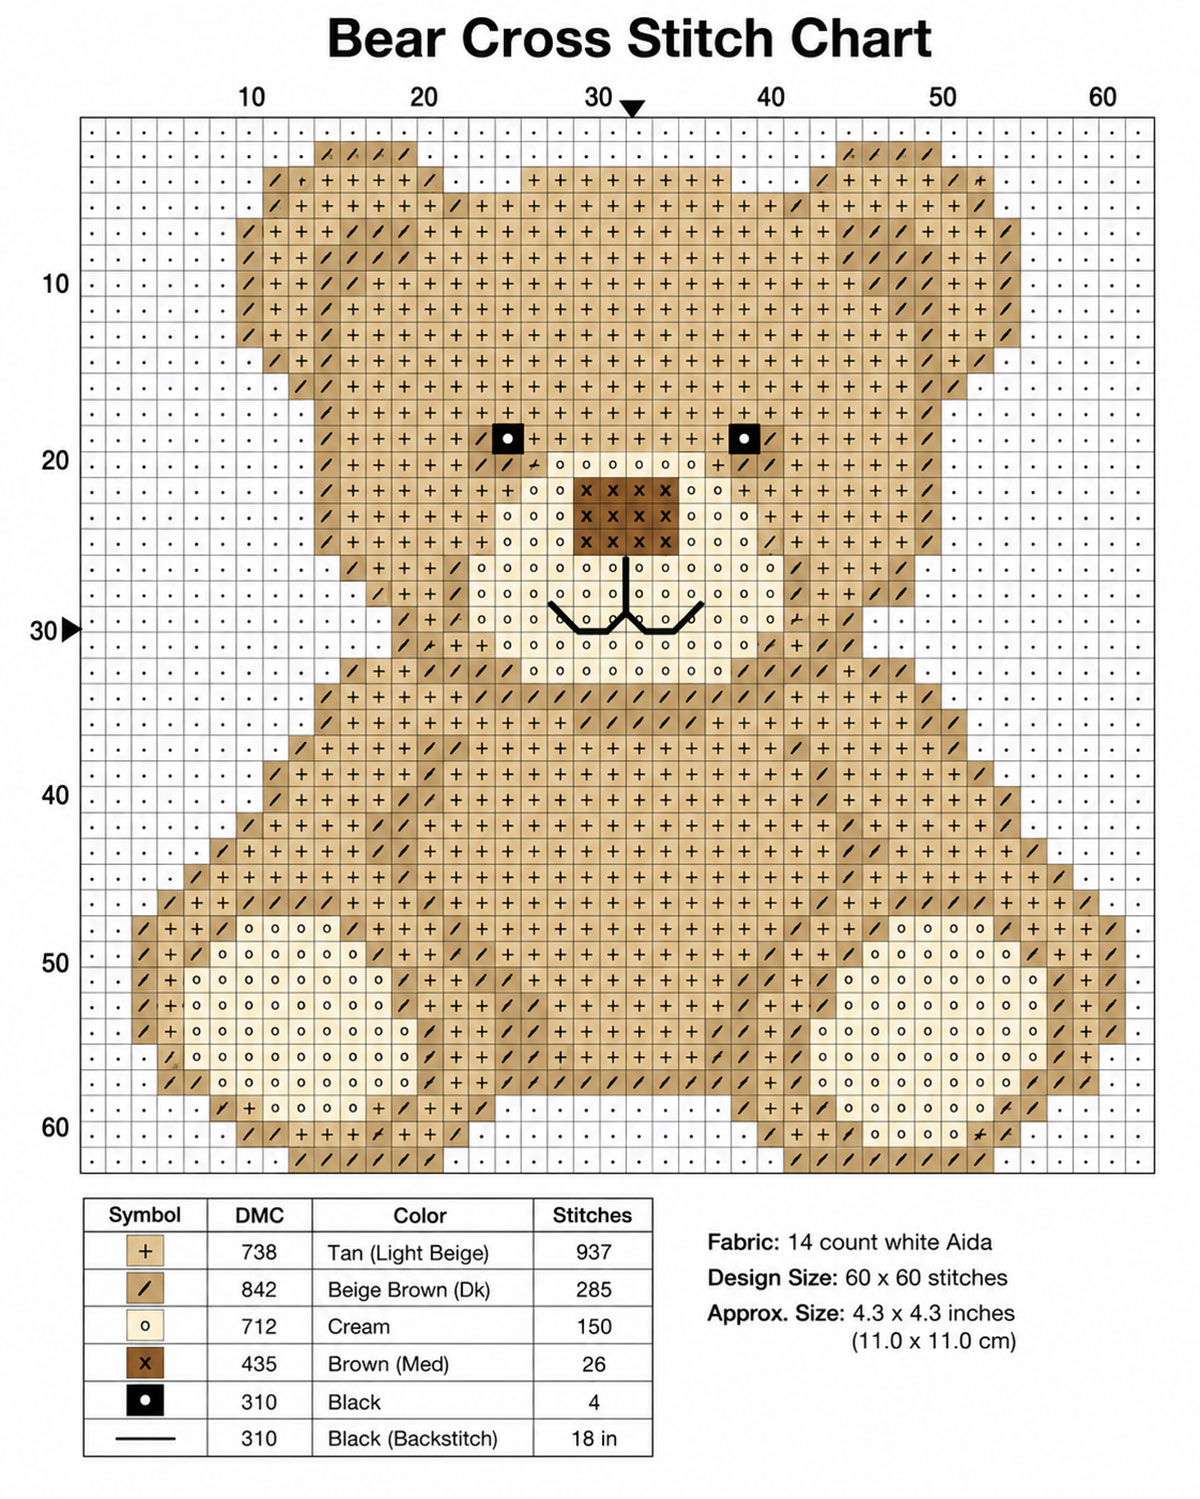
Click the chart to open the full-size pattern.
How to Stitch the Teddy Bear
- Find the center of the fabric and chart. Use the numbered grid to keep the 60-stitch design centered rather than estimating placement by eye.
- Begin with the light tan. Work the large connected areas of the head and body first so you have reliable stitches from which to count the smaller sections.
- Add the darker beige brown. Follow the chart around the ears, sides of the face, arms, legs and other shaded areas. This darker color provides the definition in the finished bear.
- Stitch the cream muzzle and paw centers. Keep their stepped edges exactly as charted rather than rounding them by adding extra stitches.
- Add the medium brown nose. Center it within the cream muzzle.
- Stitch the black eyes. Count their placement from completed facial stitches so both remain level.
- Finish with the mouth. Use one strand of DMC 310 for the black backstitch beneath the nose.
For a birth keepsake, leave several blank rows beneath the bear before adding a baby's name or birth details. Plan the complete lettering on a grid first so the finished inscription stays centered beneath the larger motif.
Free Baby Duck Cross Stitch Pattern
This baby duck has a left-facing beak, rounded head, narrow neck, plump body and two orange feet. A second yellow shade defines the neck and wing so the large pale-yellow areas do not merge into one flat shape.
The single black eye is small, but its placement is important. Keep it exactly where the chart shows it so the duck continues to face naturally toward the beak.
Baby Duck Pattern Details
| Chart size | 21 stitches wide × 29 stitches high |
| Fabric | 14-count Aida |
| Finished motif | About 1.50 inches wide × 2.07 inches high on 14-count Aida |
| Stitches used | Full cross stitch |
| Difficulty | Beginner |
Baby Duck Floss Key
- DMC 745 = light yellow, two strands
- DMC 3853 = yellow ochre, two strands
- DMC 740 = orange, two strands
- DMC 310 = black, two strands
You can soften the palette by substituting two other shades of yellow, but keep the wing and neck shading darker than the main body. That contrast is what gives the duck its shape.
Baby Duck Cross Stitch Chart
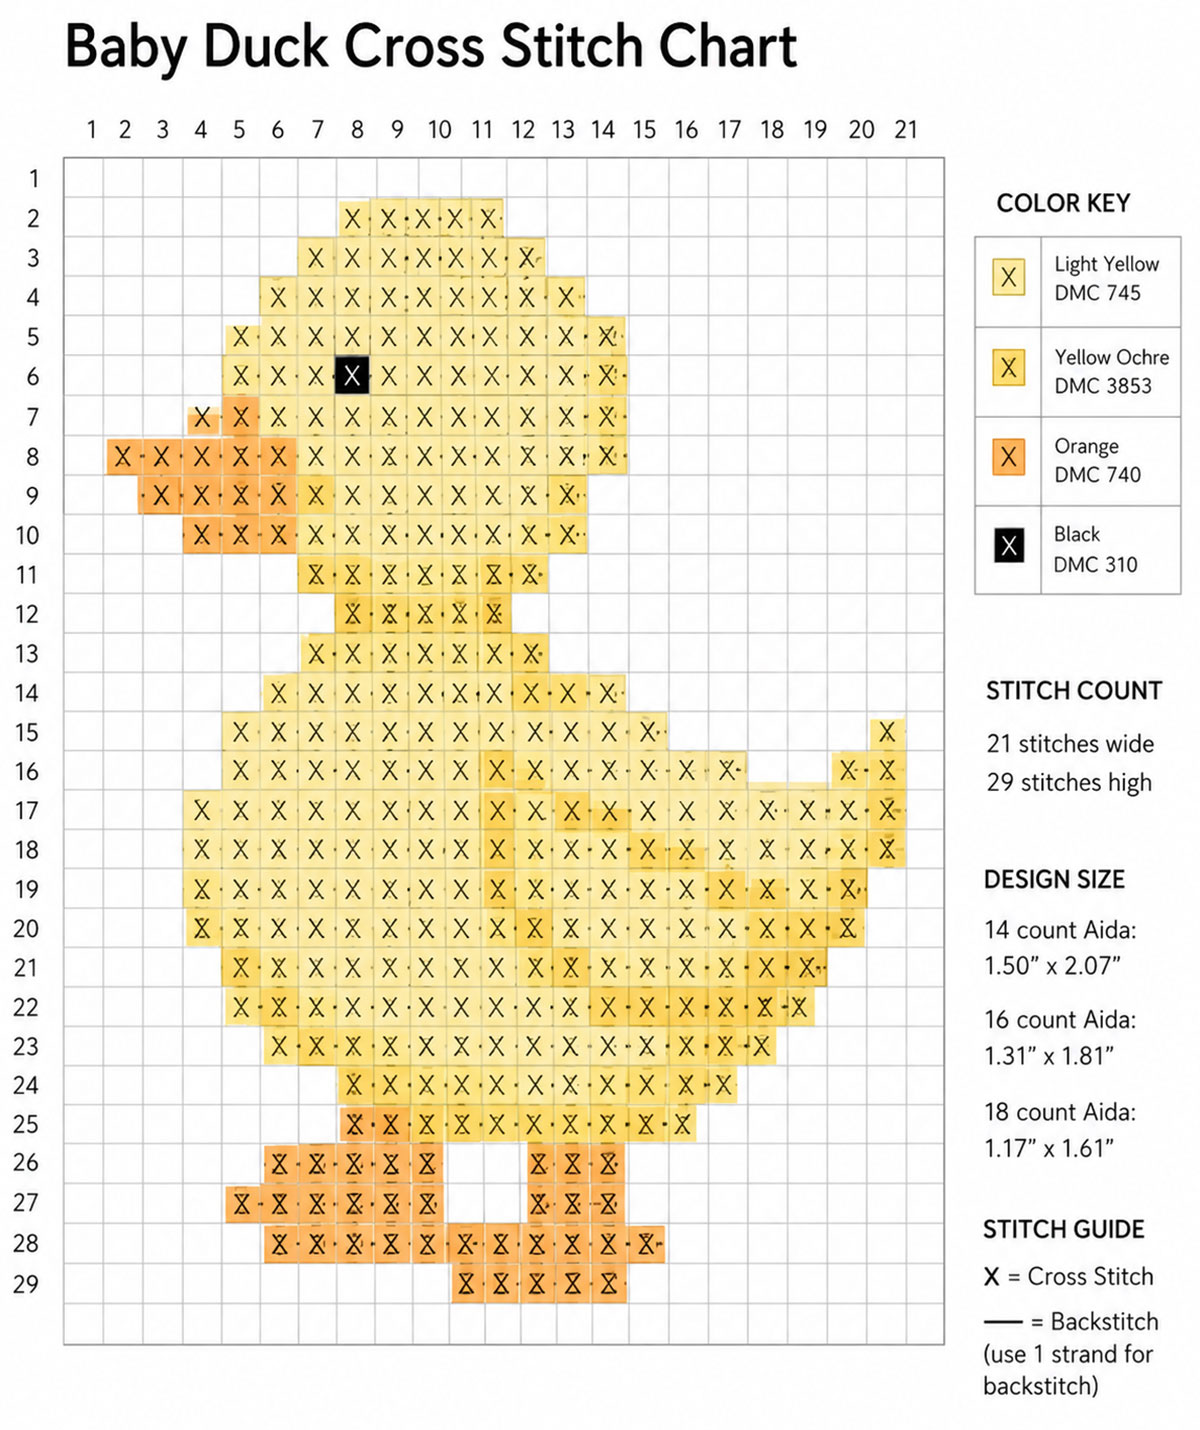
Click the chart to open the full-size pattern.
How to Stitch the Baby Duck
- Mark the center of the fabric and chart. The design is taller than it is wide, so center it using the complete 21 × 29 grid.
- Begin with the light yellow. Work the large connected areas of the head, neck and body first.
- Add the yellow ochre shading. Follow the darker stitches through the neck and wing. Keep the stepped edges exactly as charted so the wing remains visible against the body.
- Add the orange beak. Count from completed head stitches rather than from the edge of the fabric.
- Stitch the orange feet. Keep the two feet separate and preserve the blank fabric between them.
- Add the black eye last. Check its position against the beak and top of the head before finishing the thread.
A small initial or short name can be added beneath the duck. Leave enough blank fabric between the motif and lettering that the orange feet remain clearly separated from the personalization.
Free Bunny Cross Stitch Pattern
This seated bunny uses tall ears, a rounded gray head, simple pink facial detail and a wider lower body with clearly defined arms and feet. Darker gray stitches provide the definition around the body, while pearl gray lightens the centers of the lower sections.
Keep the open fabric between the ears and around the outside of the feet exactly as charted. Those blank squares are what keep the long ears, arms and seated legs from merging into one solid gray shape.
Bunny Pattern Details
| Chart size | 21 stitches wide × 28 stitches high |
| Fabric | 14-count Aida |
| Finished motif | About 1.50 inches wide × 2.00 inches high on 14-count Aida |
| Stitches used | Full cross stitch plus simple black backstitch for the mouth |
| Difficulty | Beginner |
Bunny Floss Key
- DMC 415 = medium gray, two strands
- DMC 318 = darker gray, two strands
- DMC 762 = pearl gray, two strands
- DMC 962 = ballet pink, two strands
- DMC 310 = black for the eyes, two strands, and mouth backstitch, one strand
Gray and pink are only one palette. You can change the bunny to warm cream, taupe or light brown, but preserve three levels of contrast so the arms, legs and lighter centers remain visible. Keep the inner ears and nose distinct from the surrounding face.
Bunny Cross Stitch Chart
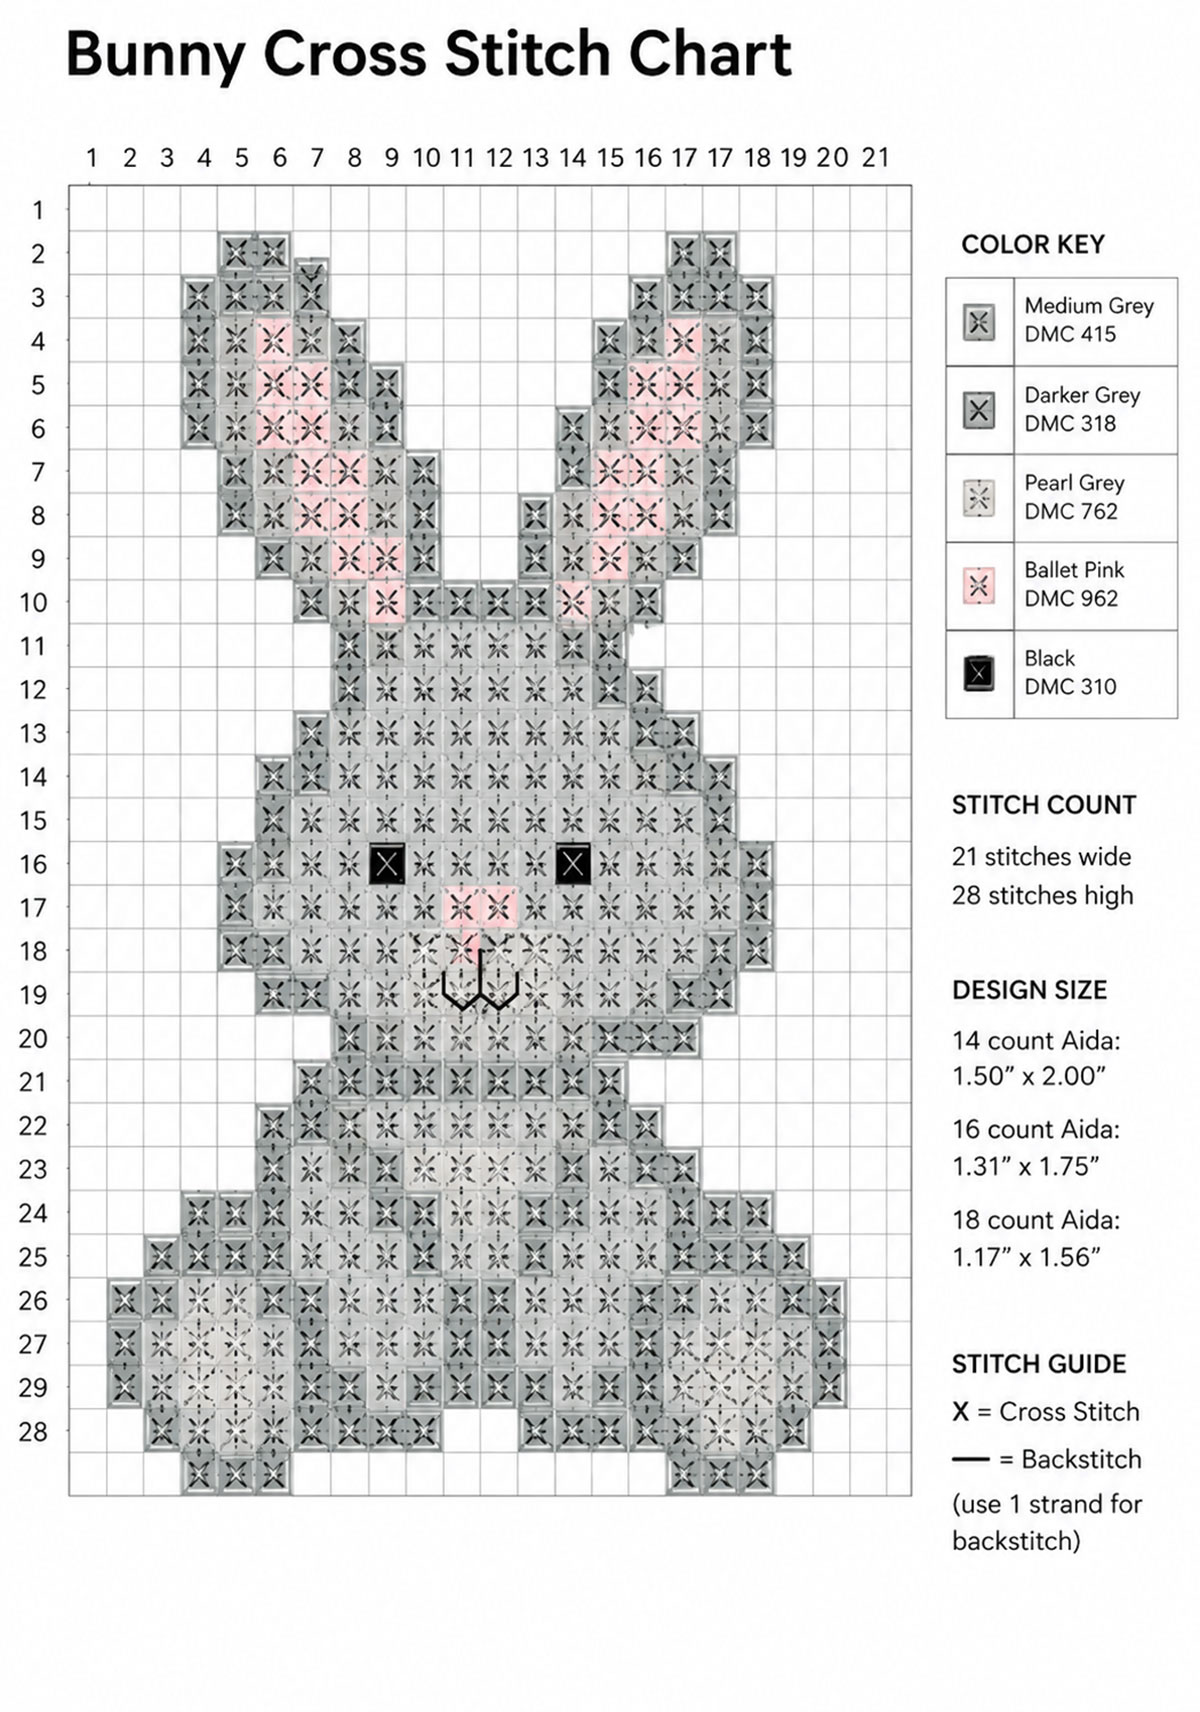
Click the chart to open the full-size pattern.
How to Stitch the Bunny
- Find the center of the chart and fabric. Use the complete 21 × 28 grid to center the tall motif before stitching.
- Begin with the medium gray. Work the connected head and body areas first so you have a reliable base for counting the ears and lower body.
- Work the ears carefully. Keep the blank fabric between them and preserve the tapered outer edges shown on the chart.
- Add the darker gray. Use it where the chart defines the outer shaping, arms, legs and other darker sections.
- Add the pearl gray. Follow the lighter sections through the lower body and feet so they remain distinct from the darker outlines.
- Stitch the pink inner ears and nose. Keep the pink nose centered between the eyes and mouth.
- Add the black eyes. Count from the surrounding gray stitches so they stay level.
- Finish with the mouth. Use one strand of DMC 310 for the simple black backstitch beneath the pink nose.
If you plan to add a name beneath the bunny, allow for the full two-inch motif height before choosing the finishing hoop or frame. Center the complete line of lettering rather than beginning directly beneath one foot.
How to Personalize a Baby Cross Stitch Pattern Without Crowding the Design
A baby's name, birth date, weight and length can turn a small motif into a birth keepsake, but the information should not compete with the stitching above it. Decide what matters most before you begin the lettering.
For a small hoop, I would choose the baby's first name and birth date. A larger frame gives you room for weight, length and time of birth as well. Trying to fit every detail into a 5-inch hoop can leave almost no unstitched fabric between the motif and the lettering.
Plan the entire line of text on graph paper before putting the first letter into the fabric. Count the width of every letter and the spaces between letters. Then subtract that total from the width available beneath the motif and divide the remaining space between the two sides.
For example, if your lettering occupies 35 stitches and you have 55 stitches of usable width, you have 20 stitches left. Leaving 10 blank stitches on each side centers the line.
Do the arithmetic before you thread the needle. Cross stitch is very forgiving about color choices, but it is less forgiving when a baby's name runs into the edge of the hoop.
Choose One Lettering Style and Keep It Consistent
Small block letters are easiest to count. Backstitched lettering can be finer and takes less room, while full cross stitch letters look heavier and more decorative.
If you prefer lettering traced onto fabric rather than counted on a grid, my baby name hand embroidery pattern is a separate freehand embroidery project with a printable alphabet and floral layout.
If you use backstitch for the name, use one strand unless the lettering looks too faint against the fabric. Keep dates, weight and length in the same lettering style. Mixing several alphabets can make a very small keepsake look busier than it needs to be.
Leave Open Fabric Around the Motif
Do not treat every blank square as space that needs to be filled. The open Aida around a footprint, bear, duck or bunny helps define the shape.
I would rather leave an extra half inch of open fabric than squeeze a decorative border against the edges of the motif. The finished piece will still look complete when the stitching has a clear center and enough room around it.
Changing the Fabric Count and Finished Size
The chart never changes when you switch fabric counts. A square on the chart still represents one cross stitch. What changes is the physical size of each stitch.
To calculate the approximate stitched size, divide the occupied stitch width and height by the fabric count. Do not include blank chart margins in the finished motif measurement.
Occupied stitch width ÷ fabric count = finished stitched width in inches.
For example, the teddy bear chart is 23 squares wide, but the stitched bear occupies 19 of those columns. On 14-count Aida, the actual stitched bear is about 1.36 inches wide because 19 ÷ 14 = 1.36.
| Pattern | 14 Count | 16 Count | 18 Count |
|---|---|---|---|
| Teddy Bear, stitched area 19 × 23 | 1.36 × 1.64 in. | 1.19 × 1.44 in. | 1.06 × 1.28 in. |
| Baby Duck, stitched area 23 × 16 | 1.64 × 1.14 in. | 1.44 × 1.00 in. | 1.28 × 0.89 in. |
| Bunny, stitched area 15 × 28 | 1.07 × 2.00 in. | 0.94 × 1.75 in. | 0.83 × 1.56 in. |
Higher-count fabric makes a smaller finished design and also makes each individual stitch smaller. A beginner who finds 18-count Aida tiring to see does not gain much by forcing the project onto finer fabric. Fourteen-count Aida gives these little motifs clear stitches and enough room for easy counting.
How to Finish a Baby Cross Stitch Keepsake
Before the final finish, remove any temporary marking thread and clear washable fabric marks according to the marker manufacturer's directions. Check the front and back of the work before trimming or closing the frame.
If you display the finished piece in a nursery, mount the hoop or frame securely and keep it out of the baby's reach. Do not hang a loose or heavy framed keepsake over a crib or changing area.
Finishing in an Embroidery Hoop
- Center the completed stitching in the hoop.
- Check that the rows of Aida run horizontally and vertically rather than tilting inside the hoop.
- Tighten the outer hoop gradually while smoothing the fabric.
- Look at the design from the front before trimming anything.
- Leave enough fabric at the back to secure the edges neatly.
- Cover the back with a separate finishing circle if you want the reverse side concealed.
Do not cut the fabric flush with the hoop as soon as it looks centered. Give yourself enough fabric to make a correction if the design shifts while you tighten the screw.
Finishing in a Picture Frame
A frame gives you more freedom to include a name and several lines of birth information. Center the stitched area on acid-free mounting material intended for needlework, and keep adhesives away from the visible front of the fabric.
If you are combining the stitching with an original newborn footprint, birth card or photograph, make copies of irreplaceable paper keepsakes before mounting them. The original does not have to be permanently attached to create a meaningful display.
You can find more ideas for preserving prints and birth details on the baby footprint crafts and keepsake page.
Keeping Your Cross Stitch Neat While You Work
Neat stitching is less about speed and more about keeping small mistakes from multiplying.
- Keep every top diagonal going in the same direction. That gives the finished surface a consistent texture.
- Count from completed stitches. Do not repeatedly count long distances from the fabric edge.
- Untwist the floss when necessary. Let the needle hang for a moment so the thread can unwind.
- Do not carry dark floss across long blank areas on the back. It can show through light Aida.
- Check each chart row before moving far away from it. A one-square error is easier to correct before several other rows depend on it.
- Keep hands clean while stitching. Small pale projects show handling marks more readily than dark fabric.
If you are new to counted cross stitch and want another explanation of chart symbols and centering, DMC also provides a useful guide to reading a cross stitch chart.
Frequently Asked Questions About Baby Cross Stitch Patterns
Are these baby cross stitch patterns suitable for beginners?
Yes. The duck uses full cross stitches only. The teddy bear and bunny use full cross stitches plus a small amount of simple black backstitch for the mouth. The footprint pattern uses full cross stitches for both feet plus a simple backstitched star. None of the four designs requires fractional stitches or complicated color blending, and optional personalized lettering can be added separately.
What size Aida should I use?
Fourteen-count Aida is a good starting choice. It keeps the holes easy to see and makes the stitch calculations simple. You can use 16-count or 18-count Aida without changing the chart, but the finished design will be smaller.
Do I need to use the exact DMC colors listed?
No. The floss numbers provide a repeatable starting palette, but you can substitute colors. Preserve the contrast between the main color and small details such as the teddy bear muzzle, duck wing and bunny inner ears.
How much embroidery floss do I need?
These motifs are small. One standard skein of each listed color is ample for an individual pattern when stitched with two strands on 14-count Aida. Personalized lettering may require a small additional amount of the lettering color.
Can I add a baby's name and birth date?
Yes. Plan the lettering on a grid before stitching it. Leave several blank rows between the motif and the name, then center the complete line rather than estimating where the first letter should begin.
Can I stitch the patterns on colored Aida?
Yes. Light gray, pale blue, soft pink and other muted fabrics can work well. Test the floss against the fabric first so the outline and small facial details remain visible.
Can I make the pattern larger?
Using lower-count Aida makes the finished motif larger without changing the chart. If you enlarge the chart itself by turning one chart square into a block of several stitches, the edges will become much chunkier, so changing fabric count is the cleaner method.
Should I wash the finished cross stitch?
Follow the care instructions for the exact fabric and floss you used. If all materials are washable, gentle cleaning can remove handling marks before framing. Test unfamiliar or substituted floss for colorfastness before washing the completed keepsake.
Make the Pattern Personal, but Keep the Baby Motif Easy to See
A name, birth date or carefully chosen color can make one of these small patterns feel completely different without changing its construction. Start with the chart, count carefully and let the stitched motif remain the center of the design.
The footprint pattern makes a natural birth keepsake, while the teddy bear, duck and bunny can be used alone or paired with simple birth details. If you want to explore other projects made to keep, browse the Baby Crafts collection.
When you click on links to various merchants on this site and make a purchase, this may result in this site earning a commission. This does not affect the price you pay.

UBGI Gold Standard 2026
Reviewed under the site's
editorial checklist.
Photos, decorating ideas, party setups and reader submissions are shared for inspiration unless a page is specifically presented as a pattern, tutorial, reference guide or step-by-step project. Follow the instructions, measurements, safety guidance and manufacturer directions provided for the particular project or product.
About Jan | Contact | Baby Nursery Ideas (Blog) | Site Map | Privacy Policy | Disclosure Policy | Disclaimer | Affiliate Disclosure | Earnings Disclosure | Facebook | Pinterest
I am a participant in the Amazon Services LLC Associates Program, an affiliate advertising program designed to provide a means for us to earn fees by linking to Amazon. As an Amazon Associate I earn from qualifying purchases.
Copyright © 2006-2026. All Rights Reserved.