Free Baby Name Hand Embroidery Pattern for a Personalized Keepsake
By Jan Bay
A baby name hand embroidery pattern turns something as simple as a name into a keepsake the whole family can hold onto. This free pattern includes a printable alphabet so you can personalize the design with any baby's name, then surround it with delicate birth flowers and small embroidered details to create nursery art, a new baby gift or a piece to save and pass down.
Explore More Baby Keepsakes and Handmade Gifts
Baby Crafts for Keepsakes and Handmade Gifts
Baby Handprint Crafts and Keepsakes
Embroidery Supplies for This Project
Jump to Baby Name Hand Embroidery Pattern
- Free Baby Name Hand Embroidery Pattern
- Hand Embroidery Supplies
- Printable Embroidery Alphabet
- How to Personalize the Pattern with Any Baby Name
- How to Hand Embroider the Baby Name
- Add Birth Flowers and Floral Details
- Baby Boy Name Embroidery Ideas
- Baby Girl Name Embroidery Ideas
- Turn the Finished Hoop into a Family Keepsake
- Baby Name Hand Embroidery FAQ
Free Baby Name Hand Embroidery Pattern
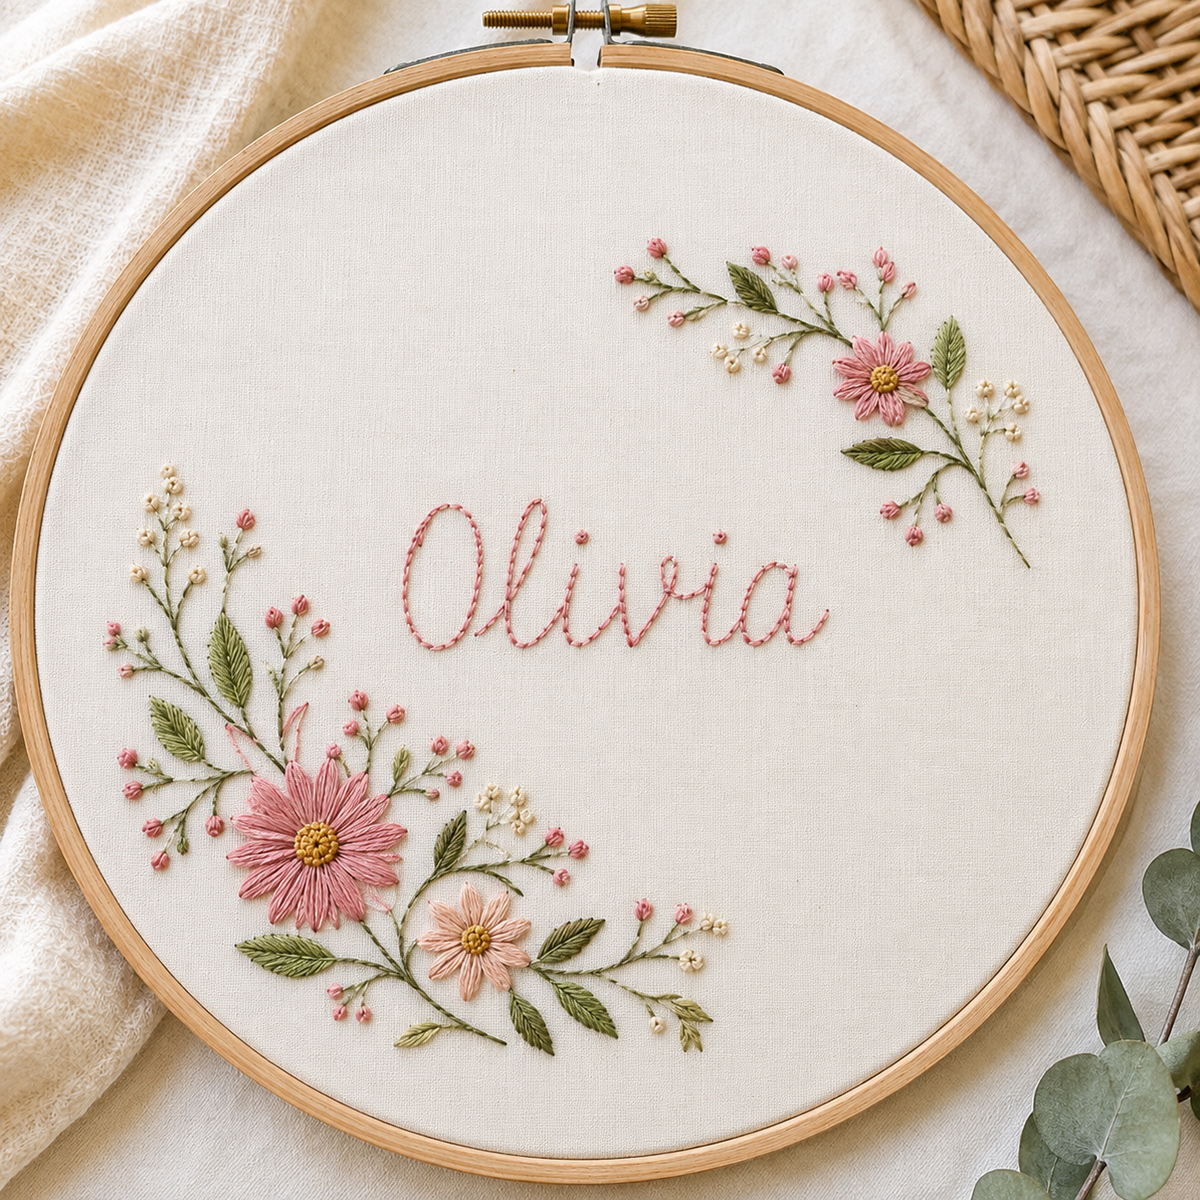
This baby name hand embroidery pattern is designed around one simple idea: the name should still be the first thing you notice. The flowers are there to make it special, not bury the lettering under a floral arrangement. They are there to frame the name, not overpower it.
The downloadable floral template is sized for a 7 inch round embroidery hoop and leaves the center open for the baby's name. Use the printable alphabet to build and center the name, then place the larger floral spray at the lower left and the smaller spray at the upper right. You can use the baby's birth flower, a favorite flower or a mix of small blossoms and leaves.
Finished size: Designed for a 7 inch round hoop. The floral sprays stay inside the hoop edge and leave the center open so the lettering can be adjusted to fit the baby's name.
Skill level: Confident beginner. You only need a few basic hand embroidery stitches, and you can simplify the flowers if this is one of your first embroidery projects.
Important: This is a hand embroidery pattern. It is meant to be transferred to fabric and stitched by hand. It is not a digitized machine embroidery file and does not include PES, DST, EXP, JEF, VP3 or other machine embroidery formats.
Download the Free Baby Name Hand Embroidery Pattern PDF
Print the pattern at 100 percent or Actual Size. Do not choose Fit to Page if you want the layout sized for the 7 inch hoop.
If you want a smaller 6 inch hoop, printing the main design at about 86 percent will give you a similar proportion. For an 8 inch hoop, about 114 percent is a good starting point. The lettering may still need to be adjusted for a very short or very long name.
Hand Embroidery Supplies
You don't need a huge embroidery kit for this. Pick the hoop and fabric first, then choose a small group of floss colors that work with the baby's name and flower.
- 7 inch round embroidery hoop for the finished keepsake
- About an 11 by 11 inch piece of light colored cotton, linen or cotton linen blend fabric
- Six strand cotton embroidery floss
- Size 7 or 8 embroidery needle
- Small embroidery scissors
- Washable or removable fabric marking pen
- Tracing paper, transfer paper or another method for transferring the printed pattern
- Printed baby name pattern and alphabet
- Small piece of felt for covering the back of the finished hoop, optional
For the main example, I'd keep the baby's name darker than the flowers so it stays easy to read. Soft charcoal, deep brown, muted plum or a darker version of one of the floral colors can all work.
Two strands of floss are a good starting point for most of the name, stems and leaves. Use two or three strands where you want a flower or tiny filled detail to look a little fuller.
You do not have to buy a separate skein for every petal. A name color, two flower colors, one leaf color and one accent color are plenty for a simple hoop.
Printable Hand Embroidery Alphabet for Any Baby Name
The alphabet is what makes this pattern useful for more than one sample name. Instead of giving you a finished Olivia design that only works for another Olivia, the printable letters let you build your own baby's actual name.
Download the Printable Hand Embroidery Alphabet PDF
The printable alphabet includes capital and lowercase letters intended to be traced and arranged before you transfer anything to the fabric. Make the complete name on paper first. That little extra step is worth doing because it lets you fix the spacing without leaving marks all over your fabric.
For a first and middle name, you have two choices. Put both names on one line if they fit comfortably, or make the first name larger and place the middle name underneath in smaller lettering. I prefer the second layout when the full name is long. It keeps the center of the hoop from getting crowded.
How to Personalize the Pattern with Any Baby Name
Start with the name before you transfer the flowers. The name controls the whole layout.
- Print the alphabet and trace the letters needed for the baby's name onto tracing paper.
- Arrange the complete name on one line before transferring it to the fabric.
- Measure the full name from the first stitch line to the last.
- Mark the center of the completed name on the tracing paper.
- Lightly mark the horizontal and vertical center of the fabric.
- Line up the center of the name with the center of the fabric.
- Transfer the name first.
- Position the floral sprays around the finished name layout rather than forcing the name into a fixed floral opening.
Trace the two floral sprays from page 2 separately rather than treating them as one fixed arrangement. Once the name is centered, position the larger spray at the lower left and the smaller spray at the upper right. If a long name needs more room, slide the floral groups slightly farther outward while keeping every traced line inside the hoop edge.
That last part matters. If you have a short name such as Ava or Mia, the flowers can come a little closer to the lettering. You might even expand the floral spray with a few more blooms or greenery. A longer name such as Charlotte needs more open space across the middle.
As a general starting point, keep the complete name within roughly 4 1/2 to 5 inches on a 7 inch hoop. If the name is wider than that, reduce the alphabet slightly or put the middle name on a second line.
Don't squeeze twelve letters into a space meant for five. Making the letters a little smaller will look much better than letting the name run into the flowers.
You can also add a birth date underneath the name. Keep it smaller and simpler than the main lettering so it reads as a detail rather than a second focal point.
How to Hand Embroider the Baby Name
Once the design is transferred, put the fabric in the hoop with the marked design centered. The fabric should feel smooth and firm without being stretched so tightly that the weave distorts.
1. Stitch the name first. The less your hand brushes across finished embroidery as you work, the better. Repeated rubbing can dull the sheen of the floss and roughen the fibers, leaving them looking fuzzy. Use two strands of floss and stem stitch for curved or script lettering. Keep the stitches fairly short around tight curves. If you're using simple printed letters instead of script, back stitch is an easy alternative.
2. Work the main stems. Use two strands and stem stitch. Start with the longest stems so the smaller leaves and flowers have something to connect to.
3. Add the leaves. Small leaves can be made with two or three straight stitches. For larger leaves, use a simple fishbone stitch or several angled straight stitches that meet near the center.
4. Stitch the flowers. Lazy daisy stitches work well for simple petals. Use satin stitch for small filled petals or flower shapes where you want more color.
5. Add the tiny details last. French knots make good flower centers and small scattered buds. A few are enough. You don't need to fill every open space.
6. Check the lettering before removing the markings. Look for places where a curve needs one extra stitch or where a letter connection looks uneven. It is much easier to make that correction while the original transfer line is still visible.
If one of these stitches is new to you, DMC has a useful step by step embroidery stitch guide with diagrams for stem stitch, back stitch, lazy daisy, satin stitch, French knots and other basic hand embroidery stitches.
Secure thread ends neatly on the back as you work. Avoid carrying dark floss across a large open area behind pale fabric because it may show through from the front.
Add Birth Flowers and Floral Details
This is where the hoop can become more personal than a name alone. Instead of using a generic flower wreath, choose the baby's birth flower for at least one of the little floral groups.
Birth flower traditions vary a little, so don't worry if your family uses a different flower than one listed here. These are simple choices you can use as a starting point:
- January: Carnation
- February: Violet
- March: Daffodil
- April: Daisy
- May: Lily of the valley
- June: Rose
- July: Delphinium or larkspur
- August: Gladiolus
- September: Aster
- October: Marigold
- November: Chrysanthemum
- December: Narcissus
You do not have to turn a tiny embroidery motif into a botanical illustration. A rose can be a small group of layered curved stitches. A daisy can be five or six lazy daisy petals around a French knot center. Lily of the valley can be a fine stem with several little white bell shapes.
I would use the birth flower as the recognizable flower and then fill around it with small leaves, buds and a few simple blossoms. That keeps the pattern manageable and gives the main flower room to show.
The lower left spray can be a little larger than the upper right one. Making the two sides identical turns the design into a formal wreath. Keeping them different makes the name feel more open and keeps the finished hoop from looking like every other floral name hoop.
Baby Boy Name Hand Embroidery Ideas
A baby boy name embroidery hoop does not have to lose the floral part of the pattern. You can simply use fewer blossoms and give the leaves and stems a little more visual weight.
For a name such as Noah James, I'd use a muted blue or deep green name with sage leaves, a few cream accents and the baby's birth flower worked into one of the sprays. Tiny stars or a small stitched heart can replace a few of the extra flowers if you want the design less floral.
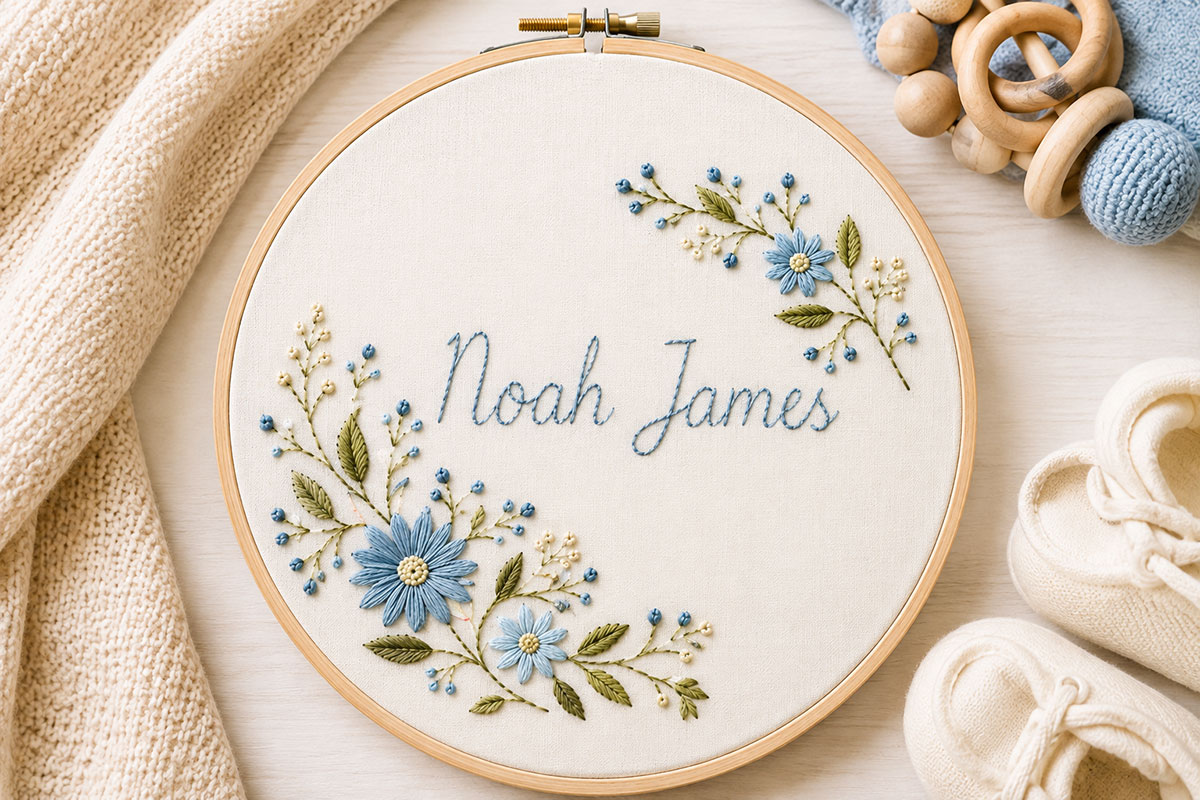
Keep the lettering large enough to read from several feet away. The little leaves and flowers are details. The baby's name is still the point of the piece.
Baby Girl Name Hand Embroidery Ideas
For a baby girl name embroidery hoop, you can use a little more color without filling the entire circle. Dusty rose, soft berry, lavender, muted green and warm white can give you plenty to work with.
A name such as Charlotte Rose would work nicely with darker rose lettering, small flower clusters and one larger birth flower tucked into the lower spray. I would still leave plenty of plain fabric around the center.
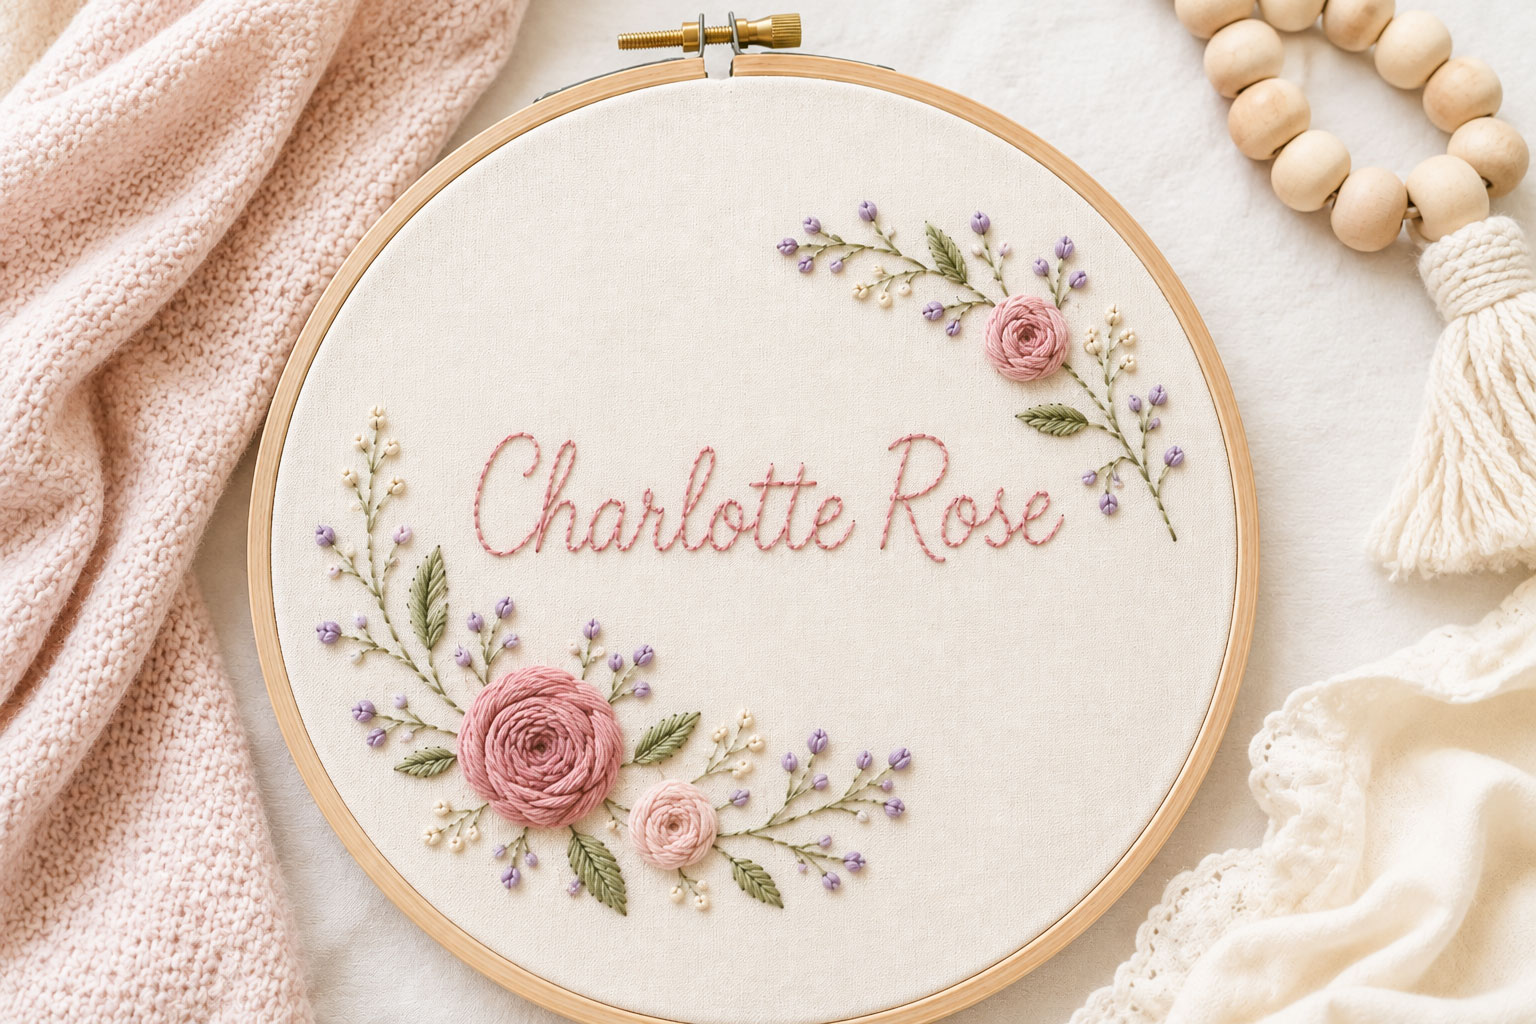
You can change every color and keep the same pattern. The layout matters more than matching the sample exactly.
Turn the Finished Hoop into a Family Keepsake
I like this project even more as a family keepsake than as ordinary nursery wall art. The baby's name and birth flower give it something personal that doesn't disappear when the nursery changes.
You could make one hoop for each child and keep the hoop size, lettering style and general layout the same. Change the name, birth flower and a few floss colors for each one. Hung together later, they would still look like a set without being duplicates.
A first name and birth date are enough, but you can also include a middle name, birth time, weight or length if those details matter to you. Keep the extra information small. You don't need to turn the hoop into a full birth certificate.
If you're making it as a gift, the ideas on my personalized baby gifts you can make page can give you more ways to pair a handmade piece with something meant to be saved.
If you prefer counted stitches instead of freehand embroidery, my free baby cross stitch patterns are a separate set of designs made on a counted grid. Hand embroidery and cross stitch use some of the same floss and hoops, but the patterns are not interchangeable.
To finish the embroidery hoop, remove any remaining transfer marks according to the marker manufacturer's directions and let the fabric dry completely if water was used. Recenter the design in the clean finishing hoop and tighten it evenly.
Trim the excess fabric only after you're happy with the final position. You can gather the fabric neatly at the back or cover the back with a hand stitched felt circle if you want a more finished gift presentation.
Add the baby's full name and date to the back before giving or storing it. Twenty years from now, that little bit of information may matter more than the perfect stitches.
If the hoop is displayed in a nursery, mount it securely and keep it away from the crib and outside the baby's reach.
Baby Name Hand Embroidery FAQ
Is this a hand embroidery pattern or a machine embroidery design?
This is a hand embroidery pattern. You print the pattern, transfer the design to fabric and stitch it by hand. The downloads are not digitized machine embroidery files such as PES, DST, EXP, JEF or VP3.
Can I use the pattern for any baby name?
Yes. Use the printable alphabet to arrange the name before transferring it to the fabric. Short names can use larger lettering, while long names may need slightly smaller letters or a second line for the middle name.
What stitch is best for embroidering a baby's name?
I prefer stem stitch for flowing or script style names because it follows curves smoothly. Back stitch is simpler for straight, printed or block style lettering. Two strands of embroidery floss are a good starting point for either one.
What size embroidery hoop should I use?
The free pattern is designed around a 7 inch round hoop. A 6 inch hoop can work for a short name, while an 8 inch hoop gives you more room for a long name, two names or extra birth details.
What fabric works well for hand embroidery names?
A stable, light colored cotton, linen or cotton linen blend is an easy choice because you can transfer the lettering clearly and work the stitches without fighting a very loose or stretchy fabric. Avoid stretchy knit fabric for this particular framed hoop project unless you already know how to stabilize it.
Can I add the baby's birth date?
Yes. Put the date underneath the name in smaller lettering or tuck it beneath one of the floral sprays. Keep the name larger so the design still has a clear focal point.
Do I have to use the baby's birth flower?
No. Use a flower that has meaning to your family, match the nursery colors or simply use the floral motifs you like best. The birth flower is one way to personalize the pattern, not a rule.
Can I turn this hand embroidery pattern into cross stitch?
Not directly. Hand embroidery follows drawn lines while cross stitch is built on a counted grid. If you want a counted design, use a pattern made specifically for cross stitch rather than trying to convert these traced lines stitch by stitch.
When you click on links to various merchants on this site and make a purchase, this may result in this site earning a commission. This does not affect the price you pay.

UBGI Gold Standard 2026
Reviewed under the site's
editorial checklist.
Photos, decorating ideas, party setups and reader submissions are shared for inspiration unless a page is specifically presented as a pattern, tutorial, reference guide or step-by-step project. Follow the instructions, measurements, safety guidance and manufacturer directions provided for the particular project or product.
About Jan | Contact | Baby Nursery Ideas (Blog) | Site Map | Privacy Policy | Disclosure Policy | Disclaimer | Affiliate Disclosure | Earnings Disclosure | Facebook | Pinterest
I am a participant in the Amazon Services LLC Associates Program, an affiliate advertising program designed to provide a means for us to earn fees by linking to Amazon. As an Amazon Associate I earn from qualifying purchases.
Copyright © 2006-2026. All Rights Reserved.