Free Vintage Christmas Teddy Bear Crochet Pattern
By Jan Bay
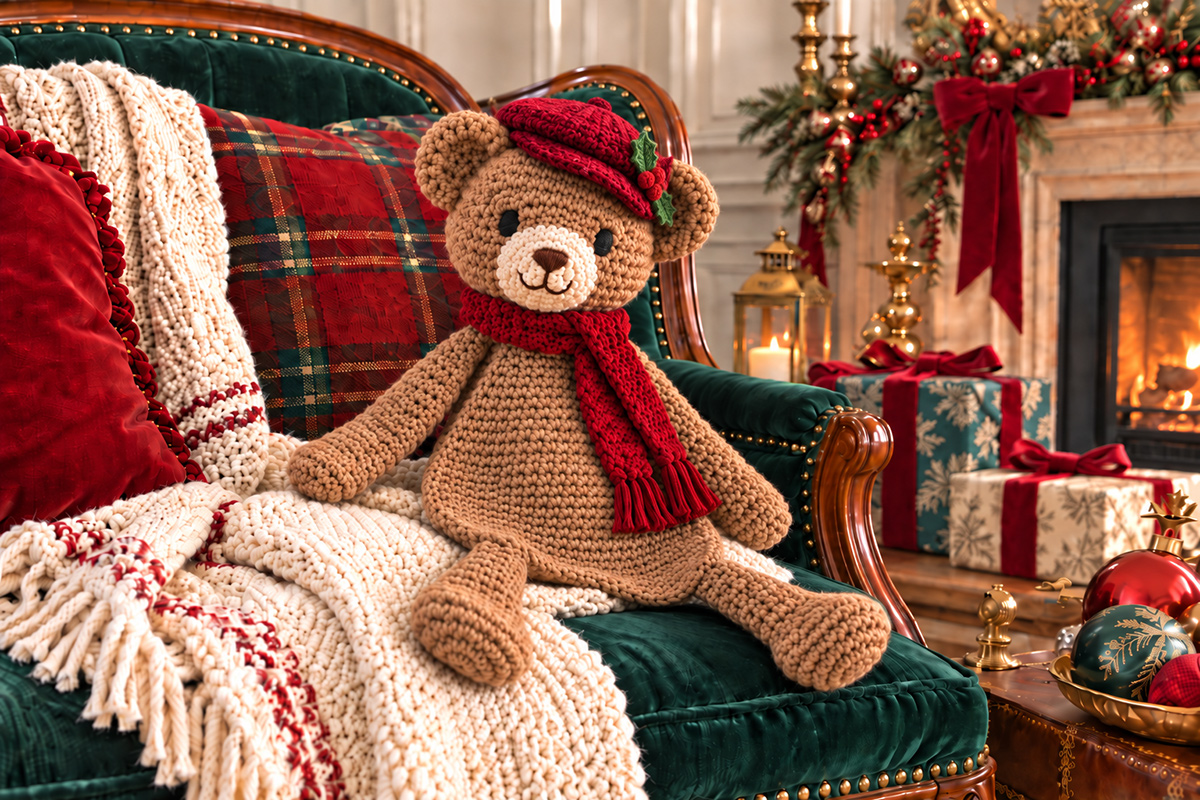
This vintage Christmas teddy bear crochet pattern is designed to take you back to the holidays of long ago. If you love the look of old fashioned holiday toys this one is for you. It gives you a soft floppy snuggler lovey with a warm brown teddy look, a cranberry scarf, embroidered features and a warm personality that makes it perfect for gifting, display, or cuddling through the Christmas season.
Explore More Free Crochet Baby Patterns
Jump to:
About This Vintage Christmas Teddy Bear Crochet Pattern
This bear is meant to look a little different from a regular stuffed teddy. The head is rounded and firmly stuffed, but the body stays flatter and softer, with long lightly stuffed arms and legs that drape instead of sticking straight out. That floppy shape is what gives him the snuggler look shown in the example image, so resist the urge to keep adding fiberfill until the body feels firm.
The Christmas details are simple but they matter. He wears a cranberry scarf and a crocheted red newsboy cap instead of the usual Santa hat. The little holly leaves and berries on the cap are optional, but I like them here because they make the old-fashioned cap look unmistakably Christmas without covering up the teddy himself.
The holly shown on this bear is a small version made for the cap. If you'd rather leave the cap plain, you can. The bear still reads as Christmas because of the red cap and scarf, and the simpler version is probably the one I'd choose if I were using a particularly textured or variegated brown yarn.
Keep the face completely embroidered. The eyes are worked with black embroidery floss using satin stitches, with the nose and mouth embroidered as well. There are no plastic safety eyes and no buttons on the finished bear.
One more thing before you start stuffing: this is a cuddly toy or snuggler, not an infant sleep product. Soft toys should stay out of an infant's crib, bassinet or other sleep space. The U.S. Consumer Product Safety Commission recommends keeping those spaces bare except for a fitted sheet. You can read its current Safe Sleep guidance if you're making this as a baby gift.
Materials
I’d keep the yarn fairly simple here because the shape, scarf and cap are already doing plenty. A smooth worsted-weight yarn will show the teddy’s face and the flatter snuggler body better than a fuzzy yarn that hides the stitches.
- Worsted weight yarn, #4: approximately 420 to 475 yards total
- Warm teddy brown: approximately 300 to 340 yards for the head, ears, body, arms and legs
- Warm ivory: approximately 25 to 35 yards for the muzzle
- Cranberry red: approximately 70 to 85 yards for the scarf and newsboy cap
- Evergreen: small amount for the optional holly leaves
- Red: small amount for the optional holly berries
- 4.0 mm crochet hook
- Black embroidery floss for the satin-stitch eyes
- Dark brown embroidery floss or yarn for the nose and mouth
- Polyester fiberfill
- Yarn needle
- Stitch marker
- Straight pins or locking stitch markers for positioning pieces before sewing
- Scissors
You will use much less stuffing than you would for a regular amigurumi bear. The head should be firm enough to hold its round shape. The body and limbs should not be. Add fiberfill gradually and stop while those pieces still feel soft and easy to flatten with your hand.
Finished Size
Using worsted-weight yarn and a 4.0 mm hook, the finished teddy is expected to measure approximately 18 to 20 inches from the top of the head to the bottom of the feet when laid out flat.
The stuffed head is expected to measure approximately 5 inches across. The lightly stuffed body is approximately 8 to 9 inches long from the base of the neck to the lower edge and about 6 1/2 to 7 inches across at its widest point before the limbs are attached.
The exact finished size can vary with yarn, hook size and how tightly you crochet. More important than hitting an exact number is keeping the proportions the same. The head should look rounded and substantial above a noticeably flatter pear-shaped body, with long arms and legs that drape naturally.
Gauge
Exact gauge is not critical for this project, but you do want a fabric tight enough that the stuffing does not show through.
Approximate gauge: 16 single crochet stitches and 18 rounds or rows = 4 inches.
If you can see obvious gaps between your stitches when the head is stuffed, go down a hook size. I would rather make the fabric a little tighter than compensate by overstuffing it.
Abbreviations
- ch = chain
- sc = single crochet
- hdc = half double crochet
- hdc2tog = half double crochet 2 stitches together
- dc = double crochet
- sl st = slip stitch
- st(s) = stitch(es)
- inc = work 2 single crochet in the same stitch
- dec = single crochet decrease over the next 2 stitches
- MR = magic ring
- FO = fasten off
Pattern Notes Before You Begin
The head, ears and muzzle are made separately. The head is worked in continuous rounds and firmly stuffed. The muzzle is sewn to the front of the head after the face placement has been checked.
The body is also worked in rounds, but it is intentionally shaped much flatter than a regular stuffed animal body. Add only enough fiberfill to soften the center and take the empty look out of the crochet. You should still be able to press the finished body nearly flat between your hands.
The arms and legs follow the same idea. Put only a small amount of stuffing into the lower portion of each limb, then use less as you work toward the body. The upper sections should stay soft enough to bend and hang naturally.
If the finished bear can sit bolt upright by itself because the body and limbs are firm, you have probably added too much stuffing. The finished shape should slump a little when you set him down. That’s intentional.
The cranberry scarf and red newsboy cap are made separately and added after the bear is assembled. The holly decoration is optional. I’d make the bear first, add the cap and scarf, then decide whether he needs the holly. Sometimes that tiny bit of green and red is just right. Sometimes the red cap is enough.
The instructions below use continuous rounds unless a section specifically says otherwise. Place a stitch marker in the first stitch of each round and move it up as you work.
Piece check before assembly: You should have 11 main pieces: 1 head, 1 muzzle, 2 ears, 1 body, 2 arms, 2 legs, 1 scarf and 1 cap. If you are adding the optional holly, you will also have 2 leaves and 3 berries.
Crochet the Head
Use warm teddy brown. Work in continuous rounds.
Round 1: Work 6 sc into a MR. (6)
Round 2: Inc in each st around. (12)
Round 3: *Sc in next st, inc in next st.* Repeat around. (18)
Round 4: *Sc in next 2 sts, inc in next st.* Repeat around. (24)
Round 5: *Sc in next 3 sts, inc in next st.* Repeat around. (30)
Round 6: *Sc in next 4 sts, inc in next st.* Repeat around. (36)
Round 7: *Sc in next 5 sts, inc in next st.* Repeat around. (42)
Round 8: *Sc in next 6 sts, inc in next st.* Repeat around. (48)
Round 9: *Sc in next 7 sts, inc in next st.* Repeat around. (54)
Round 10: *Sc in next 8 sts, inc in next st.* Repeat around. (60)
Rounds 11–20: Sc in each st around. (60)
At the stated gauge, the 60-stitch circumference is expected to measure approximately 15 inches around. Once the head is stuffed and rounded, it should measure approximately 5 inches across. Do not use the width of the unstuffed piece laid flat as your checkpoint because flattening changes that measurement.
Round 21: *Sc in next 8 sts, dec.* Repeat around. (54)
Round 22: *Sc in next 7 sts, dec.* Repeat around. (48)
Round 23: *Sc in next 6 sts, dec.* Repeat around. (42)
Round 24: *Sc in next 5 sts, dec.* Repeat around. (36)
Round 25: *Sc in next 4 sts, dec.* Repeat around. (30)
Begin stuffing now. The head is the one part of this bear that should feel properly firm. Add the fiberfill in small pieces and work it all the way into the top and sides so you get a smooth round shape instead of a hard lump in the center.
Round 26: *Sc in next 3 sts, dec.* Repeat around. (24)
Round 27: *Sc in next 2 sts, dec.* Repeat around. (18)
Add the remaining stuffing. Check the head from the front and side before closing it. It should be round, not pointed at the top and not flattened across the face.
Round 28: *Sc in next st, dec.* Repeat around. (12)
Round 29: Dec around. (6)
FO, leaving a tail. Thread the tail through the front loops of the remaining stitches, pull closed and secure.
Make the Muzzle
Use warm ivory. The muzzle is a shallow oval rather than a big projecting snout. Keep it fairly flat so the finished face stays close to the example image.
Round 1: Ch 7. Beginning in the second ch from the hook, sc in next 5 ch, work 3 sc in last ch. Working along the opposite side of the starting chain, sc in next 4 ch, work 2 sc in last ch. (14)
Round 2: Inc in first st, sc in next 4 sts, inc in each of next 3 sts, sc in next 4 sts, inc in each of last 2 sts. (20)
Round 3: Sc in next st, inc in next st, sc in next 4 sts, *sc in next st, inc in next st* 3 times, sc in next 4 sts, *sc in next st, inc in next st* 2 times. (26)
Round 4: Sc in each st around. (26)
FO, leaving a long tail for sewing.
The muzzle should measure approximately 2 1/4 to 2 1/2 inches wide. Add only a whisper of stuffing behind it during assembly. You want enough to keep the oval smooth, not enough to make it stick out like a separate stuffed ball.
Crochet the Ears
Make 2 in teddy brown.
Round 1: Work 6 sc into a MR. (6)
Round 2: Inc in each st around. (12)
Round 3: *Sc in next st, inc in next st.* Repeat around. (18)
Round 4: *Sc in next 2 sts, inc in next st.* Repeat around. (24)
FO, leaving a long tail.
Do not stuff the ears. Fold each circle very slightly at the base as you sew it on. That little pinch gives the ear some cup without turning it into a thick stuffed piece.
Make the Floppy Body
Use teddy brown. Work in continuous rounds.
This body needs to stay flatter than a regular amigurumi animal body. The shaping gives you the relaxed shape, but the stuffing is what decides whether the finished bear looks like a snuggler or a stuffed toy. Go easy with it because little ones really seem to love the floppy animals a lot.
Orientation: The Round 1 magic-ring end is the top or neck end of the body. The Round 38 closure is the bottom edge.
Round 1: Work 6 sc into a MR. (6)
Round 2: Inc in each st around. (12)
Round 3: *Sc in next st, inc in next st.* Repeat around. (18)
Round 4: *Sc in next 2 sts, inc in next st.* Repeat around. (24)
Round 5: Sc in each st around. (24)
Round 6: *Sc in next 3 sts, inc in next st.* Repeat around. (30)
Round 7: Sc in each st around. (30)
Round 8: *Sc in next 4 sts, inc in next st.* Repeat around. (36)
Round 9: Sc in each st around. (36)
Round 10: *Sc in next 5 sts, inc in next st.* Repeat around. (42)
Round 11: Sc in each st around. (42)
Round 12: *Sc in next 6 sts, inc in next st.* Repeat around. (48)
Round 13: Sc in each st around. (48)
Round 14: *Sc in next 7 sts, inc in next st.* Repeat around. (54)
Rounds 15–31: Sc in each st around. (54)
At this point the body should be noticeably wider through the lower half than at the neck. Laid flat, it should measure approximately 6 1/2 to 7 inches across at its widest point.
Begin adding fiberfill through the open lower end. Spread a thin layer through the center rather than packing it against the outside edge. The body should feel more like a softly padded cushion than a stuffed ball.
Round 32: *Sc in next 7 sts, dec.* Repeat around. (48)
Rounds 33–38: Sc in each st around. (48)
Add only enough additional fiberfill to keep the center softly padded. Press the body between your palms. It should flatten easily, and the lower portion should stay broad rather than tapering into a narrow point.
Before fastening off, lay the body flat and check the silhouette one last time. The top should narrow naturally beneath the head, while the middle and lower body remain broad and softly rounded like the example image.
Flatten the 48-stitch opening so 24 stitches lie directly against the other 24 stitches. FO, leaving a long tail, and sew through both layers across the 24 paired stitches to close the bottom edge.
At the stated gauge, the flattened 24-stitch lower edge is expected to measure approximately 6 inches across before it is sewn closed, and the finished body is expected to measure about 8 1/2 inches from the neck end to the lower edge.
Crochet the Arms
Make 2 in teddy brown. Work in continuous rounds.
Round 1: Work 6 sc into a MR. (6)
Round 2: Inc in each st around. (12)
Round 3: *Sc in next st, inc in next st.* Repeat around. (18)
Rounds 4–8: Sc in each st around. (18)
Round 9: *Sc in next 4 sts, dec.* Repeat around. (15)
Rounds 10–26: Sc in each st around. (15)
Add a small amount of stuffing to the hand and lower third of the arm. Use less as you move upward. The upper half should be soft enough to fold over on itself.
Round 27: *Sc in next 3 sts, dec.* Repeat around. (12)
Rounds 28–31: Sc in each st around. (12)
Do not add more stuffing unless the arm is completely empty-looking. Flatten the 12-stitch top opening so 6 stitches lie directly against the other 6 stitches. Do not sew the opening closed separately.
FO, leaving a long tail for sewing the flattened 6-stitch edge to the body.
At the stated gauge, each arm is expected to measure approximately 7 inches long. If yours stands straight out when you hold it horizontally, take some stuffing back out. It should droop.
Crochet the Legs
Make 2 in teddy brown.
The feet are a little fuller than the arms, but the legs themselves still need to stay floppy.
Round 1: Work 6 sc into a MR. (6)
Round 2: Inc in each st around. (12)
Round 3: *Sc in next st, inc in next st.* Repeat around. (18)
Round 4: *Sc in next 2 sts, inc in next st.* Repeat around. (24)
Rounds 5–7: Sc in each st around. (24)
Round 8: *Sc in next 4 sts, dec.* Repeat around. (20)
Rounds 9–11: Sc in each st around. (20)
Round 12: *Sc in next 3 sts, dec.* Repeat around. (16)
Rounds 13–31: Sc in each st around. (16)
Stuff the foot and the lowest few inches of the leg lightly. Leave the upper portion much softer. You should be able to bend the leg without fighting the stuffing.
Round 32: *Sc in next 2 sts, dec.* Repeat around. (12)
Rounds 33–35: Sc in each st around. (12)
Flatten the 12-stitch top opening so 6 stitches lie directly against the other 6 stitches. Do not sew the opening closed separately. FO, leaving a long tail for sewing the flattened 6-stitch edge to the body.
At the stated gauge, each leg is expected to measure approximately 7 3/4 to 8 inches long. Laid on a table, it should settle flat instead of rolling into a rigid tube.
Make the Cranberry Scarf
Use cranberry red.
Ch 9.
Row 1: Hdc in second ch from hook and in each ch across. (8)
Row 2 and following rows: Ch 1, turn, hdc in each st across. (8)
Repeat Row 2 until the scarf measures approximately 30 to 32 inches long when laid flat and relaxed. FO and weave in the ends.
The finished scarf is expected to measure approximately 2 inches wide. For this piece, use the finished length rather than a fixed row count as your checkpoint because half double crochet row height can vary noticeably from one crocheter to another.
Add short fringe to both ends if you want the same look as the example image. Cut sixteen pieces of cranberry yarn approximately 5 inches long. Fold each piece in half. Attach one folded piece with a lark’s-head knot into each of the 8 stitches across one short end, then repeat with the remaining 8 pieces across the other end. Trim the finished fringe to approximately 2 inches.
Wrap the scarf loosely enough that it does not pull the head forward or hide the upper body.
Crochet the Vintage Newsboy Cap
Use cranberry red. This little cap is what pushes the bear away from “regular teddy with Christmas colors” and gives him the vintage look shown in the example image.
Work the crown in continuous rounds.
Round 1: Work 8 hdc into a MR. (8)
Round 2: Work 2 hdc in each st around. (16)
Round 3: *Hdc in next st, 2 hdc in next st.* Repeat around. (24)
Round 4: *Hdc in next 2 sts, 2 hdc in next st.* Repeat around. (32)
Round 5: *Hdc in next 3 sts, 2 hdc in next st.* Repeat around. (40)
Round 6: *Hdc in next 4 sts, 2 hdc in next st.* Repeat around. (48)
Round 7: *Hdc in next 5 sts, 2 hdc in next st.* Repeat around. (56)
Round 8: *Hdc in next 6 sts, 2 hdc in next st.* Repeat around. (64)
Rounds 9–11: Hdc in each st around. (64)
Round 12: *Hdc in next 6 sts, hdc2tog.* Repeat around. (56)
Round 13: Hdc in each st around. (56)
Round 14: Working in back loops only, sc in each st around. (56)
Round 15: Sc in each st around. (56)
FO.
The wider 64-stitch crown creates the soft fullness visible in the example cap, while the 56-stitch lower band brings it back in around the head. The band should fit snugly without stretching hard across the forehead. Set the cap slightly to one side rather than pulling it straight down like a beanie.
Soft Newsboy Bill: With the cap facing you, identify the center front 18 stitches of the lower edge.
Row 1: Join cranberry yarn in the first marked st and work 1 sc in that same st. Sc in each of the next 17 marked sts. (18)
Row 2: Ch 1, turn. Dec, sc in next 14 sts, dec. (16)
Row 3: Ch 1, turn. Dec, sc in next 12 sts, dec. (14)
Row 4: Ch 1, turn. Sc in each st across. (14)
Row 5: Ch 1, turn. Dec, sc in next 10 sts, dec. (12)
FO after Row 5. Rejoin cranberry yarn at the cap edge beside one end of Row 1. Work 5 sc evenly down the first side edge of the bill, placing approximately 1 sc in the end of each row. Sc in each of the 12 stitches across Row 5, then work 5 sc evenly up the opposite side edge. Sl st into the cap edge and FO. Weave in the ends.
The finished bill should project only about 3/4 to 1 inch from the front of the cap. Curve it gently downward with your fingers rather than making it stiff. The small soft bill and slightly fuller crown are what give the cap the vintage newsboy shape shown in the example image.
Optional Holly Berry Appliqué
The cap-size holly is intentionally tiny. We’ll keep the full holly appliqué as its own project, but you need a workable miniature version here so the teddy pattern is complete.
Leaf, make 2 in evergreen: Ch 7. Sl st in second ch from hook, sc in next ch, hdc in next ch, dc in next 2 ch, work 5 dc in last ch. Working along the opposite side of the starting chain, dc in next 2 ch, hdc in next ch, sc in next ch, sl st in last ch. FO, leaving a tail.
Pinch the base of each leaf slightly as you sew it to the cap. Angle the leaves away from each other so they form a small V.
Berries, make 3 in red: Work 6 sc into a MR. Sl st to first sc, pull the ring tightly closed and FO, leaving a sewing tail.
Do not stuff the berries. Gather each little circle slightly as you sew it down so it becomes a shallow bump rather than a loose flat ring.
Sew the three berries at the base of the two leaves. Keep the finished cluster small enough that it decorates the cap without covering the brim.
Assembly
Take your time with the face and limb placement. A half inch can make a surprising difference on a teddy.
1. Position the muzzle. Center the ivory muzzle on the lower half of the face. The top edge should sit below the eye line, not between the eyes. Pin it in place before sewing.
Add a very small amount of stuffing beneath the muzzle as you sew around the edge. Stop before closing the last inch, check the projection from the side, then add or remove stuffing if needed. Sew closed.
2. Embroider the nose and mouth. Using dark brown floss or yarn, satin stitch a small rounded triangular nose near the upper center of the muzzle. Bring a straight line down from the center of the nose, then work a short curved mouth to each side.
3. Embroider the eyes. Use black embroidery floss. Place the eyes approximately 1 1/2 inches apart, centered above the muzzle. Build each eye with several close satin stitches until you have a small matte oval.
Do not make the eyes into large black circles. The example bear has simple stitched eyes that stay in proportion with the muzzle.
4. Sew on the ears. Position the ears high on the sides of the head, approximately between Rounds 8 and 14. Pin both before sewing either one permanently. Fold the lower edge of each ear slightly to give it a shallow cup, then sew securely around the base.
5. Attach the head to the body. The Round 29 closure is the bottom center of the head, and the Round 1 magic ring is the top center of the body. Align those two points.
Using a separate length of teddy-brown yarn, match the 18 stitches of Head Round 27 with the 18 stitches of Body Round 3. Sew the two rounds together one stitch at a time all the way around, keeping the head centered over the body. Go around the 18-stitch attachment circle a second time for strength before securing and weaving in the yarn.
This gives the head a defined attachment area without turning the lightly stuffed body into a stiff neck. Check the bear from the front before finishing the second pass so the face stays centered over the belly.
6. Attach the arms. Position each arm near the upper sides of the body, approximately 1 inch below the head join. Pin both arms in place and check that they hang at the same height. Using the long sewing tail, sew through both layers of the flattened arm top and into the body across all 6 paired stitches. That closes the arm as you attach it and keeps the shoulder flexible.
Let the arms hang before fastening off. If they stick outward, loosen the attachment or remove a little stuffing.
7. Attach the legs. Place the legs along the lower third of the body, slightly toward the front. Leave enough room between them that the body can flatten naturally.
Pin both legs before sewing and check that they sit at the same height. Using the long sewing tail, sew through both layers of each flattened leg top and into the body across all 6 paired stitches. The legs should swing and bend rather than hold a fixed seated position.
8. Add the scarf. Wrap the cranberry scarf once around the neck and let the ends fall to the front. Do not knot it tightly.
If this bear is intended for a baby or young child, omit the fringe. Using a separate length of cranberry yarn, sew the scarf permanently around the neck and tack both scarf tails securely against the body at several points so there is no removable scarf or loose loop.
9. Add the cap. Position the cap slightly to one side, with the small soft bill angled across the forehead as shown in the example image. The bill should sit above the embroidered eyes without covering them. Shape the crown with a little fullness toward one side so the cap keeps its vintage newsboy look.
If the teddy is intended as a child’s toy, use a separate length of cranberry yarn to sew the cap permanently to the head at several points around the band so it stays in place during handling.
10. Add the holly. For the decorative version shown, sew the two leaves and three berries securely to one side of the cap just above the brim, making several passes through each piece before burying the yarn ends inside the cap. If the bear is being made for a baby or very young child, leave off the separate holly pieces or embroider the decoration directly onto the cap instead.
Finishing
Weave every yarn tail through several stitches before trimming it. Pay extra attention to the head, muzzle, ears and limb joins since those areas get the most handling.
Before the bear is used or gifted, remove every pin and stitch marker and check each sewn attachment one final time.
Give the bear a final shape check before you call him finished. The head should stay round. The body should be broad, soft and flatter through the belly. The arms and legs should lie down naturally when you place the teddy on a chair or blanket.
The finished torso should still compress easily and settle naturally when the bear is laid down. It should not have enough stuffing to support itself like a firm amigurumi body. That floppy shape is the whole point.
The expected finished length is approximately 18 to 20 inches when the teddy is laid flat from the top of the head to the bottom of the feet. Because the body and limbs are deliberately lightly stuffed, the finished bear will look softer and flatter than a conventional amigurumi teddy of the same length.
For the decorative version with fringe, give the scarf ends a final even trim after assembly. Shape the newsboy bill gently with your fingers so it keeps the small curved profile shown in the example image.
This pattern has been calculated to reproduce the proportions and construction shown in the example image. It has not been physically test-crocheted from these written instructions, so the finished measurements are expected measurements based on the stated yarn, hook and gauge.
How to Keep the Teddy Soft and Floppy
The stuffing really does decide whether this turns into the bear shown in the example image or a regular amigurumi teddy. If you're used to stuffing crochet toys firmly, you'll probably need to stop earlier than feels natural.
Keep the head nicely filled because it has to hold the muzzle, ears and cap without collapsing. The body is different. Spread a thin layer of stuffing through the middle and leave the outer edges softer. You should be able to press the belly nearly flat with one hand.
The arms and legs need even less. A little stuffing in the paws and lower portions gives them shape, but the upper sections should stay soft enough to fold, bend and hang. Don't keep filling them just because there's room.
As you finish stuffing the body, arms and legs, lay each piece on a flat surface before closing its opening. The body should settle against the surface instead of balancing above it, and the limbs should bend and lie down easily. After assembly, the finished bear should keep that same relaxed, floppy look.
Changing the Christmas Details
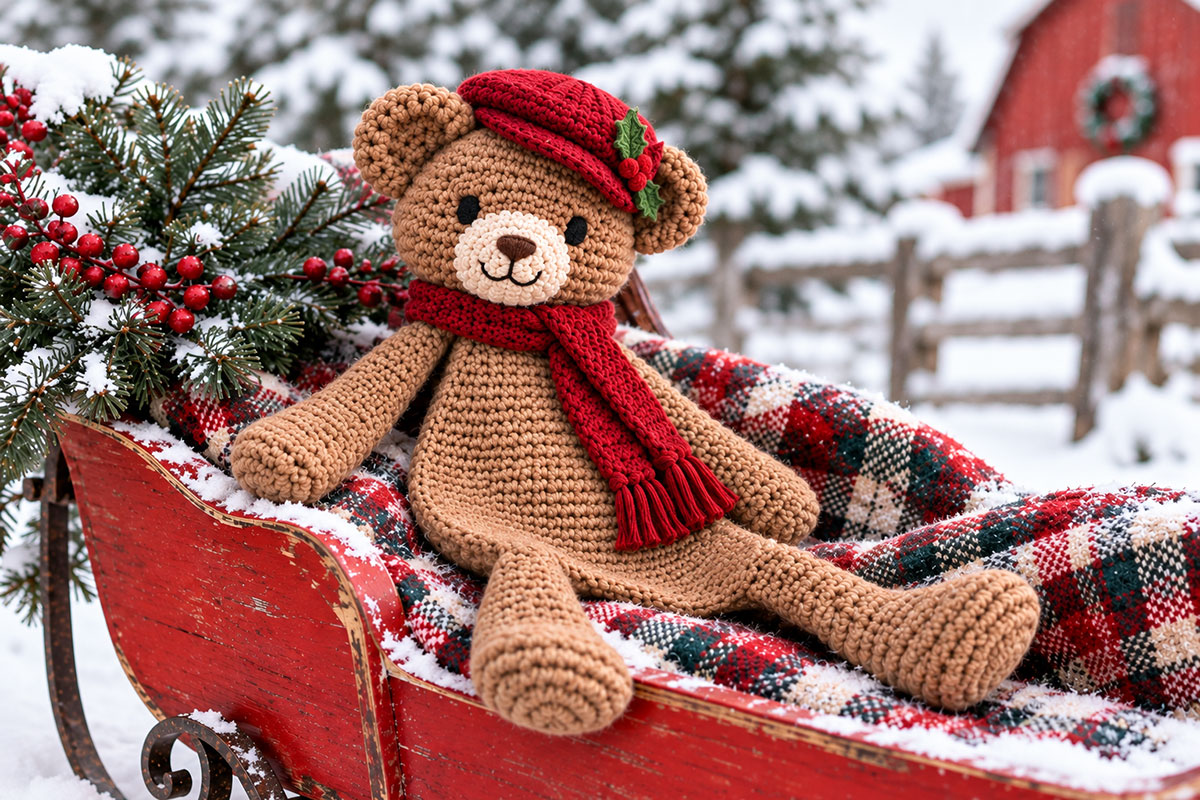
The cranberry scarf and red newsboy cap are what give this particular teddy his Christmas look, but you don't have to use every decoration.
If you want the simplest version, make the bear with the red scarf and cap and stop there. He still looks plenty festive.
Add the little holly cluster if you want more color near the face. I like the green there because it breaks up the red without turning the teddy into a pile of Christmas decorations. Keep the holly small. The cap should still look like a newsboy cap when you're finished.
You could also make the scarf and cap in evergreen and use cranberry holly berries, although that changes the balance of the example quite a bit. I would keep one color dominant instead of making every piece a different Christmas shade.
If you'd rather make an everyday teddy, leave off the scarf, cap and holly entirely. For more bear ideas, you'll find the larger collection on my free crochet bear patterns page.
Vintage Christmas Teddy Bear Crochet Pattern FAQ
Can I stuff the body more firmly?
You can, but you'll get a different finished bear. A firmly stuffed torso will turn the pear-shaped body into more of a traditional amigurumi shape. If you want the floppy snuggler shown here, keep the torso lightly padded and easy to flatten.
Should the arms and legs be completely unstuffed?
No. A small amount of filling helps the paws keep their shape. Use the most stuffing near the ends, taper it off as you work upward, and leave the upper portions soft.
Can I use chenille or blanket yarn?
You can adapt the pattern, but the finished size and stitch definition will change quite a bit. The calculations here are based on worsted-weight yarn and a 4.0 mm hook. A much heavier yarn will produce a substantially larger bear and may require a different hook and less total stitch count if you want similar proportions.
Can I leave off the newsboy cap?
Yes. The cap is part of the vintage Christmas styling, not the construction of the teddy. You can make the bear with only the cranberry scarf, or leave both accessories off for a plain version.
Is the holly required?
No. It's completely optional. I would add it only after the cap is finished and sitting on the teddy. If the red cap and scarf already look like enough, stop there.
Can the scarf and cap be removable?
For a decorative bear, yes. If you're making the teddy for a young child, I would sew both pieces securely to the bear rather than leaving loose removable accessories.
Why does my bear look rounder than the one in the example?
The first thing I'd check is the stuffing. Too much fiberfill through the body and upper limbs will change the silhouette very quickly. Take some out before changing the crochet itself. The body should be broad and pear-shaped but noticeably flatter than the head.
More Free Teddy Bear and Lovey Patterns
If you want another teddy after this one, my teddy bear lovey crochet pattern has the more traditional blanket-lovey construction. That's a very different finished project from this floppy snuggler.
You can also browse the full crochet animal lovey patterns collection or the easy baby lovey crochet patterns page if you're looking for another soft handmade gift.
And if bears are what you're after, go straight to the free crochet bear patterns collection. There are several different constructions there, so you don't have to keep making the same teddy in different colors.
When you click on links to various merchants on this site and make a purchase, this may result in this site earning a commission. This does not affect the price you pay.

UBGI Gold Standard 2026
Reviewed under the site's
editorial checklist.
Photos, decorating ideas, party setups and reader submissions are shared for inspiration unless a page is specifically presented as a pattern, tutorial, reference guide or step-by-step project. Follow the instructions, measurements, safety guidance and manufacturer directions provided for the particular project or product.
About Jan | Contact | Baby Nursery Ideas (Blog) | Site Map | Privacy Policy | Disclosure Policy | Disclaimer | Affiliate Disclosure | Earnings Disclosure | Facebook | Pinterest
I am a participant in the Amazon Services LLC Associates Program, an affiliate advertising program designed to provide a means for us to earn fees by linking to Amazon. As an Amazon Associate I earn from qualifying purchases.
Copyright © 2006-2026. All Rights Reserved.