Free Spiderweb Crochet Blanket Pattern for a Halloween Baby Blanket
By Jan Bay
This free spiderweb crochet blanket pattern creates a bold Halloween baby blanket with an open web design worked outward from the center. The repeating spaces form the spiderweb as the blanket grows, while solid crochet sections and a finished outer edge help the completed blanket hold its shape.
Explore More Free Crochet Baby Patterns
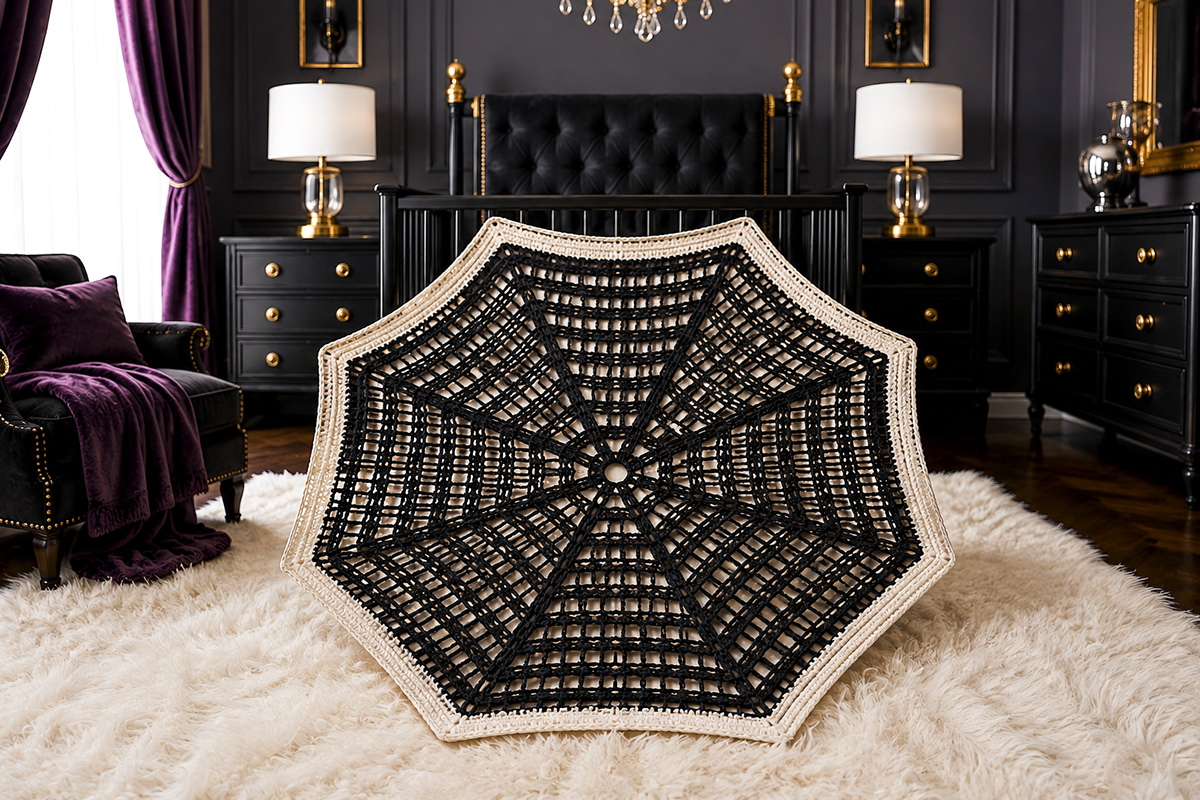
Yarn for the Spiderweb Crochet Blanket
Jump to the Spiderweb Crochet Blanket Pattern
Free Spiderweb Crochet Blanket Pattern
Supplies for the Spiderweb Crochet Blanket
This blanket is worked from the center outward, so there are no long starting chains and no separate pieces to sew together. Eight marked corner spaces guide the shape as the web grows.
- Estimated yarn needed: approximately 1,050 to 1,150 yards of #4 medium worsted weight yarn
- 5.5 mm (I-9) crochet hook, or the size needed to meet gauge
- 8 locking stitch markers
- Yarn needle
- Scissors
- Measuring tape
- Blocking mats and rustproof pins, optional but helpful
If you want a two-color blanket, reserve about 150 to 200 yards of the second color for the outer border. A single-color version shows the web structure clearly, too. I would choose a yarn with good stitch definition because fuzzy yarn can hide the small open spaces that make the web recognizable.
The Craft Yarn Council classifies worsted, afghan and aran yarns in the #4 medium category. If you substitute another yarn, compare the yarn weight as well as the yardage rather than relying only on the size of the skein. You can review the Craft Yarn Council Standard Yarn Weight System before making a substitution.
Baby blanket safety
This handmade blanket is appropriate for supervised floor time, stroller use, seasonal photographs and decorating when it is kept away from an infant's sleep space. Do not leave a loose blanket in a crib, bassinet, bedside sleeper or play yard. The U.S. Consumer Product Safety Commission recommends a bare infant sleep space with only a fitted sheet. See the current CPSC Safe Sleep guidance.
Spiderweb Baby Blanket Size and Gauge
At the stated gauge, expect the finished blanket to measure approximately 32 inches from one flat side of the octagon to the opposite flat side after blocking and about 34 to 35 inches from point to point. Small differences are normal because yarn, hook size and chain tension affect open crochet more than they affect a dense stitch pattern.
Gauge: 5 completed openwork rounds measure approximately 2 1/2 inches from the center toward one flat side before the border is added.
Exact gauge is not required for the pattern to fit another piece, but it does control the finished blanket size and the amount of yarn you need. Measure after Round 10. At the stated gauge, the work should measure close to 10 inches across from flat side to flat side.
If your blanket is noticeably smaller, first check that your chain stitches are not tight. If it is noticeably larger or the edge begins to ripple, check for extra chain stitches before changing hook size.
Spiderweb Crochet Pattern Notes
The blanket is worked in joined rounds using U.S. crochet terminology. Do not turn the work. The eight ch-2 spaces are the points of the octagon and form the main radial lines of the spiderweb. Place a stitch marker in each ch-2 corner space and move the markers up after every round.
The spaces between those eight points grow by one mesh opening on every round. That repeated increase is what allows the blanket to spread outward while keeping the openings small and consistent instead of creating long loose chains.
Abbreviations:
- ch = chain
- dc = double crochet
- hdc = half double crochet
- sl st = slip stitch
- sp = space
- st = stitch
- sts = stitches
Beginning chain: The beginning ch 3 counts as the first dc of the round.
Corner: When the instructions say to work a corner, work (dc, ch 2, dc) in the marked ch-2 corner space.
Count the eight corner spaces before you continue to the next round. If one corner is missed, the blanket will begin to pull toward that side several rounds later. Fixing it immediately is much easier than removing a wide outer round.
I would also lay the blanket flat after every five rounds. The web should rest on the surface without forming a bowl and without developing a ruffled edge. The chains are part of the shaping, so keep them relaxed and even.
Free Spiderweb Crochet Blanket Pattern
The center establishes all eight sections of the web. Once Round 3 is complete, the construction repeats in a predictable way. Each new round has one more ch-1 mesh space along every side.
Round 1: Make the Center of the Spiderweb
Make a magic ring.
Ch 3. This counts as the first dc.
Ch 2, dc in the ring.
Repeat (ch 2, dc in the ring) 6 more times.
Ch 2 and join with a sl st to the top of the beginning ch 3.
Pull the center ring closed securely.
Round 1 count: 8 dc and 8 ch-2 spaces.
Place one stitch marker in each ch-2 space. These eight spaces remain the corners for the entire openwork section.
Round 2: Establish the Eight Web Sections
Sl st into the first marked ch-2 space.
Ch 3, ch 2, dc in the same ch-2 space. The beginning ch 3, ch 2 and dc form the first corner.
Ch 1.
Work (dc, ch 2, dc) in the next marked ch-2 space.
Repeat the previous two steps around the blanket until all eight corner spaces have been worked.
After the eighth corner, ch 1 and join with a sl st to the top of the beginning ch 3.
Move each stitch marker into the new ch-2 corner directly above it.
Round 2 count: 16 dc, 8 ch-1 spaces and 8 ch-2 corner spaces.
Round 3: Begin the Open Spiderweb Mesh
Sl st into the first marked ch-2 corner space.
Ch 3, ch 2, dc in the same space.
Ch 1.
Dc in the next ch-1 space.
Ch 1.
Work (dc, ch 2, dc) in the next marked corner space.
Continue around in the same manner. Between every pair of corners, work ch 1, dc in the ch-1 space, ch 1.
After the last side, join with a sl st to the top of the beginning ch 3.
Move all eight corner markers up.
Round 3 count: 24 dc, 16 ch-1 spaces and 8 ch-2 corner spaces.
Round 4: Add the Next Ring of the Web
Sl st into the first marked ch-2 corner space.
Ch 3, ch 2, dc in the same space.
Ch 1, dc in the first ch-1 space along the first side.
Ch 1, dc in the second ch-1 space.
Ch 1, then work (dc, ch 2, dc) in the next marked corner space.
Repeat [ch 1, dc in the next ch-1 space, ch 1, dc in the next ch-1 space, ch 1, then work (dc, ch 2, dc) in the next marked corner] across the next 6 sides. Stop after you work the eighth corner.
For the final side, ch 1, dc in the first ch-1 space, ch 1, dc in the second ch-1 space, ch 1. Join with a sl st to the top of the beginning ch 3 without working the first corner a second time. Move all eight corner markers up.
Round 4 count: 32 dc, 24 ch-1 spaces and 8 ch-2 corner spaces.
Rounds 5 Through 10: Continue the Spiderweb
From this point forward, every openwork round follows the same construction.
Sl st into the first marked corner space. Ch 3, ch 2, dc in the same space.
Ch 1. Work 1 dc in each ch-1 space across the first side, making ch 1 after every dc.
Work (dc, ch 2, dc) in the next marked corner.
Repeat the side sequence and corner across the next 6 sides. Stop after you work the eighth corner.
For the final side, ch 1, then work 1 dc in each ch-1 space across, making ch 1 after every dc. Join with a sl st to the top of the beginning ch 3 without working the first corner a second time. Move all eight corner markers up.
Do not work a dc into an existing dc along the side. The side dc stitches are worked into the ch-1 spaces from the previous round. This keeps the mesh staggered neatly and prevents the open sections from becoming crowded.
Use these checkpoints to confirm that the web is expanding correctly:
- Round 5: 40 dc and 32 ch-1 spaces
- Round 6: 48 dc and 40 ch-1 spaces
- Round 7: 56 dc and 48 ch-1 spaces
- Round 8: 64 dc and 56 ch-1 spaces
- Round 9: 72 dc and 64 ch-1 spaces
- Round 10: 80 dc and 72 ch-1 spaces
Every round also has exactly 8 ch-2 corner spaces.
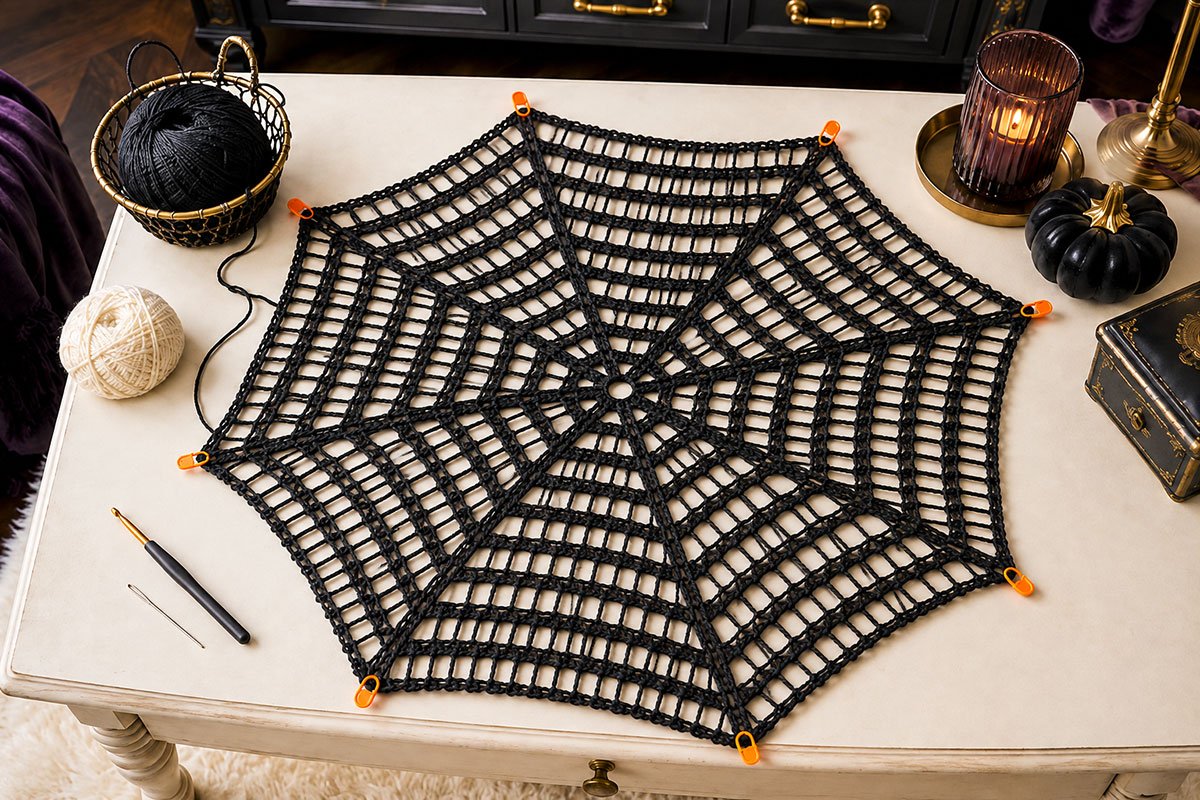
At this stage the structure should be easy to read. The eight marked points travel outward in straight lines, while the ch-1 mesh creates the curved-looking rings between them. I prefer that restrained web effect to adding a large sewn spider in the center. The stitches themselves do the decorating.
If you want a companion Halloween project that uses a recognizable spider rather than only the web motif, the crochet spider lovey pattern gives you a very different project without changing themes.
Rounds 11 Through 30: Grow the Blanket to Baby Size
Continue exactly as established in Rounds 5 through 10.
At the beginning of every round, sl st into the first marked ch-2 corner. Work ch 3, ch 2, dc in that same space.
Across the first side, ch 1 before the first mesh dc. Work 1 dc in every ch-1 space from the previous round, making ch 1 after each dc.
Work (dc, ch 2, dc) in the next marked ch-2 corner.
Repeat the side sequence and corner across the next 6 sides. Stop after you work the eighth corner.
For the final side, ch 1, then work 1 dc in every ch-1 space from the previous round, making ch 1 after each dc. Join with a sl st to the top of the beginning ch 3 without working the first corner a second time. Move all eight markers into the new corner spaces before starting the next round.
Each round increases by 8 dc and 8 ch-1 spaces. The number of ch-2 corners never changes.
These larger-round checkpoints make it easier to catch a missed section before you have a long round to remove:
- Round 15: 120 dc, 112 ch-1 spaces and 8 ch-2 corners
- Round 20: 160 dc, 152 ch-1 spaces and 8 ch-2 corners
- Round 25: 200 dc, 192 ch-1 spaces and 8 ch-2 corners
- Round 30: 240 dc, 232 ch-1 spaces and 8 ch-2 corners
After Round 30, spread the blanket on a flat surface without stretching it. At the stated gauge, the openwork portion should measure close to 30 inches from flat side to flat side.
If it is an inch smaller or larger, that does not require a correction. The border adds width, and blocking will settle the mesh. If the blanket is substantially different from the expected size, measure your five-round gauge again before continuing.
A spiderweb pattern gives you a useful visual check that a solid blanket does not. Look from the center toward each point. All eight sections should contain the same number of openings. If one section looks noticeably narrower, count that side before adding the border.
For another seasonal blanket with a denser surface, see the pumpkin crochet blanket pattern. The two blankets use very different construction, which makes them useful choices for crocheters who prefer either openwork or a more solid fabric.
Border and Finishing for the Spiderweb Crochet Blanket
The border changes the airy mesh into a firmer outer edge. It also gives the eight points enough definition that the blanket reads as an octagon instead of a loose circle.
You can continue with the same yarn or change to a contrasting color before Border Round 1. If you change colors, finish the last slip stitch of Round 30 with the new color and weave the old color in securely later.
Border Round 1
Sl st into the first marked ch-2 corner space.
Ch 2. This counts as the first hdc.
Ch 2, hdc in the same corner space.
Work 1 hdc in every dc and 1 hdc in every ch-1 space across the first side.
In the next marked ch-2 corner, work (hdc, ch 2, hdc).
Repeat the side sequence and corner across the next 6 sides. Stop after you work the eighth corner.
For the final side, work 1 hdc in every dc and 1 hdc in every ch-1 space. Join with a sl st to the top of the beginning ch 2 without working the first corner a second time.
Move all eight stitch markers into the new ch-2 corner spaces.
Border Round 1 count: 488 hdc and 8 ch-2 corner spaces.
Border Round 2
Sl st into the first marked ch-2 corner space.
Ch 2. This counts as the first hdc. Ch 2, then hdc in the same corner space.
Work 1 hdc in every hdc across the first side.
Work (hdc, ch 2, hdc) in the next marked corner.
Repeat the side sequence and corner across the next 6 sides. Stop after you work the eighth corner.
For the final side, work 1 hdc in every hdc. Join with a sl st to the top of the beginning ch 2 without working the first corner a second time.
Move all eight stitch markers into the new ch-2 corner spaces.
Border Round 2 count: 504 hdc and 8 ch-2 corner spaces.
Border Round 3
Sl st into the first marked ch-2 corner space.
Ch 2. This counts as the first hdc. Ch 2, then hdc in the same corner space.
Work 1 hdc in every hdc across the first side.
Work (hdc, ch 2, hdc) in the next marked corner.
Repeat the side sequence and corner across the next 6 sides. Stop after you work the eighth corner.
For the final side, work 1 hdc in every hdc. Join with a sl st to the top of the beginning ch 2 without working the first corner a second time.
Border Round 3 count: 520 hdc and 8 ch-2 corner spaces.
Remove all eight stitch markers.
Fasten off, leaving a tail long enough to weave through several stitches.
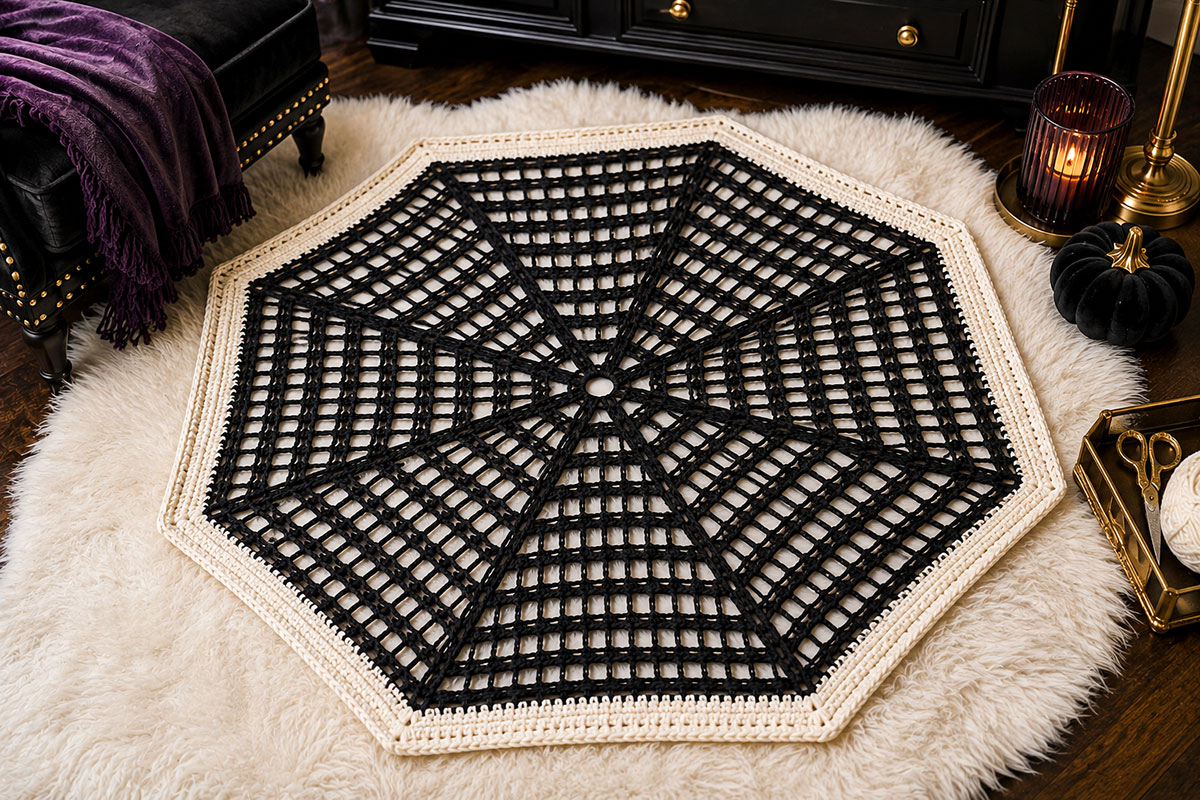
Weave each yarn tail through the back of several stitches, change direction and weave through a second section before trimming. The center tail deserves extra attention because that small ring carries tension from every section of the blanket.
How to Change the Spiderweb Blanket Size
The easiest way to resize this pattern is to change the number of openwork rounds. Do not change the number of corners. Keeping eight ch-2 corners preserves the construction and lets the web expand evenly.
For every additional openwork round, work the same established repeat: make a corner, ch 1, work a dc in every ch-1 space across the side with ch 1 after each dc, then make the next corner.
Each added round contains 8 more dc and 8 more ch-1 spaces than the round before it.
At the stated gauge, these are useful stopping points before adding the three border rounds:
- Round 26: approximately 28 inches flat to flat after the border
- Round 30: approximately 32 inches flat to flat after the border
- Round 34: approximately 36 inches flat to flat after the border
If you stop after a round other than Round 30, use the same three border rounds, but do not use the printed border stitch totals of 488, 504 and 520. Those totals apply to the standard 30-round blanket. For a Round 26 blanket, the three border totals are 424, 440 and 456 hdc. For a Round 34 blanket, they are 552, 568 and 584 hdc. Each border round still has 8 ch-2 corner spaces.
Use the actual measurement rather than relying only on the round number. A looser crocheter can reach the desired size several rounds sooner.
If you continue beyond Round 30, allow extra yarn before you begin the border. The later rounds use considerably more yarn because every side has become longer.
Color Ideas for a Halloween Spiderweb Blanket
A spiderweb does not need orange yarn to look like Halloween. Black, charcoal, ivory, pale gray and muted purple all let the geometry carry the theme. I would keep the palette limited because the web already gives the blanket plenty to look at.
For the clearest web, use one color through all 30 openwork rounds and a second color only for the three-round border. Another option is to change color every five rounds. That emphasizes the rings, although it also creates more ends to weave in.
If you alternate colors, change only at the beginning of a round. Avoid changing color halfway across a side because the join will interrupt one section of the web and make that wedge look different from the other seven.
You can browse the broader Halloween crochet patterns collection if you want coordinating projects that use pumpkins, spiders and other seasonal motifs.
Blocking the Finished Crochet Spiderweb
Blocking makes a noticeable difference to an openwork blanket because it gives the eight points equal room and straightens the web rings.
- Wash or dampen the blanket according to the yarn manufacturer's care instructions.
- Remove excess water without twisting the crochet.
- Lay the blanket flat on blocking mats or clean towels.
- Measure from the center to each of the eight points.
- Adjust the blanket until those measurements are equal.
- If you use rustproof blocking pins, pin the eight points first.
- Shape the flat section between each pair of points without stretching the mesh excessively. Add extra pins only where they are needed to hold the shape.
- Allow the blanket to dry completely.
- Remove every blocking pin before moving or using the blanket.
Before the blanket is used, photographed or stored, confirm that all eight stitch markers and every blocking pin have been removed and that all yarn ends are securely woven in.
Do not pull the corner points into long spikes. The finished outline should remain a broad octagon. The little ch-1 openings should look even rather than stretched into narrow slits.
Spiderweb Crochet Blanket FAQ
Is this spiderweb crochet blanket pattern suitable for a beginner?
I would place it at advanced beginner level. You need to know how to chain, double crochet, half double crochet, slip stitch and work into chain spaces. The individual stitches are simple. The main skill is keeping track of all eight corners as the rounds become larger.
Why is my spiderweb blanket starting to cup?
First count the corners. There must be eight ch-2 corner spaces on every openwork round. Then check that you worked into every ch-1 space along each side and made a ch 1 after each dc. If the counts are correct, tight chain tension can also pull the blanket inward.
Lay the work flat without stretching it. If the stitch counts are correct and significant cupping remains, undo the affected rounds and rework them with slightly looser chain tension. If the cupping begins near the center and continues, restart with a hook one size larger rather than changing hook sizes halfway through the blanket.
Why is the outside edge becoming wavy?
Confirm that you did not add extra ch-1 spaces between the corners. Each new openwork round should have exactly one more ch-1 space per side than the previous round.
If the stitch counts are correct, your chains may be looser than your dc stitches. Undo the affected rounds and rework the chains with more even tension. If the waviness begins near the center and continues, restart with a hook one size smaller rather than changing hook sizes halfway through the blanket.
Can I make the blanket with #3 lightweight yarn?
Yes, but the same number of rounds will make a smaller blanket. Use a hook suited to the yarn, work a test section and continue the established rounds until the blanket reaches the size you want. Buy extra yardage because thinner yarn generally requires more stitches and more rounds to reach the same dimensions.
Can I use bulky yarn?
You can, but the mesh openings and finished blanket will become larger. I prefer medium worsted weight for this design because it keeps the web openings modest while still making the radial pattern easy to see.
Do I need to block the blanket?
You can use the blanket without blocking, but blocking is worth doing. It evens the eight sides, opens the mesh uniformly and gives the border a cleaner outline.
Can I add a crochet spider to the center?
You could add decoration to a display piece, but I would leave this baby blanket without buttons, beads or sewn three-dimensional decorations. The open web already gives the blanket its Halloween character, and the plain center keeps the finished project simpler.
Can this blanket be used in a baby's crib?
No loose blanket should be placed in an infant sleep space. The CPSC advises keeping cribs, bassinets, play yards and bedside sleepers bare except for a fitted sheet. Use this crochet blanket for supervised activities or as a keepsake, and follow current CPSC infant safe sleep guidance.
What should I make after the spiderweb blanket?
If you want to stay with Halloween crochet, the crochet spider lovey pattern is the closest companion project. You can also browse free baby crochet patterns for blankets, loveys and other handmade projects beyond the Halloween collection.
The web is dramatic enough to stand on its own. Once those eight lines begin moving outward from the center, there is no need to crowd the blanket with extra decorations.
When you click on links to various merchants on this site and make a purchase, this may result in this site earning a commission. This does not affect the price you pay.

UBGI Gold Standard 2026
Reviewed under the site's
editorial checklist.
Photos, decorating ideas, party setups and reader submissions are shared for inspiration unless a page is specifically presented as a pattern, tutorial, reference guide or step-by-step project. Follow the instructions, measurements, safety guidance and manufacturer directions provided for the particular project or product.
About Jan | Contact | Baby Nursery Ideas (Blog) | Site Map | Privacy Policy | Disclosure Policy | Disclaimer | Affiliate Disclosure | Earnings Disclosure | Facebook | Pinterest
I am a participant in the Amazon Services LLC Associates Program, an affiliate advertising program designed to provide a means for us to earn fees by linking to Amazon. As an Amazon Associate I earn from qualifying purchases.
Copyright © 2006-2026. All Rights Reserved.