Free Snowman Quilt Pattern with Pinwheel Stars and Snowflakes
By Jan Bay
This free snowman quilt pattern features a sleepy-eyed snowman wearing a navy top hat and a long blue scarf, surrounded by four pinwheel stars, two snowflake blocks and icy-blue-and-ivory checkerboard patchwork. The finished 54 × 54-inch baby quilt combines traditional piecing with fabric appliqué to create a cheerful winter keepsake, complete with printable templates and cutting instructions. I hope that my quilting friends will enjoy making it as much as I enjoyed designing it.
Explore More Free Quilt Patterns
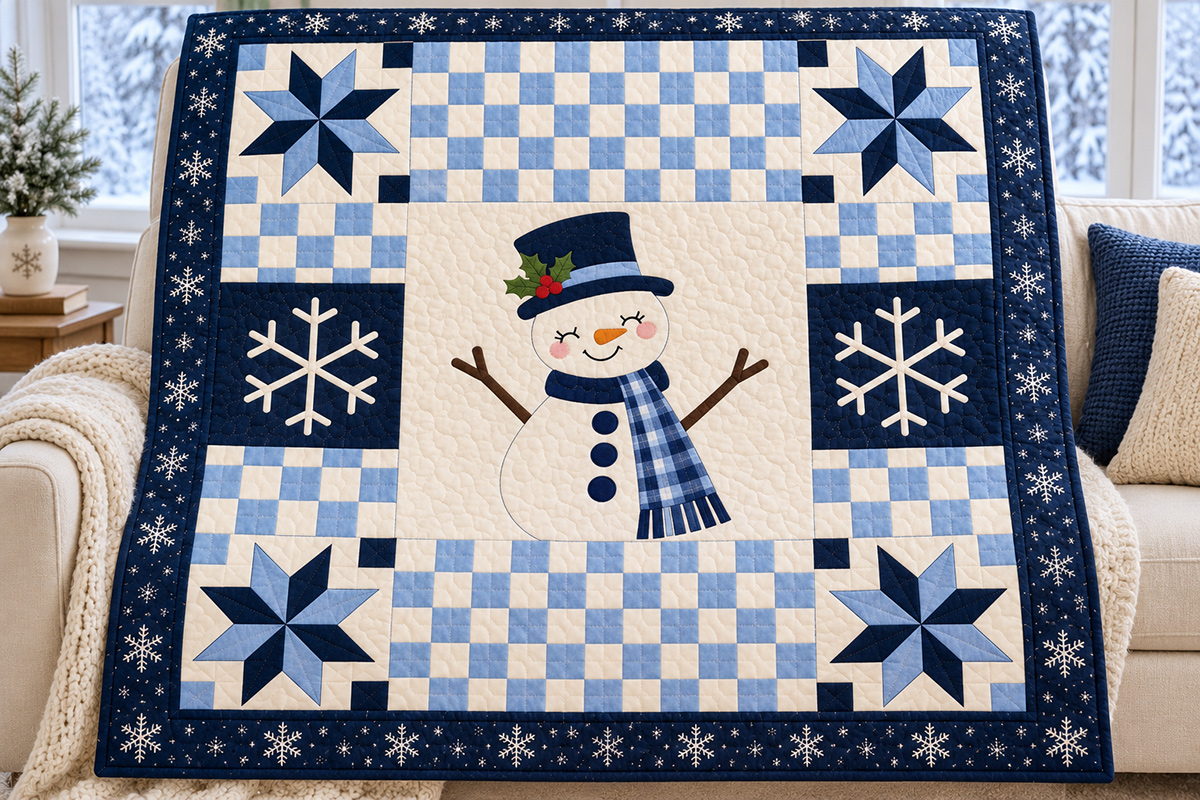
The quilt image above is a design visualization, not a photograph of a sewn sample. The L1 layout diagram and printable templates provide the exact piece shapes, placement and measurements.
See Supplies for This Project Here.
On This Page
Snowman Quilt Pattern Size and Design Details
This quilt finishes at approximately 54 × 54 inches, with a 48-inch patchwork center and a three-inch navy border all the way around. It's a generous size for a handmade baby quilt, and I especially like it as a nursery keepsake or a winter quilt displayed over a chair.
The snowman sits in the middle of a 24-inch square, wearing his slightly tilted navy top hat with holly leaves and three red berries. His sleepy embroidered eyes, carrot nose and long checked scarf give him plenty of personality without making the appliqué unnecessarily complicated.
Around him are four 12-inch pinwheel star blocks, two large snowflake blocks and six sections of icy-blue-and-ivory checkerboard patchwork. I chose to leave navy out of the checkerboards entirely. There's already enough dark blue in the stars, snowflakes, hat and border, and the lighter checks give those details room to stand out.
Here's the finished block arrangement from the pattern. This diagram follows the actual cutting and assembly instructions, including the corrected bottom border placement.
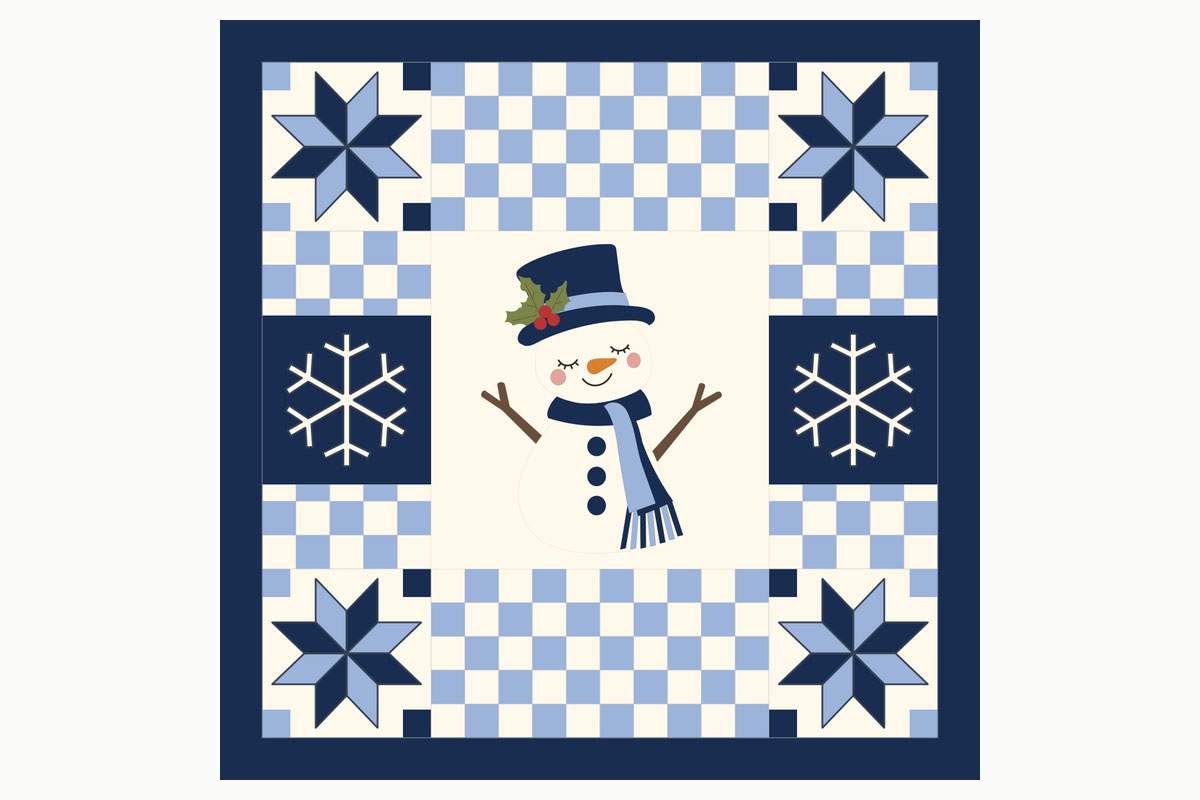
The checkerboards are sewn from ordinary fabric squares. The snowman, stars and snowflakes use flat fabric appliqué. Nothing on the medallion needs to be knitted, crocheted or stuffed.
You'll find the full cutting measurements and actual-size templates in the downloadable pattern files below.
Fabric and Supplies for the Snowman Quilt
I would choose good-quality quilting cotton for this project. The design depends on crisp color differences, so look for a clear icy blue, a rich navy and an ivory that doesn't lean too yellow. Small winter prints are fine, but I'd keep the checkerboard fabrics fairly quiet.
The pattern's fabric estimates assume at least 40 inches of usable fabric width after preparation.
Fabric Requirements
- Ivory quilting cotton: 2½ yards for checkerboards, backgrounds, snowflakes and snowman pieces.
- Navy quilting cotton: 1 yard for snowflake backgrounds, star blades, hat, scarf and other details.
- Icy-blue quilting cotton: 1¼ yards for checkerboards, star blades and accents.
- Navy snowflake-print fabric: 1 yard for the outer border.
- Navy binding fabric: ⅝ yard, purchased separately.
- Blue woven-check fabric: 1 fat quarter for the scarf and hatband.
- Accent fabrics: Small amounts of brown, olive green, red, blush pink and orange.
- Lightweight fusible web: 3 yards, assuming approximately 17 inches of usable width.
- Backing fabric: 3¾ yards of standard-width fabric, or 2 yards of extra-wide backing.
- Batting: At least 62 × 62 inches.
Other Supplies
You'll need a sewing machine, rotary cutter, cutting mat, quilting ruler, quarter-inch presser foot, appliqué scissors, iron, pressing cloth, matching thread, embroidery floss and a removable fabric marker.
I would also have some stable template plastic on hand. The checkerboard squares have an unusual cutting measurement of 2.9 inches, and the printable cutting gauges will be much more useful transferred to something sturdier than ordinary printer paper.
Before cutting: Set aside the larger background pieces and snowman appliqué fabrics first. Don't cut every leftover piece into checkerboard squares until you've accounted for the larger shapes.
Download the Free Snowman Quilt Pattern
I've divided the snowman quilt instructions into five PDFs so you can print only the pages you need. There's also a complete ZIP package if you'd rather have everything together.
Download the Complete Snowman Quilt Pattern Package (ZIP)
The ZIP includes the five PDFs and a short README with printing instructions.
Individual Pattern PDFs
01. Complete Snowman Quilt Pattern (21 pages)
The complete construction instructions, including the snowman appliqué, pinwheel stars, snowflake blocks, checkerboards, borders and finishing.
02. Actual-Size Appliqué Templates and Cutting Gauges (116 pages)
Full-size placement maps, individual mirrored appliqué templates, star and snowflake patterns, and precise checkerboard cutting gauges.
03. Fabric Requirements and Cutting Charts (6 pages)
Fabric quantities, piece counts, cutting dimensions, and border and binding measurements.
04. Quilt Layout and Assembly Guide (7 pages)
The complete block arrangement, checkerboard color charts, four different star positions, and finished assembly measurements.
05. Pattern Engineering Review (5 pages)
The dimensional calculations, digital template checks and construction limitations.
You don't need to print all 155 pages to start sewing. I'd begin by reading the complete instructions and keeping the layout guide handy, then print the template pages you need for each part of the project.
Printing the Full-Size Snowman Quilt Templates
Please check your printer settings before cutting a single piece of fabric. Some of these templates are quite large, and even a small scaling error can change the finished shape.
Print the actual-size template pages on US Letter paper using Actual Size or 100%. Turn off Fit to Page, Shrink to Fit and any automatic scaling options.
Every tiled template page has a one-inch calibration square and a six-inch assembly frame. Print one representative page first and measure both the width and height of the calibration square with a real ruler. The six-inch frame must also measure correctly.
If either measurement is wrong, stop and correct the printing settings before continuing.
Front and Mirrored Templates
You'll see two different kinds of placement drawings in the booklet. The FRONT maps show exactly where the fabric pieces belong when you're looking at the finished quilt. The MIRRORED templates are for tracing onto the paper backing of fusible web.
Don't reverse the mirrored templates again in your printer settings. They're already prepared for that purpose.
For large pieces spread across several sheets, trim along the marked six-inch frames and butt the matching edges together. Don't overlap the frames. Match the row and column labels, check the continuing lines and tape the sheets from the back.
The last two pages of the template booklet contain cutting gauges for the 2.9-inch checkerboard squares and 2.9 × 1.7-inch rectangles. I would print those separately and keep them with my cutting supplies.
One more detail: the appliqué outlines already show the exact fabric shapes. Don't add a quarter-inch seam allowance to them. The quarter-inch allowances apply to the pieced patchwork, not the raw-edge appliqué.
Piecing the Icy-Blue and Ivory Checkerboards
The checkerboards are probably the easiest part of this quilt once you've settled into the cutting measurements. There are no navy squares in these sections, just icy blue and ivory alternating across the top, bottom and sides of the snowman.
There are six checkerboard sections altogether. The top and bottom panels finish at 24 × 12 inches. The four smaller sections, positioned above and below the snowflakes, each finish at 12 × 6 inches.
Cutting the Checkerboard Pieces
For all six sections combined, cut:
- 70 ivory squares measuring 2.9 × 2.9 inches.
- 70 icy-blue squares measuring 2.9 × 2.9 inches.
- 12 ivory rectangles measuring 2.9 × 1.7 inches.
- 8 icy-blue rectangles measuring 2.9 × 1.7 inches.
That's 160 patchwork pieces in total. Each complete square finishes at 2.4 inches when sewn with accurate quarter-inch seams.
Don't round the cutting measurements up to three inches. The panels won't finish at the specified dimensions if you do.
Top and Bottom Checkerboards
Each large panel contains ten squares across and five rows down, for 50 squares per panel. Cut 25 of each color for the top and another 25 of each color for the bottom.
The top panel begins with icy blue in the upper-left position, then alternates ivory and blue. The bottom panel starts with ivory in its upper-left position. Follow the corresponding color charts in PDF 04 so the two panels face the correct directions.
Sew each row using a quarter-inch seam allowance. Ten joined squares should measure 24½ inches across before the rows are joined. After joining all five rows, the complete panel should measure 24½ × 12½ inches unfinished.
Four Smaller Side Sections
Each smaller panel has five columns and three rows. Two rows use full-height squares, while the row nearest the snowflake is only half-height.
For each small panel, use five ivory and five icy-blue full squares, plus three ivory and two icy-blue half-height rectangles. The upper panels have their short row at the bottom. The lower panels have their short row at the top.
Keep the short rows next to the snowflakes. Don't add them as extra rows between the bottom stars and the outer border.
Each small panel should measure 12½ × 6½ inches unfinished.
Check Your Seams Before Sewing All 160 Pieces
Join three 2.9-inch squares and press them. Your sample strip should measure 7.7 inches across before the end seam allowances are used. If it doesn't, adjust your sewing-machine seam position before continuing.
That's a small test worth doing. There's no point cutting and sewing all those squares only to discover that the finished panels are too large or too small.
Assembling and Finishing Your Snowman Quilt
I would work on the snowman medallion, stars and checkerboards as separate projects before joining the quilt top. You can keep each finished section flat, check its measurements and lay everything out before sewing the large rows together.
Step 1. Prepare the Four Pinwheel Stars
Each star block finishes at 12 × 12 inches. Start by making the pieced background for each one.
For each background, you'll need four colored 2½-inch corner squares, four ivory rectangles measuring 2½ × 8½ inches and one ivory center square measuring 8½ × 8½ inches.
Make the top and bottom rows from a colored square, an ivory rectangle and another colored square. The middle row uses an ivory rectangle on each side of the large ivory center. Join the three rows with quarter-inch seams.
Each background should measure 12½ × 12½ inches unfinished.
The stars use eight fabric blades each. Follow the actual-size placement maps and keep the four blocks labeled upper left, upper right, lower left and lower right. Their navy and icy-blue arrangements are not all interchangeable.
Arrange the blades so their pointed inner ends meet at the center. Don't stack eight layers of fabric into a thick lump. Once you're happy with the placement, fuse and stitch around the exposed edges using the method in the full pattern.
Step 2. Make the Two Snowflake Blocks
Each snowflake is cut as one complete ivory fabric shape and applied to a 12½-inch navy background square.
Use the full-size mirrored template to prepare the fusible appliqué, then position the snowflake using its FRONT placement map. Carefully stitch around the branches, tips and inside corners.
Both snowflake blocks should finish at 12 inches square after they're sewn into the quilt.
Step 3. Make the Snowman Medallion
The central snowman is made entirely from flat woven fabric appliqué, with embroidery for his sleepy eyes, smile and holly leaf veins.
Begin with an ivory background measuring 24½ × 24½ inches. Assemble the 24-inch FRONT placement map from the printable sheets and use it to mark the fabric shapes and embroidery details.
The medallion contains 28 fabric pieces. Work in this order:
- Position the two brown twig arms and secure their inner ends.
- Add the ivory snowman body over the arm ends.
- Position the seven separate fabric fringe pieces and the rear scarf sections.
- Place the head over the neck wrap, followed by the hat crown, hatband and brim.
- Add the two holly leaves, three red berries, cheeks, orange carrot nose and three flat navy buttons.
- Position the front scarf section over the rear scarf and fringe tops.
- Transfer and embroider the sleeping eyes, lashes, smile and holly veins.
Use the numbered appliqué pieces and full assembly instructions in PDF 01 for the exact overlaps. Before fusing anything permanently, lay all the pieces in place and compare them with the complete placement map.
Every scarf-fringe strip needs to be stitched securely along its exposed edges and tip. The ends should lie flat against the quilt, not hang loose.
Step 4. Assemble the Quilt Center
When the individual blocks are ready, arrange the quilt into three main rows.
Top row: Upper-left star, top checkerboard panel, upper-right star.
Middle row: Left side section, snowman medallion, right side section. Each side section is assembled from an upper checkerboard panel, a snowflake block and a lower checkerboard panel.
Bottom row: Lower-left star, bottom checkerboard panel, lower-right star.
Join the sections with quarter-inch seams, keeping the snowman upright and the snowflakes level with one another.
The complete center should measure 48½ × 48½ inches before the outer border is attached. Measure it before continuing. If the measurements are off, check your seam allowances rather than stretching the fabric to make the border fit.
Step 5. Add the Navy Snowflake Border
The finished border is three inches wide on all four sides.
Cut the border strips 3½ inches wide, including seam allowances. Attach two side borders measuring 48½ inches long, then add the top and bottom borders measuring 54½ inches long.
The navy bottom border joins directly beneath the two lower star blocks and the bottom checkerboard panel. There's no extra checkerboard row beneath those stars.
Your completed quilt top should measure approximately 54½ inches square before the outer seam allowance is enclosed in the binding.
Step 6. Quilt and Bind
Press the completed top carefully, protecting the appliqué with a pressing cloth. Check that the fabric pieces and embroidery ends are secure.
Layer the backing, batting and quilt top, then baste from the center outward without stretching the fabric.
I would keep the quilting fairly simple around the snowman's face and the eight-point star centers. There's already plenty of detail there. Gentle background quilting can hold the layers together without covering up the appliqué work.
Finish with the navy binding following the instructions in PDF 01. The pattern provides seven 2½-inch binding strips, which are joined and folded before attachment.
After quilting and binding, the finished measurements may be slightly smaller because of quilting take-up and laundering.
Helpful Tips and Snowman Quilt Pattern Notes
Before you begin, there are a few details I'd pay particular attention to. None is difficult by itself, but getting them right will make the finished quilt look much closer to the original design.
Keep the Four Stars in Their Assigned Positions
The navy and icy-blue blade arrangements alternate around the quilt, and the little colored background squares are different from one star location to another. Label the four blocks before sewing them together. It's easier than trying to figure out which way a finished star should turn later.
Don't Skip the Checkerboard Cutting Gauges
The 2.9-inch cutting size isn't a common measurement on every quilting ruler. Use the actual-size gauges supplied with the templates, check your seam allowance, and measure the first completed row before cutting the rest.
Choose Lightweight Appliqué Materials
The medallion has overlapping fabric in the scarf, hat and holly details. Lightweight woven cotton and an appropriate lightweight fusible web will help keep those areas from becoming unnecessarily bulky.
I'd also take my time around the star centers. Eight points meet in a small space, so accurate placement matters more than sewing quickly.
Using Your Finished Snowman Baby Quilt
This would make a lovely winter nursery decoration or a handmade keepsake to give as a gift. You could display it over a chair, hang it securely out of baby's reach, or save it for use when the child is older.
For babies, remember that quilts and other loose blankets don't belong in a crib or infant sleep area. The American Academy of Pediatrics' safe sleep guidance explains why the baby's sleep space should remain free of loose bedding.
A Note About the Pattern
This original snowman quilt design has been reviewed digitally for cutting measurements, appliqué shapes, template alignment and assembly dimensions. It has not been physically test-sewn, printed on a home printer or checked after laundering.
Print and measure the calibration square before cutting, and sew a small checkerboard sample to check the seam accuracy. A sample star block is also a good idea before committing to all four.
I hope you'll have fun choosing your winter fabrics and giving this little snowman his personality. And if you'd like another seasonal project after this one, have a look at my Christmas quilt patterns for more designs to make and enjoy.
When you click on links to various merchants on this site and make a purchase, this may result in this site earning a commission. This does not affect the price you pay.

UBGI Gold Standard 2026
Reviewed under the site's
editorial checklist.
Photos, decorating ideas, party setups and reader submissions are shared for inspiration unless a page is specifically presented as a pattern, tutorial, reference guide or step-by-step project. Follow the instructions, measurements, safety guidance and manufacturer directions provided for the particular project or product.
About Jan | Contact | Baby Nursery Ideas (Blog) | Site Map | Privacy Policy | Disclosure Policy | Disclaimer | Affiliate Disclosure | Earnings Disclosure | Facebook | Pinterest
I am a participant in the Amazon Services LLC Associates Program, an affiliate advertising program designed to provide a means for us to earn fees by linking to Amazon. As an Amazon Associate I earn from qualifying purchases.
Copyright © 2006-2026. All Rights Reserved.