Free Reindeer Granny Square Crochet Pattern Stitched In-Square Deer with Rudolph Nose
By Jan Bay
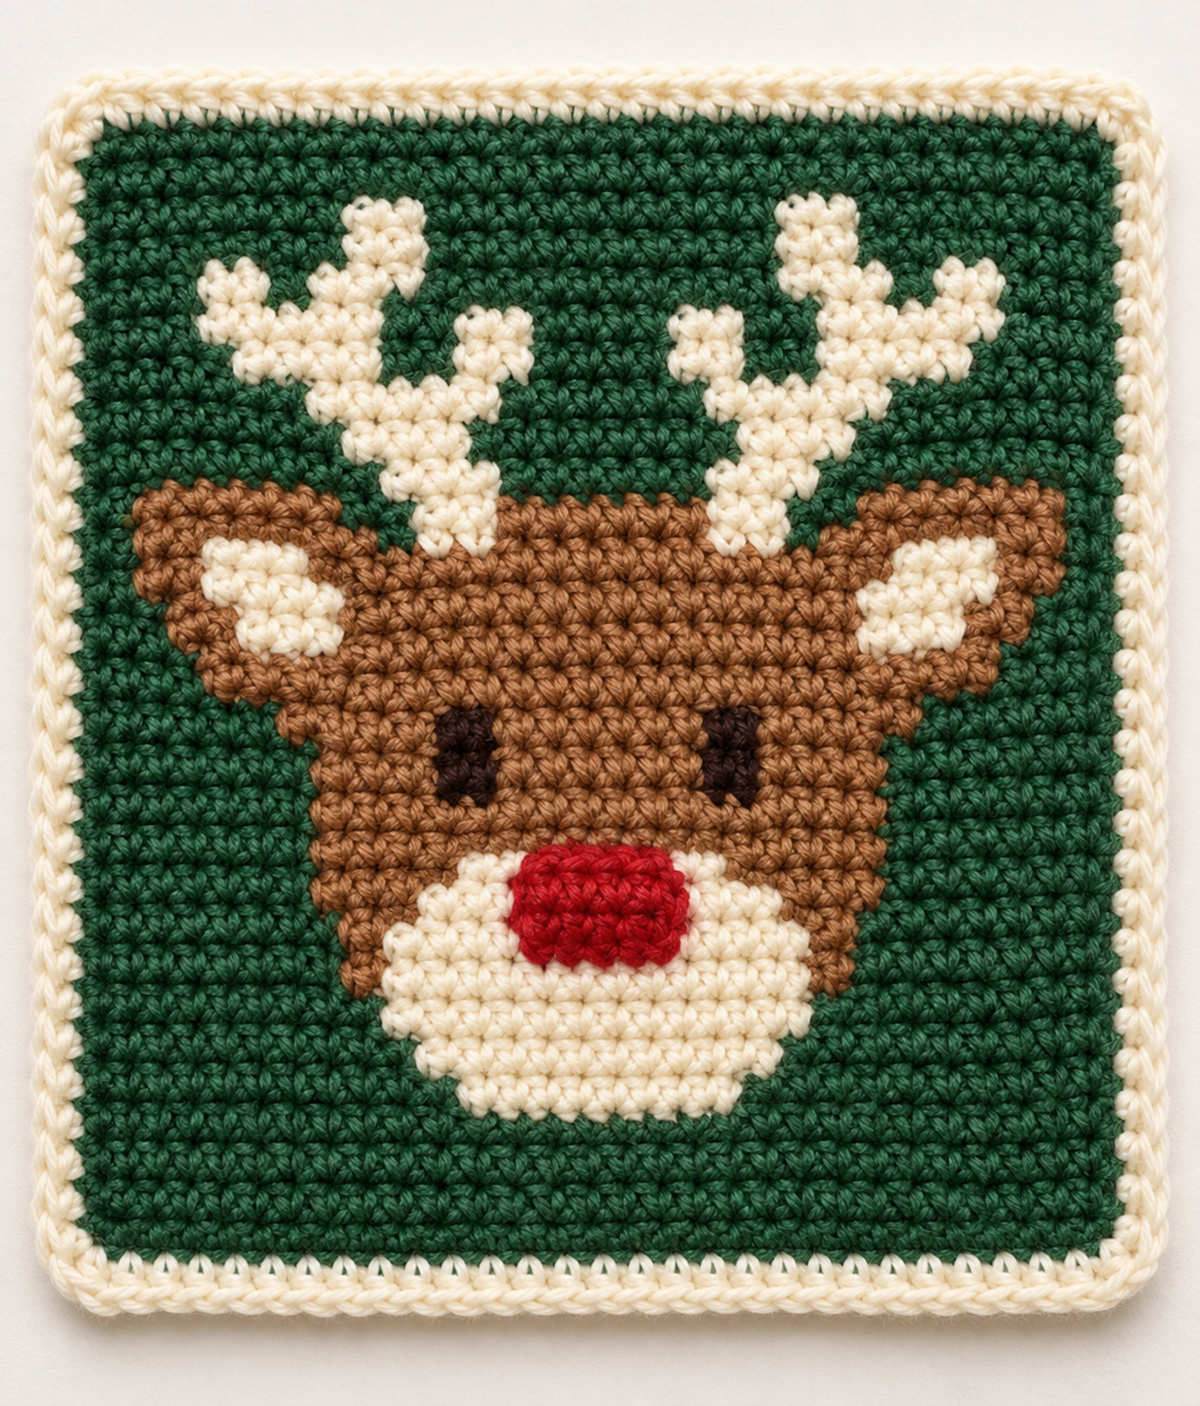
This free reindeer granny square crochet pattern features a friendly brown reindeer face with ivory antlers, little ears, dark eyes, and a Christmas red Rudolph-style nose, all worked directly into a holly green square. Instead of crocheting separate pieces and sewing them on, you'll use simple single crochet stitches and yarn color changes to make the entire design. The finished square has a narrow ivory border and can be used in Christmas blankets, decorative pillows, or other handmade holiday projects.
Explore More Christmas Crochet Patterns
Free Christmas Granny Square Patterns
Christmas Granny Square Blanket Pattern
See Supplies for This Project Here.
Jump to a Section
Materials for the Reindeer Granny Square Crochet Pattern
You won't need to crochet a separate reindeer head, make little antlers, or sew anything onto the square. The brown face, ivory antlers and muzzle, dark eyes, and red nose are all made with single crochet color changes. The finished design is flat. The example image shows the intended overall appearance, while the stitch chart shows the exact shape and placement of each color block.
I'd use smooth worsted-weight yarn for this one. Very fuzzy yarn can hide the little changes in the antlers and eyes, and those are the details that make the face recognizable.
Yarn Colors
- G – Deep evergreen: About 70 yards for the square background.
- B – Chestnut brown: About 30 yards for the head and ears.
- C – Warm ivory: About 40 yards for the antlers, inner ears, muzzle and border.
- K – Dark chocolate brown: A small amount for the eyes.
- R – Cranberry red: A small amount for Rudolph's nose.
These are generous planning amounts, not measured yarn usage. You'll need several small lengths or bobbins of the same colors because the antlers have little green spaces between their branches.
Tools and Supplies
- 4.5 mm (7) crochet hook, or the size needed to match the gauge
- Scissors
- Several small yarn bobbins or loosely wound mini-balls
- Stitch markers, optional
- Measuring tape
- Tapestry needle, optional for weaving in ends
- Blocking mat and rust-proof pins, optional
You can use your crochet hook to weave in the yarn ends if you'd rather not use a needle. No stuffing, beads, plastic eyes, buttons, wire, or other shaped pieces are needed.
Skill Level and Finished Size
Skill level: Intermediate colorwork, although the stitches themselves are beginner-friendly. You'll only use chains, single crochet and slip stitches. Keeping track of the color changes takes the most attention.
Expected finished size: Approximately 8 x 8 inches with the ivory border.
Gauge target: 18 single crochet stitches and 21 rows over 4 inches, using the yarn and hook you plan to use for the square.
At this gauge, the 33-stitch panel should measure about 7 1/3 inches across, and its 39 rows should measure about 7 3/8 inches high. The ivory edging brings it close to 8 inches in both directions.
Those are calculated measurements. Check your own square before joining it to other crochet blocks.
Check Your Gauge First
With evergreen yarn, ch 25.
Row 1: Sc in the second chain from your hook and each remaining chain. (24 sc)
Rows 2–26: Ch 1, turn and sc in each stitch across. (24 sc per row)
Measure the center of your swatch, away from the edges. Count both stitches and rows across 4 inches.
If you have more than 18 stitches across 4 inches, try a larger hook. If you have fewer, try a smaller hook. Check the row gauge too. A square that is the correct width but too tall will not match the proportions in the example image.
Once you're happy with the gauge, you can unravel the swatch and reuse the yarn.
Crochet Stitches and Abbreviations
We'll use U.S. crochet terms throughout the pattern. There aren't any special stitches or fancy clusters to learn.
- ch: Chain
- sc: Single crochet
- sl st: Slip stitch
- st/sts: Stitch or stitches
- RS: Right side
- WS: Wrong side
You'll also see letters in the row instructions. Those tell you which yarn color to use. A letter followed by a number tells you how many single crochet stitches to make in that color.
For example, G9 B2 C3 R5 C3 B2 G9 means 9 green stitches, 2 brown, 3 ivory, 5 red, 3 ivory, 2 brown and 9 green. That's 33 stitches altogether. This is the color sequence used in Row 12.
Every row of the main square has exactly 33 sc. The beginning turning chain does not count as a stitch.
If you need a reminder of the basic stitch terms, the Craft Yarn Council crochet abbreviations page is a useful reference for U.S. crochet terminology.
A Few Things to Keep Consistent
- Work through both top loops of each stitch unless the instructions say otherwise.
- Use the same hook and yarn weight for all five colors.
- Keep your tension even when switching colors.
- Do not add stitches when a color section begins or ends.
- Count 33 stitches before turning at the end of each row.
- Use Row 1 as the RS and Row 2 as the WS, continuing to alternate.
The square is made in turned rows, not in rounds. You'll make the ivory border after the entire reindeer face is finished.
How to Change Yarn Colors Without Sewing on the Reindeer
The whole reindeer is made while you're crocheting the green background. You'll change yarn colors whenever the pattern moves from green to brown, brown to ivory, or from one of those colors to the little red nose or dark eyes.
We're using the intarsia method. That simply means keeping separate little lengths of yarn available for different parts of the picture instead of carrying one long strand across the back.
Make a Clean Color Change
- Work the last single crochet in your current color until two loops remain on your hook.
- Pick up the next yarn color.
- Yarn over with the new color and pull it through both loops.
- Work the next single crochet with the new yarn.
- Leave the old yarn on the wrong side until you need it again.
Here's an example. If your row says G14 B5 G14, crochet the first 14 green stitches. On the last green stitch, use brown for the final pull-through. Work five brown stitches, changing back to green on the final pull-through of the fifth brown stitch. Finish with 14 green stitches.
The stitches themselves don't change. You're still making one sc in each stitch across.
Use Small Yarn Bobbins for the Antlers
I'd get several little bobbins ready before starting the upper half of the square. The two branching antlers have separate ivory sections with green stitches between them. Trying to carry one strand of ivory across all those green spaces can leave pale lines showing through.
Start a new bobbin whenever a color section is separated from the matching color by several stitches. Where the same section continues into the next row, leave its bobbin attached and pick it up again when you reach it.
The ears and antlers need the most bobbins. Row 25 has 11 separate color runs, and the branching antlers contain several small ivory sections. Keep your yarn organized so you don't have to carry long strands across the green background.
At each color boundary, cross the two yarns once on the wrong side before working the next stitch. That joins the neighboring color sections without adding an extra stitch or leaving a gap.
For the two dark eyes, use separate short strands of dark brown yarn. Keep each strand attached through Rows 17, 18 and 19, then fasten it off and secure the tail on the back. Each eye is two stitches wide and three rows tall.
Keep the Front and Back Straight
Row 1 is a right-side row. Row 2 is a wrong-side row. Continue turning after each row so the right and wrong sides alternate.
Keep the unused bobbins hanging toward the wrong side, even when you're working a row with that side facing you. Untwist the bobbins now and then. It's much easier than sorting out a big tangle after several rows.
Don't pull the unused yarn tight. The little color sections should stay flat, and the green background shouldn't bunch up around the antlers.
Colorwork checkpoint: When you hold the square up, you shouldn't see long loose strands running across the back of the green background. The ivory and brown areas should be connected at their edges and sit flat.
Reindeer Granny Square Stitch Chart
Here's the complete color chart for the reindeer face. Each little square represents one single crochet stitch. Follow it from the bottom upward, starting with Row 1.
The written instructions below give you the same color changes one row at a time. You can follow either the chart or the written rows, whichever is easier for you. Both use the same 33 stitches across and 39 rows.
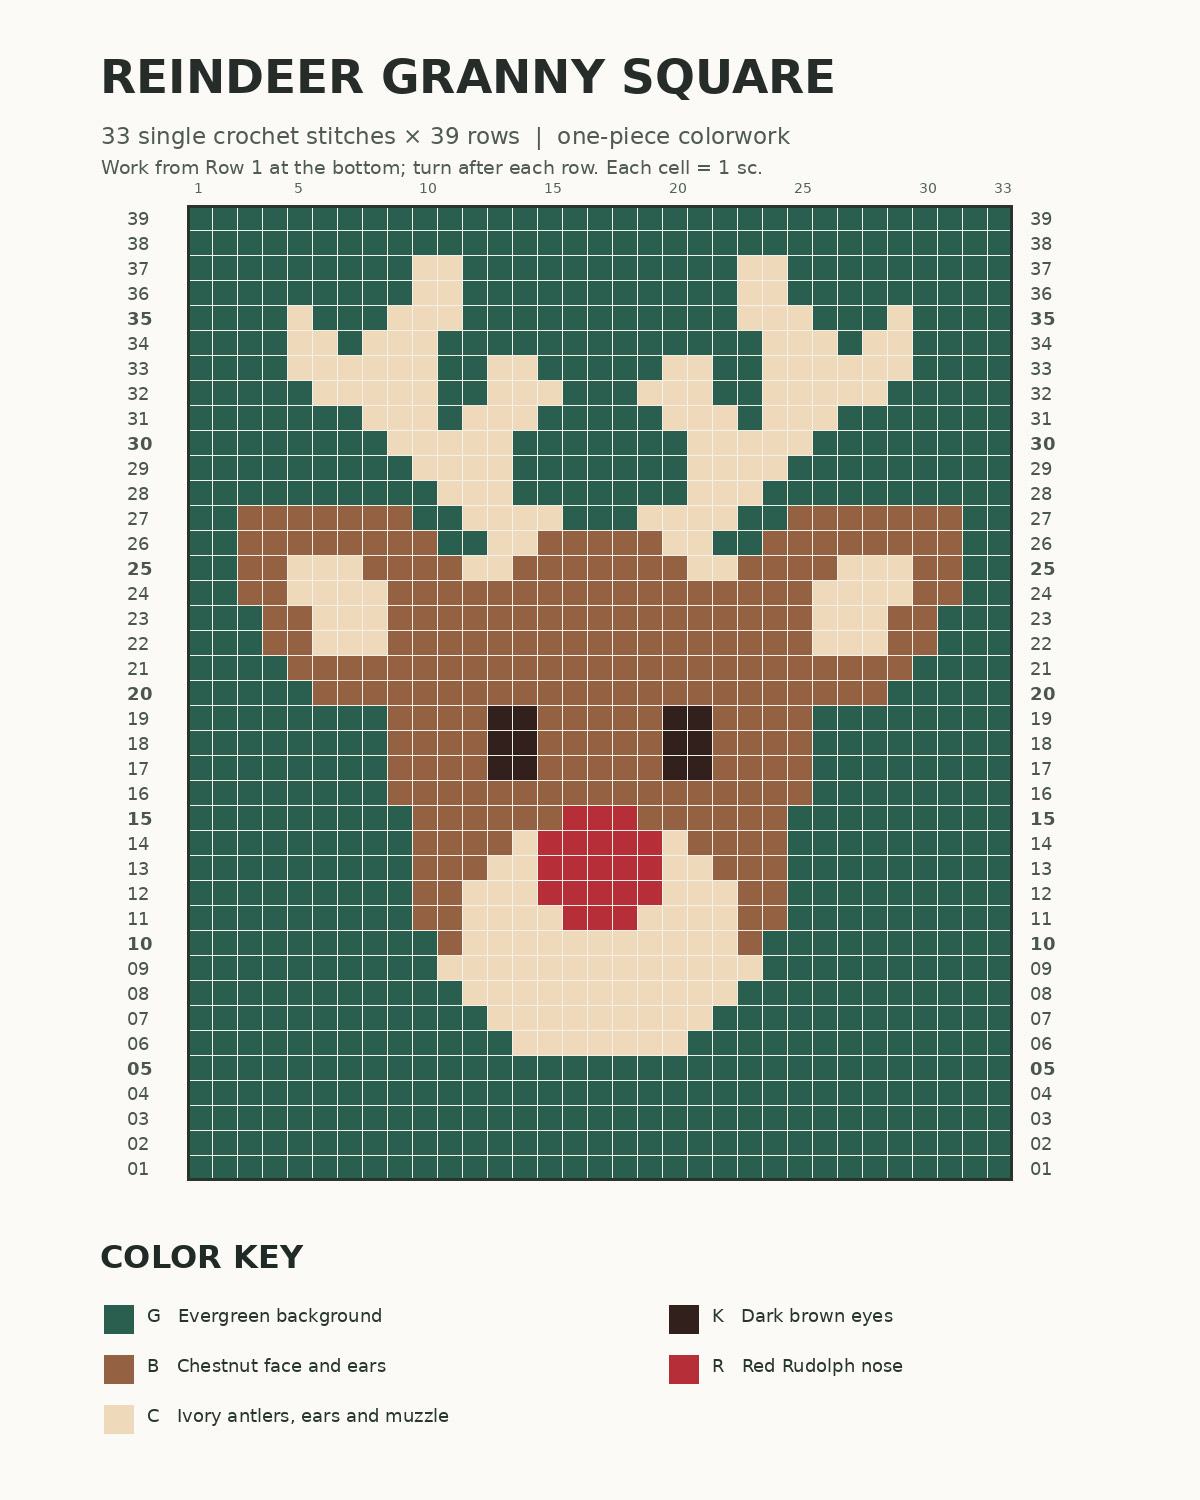
Chart colors: G is evergreen, B is chestnut brown, C is warm ivory, K is dark chocolate for the eyes, and R is cranberry red for the nose.
You'll see that the antlers are part of the background stitches. The branches are not made separately, and there are no loose pieces to attach afterward.
All 39 rows are symmetrical from left to right. That means the written color sequence works in the same order on both right-side and wrong-side rows, even though you're turning the crochet after every row.
Chart reading tip: Work one stitch for each colored square. The lines between chart squares are only guides. They do not represent chains or extra stitches.
If you're following the written instructions, mark off each completed row. The antlers have several small color changes close together, and it's easy to lose your place if you try to remember which row you're on.
Free Reindeer Granny Square Crochet Pattern: Row-by-Row Instructions
Begin at the bottom of the green square and work upward. The ivory muzzle appears first, followed by Rudolph's red nose, brown face, dark eyes, broad ears and branching antlers. Every detail is crocheted directly into the square.
Hook: 4.5 mm, or your gauge-matching hook.
Foundation: With evergreen yarn (G), ch 34.
Row 1 (RS): Sc in the second chain from the hook and in each remaining chain. (33 sc)
Ch 1 and turn.
For Rows 2 through 39: Work one sc in each stitch, using the colors listed below. Ch 1 and turn after each row except Row 39. The turning chain does not count as a stitch. Each row contains exactly 33 sc.
Rows 2–10: Green Background and Rounded Ivory Muzzle
Row 2: G33. (33 sc)
Row 3: G33. (33 sc)
Row 4: G33. (33 sc)
Row 5: G33. (33 sc)
Row 6: G13 C7 G13. (33 sc)
Row 7: G12 C9 G12. (33 sc)
Row 8: G11 C11 G11. (33 sc)
Row 9: G10 C13 G10. (33 sc)
Row 10: G10 B1 C11 B1 G10. (33 sc)
Checkpoint after Row 10: You should have five solid green rows beneath the muzzle. The ivory begins with seven stitches in Row 6, widens to 13 in Row 9 and narrows slightly in Row 10. The muzzle should sit in the center of the square, with matching green space on either side.
You'll also see one brown stitch at each side of the muzzle in Row 10. These begin the cheeks. If the ivory section looks off-center, check the green stitches on either side before continuing.
Rows 11–15: Rudolph's Red Nose
Row 11: G9 B2 C4 R3 C4 B2 G9. (33 sc)
Row 12: G9 B2 C3 R5 C3 B2 G9. (33 sc)
Row 13: G9 B3 C2 R5 C2 B3 G9. (33 sc)
Row 14: G9 B4 C1 R5 C1 B4 G9. (33 sc)
Row 15: G9 B6 R3 B6 G9. (33 sc)
Checkpoint after Row 15: Rudolph's nose should be centered above the broad ivory muzzle. It contains three red stitches in Row 11, five stitches in each of Rows 12 through 14, and three stitches in Row 15.
That's 21 red stitches altogether. The shorter top and bottom give the nose a rounded colorwork outline.
If the square pulls inward around the nose, check the yarn changes before continuing. Loosen any tight joins or remake the affected stitches with enough slack for the fabric to lie flat. Don't add stitches to make the nose wider.
Rows 16–21: Brown Face and Dark Eyes
Row 16: G8 B17 G8. (33 sc)
Row 17: G8 B4 K2 B5 K2 B4 G8. (33 sc)
Row 18: G8 B4 K2 B5 K2 B4 G8. (33 sc)
Row 19: G8 B4 K2 B5 K2 B4 G8. (33 sc)
Row 20: G5 B23 G5. (33 sc)
Row 21: G4 B25 G4. (33 sc)
Checkpoint after Row 21: You should have two matching dark eyes, each two stitches wide and three rows tall. There should be five brown stitches between them.
The face widens from 17 brown stitches in Row 16 to 25 brown stitches in Row 21. No increases are needed. The shape comes from the changes between brown and green.
Before moving on, check that the eyes are level and that the brown forehead is centered. One misplaced dark stitch will be easy to see at this stage and is easier to correct now.
Rows 22–27: Broad Brown Ears and Ivory Antler Bases
Row 22: G3 B2 C3 B17 C3 B2 G3. (33 sc)
Row 23: G3 B2 C3 B17 C3 B2 G3. (33 sc)
Row 24: G2 B2 C4 B17 C4 B2 G2. (33 sc)
Row 25: G2 B2 C3 B4 C2 B7 C2 B4 C3 B2 G2. (33 sc)
Row 26: G2 B8 G2 C2 B5 C2 G2 B8 G2. (33 sc)
Row 27: G2 B7 G2 C4 G3 C4 G2 B7 G2. (33 sc)
Checkpoint after Row 27: Both ears should be wide and brown with large ivory centers. The antler bases begin above the forehead, separated from the outer ear shapes by green stitches.
Take a look at the color chart before continuing. The left and right ears should be mirror images of each other. Check the small green gaps around the antler bases. Those gaps are part of the design and shouldn't be filled with ivory or brown.
Rows 28–37: Branching Ivory Reindeer Antlers
Row 28: G10 C3 G7 C3 G10. (33 sc)
Row 29: G9 C4 G7 C4 G9. (33 sc)
Row 30: G8 C5 G7 C5 G8. (33 sc)
Row 31: G7 C3 G1 C3 G5 C3 G1 C3 G7. (33 sc)
Checkpoint after Row 31: Each antler now has two ivory sections separated by one green stitch. Both sides should match. If one green gap has accidentally been worked in ivory, correct that color change now. The row should still contain exactly 33 sc.
Row 32: G5 C5 G2 C3 G3 C3 G2 C5 G5. (33 sc)
Row 33: G4 C6 G2 C2 G5 C2 G2 C6 G4. (33 sc)
Row 34: G4 C2 G1 C3 G13 C3 G1 C2 G4. (33 sc)
Row 35: G4 C1 G3 C3 G11 C3 G3 C1 G4. (33 sc)
Checkpoint after Row 35: Each antler should show three visible branches or tips. The short outer and inward tips have finished, while the taller central tip continues upward.
Check for tight joins where the ivory branches separate. A little stair-step at the color edges is normal, but the fabric should not gather or buckle. If a join is pulling the stitches inward, undo that short section and remake it with more yarn slack before proceeding.
Row 36: G9 C2 G11 C2 G9. (33 sc)
Row 37: G9 C2 G11 C2 G9. (33 sc)
Antler checkpoint: Both antlers should be complete and symmetrical, with three prominent tips on each side. The tallest tips finish in Row 37. Check that the antlers remain inside the green background and that the branches match the chart.
Rows 38–39: Finish the Green Background
Row 38: G33. (33 sc)
Row 39: G33. (33 sc)
Fasten off the evergreen yarn after Row 39. Do not make another turning chain.
Final Colorwork Stitch Count
The completed panel contains 39 rows of 33 single crochet stitches, for a total of 1,287 sc before adding the ivory border.
The color totals are:
- Evergreen: 790 sc
- Chestnut brown: 257 sc
- Ivory: 207 sc in the picture itself
- Dark chocolate: 12 sc
- Cranberry red: 21 sc
These totals count the main panel only. The ivory edging adds another 136 sc and four ch-1 corner spaces.
Before edging, check the completed design. You should see a centered reindeer with a broad brown forehead, wide ivory-centered ears, two dark vertical eyes, a rounded red nose, a large ivory muzzle below the cheeks, and two symmetrical ivory antlers with three prominent tips each.
All the features are worked directly into the square. There are no separate appliqués or pieces to sew on.
Crochet the Ivory Border Around Your Reindeer Square
The narrow ivory border finishes the design and picks up the color of the muzzle and antlers. I'd keep it to one round, just like the example image. A wide border would take attention away from the reindeer face.
Before starting, check that the square has 33 stitches across the top and bottom and 39 rows from bottom to top.
Ivory Border Round 1
With the right side facing you and Row 39 at the top, join ivory yarn with a slip stitch in the upper-right corner stitch.
- Upper-right corner: Ch 1. Work (sc, ch 1, sc) into the same corner stitch.
- Top edge: Work 1 sc in each of the next 31 stitches.
- Upper-left corner: Work (sc, ch 1, sc) into the final stitch of Row 39.
- Left edge: Work 33 sc evenly down the row ends of Rows 38 through 1. Skip the row ends of Rows 32, 25, 18, 11 and 4. Work one sc in each of the other 33 row ends. Before starting the lower-left corner, count your stitches along this edge. You should have exactly 33 sc, not counting either corner group. If the count is wrong, undo only this side and check the five skipped row ends. The edge should lie flat without pulling the square inward or forming ripples.
- Lower-left corner: Work (sc, ch 1, sc) into the foundation-chain loop directly beneath the lower-left corner stitch of Row 1.
- Bottom edge: Work 1 sc in each of the next 31 unused foundation-chain loops.
- Lower-right corner: Work (sc, ch 1, sc) into the foundation-chain loop directly beneath the lower-right corner stitch of Row 1.
- Right edge: Work 33 sc evenly up the row ends of Rows 1 through 38. Skip the row ends of Rows 7, 14, 21, 28 and 35. Work one sc in each of the other 33 row ends.
- Join with a slip stitch into the first sc of the border round.
Fasten off, leaving a short tail to weave in.
Ivory Border Stitch Count
- Top edge, including the corner stitches: 35 sc
- Left side: 33 sc
- Bottom edge, including the corner stitches: 35 sc
- Right side: 33 sc
- Four ch-1 corner spaces
Total: 136 sc and four ch-1 corner spaces.
The joining slip stitch and starting chain do not count as single crochet stitches.
Check the Border Before Finishing
Lay the square on a flat surface. The ivory border should follow the edges without pulling the corners inward or forming loose ripples.
If the side edges look wavy, count the side stitches again. You should have 33 sc along each vertical edge, not 39.
If the entire border feels tight even though your stitch counts are correct, try using a hook one size larger for the ivory edging. Keep the same number of stitches.
Don't add extra border rounds just to make the square larger. Check your gauge first so the reindeer keeps the same proportions as the example image.
Finishing and Blocking Your Reindeer Granny Square
You're nearly finished. The reindeer face, antlers, eyes and nose are already part of the square, so all that's left is taking care of those yarn ends and getting the edges straight.
Weave in the Yarn Ends
Turn the square over so the wrong side faces you.
- Check that every color section is connected firmly to the stitches beside it.
- Use your crochet hook or a tapestry needle to weave each loose tail under the backs of several neighboring stitches on the wrong side. For tiny color sections, such as the dark eyes and narrow antler tips, you can weave the tail beneath nearby stitches of another color. Keep the yarn on the wrong side so it doesn't show through on the front.
- Change direction and work the tail back through several more stitches.
- Keep the yarn from showing through on the front.
- Trim the excess only after the tail is secured.
Take a little extra care with the ends around the eyes, nose and antler tips. Those sections are small, and you don't want a loose end working its way out later.
Don't pull the tails so tightly that the stitches bunch up. You want the wrong side neat, but the picture on the front should stay flat.
Block the Square to Size
At the suggested gauge, the finished square should measure close to 8 x 8 inches, including its ivory edging.
- Lay the square on a clean, flat surface.
- Measure the width across the middle and the height from top to bottom.
- Lightly dampen the square using a method suitable for your yarn.
- Gently straighten the four sides and corners.
- Pin the square to the intended size if needed.
- Let it dry completely before removing the pins.
Don't stretch one direction much more than the other. If the square is noticeably wider or taller than it should be, blocking won't fix a major gauge difference.
Final Reindeer Granny Square Checkpoints
Before calling the square finished, check these details:
- The main panel has 33 stitches across and 39 rows.
- The brown head is centered on the green background.
- Both eyes are dark brown and the same size.
- The red nose sits in the middle of the ivory muzzle.
- There are two brown ears with ivory centers.
- Both branching antlers are ivory and match each other.
- The antler tips remain inside the green background.
- The ivory border contains 136 sc and four corner spaces.
- All yarn ends are secured on the wrong side.
If the picture looks uneven: Compare the affected row with the color chart. A missing green stitch between antler branches can change their outline. One misplaced brown stitch can change the shape of an ear.
If the antlers don't match, correct the affected colorwork row rather than trying to cover the mistake with embroidery. The purpose of this pattern is to make the picture directly with the crochet stitches.
If your square measures much more or less than 8 inches, check both stitch gauge and row gauge before making the next one. Use a different hook size if necessary, but keep the 33-stitch and 39-row construction unchanged.
That's the finished reindeer. No separate nose, no sewn-on antlers, and no extra decorations needed.
What Can You Make with Your Reindeer Granny Square?
I like this reindeer as a little Christmas picture all by itself, but it's also a good choice when you're putting together several different holiday squares.
Add It to a Christmas Crochet Blanket
The deep green background and ivory border give the reindeer a little contrast beside lighter Christmas squares. You could place it next to a Christmas tree, a snowflake or a Santa design without making every block look alike.
If you're planning a larger project, take a look at my Christmas granny square blanket pattern for square counts, arrangements and joining ideas.
There's one difference to keep in mind: this reindeer is made with solid single crochet, while many of my other Christmas granny squares use open granny clusters. Match their finished measurements before joining them. The edges won't have the same stitch counts, so don't assume you can join them stitch for stitch.
I'd block the squares to the same size, line up their corners and middle points, then use a loose crochet slip-stitch join through evenly spaced edge stitches. That keeps the join from pulling either square out of shape.
Make a Christmas Pillow
One reindeer square would look sweet in the center of a Christmas pillow. Add plain green or ivory crochet squares around it to make the front larger, or use several reindeer squares in a simple patchwork arrangement.
I'd keep the other squares plain if the reindeer is going to be the main decoration. The antlers and bright nose already give the pillow plenty of Christmas personality.
If you're making this as a baby keepsake, keep the finished blanket or decorative pillow out of an infant's sleep space. The U.S. Consumer Product Safety Commission's safe sleep guidance explains why loose blankets and pillows don't belong in a baby's crib or bassinet.
Use It as a Little Christmas Wall Decoration
You can also use the finished square as a flat holiday decoration. Hang it as part of a crochet wall display or combine it with other Christmas picture squares.
For a different reindeer project, my Christmas crochet reindeer appliqué uses a separate motif instead of working the face into the square.
And if you're putting together a whole collection of Christmas blocks, browse the free Christmas granny square patterns to choose a few more designs.
I'd start with one reindeer and see how you like it alongside the other squares before making a whole stack. That gives you a chance to check the finished size, too.
Frequently Asked Questions About the Reindeer Granny Square Crochet Pattern
Is this a traditional granny square?
Not quite. It's a solid crochet picture square made with single crochet stitches. The finished block is square, but it doesn't use the open three-double-crochet groups found in a traditional granny square. The tighter stitches are what let you crochet the reindeer face directly into the background.
Can I make the reindeer without sewing on any pieces?
Yes. The head, ears, antlers, eyes, muzzle and red nose are all part of the colorwork. You don't need to crochet or sew on any separate decorations.
Why are there so many yarn changes in the antlers?
The antlers have several little branches separated by green background stitches. Each branch needs its own ivory sections to keep the shape clear. Small yarn bobbins make those changes easier to manage without carrying long strands across the wrong side.
Can I make the nose brown instead of red?
Yes. If you want a regular woodland reindeer instead of Rudolph, replace the red stitches in Rows 11 through 15 with dark brown yarn. Keep the same stitch counts so the rest of the pattern doesn't change.
What if my finished reindeer square isn't exactly eight inches?
Check your gauge first. The pattern uses 33 single crochet stitches across and 39 rows, plus one ivory border round. Your yarn, hook and tension determine the final size. If you're making several squares for a blanket, use the same gauge and block them to matching measurements before joining.
Can I make this in other Christmas colors?
Of course. The reindeer can stay brown while you change the background to cranberry, cream or another Christmas color. Just make sure the antlers contrast with the background. Ivory antlers won't stand out very well against an ivory square.
The green and ivory combination shown in the example is the version used for this pattern, and that's the one I'd make first if you want your square to match the picture.
When you click on links to various merchants on this site and make a purchase, this may result in this site earning a commission. This does not affect the price you pay.

UBGI Gold Standard 2026
Reviewed under the site's
editorial checklist.
Photos, decorating ideas, party setups and reader submissions are shared for inspiration unless a page is specifically presented as a pattern, tutorial, reference guide or step-by-step project. Follow the instructions, measurements, safety guidance and manufacturer directions provided for the particular project or product.
About Jan | Contact | Baby Nursery Ideas (Blog) | Site Map | Privacy Policy | Disclosure Policy | Disclaimer | Affiliate Disclosure | Earnings Disclosure | Facebook | Pinterest
I am a participant in the Amazon Services LLC Associates Program, an affiliate advertising program designed to provide a means for us to earn fees by linking to Amazon. As an Amazon Associate I earn from qualifying purchases.
Copyright © 2006-2026. All Rights Reserved.